CamCarpenter
Members
-
Joined
-
Last visited
Everything posted by CamCarpenter
-
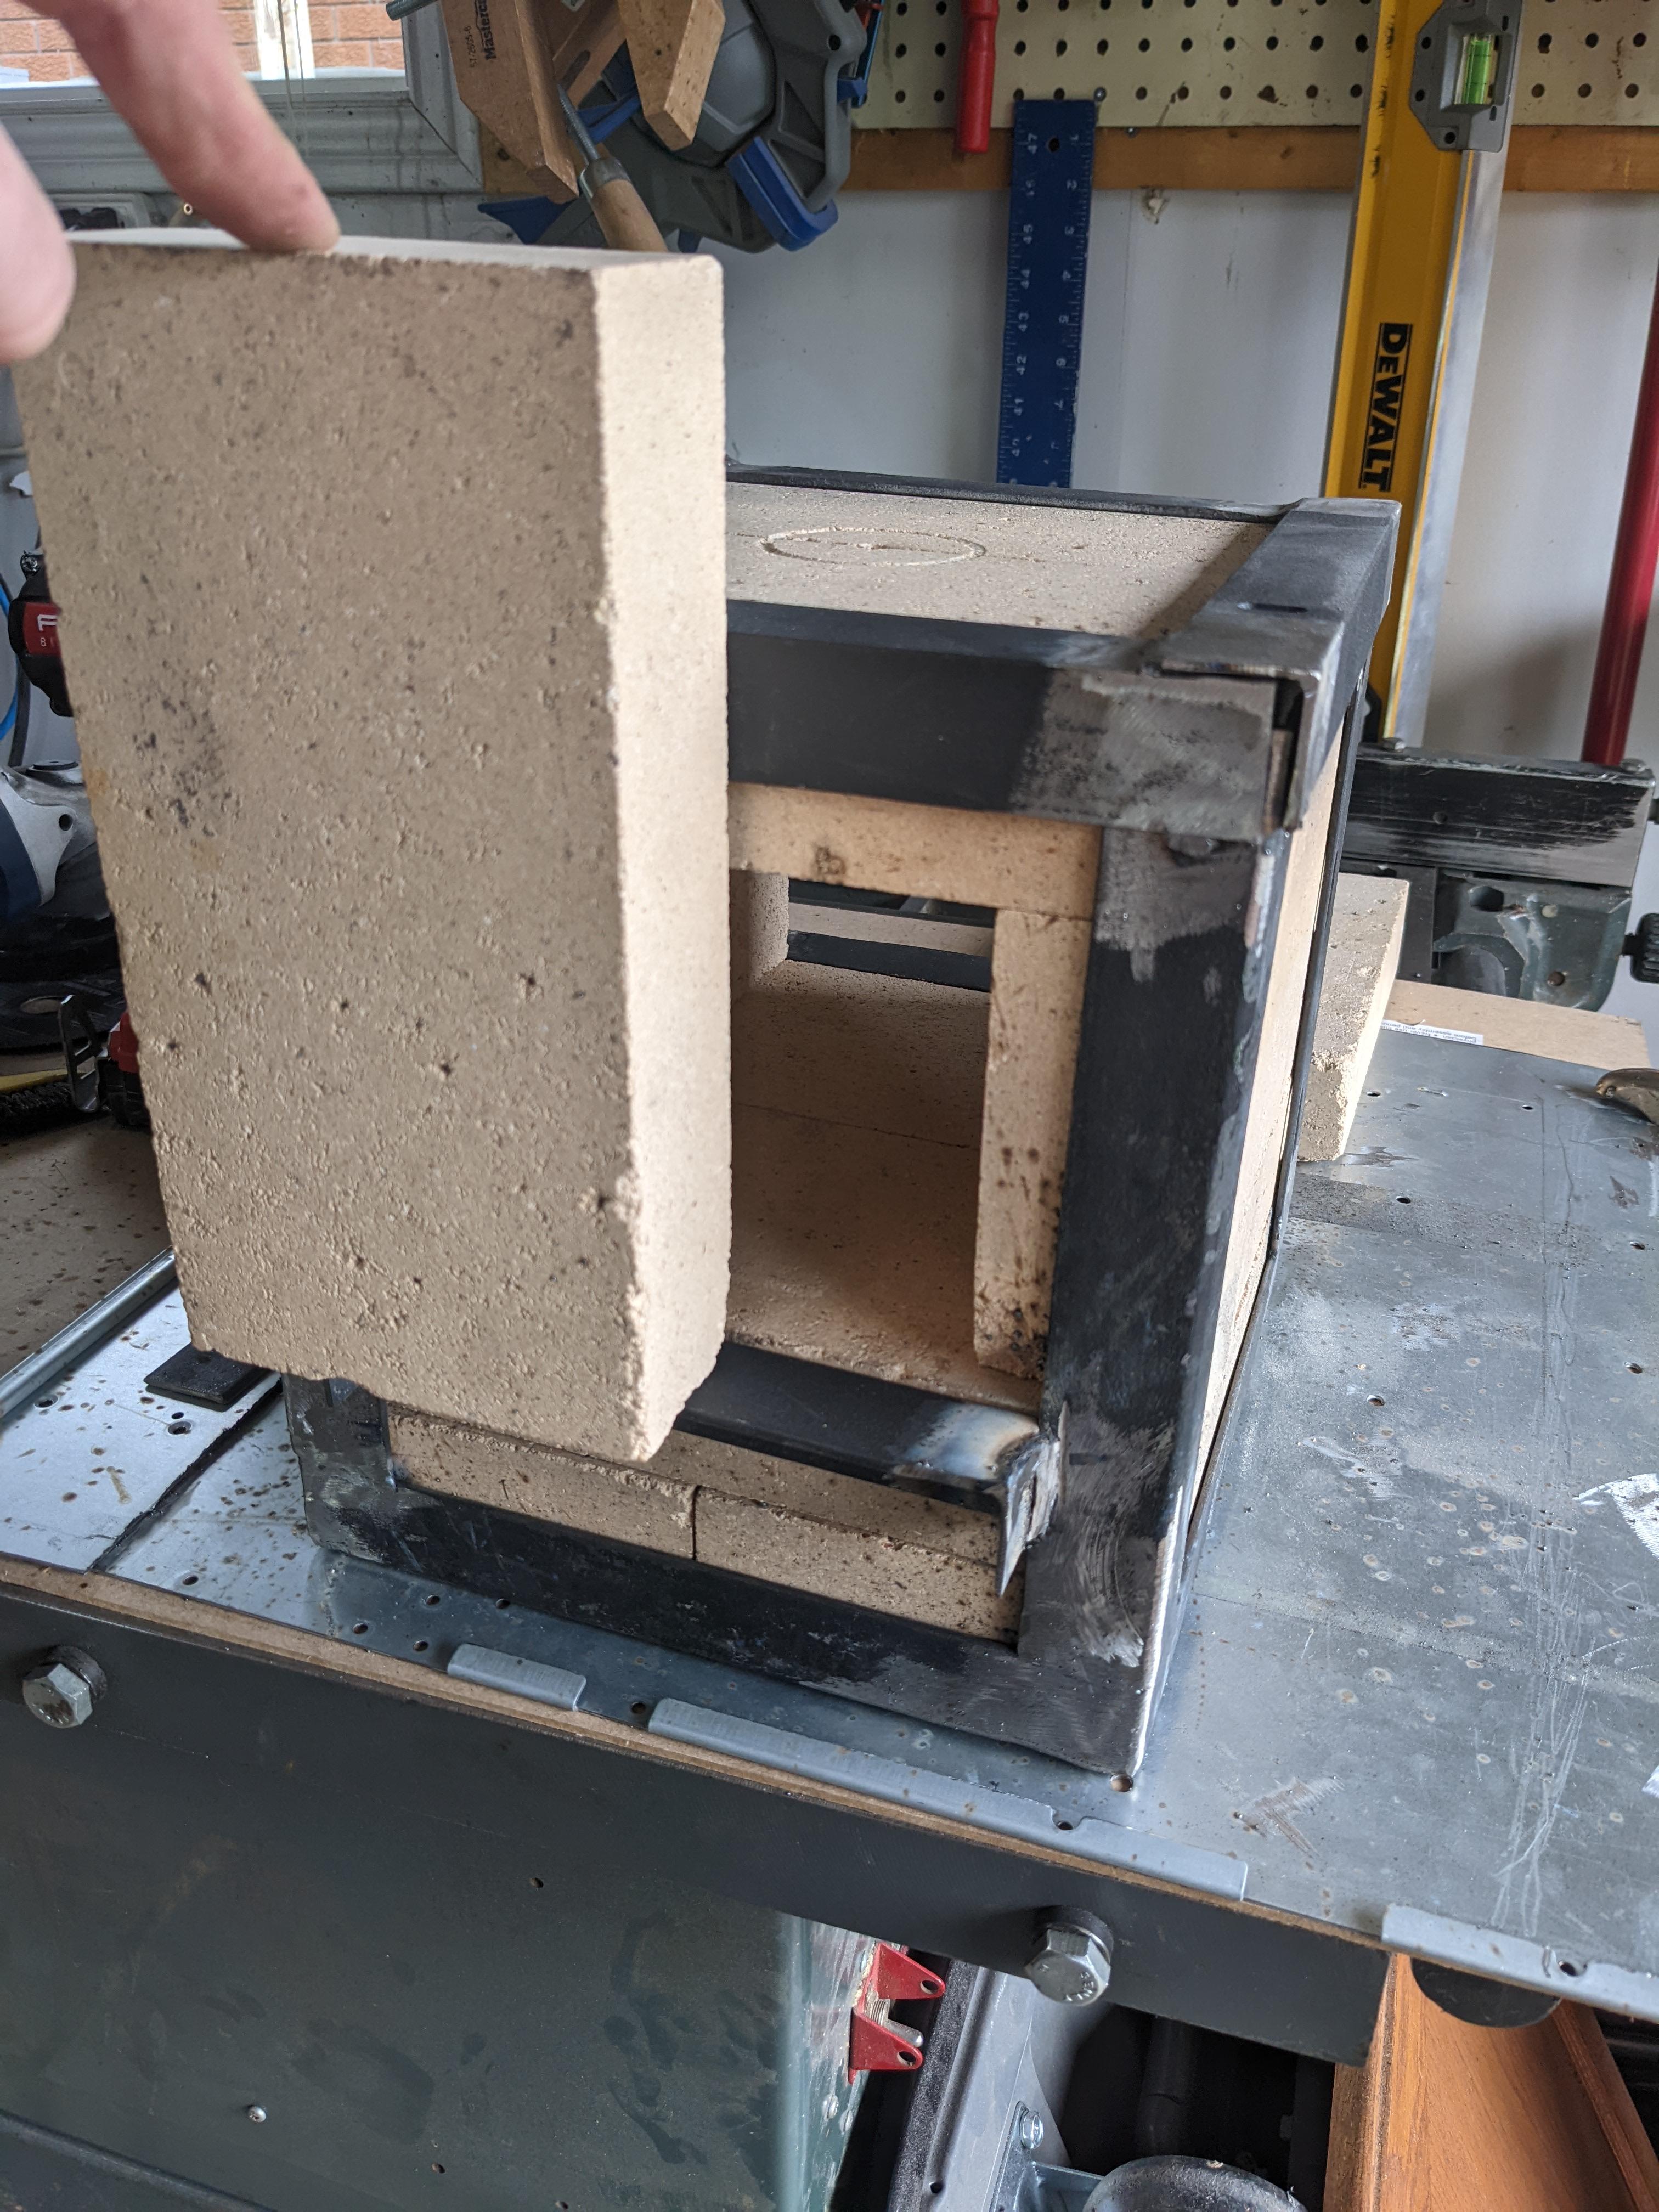
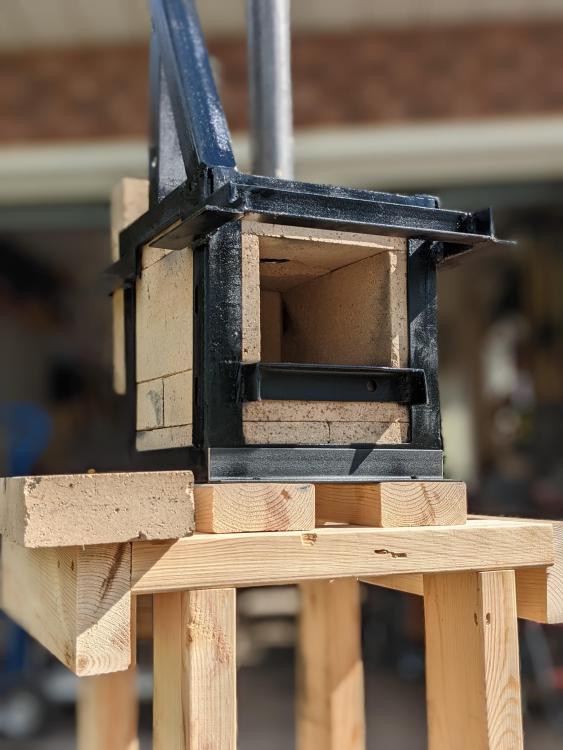
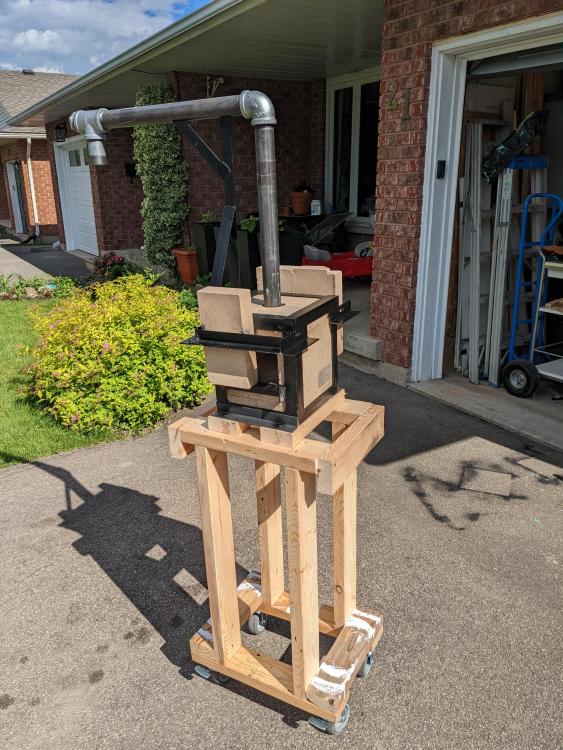
Finished the forge body and cart! Next steps: drill 3/64 hole in cap for fuel line at my Dad's drill press, get blower from my Dad and hook it up to the air/fuel line, weld the fuel cap in place and order a regulator and hose to connect the propane tank. I can't wait to fire it!
-
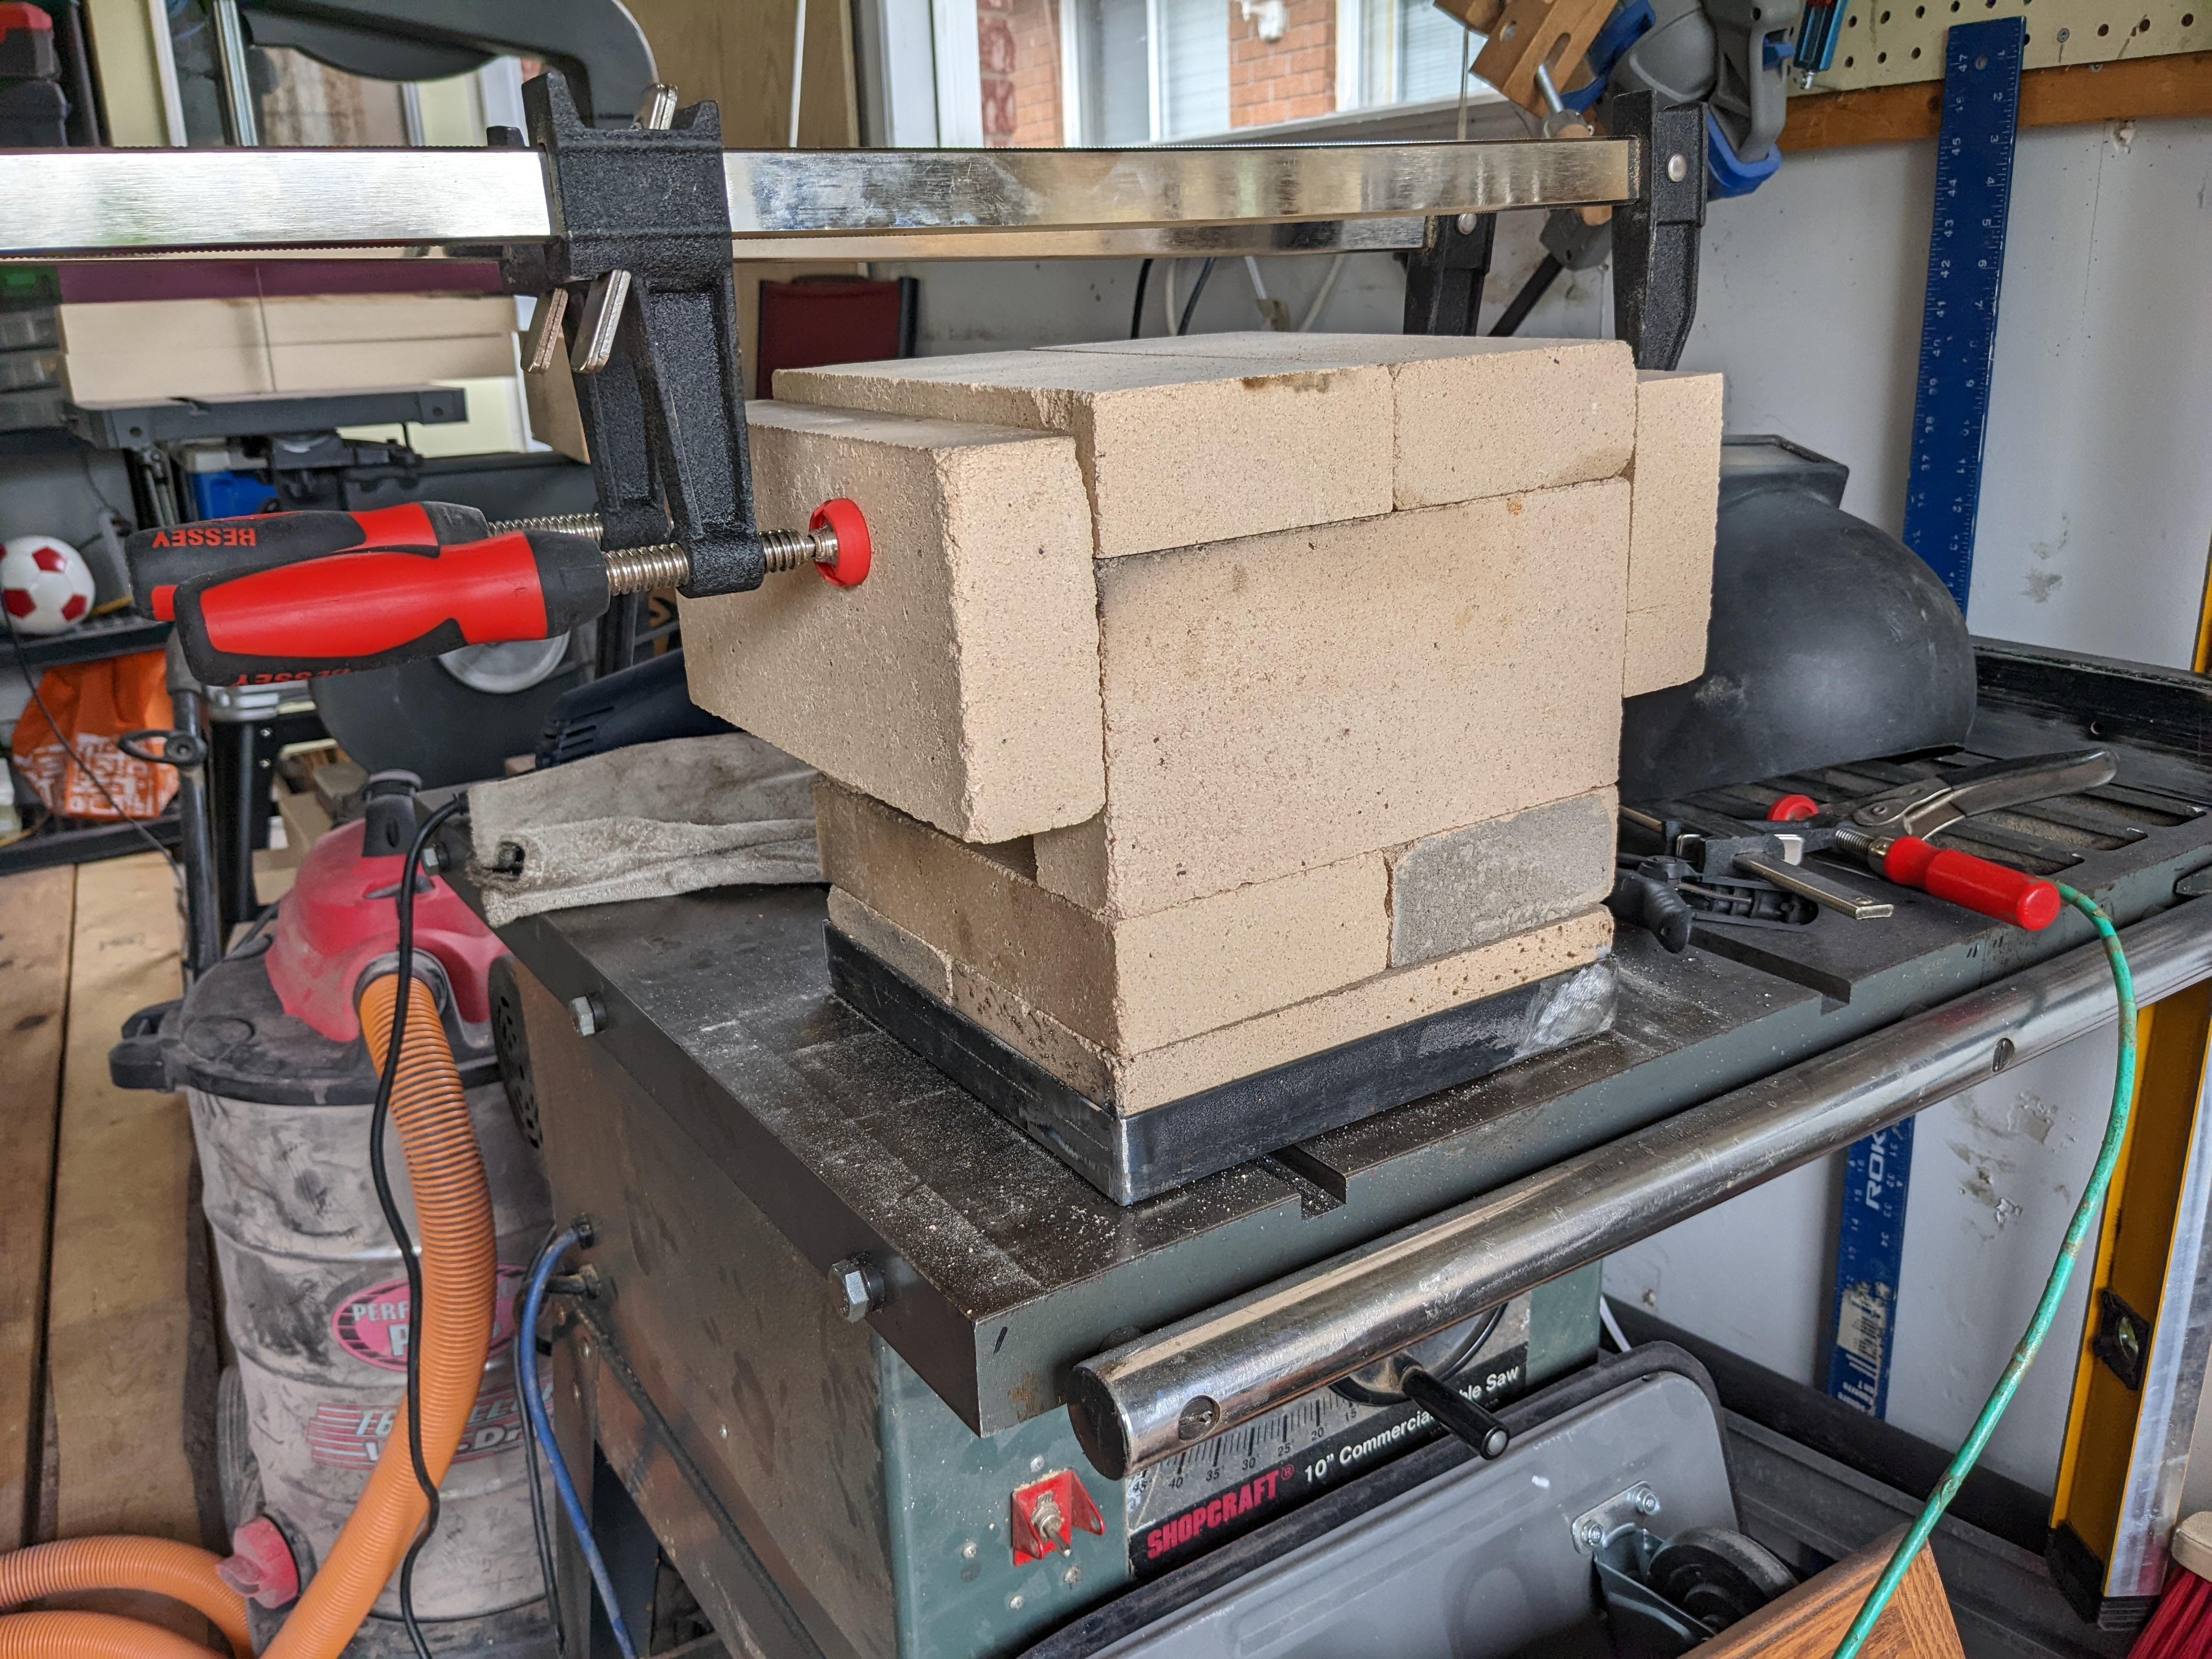
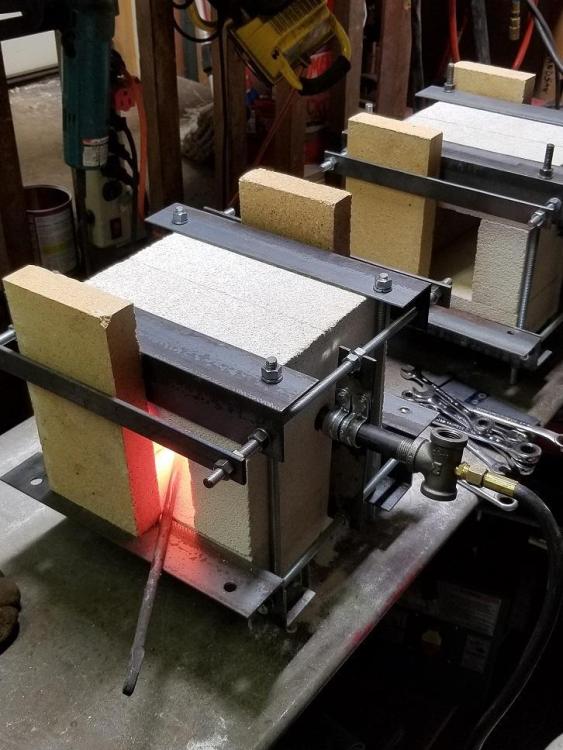
Just wanted to give you all an update: I spoke with a local-ish blacksmith who helped me source the parts I needed and I've got the piping required for the blower design I'm going with. Fun fact, this cost me over $70CAD I've welded the base of my forge (I don't have any threaded rod and I have a welder) and tacked the lid in case I need to replace bricks or use them for something else. Here's what I've got so far. I've not had a lot of time in the shop to work on this: the boys have been sick pretty much non-stop the last two weeks. I'm just working on drilling a hole in the top (with a hole saw bit I don't care about) and that's taking a while lol. I suspect this bit will be moving from "mostly junk" to "absolutely junk" when I finish the boring process lol I'm getting really excited for my first firing, which seems to be coming soon! Gonna keep the temps low so I don't turn my firebrick into glass lol no forge welding for me for a while. I hope you all have been well! Cam


-
TL;DNR: IFI community: burner on the top or the side? (see picture) I'm making a tiny shell of fire bricks and holding it together with angle iron as per Frosty's post. My current plan is to build a little frame to keep the bricks together and support the doors on the ends. I have mine clamped horizontally, but I forgot about this one being vertical, it's simpler and will allow vent gases to escape, so I will be rotating the end bricks 90°. I know with a venturi burner, you want it in the side so hot gas doesn't flood upward when the forge is turned off, but I'm planning on doing a blown-air system, so is the top an option again or should I still do the side? Thanks, Cam

-
I didn't think of party stores! I will see if any of them have a helium tank they wouldn't mind getting rid of. I doubt they'll get rid of it for free, scrap metal is a lot of places lunch fund, but maybe I could buy one. Thanks, Thomas! Cam
-
Well, I called over half a dozen local and regional HVAC suppliers this morning, none of them have any refrigerant tanks, not for free, not for sale. Not one had heard of any of the refractory products or even the existence of IFBs haha. I fear things are different here in Canada than the US. And the IFI store does "... not ship to Canada due to the high cost of shipping." (Quote Glenn) so I'll have to find somewhere local or online for my products. I'm off to find a section on how to build a blower burner and read some of Mikey98118's book. I'm hoping to come up with a half-decent design by the end of the day today so I can start building it!
-
Frosty, Thank you for the very in-depth response to my post! I appreciate the wealth of information and will try to keep questions minimal in posts for simplicity, haha. I am very encouraged to hear that a gun burner is a good option. I lean toward it because it seems... safer? If I choose to go with a burner in the top of the forge, then having the blower keep running after the forge is off should prevent too much heat from going back up the tube. I also have a blower, so I want to use it. A dumb reason, I know, but if it's not a terrible idea, I kind of like it. I have abandoned the hex forge for now. I want to make something simple and functional. I am looking to that photo you referenced a few posts ago for design notes. I am just trying to get a few details down before I commit any resources to the build. I've also been tremendously busy and have not had time for much more than reading some posts here and making one of my own these last few days, haha. That's a well-seasoned name then! I'm sure glad I didn't keep my nickname from kindergarten. My mom asked me what I wanted to be called in school (meaning Cam or Cameron) and she tells me I answered "Sugar." I'm glad yours has worked for you for a lifetime! IronDragon ForgeClay Works, (that's a mouthful, haha (or a handful, I guess, typing)) thank you for the link to that book and thanks Mikey98118 for writing it! I have downloaded it and will look it over when I have some time. (which I do not, today) ThomasPowers, do you think a heavier forge is better for everyone or does it just suit you? I know nothing about the practical side of blacksmithing, how important is the weight of your forge to its use? I had not considered that. Mikey98118, thank you for the clarifying notes, I will refer back to those when I get to that section in the book. I appreciate being kept up to date! Well, it looks like I will not be making a forge yet this week as I still have a bit more understanding to acquire before it makes sense to build! I will try to come up with a design based on what I've learned here and submit it later this week or early next week for feedback! I was reading through the post detailing optimal burner angle and I need to re-read that so I can figure out the best angle for my burner to come in to the forge... But that's for another post! Cam
-
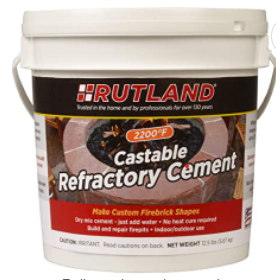
That's the product I bought, they call it "Rutland Castable Refractory Cement" I thought all refractories would be cement products, so maybe that's where my misunderstanding came from. I will look into Plistex and Kasto-lite 30 before I buy, to make sure I get the right product for my forge. Thanks, Mikey98118!
-
David, Yes, I intended to use the bricks as the outer body of the forge, with Kaowool inside and a castable refractory (I keep hearing Kasto-lite 30 and that's what I'll look into getting) to cover the kaowool to keep fibres from getting into the air and consequently my lungs. The issue is exactly the framing, I don't have a dead propane tank or anything to line with the kaowool, only the fire bricks and some angle iron. That's why I was thinking about using the bricks. They are what I have for fire-rated structural material. I know it's more work, but otherwise I have wood and I doubt that 2" of kaowool would keep that from catching fire haha
-
Yes, I have heard this, and I read that one way around that was 2x 1" layers of Kaowool with a layer of castable refractory covering the Kaowool should decrease this effect. I've seen people use only propane tanks with 2" of Kaowool covered in a refractory cement and they say those forges work well. Is that a valid way to combat the issue? I have already spent a few hundred on materials haha. I'm hoping to get started sooner rather than later (and, as of the last time I checked, nowhere in my region stocks more than a couple of those fire bricks at a time that I can find, even if I did have the money) I have the Kaowool and was going to buy a heavier duty refractory cement (I purchased some 2200°f Rutland from Amazon, but Frosty says that's too low) to cover it. I'm really trying to keep my costs down so I can buy steel next month instead of forge supplies. Glad those instructions were found, thank you, Buzzkill! I've already downloaded them!
-
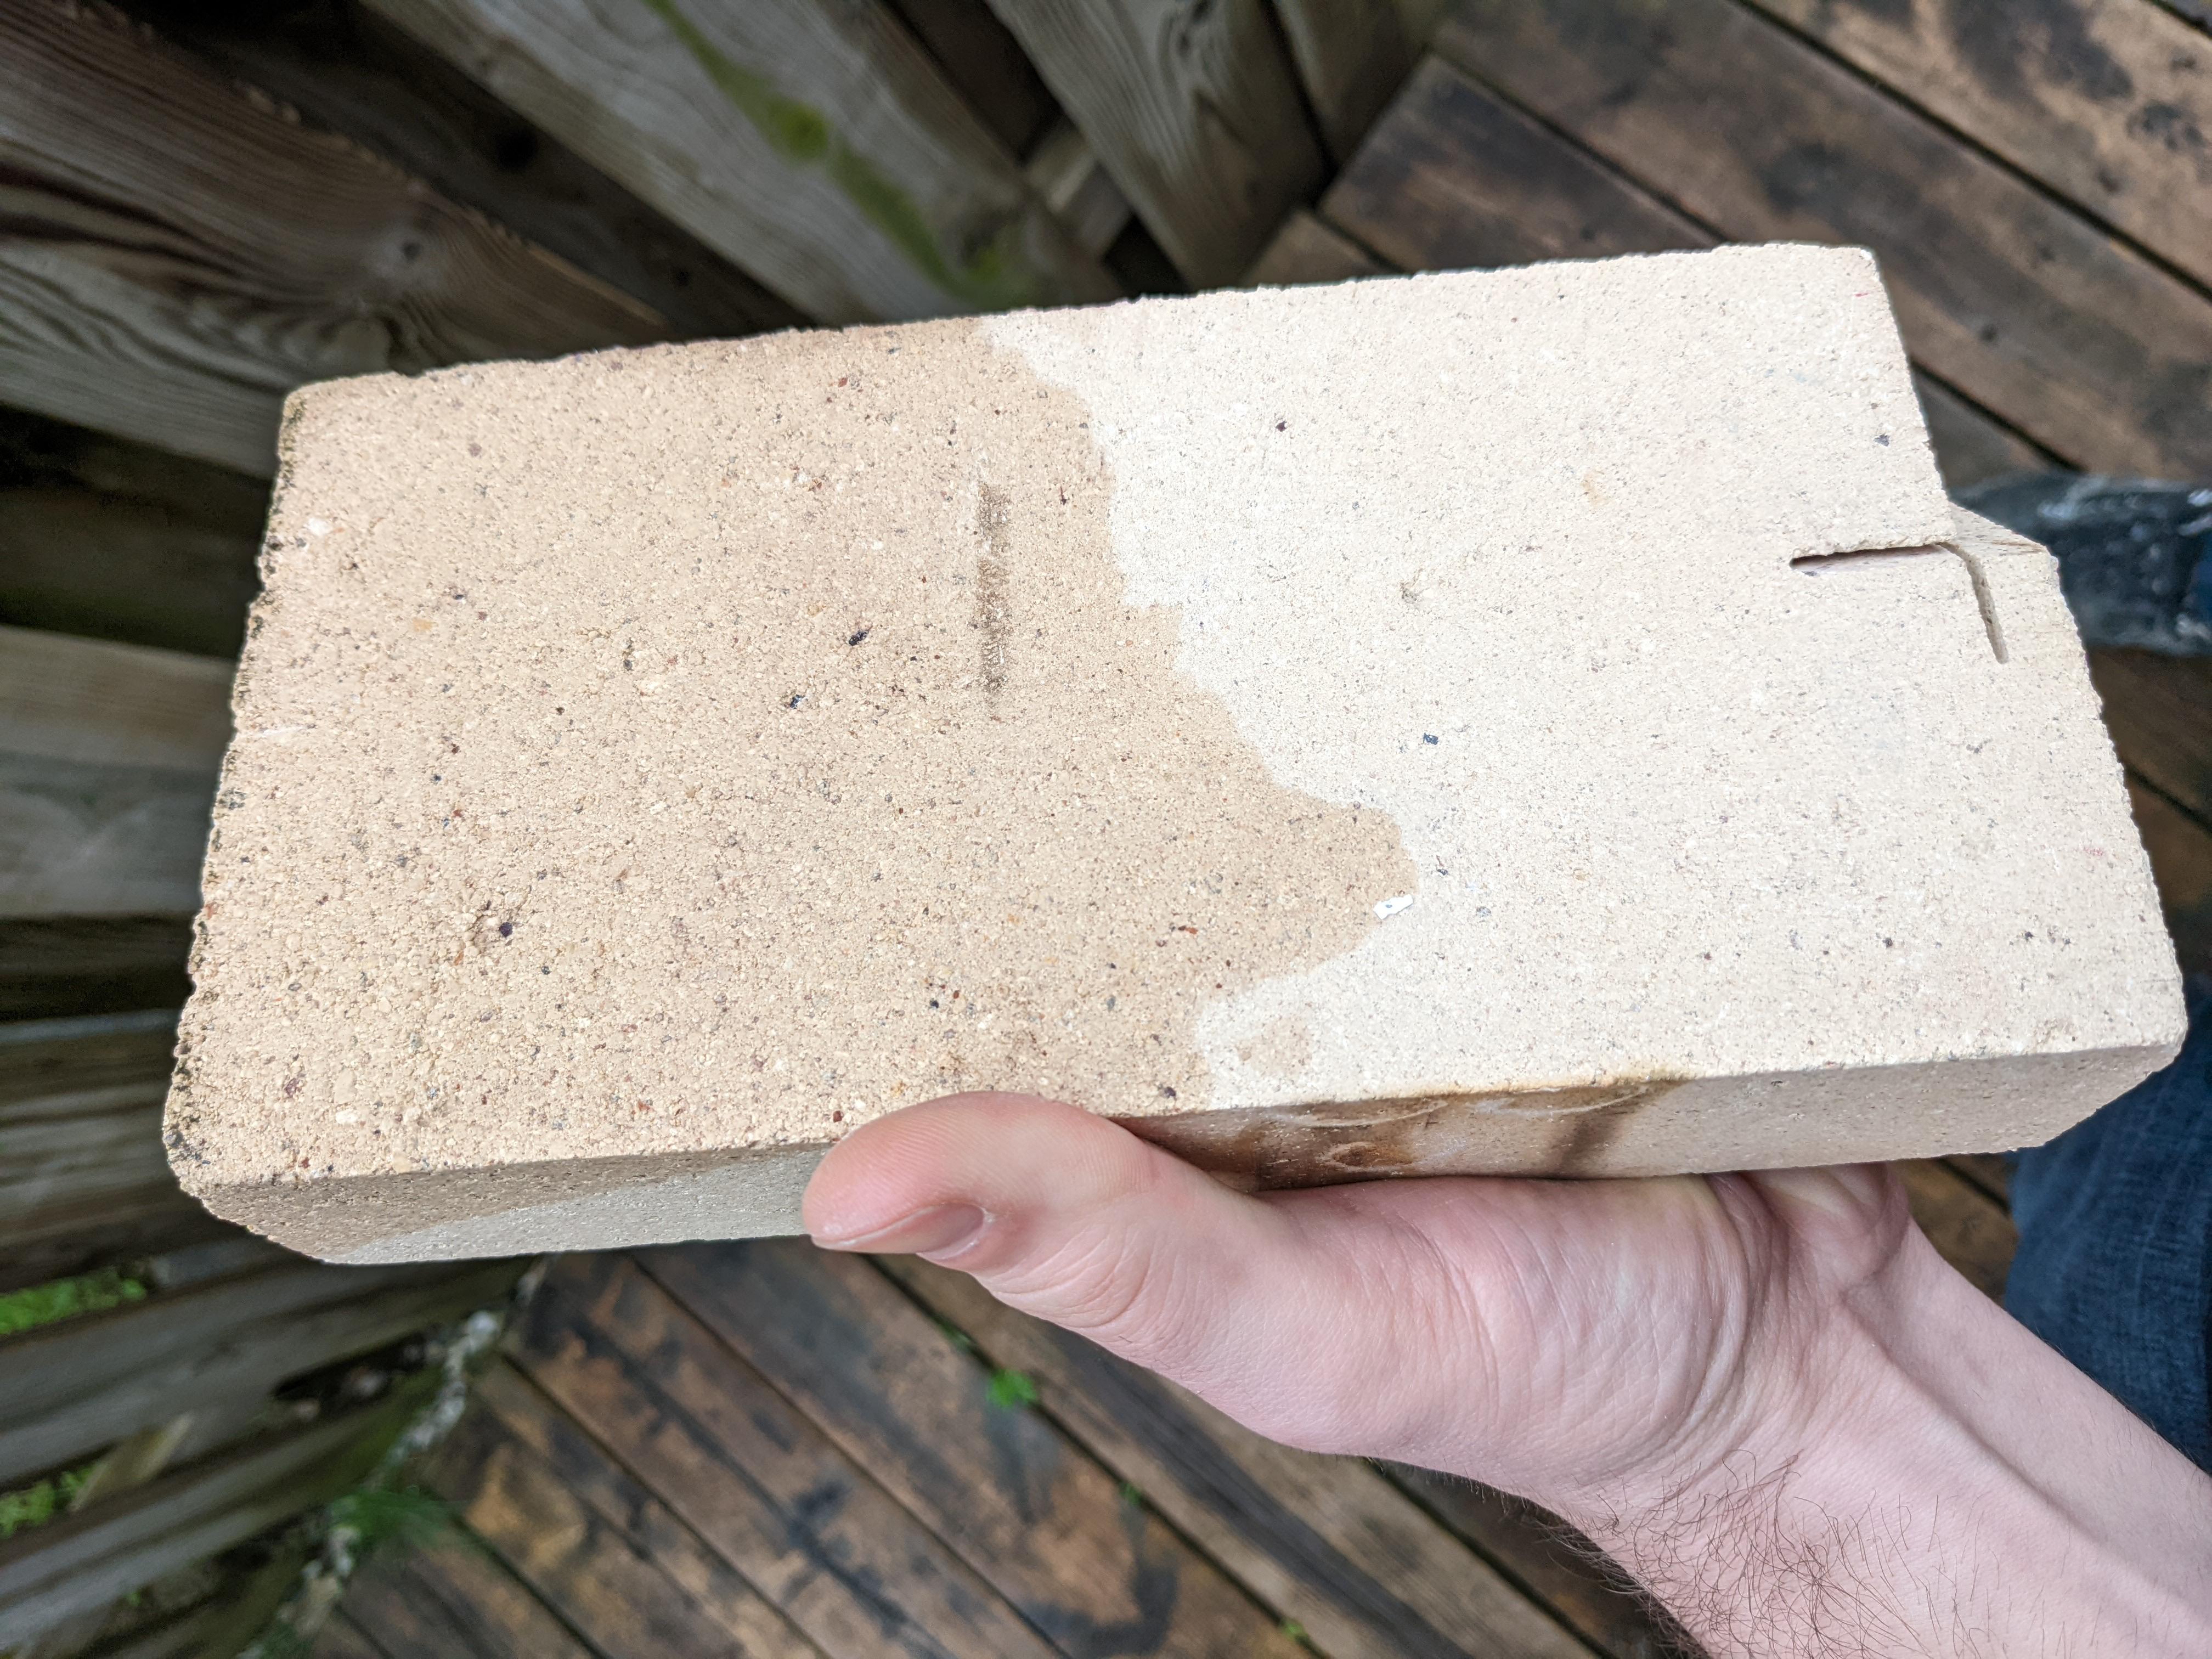
Tink, Thank you for the quick reply, I am certain, by your description, that this is not a light fire brick. It is a pale off-yellow colour (maybe with some red?) and it's heavy. I've had to grind a few down (those cuts were already there when I bought them) and they are quite hard to shape. I was just hoping it wasn't some off-type standard brick, because I doubt that would be very good for a forge, haha. Cam
-
I just realized I forgot to attach the photo of the brick I have. This is it half wet half dry, not sure if that helps or if there is another way to test / know if it's fire rated.

-
Mikey98118, Is there anywhere I can read about the Mikey burner? I am not averse to a little setup work and do like performance, haha. I understand about suppliers overcharging for supplies, I'm a carpenter by trade and it is hard to convince anyone to build anything right now with lumber prices the way they are haha
-
Firstly, I just want to apologize for my absence! I intend to post once a day (as long as there is something to say, anyway!) but I was down with the flu. My wife and I were both just helping each other limp through the last few days between the kids and each other haha. Not a lot of time to sit and think about the forge. I had a chance to read your reply before I left, Frosty, and I've been thinking a lot about it. There's a part of me (the young "I know what I know because I read it!") that wants to stick with the hex forge, but I've learned through carpentry, generally experience is a greater guide than academic knowledge. It hurts to acknowledge the best place for me to start might be the basics, but I hear the advice and I am encouraged that you're taking me seriously. None of you want me to give this up and you only met me a few days ago. I am grateful for the best-practice advice. Now, I don't mean to get too sentimental, so I'll get back to the forge. I cannot be sure about the bricks, I just bought them off an online marketplace and they were listed as firebricks. I have attached a picture, in case there's anything you can determine from that. They're ~9" x ~4" x ~2" and they don't look like standard masonry to my untrained eye. Hopefully I didn't get ripped off, cause I paid $2 CAD a brick haha. I had thought making a multipurpose tool would be a better use of materials, but I see you suggest that I choose forge or "melter" (I will be careful to use that word from now on, I promise ) and honestly melting is only a half-interest to me, so I'm going to focus on the forge part of things. I'll use the bricks I have for now, unless one of you changes my mind, if they break down rapidly, oh well, I have 50 of them. If the forge is small enough (and that model you showed me looks like it only uses a half-dozen bricks or so) I can make the forge a few times if it breaks. If it keeps breaking, I'll keep in mind those Morgan Thermal Ceramics K-26 IFBs you mentioned. Acknowledged on the breathing and eye protection, haha I've seen masonry cut and know it can be quite dusty. Wikipedia says emery cloth is like an adhesive backed sandpaper, is that right? You mean for shaping the openings and whatnot in the brick? I am interested in your suggestions, Frosty, (and other guys, too, but Frosty has been most direct haha) do you suggest I start with this forge as pictured below? I'm sorry, I'm asking so many questions, I almost feel like I should number them, but then it just feels condescending, like I'm giving you homework lol I have 48 firebrick, about 6sqft of 1" kaowool, 20lbs 2200° refractory, (still don't know if that's completely useless for my purposes or if there is something I can use that for?) I have access to 1 1/4" angle iron, little 120V welder, and Amazon. I was planning on seeing if my dad has some 1 1/2 or 1 3/4 piping to make my fuel/air delivery system. My current plan (which I am slowing down to make sure that I am getting the full benefit of the advice here on IFI) is to get a 6' propane hose to attach to the barbecue tank I have, and I have seen a few designs online for how to do the propane needle inserter that I like, though they're all blower systems. Last question for this post: Frosty, I hear you talking a lot about this T-burner (which I assume is the design pictured above) do you recommend that over a blower if I have access to electricity? I would have assumed forced air would always be better. I'm going to wrap it up here because I feel like I've asked a million and one questions haha. I just want to make sure I'm getting all this information clearly so I can start making a forge this week, hopefully. P.S. The story I was interested in was why you were called Frosty, you said it was a story for another time, haha, nbd
-
Frosty, Thank you, I'm glad you appreciate my sense of humour, I don't want to come off as blasé, haha. I appreciate that you are taking the time to show me where I'm going wrong to get me up to speed. I can't presently afford a blacksmithing class (either the time or the money, unfortunately) so your advice and the advice of others here on the forum is as good an education as I can get right now. I have a few questions to clarify some points of interest I had in what you wrote, I will try to be concise. I would like to hear it some time, haha, you've definitely piqued my curiosity. Are you saying hex is better or rectangular or cubic? I'm not clear on that from this comment. Re: the size, I made it that long in case I wanted to heat treat a longer blade. I didn't know that having metal at forging temps without hammering it affected it's strength! That's the kind of advice I'm grateful to get, rather than wondering why I'm breaking so many things haha I suppose I won't likely be making anything very large for the first while until I get the hang of the basics on smaller projects. I chose the width to fit my crucible, how long would you recommend the forge be? 8 - 10"? (Quote below because formatting on a phone is hard) Fair, I only use them because I have more materials than I do money right now. I don't have any 14ga steel kicking around, but I do have fire bricks, angle iron and a welder. I can make the size whatever I need by cutting the bricks, so that's why I was thinking that. Where would you suggest finding some 14 gauge steel to work with? Maybe I can get some next month Re: the refractory cement. ok. I will look into Kast-O-Lite 30, thank youfor letting me know about the store. Is my 2200 good for anything forge related or pretty much just outdoor stoves? I don't intend to build one so I'd likely just try to sell it if I can't use it for something related to this. Oh, that's not the idea I'd gotten, that makes them less appealing for sure. I had thought they were more efficient than venturi burners and used significantly less propane. It seemed a logical choice since I'm trying to reduce my overhead. If it adds time and cost, I don't want one for now. I know they're good for heat treating to avoid hot spots on the steel, and I want to leave my doors open for knife making. I'm still not sure where I'm going yet with blacksmithing but I figured might as well leave the opportunity to be a knifesmith (if that's an official term :P) do you recommend a different kind of burner? Done, I'd rather save the space anyways, I only added it because I thought it was wise, but I'll take seasoned advice over a Google search lol What do you mean by this? The 14Ga steel you were referencing? Like the outside shape of the forge you mean? It didn't seem like rambling to me, it seemed like helping me redesign my forge from the ground up, which covers a lot haha I know it's my forge, but I also know I have no experience. I don't want to waste my time making an inefficient, gas hungry forge with cold spots that will not survive two heats lol I appreciate all the guidance. I did my best with what I'd learned, but I will not say no to instruction. I guess that's why I saw a few pentagon forges when I was designing mine. Less wasted room around the sides. Hexagons are pleasing to look at but if I have to pay for it with gas, then it probably won't be worth it to me haha Thank you for explaining that.
-
Hahahaha I haven't even built my forge yet, and it's already gotten me burned! Dang, Frosty, I thought your username was because you were from Alaska, not because you were so cold! But seriously, I know this is my first go, and I haven't seen any other hexagonal forges so I'm not surprised it isn't going to cut it. I would like to know why, of course! I knew I was coming in to this with very little knowledge. I have scraped it all together from around the web, not under anyone's guidance. I don't want to make monumental mistakes, and that's why I came here. I am not deeply attached to the hexagon shape, but do you think the ribbon burner could be made to work in a forge? I've seen a few of them and I really like the concept. And thank you, Mikey98118 for the advice how to make my hexagon forge work, but I'm not so attached to the idea that I can't change it. I will listen to the advice here and make a more functional forge. I am all ears.
-
Thank you, Glenn, for the reminder of the invisible dangers of blacksmithing. There's a lot to learn and I've been repeatedly grateful for the community here at IFI. Does this still apply when you're using a forced-air ribbon burner? Or any other blown-air system? Or should you still have secondary air coming in through the gap between the burner and the forge?
-
Thank you, Robert, I appreciate the tip, I will use that going forward if I need to find something specific on the site. Frosty pointed me to forges 101 and I've made a post there detailing my build as best as time allowed. Thank you for the tip!
-
JHCC, thank you for the welcome! yes, I did give it a good look over, before I even wrote my response. It was very helpful, I had heard about the 2 layers of kaowool from there and having it all in one place did help a lot of what I read sink in to a right place haha
-
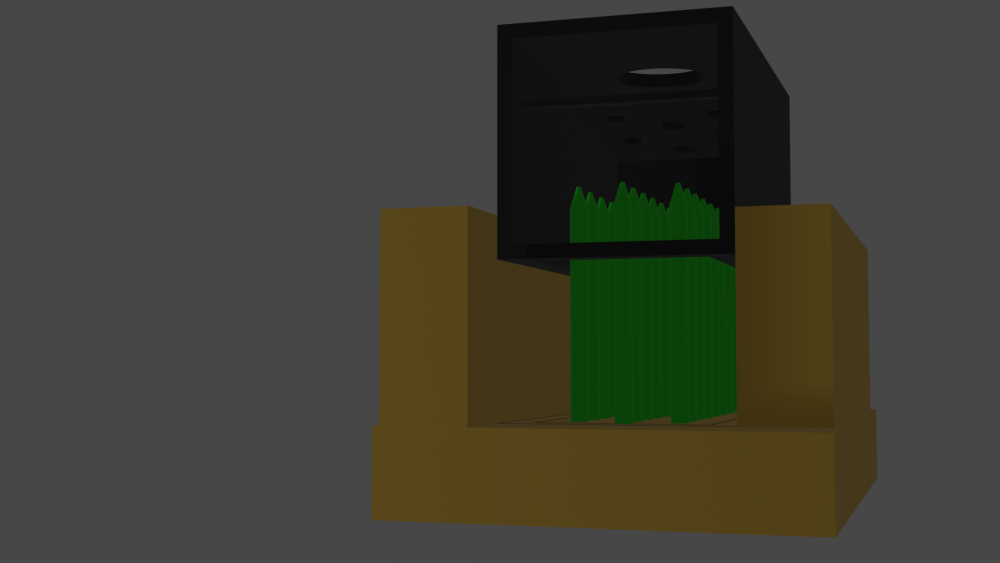
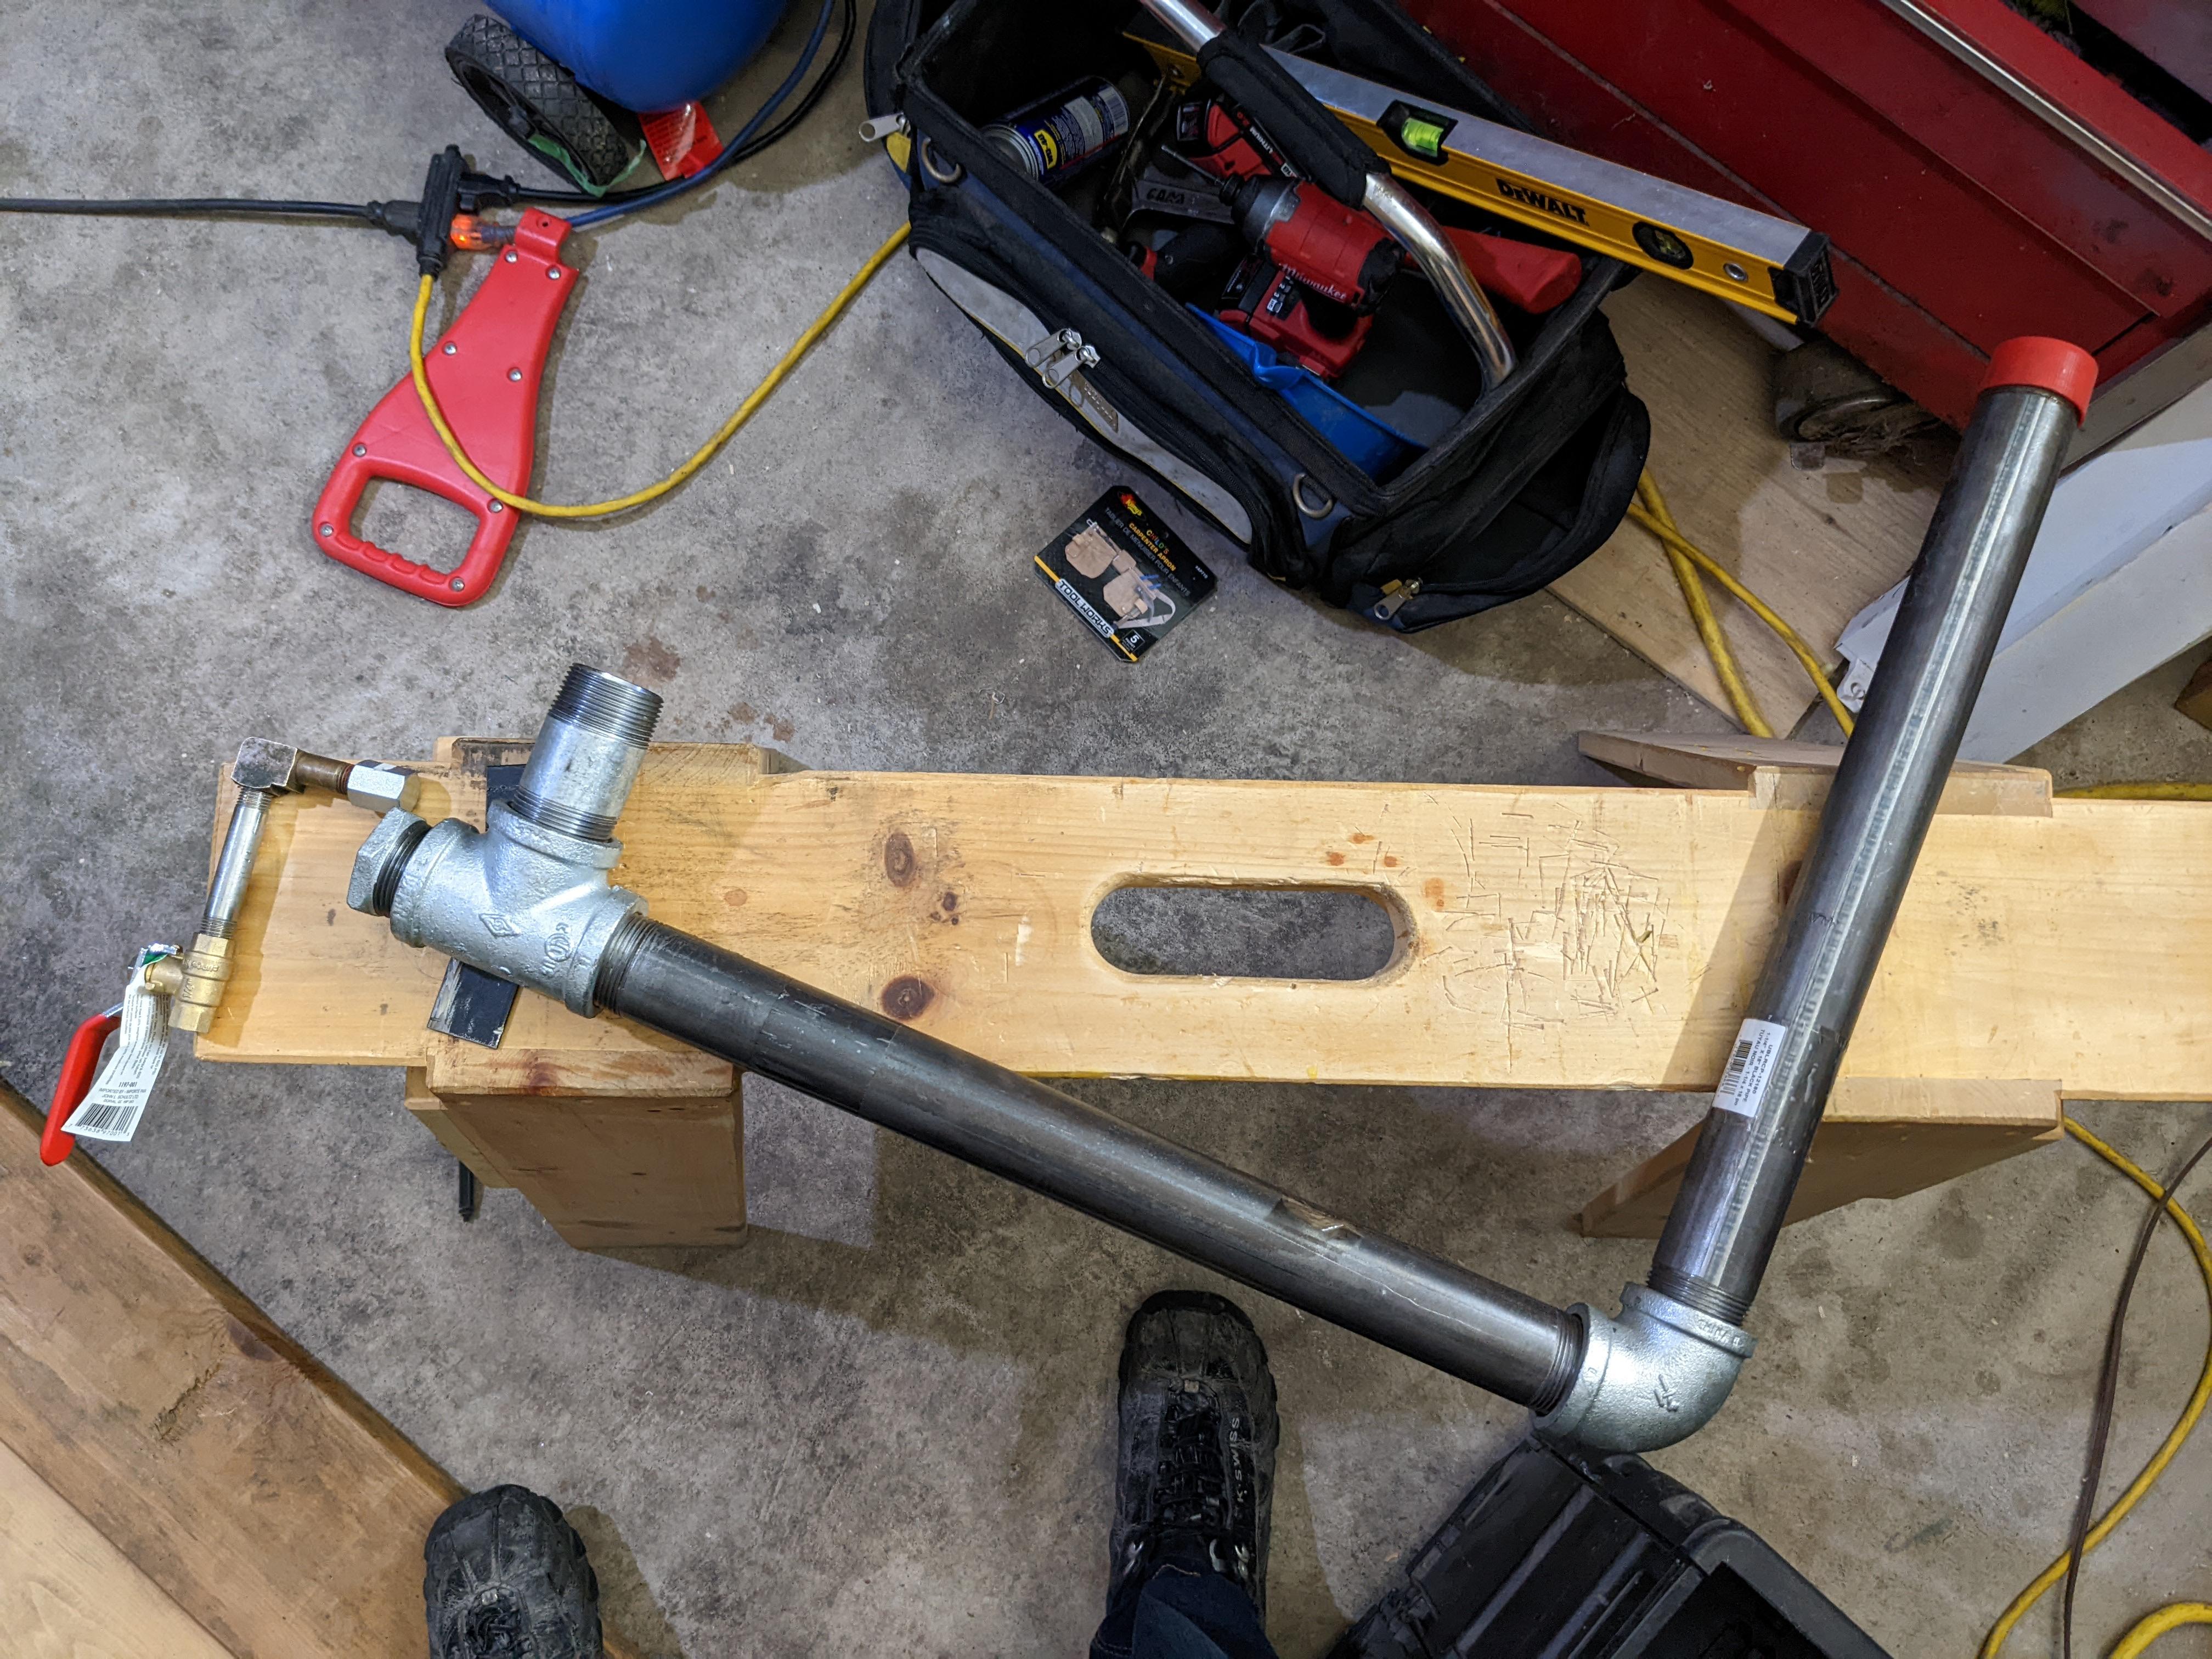
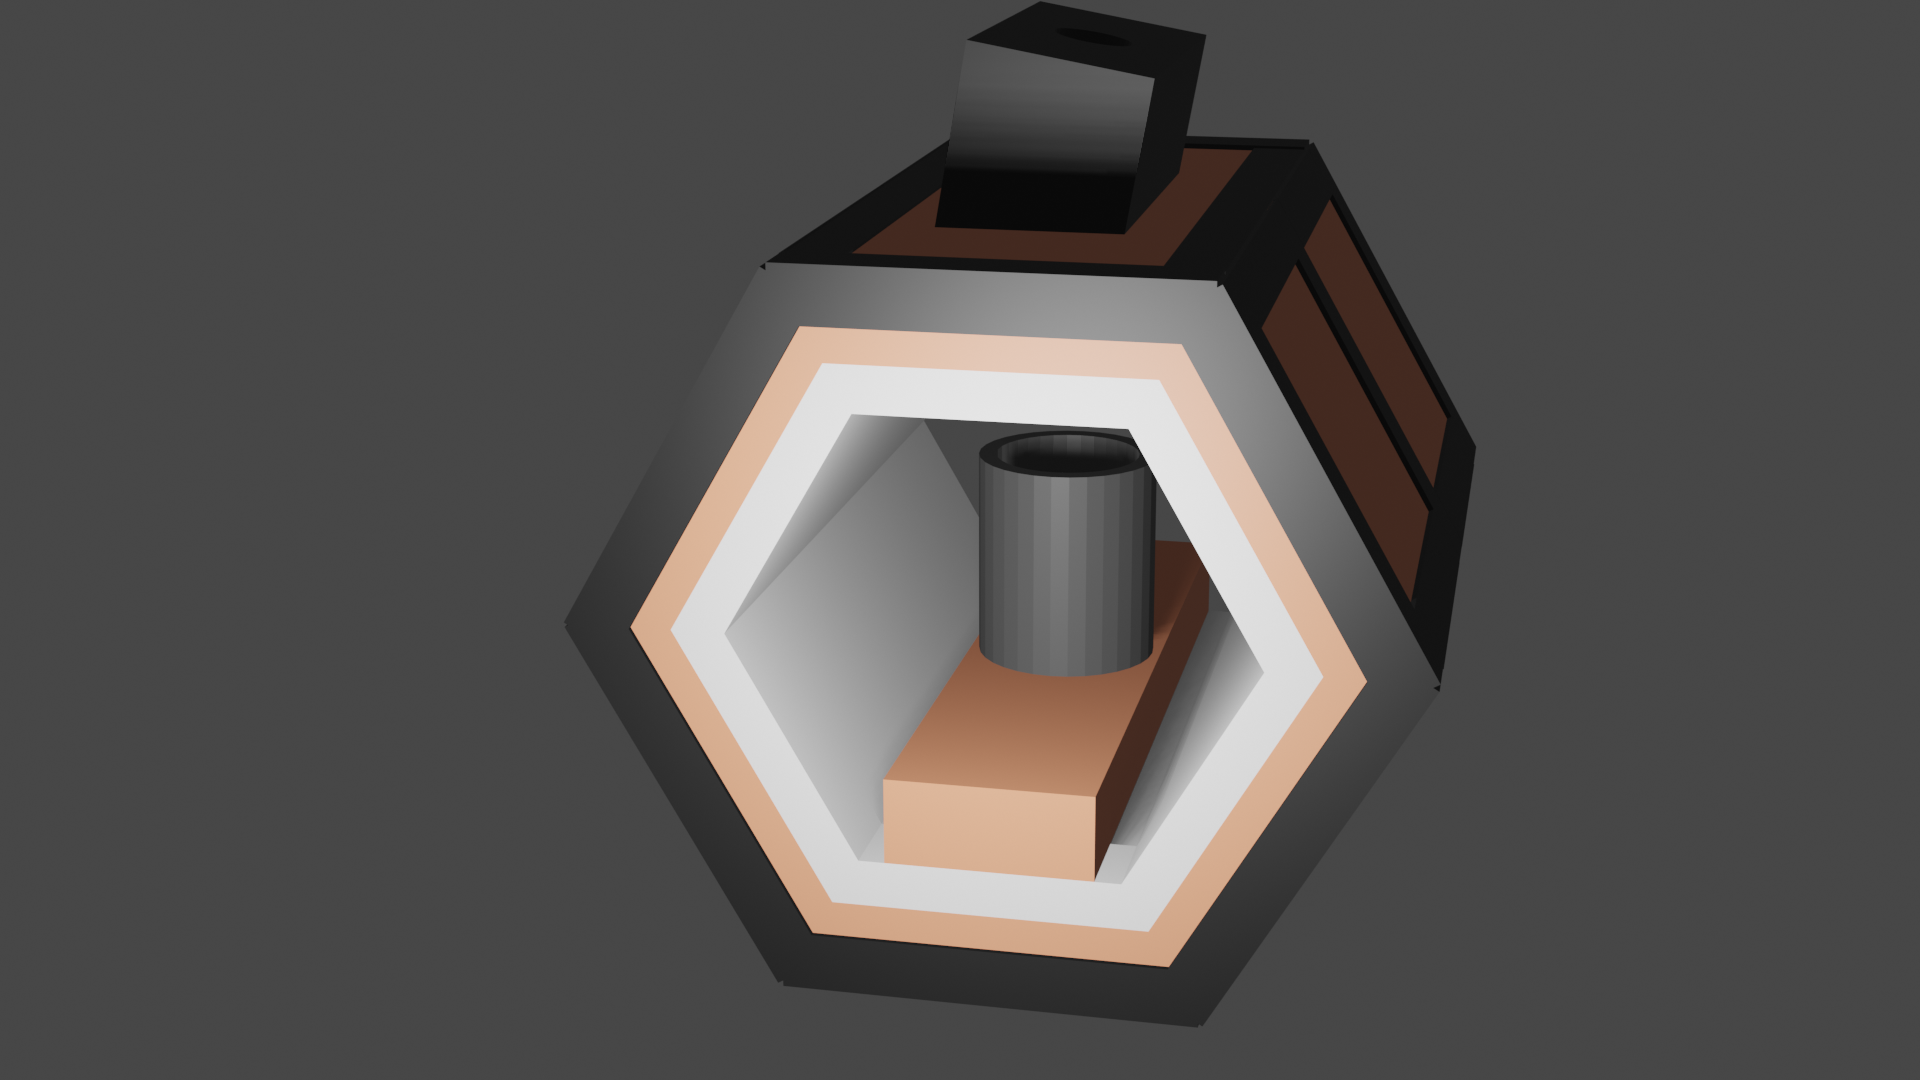
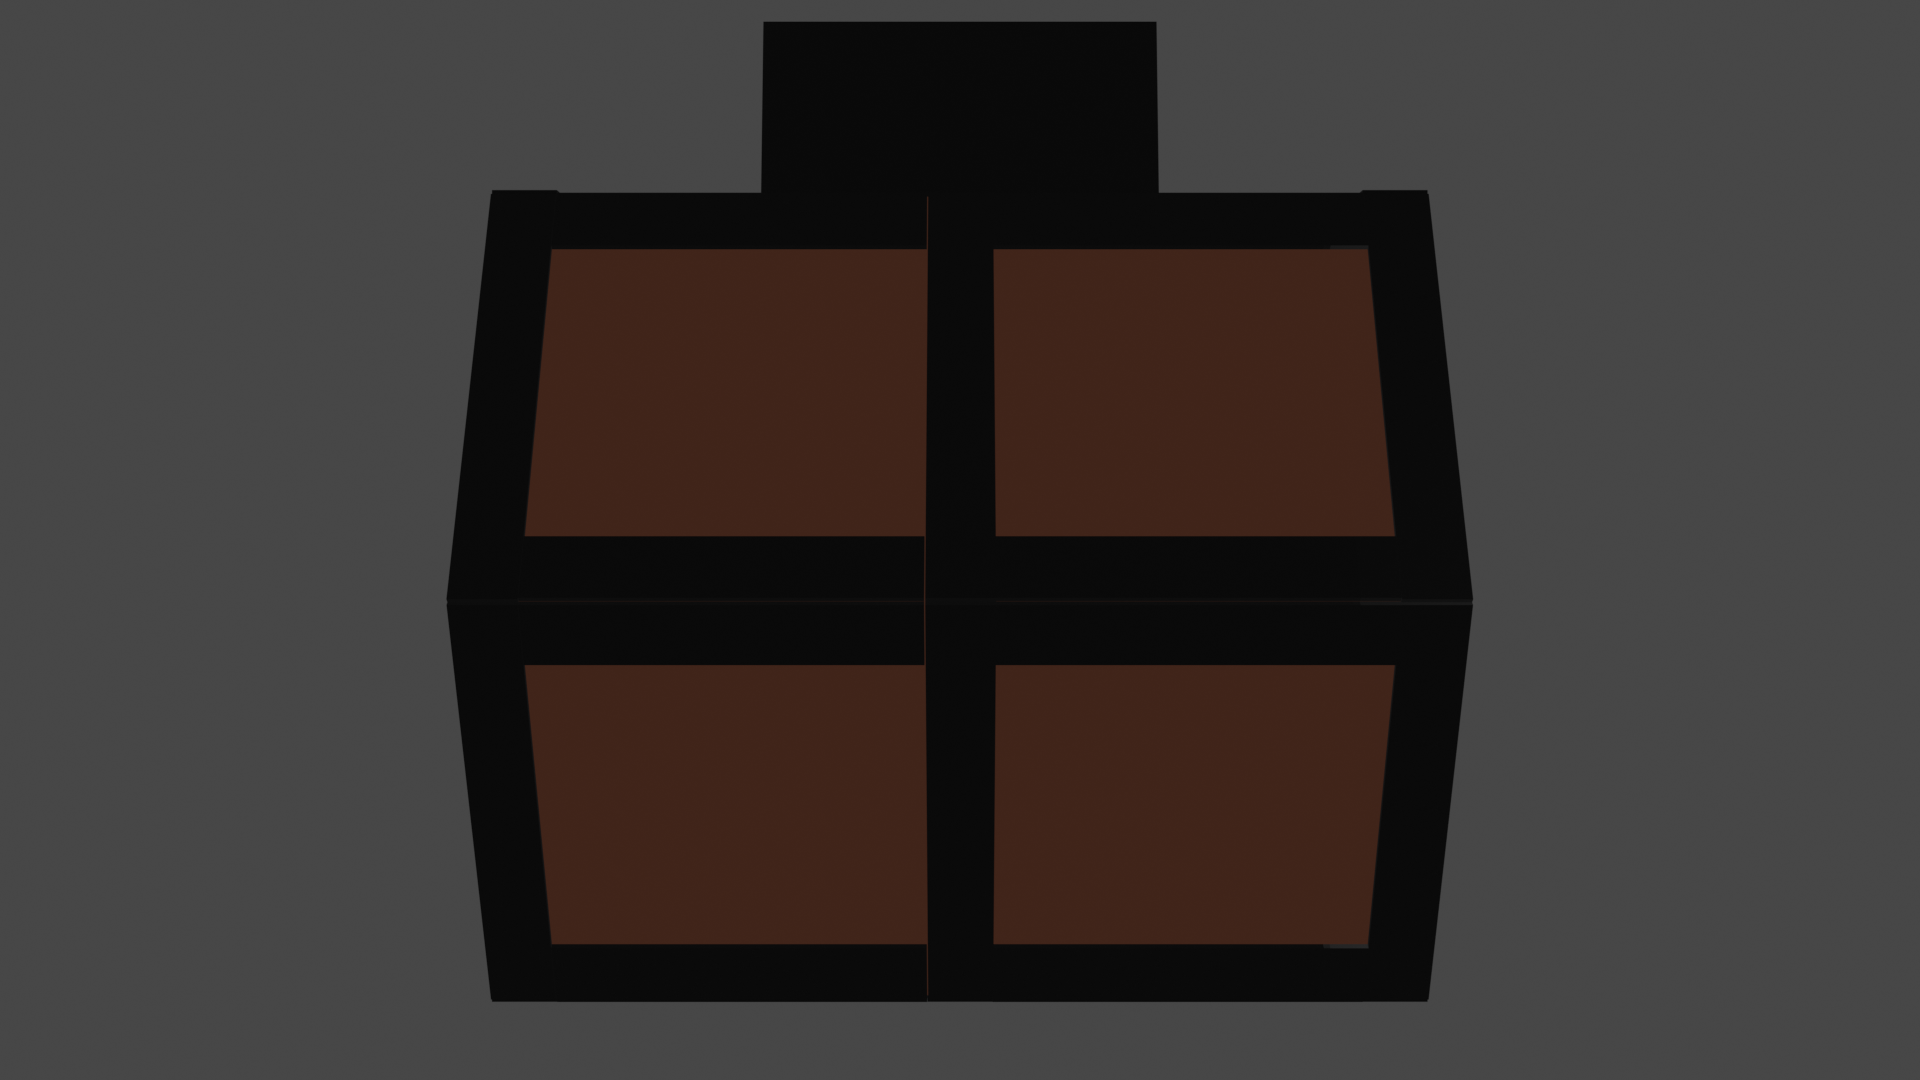
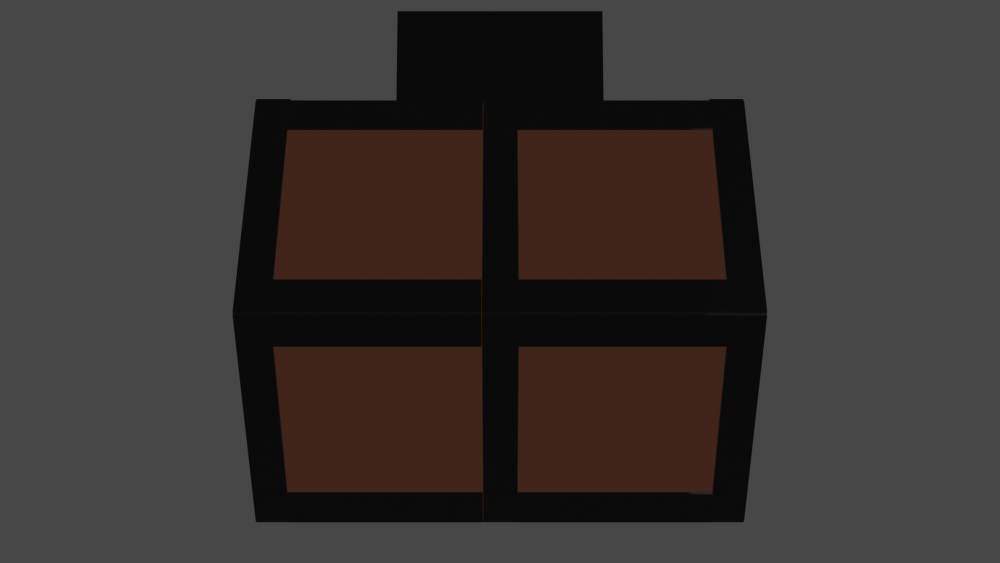
Hi, IFI, I am coming here to Forges 101 to share a few photos that I've drawn up on Blender and get some feedback/input on my forge design. I apologize if this is not the right place. The concept of my design is based around fire bricks, because I have those. I bought a whole bunch of Kijiji to make an aluminum smeltery, but as I went to fire up my crucible, I realized I would need to have tongs to remove it. The simple answer, of course, was to buy tongs, but it REALLY appealed to me to make my own. That led me down this rabbit hole of forge design... I have done so much reading and watching on the subject of forge design that I may have gotten sick of it. I saw circles, made out of propane tanks and drums, I have read about oval forges, I have seen long and flat rectangular forges, and I have seen fairly square forges. I have seen forges using INCHES of castable refractory, and some that only use a 1/8th layer of castable refractory on top of 3 inches of kaowool. I have seen firebrick only forges and one that was just a few regular bricks placed around some charcoal with a hairdryer blowing into it. With that said, I have come up with a design that is more advanced than some I have seen, and definitely less sophisticated (and therefore cheaper) than others. I hope the colours of my render help with understanding. The core concept was a hexagon for 2 reasons: one, I like hexagons. I think they are the perfect shape. Is that vanity? Probably, but it factors in. I like the look of a hexagon. Two, I tried an octagon, but unless I'm cutting the length of my bricks down, the inside of the forge was too big. I am just realizing that I have to cut every brick anyway, (to make my 60° angles for my hexagon) so I could make it octagonal with a similar inside area. (oops) I also have been trying to get this done quickly, as I want to spend more time blacksmithing than designing my forge. I do understand I should not rush through this process, but I also don't want to spend unreasonable amounts of time redesigning and redesigning this forge. (I already made two designs for the smeltery, which I will be tearing down to make the forge) I want to get forging. Back to my current design: It is a hexagon of firebricks 2 bricks long and 12 bricks around the face. (2 / side and 6 sides) I currently have them going lengthways to the back in my render, but I may choose to bevel the short ends instead when I actually build it. I imagine it will be easier to cut the short end than the long one. The bricks are 4 7/16" x 8 7/8" x 1 7/8" so that's what my forge is based off of. The firebricks will be held in place with 1 1/4" angle iron, since I have access to hundreds of linear feet of it. My dad has been collecting bedframes for years as he helped people move, and he has said I can use his angle iron to make anything I want. I just have a basic approach: hexagonal shape on the front and back, then a few flat pieces to support the middle, then some lengthwise pieces to tie those three hexagons together. I have not designed a mount for my ribbon burner yet, that is why it just sticks out of the top of the forge. I have some high-heat spray paint to reduce rusting of the bed frame components once I'm done. Inside, I went with 1" of kaowool because that was the cheapest kaowool on Amazon. But I've read on here that 2" is what is recommended, so I have mocked up a second render which has 2 layers of 1" kaowool. On the kaowool, I plan to lay around a quarter inch of refractory cement. I have some Rutland 2200f castable refractory that I was going to use for the lid of my smeltery and just did not. I plan to use a firebrick, or a half of a firebrick as a forge bed, in case I decide to do forge welding in the future, as I have read that Borax is extremely harsh on silicates like castable refractory and especially kaowool. (though I plan to have no kaowool exposed when I'm finished) For a burner, I am currently designing a system around a home-made ribbon burner. I have it designed out of 4" square tube steel, following John of Old Hickory Forge's design ( ) I did some math on the burner and found that 25 5/16" crayons (which is what I will be using, per John's design) has a circular area of 1.5625" square. I currently have 1 3/4" allocated for air/gas inlet, so I will be choking down by 1/2" square, which I suspect will have little to no effect, since my design has even more holes than John's does and he says it works great. I have included all other elements, including the baffle inside the steel tube. The ribbon burner will project about 1/2" on a 10° angle into the forge and be cast in place. I am currently designing the air/fuel delivery pipe line, though I have watched a few videos on how to do so and have a basic idea. I am planning on using 1 3/4 piping (or 2", if that size is not available/more expensive) and my dad has a furnace blower from a house upgrade that he has given me to use. I will control the air/gas mix with a needle valve or a standard ball valve and a mig tip inserted into the gas line in the air pipe (I will try to find that link later, I have to wrap up this post before 5pm) I am planning on having all the necessary safety features that I do not necessarily remember right now including a pressure gauge on the propane tank and having it a minimum of 6" from the forge. I have heard 25' but that seems excessive, and my garage is only 20 feet long lol I do not plan to forge in the garage for now, but if I start doing more blacksmithing than woodworking, I may bring the forge into the garage to reduce noise (so I don't drive my neighbors crazy, I've only been here a year mid-June lol) for now, I plan to wheel my forge out to the driveway and do my heating there. I am not sure where I will be doing my hammering, probably just bring it in the garage for that. I keep it well enough swept up that it shouldn't be a fire hazard. And I will have a garden hose near-to-hand the whole time. Well that's all the time I have for this post! If you have any insights or constructive criticism, I am always ready to hear it! I do not think I know everything (definitely not) though I have read a lot on the subject, I am ready to cede academic knowledge for practical, as I have zero of that. Thank you in advance, IFI community for your insightful and helpful correspondence! (I included the blender file, in case anyone wanted to take a look at it or give suggestions. I don't mean to be presumptuous, rather the opposite, let you all see right into my process!) Hexagonal Forge V.1.3.blend


-
Thank you, everyone for all the advice, links and input! I hope I am replying correctly. I know you're not supposed to @ people so I won't do that. IronDragon ForgeClay Works, Thank you for that helpful link! I have read through it and see that I'm not quite doing the same as the article suggests, haha. I appreciate the link, it will be helpful for me to find quick reference info! Swedefiddle, hi! Thank you for the link and letting me know they exist! I definitely wouldn't have heard of them as I don't run in blacksmith circles (yet!) but their membership fee is $40, and I spent my "fun money" this month on forge materials so maybe we'll see about next month, haha! TWISTEDWILLOW, I appreciate the encouragement. It is a LOT of information on here, and it seems daunting to get started reading. As a completionist there is a part of me that wants to read every article haha, but I just don't have the time as a dad to manage that. I will be seeking out the OABA once I have the money lying around for it. Running a budget means only so much "fun money" a month, haha. And some of that has to go to steel too! Frosty, I am glad that I will fit right in! I haven't joined a forum in years so I look forward to being a part of the community. I'll go take a look for Forges 101 and post more information, I do have some questions that I hope I can address before I get started. I'm planning on using a custom-made ribbon burner. Re: hot work, yes! I considered my woodshop as far as my forge goes, I don't plan to use the forge inside for a bit, if I can manage it. (And if my neighbors don't kill me!) I will be building my forge on a stand with wheels so that I can roll it out the garage door and use the heat outside. In general, I keep a pretty tidy shop, and I sweep in the corners regularly, so I hope that fires won't be too much of a problem! Regardless, I plan to have active fire suppression on hand. The garden hose will be right outside my shop door while I'm firing the forge. Thank you to everyone! I feel so welcomed already! It hasn't even been a day since my first post and already several of you have responded to me! I appreciate your courtesy and kindness to a newbie. I am as fresh as they come, blacksmithing wise, and I look forward to growing this skill! I have some experience welding and general metalworking from my last job, I did some structural and some nonstructural welding, and my welding instructor in college said I had very good form and with practice she thought I would be a phenomenal welder. That's not the path I plan to go, but I know that welding comes in handy with some aspects of blacksmithing. Alright, I'm off to go find the Forges 101 page and post some info about my build!
-
Hello, iForgeIron Community! My name is Cam Blumreisinger and I'm new here! I have been lurking, reading posts and gathering information for a few months now, but I have finally opened an account. I wanted to jump in and be part of this cool community! A little about me: I live in Welland, Ontario, Canada. I took an interest in blacksmithing back in college (2014ish) when a friend of mine took off down that path. I didn't think it was realistic goal for me as I was still afraid of getting dirt under my fingernails at the time. I went through computer programming, call centers, pizza delivery, siding and finally found framing and general carpentry. I found my calling in making walls and buildings, it's just so satisfying! But this calling to blacksmithing keeps coming back. I presume it will be a hobby, but I haven't started yet, so I have no idea how big a slice of my life it will take out. I am a husband (2017) and a father to two boys (Nov 2017 and Nov 2019) and have been practicing carpentry since 2018. I have completed a 3 year apprenticeship and just need to write my Certification of Qualification to be given my Canadian Red Seal (A national program that lauds professionals of a variety of trades, though I will be a "General Carpenter") I have a small woodshop in my 1-car garage, but I am looking to add some metalworking and blacksmithing equipment to my shop to round out my experience. I love how a blacksmith can MAKE their own tools. The self-sufficiency of blacksmithing has always appealed to me and I love to do for myself, rather than hiring someone else. I think a great many lessons can be learned from trying to figure it out yourself. I call it a Persistent Interest because I have ADHD, I am frequently interested in a wide variety of activities to an unhealthy degree. ... Then they're gone. I never think about them again, hours and hours of research and hundreds or thousands of dollars and I just never pick it up again. I have learned (over my meager 28 years) to give myself some time to stew on something before I jump on it, and I've "snoozed" the blacksmithing call a few times a year for the last several years until I just decided to go for it. I started learning about it and watching Alec Steele and the interest grew. Finally I acquired some fire bricks and designed a smeltery. I tried it, but it wasn't enough for me, I needed to be able to make tools and maybe I would smelt on the side, if it was an interest. I am currently in the process of designing my forge and I am done the bulk of the design (only a few hours, but I am happy with it, so far) I have made the design thanks to a bunch of information found on this and other sites. Frosty's words of wisdom have guided a few steps of my process and I am very grateful to him for his no-nonsense reveal of information. Often over my head, the basics have proven to be enough to get me started (hopefully!) and I hope to make my forge later this week or early next week. Any design input is welcome. I am not done the design yet, but I will post what I have completed. Hopefully this is the right place. This forum is a bit of a challenge to navigate. After reading all the Read This First info, I did not see anywhere to make a first post, but after about a half hour, I found this place, haha. I cannot find a "first forge build" page (without bringing up over 100,000 results) so I will post it here, hopefully this is an acceptable place. I want to thank this community for all the advice and resources I've already gained from it, and thank you in advance for all the interaction I look forward to over the coming decades.