
Strine
-
Posts
566 -
Joined
-
Last visited
Content Type
Profiles
Forums
Articles
Gallery
Downloads
Events
Everything posted by Strine
-
fire-pots cast from refractory cement
Strine replied to herchammer's topic in Blacksmithing, General Discussion
I fashioned a wooden fire pot....let me finish!! which I had cast in cast iron. The cost was surprisingly affordable even for me. That was in about 1995 and it's still going strong. When you do it this way you have the opportunity to stick on your initials or a logo or something. This really impresses the beginners and they think you're some sort of God-like smith. Gee... a personalised fire pot! What a pity the accolade doesn't fit the reality. -
I absolutely, categorically and without qualm totally and utterly disagree Jr. I'd rather divide and multiply by ten any day. I can't see the problem myself. You seem, from your post, to treat metrics with utter contempt which is sad. The ruination of a whole country...gee, wouldn't have thought metrics were that bad. Still, nothing wrong with letting another state have the reins for a while! World War Three over measurement systems...a surveyor's dream. But I take it mostly as tongue in cheek as I know you know the value of such a simple system dealing with just tenths of this or tens of that. Your list is impressive and labels you a guru on old measurements however it is far from complete. What about bee's d---s (appendages), fraggs, skins of teeth, hair breadths, widths of idicator, paces, tinnies (refer to Dale) and touches to name a few. And to counter your argument doesn't it seem odd that a great nation built with an antiquated measuring system opted very early for an infinitely simpler monetory system than pounds, shillings, pence, florins, zacs, deeners, bobs and guineas.
-
So eloquently put. Bravo. I also ask the question, which came first, the chook or the goog. How can you make a jig if you can't make a scroll by hand per your design.
-
Reeds-60 Reed shoes -60 Reed clamps -60 Reed clamp screws -120 (purchased ready made) Reed plates -2 Valve boards -2 Valve pads -60 consisting 4 distincts bits to be made = 240 Valve levers + air levers -62 Valve springs -62 Valve lever posts -62 Buttons -32 consisting 3 distinct bits = 96 Button sleeves +32 Bellows boards -96 bellows hinges (internal) -48 Bellows hinges (external) -42 x 2 =84 Gussets -63 Bellows papers -96 So far thats 1355 approx and there's still the ends, the straps, and all the ancilliary hardware such as screws and thread inserts etc oh and of course a nice box to carry it in! 2000!!! Maybe that might be too many but it's certainly a concervative estimate on how many parts there SEEMS to be:rolleyes:
-
That about sums up my response
-
Gee biting your tongue hurts!
-
Twice now I've been threatened with all manner of nasty reprisals for not posting in "several weeks". No I haven't, I've just been twice reminded I'm not actively engaged in this site at the moment. So why aren't I posting? Well, you see, I've been carrying two monkeys on my back, the first for quite some time and the second for about twelve months. For close to three years I've been working on some way to make circles out of 4" x 3/8" x 5' of hardwood and then cover the circle with a suitably prepared animal skin. My shed looks more like a pipe factory with all the failures hanging in the rafters. Each attempt has it's own story to tell as to what went wrong. Some even border on being acceptable but seeing as how the finished article is for me, it has to be perfect. Nevertheless I think I'm getting close. The other is the manufacture of a musical instrument (see avatar) which I embarked upon last year. It comprises well over 2000 parts made of either wood, steel, brass, leather, linen or bone. Some of the parts allow less than a few thou tolerance, while other parts allow the luxury of...gee...1/4 of a mm. Anybody got a good method of skiving leather to about 0.004 or 0.005 of an inch? Lately all my computer time has been involved in research or design of either of the above two monkeys at least in an attempt to get rid of one. There is only enough time left to simply pop into IFI and have a quick gander. Unless the poster is in grave danger lest I personally set him right or a post is strikingly interesting, I can't afford the time. In any case I think I'm upto about 418 posts which should tide me over for a while yet.
-
IForgeIron Blueprints Copyright 2002 - 2007 IFORGEIRON, All rights reserved BP0267 Collars, Half collars, or Clips By Strine, HWooldridge, Irnsrgn, Ten Hammers, Frogvalley, Rantalin, 6013, Ed Thomas, B.H., and Jim Carothers The following question was posed on the IForgeIron Blacksmith Forum. This is the finished product needed. What are different ways to get this accomplished? How would YOU go about making a dozen of the items? Then....for a one off... open the vice jaws to a little more than 3/4" ... heat up about 2 1/2 " of 1" x 1/8" ... lay centrally across open vice ... lay a piece of 1/2 x 3/8 over the vice gap and hit it into hot piece. hit down until top of 1/2 x 3/8 is flush with top of "wings" avoid squashing wings ... while still hot remove collar to the anvil and tidy up, leaving the insert in place ... trim to length. ... For eleven more repeat. Some questions first dear client. Those sharp corners at the bends, do they have to be sharp? Let's say no. The time taken to design and manufacture a handy little Hat Collar tool would be better spent making the other eleven collars. Strine I'd weld two pieces of 1/2" square to a bit of plate with the right distance betwixt them then make a top tool (also out of scrap) that fit the inside dimensions. Heat the stock, place over the lower jig and swat the top tool with a treadle hammer. HWooldridge I would just modify the jig I already have for my hydraulic press and go to it, a simple matter of knocking the pieces that are tack welded on off and replacing with the proper size, I used to make something similar 2 at a time, 100 to a run, about 4 a minute in the press. they can also be done on the anvil in a simple jig. I called them clips, they were for attaching the bows on a high wheeled farm wagon. Irnsrgn Same way I've made them in the past. The collar is 1/4 deep so 2 pieces of 1/4 welded to a piece of scrap, the distance between them about 5/8 or little more (would first wrap a piece of 1/8 around a piece of 1/2 and then weld the 2 pieces of quarter using this distance roughly). I don't have a treadle or a press so I just whack the collar when it's HOT with a piece of tooling made for this purpose and then whack the edges down somewhat afterward (but not a whole lot). I draw the collar ends somewhat to help in closing it fully. Heat the collar Hot, slip it over the place to wrap and then use tongs or channel-locks to close. Worked like a charm the only time I've used them. Ten Hammers I have a fixture that is set up like a spring fuller. Bottom "die" or swage is shaped just like the collar you have shown and the top is the opposite and fits into bottom with just enough clearance for 1/8 stock. Both top and bottom swages were milled out of solid rectangular bar stock. I welded a piece of round bar to it like a spring fuller, so I could use it under a power hammer or clamp in my vice or press or simply hit with small sledge. This shape is common for my bolt keepers on sliding door latches/bolts. frogvalley A jig could be made with two pieces of 1/4" X 3/4" stock that are about 3/4" apart welded to a piece of scrap as suggested below, this would account for the 1/2" width of the collar and the 1/8" of the stock on each side. You can then cut a piece of 1" X 1/8" to 2 1/4" and lay it across the jig, with each end flush with the ends of the 1/4" X 3/4". A piece of 1/2" stock is then smacked into the jig, bending each wing up. The wings are then bent over the 1/4" stock on either side and the angles are all trued over the jig. I drew a picture in paint to help explain what I mean. The hard part would be getting the 1/2" bar to be in the exact center of the 1" X 1/8" bar. Rantalin I am told that this is a "CLIP" and not a collar. The difference is that the collar encircles and holds 2 or more pieces of metal. A clip is attached to a flat surface to hold a piece of metal or other object in place. Glenn Glenn a collar is pretty much as your revised description explains....much like that hard bit of stuff at the top of your shirt that goes all the way around your neck. But heh, what you call a rose is what I call a thorny bush that's a mongrel to prune. Who is correct? Strine Any horse person knows the collar goes around the horses neck and hooks to the harness, the clips go on the clops - the feet. Otherwise the horse could not go clip-clop when he walks. And when the police horse helps arrest a bad guy, it is called a clop collar. 6013 Glenn: Clips are most easily formed with a top tool. It looks like a hand-held swage only instead of round it is square inside. You make it to the dimensions of the outside of the clip, naturally. To use, place a bar on the anvil that is the size you want for the inside of the clip. You place the hot metal across that. You put the top tool on the bar, and hit it. Simple as that. Ed Thomas An email I received said these might be called half collars. Glenn The spring swage equivalent by Frogvalley is a good solution, because it is easier to be accurate. Ed Thomas This what you had in mind, the top one. Irnsrgn Click to enlarge B. H. Hat-Shaped Collar goes onto a Wall-Mounted Coat Hook. 2x pieces of 1/4" sq. bar 10" long 1x piece of 1/8" x 1" flat bar 2x junk ball bearings Lots of heating, beating, punching, and twisting (the bearings are hot punched to let the vertical arms go into about 1/4" for a better joint) The finished piece by Jim Carothers. This is an example of how blacksmiths solve problems. There is no "right way" just the way that works for you. Thanks to Strine, HWooldridge, Irnsrgn, Ten Hammers, Frogvalley, Rantalin, 6013, Ed Thomas and B.H. for working on the problem. All this information was posted on the forum in a 3 day period of time. This is the rough tooling I used to make a handful of collars. I already had the bottom tool, but it was too deep for the clips I needed to make. Thus you see a spacer bar in the bottom tool. Thanks to all who helped answer my questions. Jim C. Here are photos of an item that will be in the Saltfork Craftsmen Annual Conference Auction. The yellow pine came from an old house (built around 1900) in Eastern Oklahoma. Even though you can drill and tap this wood, it still finishes out nicely. One of my co-workers donated the wood. The mounting holes are 16" on centers. View full article
-
Wow, Y'know, when I find an interesting shed I want to look at everything, and I don't just mean the contents. The structure is often fascinating as well. The marvels of modern science eh? I felt like I was standing inside the sheds. OK I'm ready for the whole series of IFI smithys photographed this way! Tell me how to do it with my box brownie and I'll start the ball rolling. ------------------------------------------------------------------------- "Hello Strine it appears that you have not posted on our forums in several weeks, why not take a few moments to ask a question, help provide a solution or just engage in a conversation with another member in any one of our forums?" I didn't realise there was a time limit..."several weeks". Gee I've got library books borrowed in the sixties and the libraries aren't bugging me yet. What's the problem folks?
-
Roger, you just need to check the little area in the top right corner of any of my posts. It says Melbourne! which is near enough in a global sense. I'm about 30km east, toward the hills. Or check my pin on the map. That's even closer to the mark, but not near enough for the shrapnel to reach if you dropped one on that spot:)
-
rthibeau, Your derivation forgets to substract the first number you thought. Otherwise it looks very impressive. Maths rules OK
-
G'day Roger, In the beginning it was a trickle then it became a flood. Outback where?
-
G'day Mrs Irn, I dips me lid. That's the gentlemanly thing to do when one meets a lady I'm told. Oh, the translation...I doff my hat to you...or I tug the forlock on the odd ocassion I'm hatless. Welcome
-
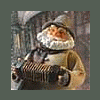
 I found this on the web some time ago. I'd love to credit someone but don't know who!! It always reminds me of my daughter in her early blacksmithing days. Sadly now she worries about getting her hands dirty so has hung up her hammer.
 -
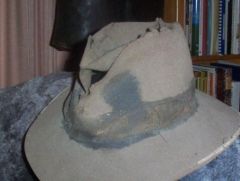 My Hat In response to Ed's query re hats I submit my own as an example. Reluctantly it's in need of replacement. Just when I've broken it in.
 -
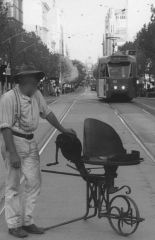 The forge. An irresistible photo opportunity in Swanston Street (the main drag), Melbourne(the State capital), Victoria(the State), Australia (Downunder). Had to be quick though, the tram was bearing down fast.
 -
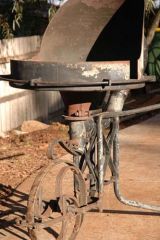 Ready to roll. It's no harder to move around than a builder's barra.
 -
 The fire pot locked in its final position
 -
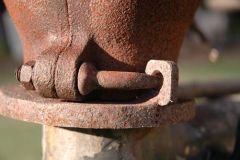 The firepot about to be locked in. The pins are a permanent fixture to the fire pot. Again no nuts or bolts.
 -
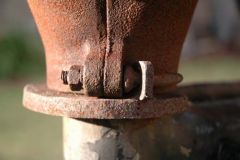
 The fire pot sits over this pipe and is held in place with pins located in the holes
 -
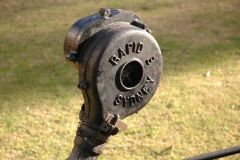 The blower locked in place
 -
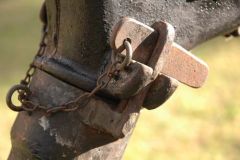 The blower is held with two keys. No nuts or bolts
 -
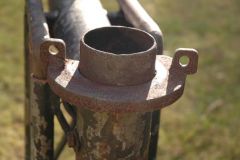
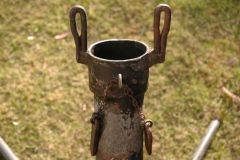 The blower drops into here
 -
 The undercarriage complete with handles that slip into the frame. One handle doubles as a large bending fork.
 -
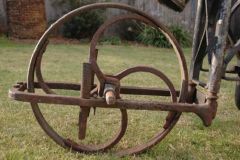 The wheel slips into the frame. Gravity holds it in place. The two spikes merely indicate that the wheel support is a recycled harrow. They serve no useful purpose...yet.