

Chris C
-
Posts
2,136 -
Joined
Content Type
Profiles
Forums
Articles
Gallery
Downloads
Events
Posts posted by Chris C
-
-
Hmmmmmm............"butter" the bricks. I guess I could get them wet just before I place the square, collapsible form inside. Will they stay wet long enough to force the KOL into the gap between brick and form? This square tube is heavy. (too heavy, darnit) I'm not sure I can vibrate it adequately.

-
He-he, Frosty, why does it pain you? Is there something bad about refractory cement? I'd only need to use it on the bricks closest to the ends. I may not even need it if I cut my bricks so there's a slight tightness to the fit. I just didn't want to go to lay this thing down and have some loose brick go sliding out. Wait...........something just hit me.................I'll be covering the brick with KOL. Does that really stick to the brick? If so, the KOL liner ought to keep the brick from sliding. Yes?
-
I'm planning on diagonally bracing the cart............just didn't have any strapping. The stand on which the forge is sitting was built with pirated pieces from the packing crate from when I bought my zero radius turning mower. It was all bolted up on this contraption. Against my wife's wishes I kept the pieces. She claims I'm a hoarder............I say I'm a collector of things I will use some day. And I do use those things when the time comes. Just don't always know when I'll be able to use them. In this case, I think they worked rather nicely. I just need some more strapping. As far as weight on the cart lower down, I have room and plan on putting the propane tank on the lower shelf.
-
The extensions are 8"..........and as you can see, very well marked. I'm the only one who will be using my forge, so I'd think I could stay away from them.
-
Things are always distorted with a wide-angle lens. The center of the forge opening is 53". The wheels are 30" apart. This is no taller than the forges at our Thursday night group, and they are mounted on the same cart as I have..............except they just have the standard 11 1/2" wheel spread.
-
Fair enough, Frosty.
-
Next step in this forge building process is installing the soft brick. I've decided to stand my forge body on end and simply stack the bricks cut to size on all the side walls. I then plan to build a collapsible "box" form to set in the center so I can pour the Kast-O-Lite in-between the box form and the soft brick. After I'm finished with that and the application of the IR reflective coating, I'll lay the forge down on it's bottom. I'm concerned the bricks might not stay in place when I do that. Is there any reason I shouldn't use contact adhesive to apply the soft bricks to the wall of the forge to make certain they stay there throughout the fabrication process?
-
Egg-zactly! Can't wait to get my forge up and runnin' so's I can dabble is similar activity, JHCC.
-
No doubt! I'm making a Hardy cutting chisel for my little Vulcan out of the first one I was given several weeks ago. The 5/8" shaft to fit the tiny Hardy hole conjured it's share of laughter last week at the open forge. Oh well, gotta start somewhere.

-
I was a professional furniture builder for 17 years, so I've a well appointed shop. www.chrischristenberry.com Take a look at some of the stuff I used to make. Now I'm makin' wood carving knives......and gettin' into blacksmithing.........who knew?????
-
I'm blessed with a wonderful shop, Goat Lady. 30x40, air conditioning and wood heat. furniture building section, wood carving section, reloading section, bullet casting area............and a 4x8 workbench I seldom see.
 There's a 1 1/2 car wide, 2 car long room attached where I will set up the blacksmithing stuff. It has a garage door, so that will help a lot with the heat involved. But it's also a storage area for garden tools, acetylene rig, and all sorts of other stuff I need to get to, hence the need for a portable forge.
-
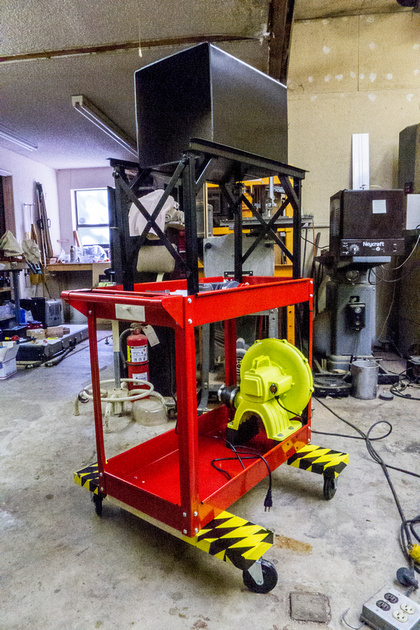
Okay, here's a quick pic. The widened stance is great! Wide angle lens makes them look like they really stick out, but they are only 8" out from the cart. I'll never have a problem turning this thing over. In fact, I had to turn it over to fasten the wiring from the fan to the switch on the underside of the cart's top tray and it was almost a comical feat!
Now it's time to start getting the pipe plumbed from the fan to the plenum.
-
Stopped by Home Depot today and asked if they had any worn out jackhammer bits..........and if so could I have one. The answer was a curt "NO.................you can't have just one. Take six and I'll let you get out the door!" Doncha jus luv a kidder?????
 Lifetime supply of Hardy material.

-
It has to be easily moveable in my situation. I just don't have the room to leave it sitting in the middle of the room. My shop is divided into multiply (hobby) sections and everything has it's place...............though sometimes equipment has to be moved out and into another hobby's space. In the case of the forge, it will be stored against the wall near an overhead door. When I want to use it, the door will be opened and the forge rolled into the opening or maybe even outside under the porch overhang. Just can't use a fixed stand.
-
I appreciate you suggestions, Frosty, but I've way too much time and energy spent on this cart to scrap it. I've got the fan mounted and the wiring channeled to the front of the cart where the switch is mounted. Holes are all drilled for the stand that extends the height of the forge. The extensions will only be 8". Even though I'm wrapping hazard tape on the extensions, I'm not too worried about it. If it's too much, a saw and relocating holes in the 2x6 can easily shorten it.
-
I think I've mentioned it before, but the narrow "footprint" of this Harbor Freight cart has me worried, especially after getting an approximate weight of this beast. The width of the footprint from center to center of the wheels is only 11 1/2". I'll have a 12" wide, 145# forge sitting about 5 1/2 feet in the air. This forge setup is going to be way too top heavy. That's just not going to be stable enough for moving around and going over thresholds of doors, etc. I'm headed to the DIY store to pick up a 2x6 to widen the stance of this cart. Think I'll feel a whole lot better. Going to wrap the extensions in hazard tape so no-one will trip over them. If this thing were going to sit in one spot and never be moved, I'd not worry about it, but I don't have the room to do that.
-
Oh, I know, Glenn and thanks for the suggestion. It's just that I've been there and done that and this time I really don't want to risk messing up my nice new forge...............if I ever get it finished.
-
I know how to crib, Glenn. Built a 30x30 barn with a doubled 2x12, 30' long ridgepole, 18' in the air by myself. Been there, done that. Just don't want to crib this forge up to eye level. I'll get a friend to help. Believe me, I "pay it forward" enough to ask a favor now and then.
-
That's a unique twist. I like'em.
-
Goat Lady, I'm a member of the Saltfork Craftsman Assoc. Good group. That's what our Thursday night group at the open forge is part of. We pound steel every Thursday. It's a long drive, but if you are ever up this way, let me know and I can give you the particulars.
-
Yup, I'm with you IFC, I've no neighbors who can help............but I do have a buddy in town who has just finished his forge and he'll help me if I need it, I'd think. Don't have any overhead lifting thingies. A small chain hoist would be nice but then I'd have to build an A-frame. If it's not one thing, it's another. Always building something or repairing something. Guess that's my lot in life.
-
Thanks, but as I said, I can lift it and if I'm worried about it, I've people nearby who can help. Besides, that would be a 2 1/2 hour drive each way for a 10 minute job.

-
Makes me want to run out and make a hinge...............and I don't even need one!
Thanks for the link, Jennifer.
-
Oh, don't worry, Goat Lady, I'll be able to lift it..........it just won't be fun putting it up on a mid-chest high perch! Just for safety sake, I'll probably get a friend to help me so I won't mess up the work I've done on the forge or my back.
We "old" guys have to take that into consideration even when our ego's won't hear of it! ")
Frosty, the pipe is 1/4".................far too thick, but it was free, and right now free sounds pretty good to my ears. Honestly, if I ever make another, I'll go to a sheet metal shop and have one bent into a box out of sheet metal. The pipe weighs 51.5#, the refractories weigh 23# and the bricks come in at a whoppin' 71#. So the total weight is 145.5#. Of course, I could lighten that a little by only casting a 1/2" of KOL, but that wouldn't save all that much weight. My only concern is the cart is pretty narrow. I'm tempted to bolt some C-channel onto the bottom like outriggers and mount the wheels further apart...............just wide enough to get through a door. I'd hate like the Devil to have this thing topple over when I'm moving it. I'd really be in trouble then!
Attaching soft firebrick
in Gas Forges
Posted
I'm planning on making a plexiglass walled box for the forum, so it will not be absorbing any of the moisture from the KOL. (I actually thought ahead for once!)