louspinuso
-
Posts
65 -
Joined
-
Last visited
Content Type
Profiles
Forums
Articles
Gallery
Downloads
Events
Everything posted by louspinuso
-
Mikey, this is the stuff they sent me and it did soak into the wool fibers though I don't know how deeply.
-
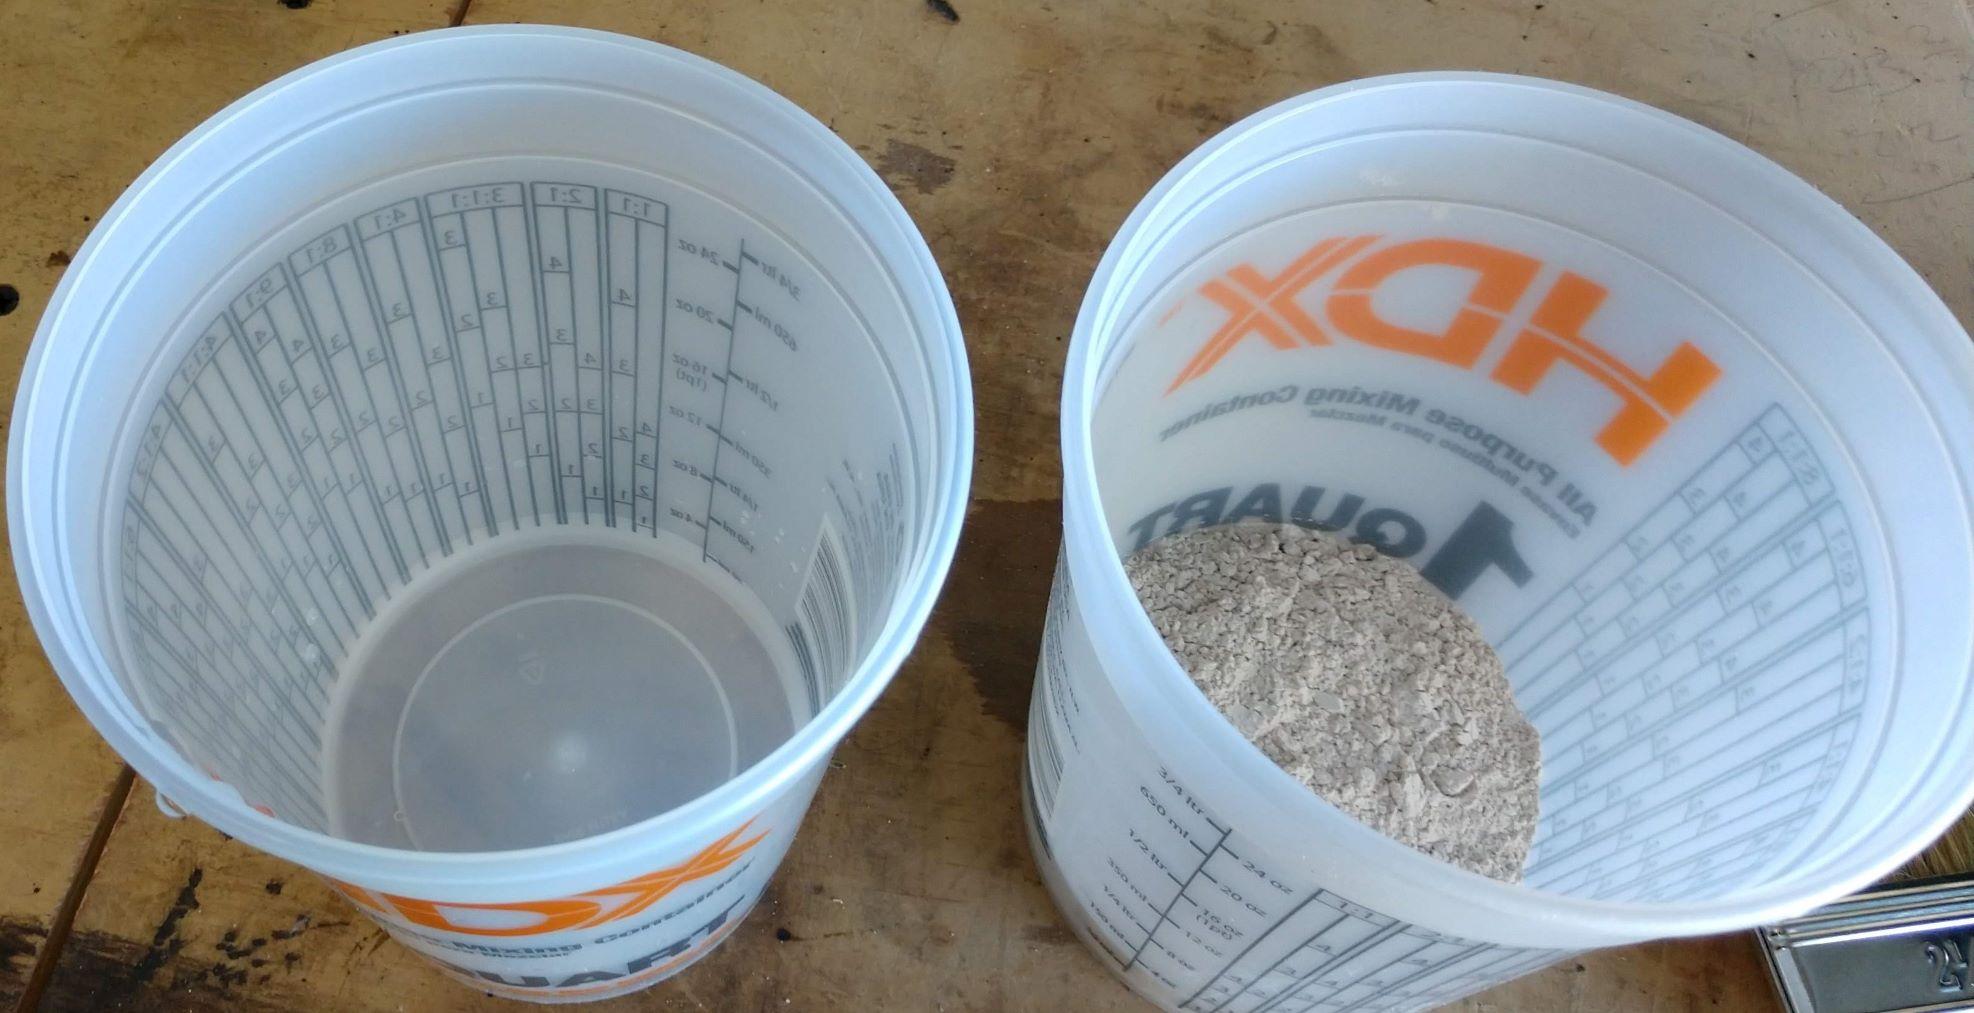
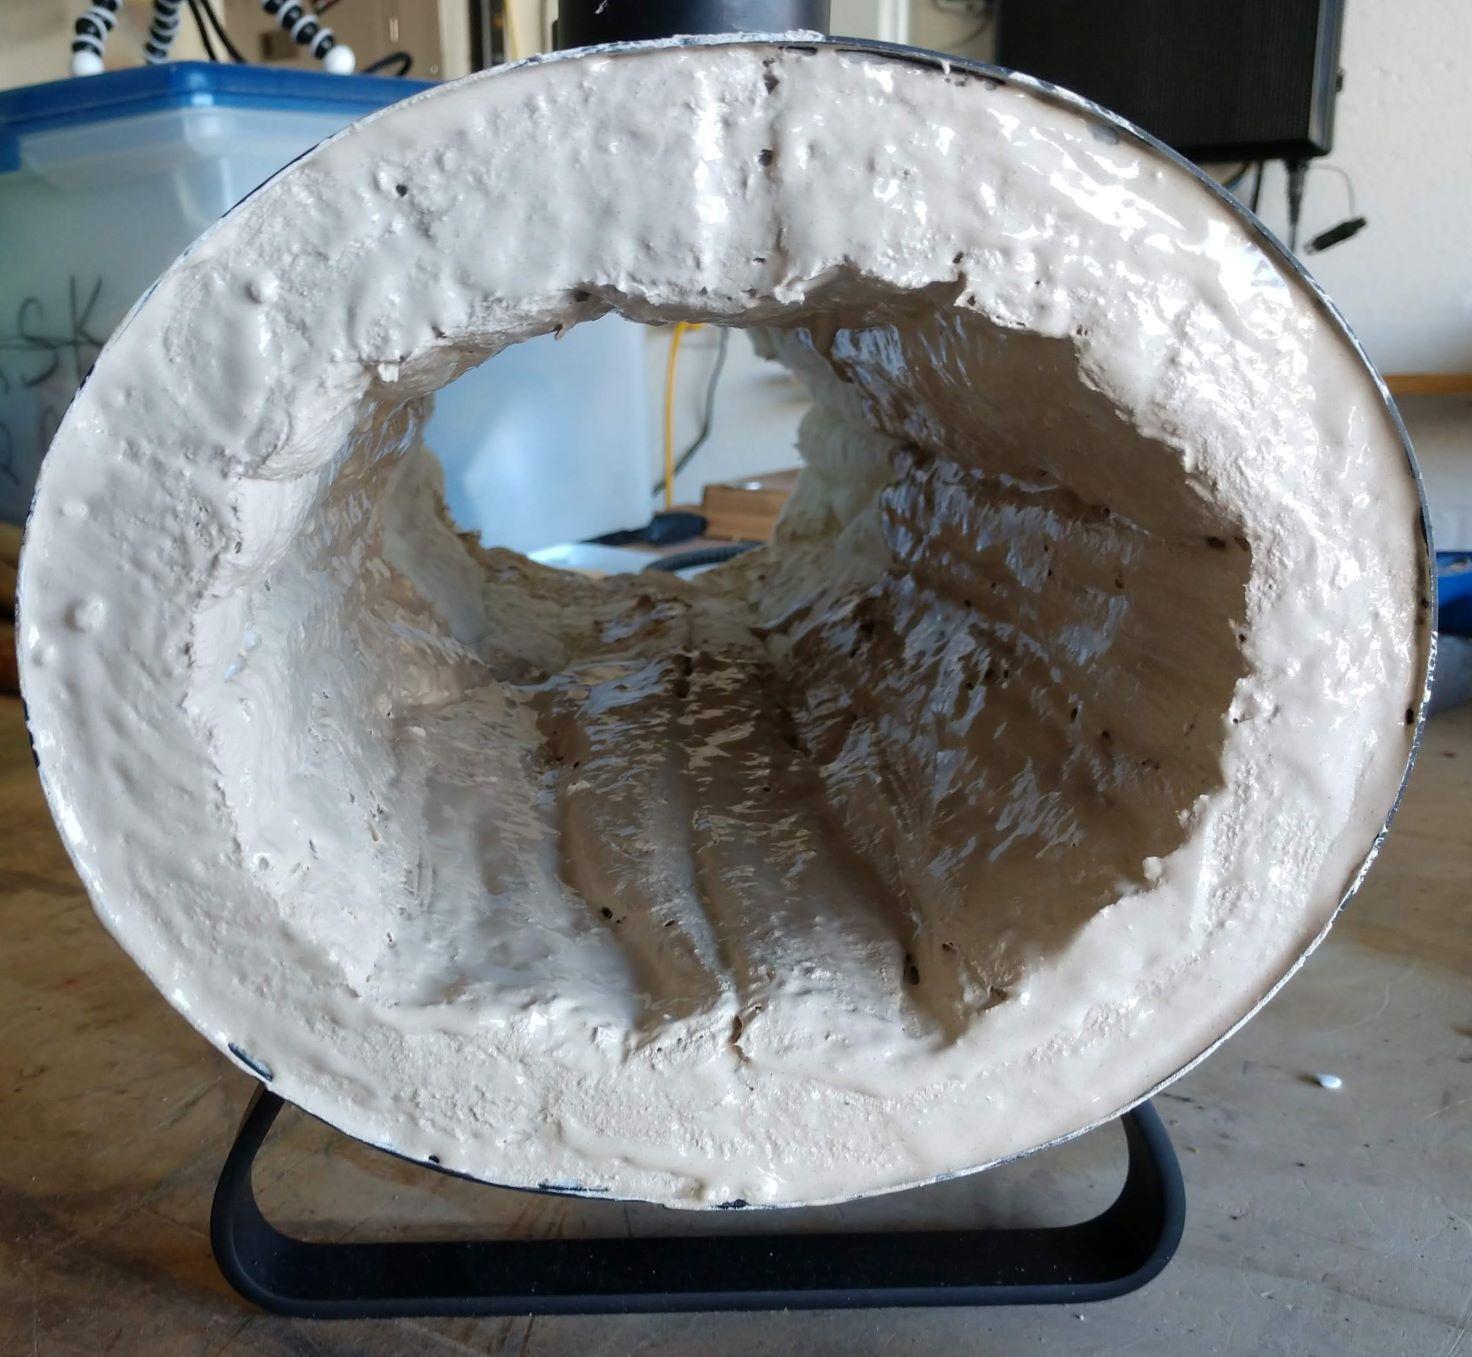
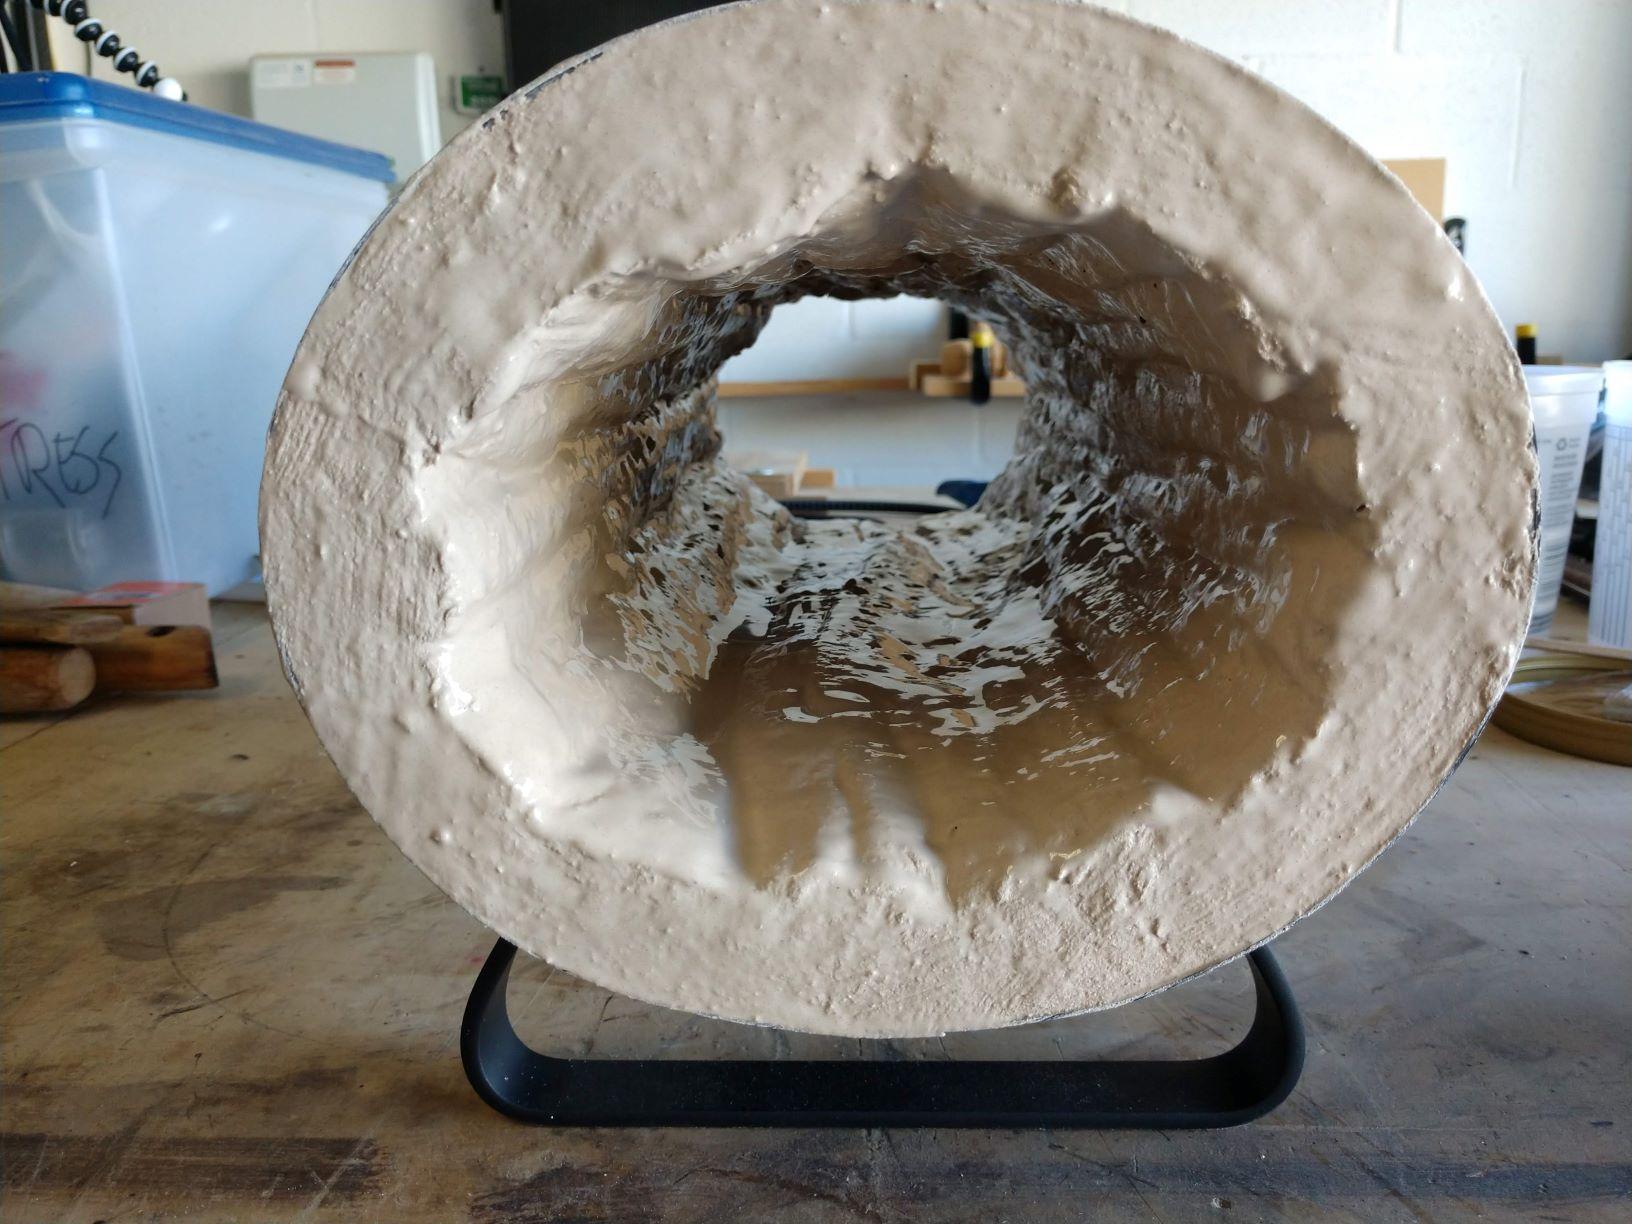
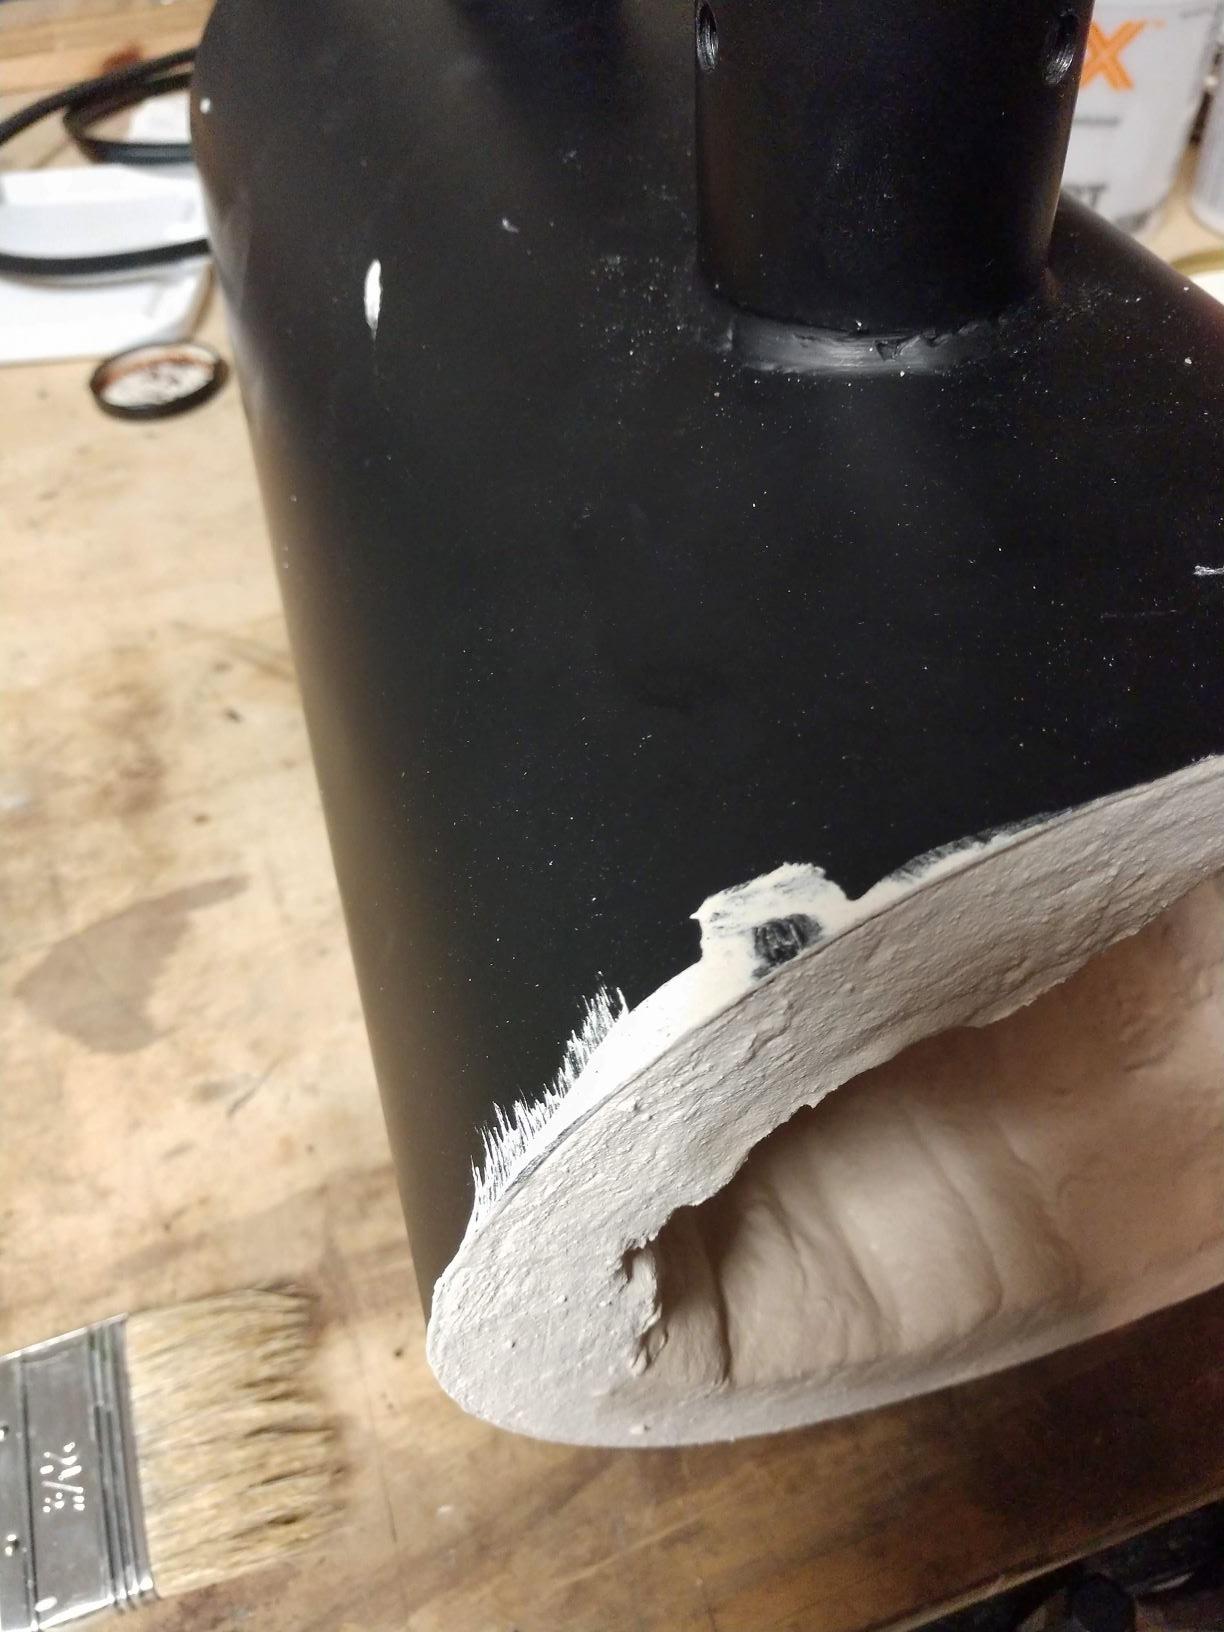
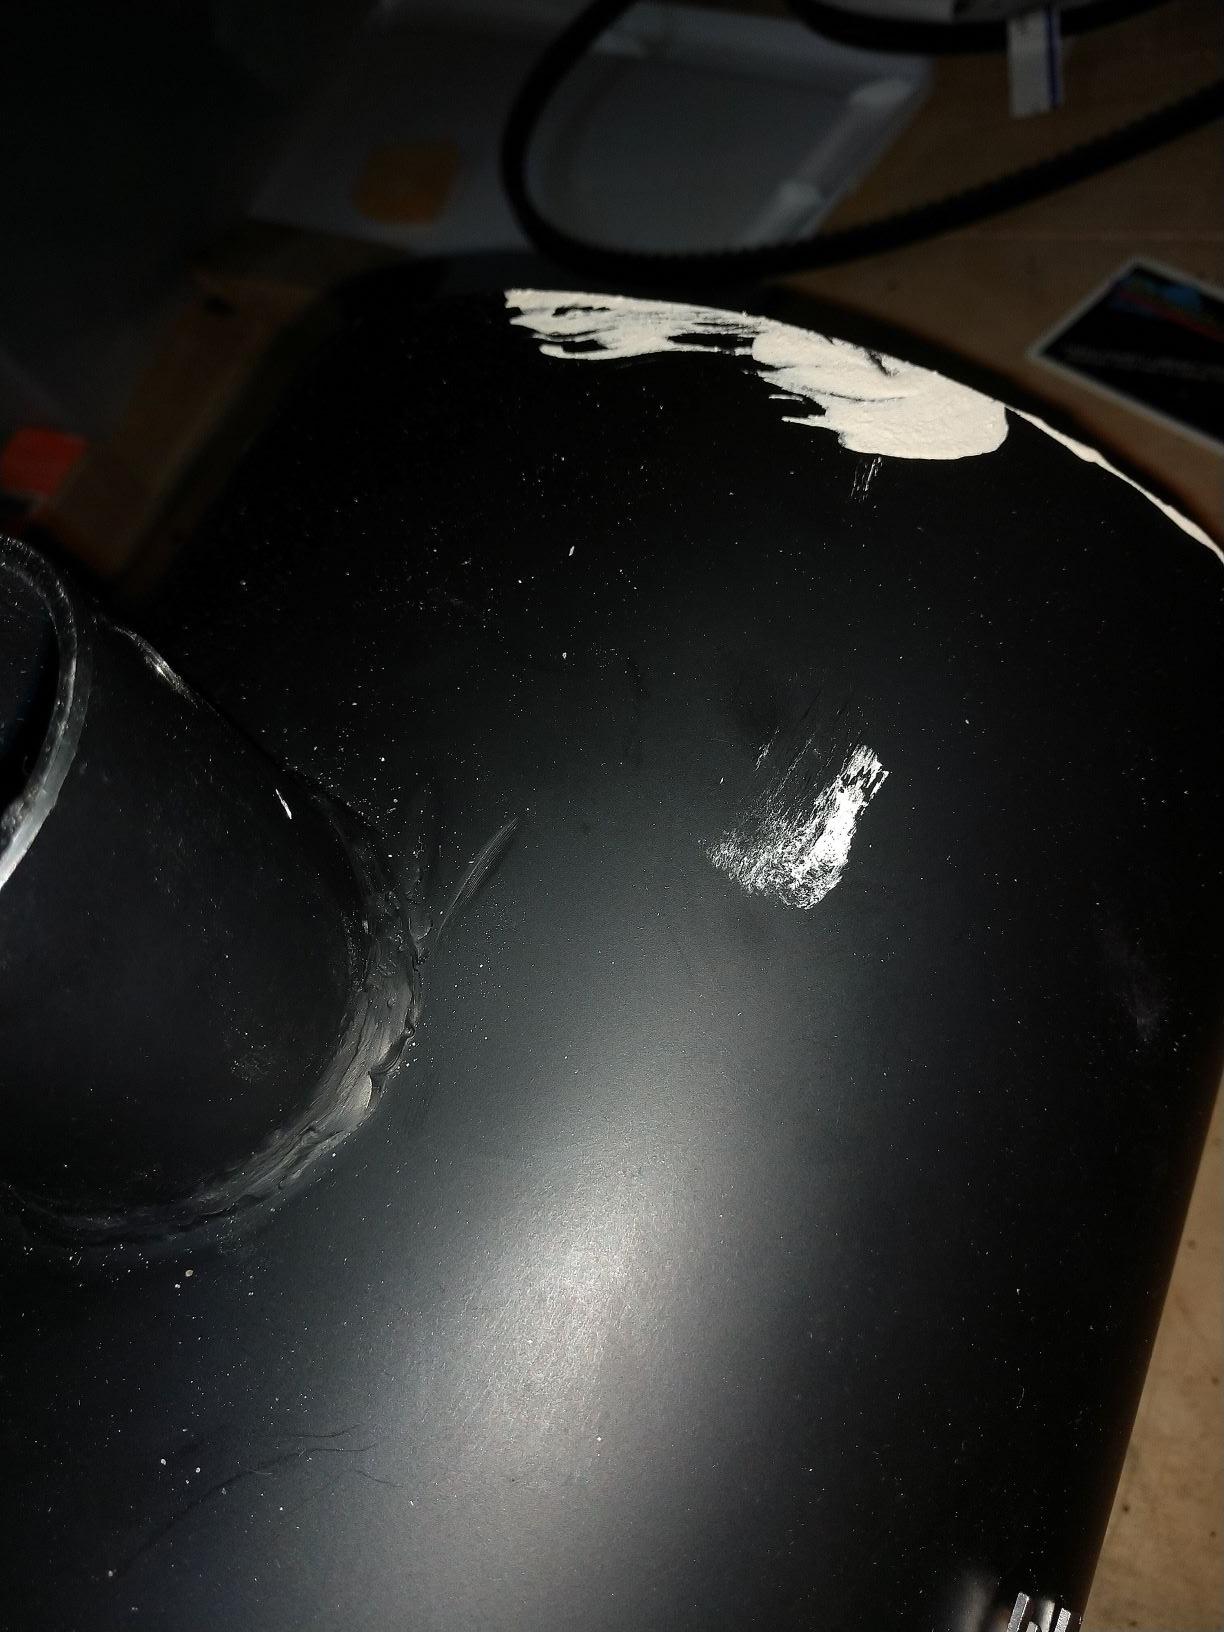
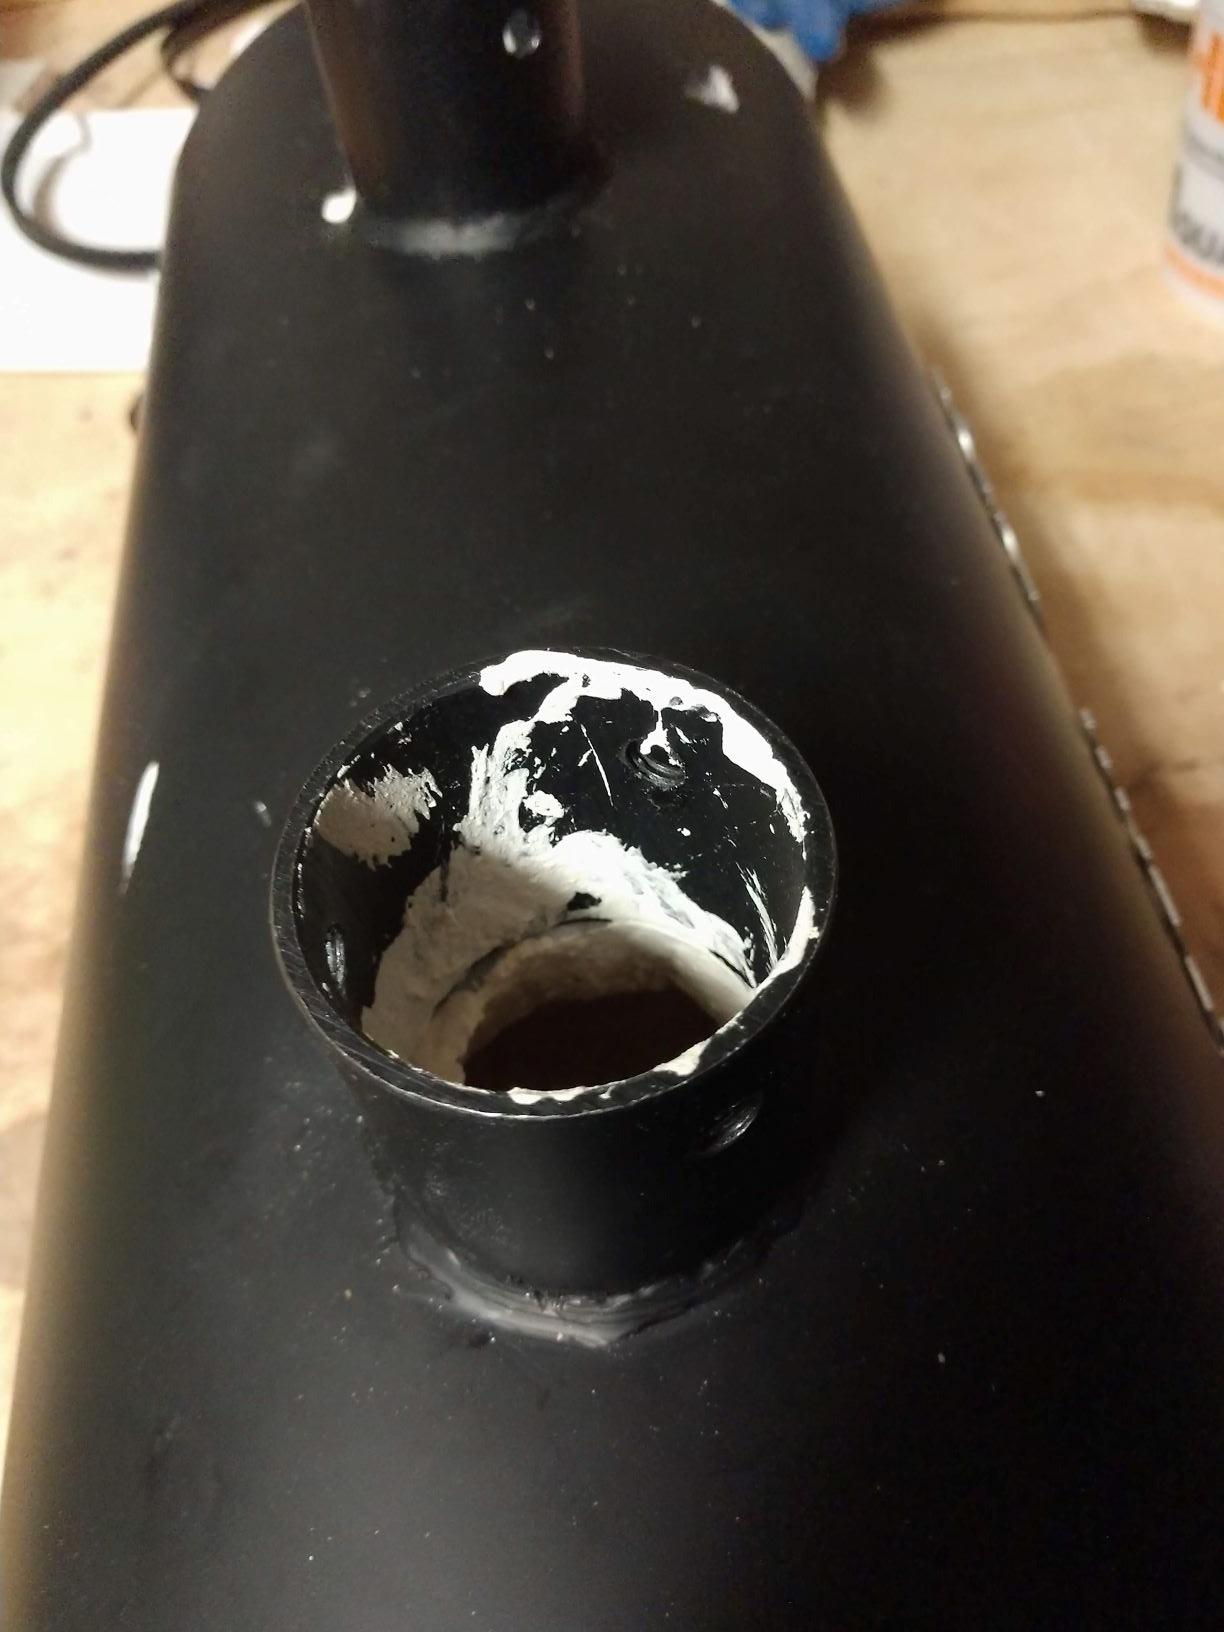
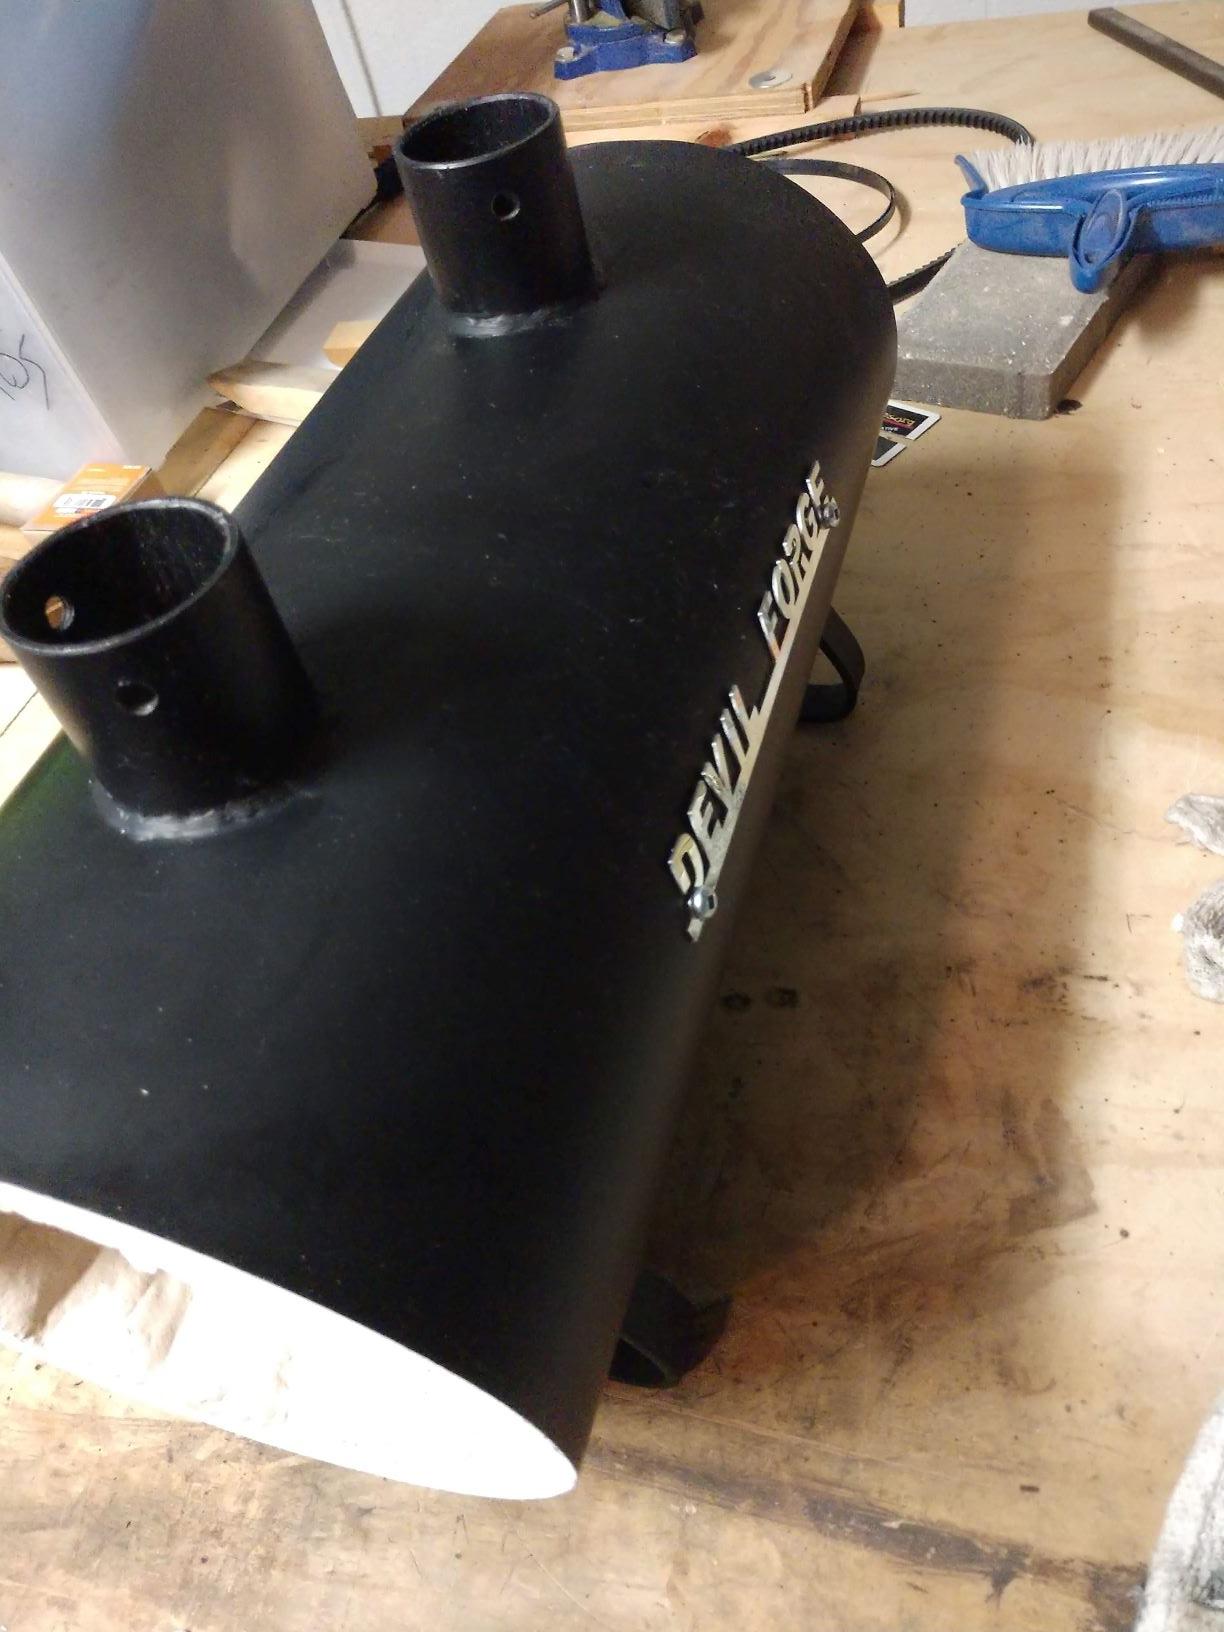
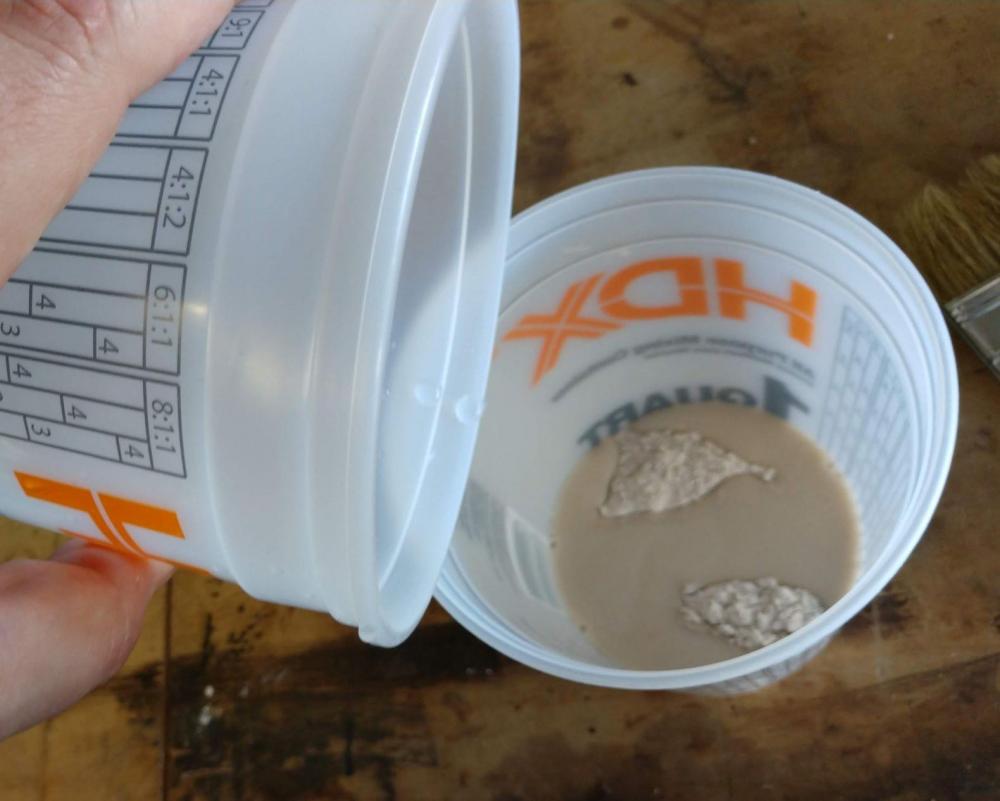
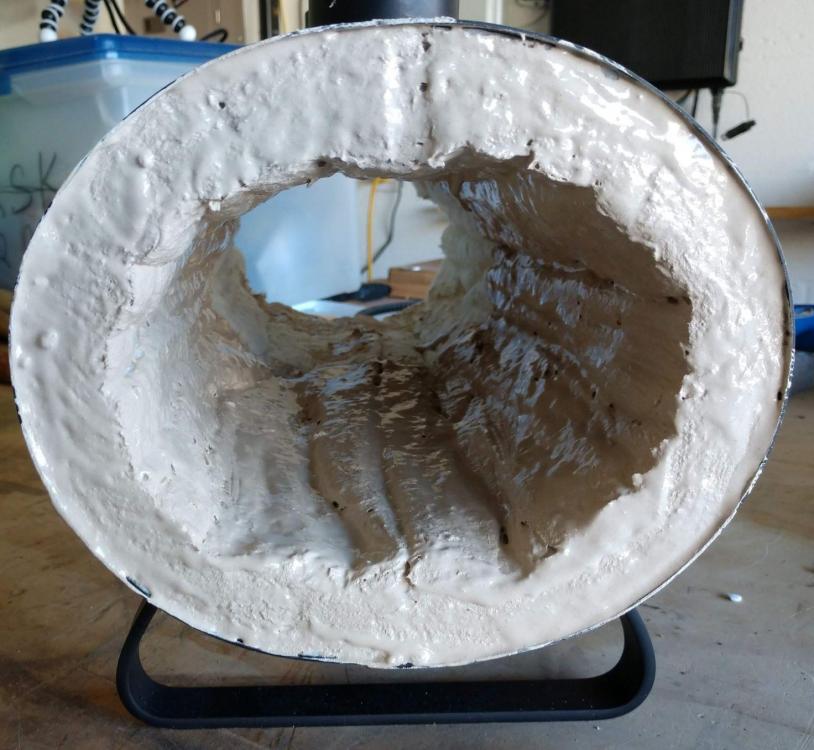
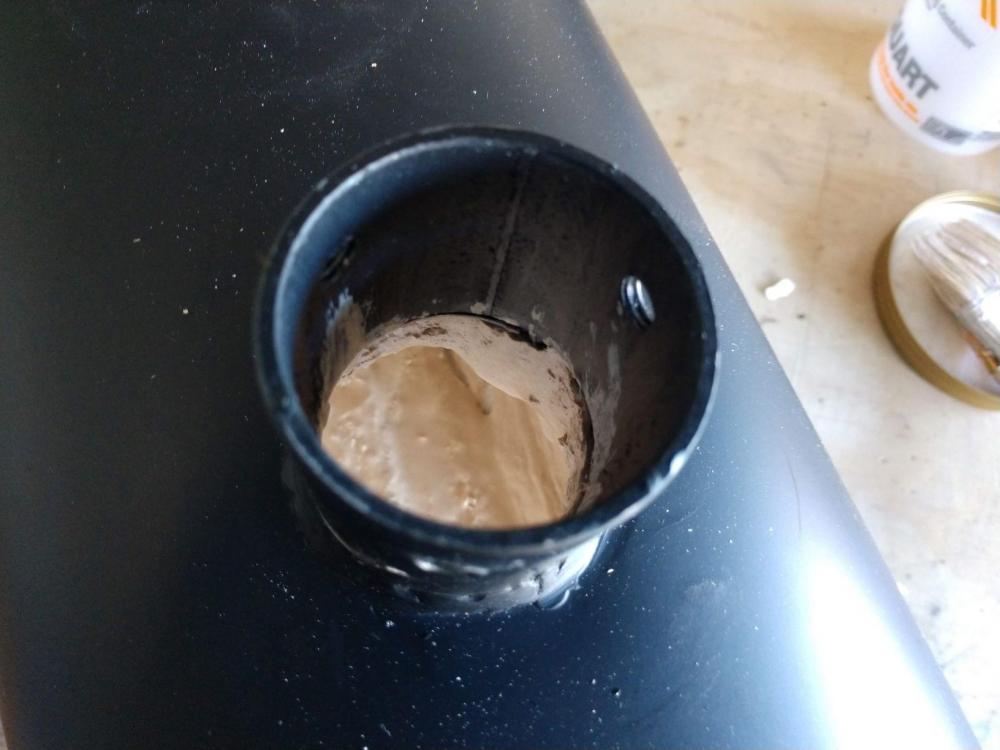
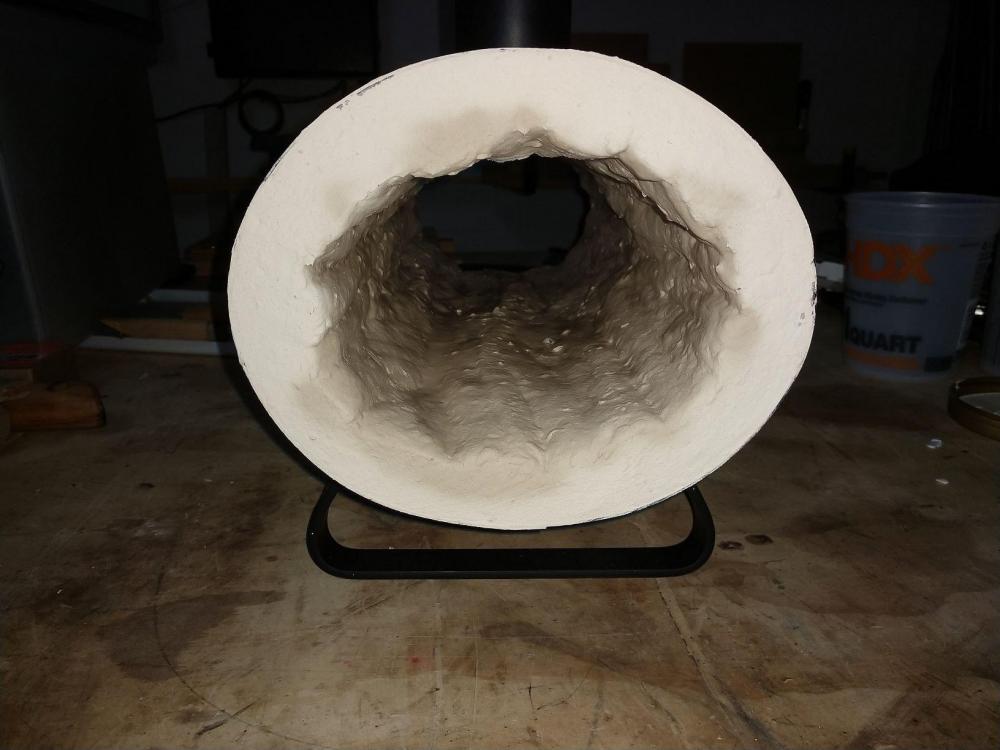
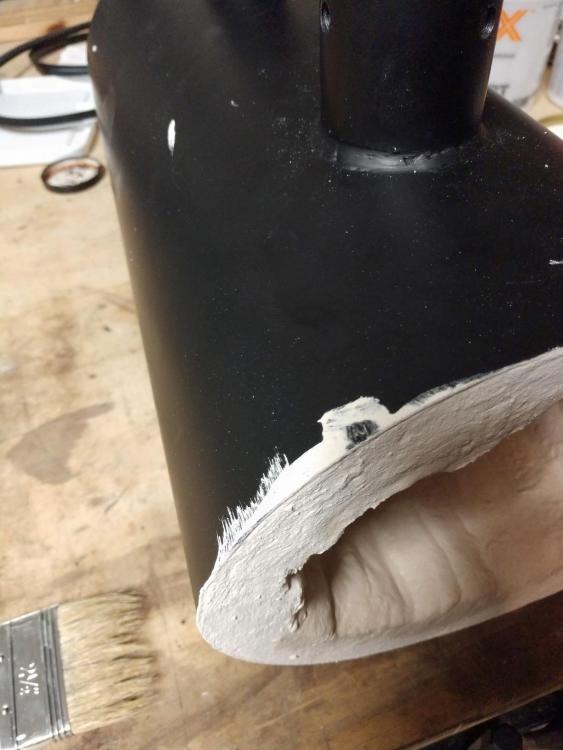
Ok, so after a long day out at a kids birthday party and visiting with a relative that is down from NY, I was finally able to get home and... wait for the baby to fall asleep (my office is right next to his and if he hears me in here before he passes out, he doesn't). Anyway, now that he's sleeping (and I've replied with what I've found about the Greenpatch 421), I figured I'd post the photos I took today. I still haven't finished processing the video so that's not ready. I need to re-narrate it as talking with a respirator on is not recommended. Anyway, let's get started. I've resized the images here to prevent it from being bandwidth heavy. Please let me know if they are still too large. I started by measuring the rigidizer that was sent to me to confirm it is, indeed, 250 gr. once I did that I decided that I'd mix it at the recommended ratio in small batches of 100gr rigidizer to 70gr w ater. I placed 100gr rigidizer in one container (measured on a scale) and 70gr water in a second container. Once I had the right amounts I poured the water into the powder and mixed. I didn't capture an image of this, however, I stirred for about 7 minutes and the consistency was about that of medium thick gravy. I then painted the inside of the forge, top and bottom, in one half (front? is there a front?)in a nice thick layer. I then applied rigidizer on the edges of the wool in the burner port. This pretty much used up the mixture so I measured out another 100gr/70gr mixture and mixed same as before. This time I turned the forge around and did the other half and the other burner port the same exact way. Any remaining mixture I went through and found places where air pockets had formed and were showing dry wool I applied to those and made sure everything was looking good. This was about 12:45pm this afternoon. At 8:41pm, this evening, you could already see the edges drying up. You could also see the mess I left on the outside of the forge body and the burner ports. Luckily, this stuff cleans up with water so I took a wet rag and wiped everything on the outside gently and washed away the rigidizer, leaving a clean looking body. That's it for now, about as far as I'm able to get tonight. I'll take progress pictures of the drying/curing process tomorrow morning and again tomorrow afternoon in the hopes that you can see how it's holding up.


-
Frosty, no offense taken. I've got thicker skin than that. Living in an area where broadband is so prevalent and easy to get makes me forget that there are still people out there on <1Mbs so I appreciate the reminder. As for shaky cam/music thing, I agree 100% with the shaky cam which is why I generally video things from a mount in one angle. If I have to move the whole camera, that move gets cut out. I remember when Blair Witch was all the rage and I just couldn't watch it without getting motion sick because of it. Now it seems every horror movie is filmed like that, I get it. As for the music thing, it's a mixed bag for me. If I'm watching a video that has a fast forwarded section that has no narration or talking during it, I like music that is quiet just playing in the background, but if the person/people are speaking, no music at all. It just detracts from trying to understand what is going on. I do understand that concrete cures as opposed to drying, but this is my first foray in refractories and it seems that many of them use vastly different instructions for how to prepare them (from letting them dry and firing to allowing to cure). I am very seriously trying to find the literature for this product but all I've found so far is the SDS and a PDS. The SDS, from their website, only has this section on "handling" 7. Handling and storage Obtain special instructions before use. Do not handle until all safety precautions have been read and understood. Keep formation of airborne dusts to a minimum. Provide appropriate exhaust ventilation at places where dust is formed. Do not breathe dust. Do not breathe dust. Avoid prolonged exposure. When using, do not eat, drink or smoke. Should be handled in closed systems, if possible. Wear appropriate personal protective equipment. Wash hands thoroughly after handling. Observe good industrial hygiene practices. Which offers little to no information. The PDS, does offer a bit more information (though maybe not as clear as I would like): Description: 3200°F, Wet, Air-Setting, Thick Patching Mortar Features: Can be used as patching material, a coating, and for bonding brick such as EMPIRE® S, CLIPPER DP®, KX-99®, KX-99®-BF, and KRUZITE®-70. Supplied as a thick patching mortar; can be field-adjusted with water as needed. Can be fired-in faster than regular high-alumina mortars. Uses: Boilers, brick plants, steel mills, asphalt plants, and iron foundries. Protective coating over ceramic fiber modules. And then later this: Mixing and Using Information Per 55 lb Pail Material is supplied ready to use and can be field-adjusted as required. Water Required—Thin Trowel Gallons Liters 0.125 0.45 Water Required—Dipping Gallons Liters 0.625 2.3 For detailed mixing and using instructions, contact your HWI representative or visit www.thinkHWI.com. Heatup/Dryout Schedule Not applicable Installation Guidelines See HWI Installation Guidelines M-1—Wet Mortars—Ready to Use. And while typing this I thought maybe just google for the document name (HWI Installation Guidelines M-1—Wet Mortars—Ready to Use) and I found this PDF which seems to have a bit more data in it on how to prepare/use the product, namely: Use Drinking water between 60 and 80 degrees F if required. There is no cure or set time needed for this product A weep hole should be used (guess I'll be drilling one before applying) to allow moisture to escape to prevent spalling or probably lining damage dryout and heatup are governed by brick requirements, typically 100F per hour (indicating that maybe once it's cured it doesn't require heatup) So based on this, I think my next steps are: Wait for rigidizer to dry completely Drill a couple of weep holes in the bottom of the forge body Apply Greenpatch to the lining in the forge Cover all the ports with wet towels Wait for the Greenpatch to cure (even though the directions specify that there is no cure or set time needed) I'd rather let it go slow to avoid rapid shrinkage and cracking install burners and fire Looks like I've got some work ahead of me for the next couple of weeks.
-
Mikey, since I have a forge that is open on both ends, I should probably cover the ends with a damp towel also. Or do you recommend something sturdier? I just rigidized and took a tone of pictures and video. I'm just going to go through the process of cleaning up the pictures and video so that they actual give actual information (instead of just distracting background noise). I'll probably be posting those tonight as I need to get ready to go to a kids b-day party this afternoon. Tomorrow afternoon I'll also post an update on how dry the rigidizer is (I've read it should only take 24 hours to dry and the humidity is pretty low for FL right now, only 55%, lol), I suspect it will be Tuesday night before everything is dry enough to put the refractory lining on. Frosty, thanks for the encouragement and information. I certainly wouldn't want to damage the wool/liner and breathe in any of that nastiness. Another thing I'm going to do, though I'll keep that separate and possibly not even post a thread here at all unless people are interested, is rigidize my cousins wool in his devil forge. He purchased his before they sent rigidizer and I've been told by the ceramics place I picked up the "Greenpatch 421" that it can be used, when watered down, to rigidize wool, and then, once dry, apply as a refractory lining. Since his wool is a little beat up, I'm not sure how well it will work, so if it's really horrible, I'm just going to order him some new Kaowool and do it from scratch. One final question, in general how hot will the outside of the forge get, specifically the metal housing? I'm only asking because I think I'd like to paint the outside with some high heat paint, if possible, so it's not just a boring flat black. Obviously that's not necessary, but I think it would be nice to give it a little bit of flare. Thanks again everybody.
-
Frosty, how about I film it and post it to YouTube so that people interested in watching it happen can. And I'll also take pictures from time to time through the process and post those directly to the thread? The YouTube link shouldn't waste much in the way of bandwidth as the browser should not load the video from another site, though the forum software may load the preview image for the video. Eventlessbox, I'll take measurements with my calipers and post them. I'll give you the various ID's and OD's for the everything I can get at. Mikey, If I understand you correctly, you're saying I could use flat washers instead of stuffing that wool in place. Would the washer need to be welded down? or can I just place it there so it basically covers everything, but isn't actually fastened? I'll take pictures tomorrow to clarify. Thanks all for the feedback!
-
MaxwellB, thanks for the info. I was wondering about that and whether those gaps actually needed to be sealed with the wool. My thoughts were more along the line of, if I do put that wool in those gaps, do I need to rigidize that also? And if I rigidize it, do I also need to seal it with refractory? I was going to rigidize last night, but my brother and his wife came by and we were hanging out till about midnight at which time I didn't want to narrate what I was doing while possibly slurring (I shounded totatatally fiiiiine to myshelf). Hoping that tonight I'll be able to put the rugrat to bed early and work on it, but I doubt it as my wife has made plans for dinner at my brother's house.... So Sunday? At least I'm not working on Monday due to presidents day so I should be able to get some stuff done by then. Hopefully. Lol
-
Excellent, I'll keep this in mind. I'll be working on this over the weekend. If the temperature holds out overnight (Florida weather can be so nice in February), I'll put the rigidizer on in my garage later and then let it dry overnight. I'll fire it up on Saturday morning to make sure it's hardened and then Saturday night I'll "butter" and apply the greenpatch (and then start the thermal dryout in the oven). I'll probably film *most* of this and put out another video including your suggestion to drill out a small hole. Once again, thank you.
-
Thank you Mikey. When you say a seal coat, do you mean something like this? This is something that I can pickup locally and the description says, under "Used as surface coatings" section, "Greenpatch can be diluted with water and "painted" on, or applied in layers from 1/8" to 2" thick. Thermal dryout may begin immediately. A maximum heatup rate of 100°F (55°C) per hour is preferred." Not sure how I'd accurately heat it at 100F/hour, maybe stick the whole thing in my oven? I think the lowest my oven gets, however, is 175F. Thoughts?
-
So as I mentioned in my introduction, I purchased a Devil Forge DFSW2 forge. I've seen mixed reviews about them online, however, I've also had the opportunity to use one that I borrowed and it seems to work really well (to a newb like me). This, along with the fear of building a burner poorly, led me to find one on Ebay for $179 shipped. A lot of what people were complaining about in the older versions of this forge was that the regulator is for European propane tanks and that the wool needs to be encapsulated. Well, the forge now comes with the EU -> US propane adapter and 250 grams of rigidizer that you have to mix (10:7) with water and paint on to the ceramic wool. The only thing I'm not clear on is if it's still required to have yet another coating over the rigidizer (I've heard mixed answers). Anyway, I figured I'd do an unboxing video of the forge to show what comes in the box and how it's packaged. I'll probably do a video when I have some time (probably this weekend) to paint on the rigidizer. Sorry for the quality, my camcorder was set to the wrong setting. Let me know what you think.
-
yeah, I am just hoping to support local businesses if I can. I mean, I have Amazon prime and I do use it for plenty of other things, but I just feel that the relationship you get from a local hardware guy is worth the extra couple bucks vs ordering the part online and hoping you got the right piece. Small electronic components, however, I almost exclusively order online as I don't have a microcenter, fry's or other electronics center within reasonable driving distance (driving to Atlanta for $30 in random parts is not reasonable).
-
Eventlessbox, The highest PSI regulator I see at TSC (on website) is up to 20PSI (from Mr. Heater). Maybe I'll run in on my way home later and see what they have in stock. I also called my local LP supplier and they told me that they don't sell parts to the public, but I did find another one, not too far, that want's $85 for a 0 - 50 PSI. Seems a bit steep to me. Maybe I'll check Rural King this weekend and see if they have anything there. Lou
-
Thanks Frosty, I'll check them out. Eventlessbox, the company I found that sells firebricks and refractory material is called Highwater Clays and they are right of I-275 in Pinellas Park. Hard firebricks are $4 each but drop to $3 if you buy 25 or more (19 is the point where buying 25 mashed sense). That link should put you on the right page. Is call before going to make sure they have what you need in stock as their main location is in Asheville, NC but they can get stuff in in pretty short order. Good to see I'm not the only newb on this coast. Lou
-
Thanks Frosty. I may have not been clear on the firebricks. I HAVE found a reliable source now (same place that has the ceramic blanket). The bricks I made were a project I bought the materials for over the last few years and decided I was just going to test the recipe to see how crap they are (I don't expect them to last the night in the firepit when firing ) As for weed burners (yes we have weeds) all the ones I've found info for don't specify the rating of the attached regulator so I've been leery of going that route. I can order a regulator online (and will if this one doesn't workout) and I do have a propane shop down the street from me (that closes 30 minutes before I get off work and opens 30 minutes after I leave to go to work), I'll try to get to them on a "late morning" and see what they have. Thanks for the encouragement. I know that nothing comes without practice and that's why I'm not jumping right into anything complicated. I'll let you all know how the forge works out for me and what steps I take to improve it as necessary. This seems like a really great community and I'm happy to have found it. Lou
-
Thank you. Yes I have. I've been a member of many forums over the years and it still surprises me that some of the basic etiquette needs to be explained to people constantly.
-
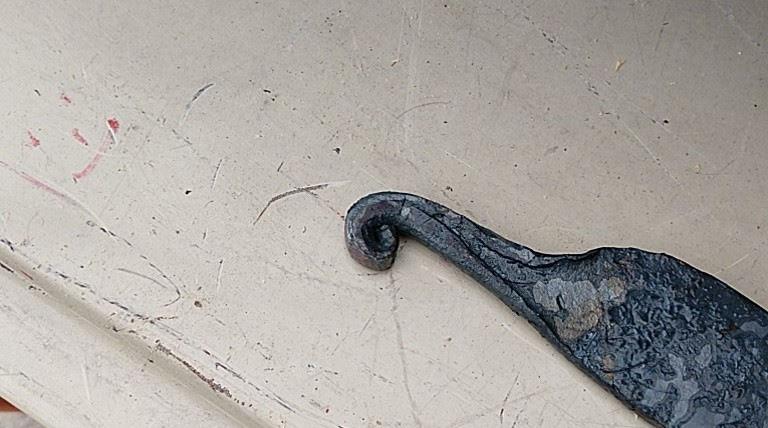
Hi all, my name is Lou and I'm just north of Tampa, FL (it should be in my profile, I'll try to fix it if it doesn't show up). I am a complete newb. I've spent the last few years reading and researching what I need before I start (I sometimes find myself spending more time learning a hobby than actually doing it) and I'm now ready(ish). I know how people feel about railroad tracks for anvils, but it's about the best thing I've got at the moment to beat on. I'm currently reading the "Gas Burners for forges, funaces and kilns" and also the burners 101 sticky. I went and borrowed my cousins forge (it's an older devil forge ebay special). Anyway, with that I beat on some low carbon welding steel (home depot stuff) that I had laying around in the garage and decided I was all ready to make my own forge (and burner) as I finally found a reliable source of TAOwool nearby (for reasonable money too). I started looking at making burners (which is when I started reading the material previously listed) and found that the cost for 2 burners, the high pressure valve, hoses, wool, rigidizer, and firebricks for the floor was going to put me at about $200. That added to the trepidation of making a burner that I was not familiar with how it should work led me to looking for premade burners on ebay, where I found... A devils forge DFSW2. Now I know that people have mixed feelings about this forge, mostly for the dollars to value point, but I've read that the burners are at least solid and this forge now comes with the CGA-510 propane adapter AND rigidizer the wool AND fire brick for the floor for and the whole package is $179 including free shipping. I figure at that price, it will at least be a good starting point and when I build my own burners, I'll know how they should behave. Anyway. I'm starting out slow, just practicing my hammer strikes and trying to make sure I'm consistently hitting where I'm aiming and would like to eventually make some decorative iron. I figure I'll eventually also make some knives, but I don't see that as the primary use of my forge time. I've included some pictures of me "trying" to upset some steel and then roll it on itself. That flat stock is about 1.25" wide and that was with about 25 minutes worth of work. Yes I see I folder over the edges and this is why I need more practice, but I'm here to learn. As for the "bricks" on the side of that forge, those are a test that I'm not quite complete with. I *was* trying to make fire bricks with fireclay, sand and perlite. I have those there drying and now that they're dry I'll need to fire them in a fire pit and hope they cure as I expect them too. This project was started, as I said above, years ago when I couldn't find a local source for firebricks or refractory materials. That is no longer the case, but I feel like I should at least see if this will work.