

Daguy
-
Posts
87 -
Joined
-
Last visited
Content Type
Profiles
Forums
Articles
Gallery
Downloads
Events
Posts posted by Daguy
-
-
Well my crayon project is going mostly well. I have some VERY positive things to report, but I'll probably be recasting.
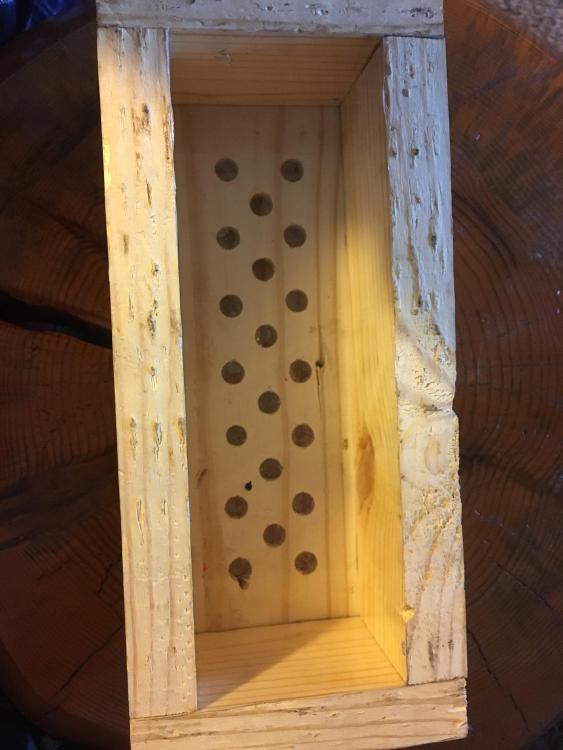
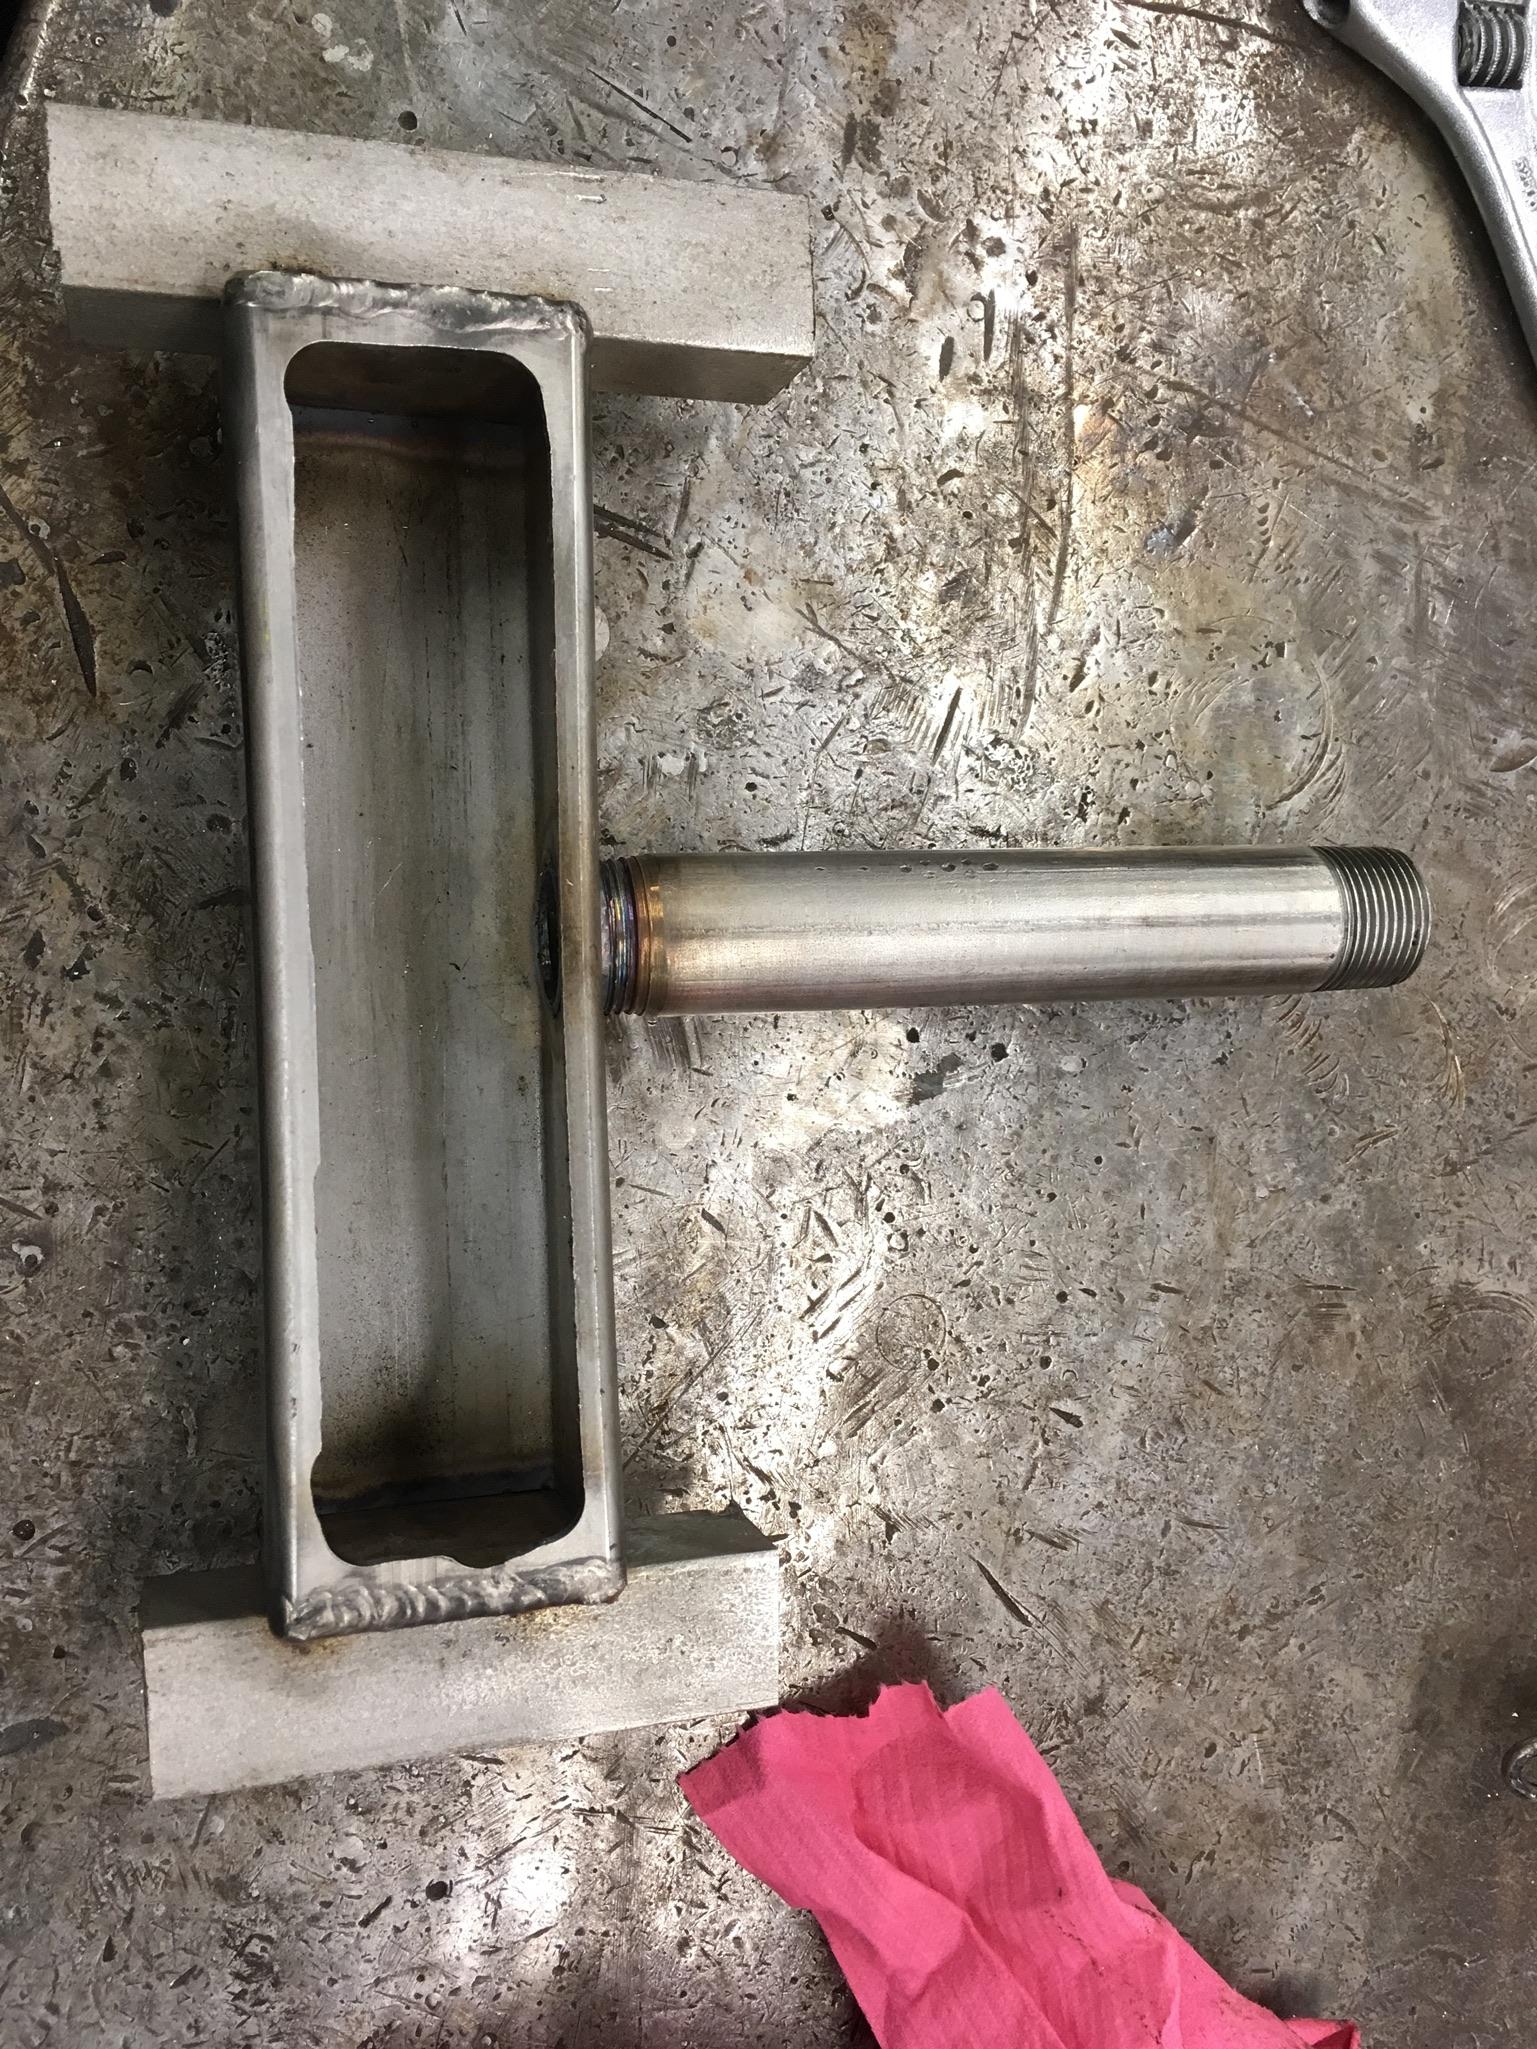
I used a 2 X 2 stainless square tube for the Ribbon burner with dimensions per Frosty's OP. After casting, I found that the refractory rattled a bit on the mix chamber, and leaked. The leak could no doubt be fixed with high temp caulk available online, but I'd rather have a tight fit, so I think I'll bust off the casting, weld on some expanded metal to reach deeeper in to the casting, and recast. Also, I made the mistake of trying to drill out the crayons after only letting it cure for 24 hours, with the result that I broke one corner off halfway up the port. IMPORTANT WARNING: if you're making a ribbon burner, melt out the crayons, don't drill them.
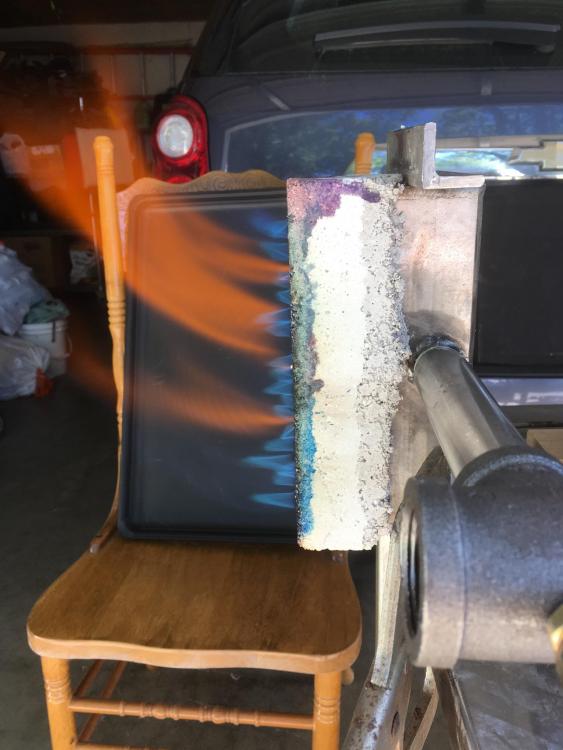
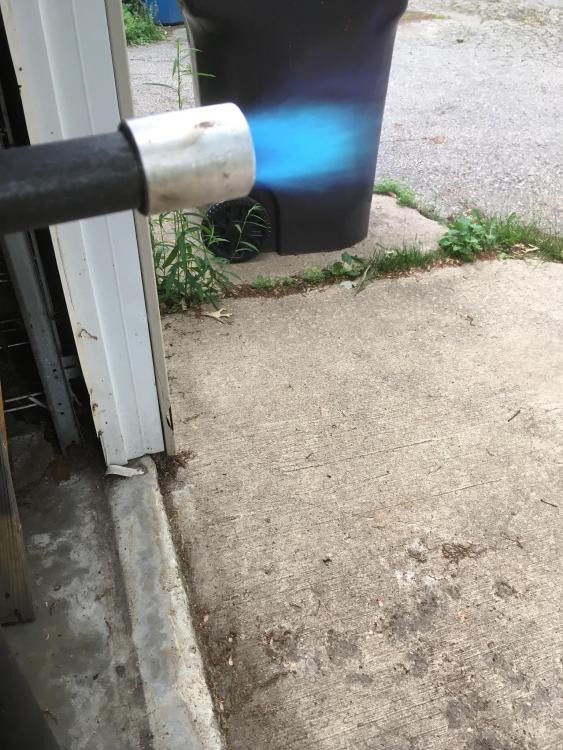
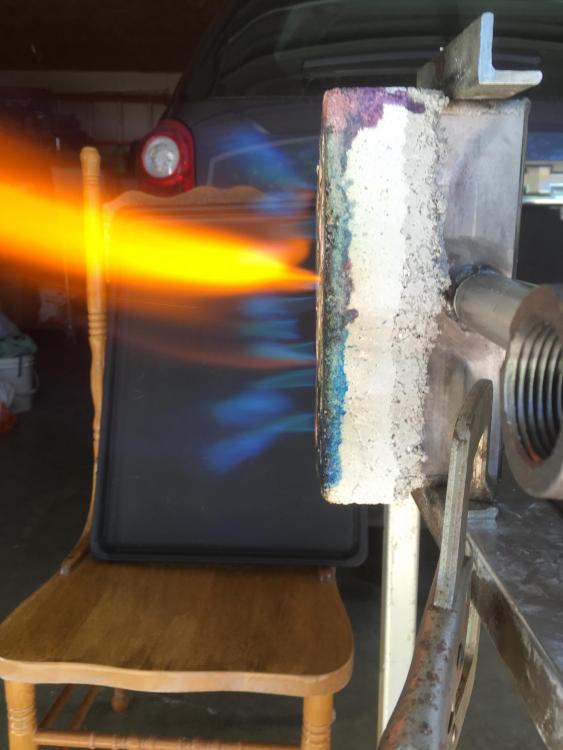
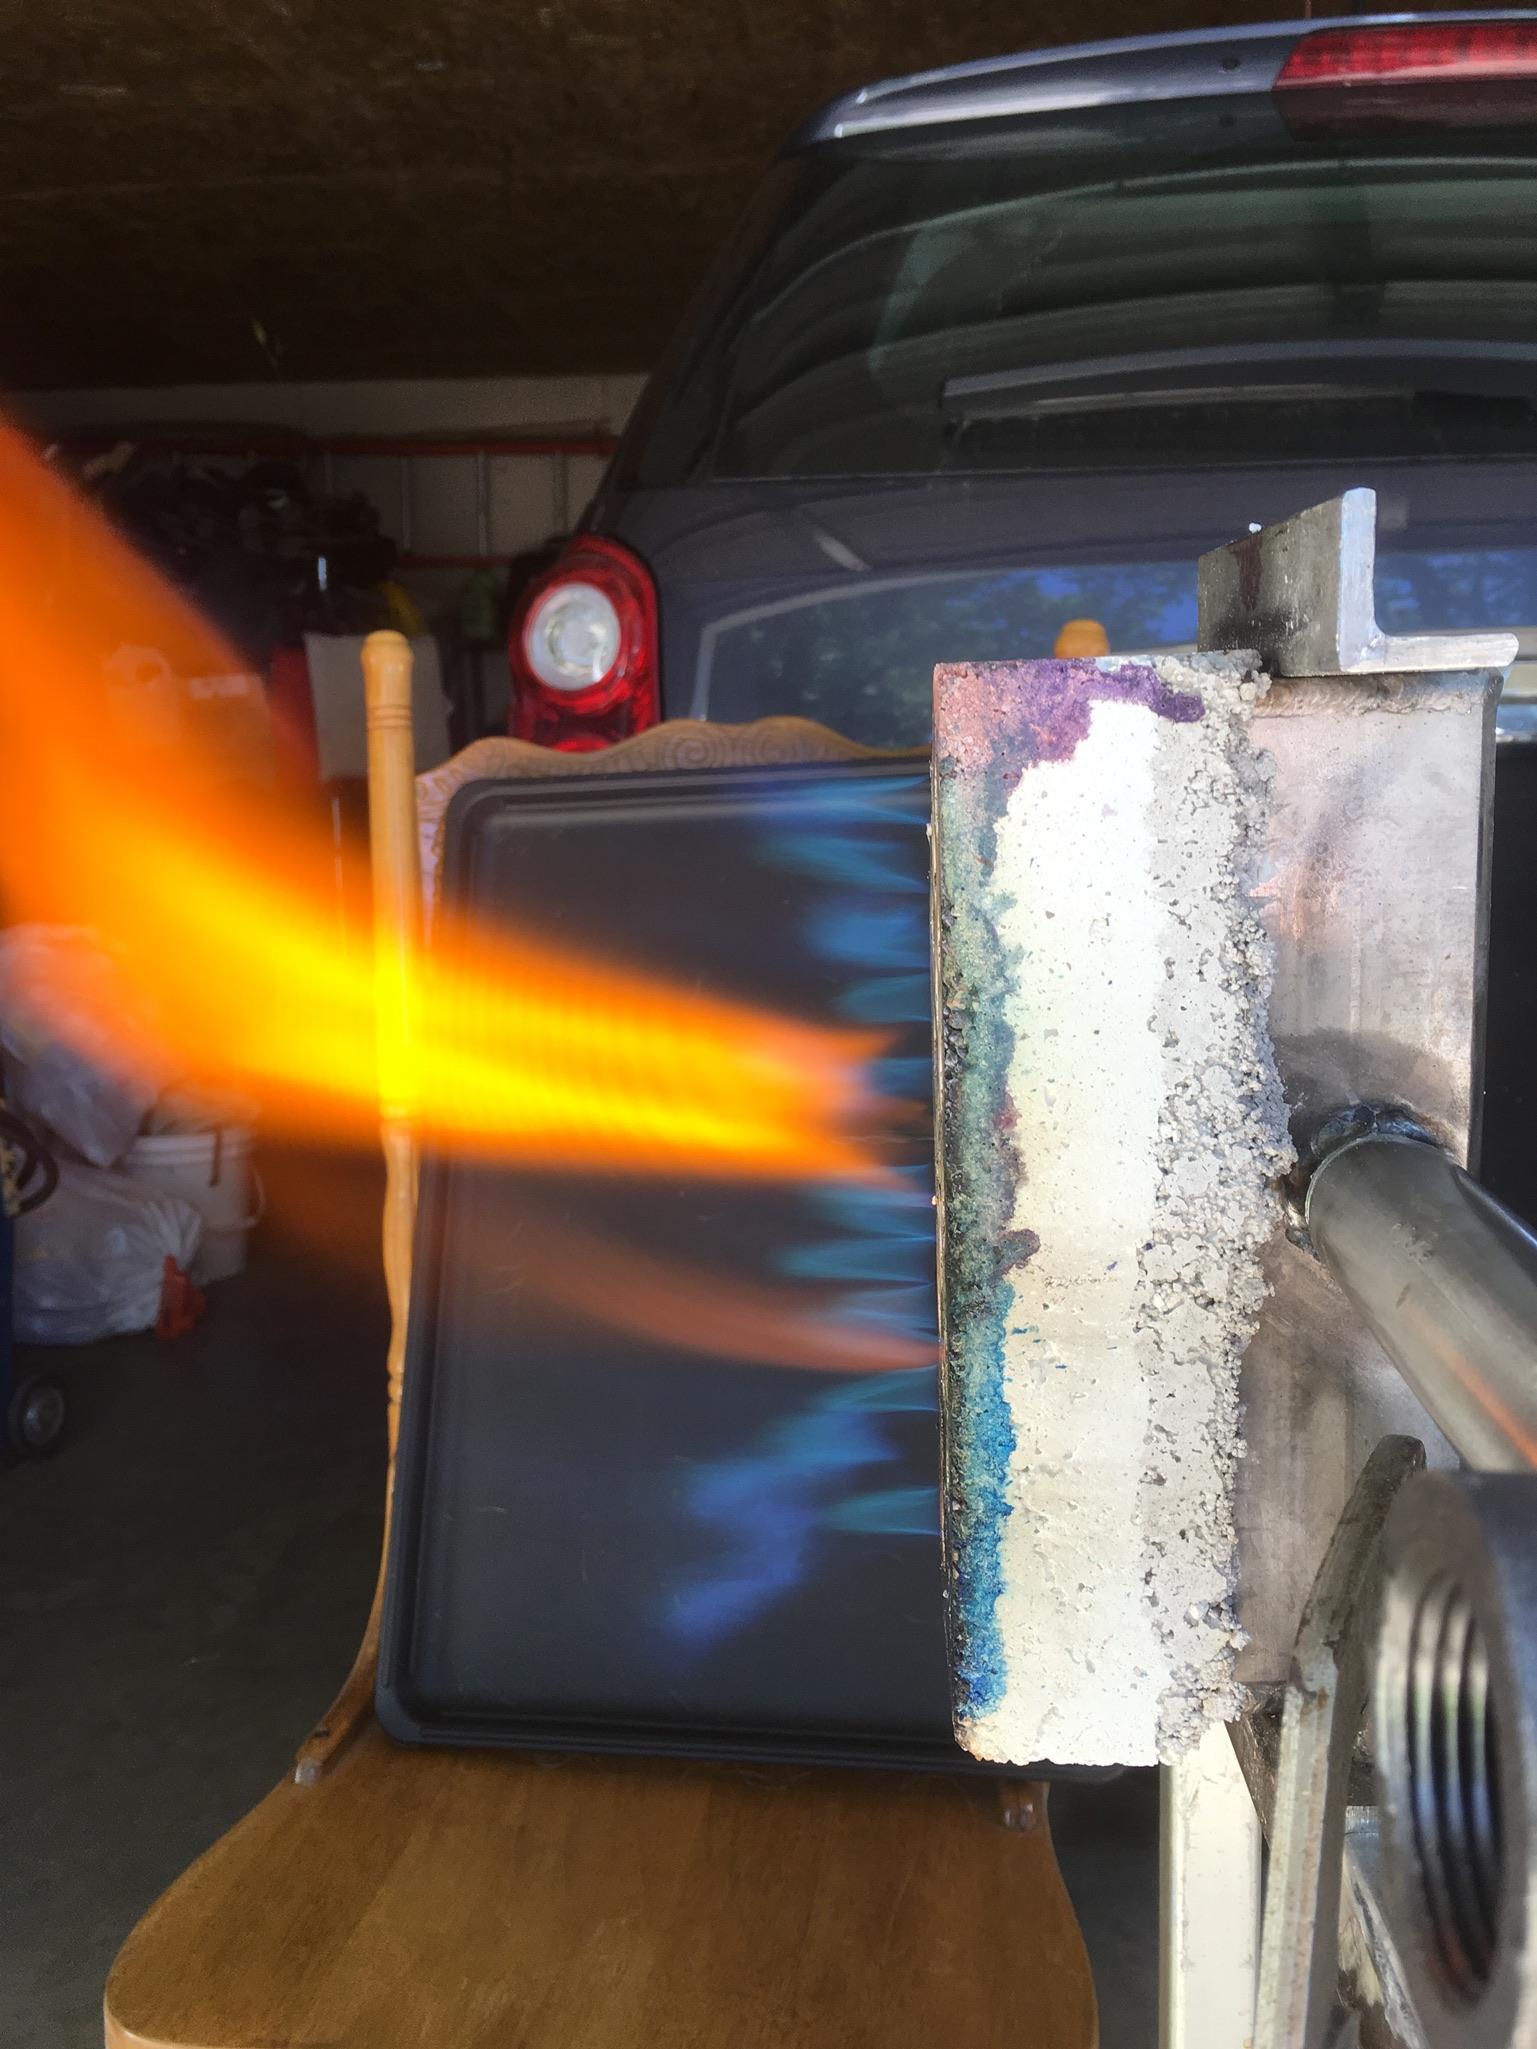
I cast with 20 holes, 3 rows of 7, 6, 7 with the port pattern 7" X 1-3/4". I tuned the tee burner before I had anything else made, with no back pressure of any kind (Just a thread protector in open air) and was wondering if I needed to go to school or something. I could hardly get it to stay lit. I got it to run as smooth as posssible that way, and when I finally threaded onto the ribbon burner, OMG! As long as I let it run long enough to heat up the face of the RB, It ran strong from 1 to 22 PSI. Now I can build the forge and have the burner for curing the layers. I'm pretty excited to see how it turns out.
Kudos to Frosty for all his work on they NARB and thanks.
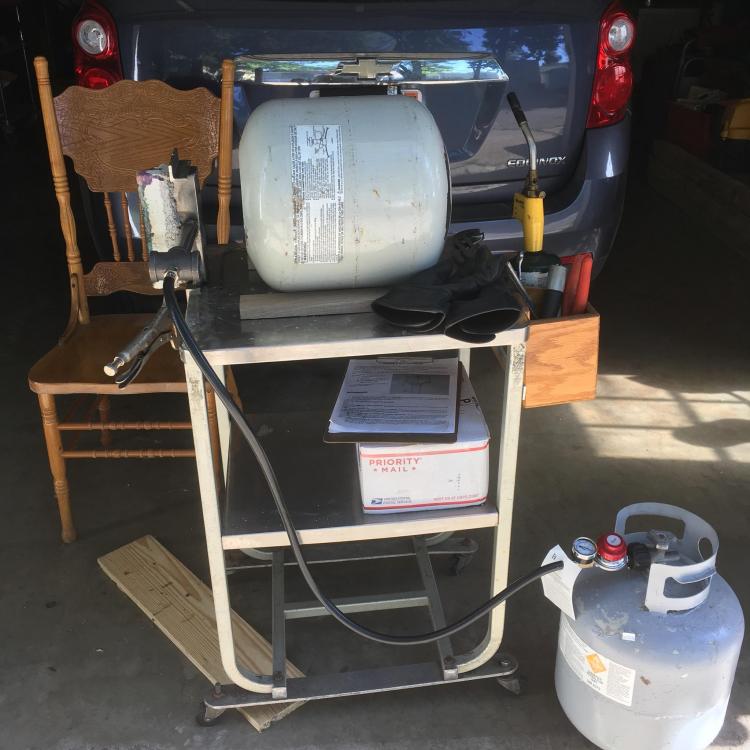
Photos:
The flame photos are at 1, 10, and 22 PSI, with the orange flames from residual wax and paper burnouts. When it's in the forge and has some back pressure, it should reach forging temps easily.
It will be mounted on a $20.00 wheeled stainless cart from a local online auction.
I made the mold from pine, used packing tape on the interior before assembling, and then covered with Crisco as a release agent , and it came off like a dream. Definitely recommend this method.
Using a 12" round Propane Grill sized tank as a housing, and the burner looks like it is very appropriately sized.. More as it comes together.
Daguy


-
I'm just glad there's a group of such understanding guys out there who will let me crayon their shoulders about it.
Daguy
31 minutes ago, Frosty said:I'm wondering that too John. I hope he didn't wax pugnacious and just bulled ahead with the project.
Frosty The Lucky.
I kept working at the project doggedly.
-
So my wife came out to the garage today and asked me how my "Crayon Project" was going.
I get no respect.

-
I'm in agreement with Frosty et al. I'm a Machine Maintenance Mechanic professionally. Read that as "Jack of All Trades, Master of None". For guys at our levels of, for want of a better turn of phrase, "The Art", we are more interested in results than in formulae. The Formulae on these matters help us determine a direction, but just as with Frosty's NARB (or whatever we end up calling it), experimentation ultimately gets us there. If we're not willing to put the time, money, effort, and thought into finding out, we weren't THAT curious in the first place. Sometimes we talk technical, sometimes we talk expirimentation.
Kudos to the thinkers here. Kudos to the grunts. I for one am so happy thatI have found a community with both, and each respects the other. What it all comes down to is that there really is no GOOD industrialy produced, out-of-the-box forge out there. But, Man, what a treasure that there's a place to find simple instructions on how to build an exceptional forge / burner combo for less money than those commercially available.
Thank you all for being here and being willing to FREELY share your knowledge/experience.
Daguy
-
Thanks for the input. I'll be sure to report the results, though it may be a couple of weeks. My Mother-in-Law just had hip replacement surgery and my wife and I are primary caretakers, so the forge build has to be put on a short pause.
-
2 hours ago, Mikey98118 said:
#80 will probably work okay; it should only need to remain in solution long enough to be spritzed onto the blanket; fumed silica will remain in solution for months or even years; the advantage for newbies is certainty. You are a grown up; I think this is all the "go for it" you need.
But 23 is Sodium Aluminosilicate. The alumina content is superior to silicate; together they match the content of the ceramic fiber...BUT the salt content will lower its use temperature rating; how far will depend on how much salt content. In other words, it's a crapshoot.
First, Thanks for the Reply, Mikey. I was hoping someone on IFI would have a little more chemical expertise than I do. Another Document:
ZEOLEX® DESCRIPTION:
Zeolex is a precipitated, synthetic sodium aluminosilicate and the first synthetic non-black filler. These silicates are semi-reinforcing fillers utilized in all types of elastomeric compounds to provide a broad range of elastomeric properties at a reasonable cost. They are available as powders with a range of surface areas from 75 to 115 m2 /gm. (BET).
TYPICAL PROPERTIES:
Zeolex 23 Zeolex 80
Average Particle Size (μm) 6.0 6.0
pH 10.0 7.0
Surface Area (m2 /gm. BET) 75 115
Specific Gravity 2.10 2.10
Sieve Residue, 325 Mesh, % 0.10 0.10
Sodium Sulfate, % 2.50 2.50
Moisture, 2 hrs./105°C 2.00 5.00
Oil Absorption, Linseed cc/100gr. 117 120
APPLICATIONS:
Many compounds consider Zeolex products as the “go between” filler amid low structure silicas and hard clays. Zeolex products fill this gap nicely acting as semi-reinforcing filler with moderate abrasion resistance and good processing properties at a reasonable cost. Low surface area grades are well accepted in the production of extruded goods where surface smoothness is required such as: hoses, gaskets and flooring materials. The higher surface area grades have more reinforcing capability and have replaced precipitated silica in many rubber applications by improving cost, processing and hysteretic properties. Other typical applications include: footwear, belts, rollers, wire and cable, sponge, tires, molded parts and calendered goods. In addition, the high whiteness of Zeolex is ideal for non-black or color rubber articles. Typical loading range is from a low of 10 phr to high of 150 phr. ® Zeolex is a registered trade name of J.M. Huber, Engineered Materials Sector
So, would 2.5% Compromise the Insulating ability TOO much?
-
So I have everything I need To begin my build (Thanks, Wayne, for the refractory) except for the rigidizer.
"But, Daguy", you ask, "WHY don't you have rigidizer? You know it's a necessary component for safety. You're a safe guy. You usually prefer to do things right. Why?"
And I reply thusly: "I am a maintenance mechani in a food production facility. We make non-dairy creamer. (By the way,if you use non-dairy creamer for your coffe, switch to halfand half ormilk or something that isn't made with chemicals. Keep reading and you'll discover one of the reasons.) Two of the ingredients we use in different recipesis calledconditioner. It helps to facilitate the product flow through the production and packaging machinery. The brand names are Zeolex 23 and Zeofree 80, hereafter to be referred to as either 23 or 80.
23 is Sodium Aluminosilicate. Some excerpts from the MSDS:
Melting point / Freezing point > 3092 °F (> 1700 °C) 101,3 kPa
Water Solubility 68 - 79 mg/l (Na+, Al3+, SiO2) (20°C, pH ~9)
Inhalation Avoid inhalation of the product. Inhalation of dust may cause irritation of the respiratory system.
Water Solubility 68 - 79 mg/l (Na+, Al3+, SiO2) (20°C, pH ~9)
80 is Synthetic amorphous silica. Excerpts from MSDS:
Melting Point / Melting Range > 3092 °F (> 1700 °C) 101,3 kPa
Water Solubility 0.0031 g/l Water 20ºC
Inhalation Avoid inhalation of the product. Inhalation of dust may cause irritation of the respiratory system.
Water Solubility 0.0031 g/l Water 20ºC
So are either of these silicates useable as rigidizer? It is still clean, but since it has left containment can't be used for conditioning product, soI can get twice as much of either conditioner (Clean) as I can use in a lifetime by sweeping up the spillage from around the machine that blends it into the product before it is cleaned up and thrown into the pig feed totes.
I mixed some of the 23 in water and it went in to solution, but settled mostly out after an hour or so. the water was still translucent white, but there was a layer of solid product at the bottom of the container. Think Corn starch. Yes, it emmulates corn starch quite closely"
So my questions are:
Do you think it's usable as rigidizer? would I negatively effect my ceramic blanket by an attempt to use it? Or would the worst case scenario be that I'd need follow it up with a real hydrophilic fumed silica if it failed to bond? How would i judge the results of the attempt?
Any feedback/input from the gurus?
-
When are we just going to put a banner at the top of the internet: "If you care about quality AT ALL, just say "NO" to H****r F*****t"?
-
My apologies to everyone. as it was a quote,it didn't even occur to me to edit/censor. You'd have thought after my earlier "occurence" I'd have been more aware.
-
OK, so we're thinking along the same lines. I'll try to remember to take pictures as I build and upload results and photos. I've got most of what I need to build. Wayne has shipped some castable refractory, all I need is some hydrophillic fumed silica and I'm ready to start. Thanks for the input and, "xxxx the torpedoes, full steam ahead".
You know, once the silica gets here and I get enough time to devote to the project.
Yada, yada, yada, the thing, the thing, the thing.
BTW, I just think bringing the burner in from the side angled up will make it look kinda sexy. If I'm gonna build it, I kinda want it to look good as long as it doesn't negatively effect how it works.
Daguy
-
4 minutes ago, Frosty said:
I'm waiting for one of the guys in the club to make an updraft ribbon.
By this do you mmean what I was describing?
Daguy
-
Question for Frosty(or any other experienced curmudgeon):
I have access to a couple of old Propane tanks that are the same diameter as the one I'm using for my forge shell. What are your thoughts on cutting the bottom of the mold out of one of them, then building the form in such a way that I can intruduce the ribbon burner to the heat chamber at a 15 - 20 degree angle with a closely matching surface geometry to encourage a vortex within the heat chamber? Would you expect that to be a good angle, or should I go more?
I also want the feed end of my burner to be lower than the flame discharge so it doesn't heat up after shutdown, thermocycling the equipment unecessarily. I figure this will be safer. Safe enough to use a stainless clad rubber hose to feed the NARB rather than copper tubing. Am I overthinking / worrying too much? I'd just expirement, but I only bought enough refractory to make one or two burners so I thought I'd get input from the brain trust.
Are there any other considerations thatoccur to any of you that I should be thinking about?
Daguy
Forgot to mention I plan to side mount it.
-
Has anyone tried LOUCAST? The maker says it compares to Mizzou. How well?
-
6 hours ago, WayneCoeArtistBlacksmith said:
Check out the Build a Gas Forge attachment and the Ribbon Burner attachment at the Forge Supplies page of my web-site.
Actually, I think that those files are where I read about using different refractoriesfor forge and burner. I know you mentioned which you liked for which, but I couldn't figure out where to go on your site to purchase them.
-
So, just to bring a question to the beginning of a thread that I've had to dig deep into several threads to find any info on (and I'm still not satisfied I've gotten all the info I need for my build), let me ask a question or two. Which castable refractory would our senior members recommend for the ribbon burner, the forge body, and the forge floor, if one decides to cast it rather than brick or kiln shelf it. And why? If a particular brand is not recommended, what properties should one look for in the material one chooses for each of these components?
The internet has such a confusing glut of conflicting information (and even here, threads wander), I'd just like to get some opinions from experienced guys. I apologize to those who have addressed these questions before, but I think future questers (Not to mention myself, now) will appreciate having these particular questions addressed early in a thread.
Let me also say that the reason I am asking these questions here is that, as my personal curiosity has moved into this area, Iforgeiron forums is where I have found the most down-to-earth, basic "guys who are just interested in this stuff and VERY willing to share with other guys" people. I appreciate that.
Your expertise and our locations do not lend themselves to an apprenticeship type learning relationship, so there is nothing we newbies can give back to the "Masters", though we would if we could. If you would all just indulge us, especially after all that flattery, please just let us learn this particular bit of info for our early builds so our learning curves can benefit from the "learn from each other" method rather than the "Do it all yourself" method. If you're not willing to pet puppies, why bother being here?
We thank you when you are willing to share your work and knowledge here. It makes you good folk
-
Well If I'm going to sort through all the available threads for the information I need for this build I'll be starting the build in about three to five years.
Since I want to start sooner than that, let me set out what I've gleaned so far and see if you experienced smiths think I have enough on the ball to get started with the build. Then I can continue to read and learn theory while making progress on the project as well. I've included a few questions:
1) Build smaller than I think I need. At this point I'll probably use a small Helium or Freon tank. Prep shell with burner port, legs, openings, etc before even starting the lining process. Have the burner built so I can use it to cure the liner layers as I go. I'm shooting for a finished chamber size of 5"-6" diameter X 10" -11" long, with a kiln shelf for a floor. This should give me an interior volume of well under 300 cubic inches(app 283" before flattening the floor with Kiln shelf). At least the front opening should be the size of the chamber to fit max size work-piece. You can always close it down with firebrick. Back opening about 2.5" tall.
2) 2-1" thick layers of ceramic blanket. Rigidize 1st layer, let dry. Lay next layer, rigidize, dry. Do I need to "Heat Cure" at this point, or just let it dry well? Cut in the opening for the burner, Leaving clearance for 1/2 inch coating of refractory(so, 1" extra wide, 1" extra long). Do I lay blanket under the floor or do I need something more solid? Can I just use the Kast-O-Lite to cast a floor on top of ceramic blanket??
3) 1/2" layer Kast-O-Lite refractory, including the burner port. Build a charcoal fire in it to dry out the refractory. (How long should this be kept going to be sure the refractory is properly cured?) (Once cured, would this make a good pizza oven? Stromboli?)
4) 2 coats of ITC100 IR reflective, firing the forge in between coats (Again, How long)
5) I plan to pretty much duplicate Frosty's 2" X 2" X 7" Ribbon Burner fed by a 3/4" T-Burner setup to Naturally Aspirate it (As described in the "Naturally Aspirated Ribbon Burner. Photo heavy" thread). I would like to side mount the burner to avoid the heat escaping the forge heating it up during cool down. is there any advantage to having the burner point in at an angle, say 15 degrees up to promote swirl in the forge? Or would a straight horizontal feed work just as well? Or is there an advantage to mounting in the top pointed at the kiln plate and, hence, the floor and the work-piece?
Any suggestions for particular threads that hold pertinent info that should be read before starting? Considerations I'm missing? Advice for the Clueless Newbie?
Thanks for all the input
Daguy
-
2 minutes ago, Frosty said:
Fill the grand kids up on sugar and send them home eh? Revenge is sweet.
As Khan said in the Star Trek movie, "Revenge is a dish best served . . . ".
I think he went on from there, but that's the important part.
BTW, Nice pun.
-
9 hours ago, Frosty said:
News paper doesn't work, printer paper is stiff enough it works nicely. Keeping it together while you cast it is a problem it absorbs water and moves around and the binder in the refractory fossilizes it. Waxed paper is too limp and butcher paper didn't work very well.
What about Pixie Stix? The candy? Comes in waxed paper straws. Give the candy to the grand-kids and use sand as a filler.
-
Has anyone experimented with using drinking straws to form the nozzlettes? Seems they would be pretty easy to remove. Or would the casting process deform or even crush them?
-
NANO - Naturally Aspirated, Numerous openings?
Or how about the “XXXX good burner": Drafted Air, Multiple Nozzlette
You got me chasing a squirrel again
or Drawn Air
So I guess that one wont work, sorry if anyone was offended. Not my intent.
-
10 hours ago, Frosty said:
close but no cigar
Gave it a shot . . .
-
On 5/6/2018 at 1:44 AM, Frosty said:On 5/6/2018 at 1:44 AM, Frosty said:
I agree, NARB is too limited a name, it's only one shape multi-port. I've seen Multi-Outlet burner used too and considered NAMOB but. . . .? If someone comes up with a good one I'll rename it. Maybe.
What do you have in mind for one?
19 hours ago, Daguy said:I didn't really have a different acronym in mind. I'll give it some thinkin'. Maybe I can make a small contribution to the forum.
I've been thinking. What about the NASA Burner? Naturally Aspirated, Several Apertures. It's not as accurately descriptive as Multi-port, but you gotta admit "NASA Burner" is a pretty cool name.
-
9 minutes ago, JHCC said:
t’s worth noting that your apology contains at least three (arguably all four) of Dr. Aaron Lazare’s “Elements of a Successful Apology” and accomplishes at least four of the psychological benefits of an apology. For the full list, see https://greatergood.berkeley.edu/article/item/what_an_apology_must_do.
It wasn't calculated or anything, just done upon reflection, and NOW I have another squirrel to chase with your reference material. someday I may learn to focus on one thing at a time, but the wife says she's not holding her breath.
-
Then we're all good. Glad you accepted the apology.
I didn't really have a different acronym in mind. I'll give it some thinkin'. Maybe I can make a small contribution to the forum.


Naturally Aspirated Ribbon Burner. Photo heavy.
in Ribbon Burners
Posted
I think I'll follow your advice on the next one, Frosty.
Quick question for the goup: I used castable # 2 from Wayne on this burner, but due to the way I put it together and tried to remove the crayons, I'm redoing it. At this point, $30.00 worth of castable for each mistake is going to be cost prohibitive, so I would like to buy castable in bulk so that it is less costly per unit, making it affordable for experimentation.
I know a different castable is recommended for Forge than for Burner. What properties should I look for for a Ribbon Burner castable? Should I be getting something along the lines of Mizzou or or Loucast? Recommendations for a brand for the burner?
Thanks for the input
Daguy