
Pault17
-
Posts
974 -
Joined
-
Last visited
Content Type
Profiles
Forums
Articles
Gallery
Downloads
Events
Posts posted by Pault17
-
-
thanks all for the guidance. as soon as I get the garage cleared out a little, I will try it out. I have about two or so feet of square bar to work with, so I can experiment a little
-
All,
I have a piece of 7/16 copper square rod that I wanted to use a sectio of for a finger guard for a dagger. My intention is to slit and drift the opening for the blade, but wasn't sure how to go about it.
should I anneal it first? pre-drill the slit and just drift it? split and solder two pieces together?
thanks,
paul -
Amen Frosty.
I hear this debate alot in my small area o practicing smiths too. Most chastise anybody that even wants to consider themselves a smith, or even try to learn, if they don't get themselves a "real anvil" first. If you don't have access or fundage for a "real anvil" but still have the desire to learn, or better yet, don't even have access to decent scrap or salvage yard to pick up an appropriate massive chunk of metal, Rail is not as difficult to aquire..
Plus, it is easier to shape into an ASO (I did mine with a 4.5 inch grinder with this cutting discs) and is easier to practice on if your space is limited.
I am still hoping and praying that someone will drop a HOFI anvil on my doorstep and shout "Merry Christmas", but till then I will continue using my russian HF POS with glee.
Oh, yeah... when a friend expressed interest in trying out smithing, I GAVE him a ready-made 56 lb RR ASO that he was able to put right to work. He has not complained once.
rant off:cool: -
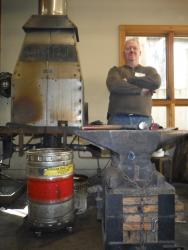
good score on the hammer. it seems like you are short-siding the hammer to anvil ratio (being only 1-to-3). Will the base make up for this?
-
Someday I will have the contacts and funds to get a "real" hand-cranked blower, but I was looking for some "home-grown ingenuity" and read this article: http://www.fastonline.org/CD3WD_40/JF/JF_VE/SMALL/04-110.pdf
if you go to the bottom half, you can make your own that should work okay till you can properly outfit a shop. (thanks again Ruben for the link).
Every time I read through this thing I keep seeing a new offshoot for te famous 55-forge -
-
-
Jmercier, I am not trying to 'jack your post, but was unable to find the one I was looking for. But, this followed (in my head) what you are asking about.
being a man of scant pocket change and also looking for a useable portable demo forge that is vaguely period, I chanced upon this image in an old Google on-line book. I have seen this before in the forum but after reading through post after post, I have to jut ask:
has anybody built or aquired one of these? I am thinking and currently working on making on to fit an IFI special 55 forge with side blast - unless I can make it an up-blast, but with the circular double on the underside.
thoughts?
thanks in advance and again, sorry for 'jacking
paul
p.s. please move this elsewhere if need be -
Heck, at the behest request of my welding teacher (rapidly becoming a good friend too) I am working on a dagger made from an old nicholson file he gave me. the blade is sort of payment for free access of a limited nature to the "weldable metals" racks at the welding shop. When I get a little closer to knife shape I will post pics for your attacking pleasure.
As it is a double edged affair reminiscent of a gerber mk 1 the even-ness all around is "fun":o
all that being said - if you're interested in making a sword, start by making a few hundred nails. then work on j-hooks, then s-hooks, and work your way up to letter openers. etc... -
Here are a few things I did a while back. I like the horseshoe because (1) it was the first thing I ever got an actual order for - the lady I gave this one to asked me to make her a dozen more. it is made from 1/4 square stock and is pretty straight forward.
the hammers in the other picture are pretty neat too - heads from 1/4 aquare and the handles from 1/8 round tapered and driven through a drilled hole.
Brian, I am almost embarrassed to be following your post. but you definitely provide something to aspire to, that's for sure
paul -
Jeff,
what they have all said!!
I still easy around the first leaf I ever made:o
but I also carry one of my more recent ones for comparison
I usually give the new one away, but will always keep the first. -
PIcture in your mind a sweat-soaked leather handle of a three pound hammer as you accidentally loosen you grip on the down-swing:o
-
adding my $.03. I have been regularly using a HF 110 pounder that cost me less than a buck a pound (it actually weighs 114 even after rounding down the horn). I have found that children under the age of 10 and friends trying to work out their aggressions/frustrations can ding up the face. But other than that, like many have said, it is nice to have a useful ASO until a real anvil comes available. I have also determined that heavier is better
-
Very nice for a first set. especially along with the fact that they are designed for a speciifc purpose in mind. My first tongs were designed by a 10 or 11 yearld named Sean Conner. two 3/4 by 1/4 bars with a rivet hole drilled and the tong ends bolted together, and the working ends twisted 90 degrees. fool-proof design and very robust.
yours look way prettier. great job -
This little this is a perfect size for making small hooks, leaves and such. I even joked with my wife about taking it on vacation with a small anvil and assortment of tools. You know, for those days that you get bored. And she thought that was a cool idea.:o
-
The torch is a Bernzomatic JTH7 Hose Torch (JTH7)from Home Depot for about $25, running straight propane. after visiting their website, I see a new product, BZ8250 Trigger-Start Hose Torch, that would be nice for the trigger start.
with proper coatings and running MAPP , I could easily see welding temp in a matter of minutes -
I have my regular gasser taken apart and I needed to fabricate a few small brackets.
So I slapped this together.
It is a pinto bean can with an inch of kao wool in the back and around the sides. the chamber is about 3 inches deep by an inch and a half wide.
I figured I could make another one a little bit bigger and properly stainite and itc100 the interior and give it to one of my nephews for a birthday or Christmas present -
Chris,
Bet a section of 2 inch steel pipe, fuller a stem into it a couple of inches from the top. flare and dress the top half and flatten and dress the bottom half.
There is this really cool tinning compound that is real expensive but absolutely amazing. you paint it on with a brush, heat it up till is goes from flat, throught bubbling, to shiny, and wipe it off. with practice it will tin the whole surface nice and shiny. Also, if you fuller the stem down tight enough, the tinning compound will fill the gaps and seal the bottom.
no welding needed.
Sorry the drawing is really crude. talk to some of the copper smiths for the powder info. The gent that demo'd it to us said he paid about a hundred dollars US for a tub the size of a squat salsa jar, but that it has lasted him years. -
Jayco,
I am having the same sort of luck. I have gone through 7 pallets of mixe material (pine, oak, poplar) and have half of a 55 gallon drum full up useable (i think) charcoal. The un-burnt or charred stuff goes back in for the next burn. I have a full barrel charring as I type now.
as for metal for forging, if you are dirt poor and have nothing but what you can scrounge, then you learn to work with that and feel spoiled when you get hold of some good metal. I get bugged when everybody says don't bang iron until you have a "real" anvil. Don't hammer untill you have a tom clark or hofi hammer. Etc. etc. etc. work with what you have until you can get something better. Always check out the local Smithing clubs and associations. Fellow smiths are almost always helpful and interested in speading the wealth of knowlege.
I have found that hooking up with and bringing gifts to a welding class instructor can get you access to scrap bins and "unusable" metal for welding. -
I just started to work on making my own charcoal too. I have a 55 gallon drum with about 20 or so 1/2 inch holes drilled through the bottom. I cut up pallets and any scrtap lumber I pick up from various construction sites and get it burning. I typically fill the barrel to a few inches above the top and light it from the bottom. When the flames drop down to the rim top I put the lid on and let it smoke. I have a two inch hole cut in the top, and when the smoke loses its yellow color, I cap it with a lump of dirt.
When it is done and the barrel is cool, I dump it into a wheelbarrow and sort out the coal from the ash from the unburnt or charred wood. The wood goes back into the burn barrel, the ash gets mixed with dirt and the coals go into a second, sealable drum.
My first try ended up with half a barrel of charcoal when I lifted the lid. There was no smoke and very little heat. I went in to have breakfast and when I came back out the coals were gone with nothing but a pile of smoking ash:o. I managed to salvage a coffee can's worth of coals. but it was a start.
Now all I have to do is make a forge to use with charcoal:D -
I have seen many postings and comments about McMaster-Carr, but had never had the need or drive to use them. I recently needed some round retainer steel locking pins for a project and, after driving to multiple local hardware and agrisupply stores, then surfing the web, found almost exactly what I was looking for at McMasters. I ordered them yesterday at 1400 and got them today at 1400. I chose basic rate ground for shipping, which ended up being less than flat rate with the usps.
I am happier than I expected and will post pictures of the project soon. -
Rebar is the "junk metal" for blacksmiths as bed frames is for weldors. If you have it try it out. I make cooking tripods for camping from #4 and #5 bar in various heights. I don't quench. I also use rebar for quick punches and tools if I luck out and find a piece that doesn't crack when quenched.
-
Bill, welcome to the addiction. Make your wife something pretty and/or useful soonest. That always helps.
In the meantime, while waiting on your fist bag of coal, go to a local grocery or hardware store and look for some "real lump charcoal". This is actual wood charcoal and not briquettes. You may notice a dramatic improvement in your useful heat.
Unless you were already using real charcoal to begin with, then just ignore my useless rantings -
Philip
two inch plate?!:0
you are a beast!! congratulations


Box bellows
in Blacksmithing, General Discussion
Posted
Darn, just when I was all ready to make a round accordion bellows. Metal muncher -thanks for starting this one up. this is a little more up my woodworking alley.
Frosty, I like the space sawing vertical Idea to-thanks for thinking out loud.