

Cavpilot2k
-
Posts
210 -
Joined
-
Last visited
Content Type
Profiles
Forums
Articles
Gallery
Downloads
Events
Posts posted by Cavpilot2k
-
-
19 minutes ago, George N. M. said:
Oooo, very nice. Do you mind saying what you had to give for the Trenton?
Something like the cylinder will, IMO, be a better starter anvil than the Centaur rail anvil that someone was just looking at and we were commenting on.
"By hammer and hand all arts do stand."
I don't mind saying. I did get quite a nice deal on it at $600. I'd expect it worth $1000 at fair market value.
I agree on the cylinder. Especially for someone whose main interest is bladesmithing. It's a fantastic bladesmith anvil.
Maybe not great for heavy smithing, but small stuff like blades - heck, that thing has more weight and surface area than those NC Anvils lots of newbies start with.
-
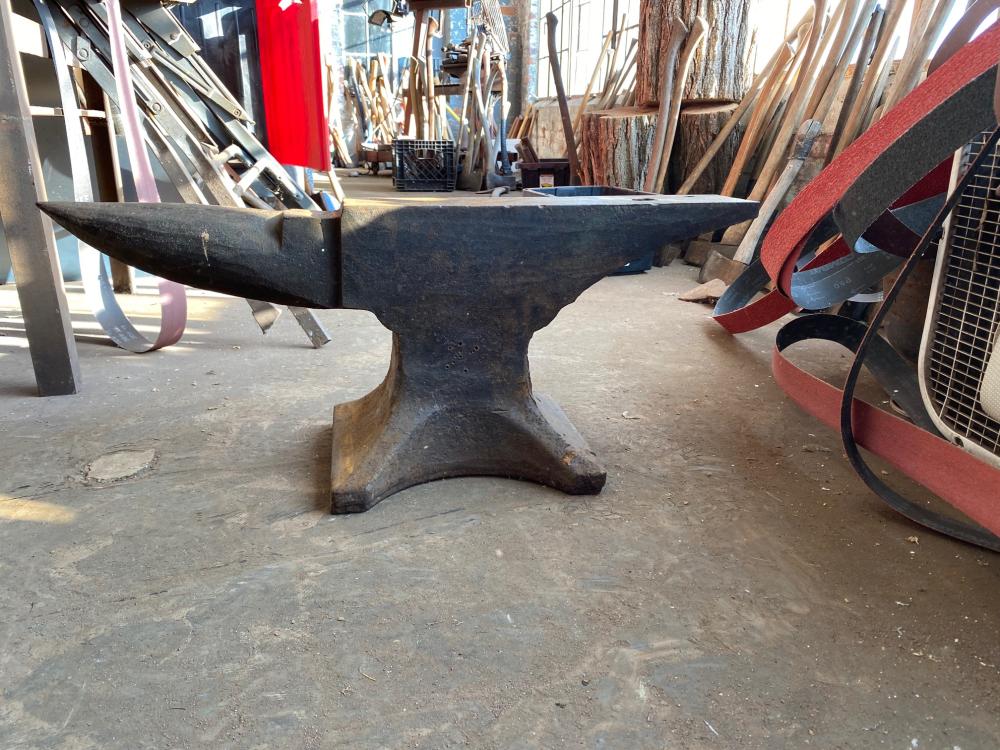
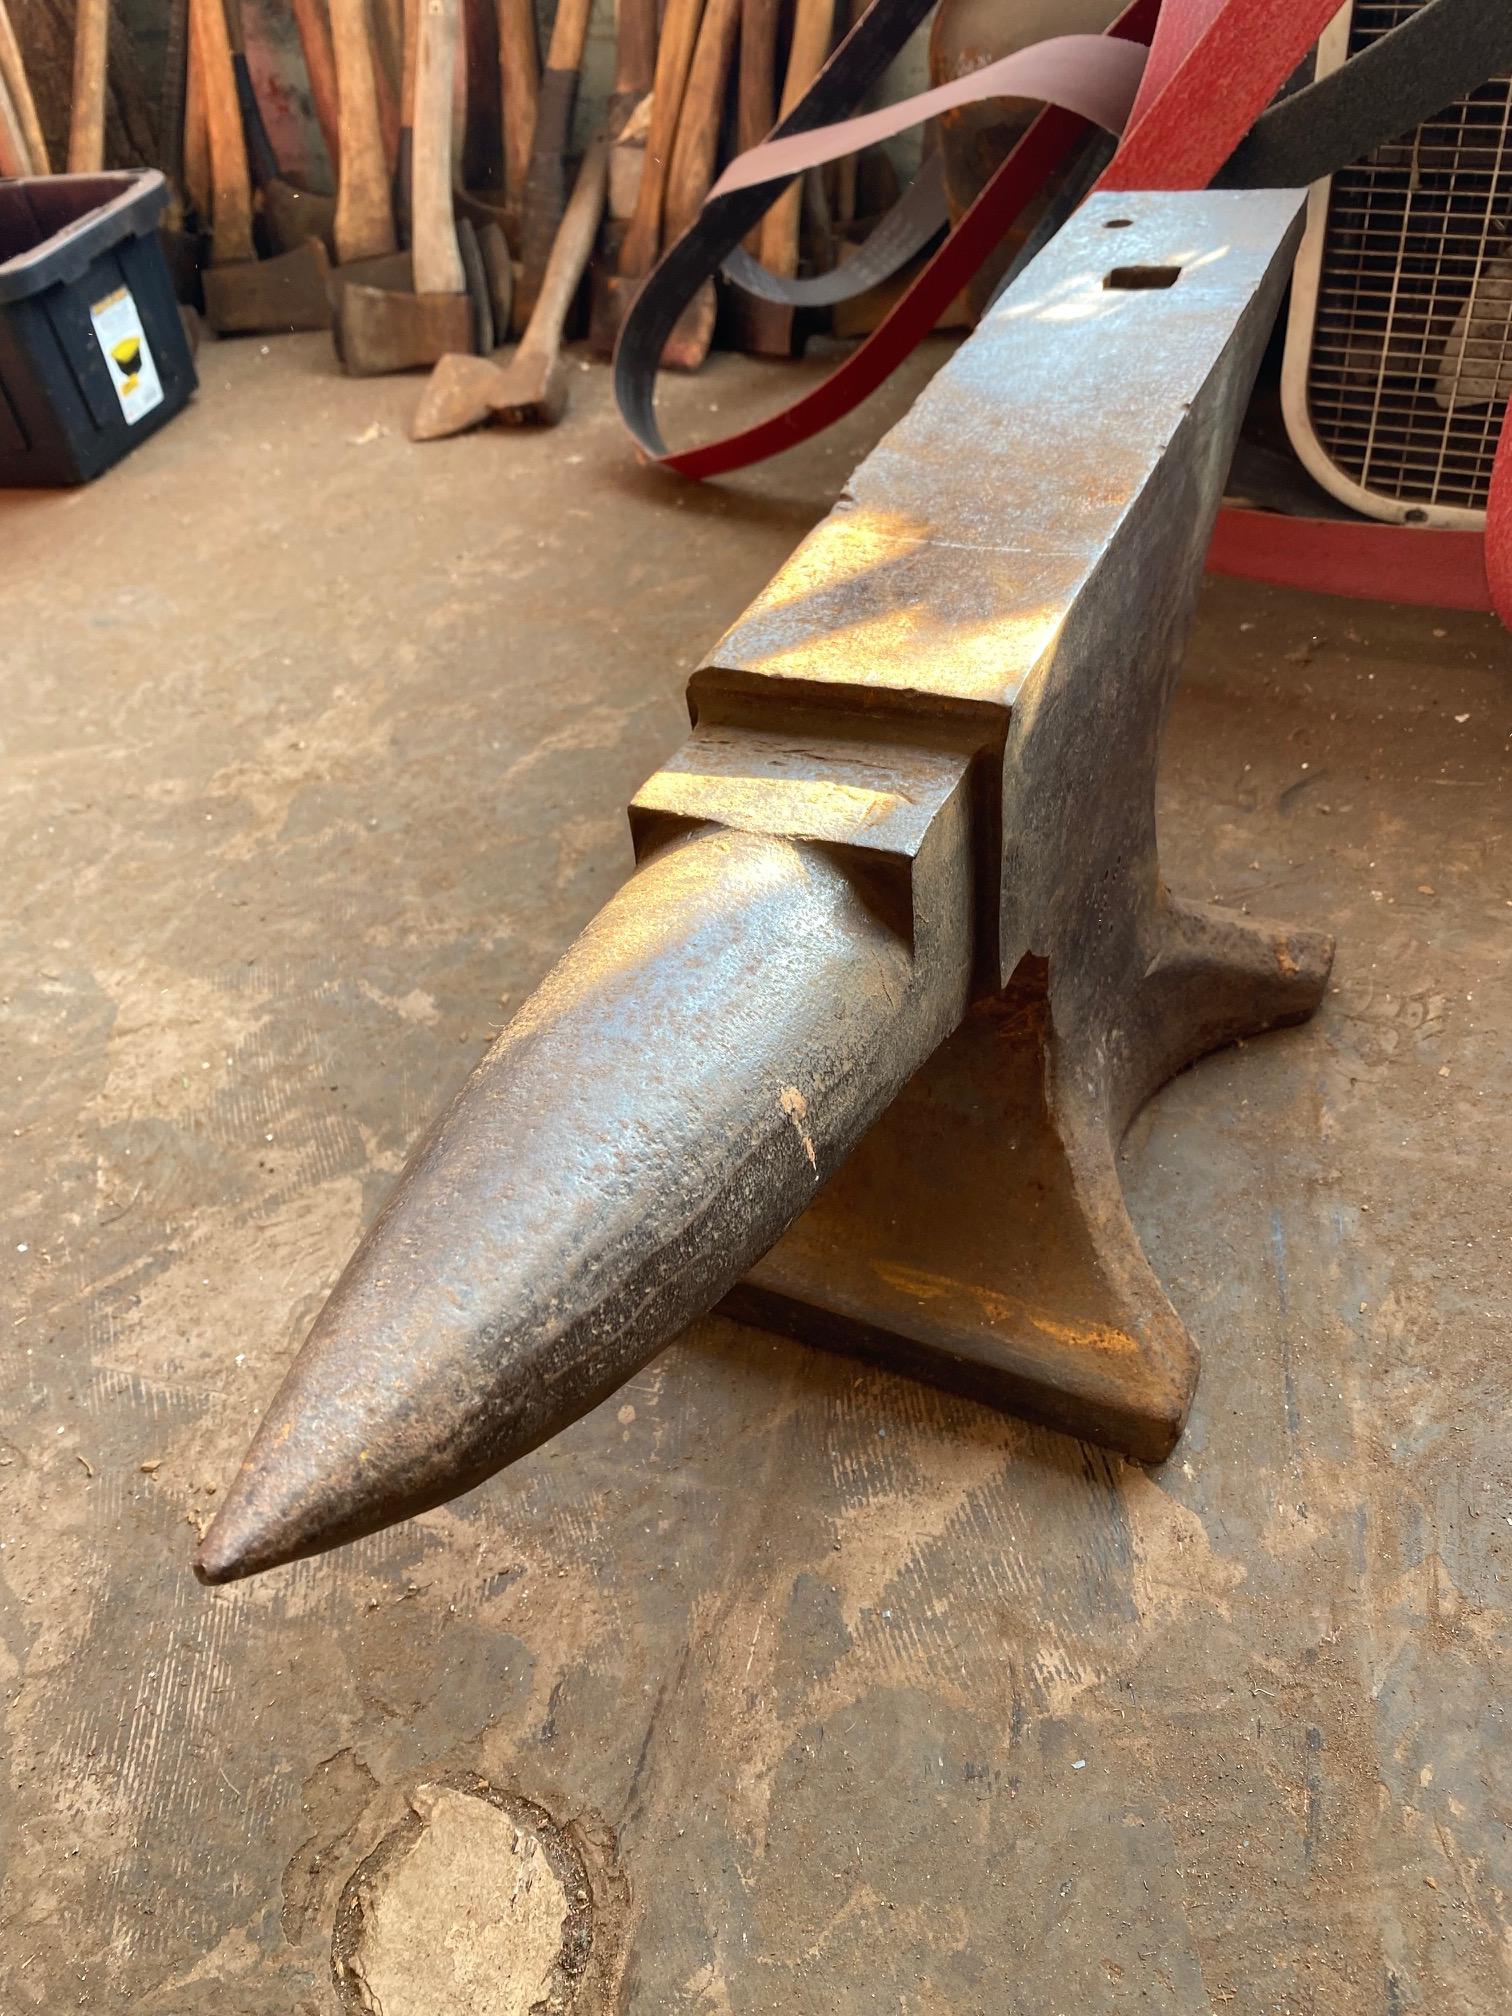
These two beauties followed me home today!
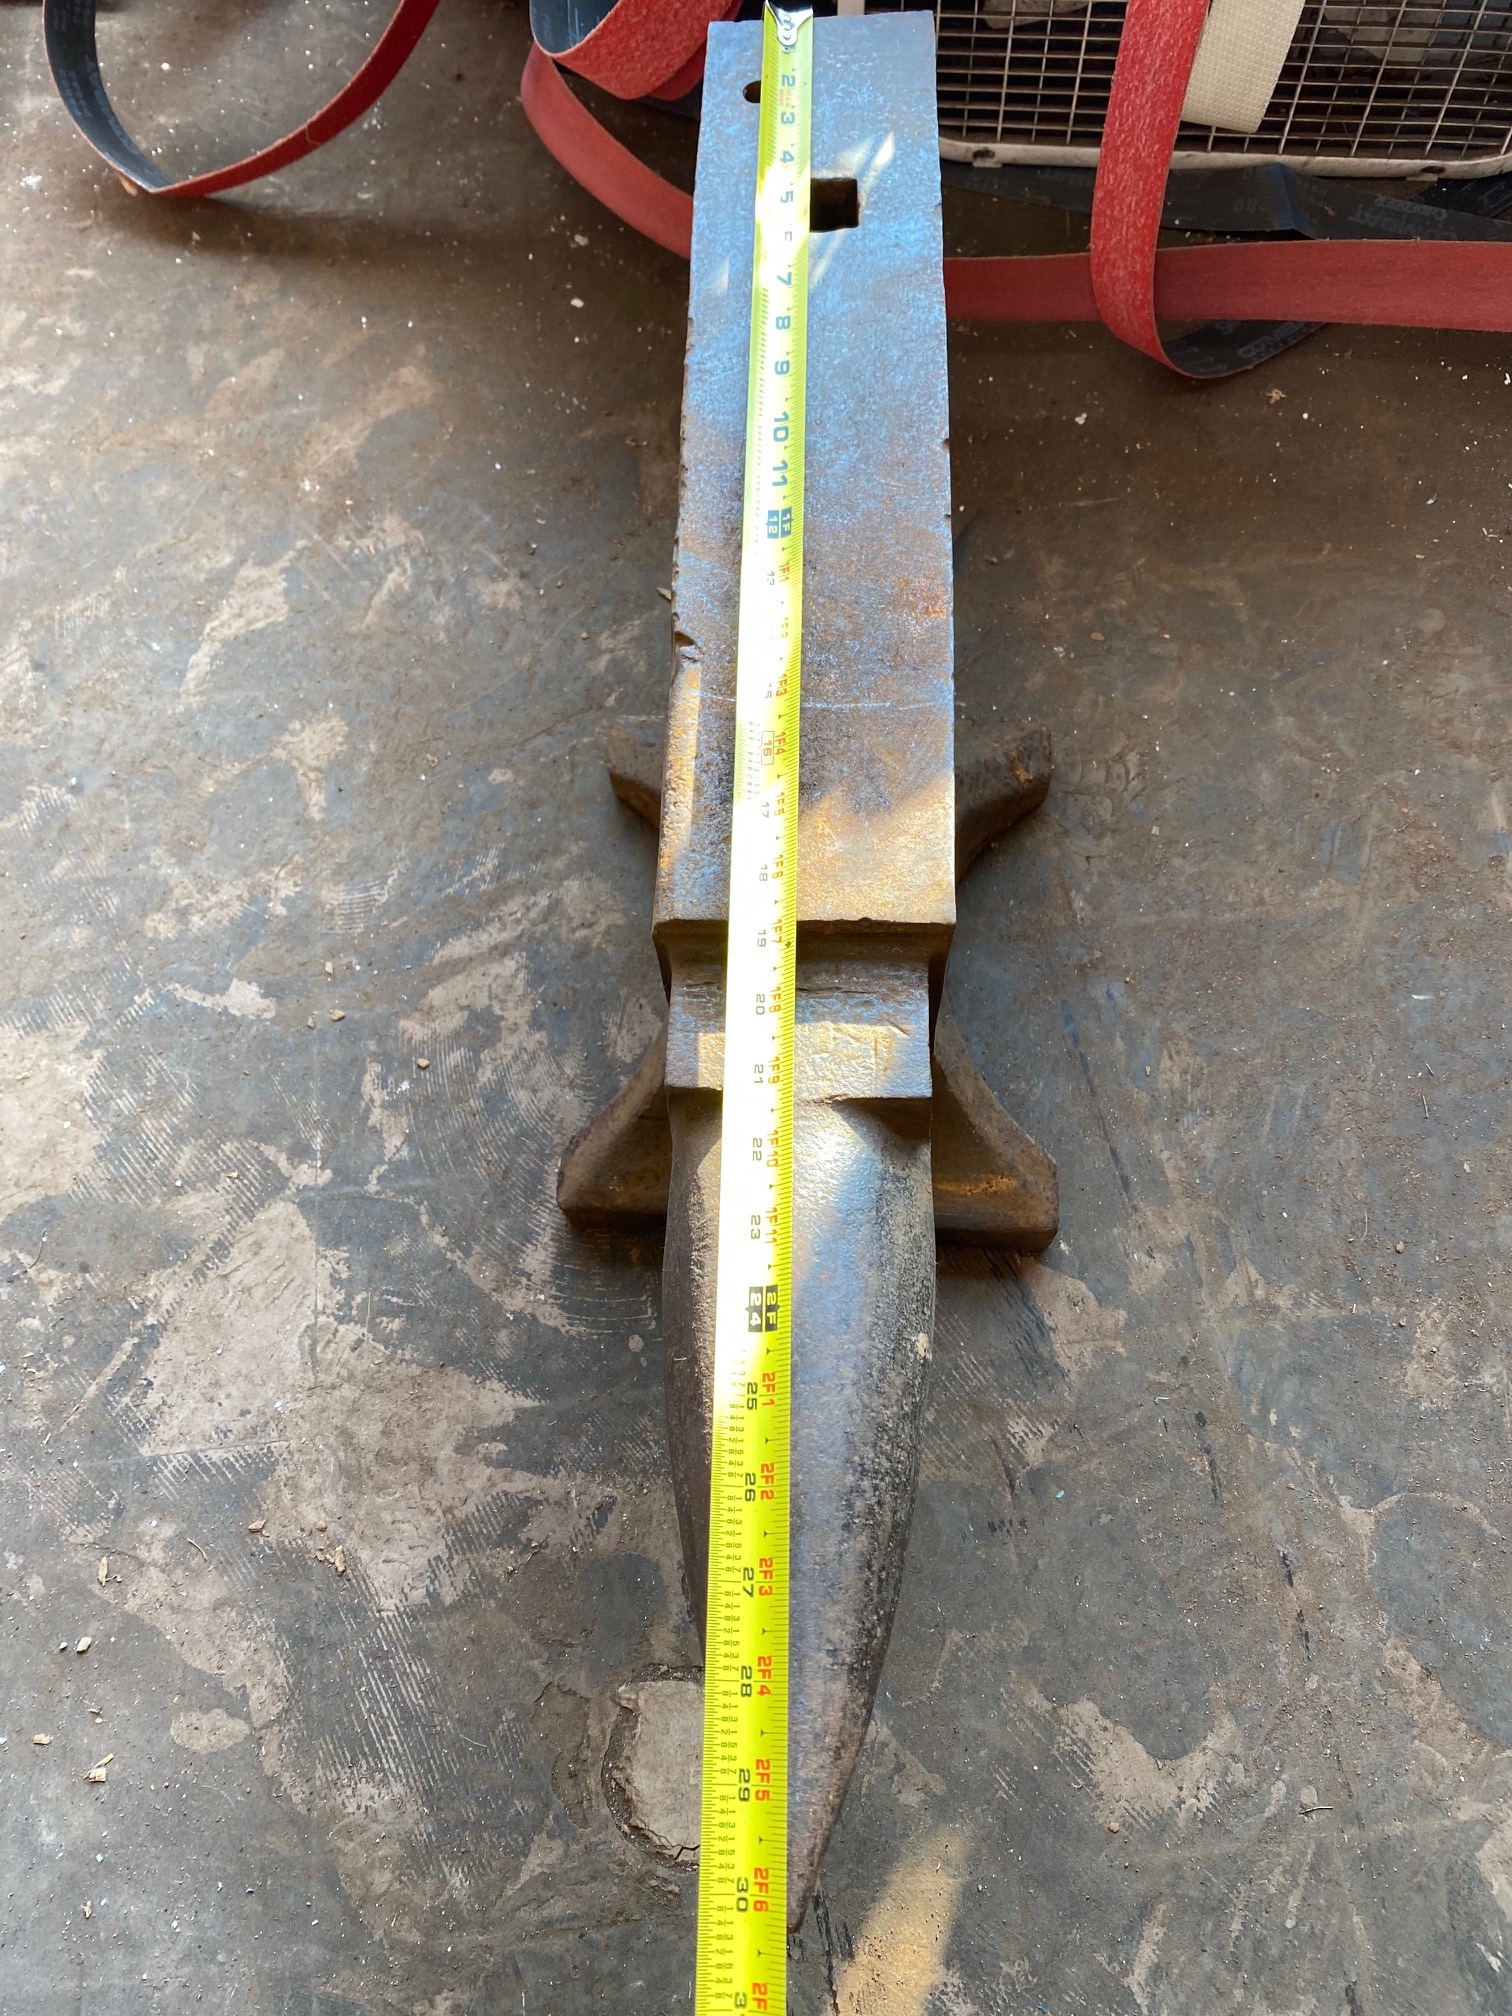
A sweet 190 lb Trenton anvil with very good edges. 30.5 inches long! Just needs a good cleaning.
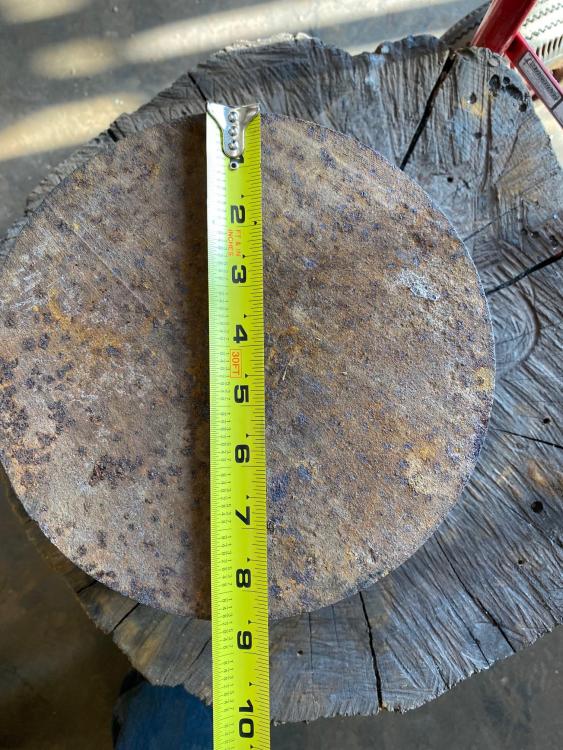
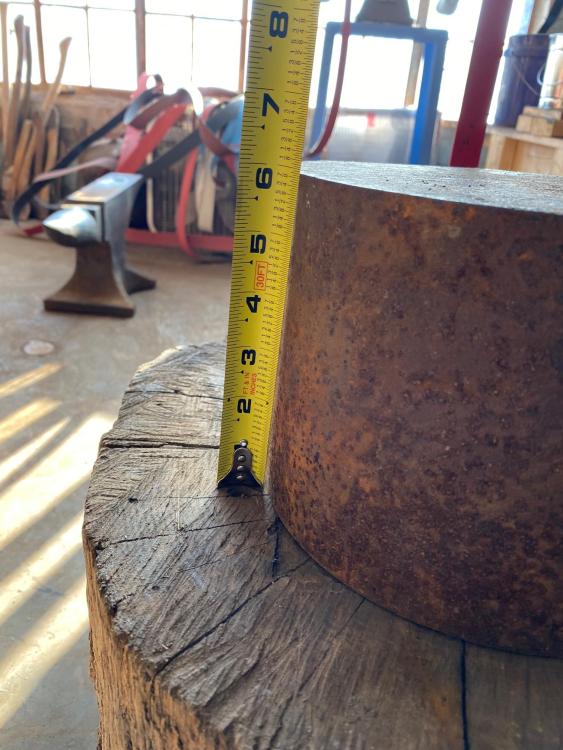
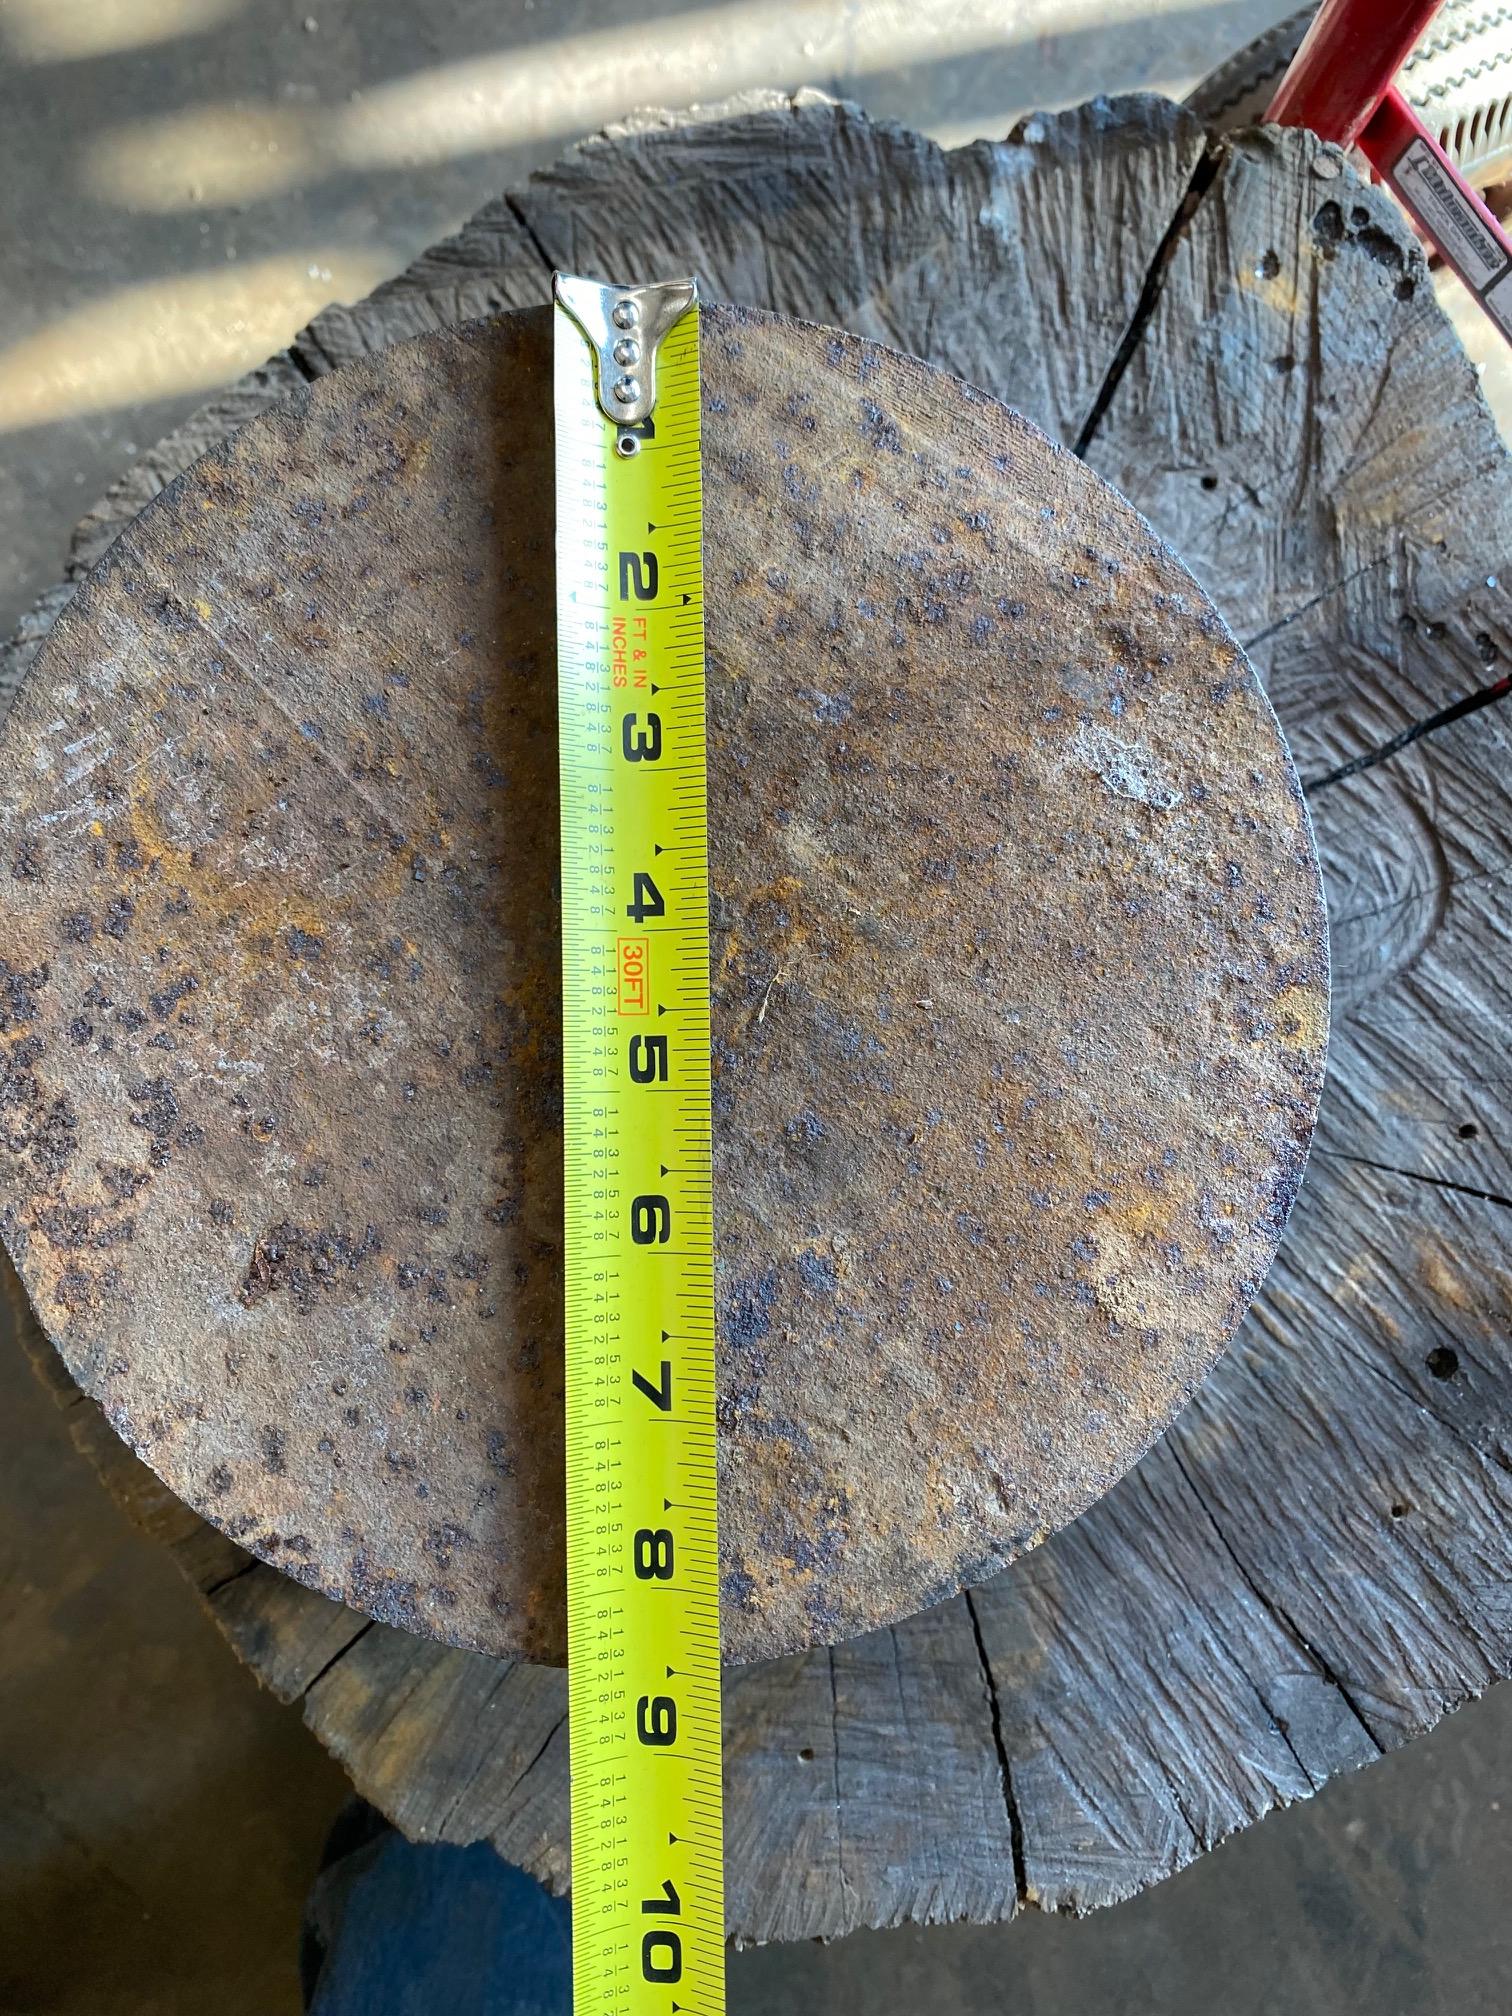
And a solid steel cylinder 6" high and 8.5" across, weighing 90 lb. It will make someone a great starter "anvil".


-
Frosty: McMaster Carr is online too! Pretty speedy delivery as well.
-
Agree rust would be unacceptable. But in my experience, one's equipment is never as pretty on campaign as it is before/after because of dealing with constant dirt, mud and grime. Then again, I never had a squire in battle.
Wait...does a copilot count?

-
Also, instead of a polished finish, I wanted an antiqued finish. Accomplished by using SuperBlue and immediately scrubbing it off with an abrasive pad soaked in acetone.
My idea was not some pristine piece that has never seen use, but the helm of a seasoned warrior. I can't stand new armor that looks like it's never been used in earnest.
-
Thanks for the suggestions. I actually have plans to put a channel top and bottom of both front and back to use insboard doors (a board version of inswool).
Yeah, the stand is the monster coal forge I've been using these last six years until I built the gas one. It's something like 36"x40", 4" deep cast iron that's about 3/8 thick. It's a beast and weighs almost 200 lb.
BTW, the chamber is 7"x6"x16"
-
Thanks Frosty!
I think the rivet/snap tool name comes from leather working where you have a similar dimple depression for holding the top of a snap while peening the inner part to attach it, but yeah, I don't like that name either - I just don't know what else to call it. It isn't a rivet header, because it's not making a head, just preserving its shape.
I never thought of using a ball bearing, but I figured the rivet itself would make a good form. It actually too two, as they did deform like they are supposed to.
Funny think about rivets is I was trying to find a source, including making my own out of nails until I discovered that McMaster Carr sells them in all kinds of shapes and sizes in bulk at a very affordable price. There are probably plenty of other places to get pre-made rivets, but I haven't found them cheaper.
-
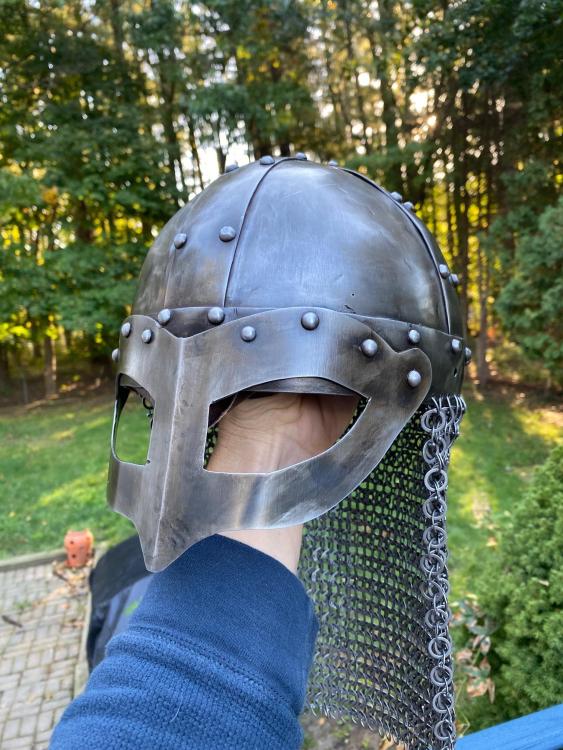
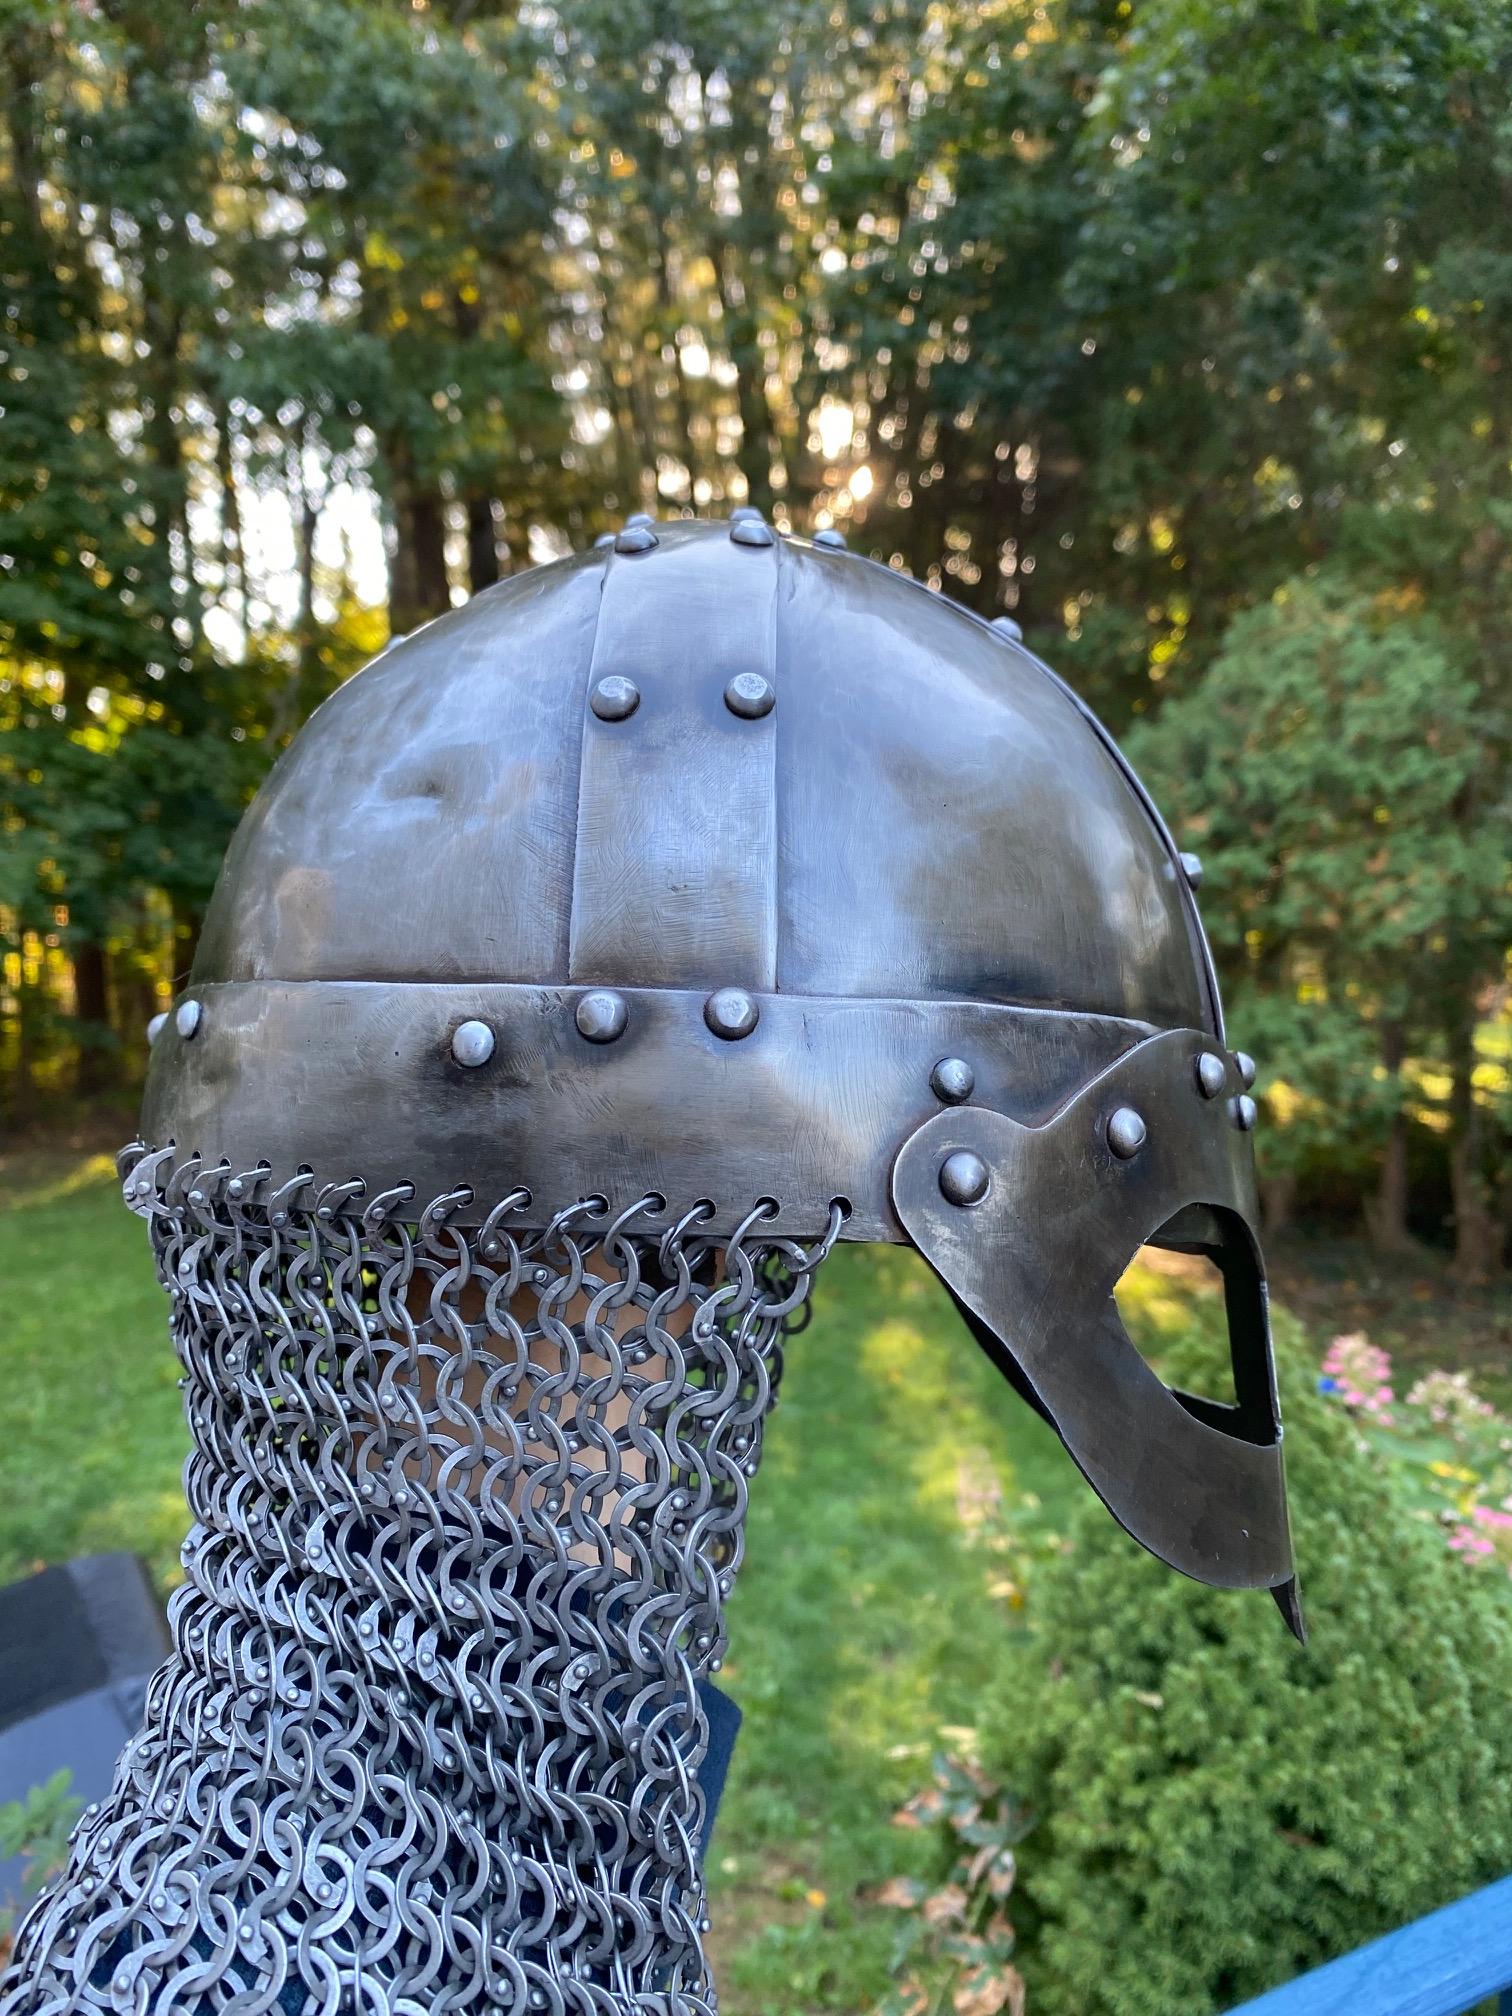
Made this to complete my Norse Karl Viking kit.
I want to make some additions to the aventail to help it lay better on the shoulders, but I was under a time crunch to finish a workable version.
16 ga. mild.
Also the battle axe is my own build - mild steel body with spring steel bit.
The seax too - brut-de-forge blade with maple burl handle, brass spacers.


-
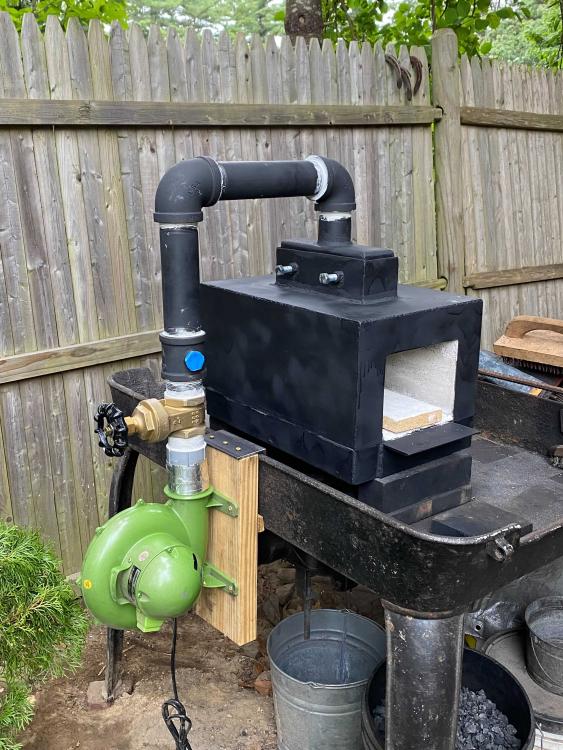
So I needed a gas forge and wanted a ribbon burner. So I followed the model from John at Black Bear Forge's videos and built a ribbon burner with two-piece body.
1/8" steel body, 2 layers of inswool, covered in Kast-o-lite 30, final coating of bubble alumina.
9 inch ribbon burner.
Forgive the poor welding - my welding has improved dramatically since then, but it works. "A grinder and paint makes me the welder I ain't"
It is so nice to be able to forge weld a large cross section of steel with consistent heat in a reducing atmosphere. Trying to do a san-mai cleaver was killlng me on my coal forge.
.thumb.jpg.9bfd333d26eb6cb0dab3b7f40c41c3df.jpg)
.thumb.jpg.aa476619a2c1b5813ee96e5a847ac7d7.jpg)
-
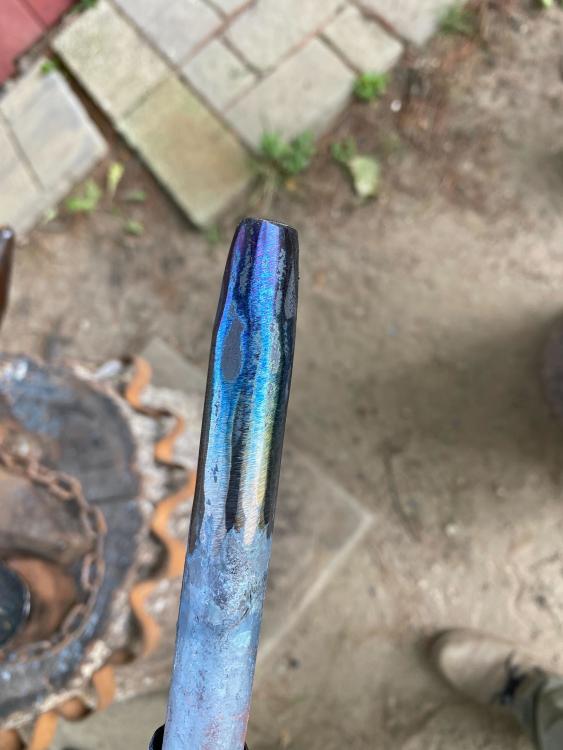
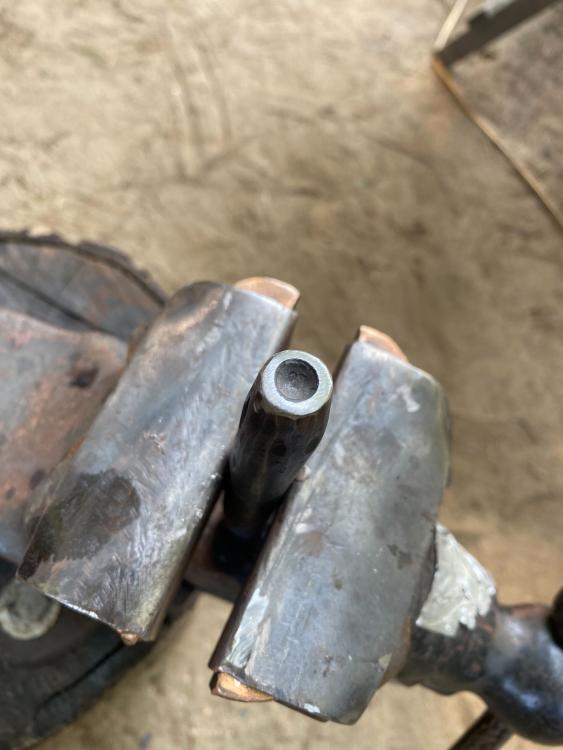
Not today, but just recently: I have started dabbling in armoring, starting with a spangenhelm. I am using bought rivets with nice domed heads and need to preserve the shape of the head when peening the bottom of the rivet. I have a little dapping block, but none of the holes fit quite right, so I made my own - I guess it is called by some a rivet-snap tool?
Coil spring straightened out, drilled a shallow pilot hole then got it up to forging temp and pounded one of the rivet heads into it to deform the hole to precisely fit the size and type of rivet.
Then I heat treated it, letting the colors run to temper it to a nice spring temper.
I used it to put the spangenhelm together and it worked like a charm!

-
2 hours ago, Frosty said:
She looks rarin to go!
Frosty The Lucky.
Yeah, except I don't need it, so I am selling to fund another one that I don't need but I fell in love with a few days ago: a monster Trenton that is at least 250-300 lb.
-
That said, I feel like $5/lb is a fair market value for good condition.
Look at other tools - a beverly shear used runs $500+ (a new B3 is $1450). I was lucky enough to find a used B3 for $300 and was immediately offered $600 to resell. I declined. I love my B3 - it's a beast!
A good brand sheet metal bench punch (Roper Whitney Model 16) is $400+ (new over $700).
A smith uses an anvil much more than any of those, so...
-
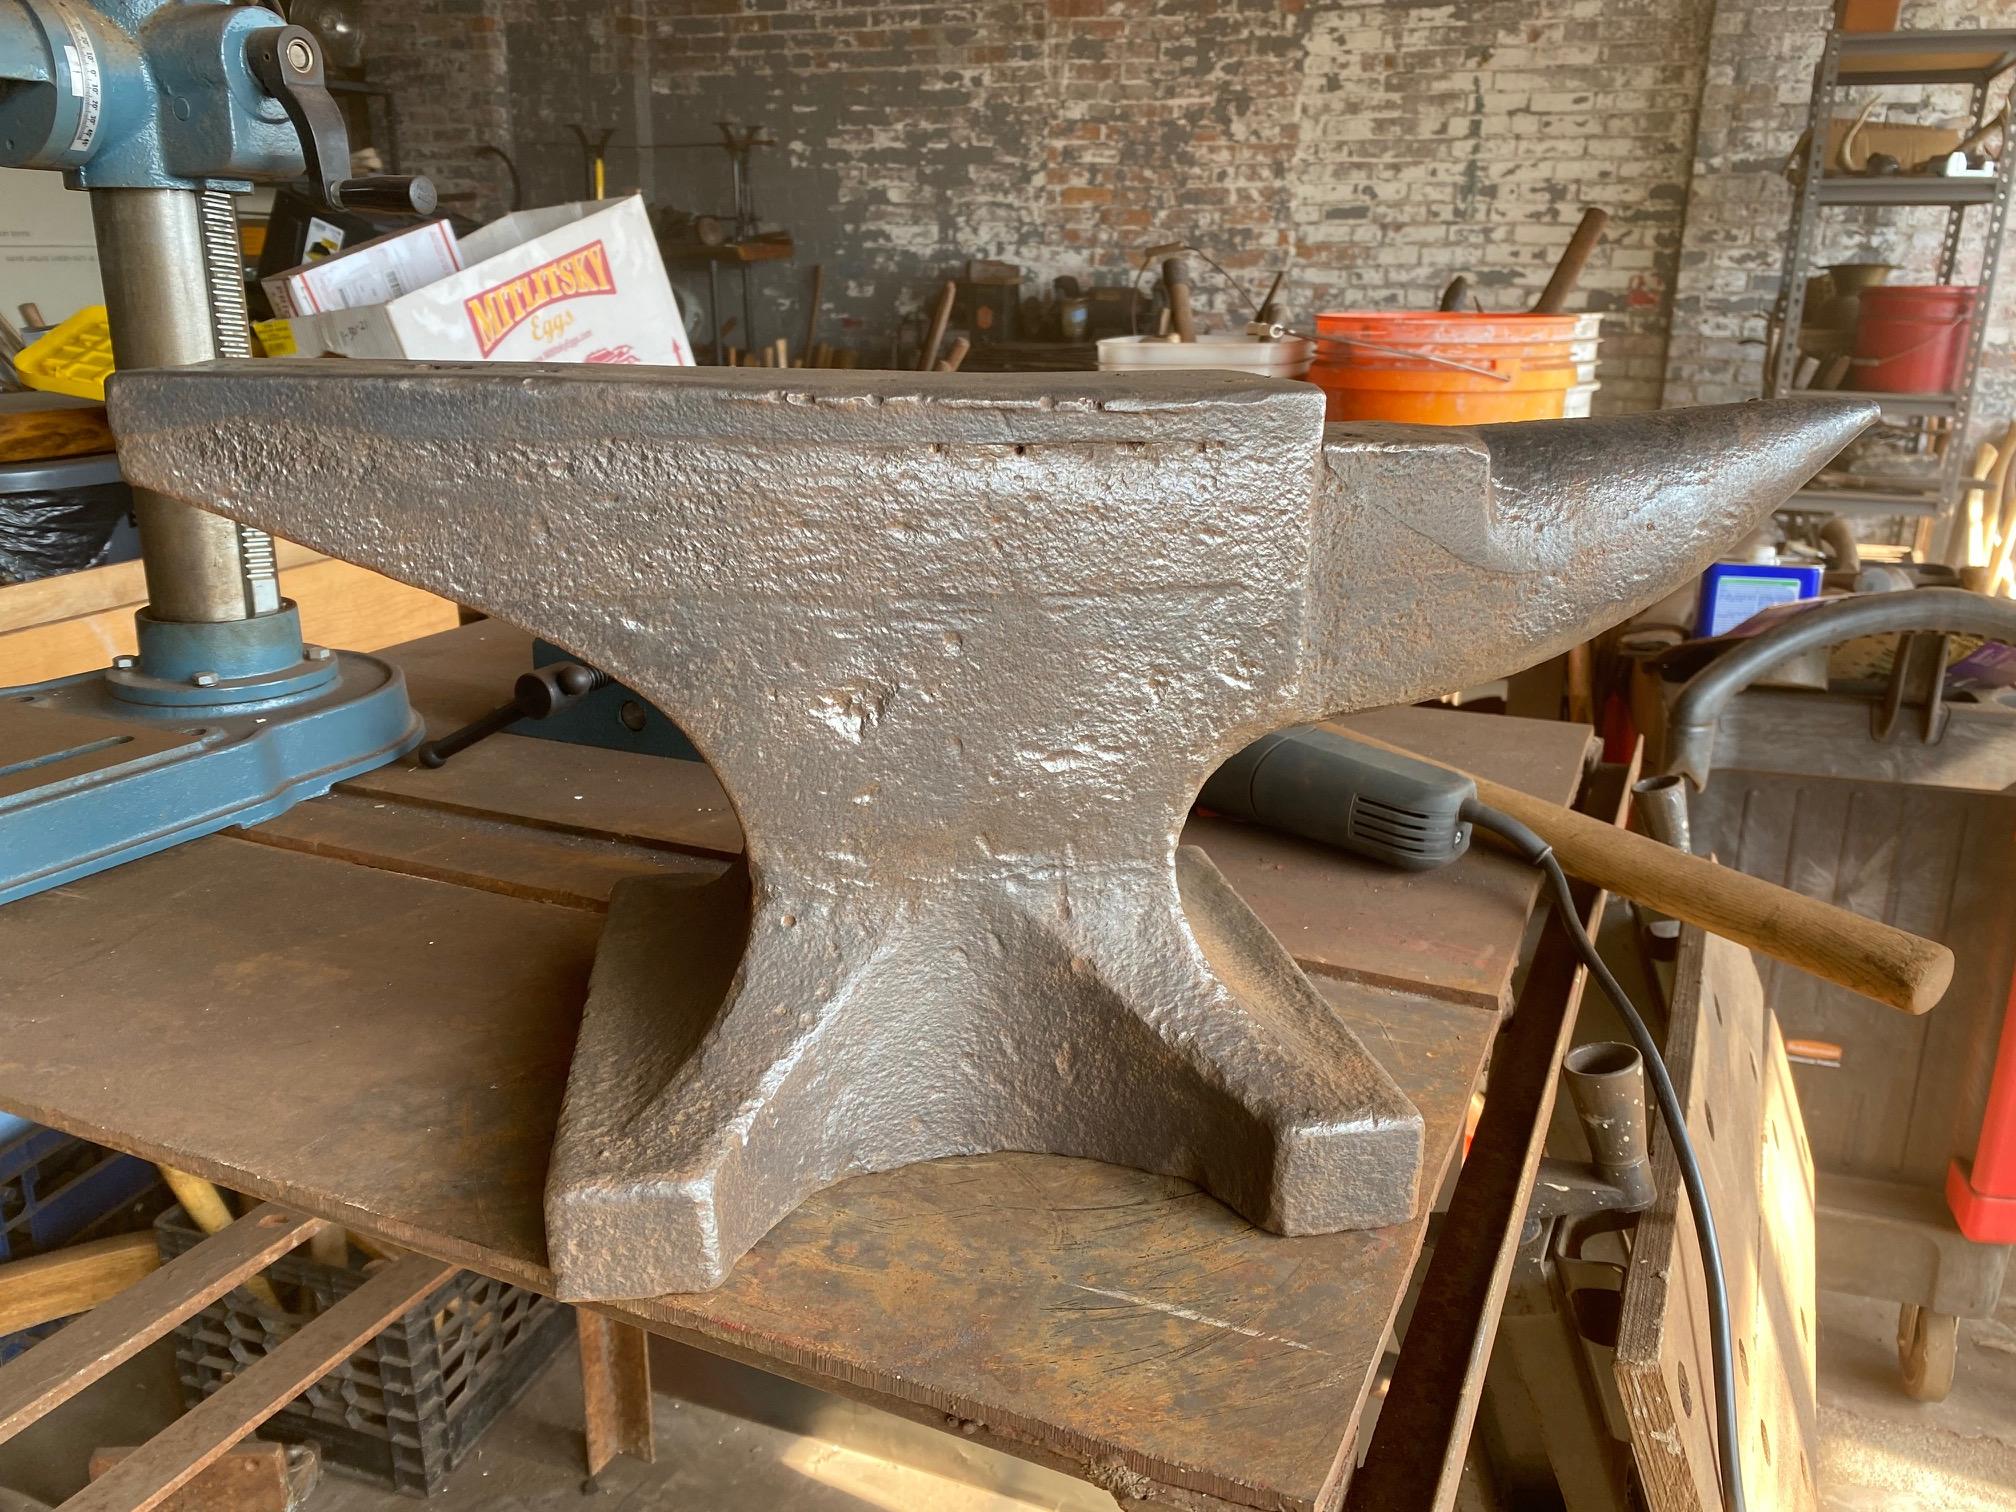
A few months ago I was looking at a house I was considering buying and found an old anvil on the front step that was basically just being used as decor (it was an old house).
I didn't buy the house, but did buy the anvil. It's a 132 lb Samson for $300 (February-ish 2022). Pics in the "show me your anvil" thread.
My main working anvil, a 173 lb Fisher, I paid $500 for about 5 years ago at a scrap yard.
My first, which I sold to pay for the Fisher above, was a 230 lb mousehole, which I got along with a post vise, hand-crank drill press, and huge coal table-forge for $500 from a retiring old-timer.
Deals are out there, to be sure.
-
I picked up this anvil about 9 months ago. Identified as a Samson - 132 lb.
I was looking at a potential house to buy and this was a decoration on the front door step!
I cleaned it up and voila!


-
Great info - thanks!
You are right that the one I modeled from looks like the Italians, but clearly without the pommel hook they all seem to have (I'm curious what its function is).
Who would have thought there would have been a Billhook Junkies group...
-
Thanks, gents.
Thomas: Point taken, and I have no doubt some of those 633 do answer the question, but after my first dozen or so mentions of it with no explanation, I decided to save myself from reading potentially 621 more that may or may not. Like I said in my post, lots of mentions (like Glenn's at the top of this post), but very few (none that I had found) explanations with enough detail to be useful. YMMV.
Cheers,
-
Frosty, a point of clarification, if you will:
You (and others, like the sticky on the dangers of ceramic "wool") mention rigidizing that wool refractory, but I haven't seen any mention of methods or products to accomplish that goal.
Is it assumed that you will encapsulate your wool in the castable layer?
Or is there some product or product class that specifically serves to rigidize the wool independent of castable?
Or do most available ceramic wool refractories come pre-rigidized?
My apologies for the newbie-ish questions - I have only ever forged with coal these las 5 years, but am looking into building a gas forge and want to make sure I do it correctly and safely.
-
Hey all, I've been away from the forums for quite a while but still doing work.
I recently experimented with using powdered citric acid mixed up to a 10% solution and heated to give a nice dark gray/black finish on a few pieces.
It worked like hot vinegar only much, much better. My guess is because vinegar is usually only about a 5% acid.
I'd say for darkening, the hot citric is almost as good as Ferric chloride with little to no mess and safe enough to pour down the drain. I have not tried actually etching with it, but I suspect it will work great.
I had the citric for some stainless steel passivation on other projects.
Plus, it doesn't smell up the room like hot vinegar.
I'm interested if anybody else has tried it. I'm sold.
-
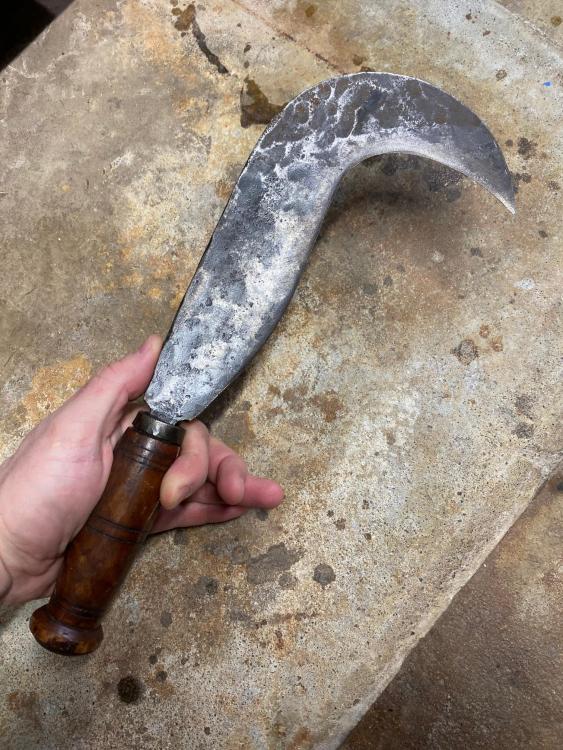
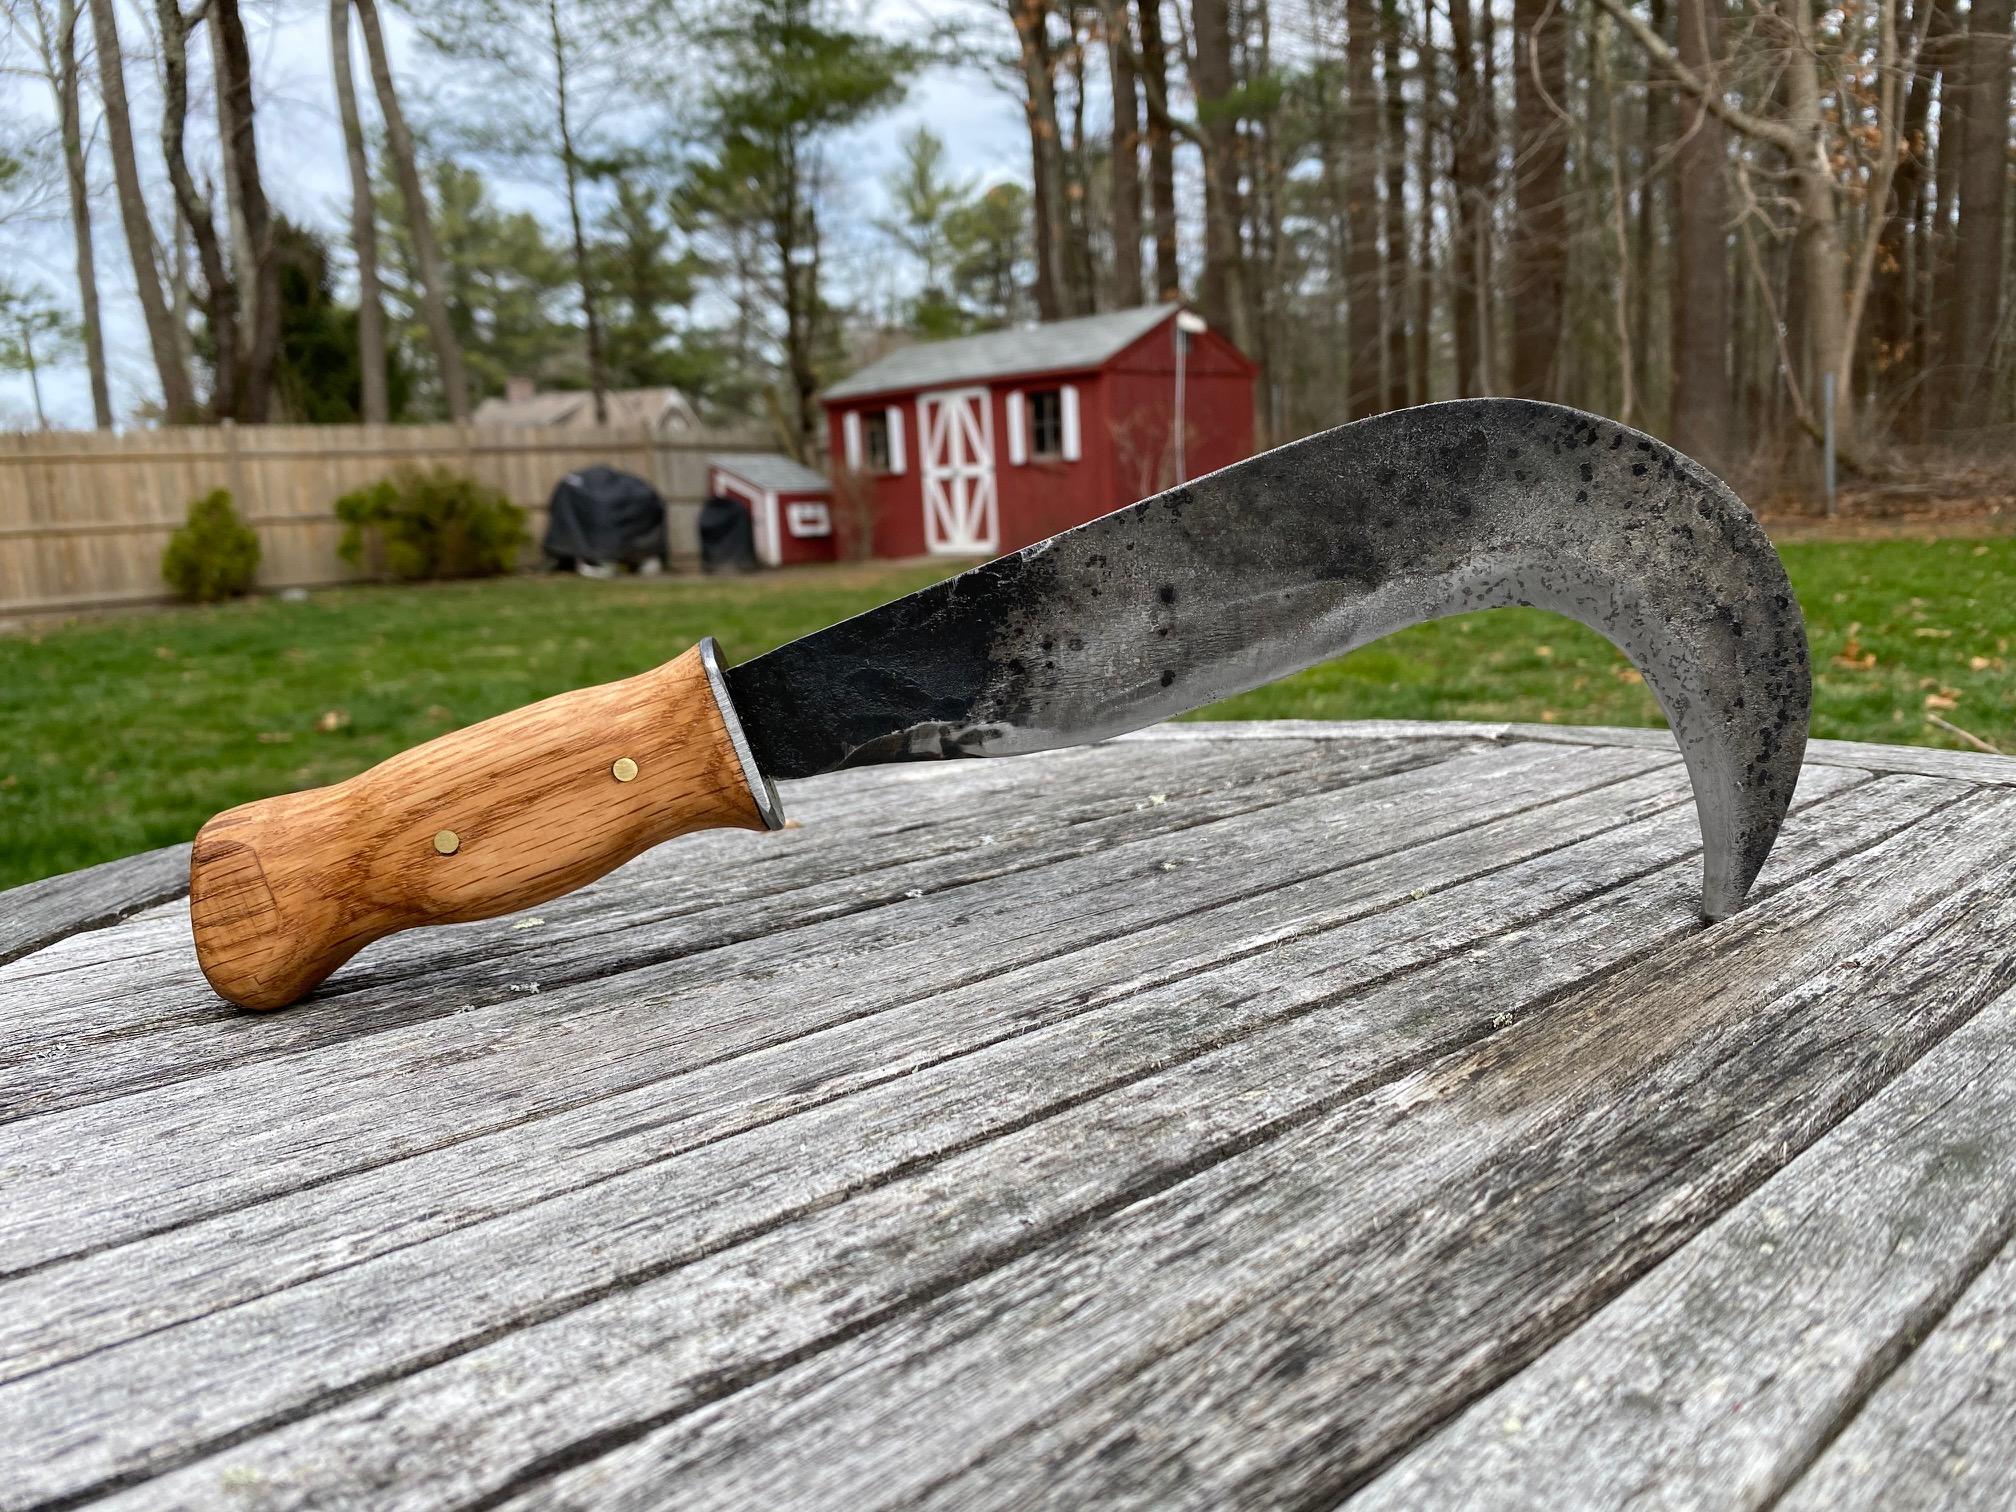
Here is the (old?) one I used as a model. It is clearly hand-forged, but its age and origin is unknown.
I also referenced that image SLAG posted to get an idea of the range of shapes.
It works very much like a sickle, but for tougher material than a sickle can handle.
-
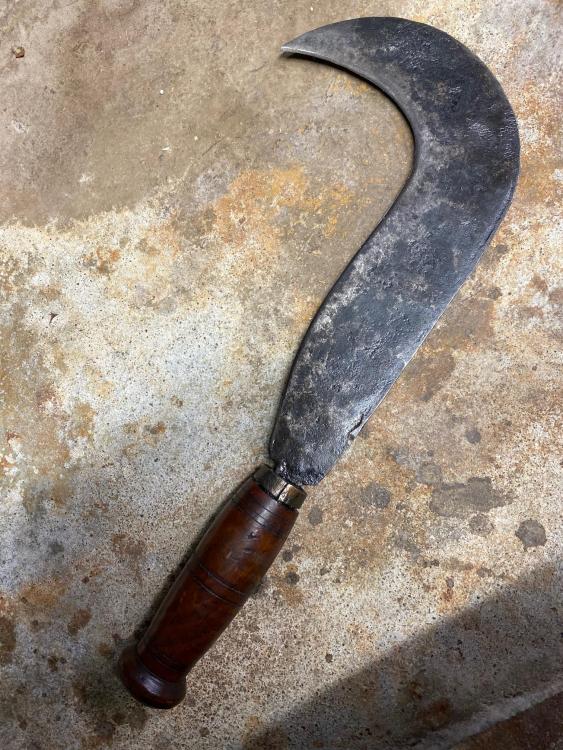
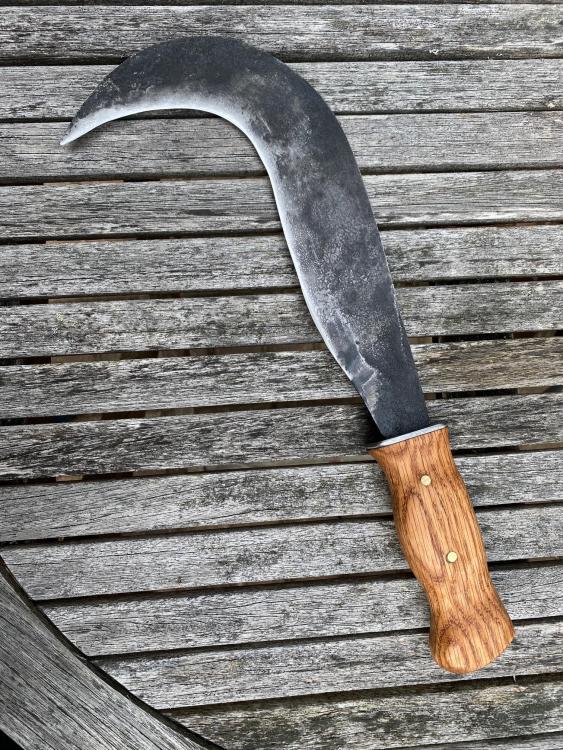
Hey folks - I haven't been on here in a while, but I've still been forging. Mostly made a bunch of knives for friends and family, but Thought I'd post my most recent project: a Bill Hook requested by the guy that is the live-in barn help at the barn where my lady boards her horse. I didn't know anybody used these anymore, and I am far more familiar with the adapted-to-a-medieval-weapon version of the Bill Hook.
I found an old hand-forged example of one a friend had and used that as a pattern.
Mine is made from 15N20, hidden tang, mild steel bolster plate/guard and handle is recycled oak household railing left over from a new one I installed a few months ago. I left it brut-de-forge for the most part, for looks and to help prevent rust because I know this tool will get used a lot (as intended). Handle treated with Dark Half from Real Milk Paint (part tung oil, part citrus solvent).
Anyway, I am pretty proud of it and being that they are an uncommon tool, I thought I'd post it here for your enjoyment.

-
Thanks, guys! Can't wait for it to arrive and start using it.
-
I agree that S7 is way overkill for leather awls, but if you want S7 awls, more power to ya.
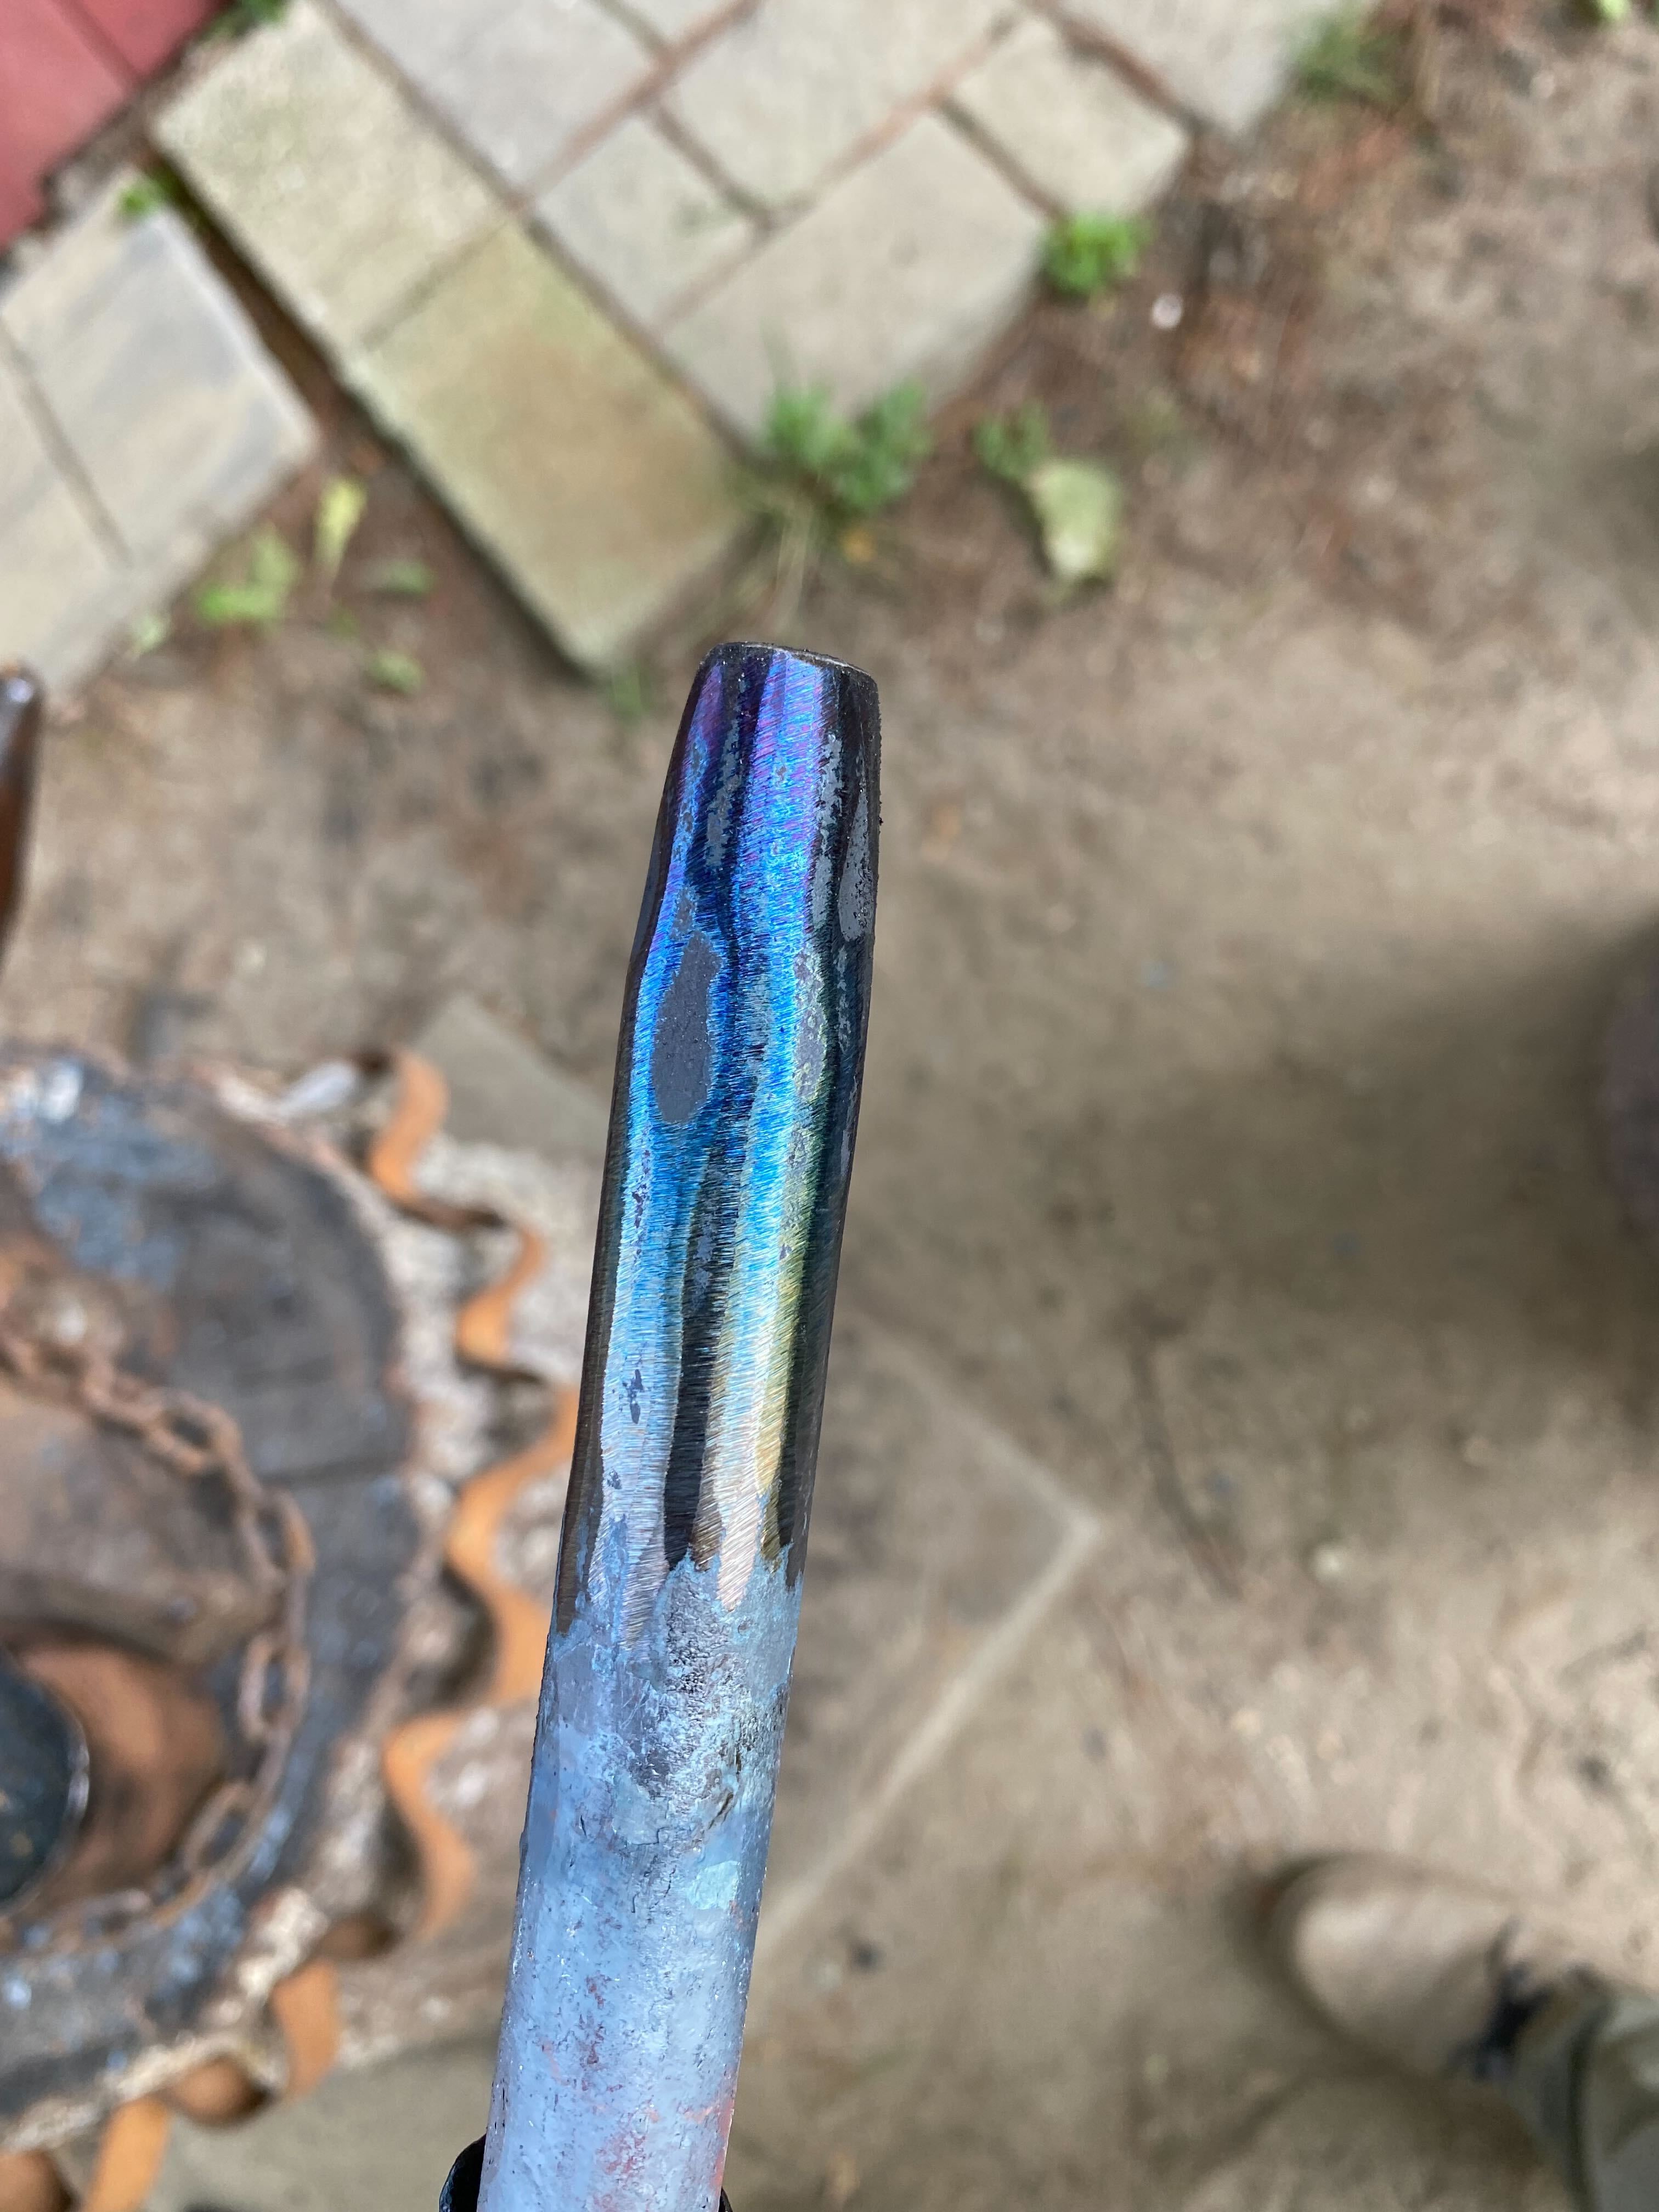
I made a hot slit chisel out of a 3/4" S7 round. I air hardened by just setting it aside from critical temp. No fans or special airflow setup, just simple air cooling. I tempered it to bronze on the cutting edge and purple on the striking end.
It has held up beautifully to a lot of use with no chipping and no deforming.


-
My brother and I are 5 years apart (he the elder), but we have always been close. Even when we go months without talking because we live half a country apart and life gets in the way. We would do pretty much anything for one another.
-
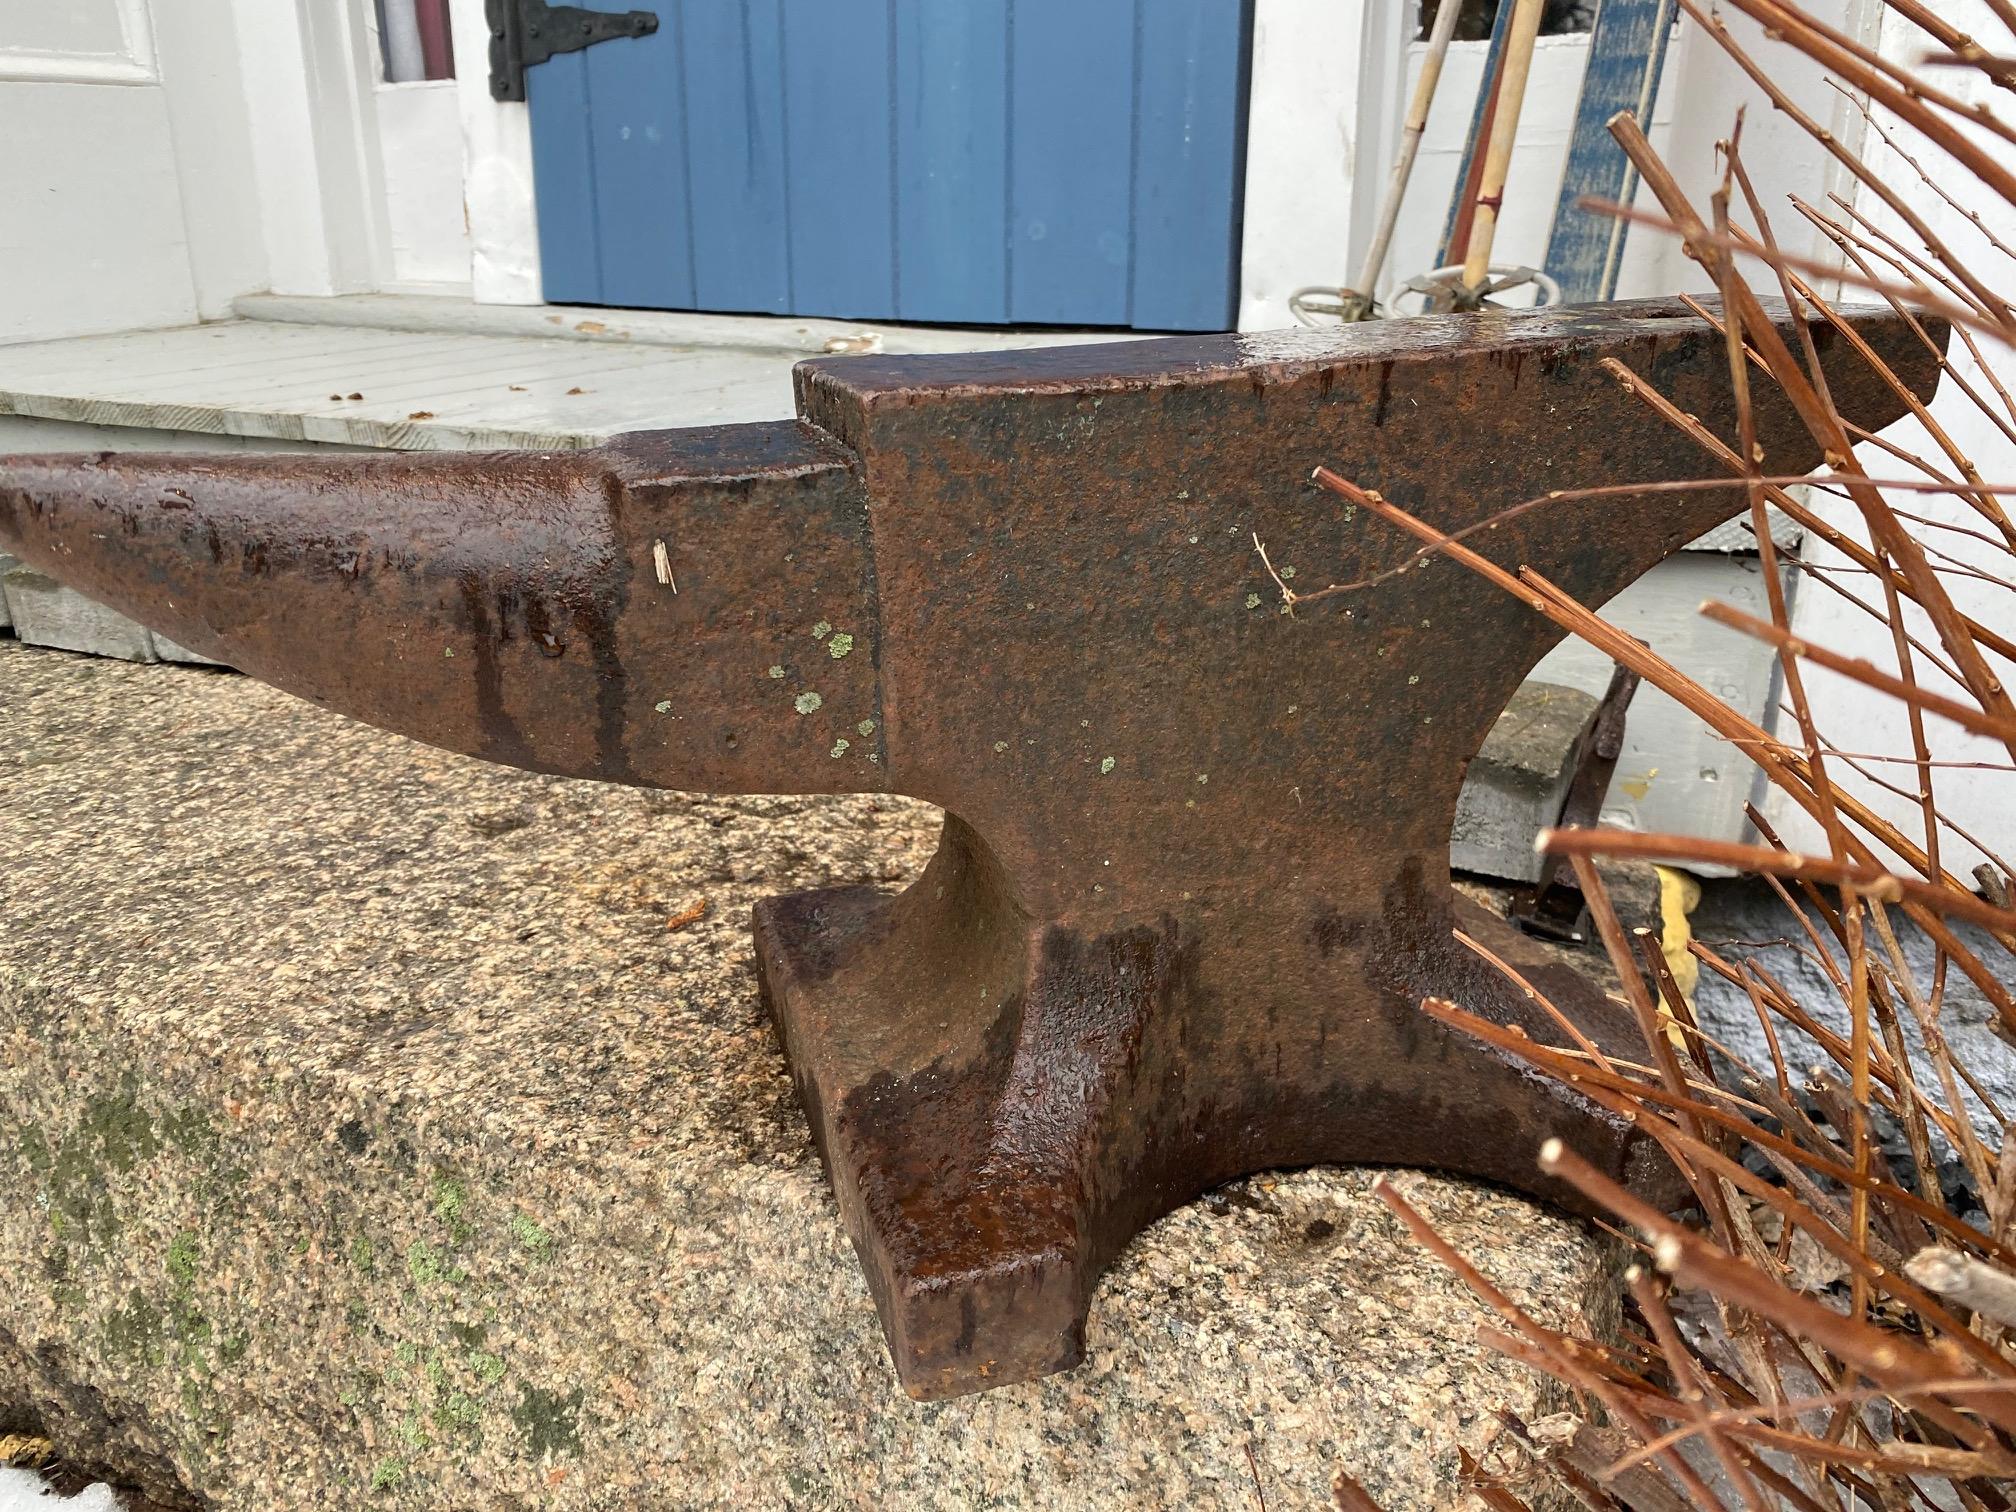
Well I was going to try the electrolysis method, but apparently my brother, who is readying the anvil for transport to me, took it upon himself to (carefully) remove the majority of the rust with a wire wheel. Then he applied a wax/oil mix to seal and protect it.
I think it looks fantabulous! Can't wait to hit something on it!


.jpg.6d7282766d2148dd9a213cb30c0f1d6b.jpg)
.jpg.8a3854a48422717847d33d108a99b855.jpg)


My first piece of armor: Spectaclehelm (spangenhelm)
in Cold Worked Iron and Steel
Posted
It would indeed, Charles!
But the aircraft I flew only carried 2 pilots, no crew chiefs. We had them, but they were just ground maintenance.
Still, an apt metaphor. I didn't use it because not enough people know what a crew chief is.