grimm1966
Members
-
Joined
-
Last visited
Everything posted by grimm1966
-
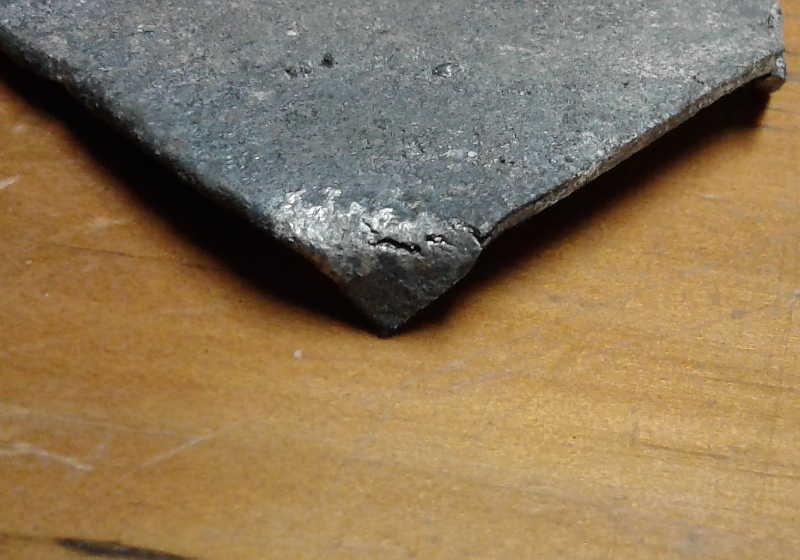
Thanks Thomas, no problem on the wrought, I completely understand. I wish I could afford "The Knight and the Blast Furnace", but I do have the Negroli book and to think that all of it was done using wrought iron/steel. I will have to look into getting "The Celtic Sword" for sure. I have noticed additional delaminations on the other plates I did. I suspect that I'm not getting the rod hot enough all the way through when I first start forging it and it's creating a separation right in the middle of the plate. This has been a definite learning experience for me.
-
Hi Thomas, I would like that very much as well, maybe I can convince you to send me some. The other test I wanted to do was in several parts. I came across an article about forging high phosphorus iron and it gave me several ideas. The paper is here: https://www.academia.edu/17859984/Forging_of_phosphoric_iron._An_analytical_and_experimental_approach Not only does it show that many artifacts from ancient on up to the 14th and 15th centuries were made from high phosphorus iron. They come to the conclusion that it's the formation of two iron microstructures that causes the cracking issues, namely ferrite + austenite. The two states do not react well together and create two different mechanical behaviours that lead to forging difficulties. But if you forge it at below 900 C then austenite can't form and you don't get the issue. According to the article this would be around an orange temp (about 1350 F to 1450 F). So I tried this and it works pretty well, I don't know the exact percentage of phosphorus in the wrought iron I have but it appeared to work out. I did get a few cracks on the very edge of the pieces I was forging, but I don't know if it was the temp or I forged it out of temp. I was able to bring the metal back up to forging temp and weld the cracks back together. The next test is to see how well the metal can be cold forged. This is essential for making armour as you can't use heat on very small parts or for fine detail work, some amount of cold work is unavoidable. I wanted to do a simple test that could be easily repeated to see how the metal will behave under different circumstances. So what I did was to put a corner of the metal in a vice and then I slowly bent the metal 90 degrees by hand. As a base test I did this on a scrap of mild steel 16 gauge plate I had laying around. And then I did the same with the wrought after I had finished several operations on it. Here is the results:The first is the mild steel test Second is one of the wrought plates that had been air cooled Third is one of the plates after it had been quenched in cold water Fourth is one of the plates after it had been annealed in the forge ashes Fifth is another plate that I also annealed in the ashes The last is a side view of the tests. The one on top is the last annealed test with one of the other tests under it. The last test is very encouraging, it looks almost the same as the mild steel test. This gives me hope that I can cold work the metal and make some armour out of it, which is the next test. Why the other annealed test didn't work as well, I'm thinking that I didn't get the plate hot enough before I buried it in the ashes. This is just something that I need to get more experience with. I'm thinking of making a replica of Wade Allen's 14th century gauntlet finger plates here: http://www.allenantiques.com/A-236.html I suspect that, because of the phosphorus, the metal will work harden very quickly, so I'm going to need to plan the hammering steps carefully. I also made some thicker plates that will be good for making buckles as another test. Well that didn't work very well, is there a way to order the images, or at least insert them in the text?


-
I cover the forge and anvil when I'm not using them with a tarp, but it's not big enough to use as a roof over them. I'm going to have to save my shekels and get a pavilion or something more permanent.
-
Thanks guys, all good points. Mea culpa. I didn't want to imply that charcoal is better than coal/coke, I should have said that this technique increases charcoals usability. I have also started to keep a pile of charcoal to the side and let it catch fire so I have a supply of fresh coals to move onto the fire. Which is a general practice for coal/coke I think. Weather permitting I'm hoping to do some more forging today. I really need to get a pavilion, tent, or something to cover the forge and anvil so I can work whatever the weather is.
-
Thanks Jackdawg, I'm having so much fun it should be illegal. That makes sense, it's no wonder that most medieval forges were inclosed. I'm thinking I might be able to build a small overhang or enclosure with fire brick?
-
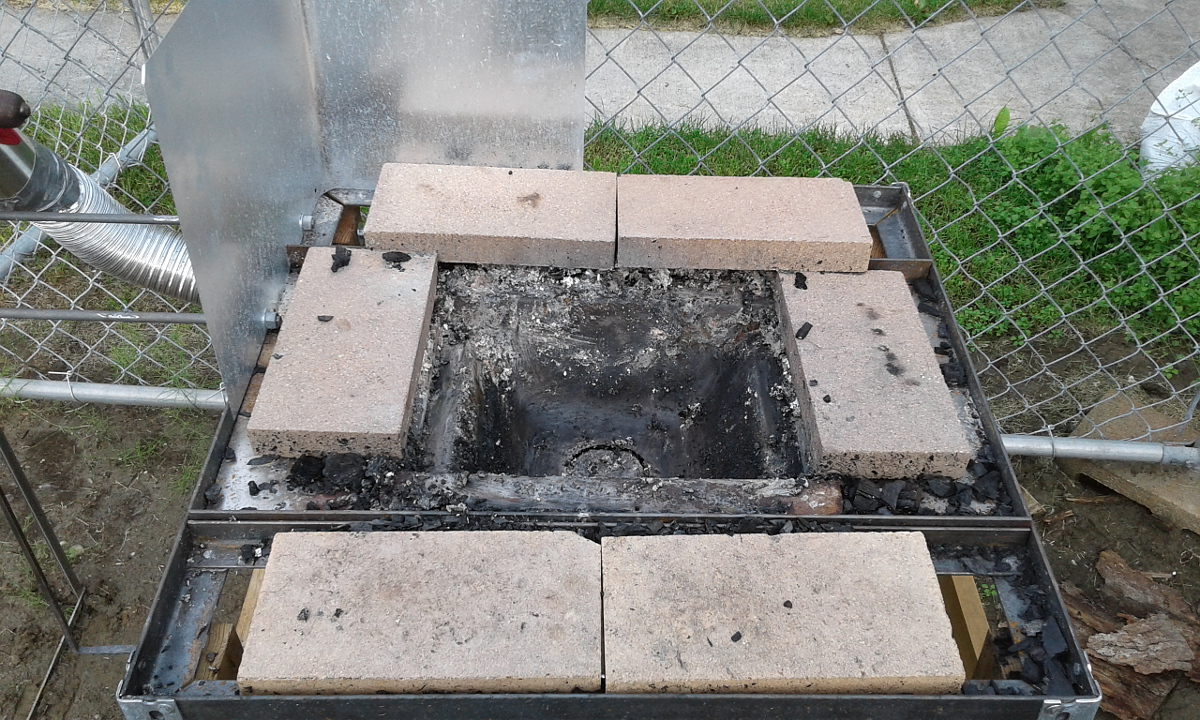
On my last forging session I wanted to test a couple of things, one of which is something I had seen the African smiths doing. I noticed that they didn't bury the iron in the coals like most smiths do today. They simply set the iron on top of the coals and tucked it in around the edges. I tried this and it worked great and there are several advantages with this technique. First you use much less charcoal than you would otherwise, maybe up to half less, which is significant. One of the reasons modern smiths like coal better than charcoal is it's ability to last longer. I think this puts charcoal on a more equal footing with coal, almost, you still have to tend the fire a lot more with charcoal. The other advantage is that you can see exactly what temp the iron is, so no more having to pull the iron out to check to see if it's ready or not. I was able to get up to welding heat with out issues. I was able to still heat the iron even when the level of coals was about 3 inches deep, but I noticed that the iron was getting more scale on it then when the fire was deeper. So at that point the position of the iron was no longer in a reducing atmosphere. Given this you need at the very least about 4 inches of coals to get to the reducing atmosphere. I did about a 2 to 3 hour forging session and went through about 10 pounds of charcoal. Before I was going through about 20 pounds or more. I haven't tried to heat a bar like this yet, so I don't know how well it will work for it. For plate like shapes it works great though.
-
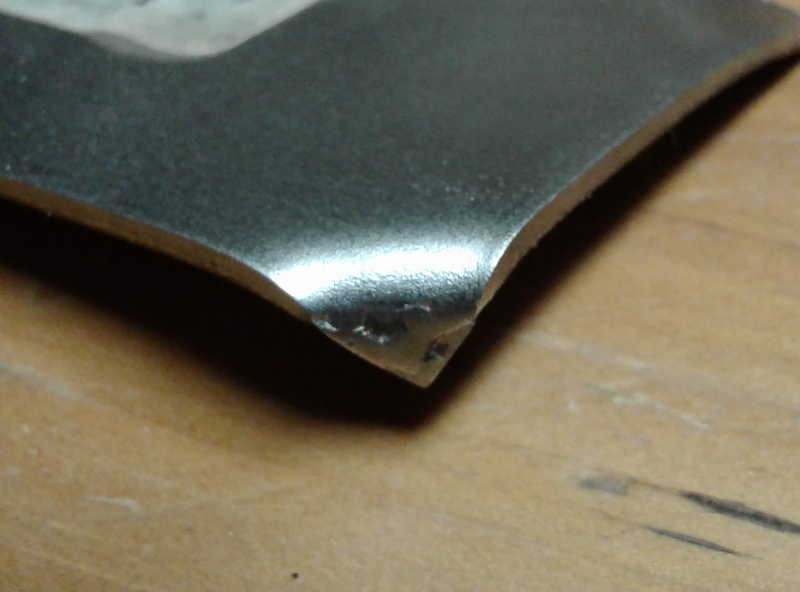
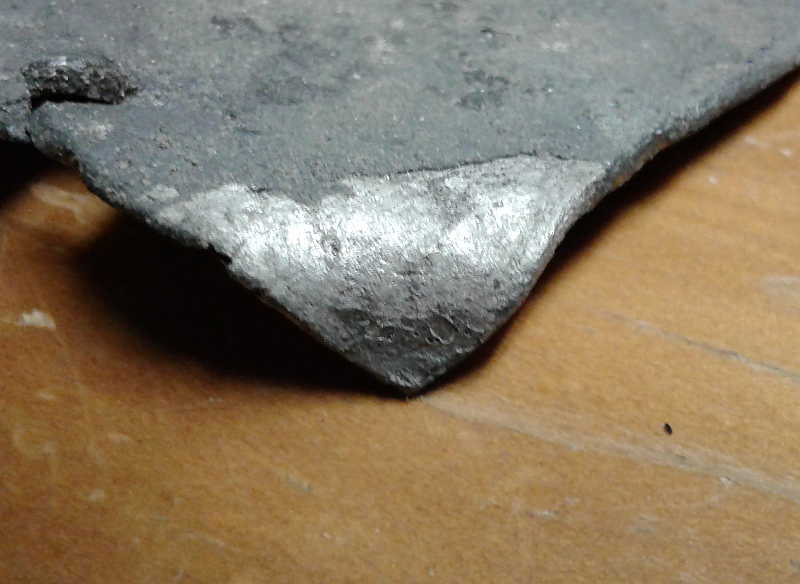
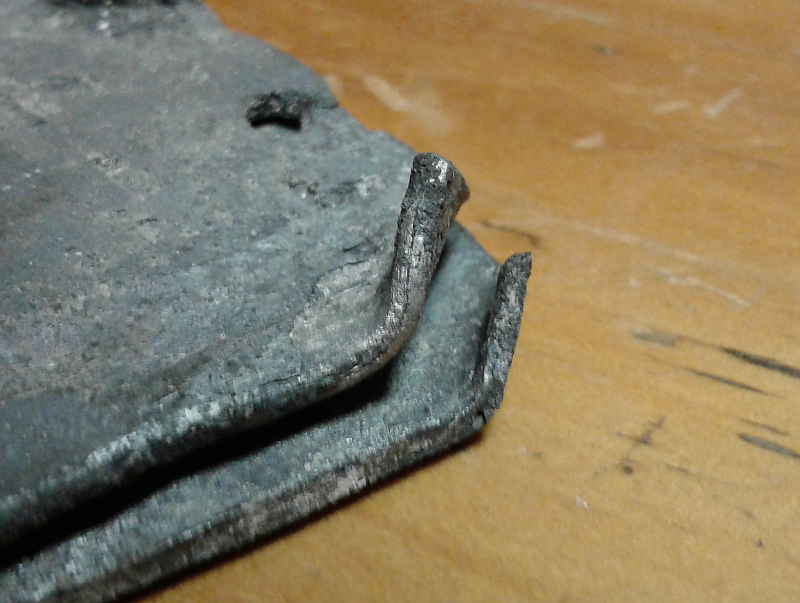
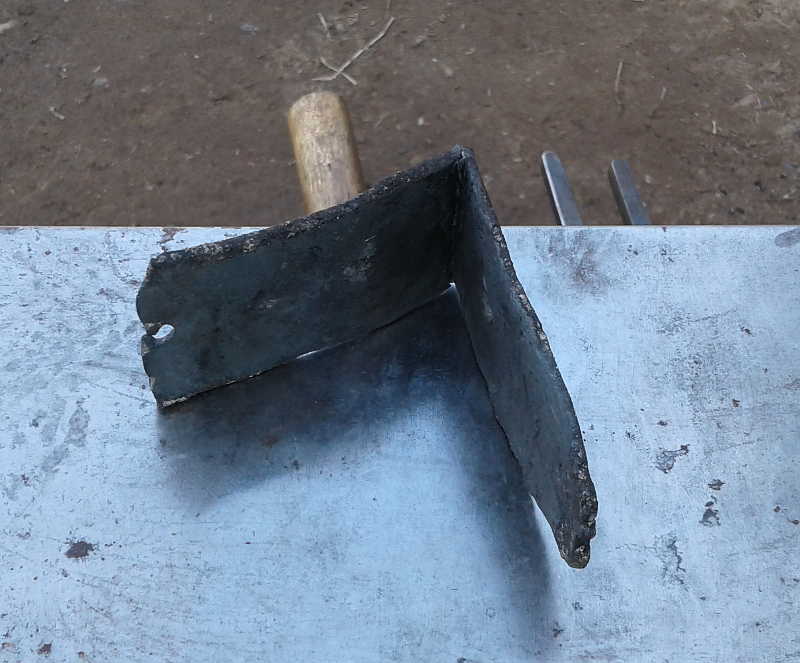
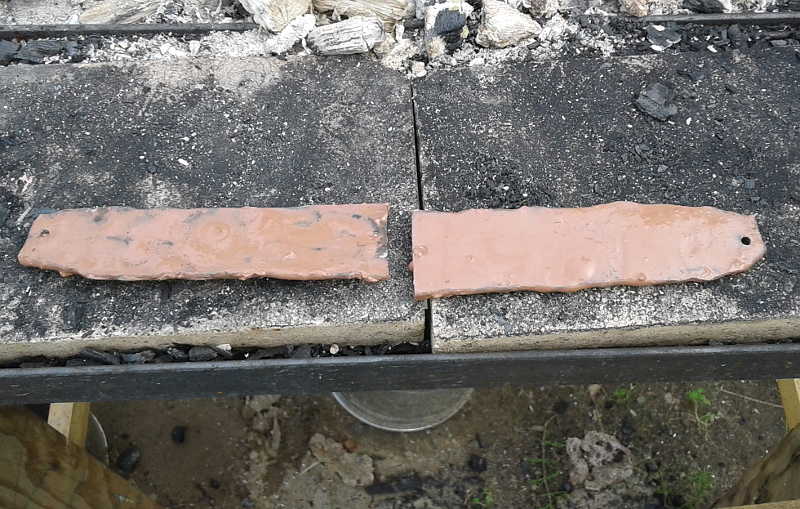
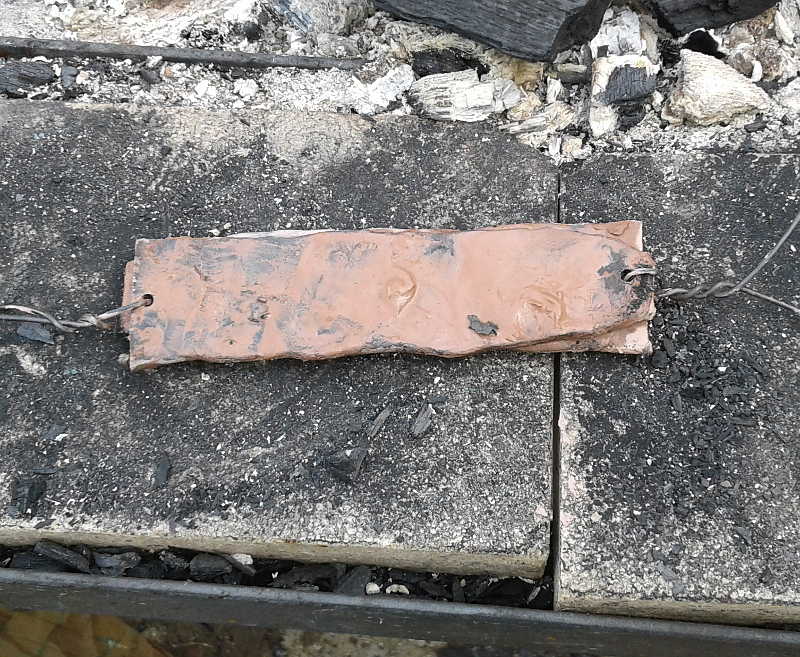
Now the wire didn't hold up the the plates did come apart before I could forge the plates very much, but they did not weld, which was cool. You could rivet the plates together but then I don't think you will be able to keep the rivet from welding to the plates and you would have to cut them apart. My next idea was to just simply fold one of the plates over and try that. So I folding the plate hot and kept the ends apart so I could coat it with the slip. I then heated it up to welding heat and continued to forge it with a ball-peen hammer to aggressively move the metal. This worked really well and I was able to get the metal down to about 16 gauge (1/16") and some parts thinner. I must have had a bubble in the slip as a small part did start to weld and you can see from the picture. I had to use a chisel to get the ends apart and the plate ended up breaking at the fold. Next time I'm going to open it up hot and see how that does. This wrought is from the Globe grainery in Wisconsin and I have heard that it has a lot of phosphorus in it that makes it brittle. I can see that in this example when I tried to open the plate cold. It's going to be interesting when I try to work the metal cold and see what I can make out of it. Lots of fun though.
-
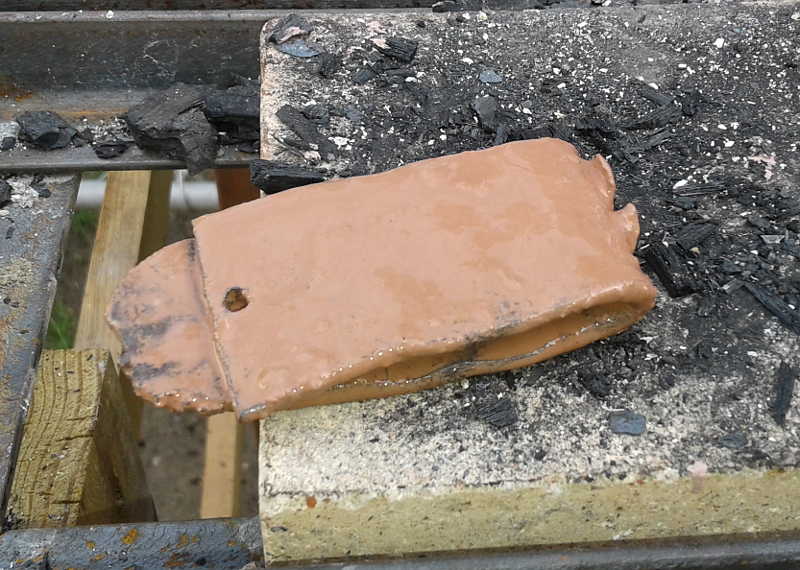
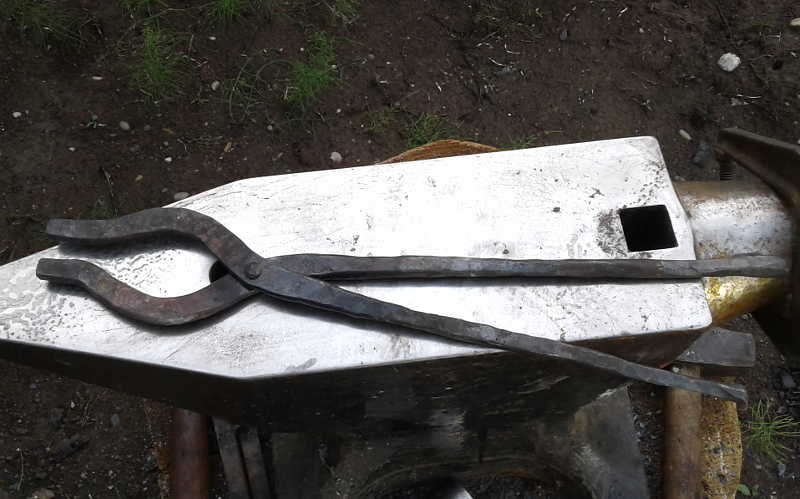
The weather finally cooperated so I have been able to get some more forging time in. I have also been moving to a new job, that takes some time. As I want to explore working with wrought iron and make some armour from it, if possible, I have been concentrating on making the wrought iron bar that I have thin. The first order of business was to make suitable tongs to grasping thin pieces. As I'm just starting out I wanted to make it simple (I think) and chose to make some viking style tongs. This design works really well, I am very impressed, they can hold just about any shape and very securely. If you notice that one of the reins is shorter than the other it's because I got it too hot and lost about 1.5". They are a bit short, sometimes when I go to pull the iron from the forge it gets really hot. They were made from 1/2" bar from Home Depot (A36?). I'm probably going to make another pair that is longer and hopefully not burn the reins this time. One technique I wanted to try is a method used by old bucket makers in Italy where they forge out bucket blanks and then coat them with a clay slip, stack them, and forge the bundle at the same time. The clay slip keeps the layers from forge welding and allows them to work on up to 7 buckets at the same time. To start with I forged down one of my 5/8" bars as thin as I could at welding heat. It ended up about 1/8" to 3/16" thick by the time I was finished. I then cut it in half and drilled holes on the ends so I could wire them together. The bucket makers would wrap their bundles with a sacrificial sheet of iron to hold the layers together. Now when I was doing this I did think to myself that the wire will just disintegrate at welding temps (it did). But that didn't stop me I covered the plates in the clay slip and wired it together.

-
Thanks Charles, that make complete sense. I finally had some time today to do some more forging as it stopped raining. Just when you get the system up and running, it rains and pours. I narrowed the fire pot with some fire brick and it's working much better. I think I wasn't turning the blower fast enough, now that I'm at about 60 turns a min. I'm getting up to welding heat reliably. I did some experiments with the wrought iron I have and some didn't do so well, others though worked out perfectly. I will create a post on the experiments later, I'm still waiting for the last one to anneal. Jason
-
-
Thanks guys, That is a lot of help, now I need to construct a charcoal shovel. @Charles R. Stevens I have that book and checked it out. I'm assuming that if you make the pile of charcoal larger, and pump the blower harder that you will have a larger heating area?
-
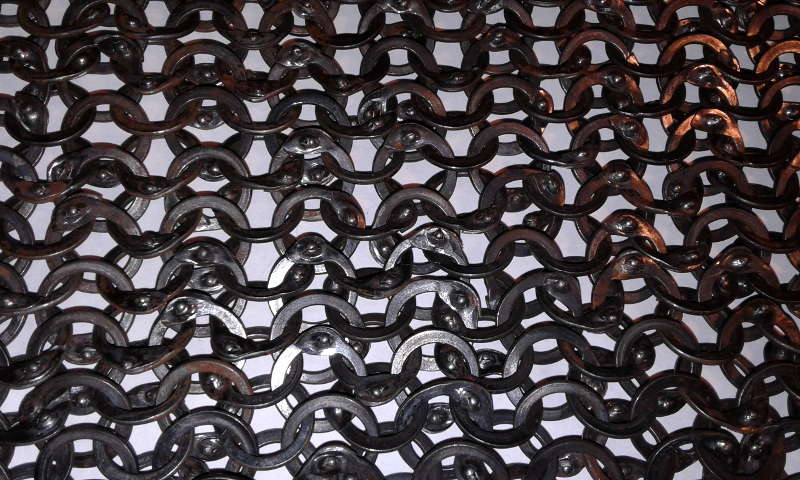
I know this is pretty old post, but here is an example of mail I have made. It's made from 16 gauge wire, punched with a modified nail set, and riveted with triangle rivets made from the same wire. The links are a bit big with an OD of around 12mm, kind of outside of the historical norm. To set the rivets I used an old pair of clinchers that was made by Steve of Forth Castle when he was still making them. I would still like to get the process better and more historical at some point. Jason
-
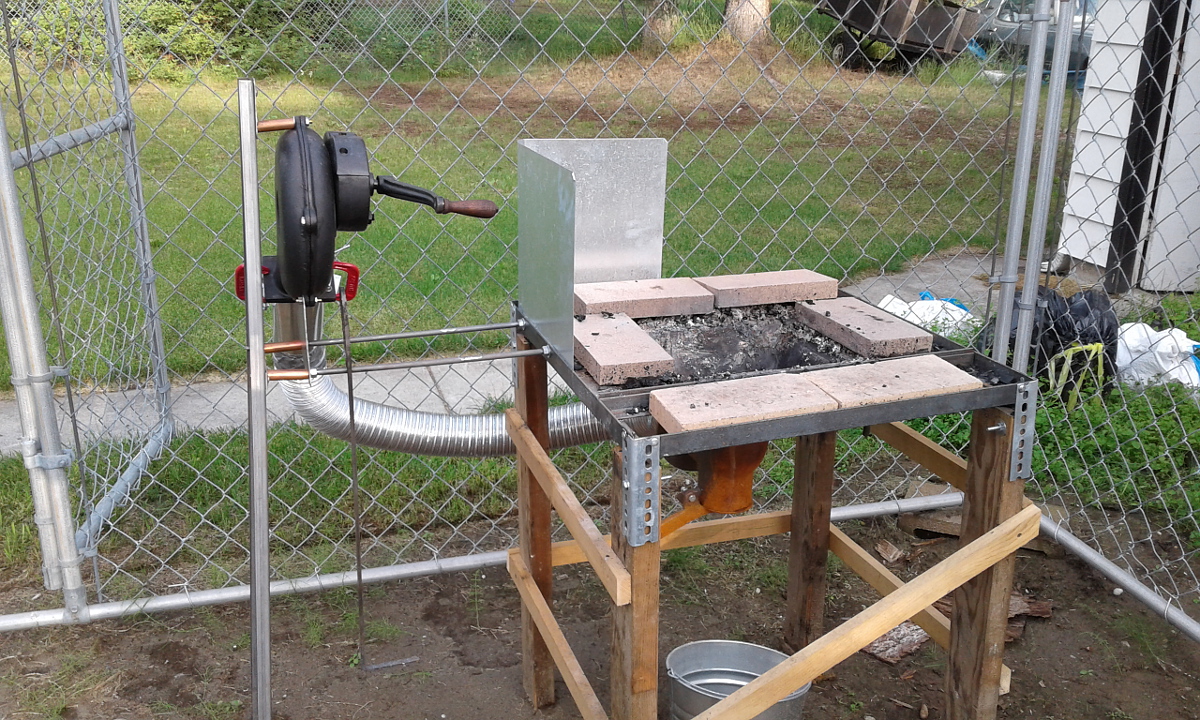
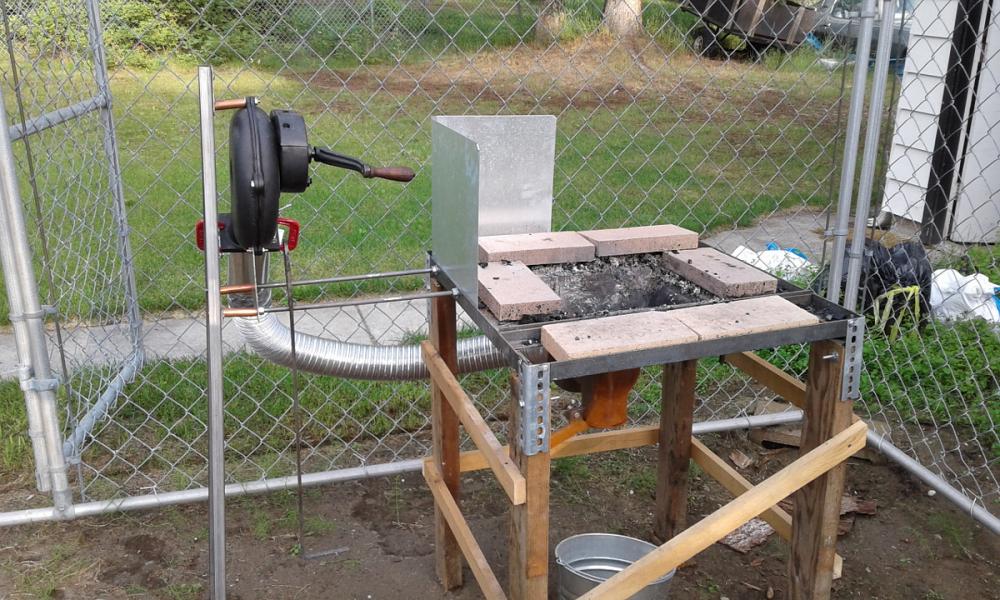
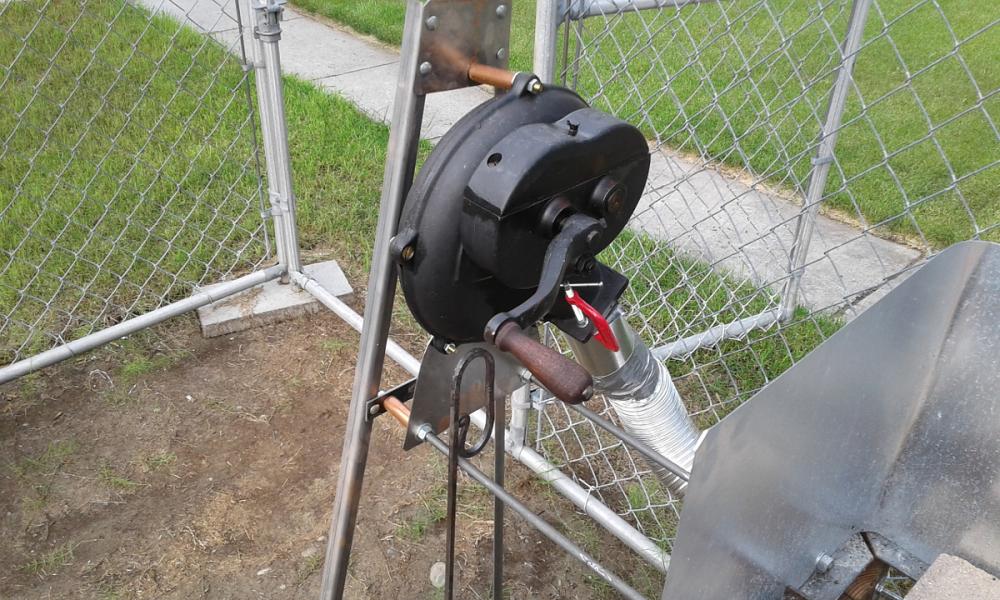
I'm looking for some charcoal forge wisdom on tending the fire and general fire pot setup. I purchased a Centaur Forge fire pot years ago which is probably not the best for charcoal. I'm going with charcoal because I live in Fairbanks proper and I don't think they (or my neighbors) will look kindly on burning coal. Especially with the problems we have been having with air pollution. At least with charcoal I can say it's just a glorified barbecue. I built a stand for the fire pot and an attached mount for the blower. My friend, who lives in Texas, was kind enough to send me up a blower that he rebuilt. I have attached an image of how I placed some fire brick around the fire pot to get some more depth. I can always get some more bricks to build it up some more. I'm guessing that I have about 6" of depth now. Any advise about how these are placed would be great. Mostly I want to work with some wrought iron rod that I have which is 5/8" in diameter. I would also like to work with some plate, so getting as big of an area as I can would be a help as well. So far I have been able to get up to welding heat, I lost about 1.5" of a pair of tongs that I was working on. Some of the problems I have found is that when I was using the forge for about 4 hours last weekend the tuyere appeared to get clogged up with ash. I wiggled the clinker breaker and poked at the coals and that fixed it. I'm assuming that is something you need to do every now and then? Back in the 80's I had an old Hay Budden anvil with a rivet forge that I did some forging with, but it's been a long while since I have done this, so any wisdom will be graciously received. Thanks, Jason

-
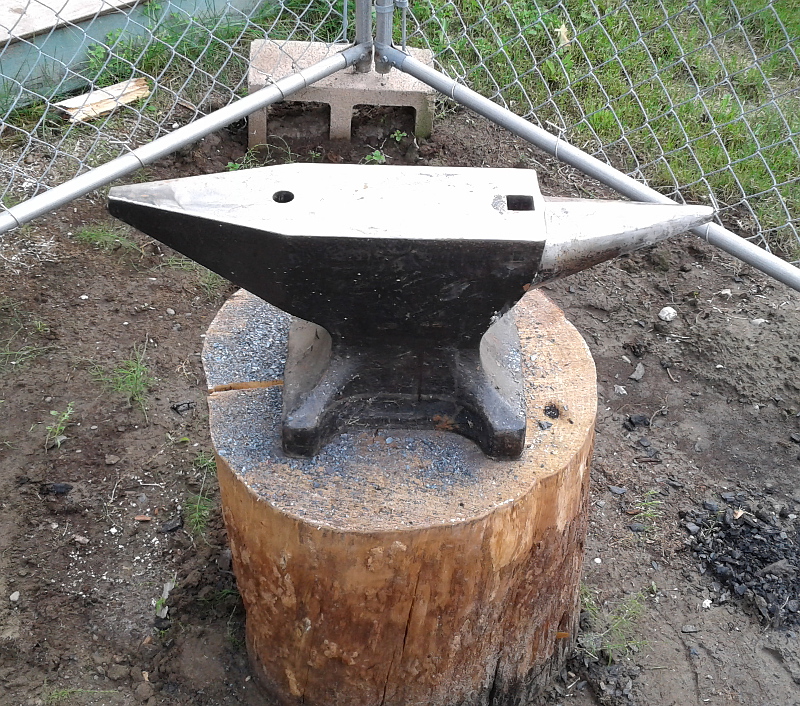
Here is my anvil that I purchased new in 2006. It's a Old World double horn classic at 165 pounds (75 kilos). I use it to make armour and now, finally, I have a forge to go with it so I can do hot work as well.
-
Thanks Frosty, No I don't know anyone up here, it's my fault as I haven't really been looking (haven't had the time ). I have hobnobbed with the guys at Wilber's Brothers sheet metal shop, they are into the hit-and-miss engines. I use 22 to 12 gauge and everything in-between and normalize a lot. Having a group here would be great as I don't get south very often. Thanks for the tip on the headache ball.
-
I only show those in private!
-
Thanks Lou, Thomas and I have known each other for many years over at the Armour Archive.
-
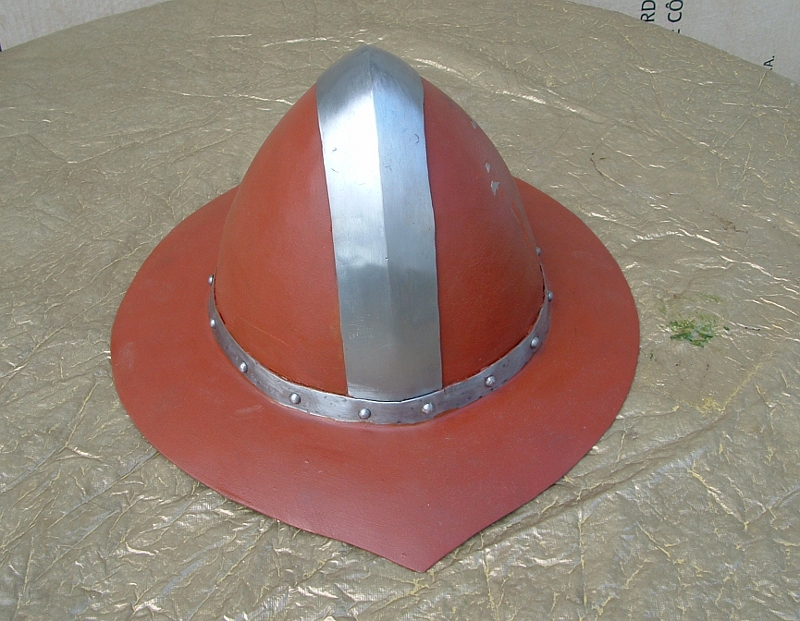
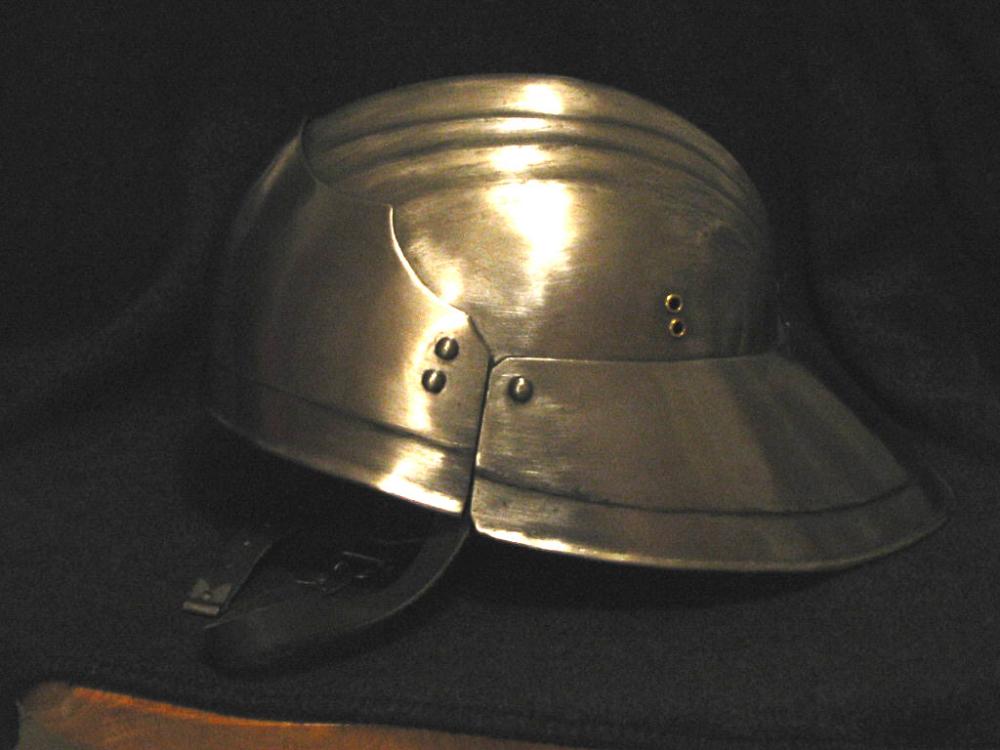
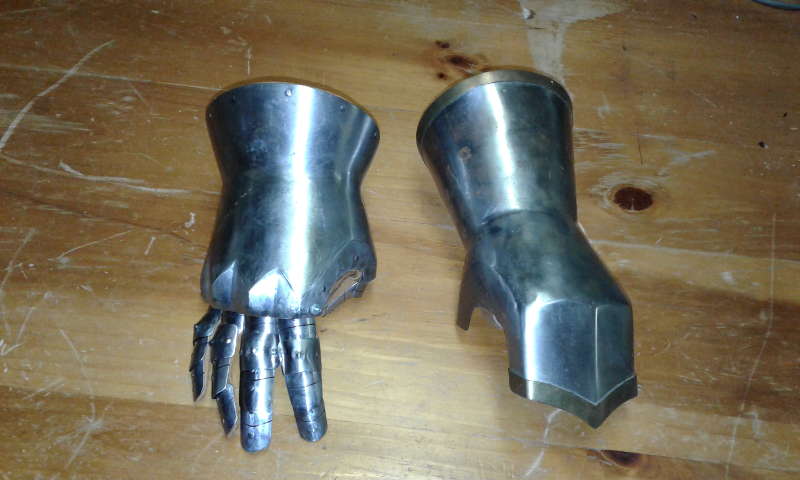
Here are a few armour pieces I have made, all are mild steel.

-
Thanks guys, I will post some pictures tonight once I get home from work.
-
I have been a long time lurker, but as I just finished my forge and blower setup, I will be spending more time here, at least until winter comes. My primary interest is medieval and renaissance armour, which I make primarily cold, but now I want to turn to using heat more. I have a ton of questions which I will be asking in the appropriate forums. One question is does this forum allow you to upload images, or do you need to host them off site? Also is there resolution limits? Thanks, Jason