Shade
Members
-
Joined
-
Last visited
Everything posted by Shade
-
Okay now you have me rethinking stuff. Thanks! Mailbox... (((hmmm that is an easy fab job... mind wanders away...))) Side tracking is also a Hi IQ thing too.
-
Frosty thanks for the reply! The cost between the 2 types, is not that bad. Saving money on fuel is good. My use will be definitely as a hobby. More use in the cooler months and less in the summer. I hate summer, too f-ing hot. I assume I can use a grinding wheel to shape the bricks as needed? I really appreciate the insight in the material differences for the refractories. I am lacking knowledge there. Fabrication of the steel is easy for me, no worries there. Just looking to add skills, enjoy making things and more toys!!! One more question if I use the IFB in the lining, I was thinking I could use a couple of hard brick on the floor of the forge to protect the IFB and use hard bricks as the doors/gates on on the ends. TIA, Ron.
-
Hello all, I am finally getting around to building my first forge. I am using an old portable air tank for the outside shell and plan on use a combination of fire brick and refractory cement for the lining. The brick is rated at 2700F and the cement for 2800F. The brick is Rutland 9x4.5x1.25. And the length of the forge will be 18 inches. So I was planing on on having 3 of frostys T-burners. KISS principle is being followed for this build. I like the ribbon burn design but for now just want to get this up and running. For a little background I was a welder in the Navy decades ago, like 3 and over the years have build a nice little machine and fab shop here on the farm, so any machining or welding is not a problem. Also this will live its life outside in the weather and I live in Northern Illinois. So the burners will be removable, and I will make a cover for the forge. I will likely make a base for it I have move with the forks on the tractor. My real question is what is the best way to drill or cut the fire brick/ best practices. Or should I just use the castable cement refractory and form it around the burner tubes? I am trying to keep costs down but if I have to buy a tool etc. that is fine.
-
-
-
-
xxxx, I spent a lot of time around some big scalers, in my Navy days, but never seen one that could do that, and with my aging body and arthritis I doubt I could handle that puppy today for very long. If it flattens the weld then I would agree it is working for you. Good practice to hit it while still hot.
-
-
-
-
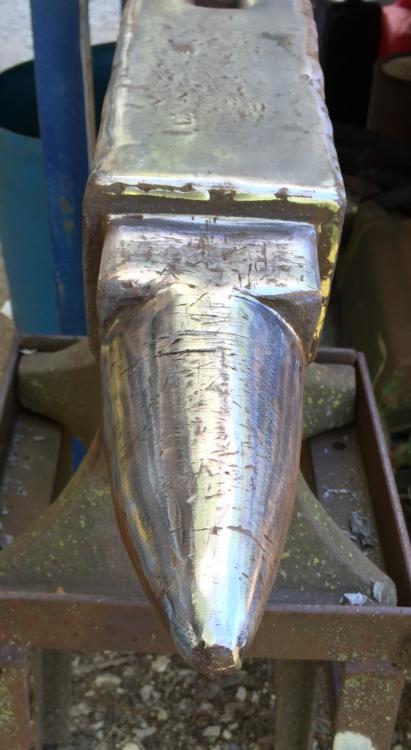
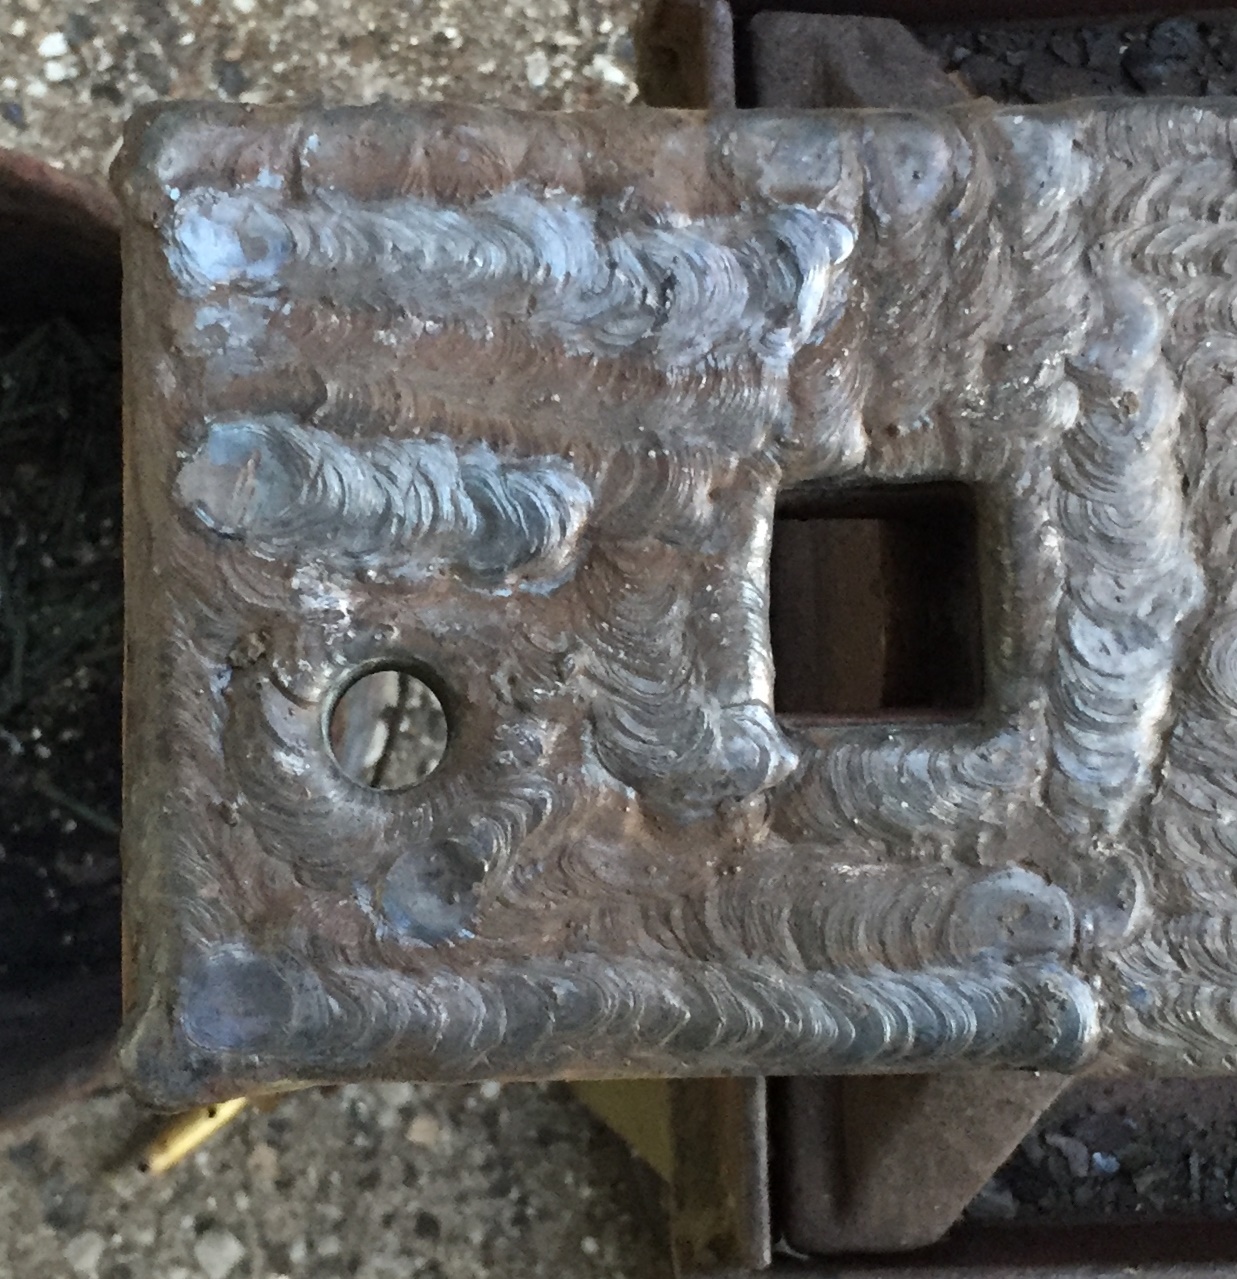
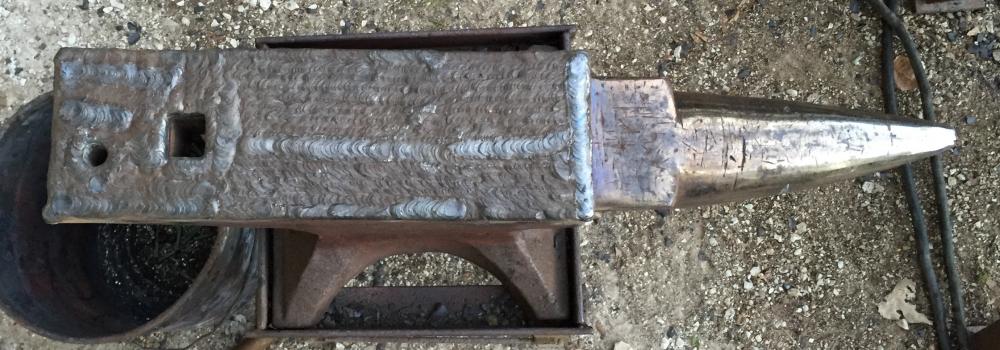
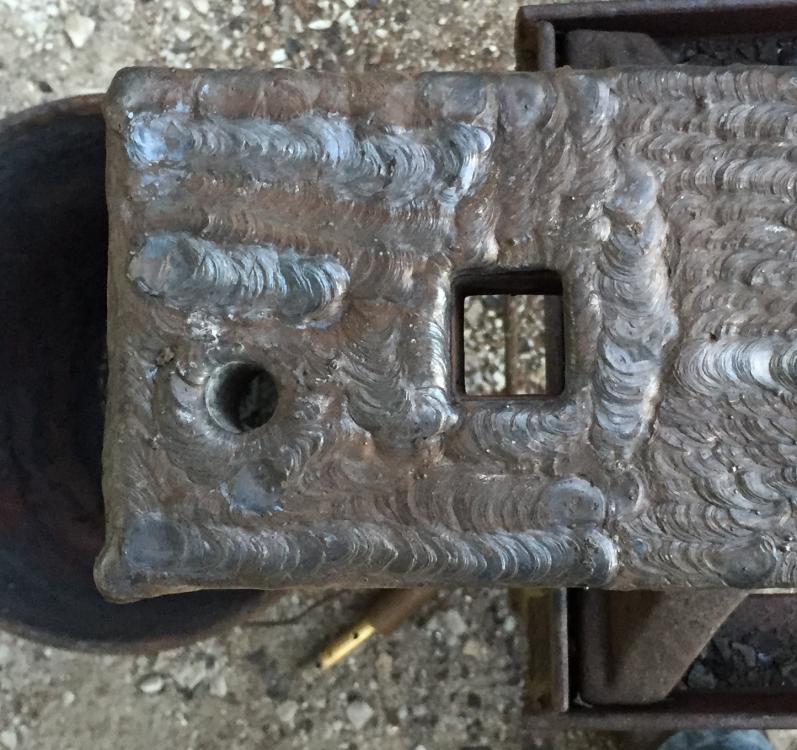
Quick update: Welding went well, put 2 layers down, and machined of about half of it, that was the plan. That is the as milled finish, I used a Sandvik Coromill 245 with a fresh set of corners for the finish pass. I was getting 55-60 Rc on surface before welding and now have 50-55 Rc on the face. I am happy with that. I knew I would loose some hardness. I lost less than I was expecting to loose. Still have a lot of finish grinding to get the edges radiused proper and a little die grinding on the hardie hole. I was going to put a 1/4" radius about 4" long behind the table and a 1/8" radius around the rest of the face of the anvil, and clean up the table and horn. Wire brush the reminder of the anvil. Question, I see all these nice pretty black anvils, what to you all use to get that color in them?
-
A needle scaler does not have the energy required to deform the weld to relieve the stresses induced during cooling. Think of it this way, would you use a needle scaler in place of a hammer when forging a piece of steel? As the weld puddle solidifies and cools it contracts, peening the weld, deforms the weld back into the base metal and relieves the tension stresses created by the cooling of the puddle/weld. If you have good access to the weld, you can use the ball end of a ball-peen hammer, if not I use the taper punch with the end ground half round.
-
A needle scaler will not properly peen a weld.
-
Grind out a good vee, generally a 70° vee is normal for welding to get good access to the root of the weld, if you grind from the opposite sides of the anvil this will give you the best access with minimal grinding and welding. Vee-ing out 4 sides is both not needed and just extra work. I don't know if I would trust much of the previous welding done to it. Also and this is important, you need to alternate welding one side then the other side on every pass this will keep any stresses equal and keep the weldment straight as you weld. I would suggest some preheat, 200-250°F. If you are stick (SMAW) welding start with E-6010 in your root passes. This will aid you in getting good penetration and cleaning out impurities. Peen the weld well after the first pass to reduce stresses. Every pass from here on should be peened well. In deep vees I use a tapered punch ground slightly round to do the peening. The remaining passes can be run with E-6013, E-7018 or E-7024. 6013 would be the easiest to run and the cheapest route. 7018 rod is a low hydrogen rod and must be kept dry or you could get hydrogen embrittlement. A proper rod oven will keep the rod at 250-300°F. (an old fridge with a light bulb is useless, xx18 high titania flux is hygroscopic) I tend to steer people away from 7018 for that reason. As mentioned 7024 is a fast fill, slow freeze rod and must be welded in the flat position and requires a 250 amp class or better machine so you can have the duty cycle you need also it is not a rod for the beginner as you can easily get inclusions in your weld. If you MIG (SMAW) get a good 70S-6 wire, like Lincoln's L-56, and run with 75/25 argon carbon dioxide mix gas. Again peen all your welds and alternate sides welding. Welding in the flat position will help, if your machine is capable you can run spray transfer or pulsed spray modes, which require different gas mixes, and can be machine dependent.
-
-
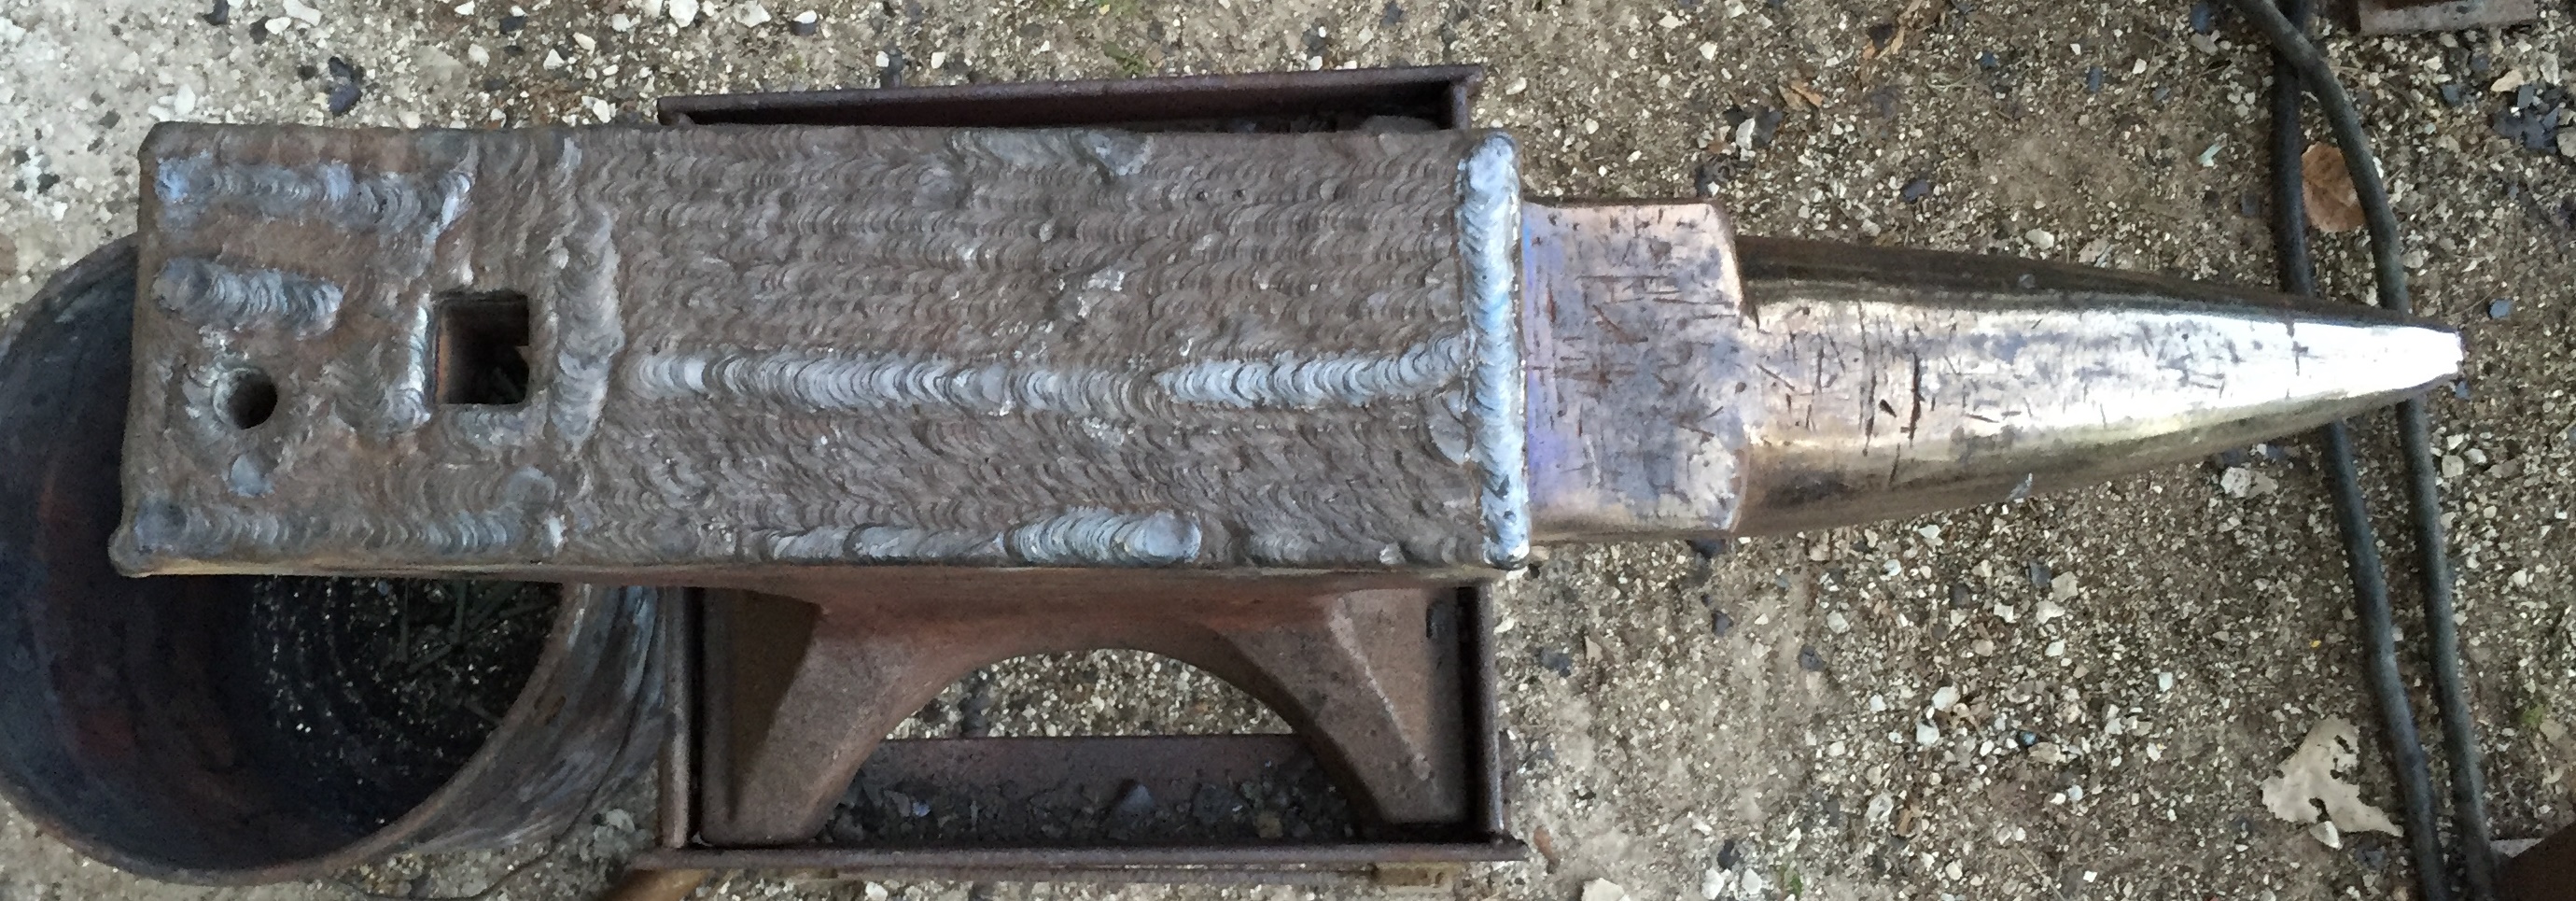
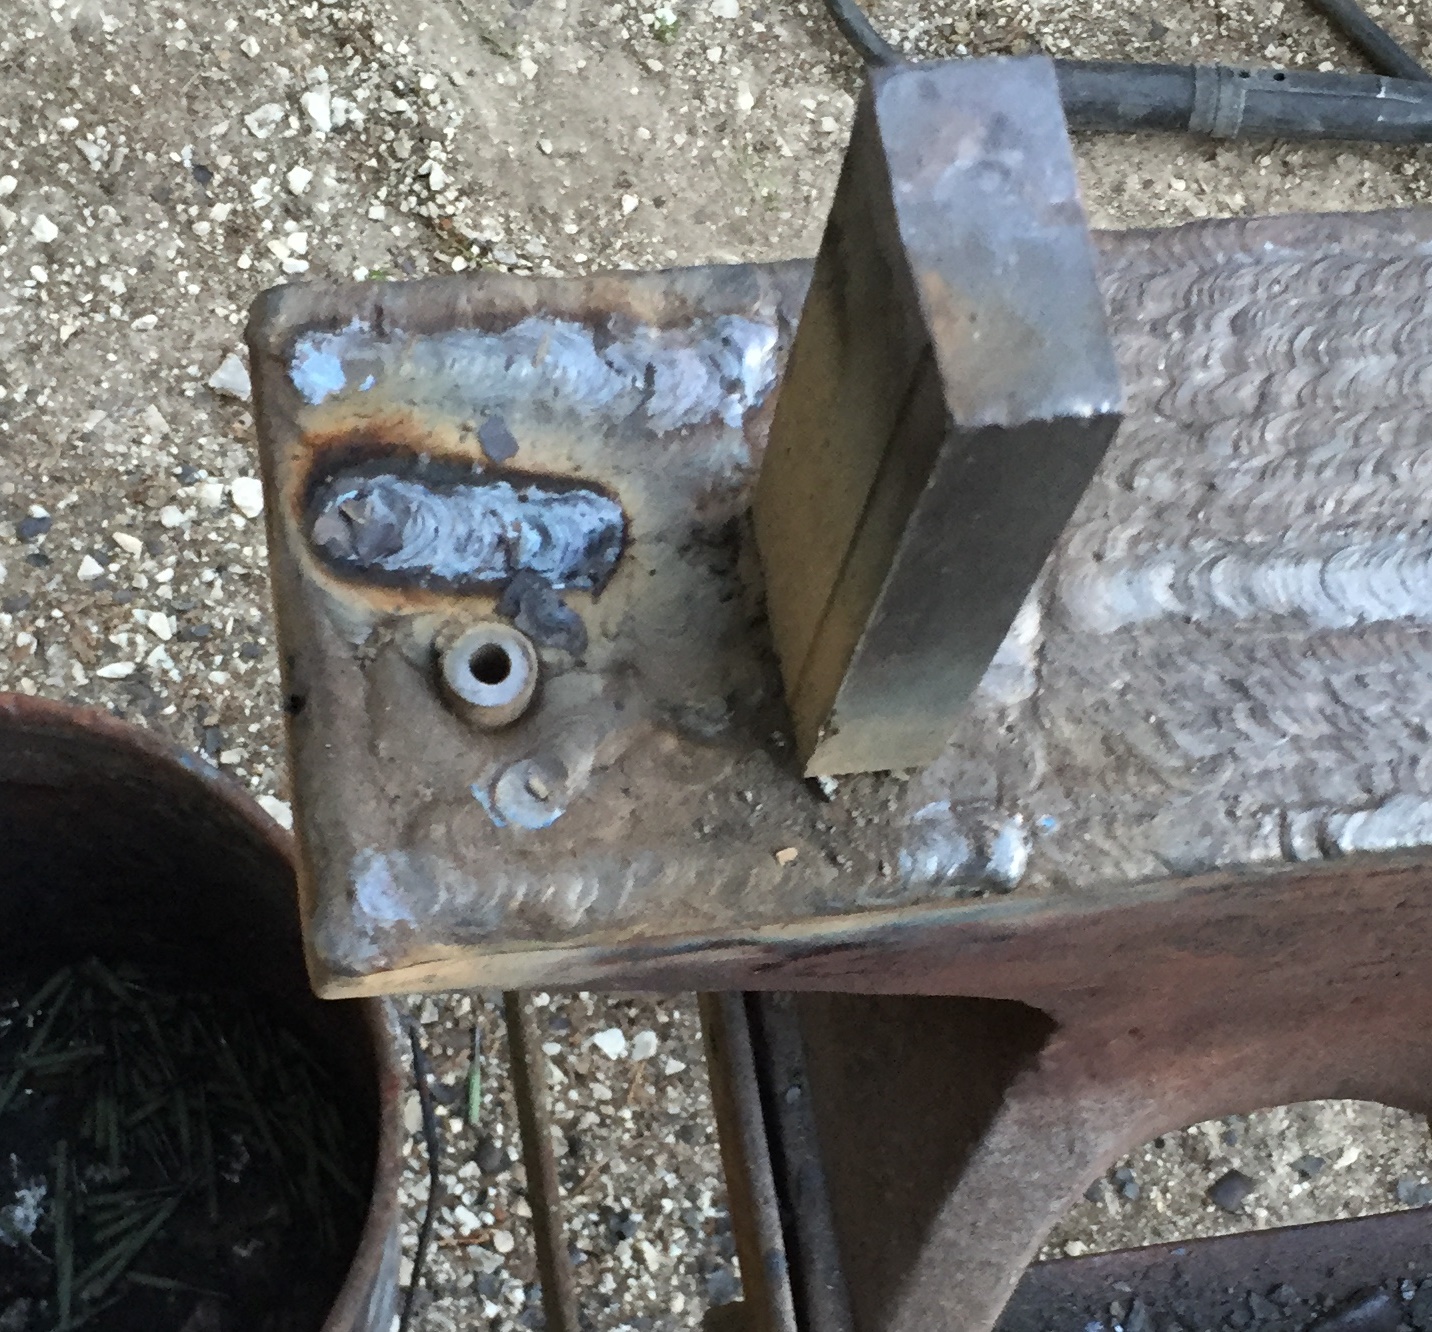
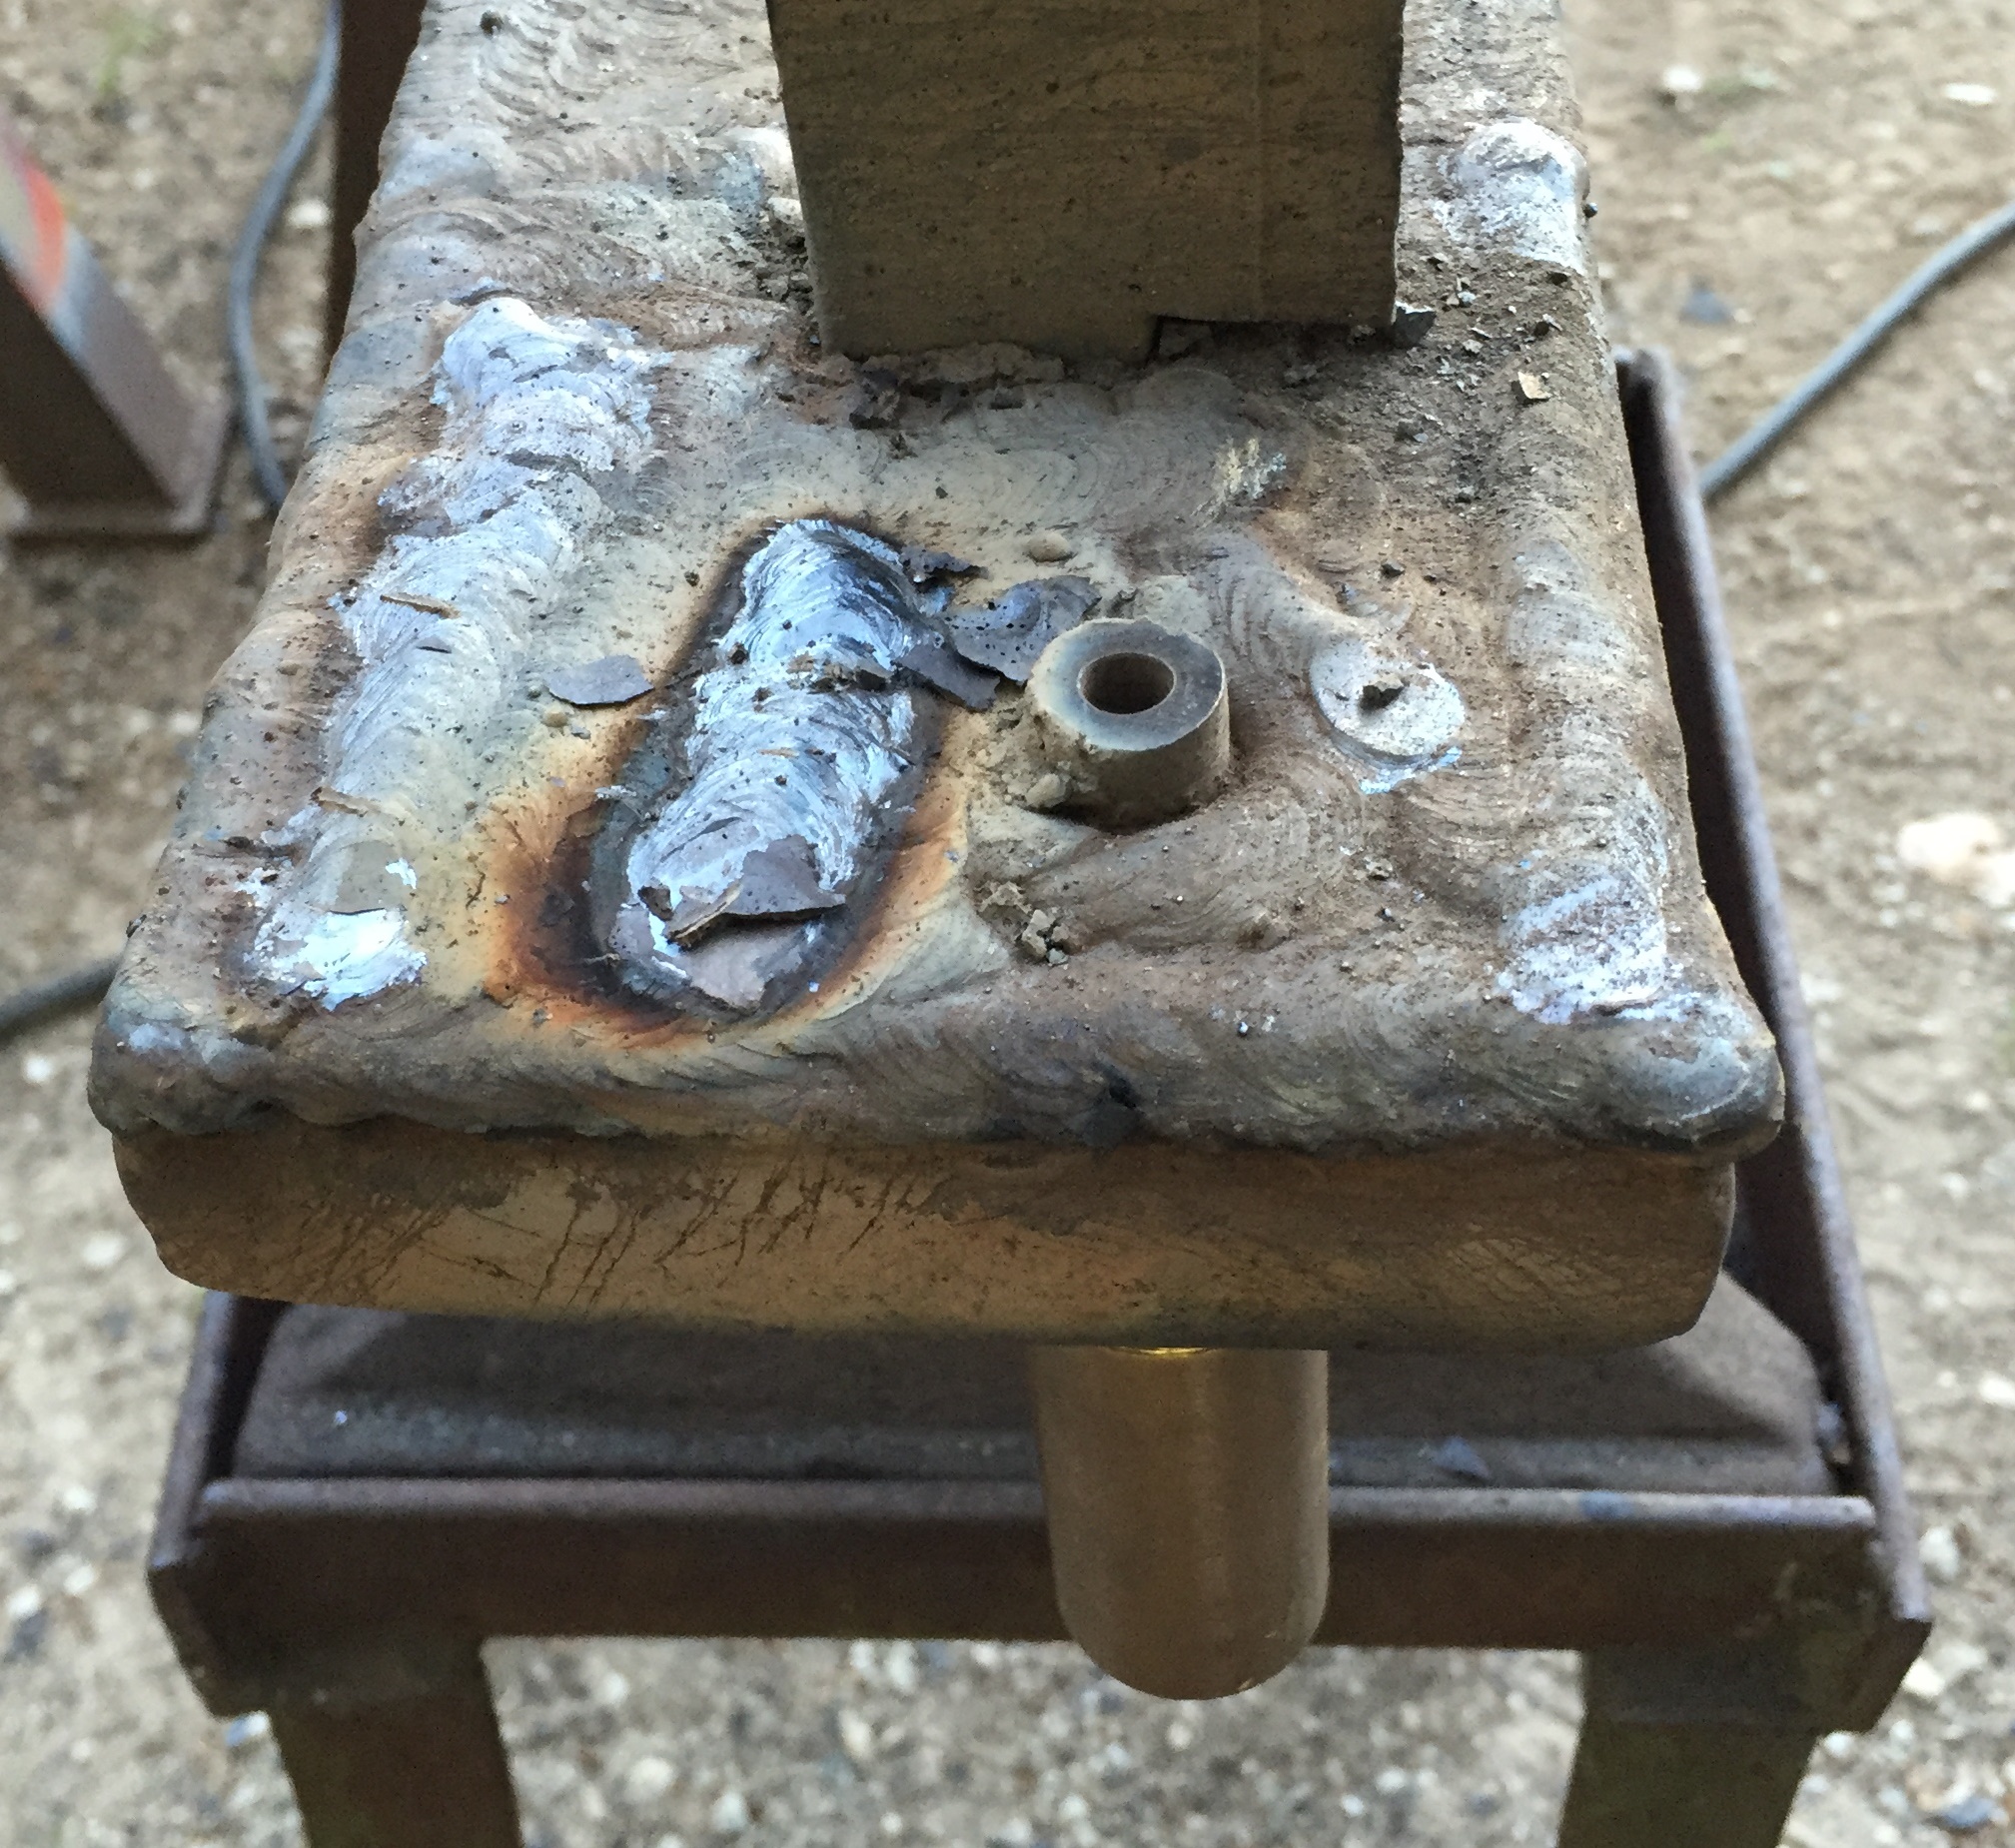
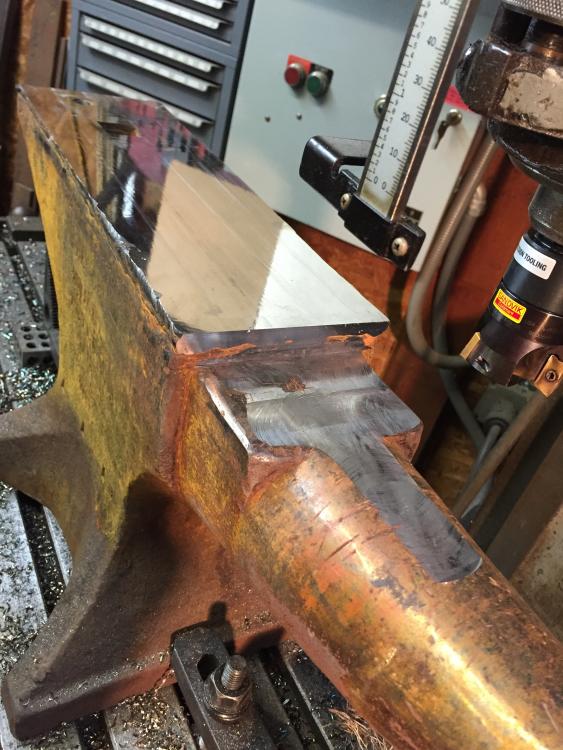
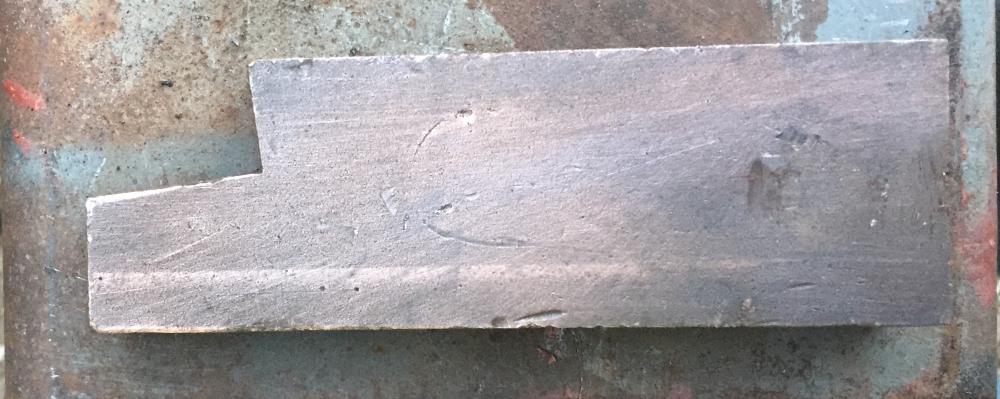
A short note, as I am beat, hot and really stinky! All went well. Welded 2 layers on the face the copper block cold shunt worked outstandingly well. The brass shunt for the pritchel hole not as well, the welding part great the getting it out was a widdle difficult but I got it out. The copper block I used for the edges and then machined a wedge in it for the hardie hole. Worked better than I hoped. Attached are pictures, I have it covered to cool slowly overnight, wrapped well in welding blankets.


-
I often run into people needing to weld something, and all too often have no clue what the base metal is. I did a fair amount of research in to the PW of the vintage I think this is early 1900's US made and the tool steel plate is similar to modern W-1 steel, with a wrought steel base. Therefore the procedure I posted the link to makes a lot of sense. Thanks for your input. Btw, I claim to be a welder who happens to own a few machine tools. Just starting to dabble in heat and beat. I also have a tool addiction problem. A little more detail over here. http://www.shopfloortalk.com/forums/showthread.php?t=46216
-
-
-
-
-
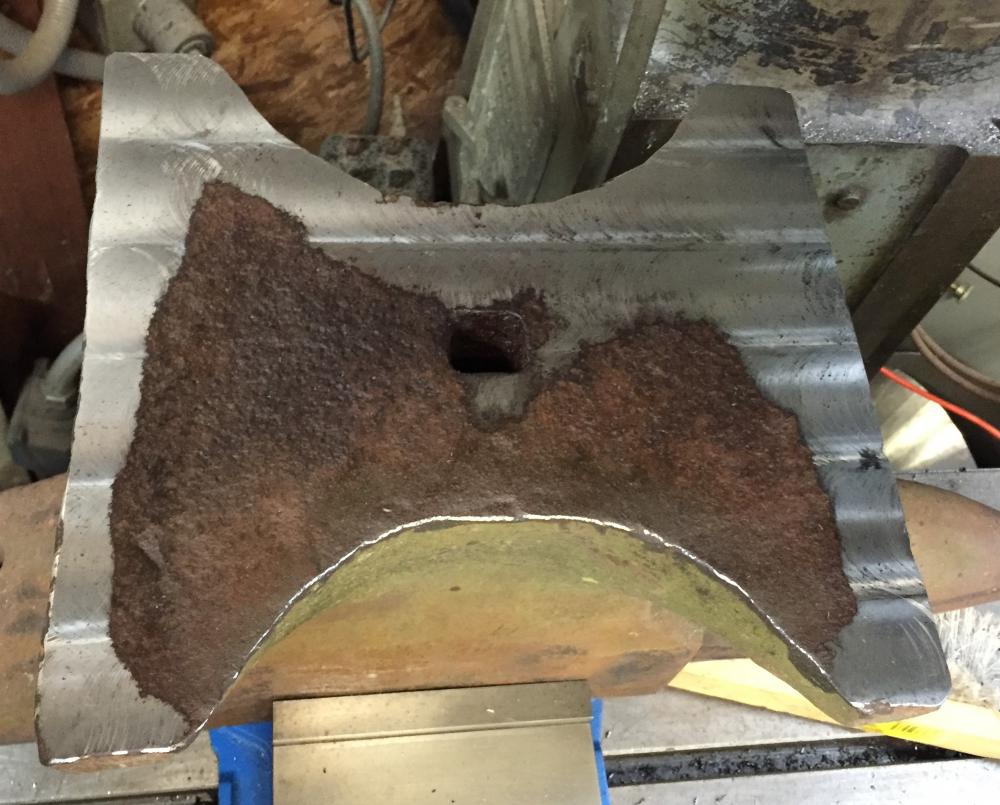
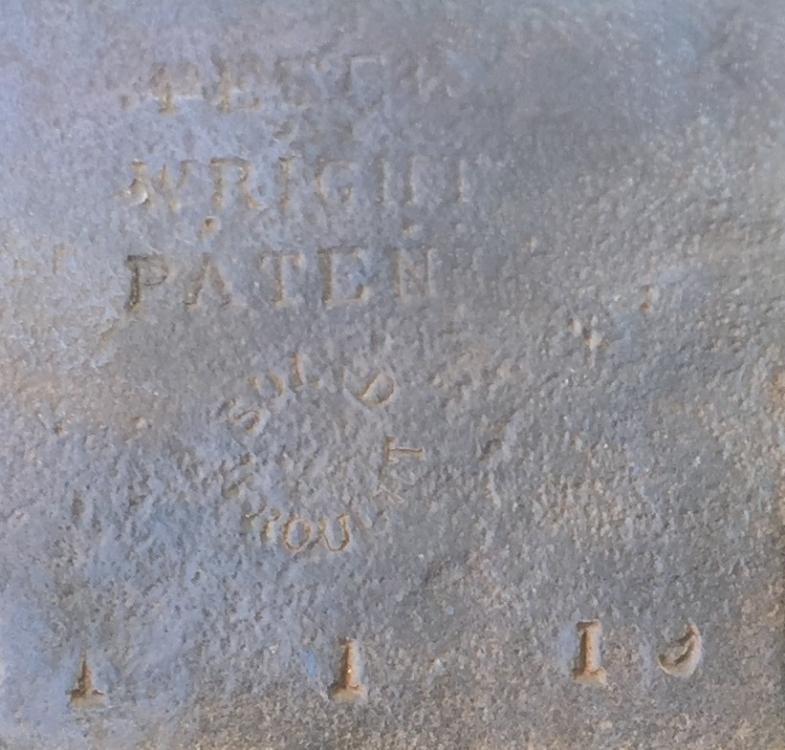
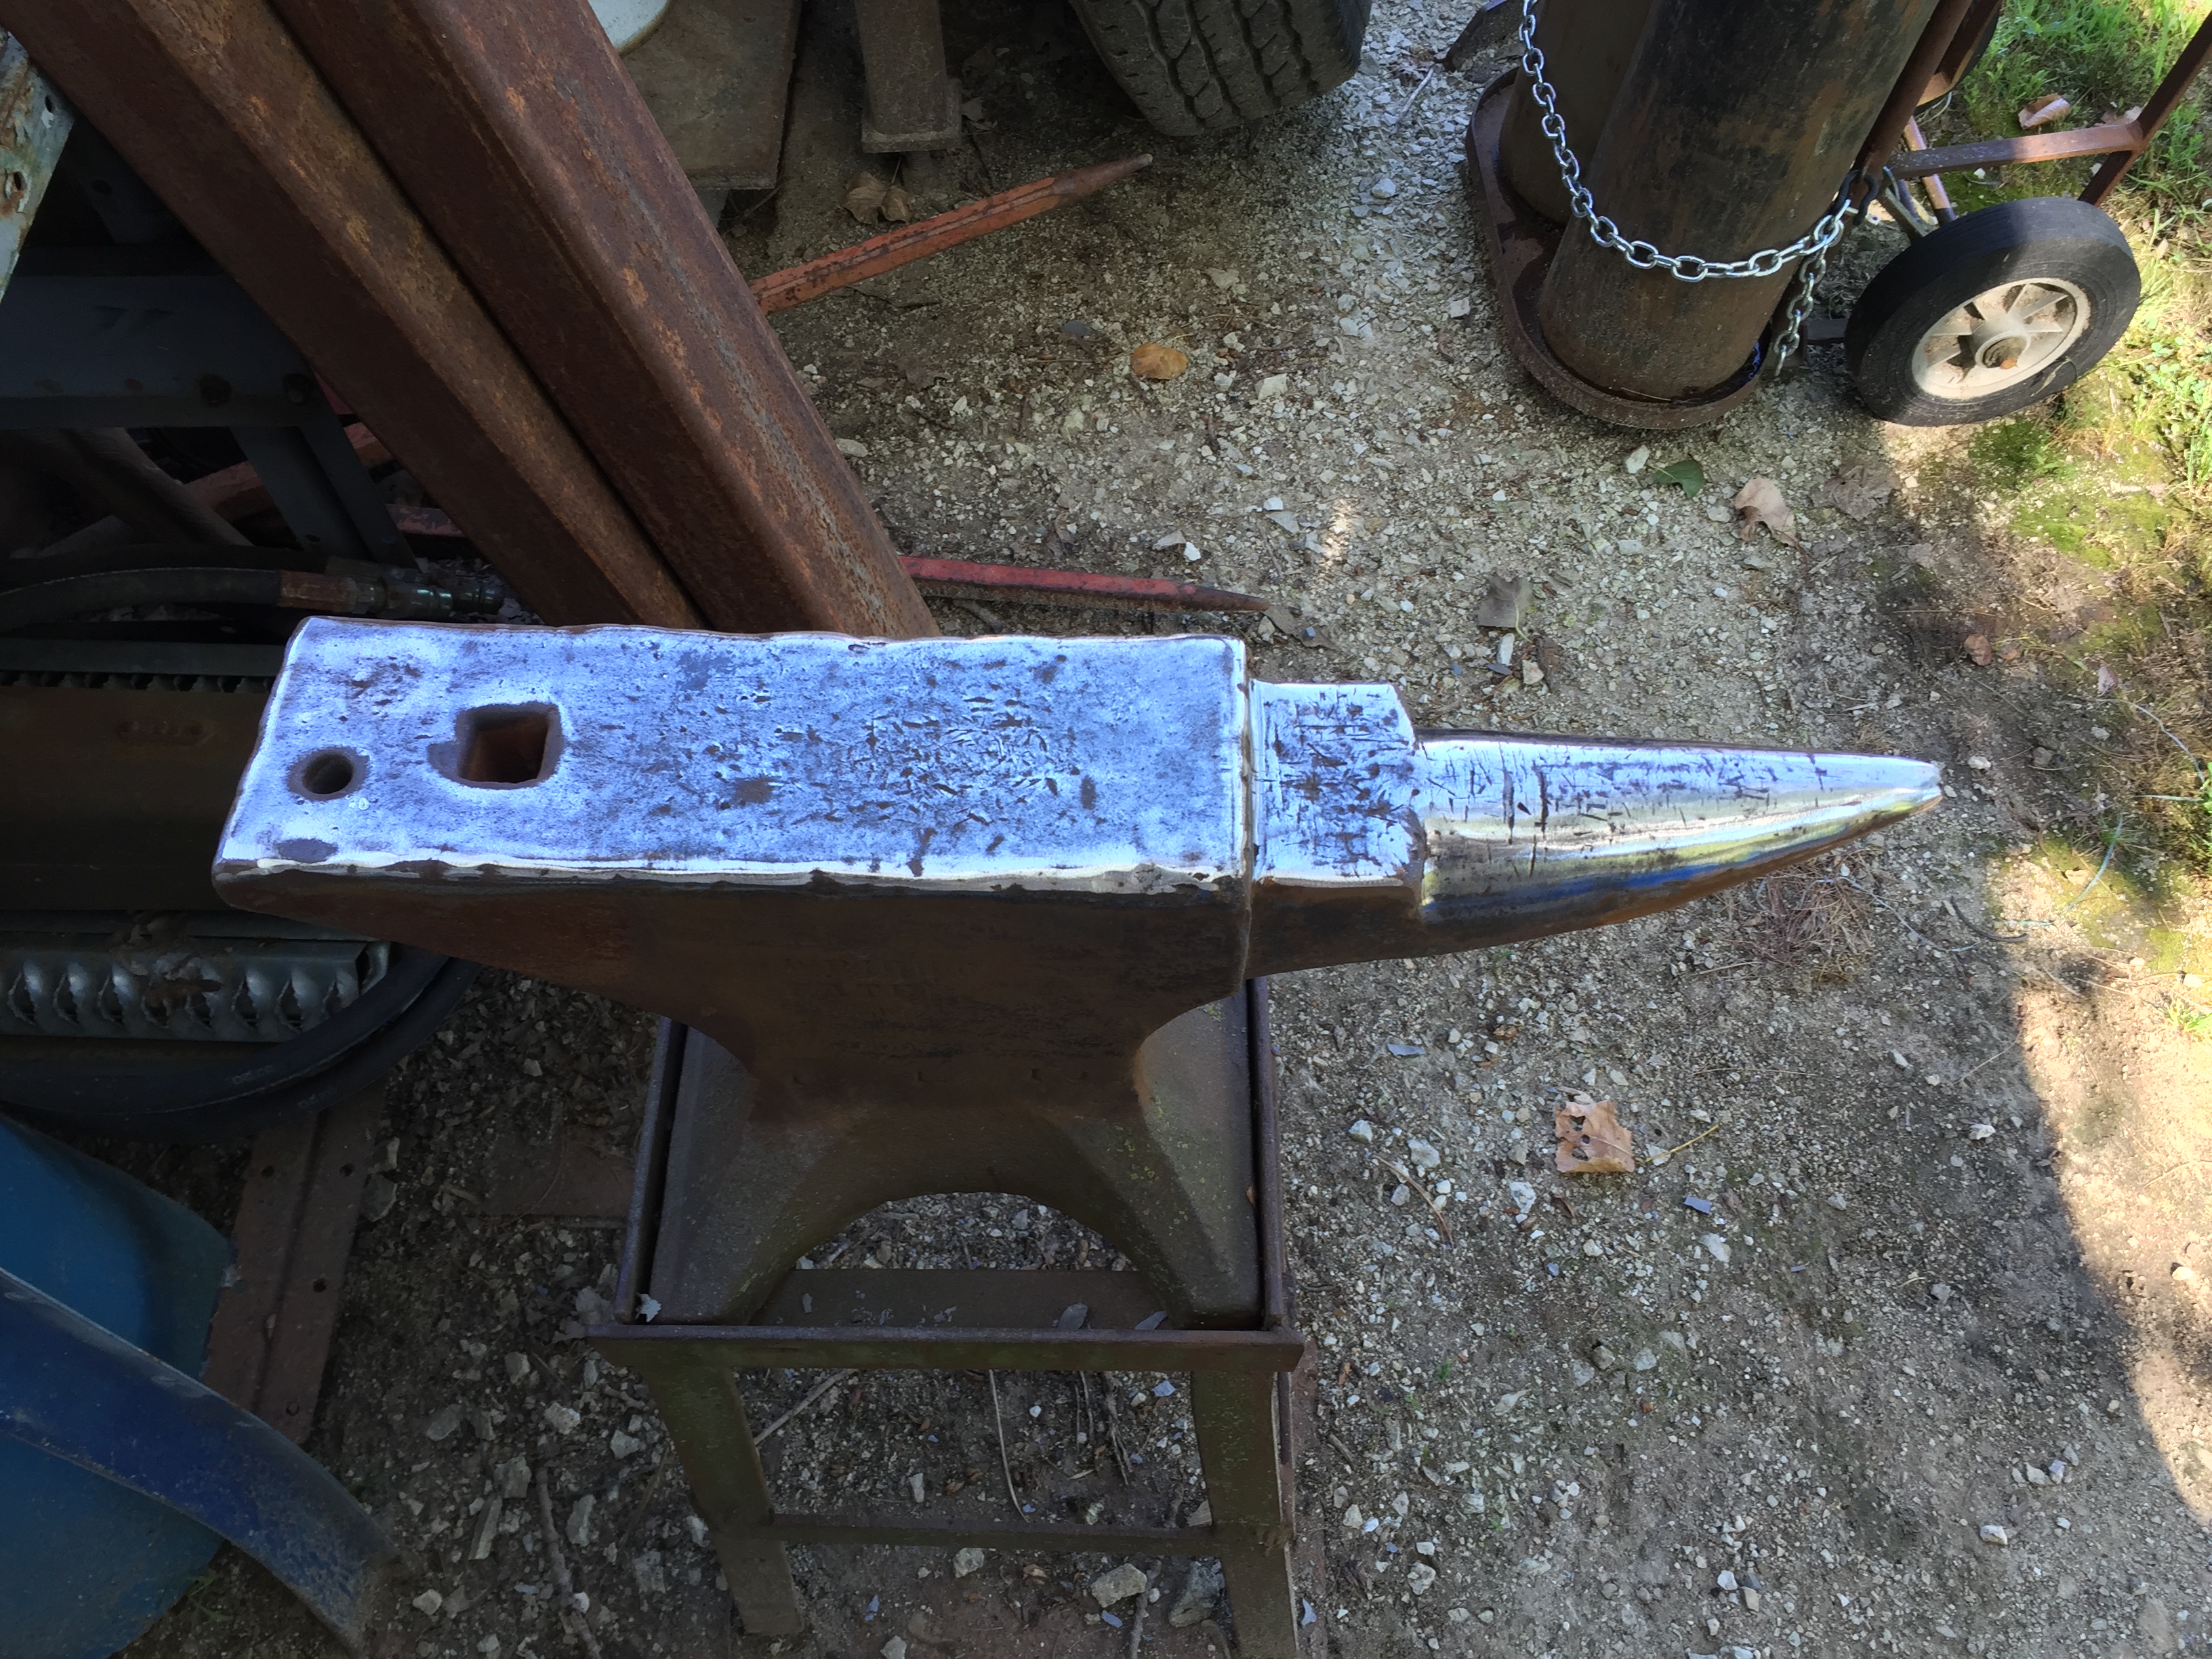
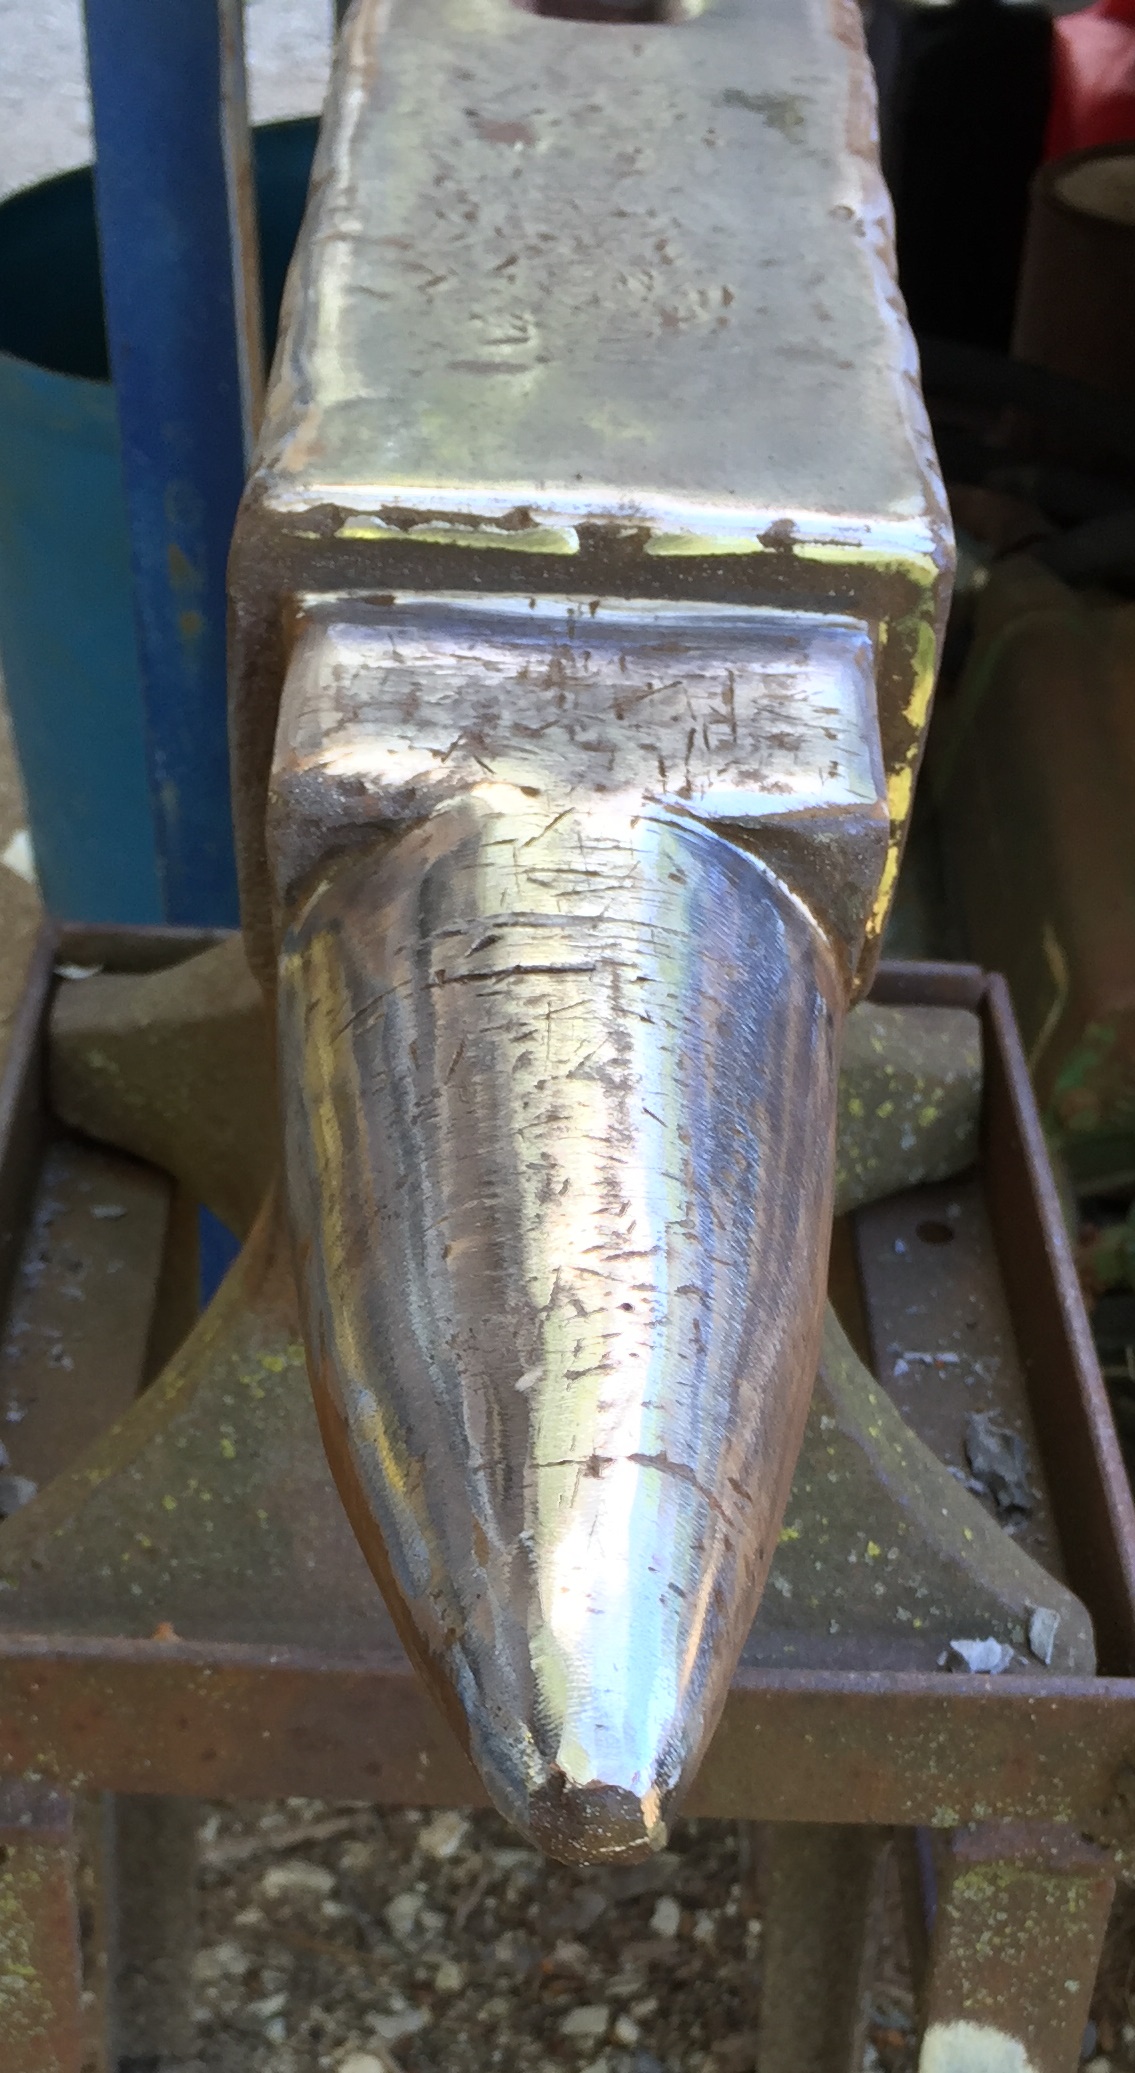
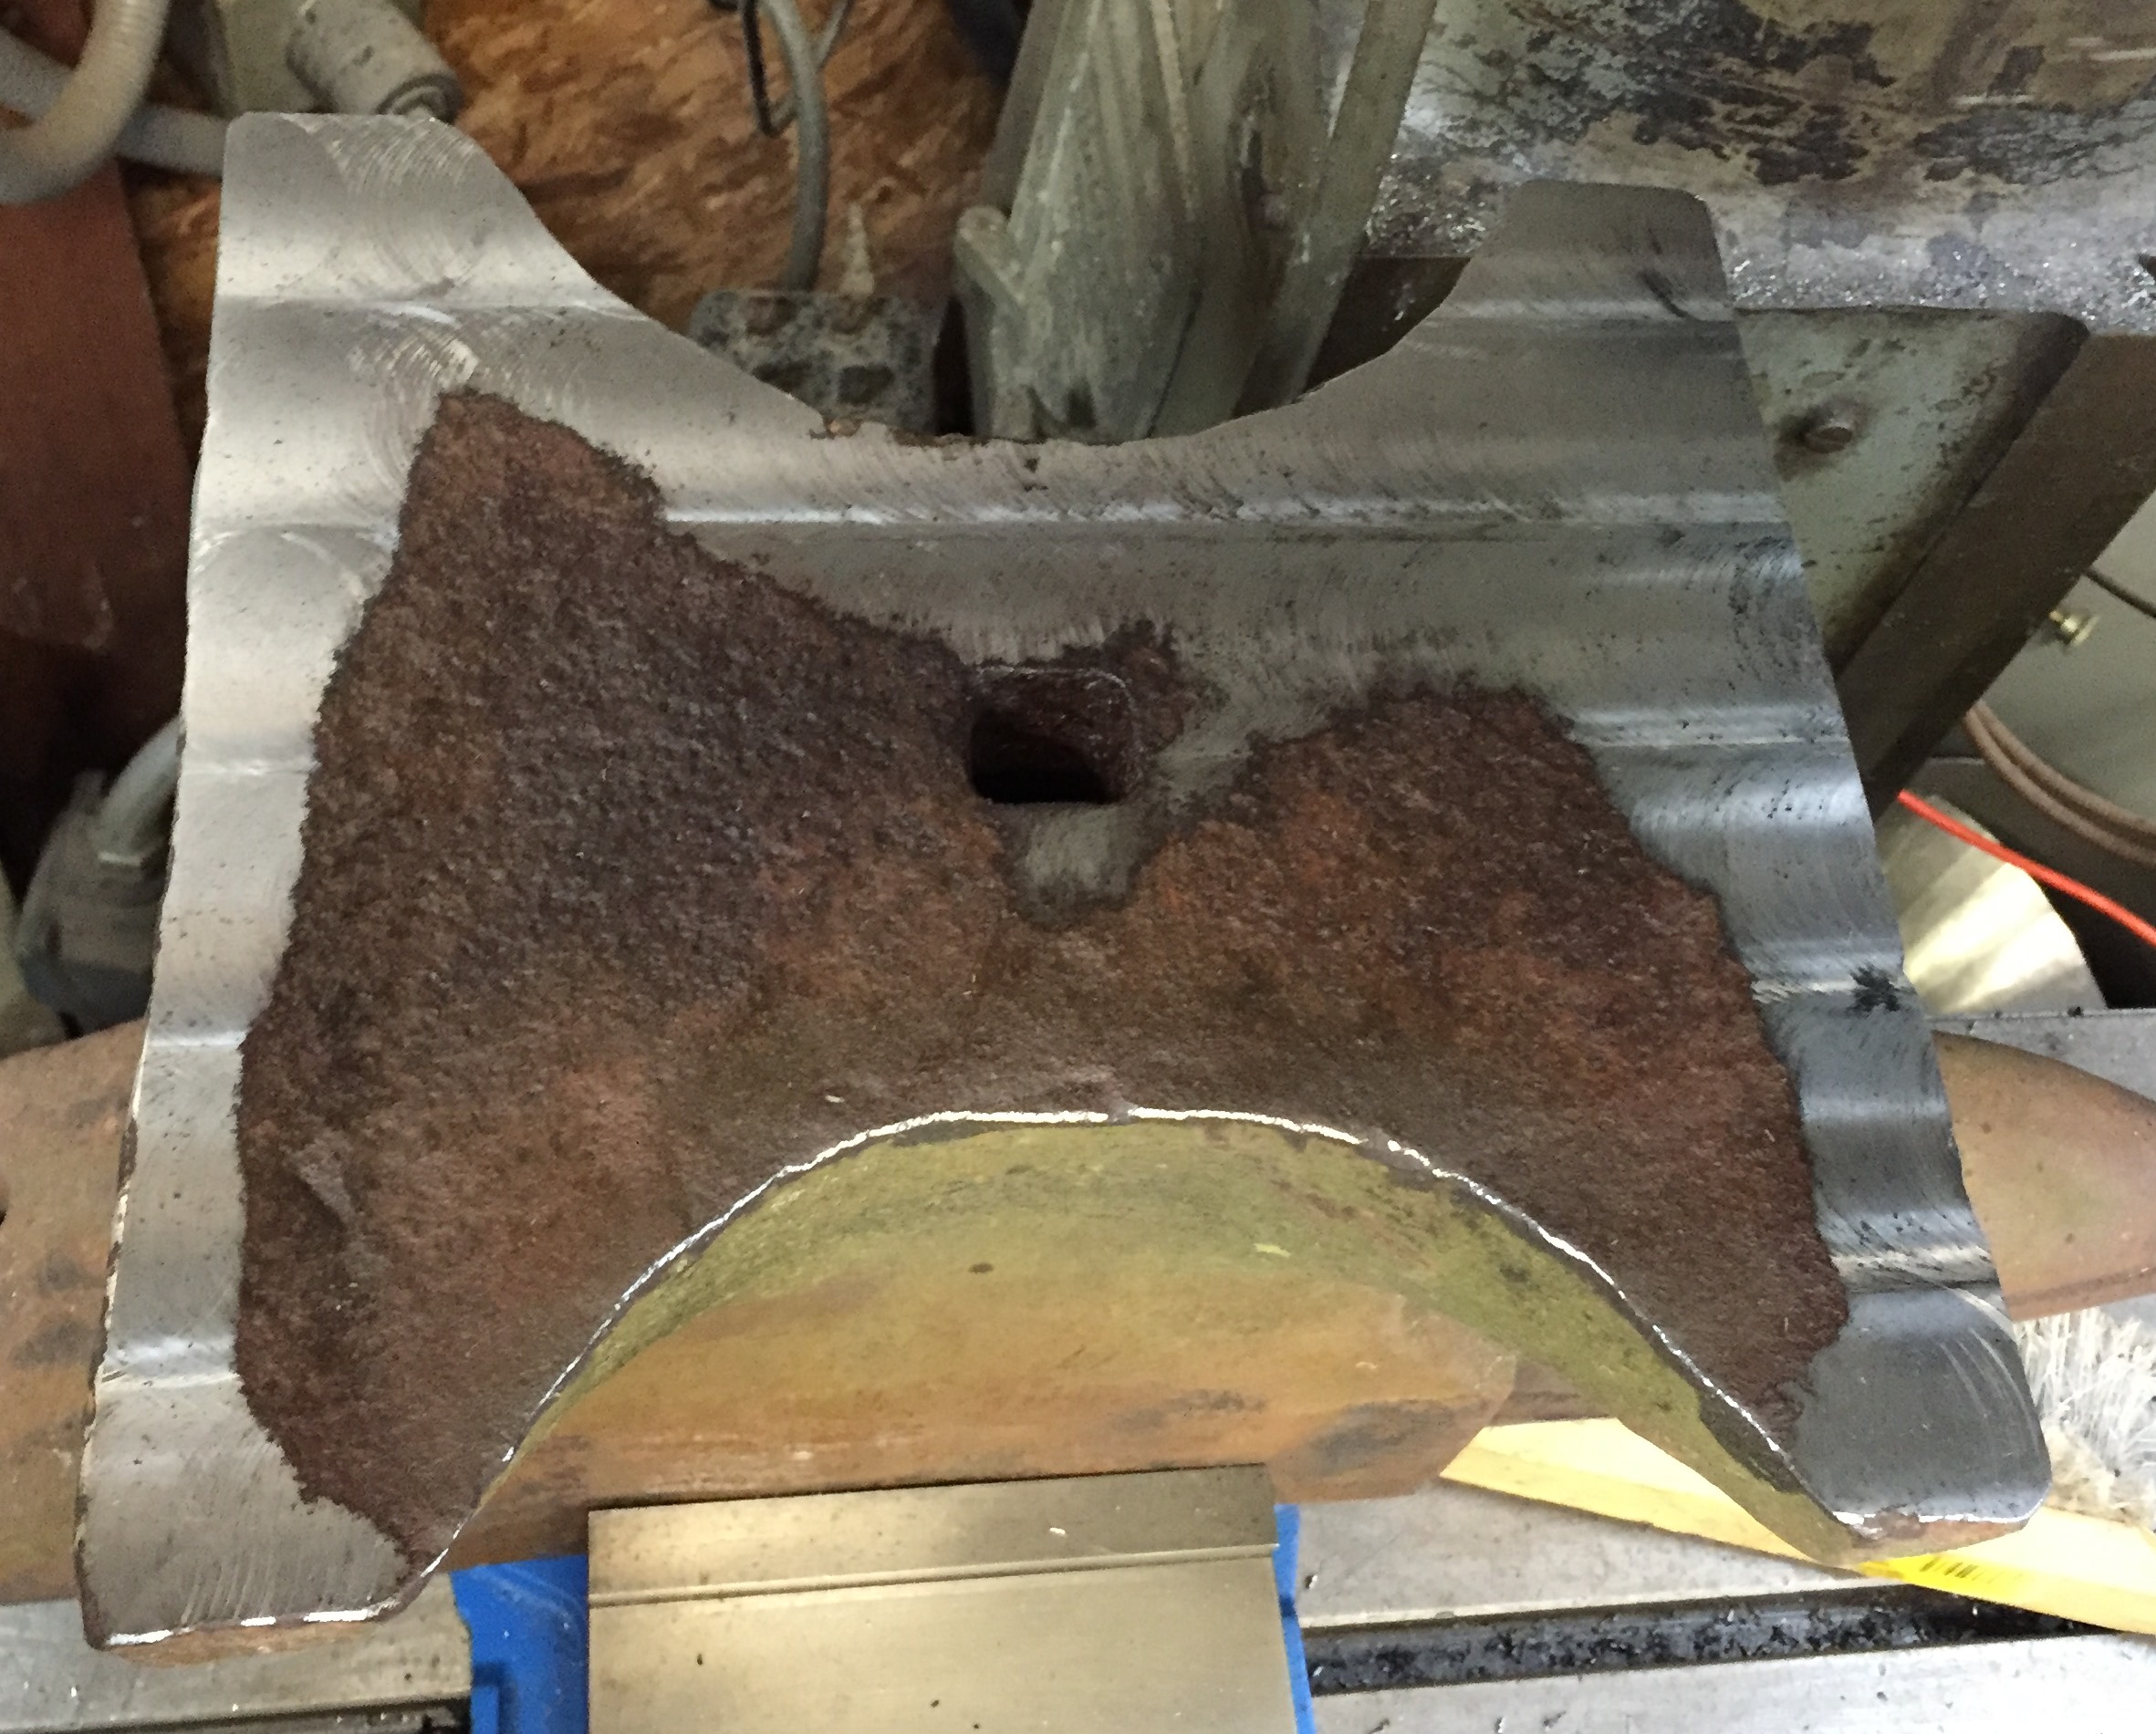
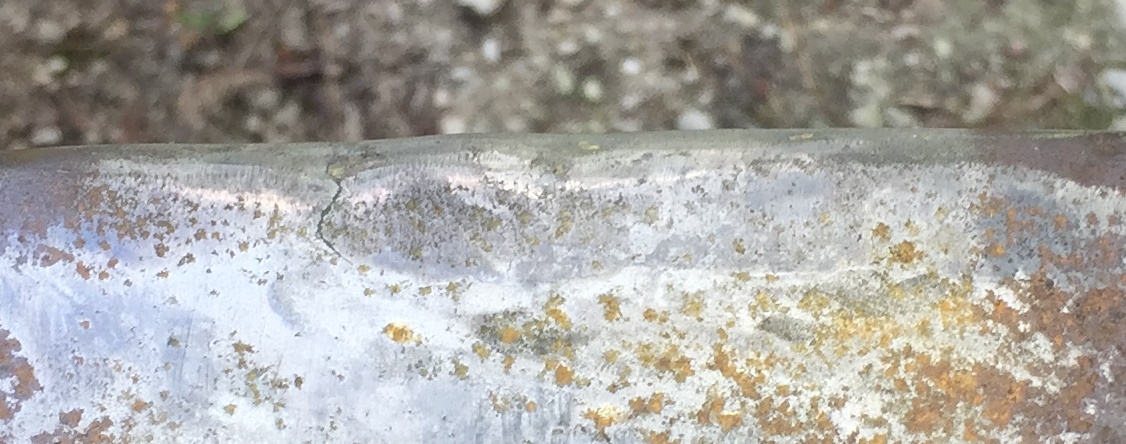
I am working on repairing a Peter Wright anvil I have it is a wrought base with a tool steel plate, the edges are damaged. I purchased some Stoody 1105 rod for facing it. I will be preheating it to 400°F prior to welding. I picked the anvil up cheap years ago, $50 or so at a farm auction. Just seeing what I can do to fix her up. I have almost 30 years experience as a welder fabricator, so I know the welding end of the game. Black Frog posted this over on my forum http://www.anvilmag.com/smith/anvilres.htm and I am using this procedure. Since none of the plate is worn away, I did an acid etch. I don't need the Stoody 2110. I have plenty of 6010 for the table and horn repairs. I leveled the feet by milling off a bit of material. Yes I made sure the anvil was as plumb and square as possible in my vise first. Also there is a ~3/16" twist to the waist of my anvil, not that it matters but was interesting to see. I am posting a few of the pictures. It is marked 1 1 19 so 159 out of the factory. I weighed it a few years ago and got 155 lbs. IIRC. I will weigh it again when I am done. I will also be building a newer and better stand for it. This one is not very stable and a bit high for my use, and I am 6' 2" I know some will be horrified by the milling and welding...