

stockmaker
-
Posts
140 -
Joined
-
Last visited
Content Type
Profiles
Forums
Articles
Gallery
Downloads
Events
Posts posted by stockmaker
-
-
MIG Tip Alignment. From experience I can tell you it is possible to tap the T Fitting/Brass Bushing at a slight angle. You can check that by watching the end of the MIG tip as you screw the bushing/w/MIG Tip into the T Fitting, it should not bobble. I am talking about the treads you tap into the T Fitting as well as the new treads into the brass bushing for the MIG tip, if the end of the MIG tip does not screw in straight while you watch, one or both holes are tapped at an angle. I really don't know how accurate this alignment has to be, but if it is close to perfect it is one less thing to troubleshoot.
-
Congratulation Andy, looks like you have a functioning burner, good job.
-
I did exactly the same as Michael Cochran suggests, he must be some kind of genius. I built this little shelf 25 years ago and never found a reason to replace it.
![20170417_192503[1].jpg](https://www.iforgeiron.com/uploads/monthly_2017_04/58f61a367f095_20170417_1925031.thumb.jpg.5abe161d5ad9999854e1fd99e1a3d2f0.jpg)
-
ddbow33, my understanding is that you plan to use a schedule 80 nipple in place of the brass bushing shown above. This schedule 80 nipple is covered in Frosty's directions and as far as I know there have been no problems with it's use. But like Mikey says, stick with the directions. Good luck.
Sorry the picture I had did not copy to the forum.
-
OK, sounds like you got it covered.
-
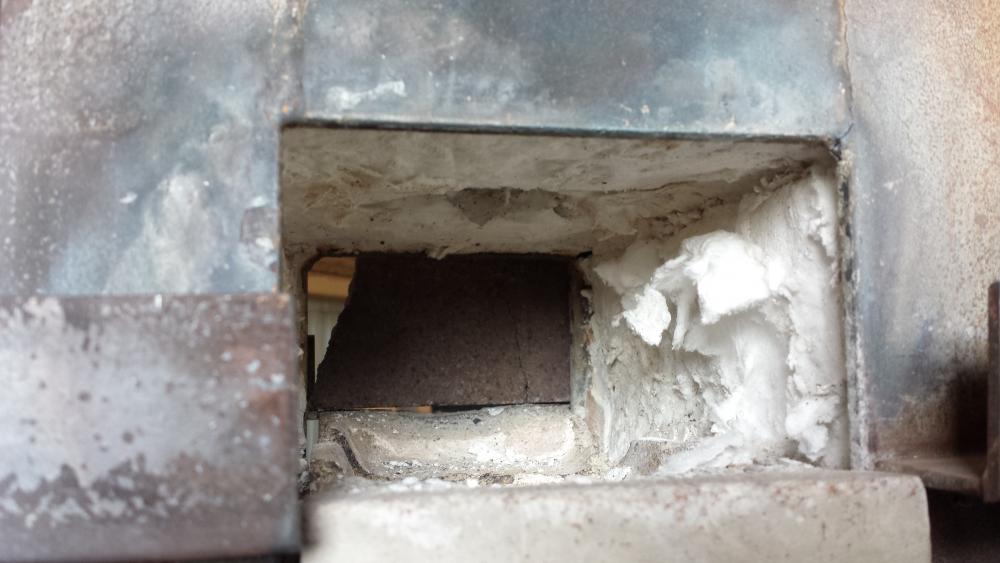
Hi EnglishDave, I have included a picture of my 1.5 year old store bought forge. It came with just an uncoated ceramic blanket which I used for about 9 months. At that time I coated with Metrikote which only helped for a short while. My answer to your question ..... " is OK to have Kaowool immediately in contact with the hot forge interior gases?" is two fold. First it is ok to do it that way, it will not kill you (from what I have read) and the forge should work to at least orange heat. Second, it is safer to coat it, as ceramic blanket does give off microscopic fibers that can linger in the air of your shop for a long long time, My forge is in a simi outdoor area so I put up with the uncoated situation for a time, but as you can see from my forge the blanket takes a beating during use. I felt my forge was already too small and coating with refractory would have made that problem worse, now after building a new forge I think I should have tried a 1/4" layer. I am not sure if your forge is made to be adjustable? If so Kaowool blocks may be the answer, but they are fragile, they give off a power when broken, I have a case so I know from personal experience. Hope this helps.
-
The length does not matter from a performance standpoint as it is just an extension of the propane line, shorter is better from a structure strength stand point, which also effects overall safety. You do not want the threads of the Sch. 80 pipe to protrude to far into the T, it should self lock at about 1/8" inside the T. What do you plan to use as a propane line? Hose or pipe? The connection to the Sch. 80 pipe from the supply line needs to be planned as well.
-
Nice little hammer Derek. Having the right hammer for the job is not only important in blacksmithing, but in other endeavors as well. The right little hammer is as important to me as the right chisel or file. I have wondered lately if there is a market them at craft shows? A picture of my workbench this morning.
![20170412_083048[1].jpg](https://www.iforgeiron.com/uploads/monthly_2017_04/58ee4ea9b5d5d_20170412_0830481.thumb.jpg.5b5ae0b4ff8c69bf2ade940c5a0216a9.jpg)
-
50 minutes ago, Tubalcain2 said:
my smithing friend/mentor who I bought most of my equipment from swears that if you leave your hammer on the face of your anvil overnight the devil gets into it and everything you make the next day will come out wrong.

So that is my problem. I am going to stop doing that!!!
-
Hi Andy, nice work on your blower. I had a thought that you need to be aware of. With the fan that close to the torch body it will be susceptible to forge heat when it is turned off after a long run. The heat will chimney up the torch pipe and could possibly melt or warped your fan blades. Of course I don't know how you are going to mount the burner or if it will be removable but just watch it during testing.
-
The Asphalt idea made me laugh, but the longer I thought about it the better I liked it. It sounds like you are not going to be involved with the top, but if I were doing it I would try taking an elevated picture of that road top above the bridge (both lanes) than enlarging the picture to fit the new table top, sticking it onto the top and clear coating with epoxy. David I met you at the 2016 Spring Hammer In, you are very open and kind person. Take care.
-
Very Nice. Now I have something else to look for... an old steel wheel.
-
Hi HSC. 2hp is 2 hp regardless of the voltage used to power it. The 110V motor will draw twice the current as the 220V version so your electric bill for the use of the 110V motor will be twice the cost. . Also the 110V motor is going to draw about 17 amp's so you will have to have it on a 20 amp circuit maybe more to cover startup. Congratulations on getting a power hammer.
-
Thanks for the information, gives me something to think about. You did such a good twist on those handles, it is not easy to twist 7/8" stock and keep it straight and level.
-
Nice job, you are a man that is not afraid of doing a little work. For my own learning experience could I ask about your tenons on the door pulls? I see the stand-off's have tenons on both ends, look like 3/8" square stock to start with then a 1/4" round tenon on each end? What are you using to make these tenons and what were your major problems? I would think getting a good square shoulder between the square post and the round tenon would be a major concern.
-
I have a similar` forge although it is not from Diamondback and it only has one burner. Some dragons breath is normal although my forge has the same characteristic, too much flames coming out the ends of the forge when the burner is turned up to a good heat. Mine has a great 1" dia. burner so maybe I should not be complaining. My forge has no castable refractory lining nor did it have rigidizer on the ceramic insulation, or an IR reflective coating, just barebones on the inside, and it looks like yours is the same. I am going to guess that yours is working as it should. How do you regulate the heat, do you have an adjustable regulator or a needle valve, can you turn the burners down to a pleasant idle? One thing you want to do is build a shelf on each end of the forge to help hold material that is being heated, and you might think seriously about installing a door at each end. The door does not have to be fancy, I use sliding fire bricks. I have had mine over a year and am slowing building a new two burner forge.
-
Very Nice Ben, you got a good deal going on there. I think the thing I like the most is your quench bucket. Second is that impressive pile of antlers in the background.
-
I have a healthy appreciation for the making of hinges, your first attempt Jonathan impresses me! Thanks for the pictures.
-
I am going to give you my thoughts on this, and they are just thoughts, because I don't know for sure what will work and what will not. My bottom line on this, is it may work, but your chances of success are slim. I recall seeing someone selling a round 3" NARB head recently but it was not using the T Burner as a mixer. You are not going to find a lot of data on NARB design.
My experiments with the NARB using the 3/4" T Burner (as with all burners) is that it is sensitive to the relationship between the size of the air plenum in the burner head and the size and number of the nozzle ports. This is where air/fuel mixing and backpressure association occur. In addition to this relationship, the entry into the nozzle head is important as well. Frosty's design uses a horizontal entry into the burner head with no diffuser, while the blown ribbon burners typically use a vertical entry into the head with a built in diffuser to spread the gasses. So the horizontal entry is in fact part of the diffusing system. Once you start messing with the size of the plenum, the shape of the plenum, the size/pattern of the burner ports , and the angle the gas enters the burner head, all bets are off, you are on your own.
This week I abandoned my plans to use a 4" X 4" burner head, and am now simply going with exactly what Frosty has working as I am wanting to blacksmith and not do R&D on Propane burners. My 4"X4"X2.5" head would not settle down (kept backfiring) until I had the 17 ports reduced to just 13, the ports are each 5/16" in diameter. This was after I had cast two heads, and after testing with a wood filled test block which seemed to work fine. I have idea's as to why this happened, but like I said I really don't want to experiment with explosive gas's as I am doing too much guess work while not knowing what I am doing.
So there you go, my thoughts on changing things, there is not much data that I have found to work with.
-
Oh he did!!!
-
On 3/7/2017 at 6:46 PM, Mikey98118 said:
I see much more satisfactory flames too; valuable information there! Also your idea of using a wooden block was genius.
The wooden block is a Frosty idea, he used it while testing his very first NARB design. I did come up with an idea that may be of value to some. I use Modelers Clay to plug ports in the burner block for testing, this has been done both on the wood block and a cast refractory block. I don't know how long the clay would last in a block, I have got a minutes run out side of a forge with no effect to the clay. And it removes easily.
-
Wash. State. The picture is small, but assuming that all the parts are there and the jaws are not bet up it would go for $150 - $200 unless you got real lucky at the auction.
-
The Rhino anvil is a very good anvil, good steel, good dimensions, I like the round horn, and the price is more than fair. I have used them, and was going to purchase one but ended up getting a 160 year old Peter Wright for free. I still have my eyes on a Rhino, but other things have to come first.
-
Congrat's on getting a good anvil, enjoy.
![20170417_192503[1].jpg](https://www.iforgeiron.com/uploads/monthly_2017_04/58f61a35de7da_20170417_1925031.jpg.f1d327b17469eff9b4766dd57ebce883.jpg)

![20170412_083048[1].jpg](https://www.iforgeiron.com/uploads/monthly_2017_04/58ee4ea935b46_20170412_0830481.jpg.49d744caf3506e2720ccd5e2092b40f5.jpg)
New Shop at Gidgegannup
in Building, Designing a Shop
Posted
OK, I think I know how to pronounce Heelerau, but now is Gidgegannup said? Thanks for the pictures, very enjoyable to see.