

CAE
-
Posts
31 -
Joined
-
Last visited
Content Type
Profiles
Forums
Articles
Gallery
Downloads
Events
Everything posted by CAE
-
Frosty Is it possible to use the same plans for a Frosty 3/4" burner and downsize the T and pipe to (3/4 x 3/4 x 1/2" Tee) and a 1/2" x 6" for a smaller can forge in the range of 200 cu/in.?
-
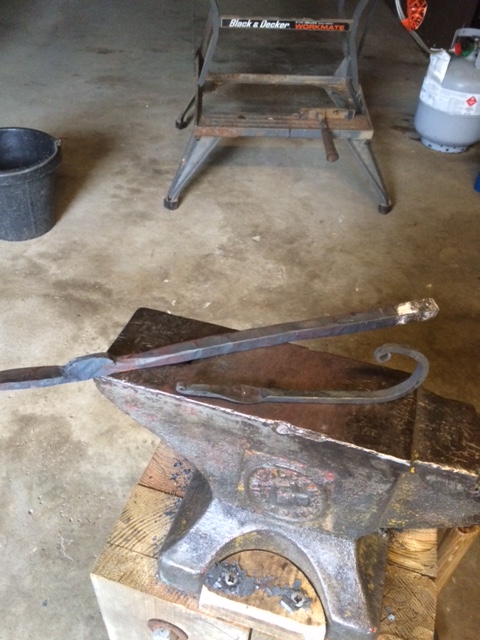
Frosty I did just what you've suggested. I had the T Burner ready and just couldn't wait to pound something. So I made a quick paint can forge with a home brew refractory that isn't holding up too well. So quick I forgot to put the darn legs on it so I just rested it on solid fire brick. I managed to pound out a couple real funky looking leaves then I did a fair job on a coat hook with scrolled ends and one half of a pair of flat bit tongs out of 1/2" bar.Still working on that one. should have started with round cause thats a lot of square bar to pound round for the reins. Going to send off for the rest of what I need for coating the insulwool and may build another can forge while I'm working on a larger PP tank forge just to have something to get hot. Pretty sure it's official I'm hooked
-
Thanks Mike for clearing up my questions and Mr Coe.... I recently emailed you about the products you referred to in your post. I received your email response and will be sending you and order soon. Thanks to both of you. I've got a lot of irons in the fire so to speak. No pun intended cause I dont even have a fire at the moment LOL. The door to this whole metal world has just opened for me. Great friend of mine who's career was welding has given me an old Miller 90 amp Mig welder and a 1/2" plate for a welding table top (no legs yet.).... that's my first welding project, and given me a few lessons in welding. Second project-I've got going is a coffee can forge w home brew refractory curing, I've finished a Frosty T Burner and it's waiting for a forge to be mounted to and tuned. Third Project-Visited my local scrape yard and brought home a 30" x 30" x 6' angle iron stand that will become a coal fired forge someday, also found a brake drum and 20# of various bar and round stock to mess with when I can get it hot enough. Can buy all the scrape I want for 25 cents a #. Fourth Project- is the PP Tank Gas forge of which I have the blanket for. And believe it or not I found a 50# Vulcan Anvil locally that I've already mounted on several 4x6 post bolted together. It's small but in pretty good shape. Couldn't pass it up but I still want a bigger one.... 100# range..My garage kinda looks like a war zone/junk yard right now. Need to go work on something.
-
Just to clarify the PP Tank build and material I have. The Kaowool scraps are 1" x 2' x 3' pieces I will have no problem cutting tops, bottoms without a splice. At 36" of usable material length it will be close on the sidewall wraps on a 20# PP Tank without splicing. If I do need to splice in a piece for the sidewalls I intend to alternate the splices putting the final interior layer splice on the bottom. My thought here was I'll be using a hard firebrick for the floor.minimizing any issues, since this splice will be covered. The way I read your advice Mike is, the rigidizer can take the place of the Plistix. Then coat the whole interior with Kas-O-Lite for the finish fire coat. Am I correct?
-
I've been bitten by the Blacksmith bug and trying to take my time and do it right the first time. That has been somewhat of a challenge. To satisfy both side of me I threw together a small paint can forge today while I put together a Frosty T Burner and a Propane tank forge. My first post was in the Introduction section and I had only one response to a couple questions I posted. Mr. Thomas Powers was kind enough to give me a little advice on a gas forge build. I've poured over so many post about gas forges I've lost count. I've built the Frosty T Burner and tested it in a stack of fire brick and I think I've got it tuned close enough till I get the PP tank forge body done. Mr. Powers suggested I used Kaowool for it's incredible efficiency. So I know Kaowool is readily available online in many places but I tried to find a local supplier for the no waiting aspect of buying getting it now. This is where it gets crazy. I stopped buy a local heating shop where I know the owner. Ask if he used the material and he does on occasion but doesn't stock it. He then matter of factually said why don't just go to _________ and ask for Lisa, tell her I sent you and she'll sell you some.The business he suggested is 3 miles down the road from his shop. Stop there and found Lisa, she said the 1" 2600* sells for $94 for I can't remember how many sq. ft. When I explained I was only looking for about 12 sq.ft. she ask if I could use scrap. Turns out I left with a full box of I don't know how many sq. ft. of 2'x 3' scarp pieces.(it weighs 45#) Unbelievable part is I only cost me $20. And that's only because I gave her the twenty to buy coffee and donuts for the whole 5 people that work there. She was going to give it to me FREE. So Tom Powers I'm going to build that PP Tank forge with Kaowool after all. Thanks for the suggestion or I would have never went looking for it. Next question. I know I've read many post about IR coatings for Kaowool as well as rigidizers. Do you need both? Looking at Wayne Coe's Plistx and Kast-O-Lite. Seems to be very cost effective and He's a member here.
-
I was a carpenter by trade and have since retired, I've got a fairly decent wood shop and believe the mechanical whereabouts to just about make or replicate most anything i see from wood. Now I realize Blacksmithing is a whole different world but I've always believed mechanical ability in general is a good start for most any trade. A good friend peaked my interest in Smithing when he showed me a knife he made from a RR Spike. And so it begins. I'm certain I'm at the point were every beginner was at the....the beginning. I've poured over hundreds of post on this Forum .....everything from building a small shop forge, DIY burners, Anvils or alternatives, and then there's the tools..... I find myself getting pulled from one topic to another. Then there's the thousands of Youtube videos on Blacksmithing... a before you know it's TOTAL INFORMATION OVERLOAD. Bottom line this is something that I just have to give a shot.. I just have to shut off the darn computer and start doing something. So in the last week I've put together a Frosty "T" Burner and waiting on a high pressure (0-30)psi adjustable regulator to be delivered this week. Scouring the various ideas for a forge, I've settled (for now) on a coffee can style to get me pounding something. The guy who turned me on to this made a simple coffee can one with nothing but sand a plaster of paris ( which by the way already needs to be replaced) I have an inherited liking for the older things. My dad and my grand dad always toted me around while growing up to farm sales, flea markets and estate auctions. Inherited meaning I can't pass up a good place to find something form years gone by. I wish I'd have spent more time with my Grand Dad before he passed. He had a home shop I'd die for right now. Including a 150# to 170# anvil and coal forge. Have no clue where that stuff all got off to when he passed. But knowing several people in the area who collect, trade and sell old finds, I've actually got a line on a few anvils. We'll see how that goes when I get to the (How much) question. So even after a month or so of lurking on this site, reading tons of good post and finally signing up I still have some questions. (Gas Forge Insulation) Soft fire brick seem to be few and far between in my area. Shipping cost is prohibited at this point. I've got a formula from Portland Cement, Bentonite and Perlite that i will try for my first small forge. My question is the bentonite that I can buy from a local well co. is "chipped bentonite" I'm guessing this will work if when I mix the chipped bentonite with the required portion of water to dissolve it first before adding the portland and perlite. Am I even close to right? Going to add a piece of hard firebrick to the floor to help with wear. (Burner Port Angle) I've seen various locations used. Top port center- 90* to floor..... Side port parallel to floor offset of center..... and angled port - 30* to 45* and pointed at center of floor. In this small of a forge what would be the best location?