

tsterling
-
Posts
23 -
Joined
-
Last visited
Content Type
Profiles
Forums
Articles
Gallery
Downloads
Events
Posts posted by tsterling
-
-
Birchwood Casey Super Blue (gun bluing), available at any place that sells firearms. Paint on bare metal after good cleaning, neutralize with household ammonia when the brass is as dark as you want.
-
-
In my press forming adventures I always get those wrinkes. I stop pressing before the wrinkles get too convoluted and hammer them flat on the anvil, anneal the sheet, and then press again. Rinse, lather, repeat as required. My pressing is lots smaller than yours, but the same principles are at work. Here's a link to the beginning of a long tutorial on my method of press forming: http://sterlingsculptures.com/wp/?p=2143
Good luck!
Tom
-
I haven't tried the download yet, my connection is weak. I will try later when I am in town. Could you give more info on the anti-scale treatment?
Hi Elemental,
You can see my anti-scale method here: http://sterlingsculptures.com/wp/?p=233 - It's about halfway down the page. Basically I use an old jeweler's trick where I half fill a small bottle with boric acid (I get mine from Ace hardware store), then fill the container with alcohol (rubbing or wood alcohol). The alcohol burns off leaving a layer of the boric acid behind, which will melt during heat treating and make a layer of flux, keeping a lot of the oxygen away from the steel. I apply it several times to leave a fairly thick white crust behind, then heat treat.
Tom. -
Thanks for the kind words, guys. Hope the tutorials are helpful.
Tom -
Great stuff.
When engraving knives do you always engrave after heat treat? I would think that would make it very difficult to engrave or are you making sure the areas to be engraved are adequately softened.
I ask as I have only played with mild steel so far.
Hi Quint,
I always try to engrave before heat treatment. Any engraving I do after heat treating is in areas that weren't hardened. I use an anti-scale treatment to keep the worst of the scale buildup away from already engraved areas.
Tom -
Glenn asked me to upload a couple of tutorials I made a while back that might be useful for beginning bladesmiths.
The first is a basic blacksmith's knife (a little light in heat treating information) made with pretty basic tooling, and the second is how I produce my signature "Knapped Stone" look steel blades.
Hope they're helpful, folks!
Tom
Blacksmith_Knife_Project.pdf
Knapped_Steel_Neck_Knife_Tutorial.pdf -
Thanks for the kind words, guys!
Here are two more tutorials relating to knife engraving that Glenn asked me to upload. There's also a little bit of kinfemaking in them as well. Hope they are of use!
Carving_Steel_Tutorial.pdf
Puget_Sound_Dagger_Tutorial.pdf -
i Folks,
Here's a PDF of my Simple Engraving for Knifemakers Tutorial for download: Simple_Engraving_for_Knifemakers.pdf
Sorry, it's 7.3 MBytes, so if you're on a soda straw connection it might be time to go get some coffee..... :wub:
Hope it is helpful, and Thanks for Looking! -
I finished the tutorial and hosted it over on Bladesmith's Form.
It's titled Simple Engraving for Knifemakers, here's the link: http://forums.dfoggknives.com/index.php?showtopic=24166&pid=227557&st=0&#entry227557
Hope it helps!
Tom -
OK guys, I'll get started on a "simple" tutorial..
In the meantime, you can get started by studying this link for the Lindsay sharpening templates: http://www.engravingschool.com/private/Lindsay%20Sharpener.htm
There's also a good video on the same page.
Tom -
Only two people interested?
Last call... -
You're welcome, Sam. I hope this info is helpful.
I've been musing about making a tutorial using the methods I've described here and oriented towards SIMPLE engraving for bladesmiths (like decorative transitions from ricasso to blade), if there is enough interest. Since it would be oriented towards bladesmithing, I'd probably host it over on Bladesmith's Forum, but the techniques would have potential for any metal art.
Sam, I was just looking at your steel skull avatar (readers, see the avatar in the post above this one) - that would be a perfect example useful for SIMPLE engraving if it was the size of a quarter ($0.25 coin) or smaller, engraving the eyes, nose, teeth, or even the outlines if it was on a non-skull shaped piece of metal. That's the level of detail I'm talking about for SIMPLE engraving...and making simple versions of the tools and holding fixtures needed, with PURCHASED sharpening items and graver blanks. At least that would tell a guy if he/she has sufficient interest to continue on along a much longer and more disciplined path (and more expensive).
Anybody interested? -
You're missing the point of the HSS. The benefit of HSS isn't so much in the using, it's in the sharpening and not ruining the temper due to heat build-up from a rotating diamond disk. The point of a graver is a tiny thing, it doesn't take much heat to ruin the temper. It is not a cold chisel. Plus, HSS comes ready to use - you don't do any heat treatment.
There are lots of ways to make and sharpen a graver. Some of the best engravers could sharpen a nail on the sidewalk and create a masterpiece. What I have tried to do here (apparently unsuccessfully) is show the simplest, most inexpensive but also foolproof method of doing the one thing in engraving you MUST do well to be successful. If you feel you simply have to strike out on your own to rediscover fire and reinvent the wheel, knock yourself out. I prefer to engrave rather than do R&D. -
When using power sharpeners to shape gravers, HSS won't be damaged by heat build up like simple carbon steels will. So, yes, red hardness makes a difference. Also, HSS, carbide, carbalt, M42 (and a GRS brand carbide whose name escapes me at the moment) provide more reliable and better hardness than a hit-or-miss simple carbon steel hardening/tempering routine. Different alloy gravers provide better, smoother cuts on different kinds of metals. For instance, carbide alloy gravers cut silver and copper smoother and with a better finish than steel gravers, so the hardness of the workpiece isn't the only issue.
Most professional and serious hobby engravers use power sharpeners - time is money and enjoyment.
In engraving, having reliable and repeatable hardness and sharpened cutting points means fewer slips and fewer broken tips which lead to slips, fewer slips mean fewer ruined engravings or mistakes to attempt to fix.
10 or 20 or 40 hours (or MANY more hours) into an engraving full of gold inlay (at $1600 per ounce), then having your poorly-sharpened homemade POS graver tip break and slip and ruin the work? All just to avoid buying a $6 HSS graver blank? It's bad enough using properly made and sharpened gravers. Believe me when I say you will need as many factors weighted in your favor as you can get. Engraving isn't an art where you can just toss it back into the forge and fix a missed hit or straighten it and try the bend again.
Tim, think about how those lovely French dividers you made would look with the flat areas engraved with delicately cut scrolls... -
$500? This will cost a lot less than that.
Here's the minimum you need to buy for the drill press version, you can easily make graver holders and make do with a small hammer:
Sharpening Fixture without stones (comes with Universal 116 degree V template) $89.00
600 grit diamond lap ............................................................................................................. $25.00
Lap Mandrel Adapter for converting a drill press to a power hone. ............................. $19.50
High Speed Steel gravers (pack of 6) ................................................................................ $30.00
Total (not including shipping) $163.50
And here's the minimum you'll need with the bench stone version (you can rough out the graver blank with a reguar bench grinder, and just refine the cutting end by hand). I REALLY recommend the drill press route...
Sharpening Fixture without stones (comes with Universal 116 degree V template) $89.00
Bench stone 600 diamond grit .......................................................................................... $39.00
High Speed Steel gravers (pack of 6) ................................................................................. $30.00
Total (not including shipping) ............................................................................................ $158.00
And let me repeat the one piece of wisdom you need to understand - It is the business end of the graver (the cutting point/face and heels) that will determine whether you make a success of this. Without the ability to properly create, sharpen and RE-SHARPEN a graver, nothing else will matter and this will simply be an exercise in FRUSTRATION! Been there, done that, and I have a few dozen t-shirts...
If you find you don't like engraving, you can probably recover at least half of your money by selling the stuff you bought on either the Engraver's Cafe or the Engraving Forum.
And, finally, visit an engraver! Join the two forums (they're free, just like this one) and ask if there are any engravers in your area willing to let you visit.
Sorry to turn this into a lecture, but it is the key to success in engraving. Best of luck!
Tom -
Here's a link to a simple tutorial on engraving and carving in metal I did a while back, just to give you an idea of how I often do it: http://forums.dfoggknives.com/index.php?showtopic=12650&st=0&p=114619&fromsearch=1&#entry114619
If money is a problem and you are REALLY keen on trying engraving, then hammer and chisel is a fairly inexpensive way to give it a try. The only problem with H and C is it is a really LONG learning curve to get acceptable results in any kind of complex engraving.
However, that said, there are some excellent shortcuts available today that will definitely help. The engraving world is full of horror stories of the grey beards' apprenticeships; "I wasn't allowed to do anything during the first (fill in the blank with a number) years except learn to hand sharpen a basic graver. I didn't engrave anything for the first 23 years, and they wouldn't let me touch a gun for another 35 years" yada yada yada.
I believe that sharpening a graver and getting repeatable results is by far the most important, basic thing to learn, and there are some excellent sharpening devices available now that weren't available just a few years ago. They make sharpening a piece of cake.
Here's what you want to start with - Lindsay Graver Sharpening System: http://airgraver.com/sharpening.htm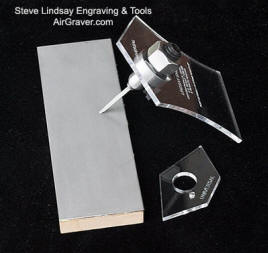
The Universal 116 degree fixture, and either the diamond bench stones, or, if you have a drillpress, the Lap Mandrel Adapter for converting a drillpress to a power hone (about halfway down the page): http://airgraver.com/Hand_Engraving_Tools_Overview.htm#GRAVER%20SHARPENING
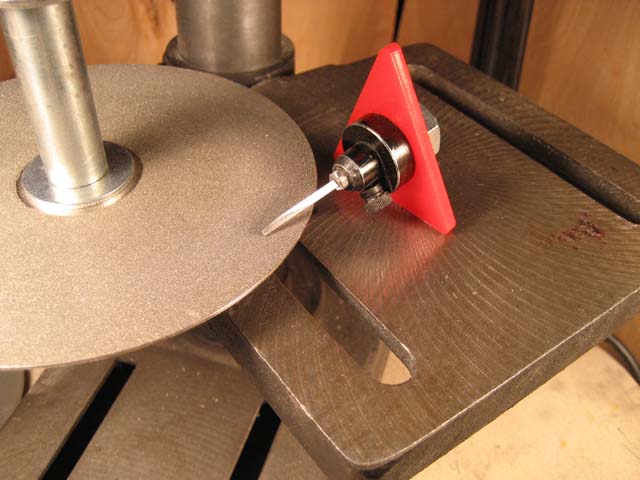
You'll also need a diamond lap with the mandrel, I'd recommend the 600 grit to start with (same page):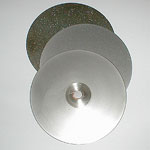
For the chisel part, Lindsay also sells one here (Stainless Chisel that holds 3/32" square gravers for hammer/chisel engraving): http://airgraver.com/Hand_Engraving_Tools_Overview.htm#Manual%20Graver%20Tools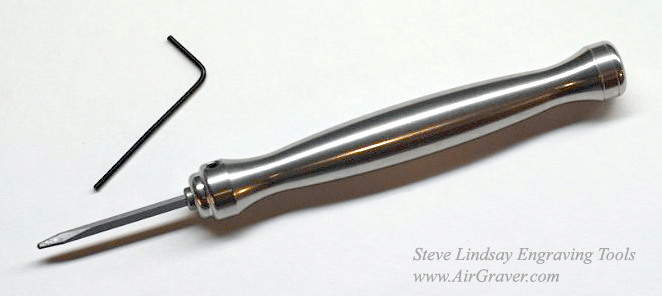
Or, you can make your own with a piece of mild steel rod, 1/8 inch hole drilled in the end, with an allen screw drilled and tapped crosswise to retain the 3/32 inch square graver. Round the end that you hammer on, and chamfer the end with the graver so you don't mar the work. Sand a flat side down the length so it won't roll off your bench and land on the point of the graver (absolutely gauranteed otherwise!).
You'll also need an engraver's hammer, or at least a small ball peen.
And, finally, you'll need some graver blanks (start out with the inexpensive HSS, about halfway down the page): http://airgraver.com/Hand_Engraving_Tools_Overview.htm#Manual%20Graver%20Tools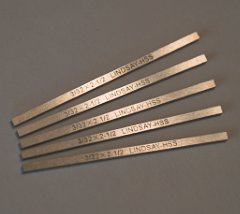
You can begin engraving on a piece of mild steel, brass or copper hot glued to a heavy, flat block of wood (say about 7" x 7" and two inches thick). If that doesn't dampen your enthusiasm, then purchase or begin assembling a pitch bowl. After that, an engraver's vise, and then the sky is the limit.
An optivisor will be helpful. I use a stereo microscope.
I suggest you don't skimp on the sharpening fixture and either the diamond bench stones or the drillpress setup. You WILL break MANY graver tips. Trying to hand sharpen without these aids can be done, but will be VEY, VERY FRUSTRATING!
One other thing. I've noticed that all professional engraving tools involve prices in hundreds. Very little available that is priced under a hundred bucks, and most things are many hundreds. Just so you know! You're about to start out on a path of many very bad habits, more expensive than smoking and at least as addictive. But, engraving won't kill you. Engraving might cause your significant other to kill you, however....
If you check out this thread on the Engraving Forum (http://www.engravingforum.com/showthread.php?t=2609&highlight=networking), you can probably find an engraver near you to go visit. Most engravers are like blacksmiths on IForge Iron - friendly and helpful. A test drive and a little face time will go a long way towards answering your questions and encouraging you, and will shorten the learning curve dramatically. Good luck! -
Start reading - lots to learn.
http://www.engravingforum.com
http://www.engraverscafe.com
Pneumatic engravers are the only way to go (Lindsay, GRS or a new one, Enset, but it has yet to be seen by a lot of engravers). I started about three years ago, you can see where I've gone with it - http://sterlingsculptures.com
Good luck - it's a long row to hoe, but I find it very rewarding.
Tom -
I use Birchwood Casy Super Blue - it will color copper and brass, but then I use steel wool to bring back the shiny soft metal. Steel wool won't remove bluing from the steel but will remove the patina from copper and brass - don't know about aluminum. Of course, the brass or copper will darken with age and use anyway, if you want really long life fine silver and high carat gold are your only real options.
-
These guys always have some, I've used them before so can recommend them - but $100 minimum order.
Gilmer Wood Company Boxwood Page
Shibuishi
in Copper Alloys
Posted
Hi Cliff,
Here's a link to a small tutorial I made on how I create and roll my shibuichi:
Part 1 - http://sterlingsculptures.com/wp/?p=1266
Part 2 - http://sterlingsculptures.com/wp/?p=1277
Hope it's helpful!
Tom