

dimenickel
-
Posts
231 -
Joined
-
Last visited
Content Type
Profiles
Forums
Articles
Gallery
Downloads
Events
Posts posted by dimenickel
-
-
good one
thats a nice project and turned out alright
i seen a pdf one time on tire hammer tooling... that had alot of home build tools.. just can't seem to find my bookmark
Greg -
i'll second that.. cement baseblock and it'll hit very nicely and cut the vibes down.. theres plans on the LG site.. i used them and it rocks !!!

If you can pour a concrete base for it, it will hit much harder, be more stable, not move around as much, and be less likely to shake nearby buildings. It is definitely worth doing, unless you are planning to move soon. -
i second that... just coat it with a slurry of 36 cement... ..and you can use a rigidizer, aswell... ( some sort of colloidal silica)
dangers are abit overhyped... just like zinc
G -
just my 2 cents
...burnishing or polishing sort of smears the top surface.. it protects it from oxidizing ...
compare the two - buff a piece of iron... and polish a piece of iron with a water stone to same grit
- then leave it in your humid shop... the waterstone/iron with the more open grain surface will easily rust
also... temper colors change alot between alloys...
i do enough heat treat in my oven.. and with the same alloys... sometimes the come out with a nice even color and other times they're darker or swirly... myself i think the temper colors are just one method of doing it, but with very wide window of accuracy
Greg -
Hi Tony
thank you for the information..
by the way, its a small world.. i know John Little quite well and it was his advice that i by the hammer that i have.... mine was sold by a fellow who bought it from the halifax military ship yard.. apparently it sat in a tool room for decades .. very little use on mine ..except for the ten layers of peeling paint.. (why they painted it so many times i have no idea )
I have a small pic of John's hammer.. hope he doesn't mind
his is exactly like mine cept he's got beaudry on the side of his
I could take some better pictures of my motor mount...if you'd like to see... just incase you'd like to fabricate something similar
take care
Greg -
yessir
here's a pic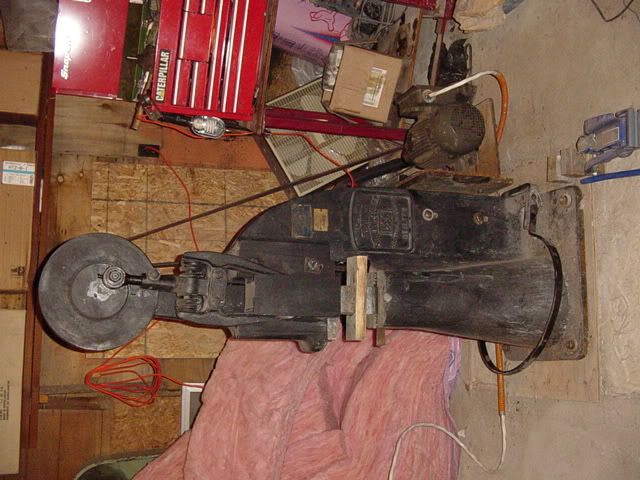
http://s43.photobucket.com/albums/e396/dimenickel/power%20hammer%2050lbs/hammer%20with%20motor/
mine didn't have the dies with it ...so i had some nice ones made of s7
maybe i should post this somewhere else.... i don't want to go off topic
Greg -
Hi Tony
nice machine !
i've got a 50lbs stockwell..its the same design and it hits very nice
- i had a heck of a time finding anyone who had a similar hammer
i'd never part with mine... unless i got a massey clearspace
take care
Greg
The upper die is 2" wide and 4" long. The lower die is about 2"x 6". Both dies are about 1.75" from face to the start of the keyway. -
a beautiful hammer... nice one
thanks for posting
Greg
now if those darned lotto tickets work this time.. ;) -
actually, the tanks would freeze solid ...but i keep them in a hot water bath... and have a gauge on the tank side to tell me what psi is available.. .. ..
- i just run a garden hose from inside the house.. from the laundry tube to get the hot water on demand
-sit the tank in a plastic garbage can
heres small vid of my process
- i've thought of going to one of those bottom siphon tanks but then i'd have to rethink my burner design...
i'm in the small league compared to the volume your dealing with.. vaporizers ? do you scavenge heat from the burner or furnace, or is it by other means
Greg
Greg, do your tanks freeze up on you dropping that much propane that quickly? We use 120 gph vaporizers to power each ten mil. It bypasses the freezing, as well as the pressure-drop issue. -
and i thought i used alot of propane... at 30lbs tank in 45min
nice burners
Greg -
nothing wrong with gloves... I wear them everyday for forging
its good to be informed and use as much safety stuff as the individual feels is necessary..
sorta the same argument with safety glasses... some people do, many people don't -
just my opinion
i like leather gloves and alway wear them.. .. only there for potential accidents.. .. not to be over used, just for when i work with hot steel..
- you can have just as much control with them on.. i make knives and you need control for that...
everyone is different and you should use your common sense to use as much safety gear as you need..
i remember in welding class ...some dude picked up a pile of coupons off the track torch table... he didn't know they'd just been cut several minutes before..... rest of the semester, he had hands wrapped up like a mummy ..
the only time i have the safety glasses off is when the humidity is fogging them up to the point where its a big hazard..... then its time for a break, and move the fan closer...
theres alway peer pressure to do this or that.... i figure after a little experience, you'll know better which measures of safety you need and don't
Greg -
i remember seeing some on the british blade forum... i'll take a looksee if i can find the link
Greg
ah...got it
http://www.britishblades.com/forums/showthread.php?97213-pretty-little-stiddy&highlight=stiddy -
25lb LG for 5... i only wish... wow
mercury is quite interesting.. and i thought it was gettin harder and harder to get..
http://en.wikipedia.org/wiki/Minamata_disease
i also remember a particular school teacher putting it on her desk and showing the class how it balled up and rolled around.....
Sam... i'd tell your friend to make sure his shop is very well ventilated
oh.. and never ship the stuff by air... mercury loves aluminum
take care
Greg -
bout 600 for the anvil
- 200 for blower
-about same for leg vise (if its a big one )
5 bucks fo set of tongs
and going rate for scrap iron per lbs for the rest..
for 9000 ...it better come with the building
he's not in a hurry to sell.. thats a good thing... in about 400 years that stuff ought get to the price he's askin ( just my opinion )
Greg -
errr... looks like its gots some leg irons attached to the base..
.. for those apprentices always on the coffee break..
kiddin aside... the cinder blocks might crackup on you... go for a big stump and burry it in the ground to the right height.. maybe that'd work better
Greg -
i have a 190lbs pete and the face is abit soft... it will ding if you miss a strike.. ... but it works just fine for many years... you have to think... how soft is a piece of yellow hot iron... and will that dent it if worked on the anvil.... if not... then your good to go !... just move past the idea of denting the anvil... your to work on denting the yellow hot iron instead...
by the bye... my 125lbs pete is extremely hard.. break your hammer kinda hard... i think they had an easier time quenching the small anvils, but the larger ones are usually a tad softer ..
have fun
Greg
ps.. if you need sharp crisp hard edges... just get a small anvil block that fits in the hardy -
if your lucky some of the bits with the collar will fit in the hardy hole... then you just forge out the ends to whatever stake tool you need.. hotcut, bick etc
nice scoop -
Dynomite !!!
totally awesome vid.. that massey is wonderful
-great forging and nice process
Greg
ps.. i noticed that the camera barely hop's around... nice to have a good foundation and not worry bout the roof fall'in in... ... unlike that other fella :rolleyes: -
wow.. awesome hammer
kinda neat how the operator looks sort of ghostly
hopefully its not ceased up with rust... -
nice hammer ..wow
if its a leather belt...i used neats foot oil on the belt.. wipe it on and let it soak in .. ... my belt was crackin and gettin glazed.. seem to have come back and does slip much at all..
- check the steam forums.. seems some people say that a proper tensioned and conditioned belt doesn't need dressin.. ... who knows
Greg -
Hi Nakedanvil
sorry...don't want to step on any toes.. just wanted to help J with his cracking problem.. as he indicated that he was unhappy with the failure rate..
in the end ...both J and customer should be happy..
And yet the customer was happy with the result. Who do you want to satisfy? -
Hi J
pending on the carbon level... you have to look at the temp of your normalization....... eg .9 to 1.10% carb would require higher normalization temp.. say about 1600F... to deal with carbides being in the wrong place or just to have all the C in solution..
i use timken W1 and i'll normalize 3 times with a descending temp... then i'll heat to 1450F and hold for 5 to 10min but thickest i deal with 1/4inch.. and a hold for 5min at 1200F for preheat....
generally if you go above .8% carb the heat treat gets more complicated..
if grain was small.....that is good... but it might not deal with grain boundary carbide... which can be trouble
w1 is a shallow hardening steel.. it wouldn't harden much by aircooling... but if it was s7, then the shop door might work.. ( but you could have untempered martensite... ouch )
-I'd do things by the book.. homebrew heat treats are fine for some, but if i'm going to tag my name to something, i'll do it by the book... the asm book if you have
Greg
They had run at least one maybe 2 normalizing cycles. When I heat treated them I normalized them as well. The grain structure on both my heat treatment and the heat treaters was very small. The surface was very smooth. One thing that was different between the ones I had crack and the ones they had crack, was the cracked surface was blue on the ones they did and gray on the ones I did. So they cracked on them while the steel was still hot while the ones I did cracked after they had cooled.
Forgemaster can you give more information on flaring off the oil? You have also mentioned reheating forge tools to the igniton point of the oil to temper them. How do you keep all the oil from burning off in the forge while reheating them before they get to the flashpoint of the oil?
I quenched the replacement chisels in oil and tempered them to 450F and they seemed hard enough. After this I was talking to a retired smith who worked at the steel mill these are going to he told me that they often just placed these by the bottom of the shop door in the winter and the cold air was enough to harden them. -
Hi J
when the edge cracked.. did it look sort of sandy/grainy... or was the break smooth like when you crack a file in two ..
- it may have been some grain growth from high forging temps... and may need some normalization cycles to bring the grain size down and lower some of the stress
watch your heat treating temps.. too high and grain growth will happen quickly with shallow hardening steels..
and make sure to temper properly
was there an alloy spec sheet that came with the W1... as W1 has a very wide carbon/alloy content..
Greg
Just completed quick-change die system
in Power Hammers, Treadle Hammers, Olivers
Posted
thanks Sam, that's it
;)