

Don Shears
-
Posts
122 -
Joined
-
Last visited
Content Type
Profiles
Forums
Articles
Gallery
Downloads
Events
Posts posted by Don Shears
-
-
JHCC - Thank you for the splicing instructions.
I bought a 4 by 108 belt grinder last Oct. but no belts. Suppliers for that size are rare (also I'm minding my cash flow during the current situation.) Your instructions show that the splicing isn't as complex as I'd originally thought.
I'd like to confirm the splice angle as 20 degrees (a protractor held onto the laptop screen is only so accurate.)
-
After initially reading this thread a few weeks ago, I started keeping a mental record of activity and flue temps at my forge.
My forge is coal/coke fueled, bottom draft. Chimney arrangement is a stainless steel 'super-sucker' side draft feeding a galvanized 10 inch HVAC duct going vertical 20 feet. Several years ago I installed a BBQ thermometer about 14 inches above the inlet. I made a SWAG that thermometer accuracy is +/_ 50 F. When working small stock (up to 5/8 inch) indication is between 100 and 150 F. For forge welding with me cranking the blower steadily I can hit around 400 F indicated.
-
Well, like many I've been pretty much doing the isolation thing. And like so many with the warming weather spending more time in my (currently unheated) shop.
I've put in time working on several projects. Handle for salvaged brass shovel head; matching poker for the shovel; flux spoon with attempt at brass inflow; repair of a fire poker; wedge for a post vise mount; fire steel; handle for a brush; hanger for bird feeders; and a sample 'S' hook for my wife to approve for her flower baskets. For scale the plywood sheet is about 28 inches wide.
The repair of the poker was needed after making it during a demo, I missed seeing a hacksaw cut about mid length. That was last fall so I got over zealous filing the rust out of the cut making it too big to just fill with brazing rod. Solution was to slightly dovetail the notch and make a fill piece from a salvaged square nail for brazing into place. Makes an interesting piece to examine after cleaning up with a file.
In early April I picked up as BS roadkill a new, but broken file. By it's condition it was brand new with no signs of use or rusting, but the tang and an inch or two of the teeth had snapped off. This is my first attempt at this style of fire steel, it's roughly 5 inches end to end. Flint, chert, and quartz all draw sparks easily. Even tried a golf ball size clinker and that drew sparks as well!
I've several other WIP that I will post pictures of later.
Don
.jpg.3e11faaaf896745a0c6e517f358a74e4.jpg)
-
Swedefiddle (Neil), SLAG - I stand/sit corrected, not high carbon, but certainly enough to be hardened. There's been plenty of discussion threads here on IFI about these. Good for making hammers, struck and hardy tools. Quite a few need re-pointing and I haven't done a spark test yet. The idea of talking to a contractor has occurred to me, just haven't followed up. The pneumatic drill rods are cut-offs, of different lengths and flat to flat sizes. I will have to clean out the air/lube channels before doing any cutting/forging. I do not want any nasty surprises.
Thomas - congrat's on getting work closer to home. As a sidebar, at another auction I met up with another fellow (a retired geologist) with a disreputable red hat (sans horns!)
-
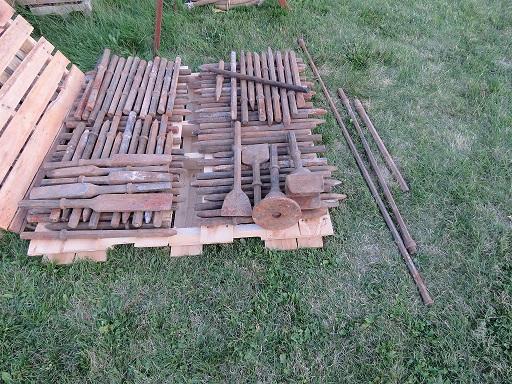
I had the winning bid on a lot of pavement breaker points and related items at a local auction last week. All up cost was just under CDN$180 (or under $2 a piece)The lot covered two standard (4 ft by 4 ft) pallets. Took me about ten minutes to hand load into my truck with help from one of the staff.
The shanks are a mix of 2 1/8 inch and 2 1/4 inch flat to flat hex.
There are 69 pyramid points, 13 with cut off ends, 9 chisel points, 5 wedges, 2 spade tips, a tamper, and what I believe to be a pipe or post driver. Also included were 3 pieces if pneumatic drill shaft, a 2 ft long (octagonal stock) chisel, 2 jack hammers, and 4 sections of air line.
The challenge now is coming up with a way to store this before the snow arrives. But I now certainly have enough high carbon stock to last me a long time.

-
If you can find a copy of "IRON MENAGERIE" by the Guild of Metalsmiths, the Introduction pages (all two of them) give the shapes and dimensions for the various basic tools* used in shaping decorative animal heads and figurines.
* - eye and other punches, fullers, and chisels. Which certainly can be used on other projects.
-
My non-scientific guess with no measurements and only one picture (though the pink coffee cup in the background gives some scale) is the moving jaw of a vise, more likely a machinists then woodworkers.
-
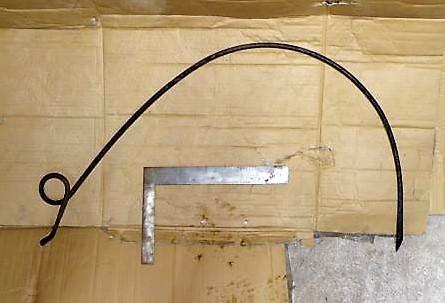
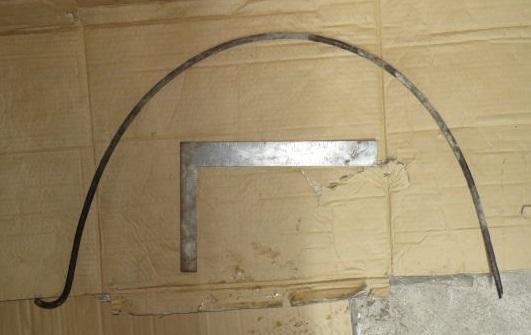
I haven't used files for fire steels. Instead I use (horse drawn) dump rake tines for making both fire steels and small knives/letter openers. Junk yard steel chart lists them as 1090.
Can draw decent sparks using chert after a quench in water from orange heat and no tempering. But having read dickb's post, go with the magnet test (more accurate then eye) and quench.
Attached are a couple of images. The tines are 5/16 inch dia. Styles obviously differ with manufacturer. The square is 12 inches on the outside of the long arm.
-
Assembled/fabricated a brass spool holder for my spouse's sewing machine. No blacksmithing, just some basic shop skills and time with polish and rags. Designed to hold the over-sized spools of specialty threads she likes to use. Made from odds and sods brass bits I've accumulated over the past decade or so. I also glued a piece of cork gasket sheet on the bottom to protect the table top.
Picture on the wood table top has a Canadian one dollar (loonie) coin for scale; the other has the holder at the sewing table sitting on a cutting mat with a 1 inch grid. Total weight is just under 3.2 pounds.
Merry Christmas all.
.thumb.jpg.c551fc9b33489765cf1e658f64dd6e0a.jpg)
.thumb.jpg.eb216a156e14871b9df0a9d380516fbf.jpg)
-
My two cents (best guess) on this is a saw set for the teeth of two person cross cut saws. The teeth on those saws are usually about 2" long on a new saw.
-
My NSWAG (Non-Scientific Wild A$$ Guesses) include (tool wise) a reamer for either a cooper or a wheelwright. Or a scraper/cleaning tool for a foundry.
For a cooper - to clean up the bung holes on casks.
Wheelwright - cleaning up the axle holes in wheel hubs.
Foundry - cleaning of large castings with deep recesses. (Think of the wheels on the railroad steam engines, or larger castings for the flywheels on stationary steam engines.
I'm more likely wrong then right on this.
Don
-
My 2 cents - Weather vane Mast/Support pole (?) The copper plating should tarnish to a nice green.
Or use some as a trade item/Iron in the Hat offering at the local BS meeting(s). And just like here, ask those folks for suggestions.
-
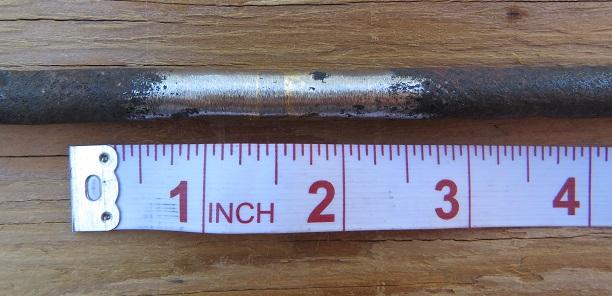
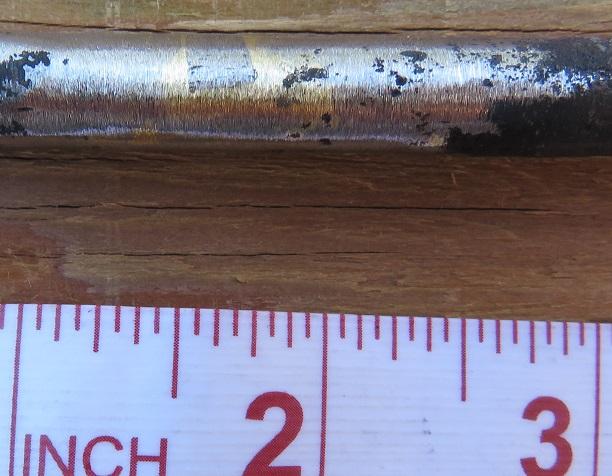
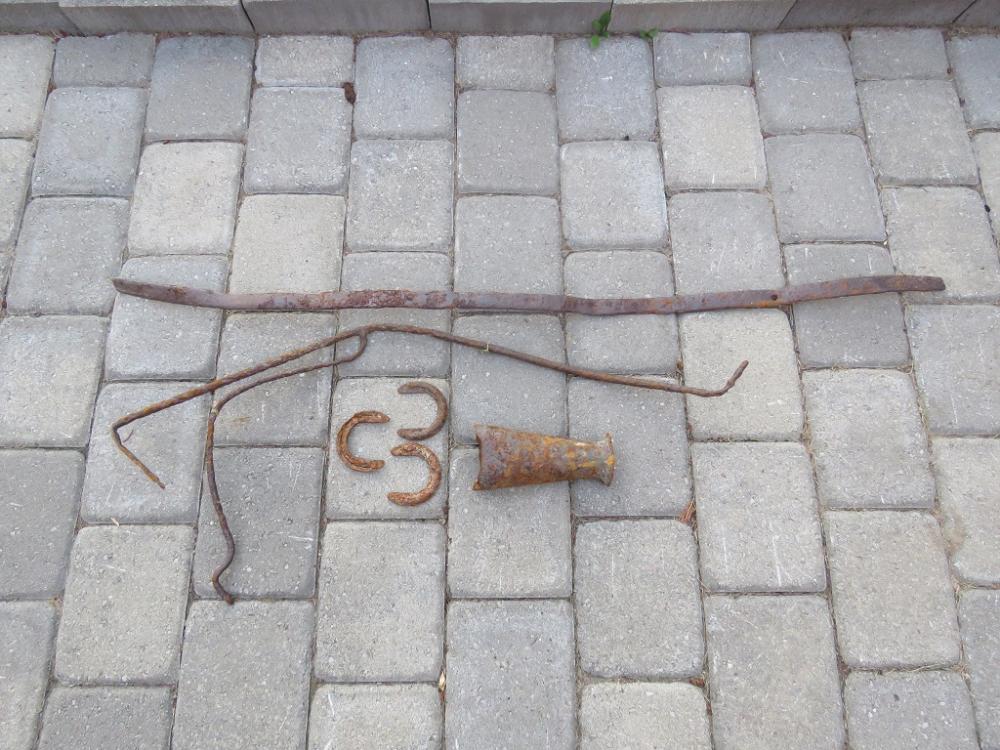
Last Sunday my wife and I went for a afternoon drive and a walk on the beach (North shore of Lake Ontario.) With the high water levels this year areas that had 20 to 30 feet of beach can be down to 6, leaving you the choice to either wade or take the obstacle course. Anyways with the heavy wave action on the shore quite a bit of the shore scree has been churned up. Came home with a piece of wrought iron about 42 by 1 1/4 by 1/4 inches. Either a runner from a sled or part of a buggy tire (two visible forge welds and there could be other welds that are not so visible. Also found a brace or bracket? 3 stamped clips and a cone of 1/8 inch sheet. For scale the pavers are roughly 8 1/4 by 6 3/4 inches. I do want to go back, there's about 30 plus feet of 1/2 inch steel cable washed with the remains of a boat dock.
Don

-
Both tool are saw sets. I have several of other styles. Both have adjustments for length of the saw tooth and angle.
If you take a close look at the cutting teeth of a traditional western wood workers saw you'll see that they lean out slightly past the sides of the blade. This is to prevent the saw blade from binding in the cut.
I've never sharpened any of my own saws, just have a idea of the principles.
Don
-
In the summer of 2007 I was in Reims, France. Incredible variety of iron work styles all around the central part of the city. This is due to the reconstruction after WWI, where some folks had their homes/property (buildings) rebuilt as they looked before the war, or had (at that time) modern buildings put up to replace the destroyed or too damaged. So the styles range from Medieval to Art Deco. Plus the Notre-Dame de Reims Cathedral is a UN World Heritage site well worth looking at.
In Paris, if your into armour, there's the Musée de l'Armée. Lots (and I do mean lots) of suits of armour. Plus ancient arms to very modern.
There's also Guédelon Castle in Treigny, France. It's the site of the construction of a 13th century French castle using only techniques known at the time. This castle is the subject of the BBC TV series "Secrets of the Castle."
There's also the Maison de l'Outil (House of Tools) in the city of Troyes (about 100 km) south of Reims. I haven't been there, but slightly regret the missed opportunity.
Enjoy your trip where ever you decide to go.
Don
-
On 04/06/2016 at 1:20 PM, SmoothBore said:
Just my opinion, ... but I've found there are few things in the world, as useless as a "speeder" wrench.
Everybody has a couple laying around, ... and they're NEVER worn out .....

On the other hand, Potato Forks are quite useful, ... but conjure up unpleasant memories of sweating in the garden.
Fortunately, it can be "re-purposed" into something less traumatic.

.
For the most part that's true; but they're great for heavy aircraft maintenance, as part of a group for pulling/installing major panels and floor boards. A couple of the crew starting removal/insertion with screwdrivers followed by others with the speeders. Saves time, wrists, and stripped screw-heads compared to air tools.
-
Realistic Blacksmithing in a Movie - Smoothbore, in response to your question, check out the opening sequence of the Russell Crowe film (1993) "Hammers Over the Anvil." The camera view is primarily shot at about the height of the of the anvil face, and follows a farrier making a horseshoe from bar stock.
-
ianinsa - I had to think a bit about potential uses for a while.
I finally remembered the use of a lead bath for tempering blades, springs, chisels and punches.
I saw this technique demonstrated over ten years ago by Lloyd Johnston, another smith who lives in my region of Ontario, Canada. Lloyd used a lead bath over his coal forge to temper a replacement spring he had made for a leg vice. It's difficult to maintain a low steady temp over a coal forge to keep the lead from fuming (definitely not healthy), so the electric temperature control is a bonus. The disadvantage of the pot you have is the small overall size and shape of the pot. Since the temperature is a known, as is the mass being tempered, time becomes a more predictable variable.
Not an ideal repurposing of the tinning pot, but the best of what I've been coming up with.
Cheers.
Don
-
Reminds me of a 'tinning' pot used for dip tinning of electronics wiring.
A quantity of solder (63/37 lead/tin alloy usually) was melted in the pot. The insulation of circuit connection wires for solder cup connectors. Ends were pre-stripped to the correct amount of exposed conductor (either bare or tinned copper) needed, the end was dipped in liquid rosin flux followed by dipping in the liquid solder. Then the wiring harness was built up. It's an older style of labour intensive assembly technique that's pretty much phased out.
Was shown and taught the technique in trade school 30 plus years ago and I've never used since.
Don
-
I have a similar style struck tool, they're used for sharpening/re-shaping the cutting bits of pneumatic drills, used in mining/rock quarrying. There was an example included as part of a display in the Royal British Columbia Museum, Victoria B.C. Canada.
I do have pictures, but not on file in the laptop I'm currently using.
-
My best guess, a struck tool called a 'cheese fuller.'
This definition came out of The Kenneth Lynch Tool Collection Catalog - "...tool is used by the blacksmith for spreading hot metal especially plate. It is similar to a flatter, but has a convex face."
Don
-
From the appearance in the picture; it is a complete bridge anvil with a coating of surface rust. From what I can make out from the photo it appears to have seen some use. Part of the manufacturers name is visible, the 'WELL SUPPLY C...." A rare to see or come by item in my area (South Eastern Ontario.) Thanks for the post.
Don
-
Check "THE KENNETH LYNCH TOOL COLLECTION CATALOG" available through the link below;
https://docs.google.com/file/d/0B_P1cjplazYgVGFRWEZYa3RRQmc/edit?usp=sharing
There are quite a few gardening implements shown along with (very) brief descriptions on their use.
An extensive catalog of tools used by many trades - a good resource to help identify that unusual find.
Don
-
Salvage from Barn Demolition.Pictures of some the material I salvaged (with permission) from a barn demolition. A better write up is give with the first image in the gallery.Don
.jpg.af1d9bc18f410fc98128d41bf9b893c2.jpg)
.jpg.c848697847eaa13c6e020a7be65db363.jpg)


cutting a propane tank
in Problem Solving
Posted
A quick question on this subject - how do you remove the valves? On the 20 pound tanks are the valves left or right hand threaded? How much force is needed to break the thread seal i.e. 18 inch pipe wrench or a 6 foot cheater bar on a pipe wrench?
Cheers;
Don