

Latticino
-
Posts
2,169 -
Joined
-
Last visited
Content Type
Profiles
Forums
Articles
Gallery
Downloads
Events
Posts posted by Latticino
-
-
I honestly don't remember seeing induction forges on FIF, let alone large ones. I know they have sizable propane forges as well as electric heat treat ovens, but I don't recall them using induction.
I well know the lure of purchasing new equipment for a new hobby, but you might be getting a little ahead of yourself. I recommend you hookup with some of the Ohio smiths and see if there is a group near you, or a class that you can take. You can learn a whole lot more from in person direction than from watching Youtube or FIF. If I recall correctly, there is a pretty large contingent of smiths in Ohio, and even though it is a large state I suspect there will be a branch of ABANA nearby (or near Pittsburgh as you appear to be close to there). Now that I think of it, the annual ABANA conference is just outside Pittsburgh in June. If you want to see some fantastic work, tailgating and comradery you might want to look into that as well.
-
Coal Ironworks recently came out with a 15 and 25 kW units. Might be a little more support, at least, than buying a cheaper overseas version.
-
Rojo,
That is exactly what I was planning on recommending (and indeed was my first hawk forging and actually third thing I ever forged). Just remember to use an older ball peen hammer. Some of the newer, cheap, ones are not made from easily hardenable steel. I would spark test the face first to be sure. Around here they are readily available at garage sales and flea markets. Without a handle you shouldn't need to pay more than a few bucks. They also make great blanks for forging various top tools (punches, hot cuts...)
-
1 hour ago, hbmasa said:
I'd say if they got a bottle, sure?
NO! Hopefully you would research it enough to get to this CDC site which would tell you that even though it etches metal just fine, it is horrifically dangerous to use:
Please learn to do research from respectable sources.
-
2 hours ago, Latticino said:
As I understand it, you don't really have two different types of steel, so you aren't really etching for topography that you can later emphasize by polishing the high points with a hard backed 2,000 grit sandpaper.
You appear to be misreading my note. You will likely NOT GET ANY SIGNIFICANT TOPOGRAPHY etching cable, so polishing afterwards is NOT RECOMMENDED.
Hopefully this is clear enough for you to understand.
1 hour ago, hbmasa said:as Moses did it in the bible
Pretty sure Moses didn't try to etch cable damascus... If you mean he got "close enough" to the promised land, I doubt he would have agreed. Recommended class or reading good reference is to avoid getting hurt yourself, hurting others or the environment. Acids are not something to play around with. What would you have done if you saw someone posting that hydrofluoric acid was a good option for etching your blade?
-
Couple of suggestions:
- Get yourself a pair of vinyl gloves and use them during the etch process. Muriatic acid is not good for your skin. Also avoid breathing the vapors.
- Cable Damascus is a very subtle pattern. As I understand it, you don't really have two different types of steel, so you aren't really etching for topography that you can later emphasize by polishing the high points with a hard backed 2,000 grit sandpaper. I believe that the white lines between the darker areas are just showing the decarbonization at the welded interface between cable wires.
- I recommend that you complete your etch, neutralize, and clean off oxides with soap and a soft cloth. During the etch, if you must remove oxides, also use a soft brush.
- Some folks recommend going with a slow, light etching solution (white vinegar or ferric diluted at least 1:4 with distilled water) and letting it etch for a long time.
- I haven't been very successful getting a cable damascus etch to really stand out (which is why I switched to pattern welded 1084 and 15N20 even though I love the traditional cable look), so can't give good advice on that, but you might want to try a final soak in highly concentrated instant coffee. In pattern welded steel it can really punch up those blacks.
- George's advice for test coupons is really on point. Strongly recommend you follow this.
-
If you know what you are doing you can make a smaller "viking style" hand axe out of the 1.5" round 4140 stock. It is certainly possible to hot punch the eye solo with a good drift (see videos by Brent Bailey or our own JLP). It is a lot easier with a helper swinging that big hammer. It's a great team project with a striker, but it helps if you make the tooling first. You need at minimum a hammer eye punch or slitter and an axe eye mandrel/drift. You may find it helpful to have a flatter and a radiused top tool to match the curve of the belly you likely think you need (note there are a great number of different types of "viking" hand axe. Some had rather simple lines, some superlative silver inlay. You can go in either direction, but I don't recommend going for a bearded axe on your first try unless you are a fairly experienced blacksmith).
-
Frosty,
Yeah, on my phone to answer and conflated locker room showers and residential restrooms.... It is exhaust duct either way. We typically don't call it "ventilation" exhaust.
-
In my opinion flexible aluminum duct is not appropriate for either kitchen hood exhaust or forge flues. It is just barely acceptable for laundry dryer or bathroom shower exhaust.
-
More importantly it might be worth investigating what you want to use the forge for to see if there are more economical alternatives, or if the whole undertaking is impractical. For example if you are only going to bend or twist 3/8" rod, you can likely do it cold with the right leverage. If you plan to make knives, the fuel cost is only a small fraction of what can be required for abrasives to finish the work.
Certainly not discouraging you from getting into smithing, but if sourcing a 55 gallon drum is going to break the bank, forging may not be a reasonable path. I see preowned, reconditioned drums around here for around $20 -$30.
-
So something like this?
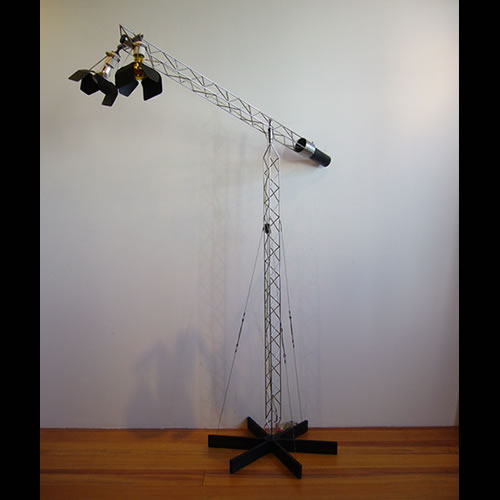
curtis jere crane lamp
-
Back in the 70's her album "Recollections" was one of my favorites. I think I still know most of the lyrics by heart.
-
Also loved her in the Silly Sister's group. Look them up if you don't know them. Actually also saw Judy a year ago. She certainly still has the charisma, but that polished voice from the 70's isn't quite there.
-
I'm a big fan of Steeleye Span as well. Of course, the traditional song/jig "The Blacksmith" that they do has been recorded by a great many artists (it's a fairly popular Irish music staple), but I heard it from them first. There are a couple of other blacksmith themed instrumental Irish tunes as well including: "The Merry Blacksmith" and "The Blacksmith/Blacksmith's/Blacksmith's Daughter", both reels. I also don't usually care for lyric screaming, but each to their own.
-
As far as value goes, things are pretty variable. Would cost you around $400 to replace it with a new one, but there aren't all that many being manufactured today. I've seen post vises in that condition sell for anything from $45 (yes I bought that one myself...) to $175. They do sometimes get posted for outrageous numbers, but rarely sell at them. Needless to say, if you want a reasonably quick sale you will want to be closer to the $75-$125 range. The New England Blacksmith group in your area is quite active. Perhaps someone from that group can help you out.
-
Many folks use spiral duct for their forge flues. You are correct that typically this duct has a galvanized coating and, if overheated, can be a problem. In my experience an old school overhead hood entrains enough shop air to cool down the flue gasses to a point where it is not a problem, but the super sucker style is so effective that the flue can get overheated, particularly if you are building a larger forge fire. You can probably go with spiral duct if you have some kind of black steel or stainless connector between the super sucker hood and the following duct. I would use a piece that is at least 3' long for this purpose. Please note that most of the snap together duct with the snap together longitudinal seams that others have been advocating are also typically made using galvanized sheet metal as well. IMHO spiral duct is a significantly better option than snap seam duct, but usually a lot more expensive and only available from a sheet metal duct manufacturer (snap seam duct is available here in hardware stores).
-
Also get the hood opening closer to your fireball if possible and be sure to start the stack drawing fumes by burning something inside the "barrel".
-
To allow the turndown ratio you will want for heat treatment (it is really nice to have the capability to turn down to around 1250 deg. F for a subcritical stress relief pass) I would recommend considering making one of your burners rather small and the other large. The small burner gets tuned for the lowest temperature you want to run the forge at, and the larger one cycles with setpoint. This way the smaller one acts as a safety pilot (if aimed correctly) and you only need one set of controls.
I like a thicker castable refractory layer than 1/4", but only if you are using the correct material. A lightweight, castable, high alumina refractory like Kastolite 30 works extremely well, but I like to see it at least 1/2" thick (if not 3/4") for real structural stability. Of course you do have a bit more time to heat up, but there is a thermal mass benefit as well.
-
One of the first steps in forging a hammer head for me is to make the tooling necessary to forge it efficiently. For me, at minimum, this is a hammer eye punch and a hammer eye drift. There are a bunch of different designs for each, but the one recommendation I have is that you size your hammer eye drift with a crossection and taper than matches standard commercial heads. If you then use it from both ends, you will get an hourglass shape that will fit securely on a handle and be able to be wedged.
There are also some tricks to keeping the eye punch correctly centered in the billet:
- Some folks predrill two holes all the way through the billet at either end of the eye before any hot work. Essentially then you use a large slitting punch to remove the web between the holes.
- Some folks just drill a single hole at the center of the eye that works as a guide for a hammer eye punch that has a center finding face (see the Brazeal style hammer eye punches). This avoids the offset from each side of the eye that can make punching the eye a challenge.
- Some put a deep centerpunch on each side of the eye to act as a locator (see above). Make sure you look for the center of the "swell" when you flip the billet and start to work the other side as one of the punches will get a bit washed out while you are punching the original side.
- If you have a coal forge and can selectively heat one side of the eye, you can try to correct a thinner side by heating the thick one when you go to drift the eye. That can even the eye out, but may twist the face orientation a little (easily corrected either hot or cold).
- Make sure you rotate the billet 180 degrees every couple of strikes to help you punch perpendicular to the face of the eye in both longitudinal and latitudinal orientations. Unless you are using a hydraulic press to punch the eye, ergonomics work against you in punching truly perpendicular.
What you have made looks more like a handled top fuller than a hammer to me. However, correctly heat treated, it will likely work for either role.
-
My current gas forge has a 14" long interior, and 90% of the time I wish it were shorter. You are much better off with a 6-8" long interior and doors that can be opened at both ends. This actually works better for forging sword lengths, as you can only hand hammer about that long a section at a time. For heat treating a dedicated vertical 55 gallon drum lined with 1" of refractory blanket (properly rigidized) and a 1" burner works better than any long multi-burner forge I've ever seen used.
-
That's a lot of forge and will be a bit of a gas pig. Depending on how hot you need to get, I would go with (3) nominal 3/4" burners provided you are thinking of standard NA propane burners.
-
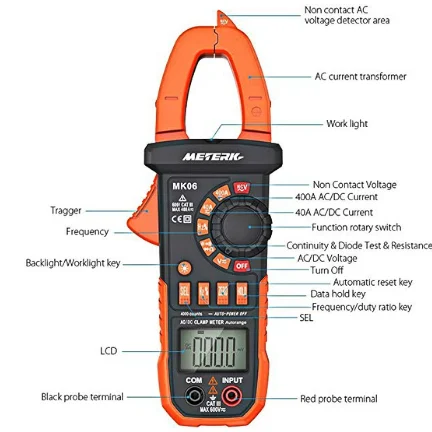
If your motor is up and running (photo shows it already powered), you can put to work and measure the amp draw at each of the hot legs using a strap around (clamp on) ammeter. This will give you a direct measure of the brake horsepower currently required by the motor in question.
-
A hand filing jig like that one can certainly work, but will be a bit slow and needing some tweaking compared to a 2 x 72 belt grinder with accessories. You will also need your stock to be fully annealed to effectively use the file without destroying it. I'm not sure the band clamps and eyebolt you are using will provide the accuracy you want in a file guide, but it is a start.
Regarding holding your blade flat:
- You should have forged in a riccasso that is flat and parallel on both sides. This is what gets clamped down to your board. You may have to shim the tip of the knife a bit to keep the rest of it level , particularly when you switch sides. I have used tongue depressors, available in bulk in most hobby shops, to work as a shim.
- If you are including a Joe Keesler style integral finger guard, you will need to notch the board to miss that.
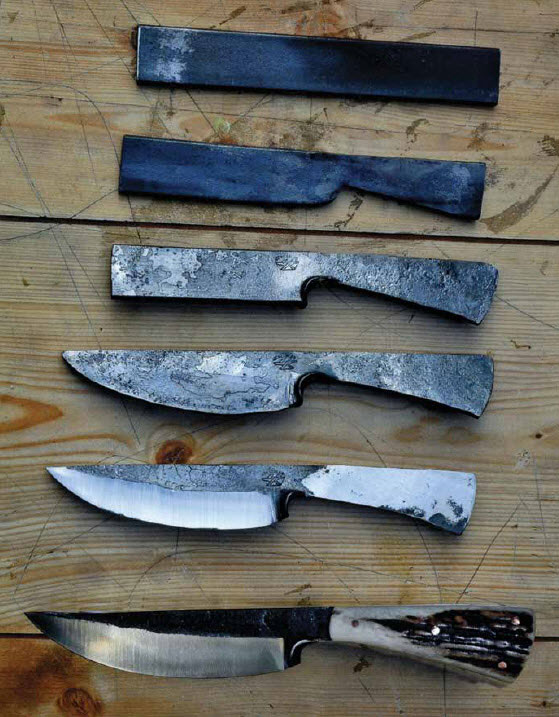
Here is a great image of Keesler's forging progression for making these knives. He certainly uses a 2 x 72 with a contact wheel to grind that hollow grind bevel, though I have made them with flat grinds as well. I am a big fan of Joe Keesler's work. When I saw him demo these I believe that he freehand grinds, though he may use a rest. Of course he has been making them for decades...
-
Basically what I used on my temperature controlled furnace, except I used an independent pilot at low output and a solenoid main burner. Works well, but you will burn your type K thermocouples out pretty quickly if your forge stays up at welding temperatures for long. I used to use a high alumina thermowell to protect mine, though they don't always like to thermocycle.
What's up from Pittsburgh PA
in Introduce Yourself
Posted
Be extremely careful about banging on the section of your mount that is lying flat on the anvil face. It looks like it might be cast iron. If so, it will be extremely brittle and not forgeable at all. The bracket holding it looks to be mild steel and can likely be forged.