
norrin_radd
-
Posts
298 -
Joined
-
Last visited
Content Type
Profiles
Forums
Articles
Gallery
Downloads
Events
Posts posted by norrin_radd
-
-
Saw this one yesterday, seemed kinda funny to me:
"vtg tool miniature railroad spike hammer sales sample / blacksmith hole puncher"
Just kinda throwing anything in there to get views I guess, asking 199.99, unless I'm missing something I just don't see it.
-
Great vid and nice tongs. I liked the "kiss" blocks too. I am planning on building a guillotine tool and had wondered if something like that would work. Nice to see some in action.
-
I'm just a newb but I bought a bathroom exhaust fan from a big box hardware store for about 20 bucks to use in my coal forge. It works well enough to burn the tip off of a rr spike. :( I did have one of those bounce around things for kids to jump in with what I think would be an awesome blower, but I sold it like a month before I got into this, doh!
-
norrin_radd I am digging the crank shaft stand, that's an awesome idea and it looks nice! That anvil is nice looking too, make sure you secure that thing down it looks a little top heavy but maybe it's just the angle in the picture.
Thanks, the length on that crank shaft was perfect and it adds a lot of weight. I have been eyeballin that crank shaft in a scrap pile for years. I probably should take some better pics of it and post in the vise section.
The angle in that anvil pic may make it look a little weird, it may be that the distinct Star anvil shape makes it seem that way too. I made a base for it from an old creosote pole and some 2x6's screwed to the top of it to get support out to the anvil feet, the pole was just a little shy of being big enough. Its kind of ugly but gets it off the floor. I have a possible line on some large oak blocks that I may switch to.
-
The main reason I went back for it is because I had researched it on this site and found out its history, thanks for the info.
I took a my drill with a wire brush to it a little bit and the face does look a lot better. Cant wait to get a stand made and start using it.
Thanks again for all the advice.
-
I finally bit the bullet and bought me an anvil. Its a 150+lb Star I think its in pretty good shape. It is probably in the best shape of any I've seen in person. But the top is not very smooth, and the edges don't have a real uniform radius, no radius at all mostly. What should I do to this anvil, if anything, before I start to use it?
Thanks
-
This is my first real anvil. 150lb Star with the oval hole in the bottom. Edges are nice a little pitting and the horn tip is a little messed up. But I like it.Here it is next to my vise and homemade stand.
-
Well then...thanks for the reality check. You've given me something to think about. I actually had wanted to make a guillotine a while ago, probably a better use for it. I may have let my desire to make a huge knife cloud my judgement. Every time I thought about it I knew it was going to be a huge pain.
Thanks for all the advice. -
Just want to point out that the standard issue Khukri has a 3/8" spine. 1/4" would be fine but less hammering and more authenticity sounds like a win to me!
-Crazy Ivan
I had thought about making one that thick but I was afraid it would be too heavy for backpacking type useage. I was shooting for at least a 12" blade. I might try the first one at the 3/8" though. There is plenty of material in that blade for 2.
thanks for the replies.
-
I came across an old bush hog blade similar to this:

The end of it is worn more to blunt point but its the basic same thing. I thought this would be good to make one or two big Kukri's out of, my first ones, but I think its a little too thick at a 1/2".
Im still a newb, so my dumb question is should I just heat it up and start beating on it with my regular 3lb forging hammer or should I use something like a flatter to try to get it to around 1/4" thick before I start to get the kukri shape that I want. I dont have a power hammer and have never used a flatter so I thought I would just see what the pros would suggest before I get started with this rather large piece of steel.
Might be easier to just make some big a' viking axes out of it, i dunno.
thanks for any advice.
-
Can't you find old coil springs? Those make decent punches, slitters, chisels, drifts, etc.
Frosty The Lucky.
Thanks for the reply. Yeah I just got a source for some coil springs and leaf springs today, not sure when I can get there though. But I was just curious about this stuff I have laying around. Kinda getting anxious to forge something ya know. ;) I think I can get a cheap set of pry bars to use as for a slitter pretty quickly from a place like you mentioned.
Thanks again
-
Probably a stupid question but, I have several bars of 3/4" A36 lying around and have been searching to see if it would make workable, even temporarly, drifts but I havent really found a diffinative answer so I thought I would just ask.
I know tool steel is preferred but I dont have any right now and as a newb I wonder if I could practice on the A36 and make something usable enough to maybe drift or slitting chisel for a rail road spike tomahawk that I want to try?
I got this from a steel fabaricator but I was wondering if A36 is the same stuff they sell at the big box hardware stores for "weldable steel" or is it better?
thanks
-
If the community college you go to has any programs that deal with welding/machinist/hvac/small engine or anything even remotely resembles one of those trades it would probably be worth your while to lurk around there or talk to one of the instructors there may be something you could use lying around and possibly get for free.
I'm pretty new to blacksmithing too but that's my 2 cents, good luck
-
norrin_radd
Just go to the scrap yard, get the biggest bearing you can get, cut it with a grinder, extract the steel balls and make the test. There are lots of youtube videos that show ball bearing rebound tests on anvils.
I guess I will try and do that at some point. I think for what we need it will do an adequate job for now. I might even try to harden it some time in the future if I feel like its something I need to do. Right now I want to get the forge fired up and make stuff.
In the process of fabricating me a "stump" out of that fat lighter beam too.
Thanks to all for the great info on this site.
-
Dawned on me a few minutes ago that you thought I might have tried the rebound test with a magnet, that's pretty dang funny.
-
Magnetic as in will stick to a magnet. It came out of an ancient mouse and I peeled the rubber off of it. Its actually a steel ball about .75 in dia. not sure how much it weighs but I wouldn't want anyone to throw it at me.
Anyway that's all I have right now. So I read about the rebound test and one thing said to drop it from 10". So I polished off half a tube of pringles, cut a 1" slit up the tube and marked 1/2" increments up it, I had about 9 1/2" on the cylinder. I held it about 1/2" above it and dropped it several times down the tube and the highest it got on the welded on face was maybe 4.25". I dropped in on the exposed part of the original slab and it bounced almost to 5". So I guess the added face has about a 42% and the original face had 50%. I guess that should be good for a hobby anvil?
-
I haven't done the ball-bearing test, but I will. Would an old mouse ball with the covering removed be sufficient to use? Not sure what they are made of but its about .75" dia and magnetic.
-
Well due to the "polar vortex/global warming" and other obligations I haven't had much time to do any forging but I thought I would just post an update on my homemade anvil for posterity if nothing else.
I started out wanting to find a good stump to set my anvil/slab down in for a better base but ended up with a entirely different product. I was just looking at the slab and started to wonder if I were to cut it square what could I do with pieces to make it a little better. Well this is what I came up with.
First we cut it square where the cutouts were:

My vision was to weld the wider 3" piece (top left in the above pic) to the top of the slab to give myself a little wider of a striking surface. When the pieces fell it became apparent on how I needed to do this. Then I really lucked up and my bro in-law was going to have a piece of scrap from a hay fork extension job that he had to do. I was literally just about to try to torch cut about 3" of steel to get a tapered end off of some really heavy piece of an old tractor steering mechanism (yeah I have no idea what its called) when he showed up with the hay fork. Anyway this is what I got.


I put good bevels on the edges before we welded it and all the welds are solid. She aint pretty but I think this will work out good for hobby needs. It pretty much has a 3/4" x 1" hardy built in from the way that it had been cut before I got it which came out pretty good for me. And I left the 2 extensions hanging off the sides to see if they will be of any use. I figured if they get in the way or I don't want them I can always cut them off, already came in handy for a small welding job I had. I have an ancient 6x6 solid fat lighter beam out of an old house that I am going to try to fabricate a base out of unless I come up with something else.
Anyway, that is all.
-
Thanks for the kind words.
I really like the school projects and I get very frustrated when I get the "oh yeah I have this project that I knew about a month ago and we could have done something really cool but its due tomorrow so now we have to throw some hunk of crap together so I can get a grade" sort of scenarios. :huh: That's just kids though. This one was done in a timely manner so hopefully those days are over.
But yeah, raising kids takes a lot selflessness when it comes to time, but when its gone its gone. I'm just glad he's gotten into something we can both enjoy.
-
My middle schooler had a social studies project to make a traditional African mask. As soon as he got the assignment he told me he wanted to forge it. Since we're both just beginning metal workers, I couldn't really figure out how to go about it so I came up with using copper. Bro inlaw does dozer work had come across a large squashed copper pan of some sort in a trash pile, so we cut a big piece out of it. Worked it cold with a ball-pein on various different "dies" that we found laying around. It was about a 50/50 job between me and him. He'd watch while I figured out how to do something on one side then he would do the other side. I thought it came out pretty good and it was a hit at school. We decided not to leave it there though, probably wouldn't have lasted a day. It was a good time out in the shop and we learned a lot. He is in to the whole bladesmith/armorer thing so this gave him some good experience with sheet metal. This is the first thing either of us has made out of copper.
-
Thanks guys, I'll have to pay attention to those stress points. Cant wait to use them now.
-
They look good to me. I like the re-bar grip texture.
-
Finally finished my first pair of tongs, my first real tool actually. These started out as a simple pair of flat tongs from 1"x1/4" mild flat bar with the 2 90 degree twists, but I modified the jaws to hold rr spikes or bars.

They actually line up better than what is pictured but the temporary bolt I'm using lets them move a little. I drilled the hole since I don't have a pritchell (sp?) hole yet.

Riveting is next. I probably could have done them more efficiently, I got about 5 hrs total into these, but I learned a lot and fun while making them. Quite a bit of just looking at them and figuring.
They came out better than expected for my first real project.
-
Well I installed my "anvil" in its stand this weekend.

I removed my rr track and hobby anvil from the old weight bench that I had them mounted too and the 2x9.5x28 plate slid down in it perfectly. I braced it with a couple of 1x4's and it is firmly on the ground, maybe a little bit "in" the ground. I made a post to mount the half round to. I think I need shorten it to use as a hardy. This gives it a very stable platform and its all recycled stuff.
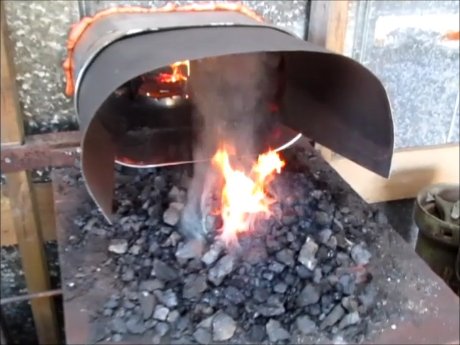
The plate has a real nice ring to it and I knocked the edges down a bit with a polishing wheel on an angle grinder. I started on a pair of tongs and the difference is night and day from hitting on my older stuff, completely solid. Not bad for around 60 bucks IMHO. I have to smooth it out a little more but its ready to work. I'll have to get a pic of our forge next.
thanks for all the advice. if we make anything cool I'll post it.
Hot cut hardy from an auger tooth
in Hot Cuts, Anvil devils, metal cutting on the anvil.
Posted
Co worker gave me an auger tooth he found. I made a hot cut out of it. My first attempt at forge welding was to get those pegs together and I think it came out pretty good. Tapered the edge, and heat treated in oil. Works good so far, fits better on a diagonal.
http://www.iforgeiron.com/gallery/image/38678-hot-cut-hardy-tool-from-auger-tooth-ready-for-action/
http://www.iforgeiron.com/gallery/image/38677-hot-cut-hardy-tool-from-auger-tooth/
I haven't posted much lately but I have been in the process of building a shop. I basically got it built just laying out the inside now. You can kind of see my forge that I just got finished in one of those pics. Just rigged a dimmer switch to the fan this week. One day soon I'll have to post some pics of the forge and my new shop.