

will52100
-
Posts
351 -
Joined
-
Last visited
Content Type
Profiles
Forums
Articles
Gallery
Downloads
Events
Posts posted by will52100
-
-
I'm needing a couple of top fullering tools, thinking of forging out a couple of harbor freight 3-4 pound shop hammers to save time. I could forge from 1045 round bar, but am thinking of the time savings. Is this a crazy idea, or false economy? Thing is I can get them for 9.99, then add a 25% off coupon, so 7.25 before tax. Of course I'd have to cut the handle off, but I save them for future projects, not that I need too, got plenty of hickory around here.
-
Awesome!
-
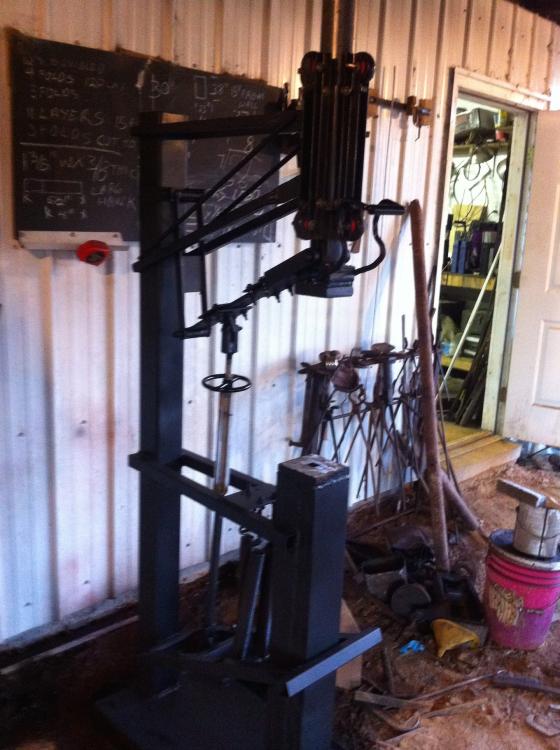
Well, got it done. No need to heat treat the flat spring, and judging from what little I've used it, there doesn't seem to be a lot of flex. A butt weld would most likely hold up fine, provided the 5160 was pre heated and it was a multi pass weld with something like 7018. In fact, I'm wondering if mild steel wouldn't work as the leaf spring, it doesn't flex that much.
Anyway, I used it while forging out a hawk and it worked great. If nothing else it let me use a hand held flatter without a juggling act. Surprised at how hard it hits, and very precise and controllable.
Here's a couple of pics, normally my smithy floor is a bit cleaner, but I'd just finished painting and hadn't cleaned up yet.

-
Thanks, but I'll forge it round then true up with a 1/2" drill after forging. As a welder I shudder at the thought of a butt weld on a spring.
I will give the leaf spring a try with no heat treat and see how it works. Worst case I can always take it off and heat treat it.
Thanks
-
So far not crazy about the way the plans are drawn out and written. Not too bad, but lack detail and have had to back up a little a couple times and re think how to do something to get it to come out rite. Not a big deal, but irritating at times.
Anyway, I've got the main construction done, about to start on the turnbuckle and leaf spring linkage. I have a couple of questions, mainly the springs. The coil springs Clay list, the plans say "Bend spring into a "U" and heat a spot on the center coil with a torch until it separates. Bend out a 2 turn loop, cold on each end" Am I overthinking things, or just bend in a "U" and heat the middle and grab a couple loops with some pliers and pull them out? The other question I have is about the flat spring. Clay calls for butt welding a pipe with a 1/2" ID to the flat spring. I have a longer than needed piece of 5160 and plan on forging it over with a 1/2" drift to make the eye. Why would a welded pipe be better pivot for a flexible piece like this, and there's no mention of what temper the flat spring should be. I'm assuming a spring temper is what I should heat treat it too, I've got a Paragon oven that it will fit in so that's no issue.
Any other issues I should watch out for that ain't in the book?
Thanks
-
Any updates on this project? I understand life getting in the way of projects for sure.
-
You can use tooling on either design. Also the tire hammer can be adjusted, but it really shines for drawing out stock. The biggest issue I had with the rusty I build was lack of power and control. The tooling is one reason I'm building a treadle hammer. I did make a set of extreme drawing dies for the tire hammer, but it's a little aggravating to change back and forth, though it's not that big of a deal.
-
In my experience I've not been that impressed with the "rusty" style hammers. They are better than a sledge for moving steel, but the tire hammer has it beat hands down!
I'm a bladesmith that's branching into blacksmithing just a bit. For me, I would be hard pressed to live without my hydraulic press or my power hammer. I'm also in the middle of building a treadle hammer for certain operations. For bladesmithing the power hammer and press really compliment one another. What one sucks at, the other is good at.
I've been using a tire hammer for several years now and have really enjoyed it. I've thought about maybe building a 100 pound version like the Anvil Fire X1.
That said, the main use I use either the press or power hammer for in bladesmithing is to turn large stock into small stock, very little shaping is done on either. However, try to forge down some 1 1/2" 52100 square stock by hand, you'll be there for days beating the crap out of it, once it's down to about 1/4" thick it's not too bad.
If I was a full time smith I'd have a commercial air hammer, probably a self contained one like the Anyang. If I was full time blacksmith I'd probably have something like the Iron Kiss or Big Blue. The reason I don't have an air hammer is operating cost, your running a 5+ horse power motor, the power hammer runs on 120V 1 horse. The press is a 3 horse motor, but it's not run nearly as much as the power hammer.
For blacksmithing you want something you can use tooling to do shaping, not just drawing stock out.
-
Good looking hawk, never would have guessed the construction method from the pics.
-
Got all the steel and bolts and nuts, just waiting on some stuff from Mcmaster-carr and I'll have everything. Except maybe time to actually build it.
-
Thanks, from what I'm thinking, I won't use it that much, but when I do it'll let me work by myself without needing a striker and will be very useful at times.
My press gets a lot of use, but it's an H frame with only about 7" of clearance between the dies. Also on delicate work it tens to be too slow and to really squish things. The power hammer is a clay spencer tire hammer and works great for turning large stock into smaller stock, but single hits are not that accurate, either too hard or too soft. Not to mention there's enough play in it to make really accurate top and bottom tools just a bit off. Though I have made a few spring tools for it.
-
I've got the plans to build a Clay Spencer in line treadle hammer. As a knifemaker I haven't had much need for a striker or a lot of tooling. I am however moving into a bit of decorative work and branching into axes and hawks.
I've got a H frame hydraulic press I built, a 50 pound tire hammer. The press and the power hammer really compliment one another. I'm thinking of building the in line treadle hammer to act as a helper or striker with tooling. I could use the press on some of it, but it's real easy to go to far to fast with the press, even with stop blocks. I designed and build the press for damascus work and to turn large billets into smaller billets that the hammer draws out. I'm thinking where normally a blacksmith would have a helper strike while he holds a top fuller over a bottom die the treadle will take the place of this.
Or am I just wanting to add more gadgets to the workshop?
-
Outstading! How did ou atach the pipe? Silver braze, or screwed on?
-
dont matter as long as your counting for your benefit is consistent you will be able to repeat what you did later. in the end your count will never be 100% correct due to scale and grinding losing layers anyway. The only way to know for sure is to cut it in half and count under a microscope
Exactly! If I start with 5 layers, I count it like this, 5, 10, 20, 40, ect. Most times though I tripple or quadruple stack, but you get the idea. It's all an aproximation.
-
Cool, a press sure makes quick work of large stock don't it?
-
I hear you on that, think it came out great!
-
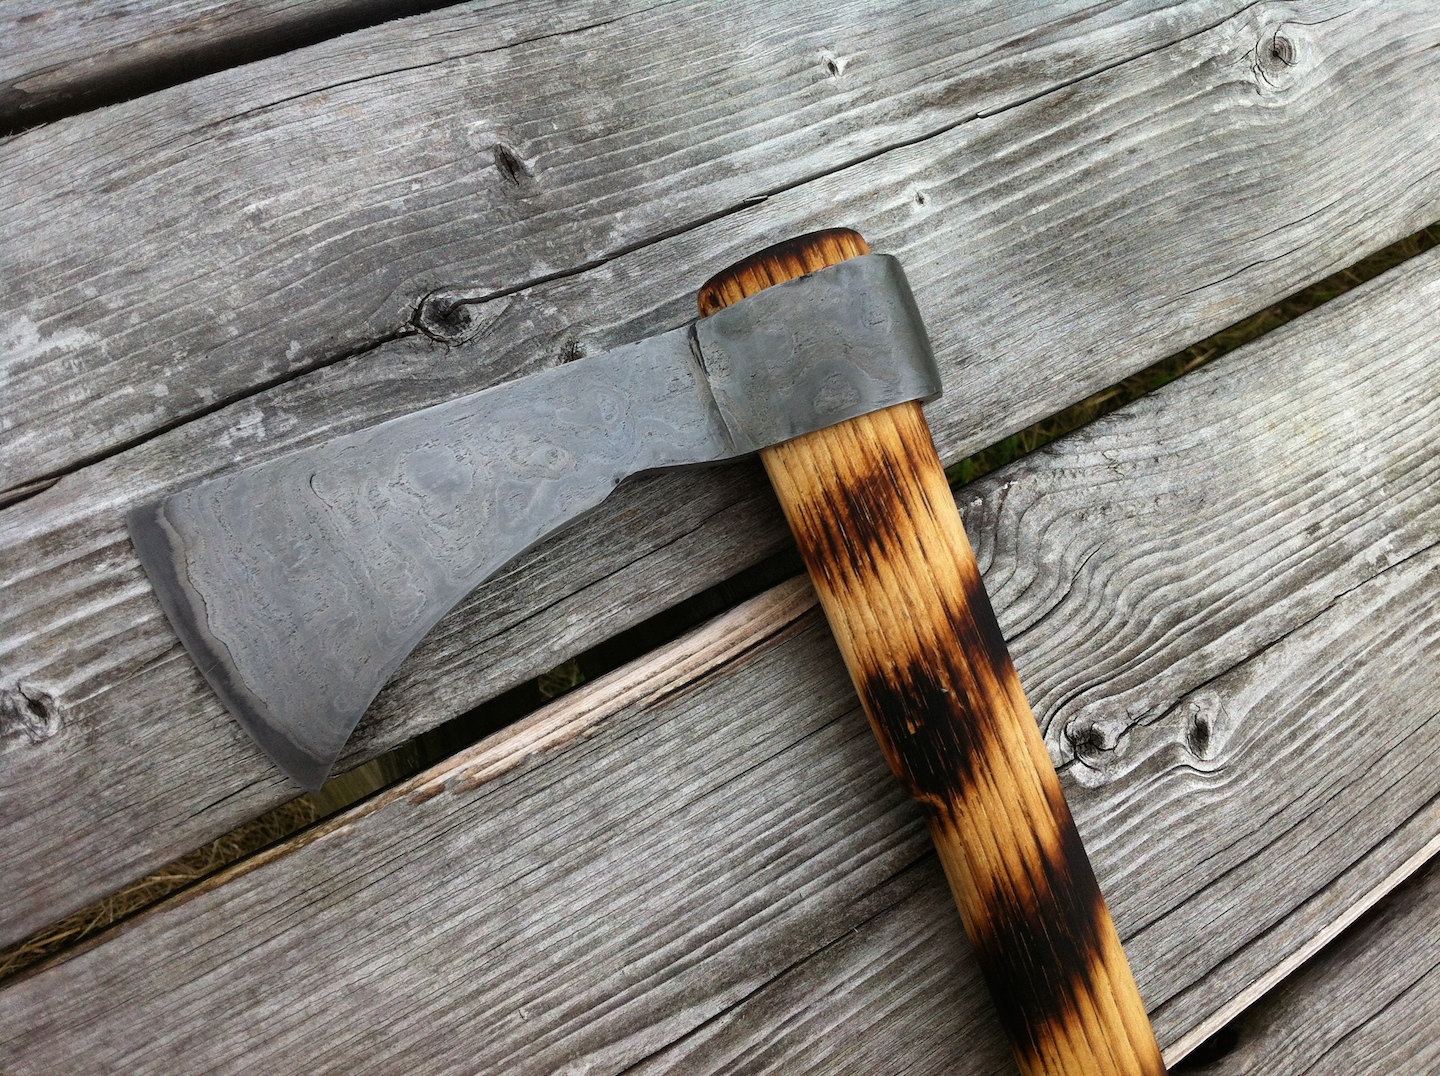
Thanks, not vice edges, just where I knocked the majority of the scale and hammer marks down on the belt grinder. Normally I'd put a small shelf there with a file, along with a little moulding, this I just left rough ground. It'll get nice and rusty in my mule, I just wanted an idea of what the wrought would look like. Will be doing another from welded up bits of wrought iron again, hopefully taking precautions against welding flaws next time!
-
Looks good, can't really see from the pics, but if your using the factory cylinder mounts, with the rite pin you shouldn't have a problem. There have been some pins sheared that shoot out like bullets though, that's why mine has a deflector plate in front of the cylinder mounts, but then mine more of the clayborn style and the pin is at eye level.
Only thing I see is maybe adding a die plate retainer, had one pop out on mine when doing some off center work and it punched me in the gut, no damage to me, but didn't feel real good. Looks like you've got bolts in front, wouldn't take much to make a keeper/latch for the die blocks.
-
I've had good luck welding with the press, but the stack needs to be clean, and it's a good idea to have the grind marks going sideways so there's a path for the flux to escape out. Normally I flat grind when doing a billet and either arc weld the ends and a handle on, or wire up. I've gone to doing the first weld using diesel as the flux. On some mosiacs I've taken to surface grinding the pieces before stacking.
Thing about a press is that it is slow, a hammer with a dome face will squish the metal together and squeeze out crud. On a press everything needs to be pretty well clean and in close proximity to start with. Not to mention that the thicker the pieces are the better as a press sucks heat fast. When I'm doing a "Frontier" damascus, welded up from high carbn scrap one piece at a time, I do the welding on the anvil by hand as the pieces are odd shaped.
I've got a press and a hammer, and they compliment one another well.
-
Beautiful work! Don't know how practical it would be in day to day operations, but stunning work.
-
The slag in wrought iron make for easy welding, as long as your hot enough. High carbon steel welds at a lot lower temp than wrought iron. A good flux, one that acts like an acid at heat, is a must for welding high chrome steels like 5160. The issue is scale doesn't melt back into the steel and keep metal from touching during welding, flux melts it back into the metal, or lets you squeeze it out when hammering.
-
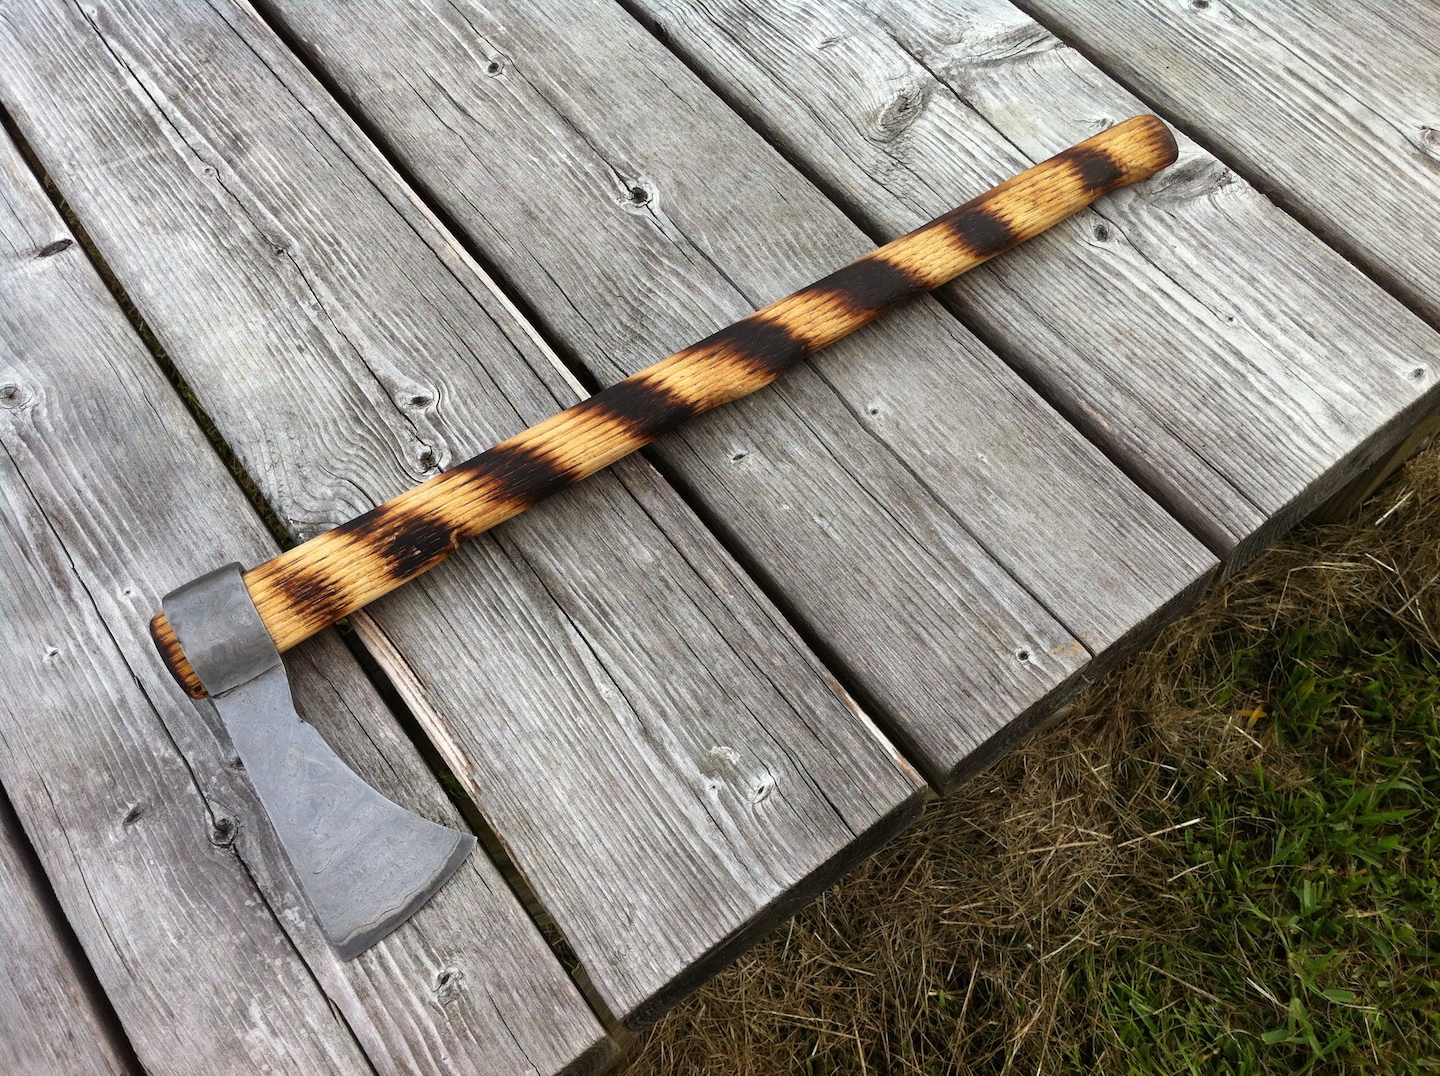
Not real proud of this one except I finally figured out the proper preform to be able to knock one out pretty easily. I had a couple of minor flaws in a couple of welds, so it won't be finished and sold, but solid enough I will keep it in my mule for use around the place. Just stuck a cheap hickory handle in it and did a little decorative burning.
Head was welded up from bits and bobs of left over wrought iron, some pretty ratty. Bit is 1084. I did just enough grinding to clean the scale off and be able to etch and see how the wrought iron came out. Not the most even grinding, but will be functional, like I said, just enough so I could etch and see what the wrought looked like. Shame about the flaws, but I have a pretty good idea of what I did wrong and will correct it on future hawks and those will get a bit more file work and cleaning up.
Anyway, after all the complicated preforms I tried, I finally figured out to use a piece about 1 1/4" wide by 1/4" thick about 12" long, draw the ends down, wrap around the drift, forge weld the center and add the bit. I know it's old hat to a lot of you, but I didn't have anybody to show me the easy way to make these and kept trying to make a step down and such. In any event, it'll make a useful tool for the woods around here.


-
I've had a few issues lately, one is a hawk welded up from left over bits and pieces of some pretty rough wrought iron. Had a few minor flaws, major enough I didn't bother filling it out and doing a proper finish, minor enough I'll leave it in my mule and use it around the place. This is the first hawk I've tried using iron moutain flux on, thinking I may have trapped some scale while welding up, and I didn't do any grinding before hand.
I've had very good results welding high carbon steel, and even 5160 and 52100, but the steel needs to be clean and you've got to get your heat rite. Also your hammer technique can make a big difference. When I weld up a stack for a particular patter, most times I start with a multilayer stack of 1084 and 15n20, all pieces ground and stacked and shove it in the press. When I'm welding up bits and bobs and making "junk yard damascus", or AKA "frontier damascus", I weld one piece at a time with the hand hammer starting from the center out.
The thing about forge welding is, your not welding with the hammer or press, your just getting clean steel in contact at the rite temperature. All flux is doing is keeping oxygen from getting to the hot steel and keeping clean steel from touching clean steel at the rite temp. I have surface ground a multi piece stack and used no other flux than diesel fuel. The oil burned off leaving a layer of carbon that keep the oxygen away from the clean steel, a squeeze in the press and perfect welds. A good flux also helps melt any scale back into the metal, or failing that lets you squeeze it out when you hammer it together.
Uneven heat, metal not at the rite heat, scaling from to much oxygen in the atmosphere of your forge, a cold anvil sucking heat away and dropping your material below welding temp before you set the weld, scale build up, trapped flux, all this can make for poor welds.
No answer except to keep at it. After a while you'll wonder what was so hard about forge welding. And not too long after that you'll get cocky and screw up. Or at least I did.
-
Nice! Love the embellishments


Harbor Freight shop hammers?
in Hand Hammers
Posted
Got a drift, no issues. No issues forging a hammer or a top tool, except for time. I'm just slow, and wondering if it'd be worth it time wise to start with something already mostly there.