
mofokaye
-
Posts
88 -
Joined
-
Last visited
Content Type
Profiles
Forums
Articles
Gallery
Downloads
Events
Posts posted by mofokaye
-
-
Here's an old one for you guys. 1910 'Bradford Makers' treadle lathe. I took these pictures when I first got the thing, it's since been cleaned up and mounted with an electric motor, whilst the flywheel and treadle have been stored away safely. There's a few minor issues with the carriage, but nothing I can't sort out when I have the time, otherwise the thing's tip-top.


-
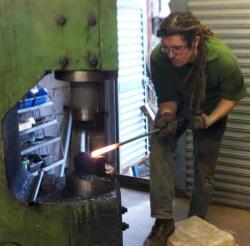
Following my previous attempt at building a helve hammer, shown here:
...I decided to stop buggering about, and do it properly. Here is my progress so far:
The basic metal frame, and the hand forged crank shaft in what will roughly be it's eventual location. Shown in this picture is the dies, made from rail track, which will be held in 'rail chairs'.
The crank shaft, finished on the lathe and polished. My job for later in the week will be making the bearings and mounting them in place.
The monstrous 8-belt drive pulley. Wouldn't want this falling on my foot.
Everything clamped roughly in place to give an idea of the final dimensions. Hopefully I'll be obtaining a solid lump of 16" square 12" thick plate, hacked from an old car crusher to use as the anvil mass.
And the obligatory shot of my tiny messy workshop.
Hopefully many more progress updates over the coming weeks and months! -
Why not sell the scrap copper and brass and use the proceeds to buy yourself a couple big pillow block bearings from Surplus Center? Whole lot easier, and the final product is likely to be significantly better. You'd probably have money left over to by other smithing toys, too.

Very good point, but doesn't sound anywhere near as fun
I'll look into getting some babbit, I have plenty of other uses for the scrap copper! Thanks guys -
I'm currently building a helve hammer from scratch, and want to cast myself some heavy brass bearings (Or any other material you can recommend)
I was thinking of forging up some mild steel bearing blocks, and casting the brass bearings inside around the crank shaft itself... Obviously I'm not at all sure what I'm doing, and any advice is greatly appreciated regarding actually heating the metal, the choice of metal, and the pouring and casting itself. I have a large supply of scrap copper pipe and brass fittings to melt down...
Thanks! -
Thanks for the links and ideas guys, love the use of the old engine, excellent improvisation! I'm going to rebuild the whole frame from steel, and will probably implement the double spring idea... Also got my hands on a hefty cast iron flywheel to replace the spoked wheel, and I'm looking for an even more solid crank shaft. Will be my project in January where I've got myself a month free
-
I'm the chap responsible for this... Thing. Glad you all appreciate it, it's been a lot of fun building it and experimenting. The original axle was formed from bicycle bearings welded together at the shafts... It was fine for it's first incarnation, but when I obtained a much larger motor the shaft and bicycle wheel were basically torn appart (A terrifying moment.) So I forged a new axle from a small car axle, and fabricated a new drive wheel from scrap laying about...
Unfortunately, last week the spring linkage decided to crack (Despite being from a large truck, with the original temper) so I'm not toying with the idea of a more complex but resiliant linkage... Anyway, I mannaged to get a video of me working some metal with it minutes before the spring went, which is now up on my channel. Enjoy! -
Man, if I lived over there I'd have to get me a bigger shovel.
-
Just to throw it in there, I never stole the fencepost. I just found it amusing I so easily noticed it amongst the weeds and hedges. If I wanted it, I would've asked the landowner, who I know.
And in this case, he'd lazily wrapped the fencewire around it several times. It wasn't doing it's intended job very well... -
Well sorry you've developed such a reputation for yourselves, thought a stereotype like that would tickle some funnybones. Next time I try to gain some common ground I'll be sure to leave my humour at home.
-
Some things are not funny.
Not when you're included, it would seem -
Somebody had best remove the humour tag!
-
You're a blacksmith when you notice every fencepost made out of railtrack, and return later that night with a shovel.
-
I trained using sideblast forges. As was mentioned they're far more common here in Europe. Personally, I can't see any pros or cons in using a side blast compared to a bottom blast, once you're used to opperating it, but I certainly prefer the simplicity of a bottom blast forge. Less to go wrong, and you don't have to constantly check waterlevels! Having said this, I know plenty of Smiths over here who'd disagree...
Helve Hammer Build
in Power Hammers, Treadle Hammers, Olivers
Posted
This is a very common form of rail over here in the UK, and for the largest part of our rail networks history, these cast iron rail chairs were the standard method of attaching the rails to the sleepers.... Subsequently, if you know where to look, there's millions of them! As for my intended use for them, it's a complete shot in the dark... But if it works it'll be a very quick way for me to swap dies. I made a solid forged crank simply due to the stresses I expect it to encounter, but one I could dismantle would make life a lot easier. Good luck!