Joel OF
-
Posts
1,075 -
Joined
-
Last visited
Content Type
Profiles
Forums
Articles
Gallery
Downloads
Events
Posts posted by Joel OF
-
-
2 hours ago, beaudry said:
My understanding of the zinc spraying that you are talking about is where a metal powder is shot through a torch flame by compressed air which deposits a thin layer of molten metal bonded tightly to the clean substrate.
This seems basically like painting or powdercoating in that it is basically a straight line process and that the coverage is only as good as the dilligence and attention of the operator.
Nice rails.
Yeah basically. If you YouTube "zinc metallisation" or "zinc flame spray" there's a few vids out there that'll give you the jist.
Part of my reason for favouring it is because 75% the work I have have had galved before has come back bent from heavy handleing & covered in really sharp build ups. I haven't used the other galv firm yet that I know the other local smiths use, but even then one smith said he sent one job to the firm 3 times before he was happy with the result and eventually paid. Galv seems like a great method, just let down by the operators, however it sounds like you've got some good guys dipping your work!
-
It sounds like you've had worked galved before - sorry if my previous answers seemed condesending or obvious, I assumed you hadn't had work galved before so answered as such.
From memory I think I just made the hinge barrells snug. I think the hinge pins were 20mm and I just used a piece of regular 20mm bar in my jig - or at most I upset the jig bar to 21mm. That gate was pretty darn heavy so I knew the weight of it would work the hinges free. With things like like drop bolt holes or holes in a latch to accept a padlock I do drill the holes 1mm oversized to allow for the build up of zinc and paint.
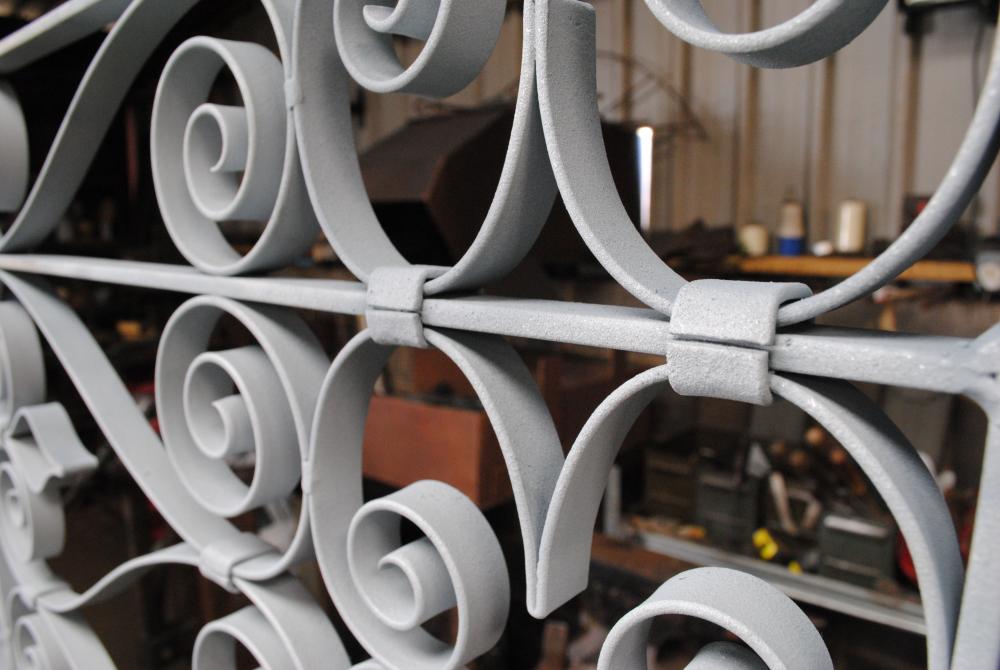
Here's those pics I mentioned, these were the first gates I made. Hanging up in my old workshop after being zinc sprayed waiting for me to paint them. Fresh sprayed zinc has the sligtest furry/coarse texture to it so paint keys perfectly into it. Sprayed zinc doesn't hide forged details.

-
45 minutes ago, beaudry said:
The thing I like about the hot dipping process is that it gets into all the hidden crevices from using traditional joinery techniques like collars . Does the manual zinc spraying process get in there as well ?
Yes and no. The manual nature of sprayed zinc relies on the operator's dilligence, but it works in the same way as galv, so the rust won't creep beyond any spots that didn't get covered.
I get a lot of repeat clients so I've been back & seen how work is fairing up months after it's been installed. On the jobs where a light colour paint has been used as a top coat I've noticed a minimal amount of rusting where a round bar passes through a drilled flat bar because I've only welded it underneath & haven't sealed it with weld on top as well. The zinc firm I use nowadays also spray vinyl paint top coat. If I wanted to I could dab some paint on the end of a brush & jab it in/around seamlines so all spots are truely covered.
Galv firms tend to handle lots of fabricated heavy duty stuff so can be a bit rough with neatly forged work. Sharp drips & "snots" are also a common by product from galv dipping & it's common for smiths having to fettle away nasties back at the workshop before delivery to customer. Most of the smiths local to me use galv firms, I just prefer zinc spray.
A couple years ago I did post up pics onto IFI on a pair of gates I made hanging up in the workshop after being zinc sprayed, before I painted them. I can't find that thread & I'm typing on my phone at min but maybe when I get onto my laptop I can dig them out. They had quite a few collars on. Zinc spray surface texture is not smoothe like fresh galv, it's keyed so it's perfect to accept paint directly, unlike galv.
Because you've mentioned collars a couple times these pics may or may not ease some of your concerns over zinc spray (which is also typically dearer than galv). I took these pics a few months after I installed the gate. There was maybe a hint of rust showing around the odd collar edge, but nothing drastic. I think the makers are typically more concerned about a perfectly neat rust free finish than the clients.
-
That's an incredible amount of work. Do you have any pictures from during the making? Any pictures of the frame?
Google Translate:
Это невероятная работа. У вас есть фотографии с момента создания? Любые фотографии рамки?
-
In the UK the acid that's put on fresh shiney galv to etch it back to the softer grey colour is called T Wash. I don't know if the name will be the same in the States but that may serve as a starting point.
Because of the sorts of issues you mention I've always favoured having my exterior work manually zinc sprayed & paint top coated rather than galved (zinc dipped) but zinc sprayers are a rare breed.
I don't think you want to coat the hinge pins or barrells, let the galv get everywhere so you've got max protection. You'll need a millimeter or two of slop in the barrells anyway for them to function freely, so when they come back from being galved offer the pins up - if they fit then great, if not then drill out or file down the galv build up that's making them bind.
I suppose every latch is slightly different & harder to say what'll be the best approach without knowing how much surface area is in contact. Again for the purposes of letting the weatherproofing get everywhere - I typically bolt them on & leave a bit of slop in the mechanics knowing that otherwise they'll bind. For zinc spray + paint top coat I typically drill holes 1mm larger than required.
-
14 hours ago, Donniev said:
I'm curious of how you go about hiding screws holding your work into a wall. Ive seen small squares of textured steel over the screw in pictures, but I'm unsure of how it's done
What's the context? What are you trying to fix to a wall? Black slotted round head screws and/or square head coach screws are what I always use, and leave unhidden.
-
Maybe the videos I have posted on YouTube will help you regarding tooling? With a lot of YouTube content 95% is surplus info and all you're really waiting for is that 5% of info you're after. You may find snippets of these videos useful.
Making a rivet head hardy tool using bought rivets: https://youtu.be/tT-Lxa1qc-8
Figuring out rivet lengths: https://youtu.be/IIikn0XOG5g
The first of 3 videos relating to hot riveting a gate I made: https://youtu.be/e1r8kNiBXlM
-
My main gripes are also weight & weatherproofing. How filthy the job is bugs me sometimes too.
-
A lot of us fall over ourselves to say how great metal work/forge work is but for the sake of balance what frustrations do you have with "our" material/medium?
-
2 hours ago, beaudry said:
I've never quite understood the idea that to be productive a work space has to be a cluttered mess, although I admit, everyone has their own method to their madness.
I used to rent some workhop space off a fabriactor with a huge workshop. He worked solo on fabricating very large projects - boats, houses, film stunt rigs etc. His work was meticlious and always millimeter perfect, but you could barely see a surface or the floor from the junk that was piled high. Before a new project he'd clean it all out - give it a week and it'd be back.
-
10 hours ago, Richard Tuesday Williams said:
I’m located in East Sussex
Where about in E.Sussex?
I wasn't suggesting you buy a 6m length of striking plate, I was suggesting Brundles and the like for 6m lengths of smaller gauge stock for when you want to make fire pokers etc.
Local engineering firms will be the best starting point for big chunks of mild steel. I remember seeing Nick Bates from Burrows Lea Forge advertise on the BABA Facebook page that he had some big chunks of round bar for sale - maybe he's got something nearer the profile you're after (?) - he's near Guildford.
-
Don't buy from Parkers, they're often twice as expensive as other suppliers. Not sure where in the country you are but you could start with FH Brundles for mild steel as they're based all over. If you want random large chunks of solid bar you'rs better off calling up your local engineering & fabrication firms to see if they've got a scrap bin you can rummage in.
You'll only get mild steel from the big suppliers & that won't be suitable for hammers & tools. I've scored some good chunks of tougher steels before from my local steam train line & the local light gauge steam train line. They both scrap track & other associated bits. I've forged a few hardy cut off tools from the light gauge track & they're holding up well.
-
On 13/01/2018 at 12:32 AM, 19Branden86 said:
if I just drill a shallow hole into a block of mild steel and just use that to upset a small piece of bar stock into, would I get the desired result I want?
You don't say whether this tool you're looking to make it for use whilst you're riveting a plain piece of round bar, or if it's a tool for pre-shaping a button head on a short length of round bar for it to then be used as a rivet.
There's lots of riveting info on the site, but nevertheless, in either case ask yourself - if the tool you're looking to make gives you a button head on the underside, what gives you the same size smoothe button head on top?
-
On 06/01/2018 at 4:27 AM, ThomasPowers said:
You would like the bottom of the hole to be larger than the top. (Which in my early days happened because the punch got too hot and upset itself in the hot stock; I'd expect you could try working a small punch around the bottom edges to make the hole larger there without destroying the punch. I would use a high alloy punch for that---like S-7 or H-13)
It would give you a slightly different look on the surface of the mortise, but wouldn't it be simpler to make the mortise and tenon both regular & to the same size, then whilst cold file a groove out of the tenon just below it's shoulder, fit the tenon cold, heat the mortise & pein the mortise to make it fill the groove in the tenon?
I'm remembering an old YouTube video by Torbjorn Ahman where he did something similar in the course of making a swage of some sort.
-
3 hours ago, anvil said:
Even for on site installs, a half inch plate with a countersink, two vice grips, a torch(or set cold) is all that's needed to set a rivit in the field.
The interesting thing about @Glenns question is that what may suit one area may not suit another. My Dad (architect) commented to me the other day that in the UK we have the perfect storm for the worst corrosion, so everthing done on site / in the field has to be pre-weatherproofed if it's to last, i.e galved or stainless, which doesn't really allow for much on site heat work.
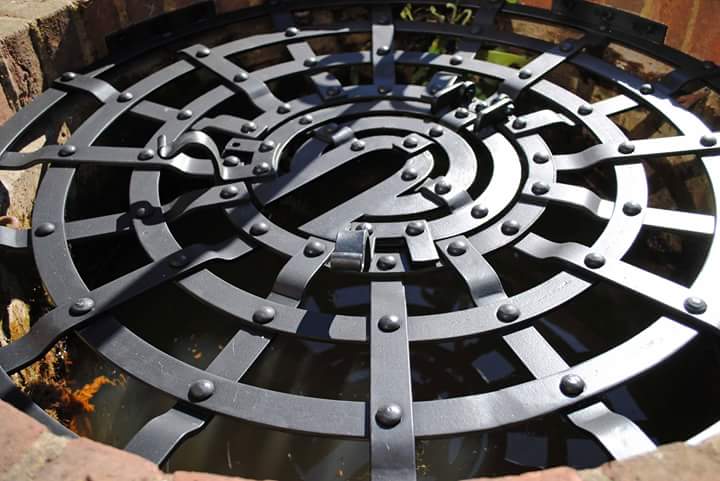
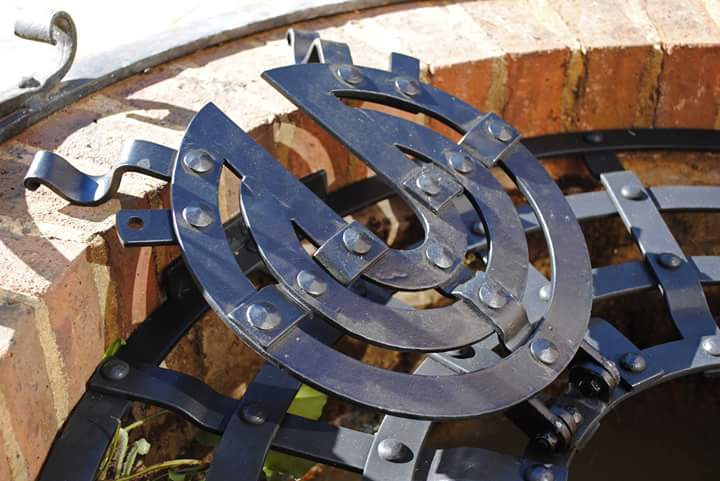
From memory that's why I fixed the hatch on this riveted well cover with stainless bolts on site - so the weatherproofing treatment could get right into every surface whilst all the parts were separate. If treated as a whole there would spots that didn't get treated and would have rusted.
-
I have had another big workshop move around since making this video (I've also removed the leg vise on this bench), but the adjustable wrench setup has stayed and it's what I'm drawing your attention to. Simple but effective.
-
4 hours ago, Glenn said:
Why do we use rivets instead of bolts, or bolts instead of rivets?
The small to medium sized commissions I do don't really require stress load calculations, (furniture, gates, sculpture etc), so for me it's mainly down to aesthetics as a rivet or a bolt will often do the job just as well as eachother.
The situations that immediately pop to mind where I use bolts: holding something together temporarily before riveting. On site fixings that have to be done cold.
-
E.g:
A one off piece designed & made for a client / situation.
VS
A pre-concieved design made to work for a specific location.
-
I had to Google image search it - I can see why you'd wonder that. My guess is no. The ones I found don't seem to have much mass to them so I'd imagine they'll deform or split - depending on what they're made from.
-
The style of presentation can make or break a YouTube video for me. I can't watch a lot of videos because the smith's presentation irritates me because they think it's all about them, and not the procedure their demonstrating.
Gary Huston on the other hand is great - his videos are an explanation of the process & without ego. Half the stuff he makes isn't really of interest to me, but I can actually listen to what he's saying because he's not being a clever clogs about it all.
-
An advantage of mechanical fastenings is that they can be handsome enough on their own to be the aesthetic of a job (especially if repeated multiple times) and so extra frills aren't required. E.g Industrial riveted bridges.
-
From memory I just fabricated my little demo forge that I take out for summer shows from a bit of 10mm (3/8") thick box section. It's about 3" deep, about 6" wide & about 10" long. No angled walls. Lasted a good few years now. Even off my hand cranked blower I've fire welded 1" bar in it.
-
4 hours ago, JustAnotherViking said:
Did you have to do anything with the seams to seal it?
No.
I've always thought that an easy make.shift quench bucket / vinegar pickleing tub could be a watertight tarpaulin roughly shaped to fill another container that's porous.
-
I use a standard size galved metal bin, plus a little watering can for spot quenching/middle of bar quenching/cooling things down whilst locked in the vise etc


Is this common?
in Problem Solving
Posted
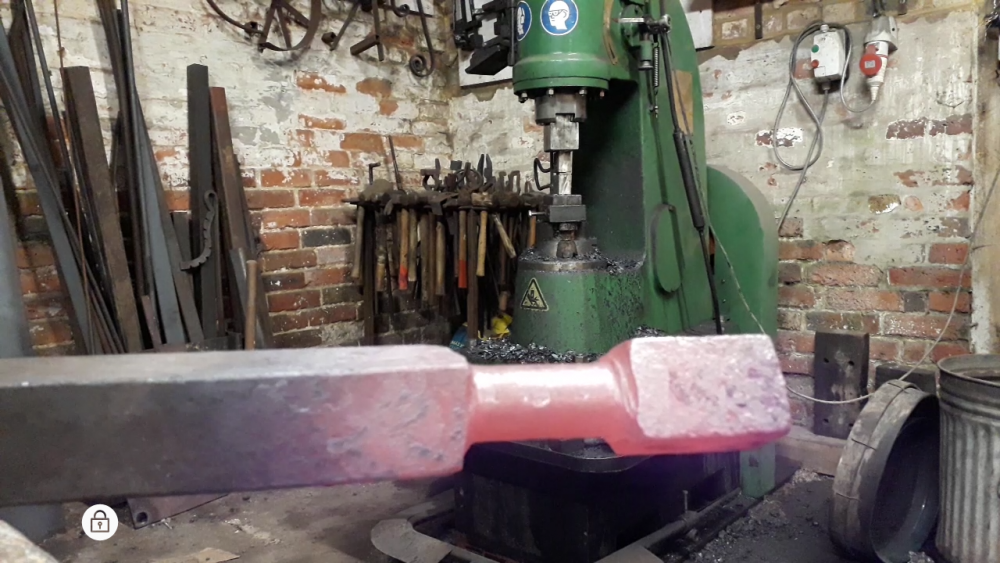
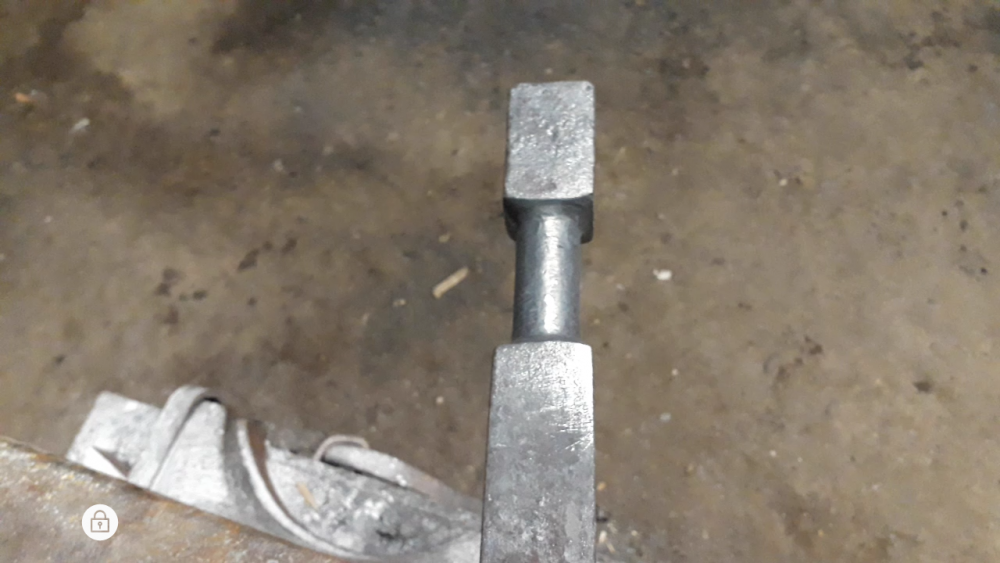
Hi folks, I'm after some input regarding power hammer spring swages. I've not had my power hammer very long but recently made a spring swage that turns 40mm (1, 1/2") solid square into 28mm (1" ish) round. I need to use it in the middle of the bar to round up a 75mm (3") section.
I've been doing a bit of experimenting with it & found the bar is twisting during the process so that the square sections either side of the round portion are out of alignment.
Thinking back I know I made the mistake of rotating the back continuously in one direction & that is likely to have made the problem worse, but I'm wondering if this twisting is a common problem in any case? I don't mind having to do a bit of corrective twisting, I'd just like to know that this is something other folks encounter too.
I have attached before & after pictures to help explain what I mean. I also neatened up the shoulders with a file after twisting.