

David Kailey
-
Posts
276 -
Joined
-
Last visited
Content Type
Profiles
Forums
Articles
Gallery
Downloads
Events
Posts posted by David Kailey
-
-
Man,
Every other trade that happens, house builders, bakers, wood carvers, restaurants, I have made some stuff that i have taken from things on the net I am honest and tell the customer that I got the design from another smith. I would probably not be offering the item right next to the smith down the street who i know is making them. However, If they bring you a plan or picture and ask you to make it........ Just make it. smithing has been here for a long time. nobody is coming up with "new stuff" for petes sake we have forgotten more about blacksmithing then we know about it.
-
Appreciate all the feedback, If you could give me a basic list of things that are necessary for your own smithing setup. A rough estimate of the price of all the items that would be fantastic. Remind you all I'm on a budget.Hole in the ground with rock, hair dryer, 2' chunk of 2" pipe-Forge >$30
chunk of heavy 1" or thicker fastened to a stump- anvil>$20
hammer-hammer >$25
new/used tongs, >$15-35
Just do it. I hear so many guys talk about smithing, know all about smithing, but cause they don't have all the "proper stuff" they never ever ever ever smith ANYTHING!!!! I dont care if you have $100 or $100,000 You can make a smithy and start making stuff that is great!!! It is and will be what you make of it.
BTW this is pretty much what I started out with.
-
The discount is about 30% off, and still expensive post-discount, so I'm not sure I'm up for the financial risk. I mean, I'm still young enough to be financially irresponsible and recover, but that's no excuse :P. I'm not terribly fond of the possibility the shelf may break off, so I think I'm going to pass. I may as well purchase a cheaper anvil without the shelf.
If anyone is curious, its a 275lb Refflinghaus, #58. The price, post-discount, is $1680.
I wouldnt pay more then Scrap price because it is just a matter of time and that it what your going to have. I would think that that anvil has issues all thru out the whole thing, its got the cancer!!!!!. Rhino 240lb is $1250.00 life time warranty. i have one and love it. Your just wasting your money anything over scrape price.
-
So I had seen wedge joints on fences in Virginia City Montana and actually took some apart while cutting a tree out of a ladies yard, I remember I was pretty wowed by it. So when I started smithing it had been on my mind. So I made my slitter, drift, fuller, and swedge and made a simple project to test the waters. Here is my result. I did make the wedge part of the "tail" cause it seemed like it could be so much more then a wedge. lol


So here are all the tools I made and my project.
-

 Here are some lights i made, 6 in total.
they were 29" tall be 17" wide and weighed about 80lbs
Had to had forge over 250 pieces.
6 sided with the back 3 sides solid so no direct light shines into the Gazebo.


-
It looks great. I do have one nit-picky point. The feet of that stool look like they would do a lot of damage to a wood floor or probably even tile. if it isn't carpet or such... is there any way you could add pads to the bottom of them.
It is on carpet. However if pads were needed i would drill and tap holes to screw in a pad and apply felt to the bottom. Or you can mill 50% of the bottom which would give you a 3/8" X 1" area to adhear a felt bad.
-
I assume the anvil is *not* part of the item?.....
it is avalible as an add on for $1400 plus shipping. lol
-
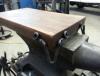
Angie's Foot Stool
Created: 1/16/14
Materials: Black Walnut, Iron, 3/8 round rod
Weight: 6 poundsSo I was visiting my wife at her work and noticed that Angie, one of the ladies my wife works with, had her feet on top of about a 4" box filled with catalogs of some sort. After asking why, Angie, slightly red in the face told me how she feels more comfortable at times with her feet elevated. Not sure, but this injustice seemed to bug me, most likely the OCD going from 0 to 100, so I said, " I can fix that!!!!" like somekind of low buget super hero.
3 months later!!!!?---- sorry none of my "super hero" powers has anything related to speed.
I have a few slabs of 2" and 3.5" black walnut so I cut a 12"x18" block from the 2" slab.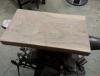
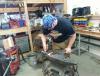
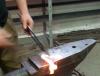
I then cut some lengths of 3/8 round bar 10.5" long. 4" from the end of the rod I started to draw the rod out to a taper until it was 6" long. After both tapers where drawn out the rod was 15.5" in length. As my usual habit I textured the full length with heavy hammer blows using the corners of the hammer and horn to drive deep dents in the iron. I know, I know, but I love hammer marks, they are raw, bold, and beautiful. Its my piece so I get to do what I like--------- Hammer that thing!!!!! O yah it happened, just like that!!! Ok,,,,,, to much caffine maybe, moving on......
I then folded the rod in half lining up the ends, bent them at 120 degrees, formed the scrolls together and curved the tips out in lines that flowed nicely.
I drove the iron down on to my hardie hole cutter to split the 2 ends apart again, placed it in the vice and bent the scrolled ends away from one another until the lines formed a 45 degree angle that would accommodate the corners of the walnut slab.
I created some flat areas, and punched some mounting holes, wire brushed, and treated with bee's wax. Due to the fact that shoes will be placed on the item all the time, I treated the wood like the iron. I melted bee's wax and dripped it all over the wood and used a heat gun to melt it, which allowed the wood to soak up the wax, wiped off the excess, screwed the legs on, a little grinding to get it to sit with no wobbling and a foot stool we have. Angie was very thankful, and put it to use right away!
-
Agreed. How about something along the lines of "One piece of steel and 30 minutes" to start. Of course, no one would stoop so low as to cheat, we all know that...
So I already have a huge pile of those sitting behind my shop!?!?!?!?!?!?! lol
-
I can if i want to make a living from smithing but it requires a lot of effort, so I maintain my other company cleaning commercial Hood systems over cooking lines, this allows me to maintain my addiction to smithing. It can be done but you have to beat the streets and hustle your butt off. I would smith everyday- buy iron at the scrap yard cause it is super cheap 20-30 cents a lbs here, and i would forge things that would sell at craft shows $10-$100 bucks I would do bigger project for my house or friends or cause I had a little extra money and take pictures and have them or the pics at the shows. I put up a simple web site and cards. I stay as busy as i want to. I have even contacted other metal craftmen and rented booths around my house for $40 a weekend and advertised it in the paper and local craft shows and mini nickles. I also contact heritage fairs and events like that and demo at them and usually they will let me sell my wares and i dont have to pay a "venders fee" I don't always make much at those but I have always payed my cost and it get your name out there,
contact me anytime if you have questions.
-
Thanks Frank. and all
I contacted a lock smith and i think i am headed in a direction that should get me there.
-
I have been contacted by a client to make an 18" door handle with a thumb latch and a deadbolt and a knob on the inside. But he wants modern internal parts any one recommend some door handle hardware that i can toss the plate and handle but use the guts?
-
This is another up-cycle project. Starting with a piece of wrought iron from the early 1900's that was shipped from Egypt to the US in the 80's. The top is an up-cycled piece of oak from a shelf behind a bar.
So I am converting it in to a patio bar.
I have cut the ends and bent them at a 60 degree angles and started to add some iron for the foot bar and to get the bar top at the correct height. I will add some detail work to fill the gap from the bottom of the bar top and the top of the railing. I will continue to add photos as I build it.The railing is wonderful, no welding on it at all, 100% rivet. Well until now. lol
You can follow this project on my website.
http://www.morganjadeironworks.com/project/18/egyptian-wrought-iron-railing-up-cycle-to-a-patio-bar


-
How'd you attach the upright pieces to the disc base?
The disc has a square hole in the middle so i welded all the stems on the bottom. The piece also has a front and back so for stability I were the stems cross i welded the botton side on the back of the piece.
-
so i got a shop for $700.00 a month which was $500.00 cheaper then what they were asking for. Sounds great right??
Well with in a block we have harbor fright, napa, hardware, a chocolate factory and......
A SCRAP YARD!!!!!!!
The scrap yard alone probly cost me the $500.00 i save in rent.
But i have a dream pile of scrap!!!!!!!!!!!!!!!!!!
-
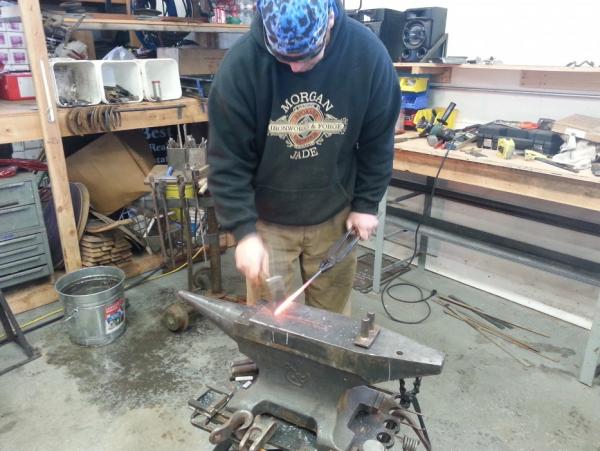
made these while at the wild west fest in missoula, mt
It was a peiod old west deal so no power tools all old school smithing
Had a great time.


-
Buddy of mine gave me a moose skull that he found in the woods.
I is a bit weathered and so i wanted to do something I had never seen before and so here is is thus far.
the pit will have an isulated bottom and 4" wall to help keep the heat from charing the skull
I also made some candle holders as mantle or table center pieces


-
Thank you guys for your comments, I am very humbled by your appreciation.
-
I like it. Have a few of those myself... mind if I try something similar?
Go for it!!!! I just want to see the pics when your done!!!!
-
Made this for a friend of mine to say thanks for doing me a favor.
You can get all the details on my site @
http://www.morganjadeironworks.com/project/7/3-candle-floor-table-stand-holde


-
Never messed with the lily but here is my effort.


Check out all the details @
http://www.morganjadeironworks.com/project/17/calla-lily-candle-holder

-
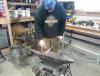
I currently use a a papa rino that i bought from http://www.incandescent-iron.com/rhan.html
it is a papa rino, it is a great anvil and i have had no issues with it.
I designed the plate that the anvil sits on because i got tired of the rings and hardy tool holder breaking off or bending and the time it takes to weld all off them on. So I had the top plasma cut from 1/2" plate. It is very strong and is holding up well, I have sold 5 of the top plates and had no problems with them so far. I went with the 3 leg so it never wobbles and a shelf with expanded metal so the scale falls thru the shelf


-
That looks fantastic! How have you done the acorns? They look great!!
Colleen,
Here is a link to the Smiths web site that taught me how to forge acorns from black pipe. Below that is the link to the article he wrote and posted on his web site.
http://www.incandescent-iron.com/
http://lib.store.yahoo.net/lib/yhst-17797617870419/ForgeAcorns.pdf
-
I started my Smithing by taking a class from Steve McGrew in the winter of 2011. He was working on a oak leaf and acorn door knocker and I thought is was great, so he taught me to make an acorn and oak leaf, among other things. After taking his class I started forging different things and Steve always welcomed me into his Smithy and I could always contact him for any questions.
After seeing his article in the Hot Iron News 2013/1 where he showed how to make his door knocker, I decided to finally tackle a project that had been rolling around in my head for over a year. An oak Branch center piece for a table that could also be hung on the wall. So I built everything i needed to make an acorn and started in on the project. Steve had e mailed me and told me that i could come beat some metal with him at his smithy over the weekend and so it began.
I drew out the main branch and all the side branches that day and welded them up. Thankfully Steve let me use his power hammer for the main branch it started as a 1 1/8' round stock so that saved me a lot of work, Thanks Steve!!!! The side branches are from 5/8" round stock.
So Spring break was here and i had my 10 year old Daughter Madelynn for the week and so we forged all the acorns and the leaves together, It was great to forge with her, She loved it!!!!
All that was left to do was to assemble all the pieces into a branch. So here it is. I have about 13 hours into this branch it is 32" long and about 18" wide.


Dimple leaf and curly dragonfly table to candle holders
in Metal Sculpture & Carvings
Posted
Here are a couple table top/ mantel candle holders I threw together.
Dragonfly...........
Curly dimple leaf