

BlissStreet
-
Posts
121 -
Joined
-
Last visited
Content Type
Profiles
Forums
Articles
Gallery
Downloads
Events
Posts posted by BlissStreet
-
-
Wow. This is both an inspiration and discouraging at the same time. Beautiful!
-
Use a temper color chart. I use the home gas oven. I set the temps close to where I know it was the last time I did that steel, BUT I have the blade polished and shiny so I can read the color of the oxides to verify what temp it was really at. The Oxides do not lie, but we can misread them a bit.
Check.
A convection oven uses a fan to circulate the heated air. This changes the heat transfer rate, increasing it greatly. This increase in rate is why when cooking you need to reduce the temperature so the heat can penetrate the food without burning. With a knife that you are tempering it should eliminate hot and cold spots creating a more even result (remember to accommodate for radiant heat effects from the elements if necessary) but the final temperature is still the same, so the oven setting would be the same.
Roger.
Feeling mono-syllabic tonight, lol. -
And since we are having a good discussion, I thought I'd ask:
When you cook and bake in a convection oven, you have to adjust your temp to accommodate the moving air. Usually, you decrease the temp by 50 degrees F. Ex: in a convection oven you bake at 300 rather then 350 degrees to get the same results. I know it sounds silly, but if you are tempering in a convection oven do you do that same with the temperature compared to a still oven? -
You'll find it easiest to clamp the knife to a scrap piece of wood, supporting the whole blade. Make sure the blade is fully annealed and you'll be surprised at how quickly you can remove stock.
-
Files. It's slower, but you get a nice flat surface.
-
I use 2x4 cut to length, stood on end and bolted together in a butcher block. It's working well so far.
-
I don't know anything about steel prices in South Africa, but I can get five feet of 1/4"x1-1/2" 1080 from Admiral Steel for around $20,
I know it sounds silly, but it's not about the money. I just feel guilty screwing up perfectly good steel. I'm not to sort to be cheap, but I think that I need 4-5 more springs of practice before I'm ready to start out on new stock. Also, I'd rather not start accumulating more stuff right before an impending international move.
When I have the skills to translate my ideas to the anvil, then I'm certainly going to look into solid stock supplies. -
as for your similar profile theory , take 1060, 1095 and 5160, these are all used for springs, one has 0.80 Chromium and a few degrees higher hardening temp for ideal conversion than the others. Another is a few degrees lower hardening temp than the others. One needs water for good hardening, another one is a problem in water, the other can be hardened safely in either. I aint telling which is which, as they are all the same right ?
 But I have posted them in other places in this forum, if you read up you will find it. Welcome to the wonders of mystery metals from buying used stock.
Point taken -
-Forge Knife Blank
-Rough Grind and clean up - sanding is done here up to 120grit
-Normalize (cycle of 3) (is annealing with one heat good enough?) I was told to do this after shaping, since you want all the stresses out before hardening. Grinding is a stress.
-Harden the blade
-Temper the blade
-Sanding here up to 1200 grit then Polishing and wrapping blade to protect
-Mounting bolster and handle material
-Shaping and finishing handle
-Sharpening
That is how I was taught, and what I have gathered from research. YMMV. -
Sounds like you need to take the notebook and pencil and go for some walks where you want to...maybe the woods, maybe the museum. Whatever ends up in the notebook doesn't matter, writing, drawing, musings, blank pages... Relax, look around and enjoy yourself. The forge will be there, plan on using it more. Phil
This is great advice. -
I will post a wild guess here that you are forging in the sunlight or a well lit shop. If by any chance that is correct you are most likely overheating the steel. Ambient light is fine as long as you learn wot colors to look for when working in that light. A piece that looks to you to be red in sunshine may look to be really bright and about to burn in less light. You can work in any light as long s you determine by trial and error wot works for you. One other thing that may help if you get a used spring; clean it really well and either hold it up by one hand or hang it from a string, tap with a piece of metal and listen for a ring. If it has a dull sound it has cracks. Dirt or crud on it will make a dull sound also. If you are not working in bright areas nevermind wot I just wrote, but it sure seems like it is getting too hot!
While the forge itself is outdoors, the anvil is in a dark garage. Yes, there is a rather large color shift in moving from out to indoors. I'm paying even more attention to it now and getting better results.Thomas is right about the manufacturer. I worked in a factory which made ball joints, bolts and tie rod ends. They would use different materials to make the same parts. Depending on where they could get the wire cheaper. All they did was heat treat it in a different manner.
Interesting. But the materials used in springs all have a similar profile, no? I mean, the difference between one spring steel and another shouldn't be that radical, should it?Junk yard steel is a crap shoot. You can get W1 and O1 drill rod in 3 foot lengths from MSC, McMaster-Carr, or Travers Tool catalogs. The W1 will have about 0.95% to 1% carbon content.
I didn't get a random piece of metal in a scrap yard. I made a point of getting a spring from a car, so while there is some chance in it; I think it was the best choice short of buying new stock. Which, for me, seems a waste since I know that there will be a number of screwups. For the price, ~$20, it's what I need. Shipping new stock 1/2 around the world isn't something one does when needing basic skills material; $20 worth of metal would cost about $200 to get here. The good news is, that I can get new stock in just about any steel, size, shape and quantity I want here. I just don't see the point just yet. I figure knife #10 will put me in a position where I feel I'd do the price justice.
In other news, after a morning of appointments, I got around to putting 4 bricks around the sides of my current firepot, giving me about 5-6 inches of depth. It certainly changed the way the metal heated and how it worked. The shift in the amount of scale falling off went from about a 30% wastage to almost 0%. This really made a difference. I can see now, there is definitely a need to rebuild the forge. There is also a chance that I might have a lead on a locally built propane forge with 2 burners for around $150. Even my wife thinks I should buy one at that price. We'll see how it turns out, I have a friend that just bought one as his 2nd forge and if it works out for him, I'll place an order. With the ability to adjust the temperature range by pressure, I think it might offer more consistent results. Either way, my initial forge is too shallow and seems to be part of the issue.
I can't thank you guys enough for the insights. -
If you're using coal or charcoal, be sure your fire is plenty deep and that you're not over-doing the air.
Ahh, this certainly sounds like a portion of the problem. It was a first attempt at a forge, and I know it's not nearly deep enough. Looks like I need to rebuild it using that steel wheel that I finally got my hands on.Also remember that as the carbon content increases, your forging range decreases. High carbon is, from a non-scientific perspective, forge at orange heat, stop at red.
I'll have to bear this in mind. Thanks.Steels can crack from being worked at the wrong temp, as in below or above forging range or welding range.
Interesting, I assumed it would be from being worked to cold, but why does working over the forging temp crack it? -
Guys, I'm a little frustrated. I started a knife with some scrap from my anvil project. It sparked carbon, but never really hardened in oil or water. "Ok", I thought, "lesson learned. Unidentified scrap shouldn't be used."
So I went to a breaker yard and cheaply acquired a coil spring from a BMW. I understood that the rule of thumb is: coil springs=1095, leaf springs=5160. Both are oil quenching and are good, cheap stock to learn on. (right?)
But, as I uncoil the spring and start to work it, gaining basic skill like squaring, upsetting, drawing, shaping; two things are happening with regularity: One is that parts are falling off in the fire. Like big parts. I think it's that I'm heating it beyond it's plastic point and into it's melting stage. Ok, I get that. The other is that there are slow growth cracks forming as I work it and they continue to spread until I can bend the stock by hand and break it. I figured I was working it to cold. Ok, I get that too.
But here is the thing, the crux of my confusion. It's not consistent. One section will work wonderfully at an orange, the next will crack. So I add more heat and it melts. There seems to be no middle ground. I'm willing to admit that I am learning, but I'm watching the darned coals and steel color like a hawk. Which is why I'm shocked when 1/2 of my fledgling knife blank stay in the forge while I'm staring at a bolster and tang. or when the tang cracks like my mother during my mid teens (I wasn't an easy child)
Is it my inexperience, which I will cop to. My idiocy, which of course, I won't. Or is it some residual stresses I can't see? If so, how do I work around it?
I need a win to keep my spirits up and at the moment, this is really cramping my style. Help me, Obi Wans....well you get the drift. -
I really like the looks of these.
-
The De Beers were the farmers who owned the land and never saw a cent past the initial buy out. It's the Oppenheimer family that you want to be talking to.Note: If there are any members of the De Beers family on this forum that would be willing to let me have free sample 100 LB bag of diamonds to experiment with in my forge, please let me know.
-
So that one is placed so the very sharp horn is out of the way of my thighs and private parts while dancing around in the excited way i get sometimes.
I can't help but file that away for future reference. -
Which you will find in troves, especially in the older posts. There is an archive of information here, use the search often. Few things are new ideas, chances are someone has done what you are thinking of or knows someone that did.So i turn to this forum, with a request for tips, advice, guidance, and general help.
I'm a bout 2 weeks in front of you, so I think I feel the pressure of your impending leap. I'm happy to say, it's a fun leap to take. Everything you see as an obstacle is really just a project in disguise. I made an anvil and stump, a forge, a pair of tongs and chisel within 2 weeks and on a budget of roughly $300. Trust me, there is nothing stopping you, given some time and thought.Talking with the blacksmith at the event, he told me i could use an old charcoal grill and a hair dryer as a blower, and with a few modification i could have a very basic forge. I was wondering the viability of that set up, and if it would be able to last for a while, as it might be my forge until i graduate college.
Second, I find myself lacking a very key item, an anvil. where would i be able to find one cheaply, or is there anything i can use as a pseudo-anvil until i can find/afford a proper one?
The anvil issue has been beaten to death (see what I did there?) and there are more solutions then you think. Mine is a 4" x 4" x 8" block of mild steel. The grill forge with the hair dryer blower works, I have to watch it carefully or else I will burn metal in mine. The clay lining ratio is repeated often here, just look. Hammers are everywhere, just take the time to round and polish the face. Steel is literally lying around once you start looking. White vinegar, water, and canola oil are already in your home for quenching and etching. The grocery stores, hardware stores, and home furnishing stores come alive with possibility when you look at them through the "cheap skate, what can I make this into, blacksmithing" prism.
Do it. Do it now and make lots of mistakes. -
Ok, it all happened really fast (or it seems that way). I got the knife back into the forge yesterday and managed to gently tap out most of the tool marks I put into it. I also annealed the blade and spent the evening filing the shape and profile. Today, Thursday, I picked up some clay and mixed it with some coal ash. Then I clayed the spine with an Ashi design, let it dry, got the whole knife up to critical temp and quenched it in light oil. It's in the oven now, on the first of 3 tempering cycles (@180/375).
And I forgot to take pictures. I was kinda in the zone, and lost track of what I was doing. But once it's tempered, I'll be sure and post some pics. -
25lbs for a first sword? wow. I bought 200 lbs for a pair of tongs.... :D
-
I should clarify, it's a work in progress and will go back into the forge to me smoothed out. Then filed and finished.
-
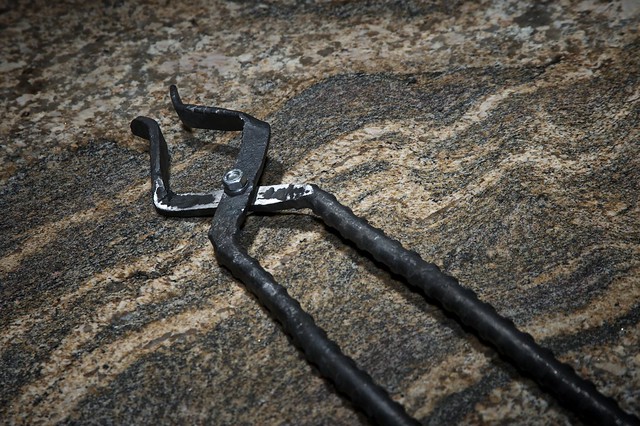
Now that the anvil and forge have produced a pair of tongs, I figured I'd put them all together and try a small veggie knife. This took about 3 hours, and still needs touching up in the morning. Not as smooth as I had hoped for, but I'm willing to bet in 2 or 3 more tries, they will be looking closer to what I want.
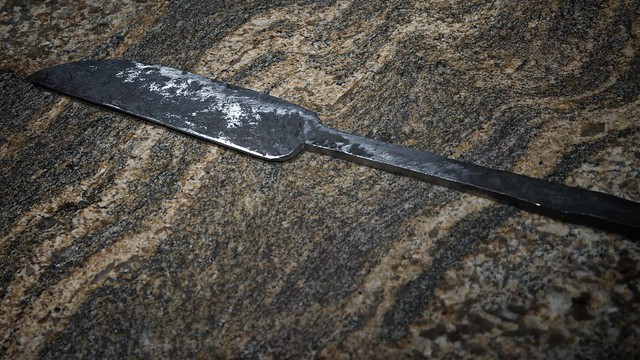
The tang is much longer then it needs to be, it helps in handling it in the forge. I'll keep you updated as it moves along. In the mean time, I'll be on the sofa with my Ibuprofen and icepack. -
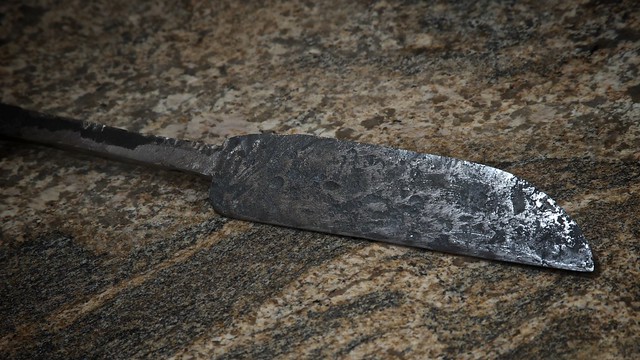
UDATE:
Here is how they are looking now. -
I'm really diggin' the first two.
-
I am just getting into black smithing and I'm looking for a set of tongs. I'll be working on metal roughly 1/8th to 1/4th flat bar for now. Any suggestions would be awesome, thanks!!
I just started and with a little effort I was able to make a pair. The first effort was crude, and I went back and re made them the next day with more thought. It seems the perfect place to start. Seems a shame to buy your first pair, the satisfaction will never be on the same level.
I need some advice.
in Heat Treating Knives, Blades etc
Posted
Hey guys, I have some news. After giving your feedback some thought, and getting really XXXXXX at the XXXX BMW coil spring, I did some calling around. So it turns out that Toyota uses leaf springs in a variety of vehicles. And they are consistent in their standards for the steel used. (turns out there is a Toyota employee that makes knives and has done all the leg work for me). They use a standard of steel called JIS SUP9A, which according to this pdf file is same as SAE 5160. I bought a leaf spring, which is a lot of steel. But...a known steel. This should take some of the guess work out of the equation.
Right? guys?