

nonjic
-
Posts
1,021 -
Joined
-
Last visited
Content Type
Profiles
Forums
Articles
Gallery
Downloads
Events
Posts posted by nonjic
-
-
Mike, your gonna need a bigger bottle if you want to do much welding. As you draw the gas from the bottle it gets colder, then freezes up, then ya burner stops burning!
I use a 100lb bottle, and can get that iced up in a couple of hours on a forge that I weld smallish billets in. Your going to have to do some serious reading up if your going to be making stacked billets with any success mate. -
Just out of interst have a look at this distinctive monster anvil recently sold on ebay UK,.. (must be 6 cwt)
120401435990 (ebay number)
41.5" long / 7" wide / 15.5" high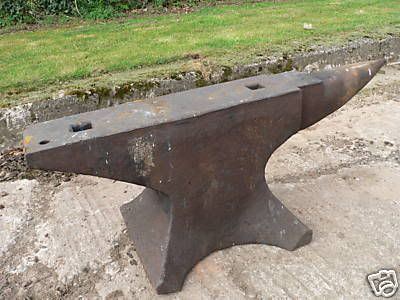
be intersting to see if it ever pops up in the states! -
One ebay member ('hammered2bits') buys a lot of the decent anvils (ie named, and large!), I think they buy loads, then do a 'collection round' for them before shipping to the states as one of the commonly asked questions was "if I pay straight away can I collect in xzy weeks"
They are buying at the moment which is a shame as ive had my eye on a couple
I did manage to get a near perfect 226lb p.w from ebay uk for -
Ive only made cylindrical shaped forges, so cant be much help to you on yours, I do know however that your burners will act like chimneys once you switch the gas off, and will get red hot so make sure they are not piped in with rubber hose !
-
Mike, I jumped straight into damascus forging without doing much 'general' blacksmithing, I'd hit on a few hot bars by hand (and used a lot of powerhammers)
But...... Ive worked in the industrial forging game 1/2 my life, so I knew what I was aiming for when I set about building and aquiring all the tools needed for patternwelding.
You will save yourself alot of frustration and money if you can get a couple of days in at a bladesmiths forge (who specialises in patternwelding) before you start building your own stuff. Even doing it 'on the cheap' it can get pretty spendy pretty quickly! -
Hi jeff, Worth checking if the pallet strap has enough carbon to start with if your using it for blades (though youll get some migration for the 'good' steel) just water quench and snap if its good stuff.
Ive scrounged my pallet strap from bundles of big tubes but im nearly out now.
A populatr steel mix, which I would use if I could get small qtys is udderholm 15n20 and 20c (which is basically the 15n20, without the nickle) - sticks like *errm something does to a duvet, and contrasts black and silver when etched. -
yup, its propane,. might be pulling in some dust from the air maybe? might be some IR washout on the phone camera? - but i have noticed that when you get a really complete, vicous, hot burn you get some dancing (colour) on the end of the flame cone like that!
Nelson, Ive never tried welding cable in a tube. Ive welded swarf up in a 'can' though, and ive just made sure that the forge is running hot, and given the can full of swarf a reasonable soak time (based on experience from welding stacked billets, which require a soak time depending on mass)
You cant really look into a gas forge at full welding heat without damaging your eyes, I wear a pair of no.3 shade safety specs which let you see any cold spots in the forge. -
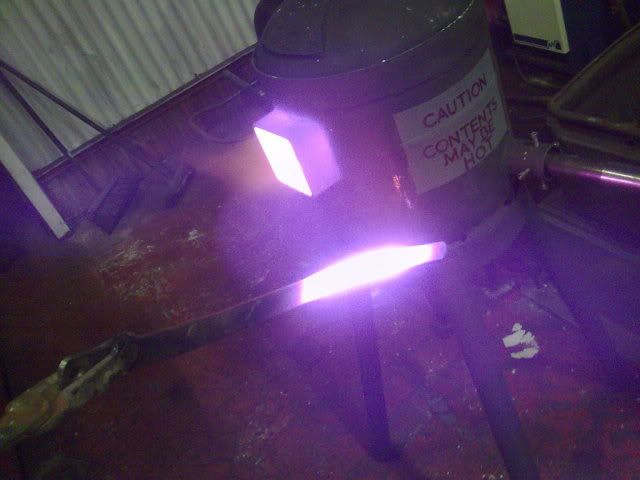
I like the sign on the side. "Contents MAY be hot":D
made me chuckle for a bit, health and safety dont you know
(course it burnt off after about 10 mins!) -
And just becasue photobucket is open a couple of pictures of the burner (F16, coz of the noise it makes lit!) and just because its a nice photo (taken on my phone so just lucky it looks nice) a photo that as a patternwelder I call 'Anticipation' - all the hard cutting and stacking works done and the funs about to start :D
-
Good spot on the burner, its based on porters design ! I think its a 0.040" tip in there
The lid of the forge isnt welded on. Basically I cut a 1 1/2" band from the cylinder, then welded it round the outside of the cylinder forming a lip that the lid sits * in *. the speed I burn through linings access is required pretty often (and when steel melts it cuts through most linings!)
The other main reason for a removable lid is you cant discount the chance of dropping the billet in! -
I also think verticals are the best for welding. Nice job there, John!
I'm in the process of building another vertical with a pipe vise attached so I can weld cable without removing from the fire.
If you ran a piece of 1" stainless tube through the forge, and put your cable through that (with the gaps at the end plugged up with a little insuwool) you wouldnt need flux either!!! :cool:
-
I thought I would share a few pictures of my vertical gas forge. I use this primarily for welding stacked billets for damascus (patternwelding)
The design is based loosly on those shown on Don Foggs website.
The beauty of this style of gas forge is the gases get a full burn in the forge (not out of the door as with many horizontal forges). This means that they run HOT
In this design of forge the workpiece is held 'mid air', not sat on the forge floor. so workpieces are usually welded to a piece of re-bar or similar as a handle. This way your billet is not sat in a pool of melted old flux / refractory etc.
The construction is very straight forward, old gas cylinder (read all the other threads on using gas cylinders as forge bodys and make your own informed decision), top lopped off and a couple of pieces of box section welded in for the door apatures, and a piece of tube for the burner port angled so the flame swirls at the bottom of the forge .
You can use a blown burner, or verturi. I run mine using a home made venturi burner.
This one is lined with a couple of inchs of Thermal Ceramics Wool with rigidiser. Refractory cement 'floor' and a couple of inches of wool under the lid.
These forges do run very hot and I regularly melt linings, so ive switched to 1700 degree castable (longer heat up time but much more durable)
This is the most gas efficient forge ive built. At a good welding heat it uses 1.5 - 2 kg of propane an hour ( 30 ish hours from a 47 kg / 100 lb tank)
Any questions and ill try and answer them -
Back to basics, one hammer, one anvil, one pair of tongs and a forge. Ignore all the other kit youve got. heat the metal, watch and smell the fire, See what happens when the fog of modern day life starts to lift a little as the metal is laid on the anvil....
You might be suffering performance anxiety, youve got all the kit, and therefore no excuses. back to basics might help the fire burn a little brighter. -
Hey Jeff,
I use old bandsaw blade (its about 6" deep x 0.060" thick) and pallet strapping (the 1 1/4 wide stuff x 1 mm thick) , proper steel is massivly expensive in the UK as your up against min order qtys from udderholm ( -
Jeff,! - if you have the desire and passion, and a willingness to read a lot, think, and practice you can make nice damascus in pretty short time. dont worry to much about the years of experience !
I had never really swung a hammer at a piece of hot metal when I decided I wanted to patternweld. I have been at it less than 18 months total now (forging at most every 2 weeks, often not for months) and am starting to get some reasonable results, . below are my last 2 out of the forge (and ive never made an 'S' hook - ive also put up a pic of my vertical welding forge.
I cant repeat this enough for anyone wanting to patterweld, your gas forge has to be screaming hot! get this right and the rest will fall into place. If it aint hot enough you are always going to struggle, no matter how good you are!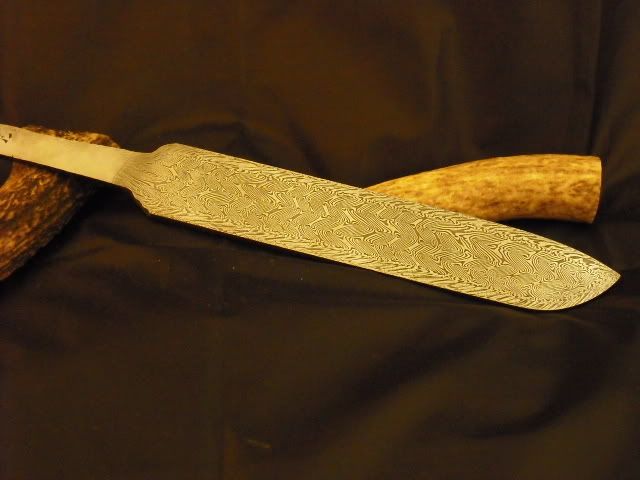
-
Im just guessing here but you are probably working much to cold, I cant look into my gas forge without a no.3 shaded lense when its at welding temp.
The other thing is to try and weld a larger diameter piece, it is much easier as it has a higher thermal mass so it doesnt cool so quick!
Youve not mentioned it but think about flux. I use household borax, straight from the carton. It foams a bit when applied but its simple and ive got faith in it, which is very important.
So, flux just when its starting to turn from black to red, then again when a bit hotter, then again when a bit hotter (you get the idea) I once heard it said its impossible to flux to early, or to often when starting out! (borax is cheap, dont be shy with it!)
The flux will start to look like melted butter on a crumpet, or run around like kids on a playground when your at the right temp for welding. (Ive found a no.3 green shade makes judging all these things much easier) -
Glad its working for ya! - you can buy me a pint if our paths ever cross :D
-
I agree with most of what James says, but would like to clarify that the small Anyang hammer is not based on the Massey Design. As far as I can tell the hammer is based on the designs of Beche, Germany. (A very good hammer)
-
be careful doing this conversion guys, if you jam it it will smash itself (and sometimes the nearest fleshy thing) - make sure youve got a 'shear' overload on it, or a sprung loaded die set so the press can not jam on a cold billet, or if you try to take to big a bite on the billet.
-
We dont make new Massey's any more, they cost to much to make. Ive got the technology though but you would need to be thinking in the order of 5x the cost of a new chinese / turkish self contained.
On autocycling of steam, or hydrualic hammers you have 2 spool valves. The control valve which is acutated by a mechanical arm from the hammer tup, and a throttle valve, which effectively limits the qty of air / steam / oil entering the control valve (thus giving blow energy or length of stroke (the 2 arent mutually exclusive - you operate the throttle valve, the hammer tup operates the control valve
 -
warren, when the piston rod lifts it additionally compresses the gas in the accumulator bag, that then pushes it back down when the oil is released below the piston.
Accumulators are 'pre charged', think of an inflated balloon at high pressure, in a gas cylinder. -
Frosty, The accumulators can be sealed bag types, no maintenace required.
You would have some accumulators on the pump side aswell for the 'working' oil.
The valve would be a spool type, but small. With mechanical links you can get the hammer to auto cycle. -
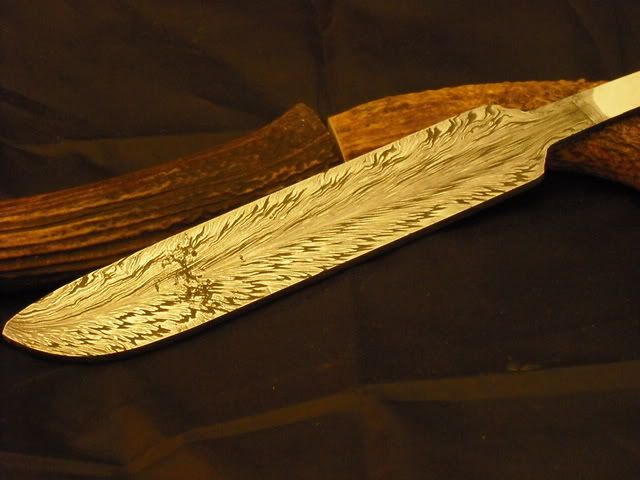
Thanks for all the positive comments everyone ! I managed to get the tiny defect at the tip of the blank to re-weld so this one does actually have a chance of getting finihsed into a knife!
For handle guard etc im not 100% sure, but ive got some nice re-rolled wrought iron that would make an intersting guard after a heavy etch, and I was thinking maybee desert ironwood for the handle. Because theres alot of detail in the blade I think simple would be best for the fittings etc.
Someones offered me a decent sized piece of oosic which could be used for the handle but ive never worked it before, so might stick to good old fashioned tree wood!
The blade was etched in Ferric Chloride, You can get it off ebay as granuals.
Ill post some more pics as this one progresses. As it is all twist patterns the look of the damascus will change drastically as its ground thinner. :) -
On the massey hydraulic hammers the piston rod on the 3 ton hammer (closed die stamping hammer) was only 1.5" dia, and the piston head maybee 3" dia max. The H.T on the piston rods is phenominal (sp) they visibly whip when the hammer strikes.
Frosty, on the latest generation of massey pneumatics some of the air from the compressor piston is constantly diverted into a resovoir cast into the cylinder, so in normal operation the hammer runs as you would imagine, but for clamp / high pressure hold up and single blows the hammer is using air that is stored (and constantly topped up) by the compressor piston.
Ill dig you out a valve schematic at some point but it will give you a head ache
On the hydraulic hammer, its dead easy. Top of ram to bagged accumulator, no return to tank. When the oil is addmitted under the piston it lifts the ram and compresses the gas in the accumulator. You then just need to release the oil as quick (or slow) as you like from under the piston head and it will be forced down by the energy stored above the piston.


Wierdly strong metal
in Problem Solving
Posted
How do you know its very high carbon?