
knots
-
Posts
734 -
Joined
-
Last visited
Content Type
Profiles
Forums
Articles
Gallery
Downloads
Events
Posts posted by knots
-
-
I almost always use the horn for drawing. The table area flat extends out onto the base of the horn on my anvil a short distance so different contours are available by simply raising or lowering the work piece to tilt or moving back and forth along the length of the horn to find the perfect contour for what I am doing.
Most of the time I use a wide blunt straight peen for drawing so I usually stand side to side with the horn at about 45deg. Using this position and tooling the metal moves well without excessive divots.
I work mainly with the anvil horn pointing to the right and favor the far side but work all around the anvil since it is my main work surface when forging and especially when using special tooling in my hardy hole.
What ever works best for you is the right way. -
The link below fearure the bells that I referenced as being featured in the Scientific American Magazine. Follow the links provoded for other sources. These are really more than simple bells. Each apparently has multiple tones .
http://en.wikipedia.org/wiki/Bianzhong -
! 1/4" square stock is an odd size for a lot of us . What would be an equivalent challenge using 1" stock ?
-
How the hammer is held and manipulated by the hand is vitally important to effective forging technique and an important part of maintaining healthy joints. Basically what is shown below is the bottom part of my down swing. These pictures show the action of the hand. While loosely gripping the hammer handle with the thumb and index finger which also act as a fulcrum, the lower three fingers act to lever the hammer down for additional acceleration, (additional to the wrist and arm motion).
Upon rebound the hammer head quickly is returned to a position above and behind the hand which reduces strain on the wrist and uses the large muscles of your arm ( and maybe body) to raise the hammer for the next strike.
I ain't no spring chicken - This is just a small snippet of the whole picture but a method that has allowed me to continue forging long beyond the point that my body said stop. If you do not agree I invite you to provide a similar graphic presentation showing a better way.
The rubber mallet was used to void damaging my anvil.


-
Timber ramps and winching work well, but one of those cheap HF hydrauic lifts is another way to save the back for the lighter stuff up to about 500 lbs ( they say 1000 lbs but I that is with boom shortened which reduces utility). I have one on my trailer which proved real handy when I moved my shop. However a scrap lumber ramp is a good solution in a pinch.
To lift an anvil a length of strong rope tied end to end will form a sling to loop under both ends for lifting. -
I am impressed. So you think this is a Peter Wright ? What other features can be used to confirm this ?
-
Markings ? That was a great deal. The anvil should be worth three times what you paid. My anvil is the smaller sibling of yours, it is 31" long and has a 5 1/4" wide face. It weighs 308 lbs according to the markings. That means that yours will likely weigh 350 or more pounds. I paid $500 in 1991 after driving all over Penn looking for one. Back then the internet was a dream.
There are no markings, other than the weight markings, on mine, and I have always thought that it was a Brooks clone, so I will follow this thread with interest to see what others believe it to be.
The attached photo shows how I used a z clip to fasten mine down to my stump.
-
If you make rings buy it . They are a great time saver. The price is good. Useing a wood mallet to finish form your rings avoids unsightly dings.

I feel fortunate to have a Wally Yeater and use it on virtuall every project . -
This thread has me re-thinking my ballast. I just consolidated my two shops into a smaller area and currently have buckets of steel scrap taking up needed floor space. I think that I will move the concrete pavers out and build a box into my bench base for all of the scraps. I only need about 200 lbs of ballast and should easily have that much good scrap to throw in there.
sanddraggin - Set the shelf as low as possible without messing up the benifit if the tripod legs. My balast shelf is only 1/4" off of the floor since it will always live on a concrete floor slab. -
Depending on the intended use 130 pounds sounds a bit light to me. That is about as much as I would want to lug around for demonstrations. However if it is to be used exclusively in your shop I think I would look for a heavier one. Just something else to consider.
-
Nice looking stand. If you find that the stand moves around when using tools like bending jigs, forks, and such, you could weld angles between the legs at the bottom and balast the bench with solid concrete blocks or what ever is available. My bench is a bit larger but lightly constructed so that it can be moved easily out of the way. The problem was †hat lateral work loads moved the bench around when I needed a stable work platform. I solved that problem by welding a few bars across the bench base on which I placed some nice big 4" thick paver blocks for balast. I can still remove a block or two and move the bench out of the way then Re balast the bench base. A bench that moves when working can be a real irritration. My recollection is that Nevada has no shortage of stone lying around I already had the pavers handy but stone would work as well.
-
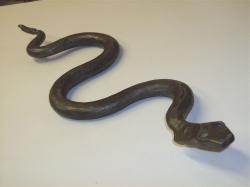
Most of my sculptures have round stock that I give a sinued look to by first hammer texturing the HR round stock then twisting it . I sometimes reverse the twist to add interest . You will be surprised at the effect. You can play around with the texture until you find the effect that suits your needs . Most of the time I just use my forging hammer but you could use a narrow peen to give the texture more of a lineal effect. Mcbruces special hammer sound like a good idea. Thanks MB I will try that one myself..
The key to twisting round stock is that you will need to fabricate a twist wrench from a pair of those round jawed locking pliers. The kind of jaw that is used for pipe. Weld a handle onto the jaw end oposite to the regular handle. The twist will be more easily controlled with a two handled twist wrench.
The locking pliers do not need to be vice grip brand (I hate ruing good tools). Just get a good sized locking plier, weld a handle on and twist away. -
Try this. Being a Vermonter this is all I've ever used for most any medical condition that didn't require invasive surgery
 http://www.bagbalm.com/
Literature states for horses, cows, and other "Domestic Animals" Yep, there you go, thats me. Actually teet balm has been suggested before and it works !
-
I did consider using a sledge hammer head, but I plan on doing some reasonably sized projects and there is nothing wrong with looking around for the available options before making a decision, is there?
As for the forge, I am currently sourcing parts for a coal forge made from a wheel hub and an old hair drier. I am a currently unemployed student, so I'll be doing this on a shoe string budget. But that just seems to add to the fun. Or is that just me?
Nothing wrong at all with trying to figure things out . That is what we all do. You will find only encouragement here. My point was get a fire and get started with what you have as soon as you can. Once started your kit will come. Fork lift tines are especially good if you have access to one, but you can make do with a lot less to get started if you don't. It doesn't hurt to start with a couple of smaller projects, just to get the feel of things, before going on to the larger forging projects that you really want to do . The exercise could offer insights as to what you really need.
Friends with shared interests are important resource. Networking is a one of the best ways to find equipment. Where money is short, barter between friends can be an important resource. Start forging and get connected, and the rest will come. You might even run into a smith who is cleaning out his shop - one mans trash is another's treasure.
Although there is absolutely nothing wrong with your plan to build a brake drum fprge, before you commit, you should have a look at Glenn's 55 Drum Forge Blueprints. The link is pinned at the beginning of the the solid fuel forge section . Infact cruse the blueprint section for lots of good stuff. Let us know what you find. -
If you live near London you are not alone. Google BABA (British Artists Blacksmith Association) . Contact them and find someone to talk to or a group to join. You will never regret having done so.
It would be nice if one of our members from UK could be contacted. Having the opportunity to see a shop and talk to someone local would be the best way to get a kick start. Truth is you can use something as simple as a sledge hammer head to forge small things on, but you can't forge anything without a fire. -
Yup, just like that. I used mine a lot for several years, then started using the edge of the face for the straight pien and now rarely use the diagonal.
And this double peen hammer is ambidexterous. That is, you will always have a peen either perpendicular or parrallel ( approximately) to the anvil edge/long axis when used right or left handed.
One handy thing about a diagonal peen hammer is drawing over the base of the anvil horn. The diagonal peen gives you two parallel convex forming surfaces working simultaneously when working on the horn. The diagonal peen makes this easy to keep the peen face parrallel to the horn. Since I mainly use the peen for drawing, my main hammers have blunt peens as shown . Normally I just use my straight peen for that forging in that position but the diagonal peen might be more comfortable in use for some. -
Actually a diagonal pien hammer is not left or right handed. It is drawing (making longer) or spreading. I made one years ago with a diagonal pien on both ends. Looking at the hammer head on both are on the same angle. Held with one head striking it is either drawing or spreading. Flip it over and it is the opposite.
Like this ?
-
Billingstwo, That is a beauty. Looks pretty clean, table not all drilled up. I assume that this machine uses MT shanked drill bits. If so what size taper. I may have a cuple in the scrap bin.
-
In this situation, it really doesn't matter who's right, and who's wrong. The chimney is already built, ... and the question is how to make it work. In-so-far as the above information applies to any future constriction, ... I think we would all "stipulate" to the notion, that a 12" flue is ideal. .
Well put. This would have been the gold standard for the first reply. Still it is as good a summary for this thread as I can imagine. -
Shoo Goo
Please elaborate -
Another more complyant plan would be to bore the end of the aluminum bar, turn a boss on the the W1 that would fit into that bore hole. Drill and tap both the bore hole and the boss end. Connect the two with a stainless steel all thread using your locktight.
Sure would be nice to have some idea of scale and load/strength requirements. Is the reason for using aluminum the need to be non magnetic ? Are the pieces cylindrical, or forged shapes, something else. This would make a great parlor game for machinists. -
How about weld or silver braze a thinwall steel sleeve onto the Wi, make the sleeve/W1 assembly the full length of the part and then fill the sleeve with a press fitted aluminum bar . Strong and light, and since the aluminum is just a filler the press fit would not have to be as structural.
-
Nice looking forge. Looks like it may be one with a rear blast water jacketed tweir. It should work unless there is a damper hidden up in the hood some where. Riche's suggestion of burning news papers to start the draft is standard proceedure for many forges. if the hood has an accessable smoke shelf that would be the ideal place to burn the news papers.
-
That anvil sounds like a good luggable size . You can expect to pay more for good anvils which can be easily moved around to use as a demonstration anvil. I had a Milwaukee (probably made by brooks) that I bought new in 1980 that sold for $350, with stand, and a couple of hardy tools after 22 years of sporatic use, mainly for demonstrations. That size anvil moves around a lot when forging so if you do not plan to use it for demonstrations I would buy a bigger one. Sounds like you are in a buyer friendly area. Then again you might just like to have a stack of anvils in a corner somewhere. It's hard to have to many.


"Coaless" coal forge.
in Gas Forges
Posted
Why not combine a ceramic chip forge with a hinged clam shell or crank up lid. The ceramic (or lava chips) would store the heat but would likely be difficult to embed large work pieces into. Opening and closing of a the lid would not be a problem since if large enough to require assistance it could be fitted with a winch . The lid could be left open for normal forging.
Come to think of it I recently saw a posting here in IFI about a forge hood that was winched up and down to solve a draft problem. Such an arrangement could be made to drop down to form a lid and still act as a hood if insulated .
The only problem I see might be fueling this kind of forge with oil. Blowing the oil air mix into cold ceramic media sounds problematic to me. However that problem could probably be overcome with propane preheating. This is an interesting conceptual problem that I will follow with interest.
Edit: Check out SmoothBore's posting on the overhead forge hood thread.