
solvarr
-
Posts
382 -
Joined
-
Last visited
Content Type
Profiles
Forums
Articles
Gallery
Downloads
Events
Posts posted by solvarr
-
-
I get allot of complaints about using coal or charcoal.
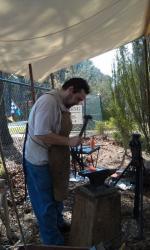
My entire rig goes up and takes down very fast. putting up the canopy takes longer than the rest of the setup.
The tripod post vice did very well on it's first run.
not quite as the good as the 55gallon drum filled with water I use at home but it really packs down
Midnight at the oasis 2008 010 on Flickr - Photo Sharing! -
This style of burner was more common in the 50's and before.
There are a few older styles of gas forges and household boilers that used these.
My sister in law threw away a heater with 8+ of them in the bottom.
She thought we were kidding about driving up and taking care of it for her.
They had steam radiators throughout their house and the boiler had a large mica peek window. -
Williamsburg Clockjack - a set on Flickr
ClockJack - a set on Flickr
Flickr Photo Download: Opera di M. Bartolomeo Scappi (1570) g
I recently was able to video the inside "ratchet" of a clock jack
-Solvarr -
I like your top mount better than mine I used 3/8 x10x12 ...too heavy . I think the 3/4 pipe was a bit cheaper that square tube... looks good to me what did you use for the feet?
For feet I cut off some pieces of 1/4 x 2 1/2 it seemed about right.
The one thing I'll do different on the next one with the feet is take a bit more time grinding it so it'll match the floor. I was a little sloppy and I had to build up the weld a bit and the pipe walls wanted to burn out from the stick welder.
My welder tends to burn a little hot though.
the 3/4 pipe from lowes cost about 27$ but I planned on a decent amount of waste to use in my tong racks. I cut off 1 inch long rings of 3/4 and weld them around the top of my brake drum stands. This keeps the tongs and pliers neatly presented. -
Snort.
My forging buddy asked where i was hiding the 50 cal. -
I used the 3/4 pipe.
I am surprised by how stable it is.
I used 2 inch square pipe for the vertical shaft (I grabbed the wrong piece) and 2/3 inch pipe fir the legs.
I raised up the leg hinge a little.
Tripod Post vise stand - Blacksmith Photo Gallery
Tripod Post vise stand - Blacksmith Photo Gallery
I ran into the problem that the bottom hinge on the post vise bumped into the bolt for the leg vise.
Tripod Post vise stand - Blacksmith Photo Gallery -
Wouldn't you need to sing I'm a little teapot, dip yourself in honey, and release a swarm of bees while blacksmithing to meet the burning man standards of weirdness.
-
Northern tool house brand sn't the best but I can afford it.
Put their tools on a surge protector and it'll tell you when to stop for a while.
I love my band saw
they just knocked it down to 155$ 2 months after I bought mine
Northern Tools Metal Cutting Band Saw -
alot of the noise can be absorbed by making sure to limit hard flat surfaces.
The stuff we spray on cielings in houses helps
Acoustic tiles(don't have to be new).
welder's blanket on the wall.
Flammability is an issue so be careful what you use. -
we had an anvil go flying 76 feet vertically.
This was back in 94 or 95 and we used a bunch of gunpowder at an abana meetup in north carolina.
Some nice gentleman was nice enough to show my buddy Cem and I how to do it.
I still giggle maniacally when I recount that day... -
yes it can
It' can spark something fierce and you'll have some steam mixed into your fire.
I've done it in a pinch and found that the excess fire becomes a little cumbersome.
As wood burns you dry the wood (which is why we season wood) then you char the cellulose creating wood gas then you burn the charcoal.
There are anecdotal stories of Appalachian blacksmiths welding using green hardwoods.
and you tend to use a watering can to shape and limit the fire -
She's pretty active and been participating for a number of years. You might want to say hi. This is her Yahoogroup page:
If you'd like I can send her E-mail address on the side.
I haven't seen a post from her in a bit, she went to Pennsic and may be doing some visiting since.
Frosty
Then I bet I met her at the metalsmithing symposium a few years ago up in PA.
It is hosted by a bunch of people on the EKMeatlsmiths list. -
Those "SAW" cans are bothering me. I saw them online too, but I always thought the SAW (M249) was 5.56mm. Why the big cans?
The bigger cans are used because they are one refractory brick wide plus kaolwool.
http://www.forgemonkeys.com/images/canfront.jpg
http://www.forgemonkeys.com/images/canside.jpg -
I don't know her.
I'll keep an eye out for her.
I only know a handful of female blacksmiths in the SCA.
Most I've seen get frustrated at not being as strong as the boys and are sensitive about that issue.
Most sca metalworking women go into armoring, jewelry, or casting.
I have one female student who is willing to come out once a week starting in September and I have another who wants it as a sideline from armoring. -
thank you.
I now understand where you put the round pipe.
all I need is some chain and some 1 inch square tube and I am good to go. -
If you have any questions let me know and I'll add the data.
I am looking forward to seeing you again at pennsic next year.
if you have a hard time getting the refractory I can bring you pack next year (I ran out of space this year) -
If I remember right this style doesn't have the center tube touching the ground right?
Could you post a couple of close up pics of the hinges?
Thanks
Solvarr -
I was told that a yard torch is balanced for a reducing flame.
It wants to heat, dry, and then start the combustion of the material.
Also yard torches burn an obscene amount of gas when compared to a forge burner which is why many of them have an "idle mode" and a blast trigger. -
I didn't know the kit was 40$ !!!
between car gas and my time driving arround to get parts It's a savings.
All of those parts cost over 30 dollars from my local stores.
I think from here on out I'll tell people to go buy a kit and we'll assemble it when we make the ammo can forge body.
The cost of the ammo can forge would still be under 120$ -
As long as you don't quench the top they should do fine.
the fancy top isn't really necessary
but if they break it's easy to rework them
all of mine look like jas townsend stakes except I make the hooked end fold over a little more.
The extra hook is to accomodate the tent stake puller and make it hold the rope better
Tying a small loop of tough cord through the nylon/canvas loops on the tent and staking to that will greatly extend the life of your loops. -
BTW hey Drogo and Solvarr...hope to see yall back up here next month at the meeting
I'll be there and so will my wife.
Drogo doesn't have anything scheduled that day but you never know what'll pop up.
Peyton told me about the demo plan.... wow... that'll be an amazing day. -
The ratio is one 3/4" burner per 350 cu/in. This is a conservative rule of thumb Ron and I thought good and it is.
More efficient burners will heat larger volumes of course but one 3/4" burner/350/cu/in gives you a pretty sure probability of hitting whatever heat you'll need.
Frosty
I remembered reading that years ago. Thanks for the verification. -
id of the kaowool
-
Lots of info on burners, and some on insulation, but couldn't find anything on shell shape... it's a big site, maybe I missed it. Where should I be looking?
Good Luck!
Some people use pipe, some use boxes, I know a guy who uses old mufflers
1)make sure the burner is roughly center is a multiburner space em out evenly
2) Sizing is mostly about internal volume 350 cubic inches per Ron Reil burner is a good idea
3)Many people offset the burner to get a spiralling gas pattern in the forge others don't and put it up the center.
4)that bend you see in many burners NC TOOL CO reduces the chimney effect where it drafts hot gasses when you turn it off, mixes the gas better, looks cool, helps it fir in a smaller shipping box, prevents magic fairies from spoiling your forge, and a bunch of other things that make partial sense. I didn't bother with it.
5)The size of the ammo can I put on forgemonkeys.com is because with the kaowool the width of that box is one firebrick plus kaowool wide which is enough for 95% of what I do. I liked that width also because kaowool would span the dome of the forge and I would not need to do anything fancy. Once you go beyond a certain size you have to do accordion folds with the kaowool like in the roof of a glass glory hole or it will fall in.
6)Many people swear by having a back door on the forge they can close. I use an extra brick an place it against the back. Once I get my oxyacetylene set back I'll probably make something more entertaining.
7) Buy a push button starting blowtorch to start your forge it's better than grill lighters or matches.
8)The perfect size is what fits your work.

Interesting bellows
in Blacksmithing, General Discussion
Posted
Those are for doing labratory glass and jewelry torch work
Your Place And Mine - Topics - Myth & Mystery - Bellows that baffle