

jason0012
-
Posts
469 -
Joined
-
Last visited
Content Type
Profiles
Forums
Articles
Gallery
Downloads
Events
Posts posted by jason0012
-
-
Does anyone here know who clifton got to make his custom oversized springs? I swear I used to have contact info but just can't find it.
-
I believe Jock redesigned it with springs.
-
I have really good control at low speeds and fair single blow control now. It does have a tendency to collect oil on the flywheel which makes the break slip, but i likely need to replace the wood block.there are two points of adjustment. The split sleeve is the one that gets moved outside of special circumstances. It is a smooth (more or less, it is 120 yrs old) shift held in a split sleeve, the big lever is part of the clamp screw that catches it. On top of this, the eccentric is adjustable. You can see two nuts in this picture. This hammer is adjustable from 0-5 inches stroke. It runs best at around a 4- 4.5 inch throw. When I first got it I played with this a bit, but it gets out of balance so this is where it is kept. This is a " I really need fast short strokes for the next 50,000 parts kind of thing and not a 10 changes a day kind of adjustment.
-
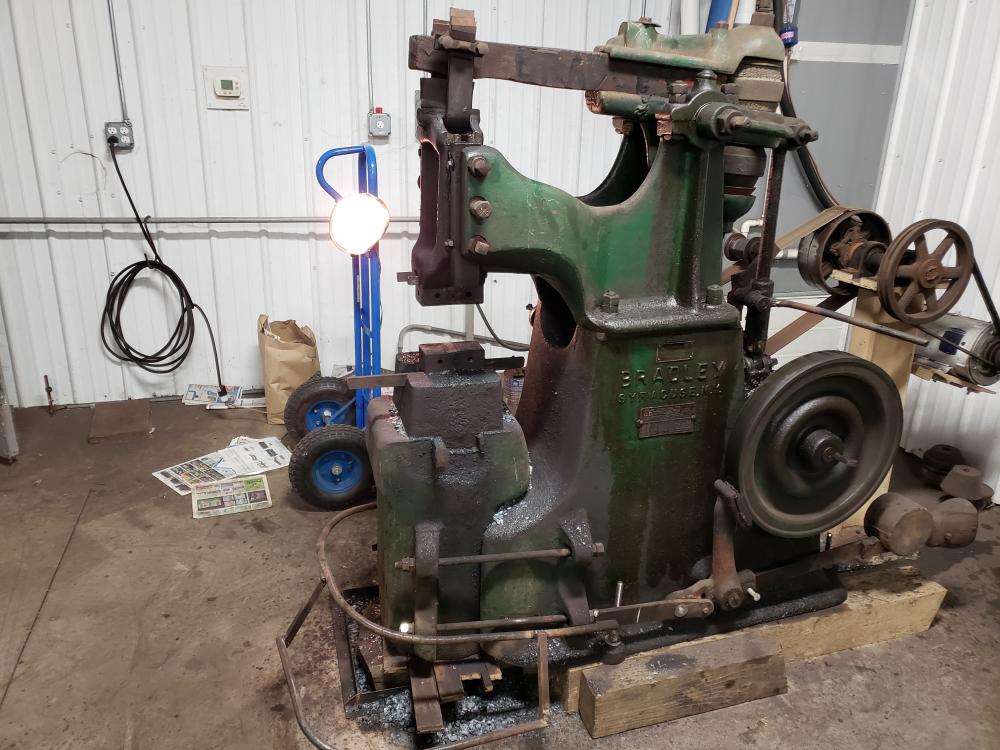
A bradley is an awsome hammer. Mine is a 75/100 pound upright helve Franken hammer- ( assembled from the parts of several machines at whatever factory it used to belong to) Space between the dies is the limitation of these hammers. Adjusting on the fly is not too hard, but gets annoying. I have punched hammer heads on this hammer and worked down stock as big as 5 inch round. I can hit a piece 8 inches tall but it is at its limit. The normal slap of this hammer is 4-4.5 inch, with 1.5 inch opening i can easily hit a piece 5 inches tall then die to die on the next stroke which I think is probably close to what your 50# will do if memory serves. Bradleys are seriously overbuilt machines. Mine runs a full 370 bpm with a 110 pound ram. Punching is not its strong point, but i can draw steel faster on this hammer than any air hammer. I have been using this hammer daily since '95. Air hammers are more versatile but these machines have personality, and few air hammers today are built as heavy.

-
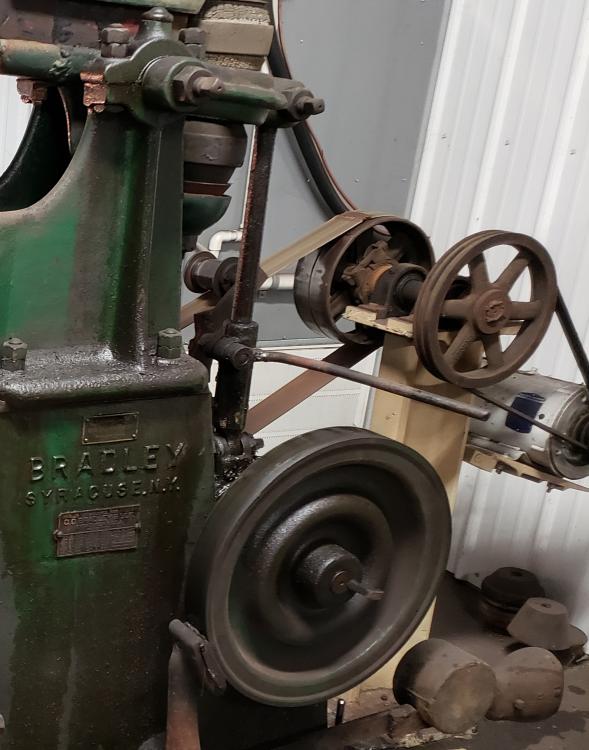
The heat on the factory system is a result of the belt stopping on the small pulley. When it sits stationary, it gets hot. By switching to a larger drive pulley the belt remains in motion with more contact on the driving pulley. You may have the wrong composition of belt. These systems are tough on belts in a way that static pulleys won't be. I run what the farm supply calls "bailer belt", or "tobacco belt", which is a canvas/rubber belt, spliced with alligator lacing. A friend of mine runs a quite large Beaudry on a canvass belt. All of these were meant to run on leather belting, which was all that was available in the day.
-
Adhesive? You gooped up your belt? Clean everything. Both pulleys, idler and belt. Try acetone or denatured alchol. If that fails make up a new belt. In my experience it all works best when a clean belt is running on clean pulleys. Belts will heat, it happens, but should not be enough to be an issue. I never got my bradley to run right on the factory set up with the teeny motor pulley directly on the motor. Switching to a jackstand made a world of difference. Slack belt systems work best when the driving pulley is near the same size or bigger than the driven pulley.
-
no, and no idea who they might be- that is why I asked.
-
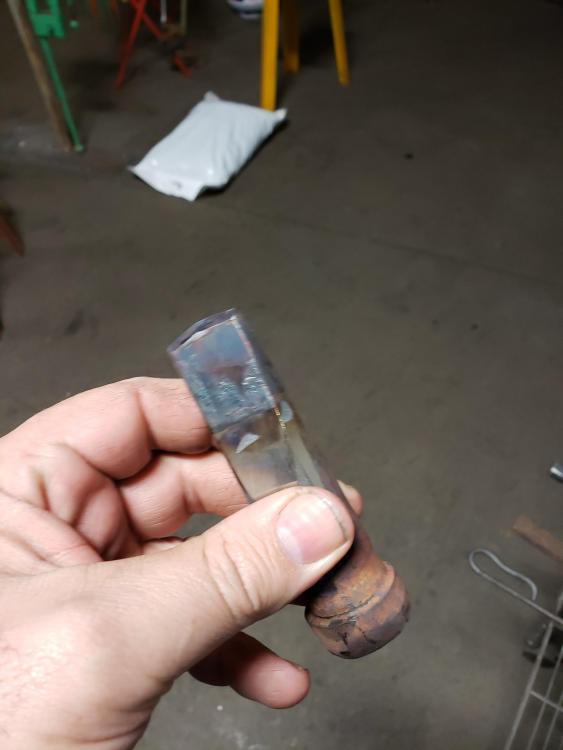
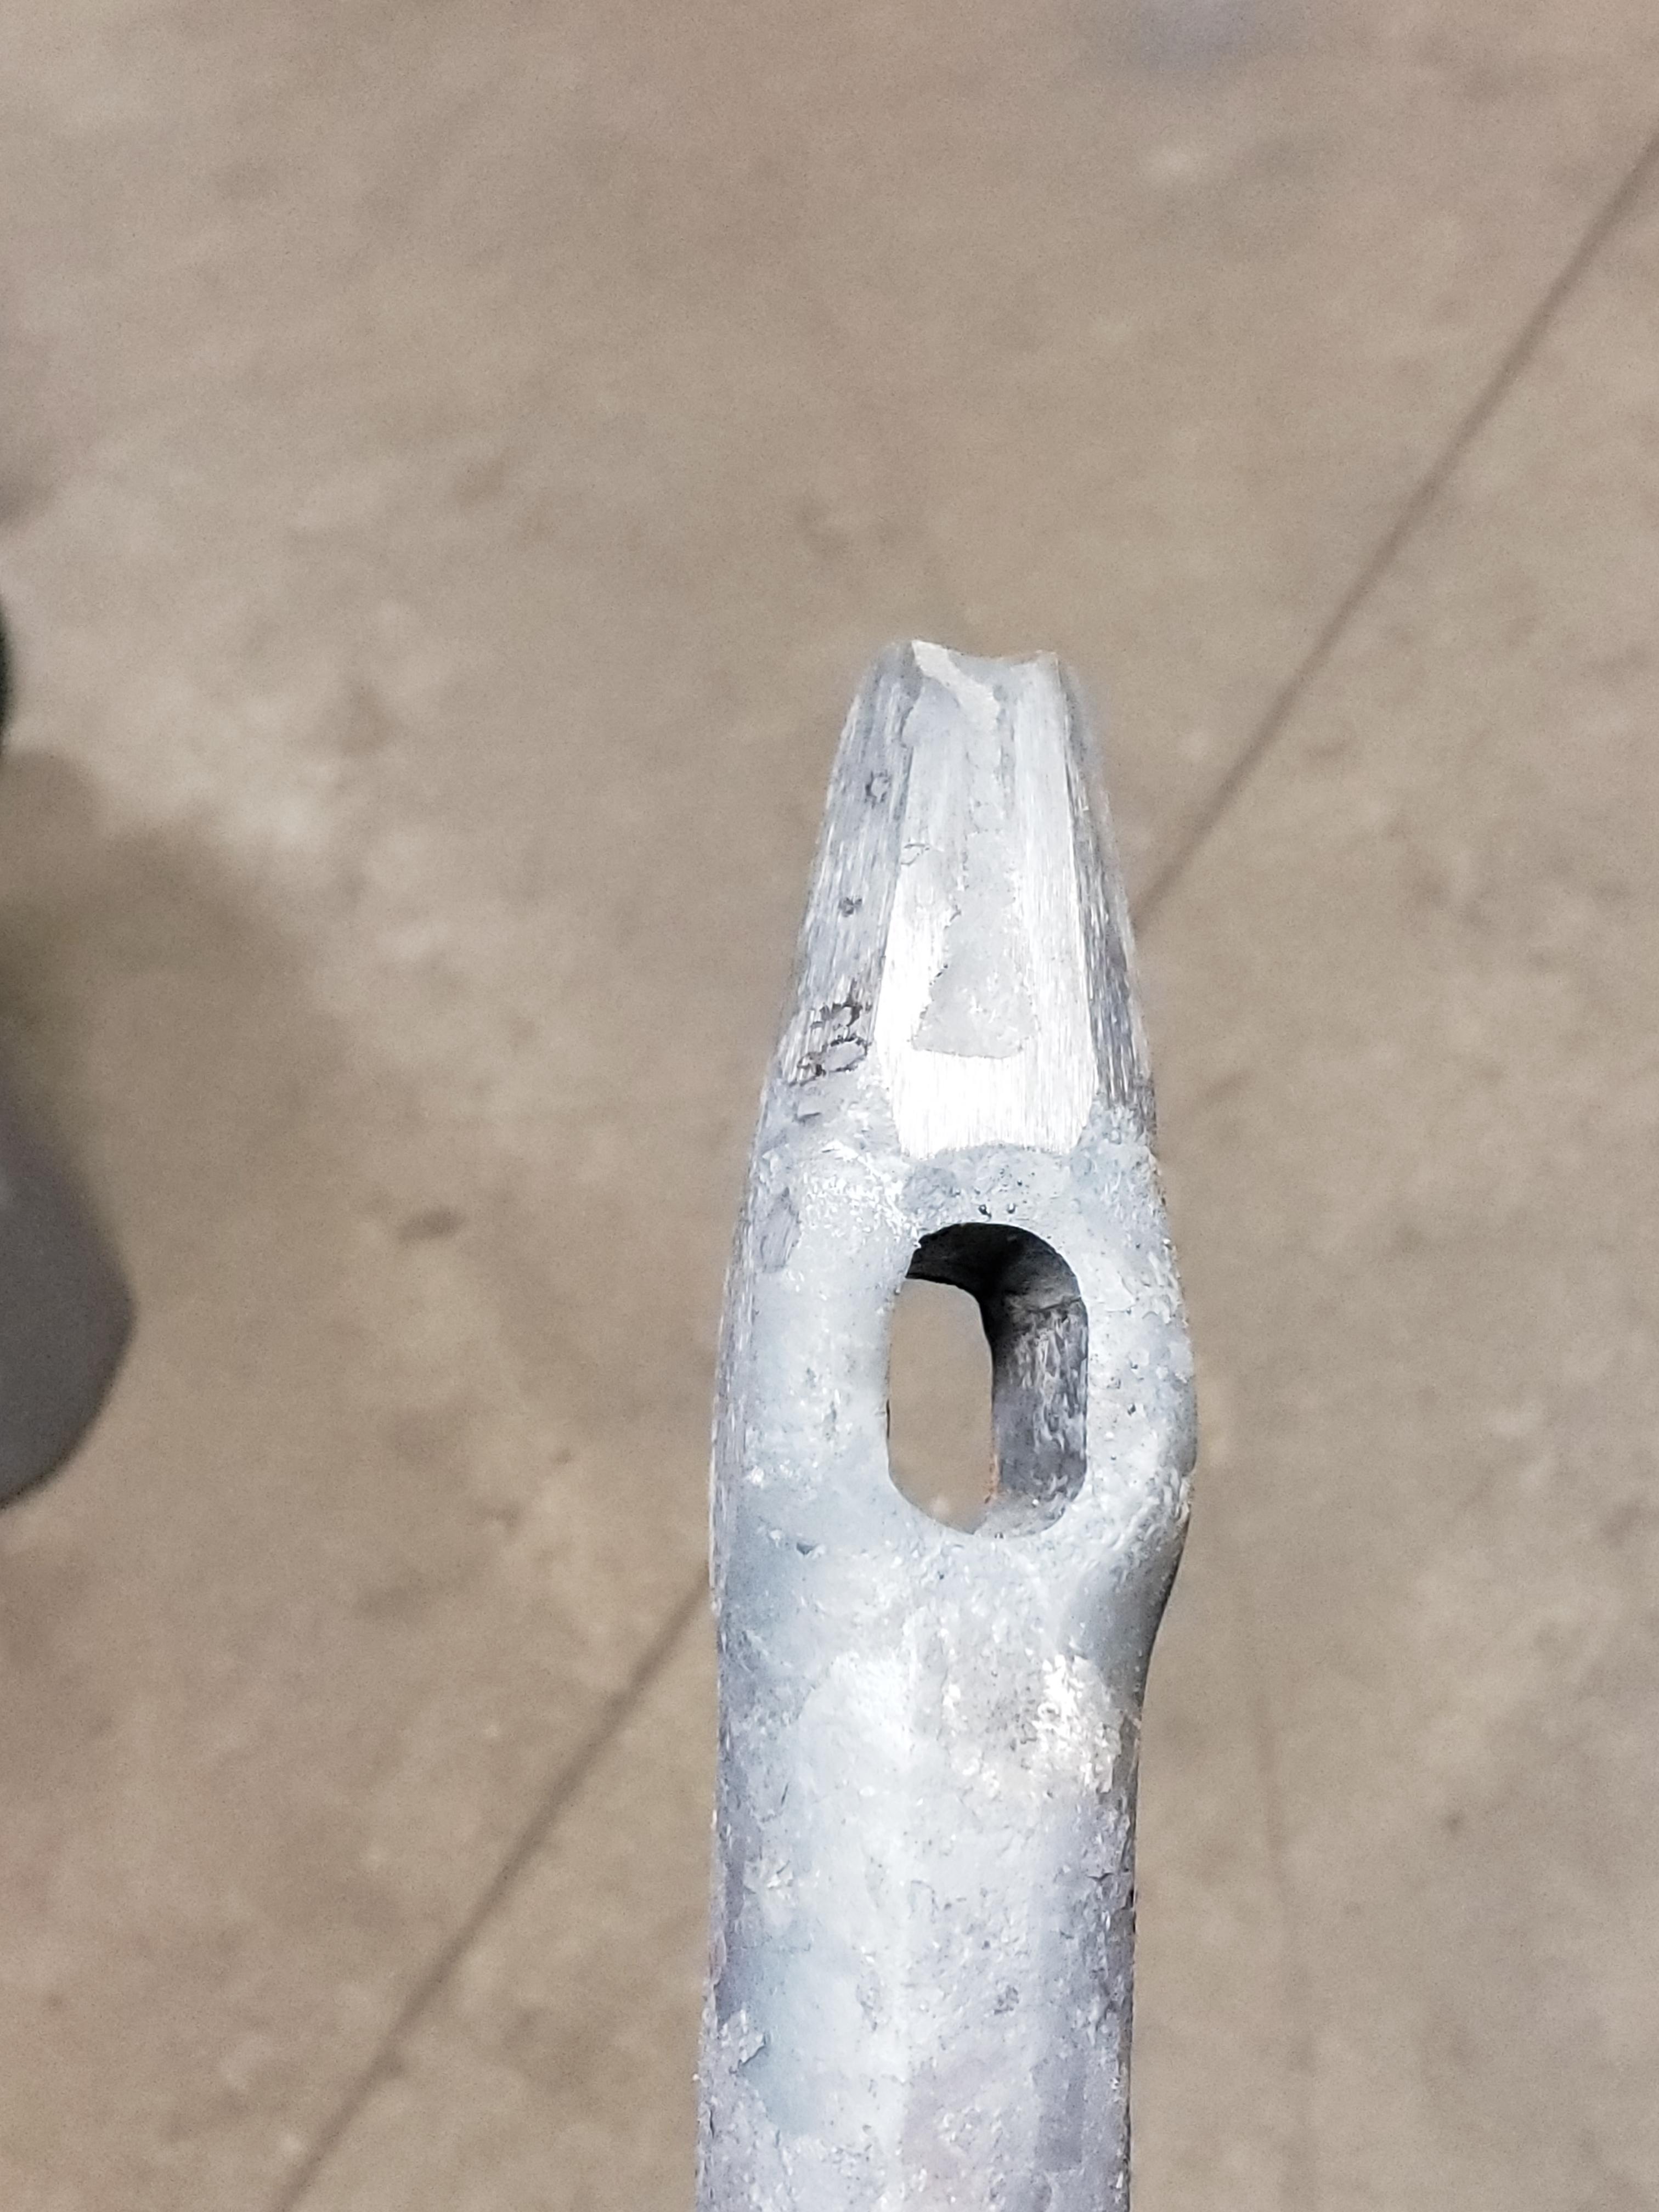
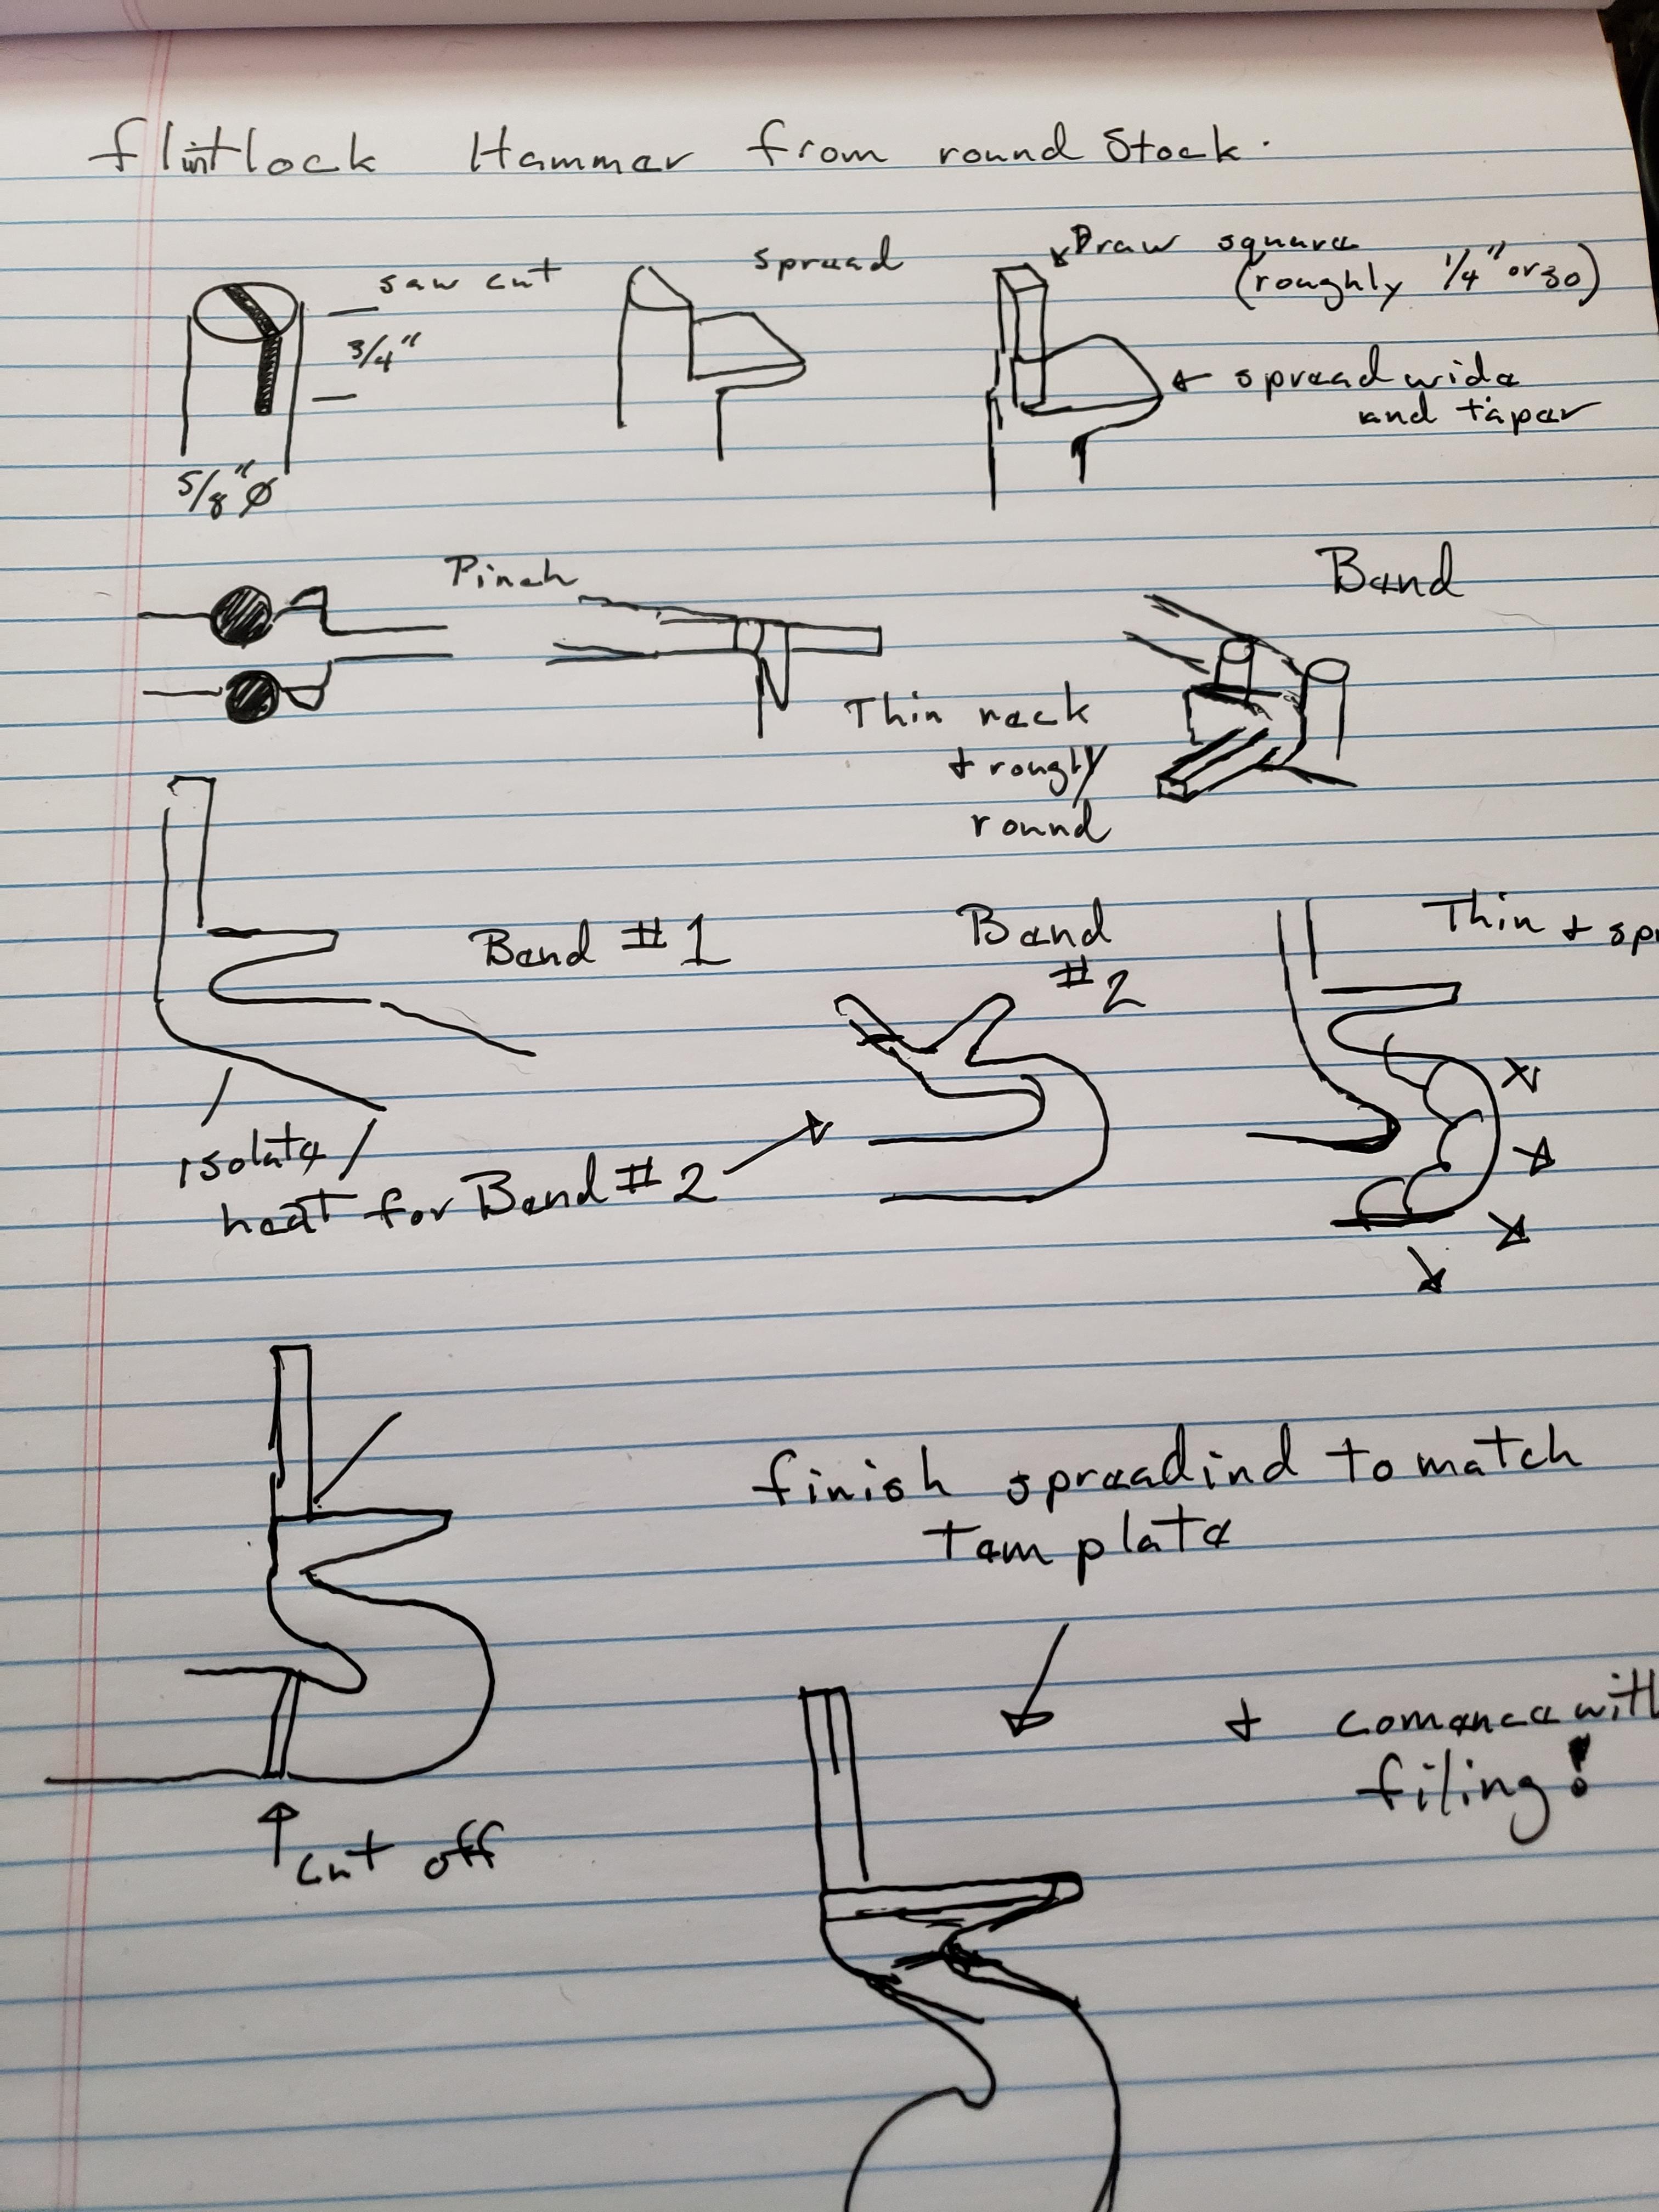
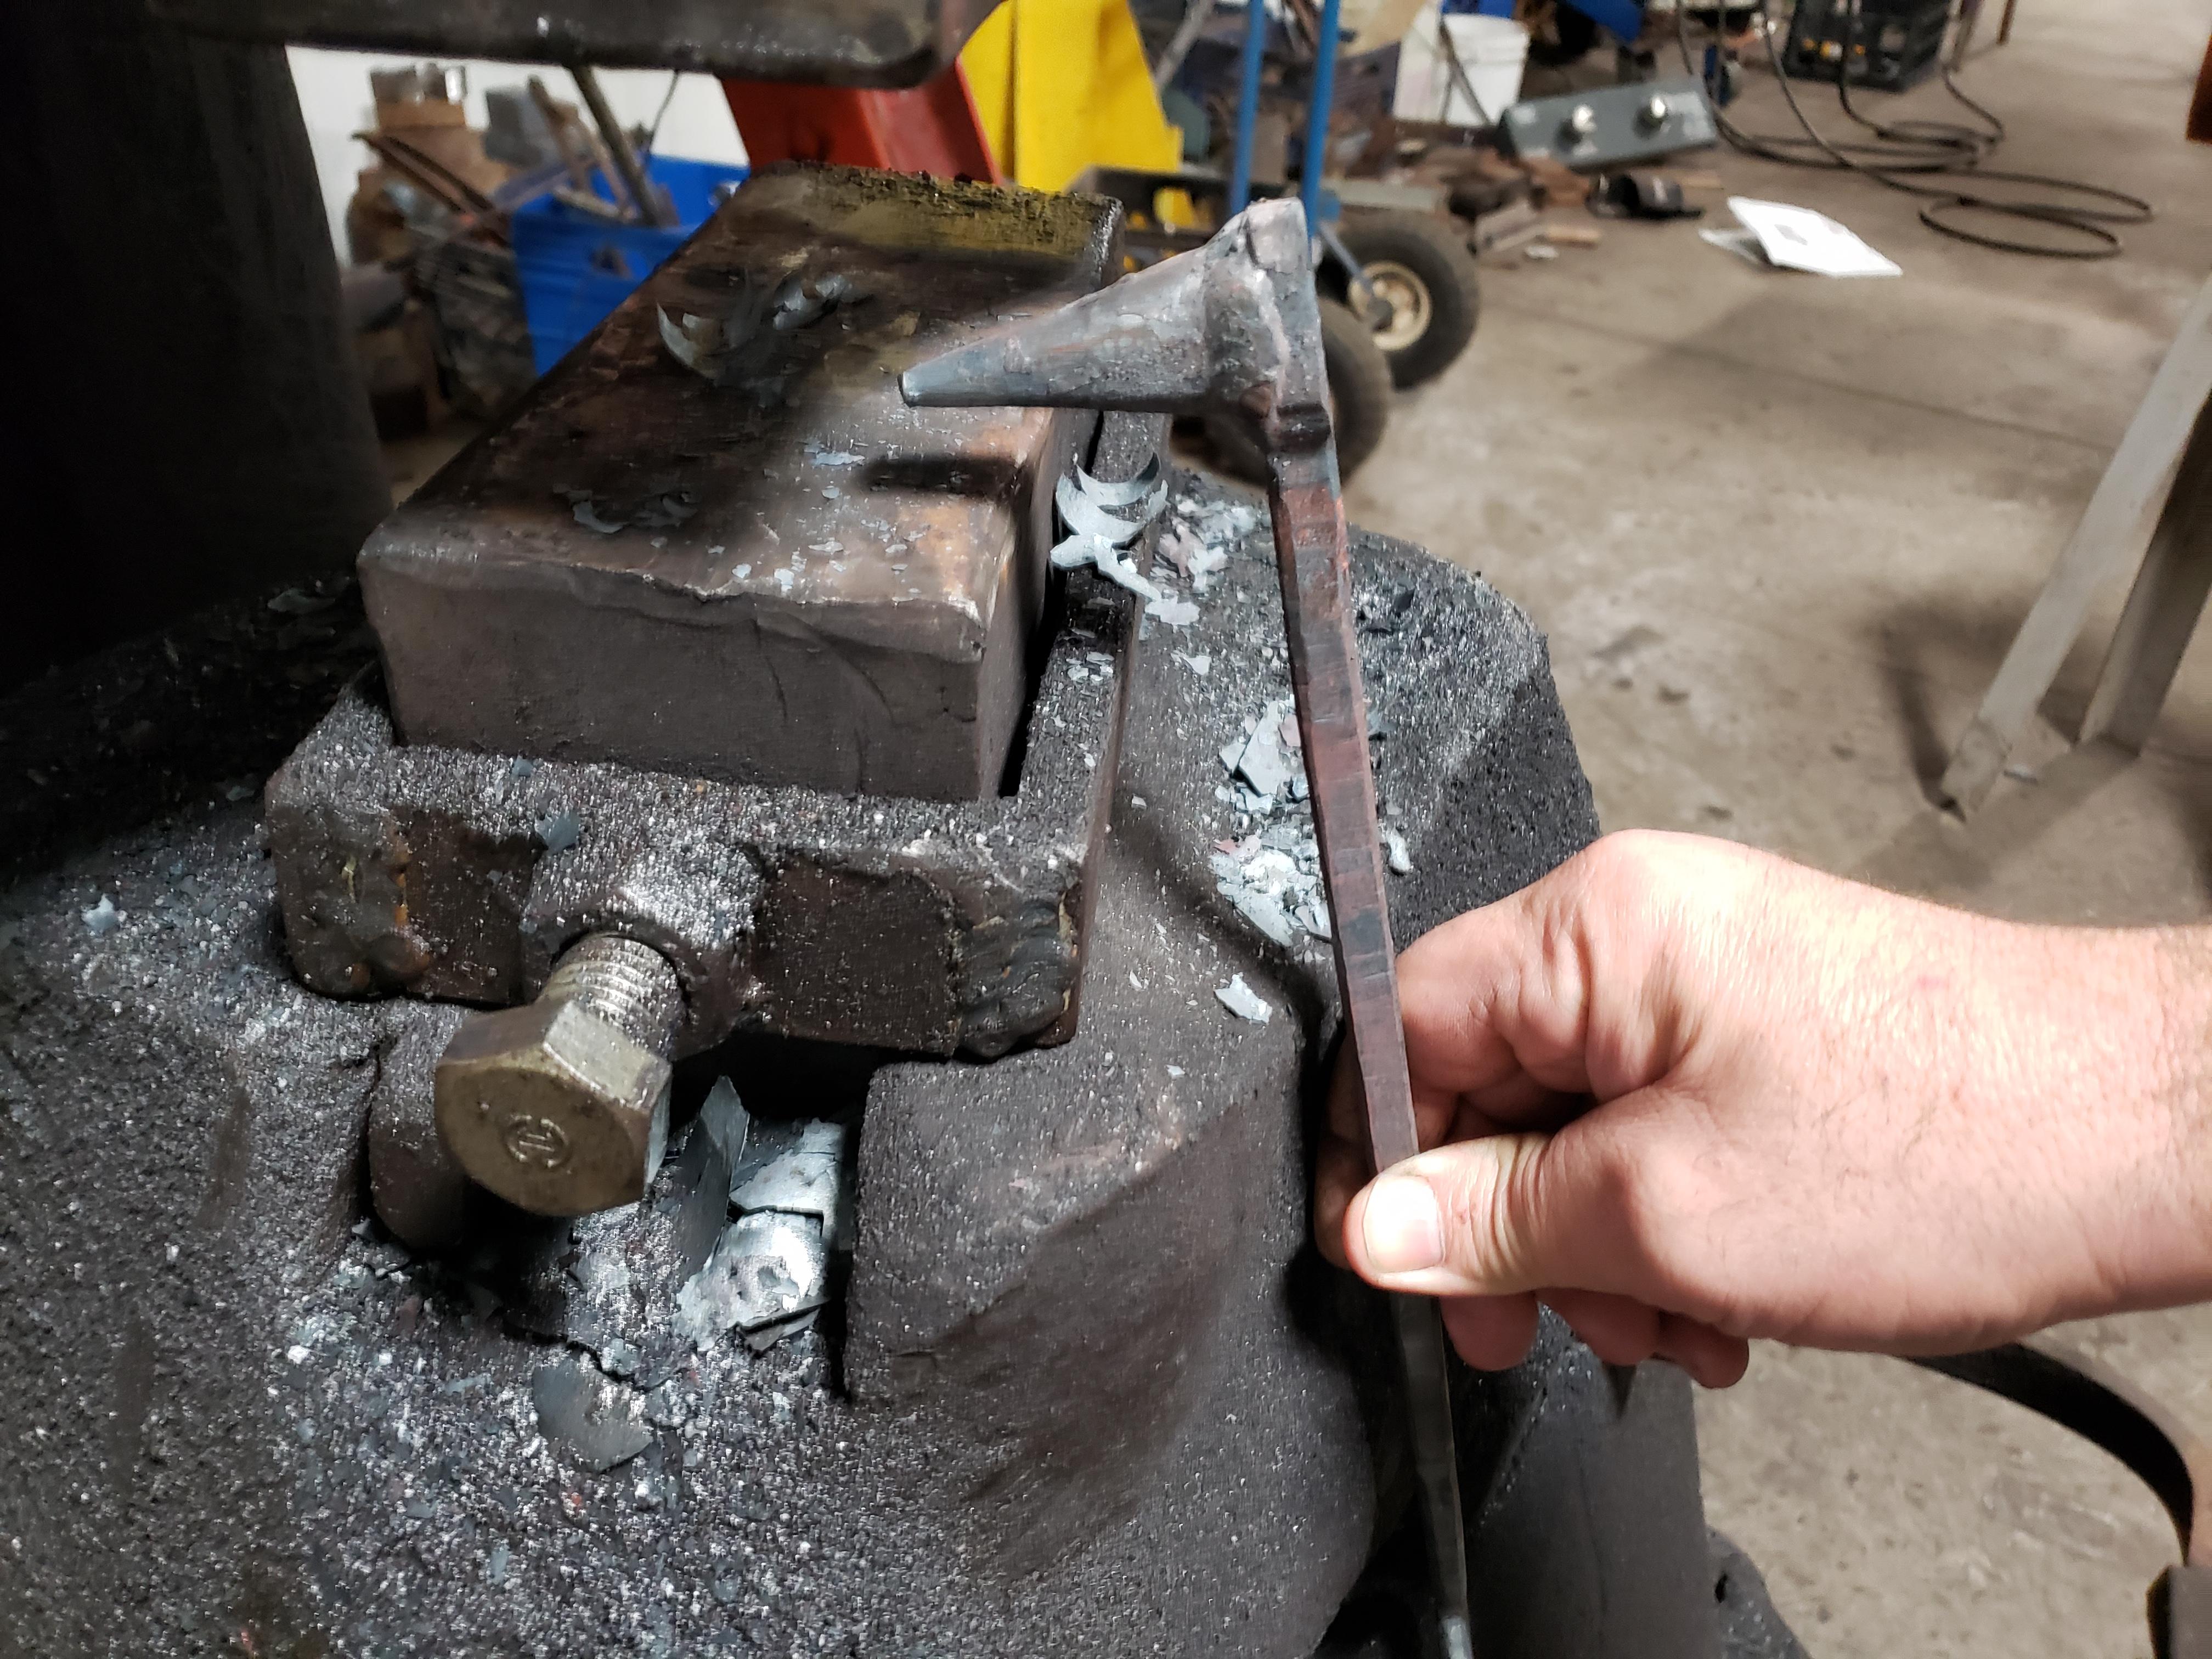
Getting proportions right is giving me a hard time, the cardboard template has helped. There just is not enough material in the 1/2 inch. I may try square stock next.
-
I have found the article from anvil magazine on Bob Patrick, and can post it. Would that violate any rules?
-
One of my earliest blades had a red cedar handle. It is currently in use as a patch knife and has held up ok. I was 13(?) When I made that knife so it has seen 32 years of use or thereabouts. The blade has more issues i am embarrassed about than the handle. It is just bare cedar, but has a fair application of skin oils, sweat, and dirt
-
I have a 13 inch craftsman atlas that was given to me by a neighbor over 20 years ago. It is a nice lathe with lots of tooling, but in the new shop I really was ready for bigger. Back in March I got a call out of the blue from a neighbor about a barn find lathe, would I be interested,
he needed the space. So I now have this cool Lodge and Davis 18 inch swing monster. Now to make some new tooling....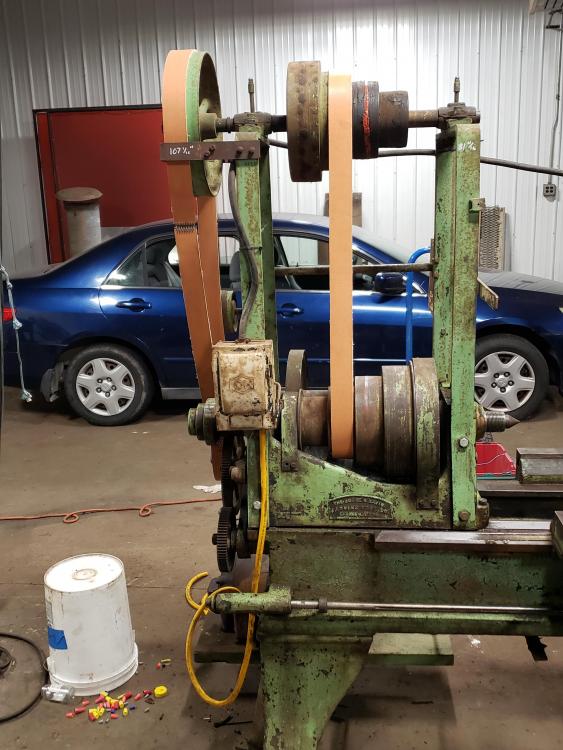
-
Bob was the Smith i have seen do this without a mandrel. My process, power hammer or hand, is as follows. Coil your skelp of 3/8×3/4 or so around a 1 inch or so mandrel. Coil the whole thing. Taper the ends so they lie nice and square. Starting at one end, weld first with an end bump and then across the face in a bottom swage or v block. I use the v block a lot. Rotate as you hammer in the direction of the coil. (So it twist tighter as you turn) by the time a 1 inch id coil is reduced to solid seams, it will be reduced enough to clean up to a .40-50 cal. Bob was quite specific, if you can still see the seam in the final forging, it likely has not welded...
-
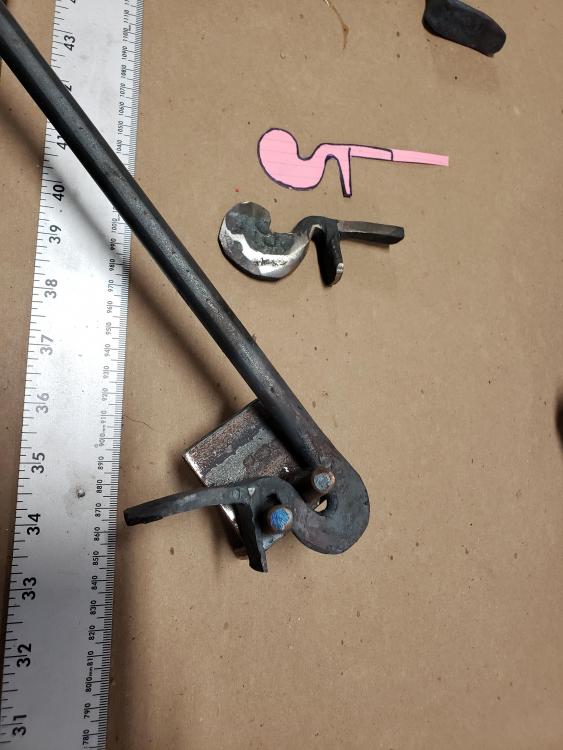
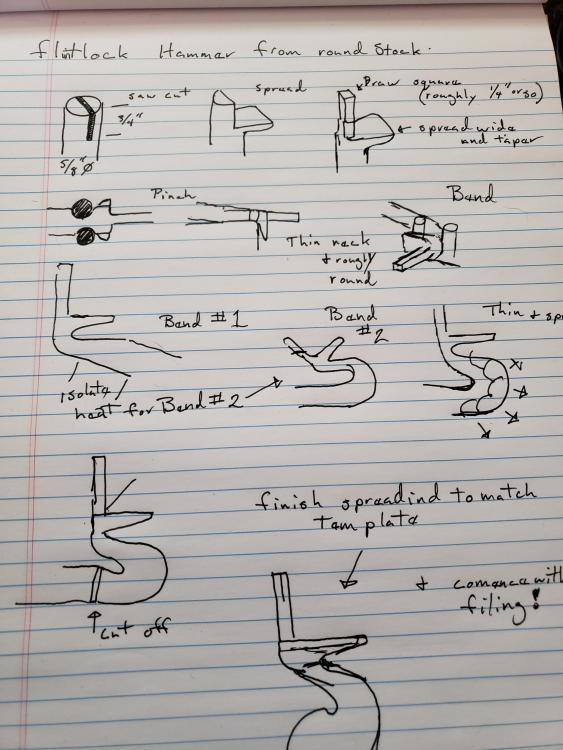
I recently saw a post about a process for forging a hammer from round stock. This is the easiest I have yet found. The original post was on Facebook from a European smith. He was using 12mm material. I started with 5/8. My first attempt was just too big. The next two were in 1/2". My recent attempts in 5/8 have worked out quite nicely. Square might be easier. I found that having a template to work to, at the anvil, helps a lot.
-
That is an ok price. In my opinion little giants are getting a bit out of hand on price. I would think $4-5000 for a 100 would be more reasonable. It looks like it is in good shape and is a good production hammer. You wont regret having it and it should be able to earn back 6500 pretty quick.
-
Facebook is pretty easy to use, but they have automated systems looking for items they consider dangerous. Etsy has odd pay schedules that I have yet to figure out, but is a pretty decent low cost way to go, but the traffic is not the best. I tried ebay for a bit but had a lot of trouble with thier policies. They put 30-90 day holds on several big orders that I just could not afford to ship. After that I cut ties with ebay. Best of luck, I have a fairly reliable $500 or so in monthly sales online, which is not close to making up for the venues that have been suspended/ lost, but it is something.
-
I once took the ram, guides and whole arm assembly from a 25 lb little giant on a flight in carry on
-
Kerrihard. Ah the days when sears carried good stuff...
-
On 1/20/2018 at 7:54 PM, MC Hammer said:
Tongs are a hard learning project for a beginner. Offsets, drawing out, and lots of hammer control are needed to be successful. I'd have to disagree with it being a great first project. Maybe a 20th project after mastering some S & J hooks, chisels, punches and such. Heck even buying some farrier nippers, heating and straightening out the jaws would be easier than starting from scratch. I see them all the time at antique shops for cheap. You can do anything with shaping the jaws to conform to what you need.
I will agree that there is something satisfying about using tools you've made. Hey that's what this forging thing is all about. Lots of mechanics that wish they could make the tools they need to work with instead of owing Snap-On a lot of money.
Check out that guy who makes the kits if you really want to make your own. I just saw a bundle set on E-bay for $43.00. You get something like four tong kits for that price. I used his kit to make the scroll tongs and I still have the satisfaction of using a tool I made.
Harbor freight has nippers for something like $12. Heavier and cheaper than farriers nippers, since I first saw them I thought they would make great intro level tongs.
-
A very important textbook, full of good solutions...

-
Back around 1987 I checked a book out from the local library. It was a really good book on blacksmithing, though I did not really know enough to understand it at the time. It described a forge, hood and chimney built from old water heater shells, with a really good description of fire management, evaluating scrap, and making blacksmith tools with a whole chapter on punching and drifting. I do not recall the author or title, and it was a rebound book so it was just a shiny grey binding. The author was from the southwest somewhere, and talked about learning from mexican smiths. He had a Spanish sounding name that I do not recall. It is not much to go on, but I would love to find a copy of it, or at least know what this book was...my library has no records from before 2012 ( I already checked)
-
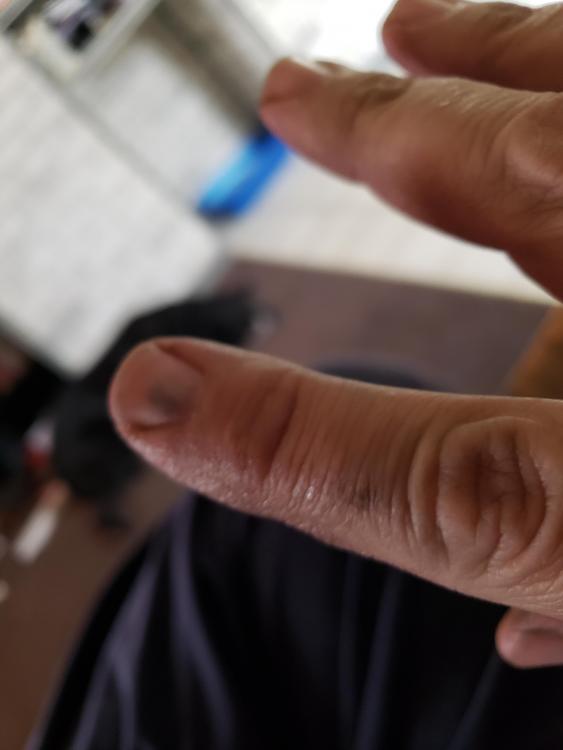
Here is the dumb move. Do not do this! I shudder to realise, in this picture my finger is against the sow...

A tool like this is much safer
-
I had a bit of a problem today and got a big gotcha from the 250. With power hammer tools you have to be aware of where your tools are and where the hammer is going to push them. Sometimes it is not what you expect. I was punching eyes in some hot cuts today and when edging a tool to knock the punch out, got my right index finger in between the tool handle and hammers anvil. I got a smear of grease and bruised finger, but that could have been much worse. Tool handles should have a decent amount of spring or give, be always aware of where your fingers are, and never put fingers through the loop! Stay safe everybody...
-
I am thinking iron pipe outside, parallel to the low pressure, with a branch through the wall where the forges will be. It should T off the line before the low pressure, and inside the wall have a shut off and regulator for each branch, then the forge hoses will tie into the regulator on the inside. Am I missing anything?
-
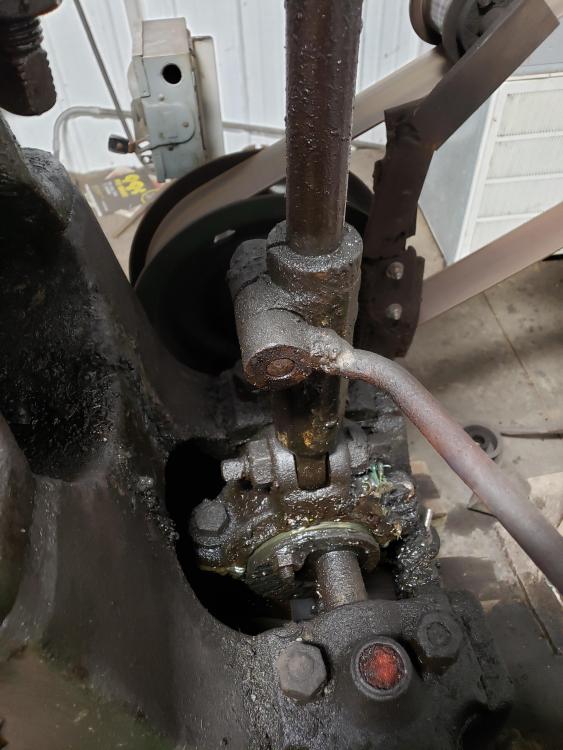
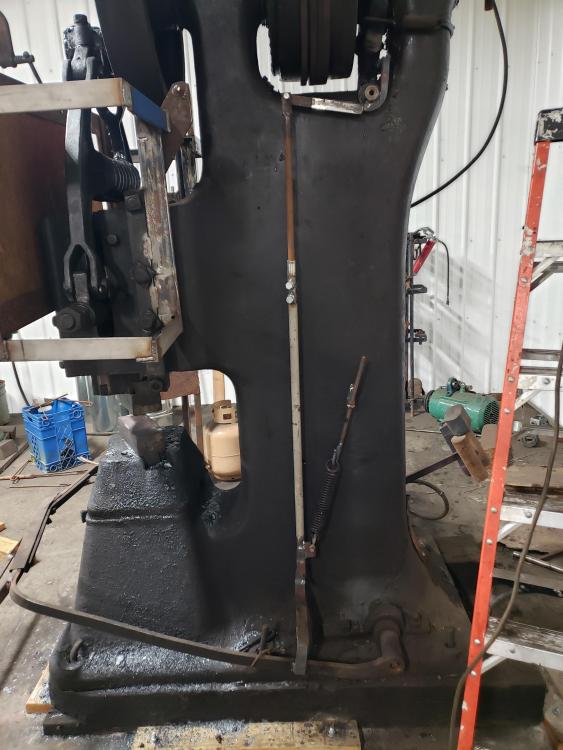
The latest with my hammer is an upgrade to the clutch. There is virtually no literature on the 250 so I am not sure how common it is, but the clutch tod runs inside the frame. It connects to the treadle by means of an arm on the underside of the frame. Adjusting clutch throw requires getting both arms inside the frame, with wrenches, from underneath. The parts are ancient and well worn and I hate to have turn a 7-9000 pound machine on its side for adjustment. So I added an external rod. The funny thing is, it looks mighty similar to a normal little giant clutch rod. A lot of its funky behavior settled down with this modification.


Bradley Drive Belt Squeal
in Power Hammers, Treadle Hammers, Olivers
Posted
My driving pulley is just a hair under 12 inches. The driven pulley (on the hammer) is 14". It would be ideal for the driving pulley to be bigger than the driven. This helps keep the belt moving, rather than hanging stationary on a moving pulley. When i tried the direct drive I went through a few pulleys from 3 1/2- 5 inch diameter. None worked for long without eating up belts. Sadley, flat pulleys are not terribly easy to find so the one i am using was a compromise.