patrickrock
Members
-
Joined
-
Last visited
Everything posted by patrickrock
-
Thats what I thought. Any equipment I've ever used (and I've used a lot of WWing equipment) you always let the tool come up to speed first.
-
In another forum today a lifelong metal worker said that the safest way to use an angle grinder is to start it with it TOUCHING the workpiece. Curious about this I went and did some research, and everything I read indicated to start the grinder away from the workpiece, let it come up to speed, and then bring the tool to the piece. So... err which is it?
-
Don, yes, that would be cool.
-
My forge is currently a nice heavy brake drum set into a dry stacked hearth of firebrick. Bottom blast. Works very well, but the wide shallow brake drum makes a BIG fire... Haven't figured out a way to really control that yet. But coal is cheap. And I save my left over coke like a miser. (Young beginning smiths, don't ever ever let someone tell you that a brake drum forge doesn't work. there is a, seemingly, popular site that has an entire page dedicated to bashing brake drum forges. Ignore it. My brake drum in a hearth is every bit as good as the Centaur firepot in a hearth I learned on.) But... was looking at some side blast forges that are basically stacked firebrick with the blast coming in from a gap in the side. I am intrigued. It looks you would have a lot more control over the size of the fire, and the location of the "sweet spot." So. Bottom Blast vs. Side Blast. Discuss.
-
-
If you can stand it. Go to college. That's my advice.
-
Using a spring fuller. That's a great idea.
-
thanks all for the help, comments, and links.
-
I use a shop vac with a 2 inch PVC ball valve for air control. Works ok. Funny story. One night I was running it wide open to quickly bring something up to heat so I could finish up and go in. At that point it was all coked up. I turned my back for a second and when I turned back the blast had blown out all the burning coke into the air and my forge had turned into a volcano. White hot embers of burning coke were going everywhere, like popcorn. It was exciting. Now I never run the air at full blast anymore.
-
I agree there's not enough carbon to make a *good* knife, but there is enough to make a *useful* knife. But yes, agree, they are mostly for forging practice and conversation pieces, "Hey neat it's a knife made out of a railroad spike."
-
Oh, Im not afraid of messing up, but I'd still like to have a rough idea of the sequence. Im working at orange to bright orange. I'm drawing down/out the blade... How did you do it?
-
A friend was kind enough to give me a bucket of assorted rr spikes. So last night I started working on one marked MC (I assume medium carbon?) and trying to forge it into a knife. Well, I am having a heckuva time with this. First it took me forever to draw down the blade, 6-7 heats and just wearing my arm out, makes me think I was doing something wrong there. Next I'm have a hard time centering length of the blade and its distal taper in relation to the handle. And last, I kind of wanted a bit of shoulder between handle and ricasso, but can't quite figure out how to do that part and still keep everything centered up. In other words I have no idea what I'm doing, and can't visualize the steps I need to do to get to where I want to go. Does anyone know of a step by step process on how to forge a spike knife so that I could look at it and absorb the steps? Cheers, Pat Rock
-
It was for a jury-rigged bending jig. No problems though, I just bashed it over the anvil to a rough 90, and then creased the end until it dropped into the hardy hole. Ugly but it works. The blacksmith makes the tools, eh?
-
Is there way to forge a 90 degree bend in 1 inch square tube?
-
I use some cheapies I bought at lowes. They work great. I can't imagine how a $50 splitting wedge could be worth $50. Lee Valley sells something interesting though. A spiral splitting wedge. The spiral adds extra leverage to the wedge action. http://www.leevalley.com/wood/page.aspx?c=2&p=41142&cat=1,41131
-
First, let me say I'm glad you and yours are all ok. That must have been scary. And I'm glad your parents aren't putting the kibosh on your hobby. I've never heard of cold ashes spontaneously combusting. I mean what did they combust with? Do you mean it was coals springing back to life in your brass bucket? And why are you lining your forge with ashes? What do you mean? Are you making some kind of fire clay? I need more details.
-
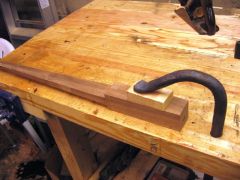
Here are 5 pairs of woodworking holdfasts that I did for some woodworking acquaintances.
-
All I want to know is how do they cut down their power hammers so they can use them while sitting on the floor.
-
Yeah me neither. Also I'm not really interested in making knives. Hmmm. Ok. Into the recycling bin it goes.
-
I helped my brother-in-law unload a truck last night and managed to hang onto all the steel strapping that was used to hold the packages onto the pallets. Is this stuff useful for anything? Seems like I have read that it is, but for the life of me I can't figure anything out to do with it. What do you guys think? Cheers, Pat Rock
-
Thanks all. Went out tonight took out my belt sander flipped it upside down, chucked it into the vise (poor man's belt grinder dontchan know) and went to work on the hammer face. Tried my best to get it to look "like the back of an old pocket watch." After that I fired up the forge and went back to basics. Grabbed some 3/8" and forged a couple of quick hooks. Square, taper, round, bend. Kept in mind your suggestions, watch the plane of the hammer strike, work at a dark red heat to remove marks, and then finally at the end I tried rubbing it all out with a brass brush (something I knew about but hadn't really done before). I could really see an improvement in the look of the work. The hammer face still needs work, I only had 80 grit paper for the belt sander, but tomorrow night I'll work it up through the grits. And my anvil at the moment is the Harbor Freight 55lb cast iron one so the face of the anvil is quite marred. But even still at least a 50% improvement. Thanks again to all for the advice encouragment.
-
I'm sorry. I'm not understanding your meaning. Do you mean crowned and smoothed?
-
could you describe finish hammering?
-
Things are working good for me. I have a forge, all the tools and have been merrily forging away at home. I'm enjoying a reasonable level of success in producing things that WORK they are supposed to work. But. Everything looks like its been chewed up and spit out. Dents, dings, rough, burnt looking, points split, thin edges split, etc... I know some of this is technique, some of it is because of burning thin things up in the forge. But I am wondering if anyone can share some techniques in getting work with the smooth hammered facets generally associated with blacksmithing.
-
One other thing. My projects have funny oily looking places on them. Is that some kind of residual finish from the steel factory on the rods? And also I keep getting tempering colors on the metal right above the highest level of water in my final quench... Is there any way around these two issues?