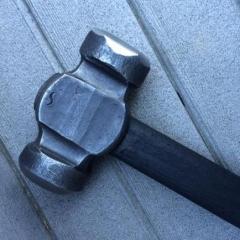
October 18, 201510 yr I started to make a hot it today since my other one got stuck in the hardy whenever I used it. I plan on making it a brazenly style hot cut, but make it have a shoulder. I think I made the taper fine, then I cut the rest of the steel I do t need on the top and started to heat that and got it to form the shoulder. It got a little bent out of shape, but I think I should be able to fix it. My question is that is the shoulder I have on it big enough to stop the shank from going any further into the hardy, and if it is large enough to not chip. Also any tips on how to make the fan shape hot cut. I know that I need to fuller it, and I hope my 2 pound cross peen will do the trick. Am I headed in the right direction? Thanks
October 18, 201510 yr what size hardy hole do you have and what material size did you use? the shoulder in the last pic looks a bit weak on the bottom side.you will need to address the "fish mouthing" on top before flattening and speading into a cutting edge.looks like you are on the right track.
October 18, 201510 yr Author I used 1 inch steel. How do I make the shoulder? Once the shoulder is done then I have to make the top square and i should be good to flaten and spread? Once the fishmounthing is addressed, do you think it will be too big to make the cutting edge an should i cut it shorter? Thanks Edited October 18, 201510 yr by Forging Carver added
October 18, 201510 yr Brazeal style hot cuts are designed to friction fit into the hardy hole (if that is what you mean by brazenly). If you add a shoulder it becomes a more conventional hot cut. With that type the shoulder needs to be very substantial to support all the weight of the hammer striking during the cutting operation. There are a number of different ways to form this shoulder depending on the stock size you have and the tools you have to work with. Anything from forge welding a collar, or upsetting the center section and necking down either side (as it appears you have tried to do), to arc welding a hardy post onto a shouldered cutting edge. You can even fuller down two sides of a thick flat leaf spring to form a shoulder that fits into our hardy then put an edge on the opposite side (hot cut goes into the hardy hole on a diagonal).You are doing a good job working with such heavy stock, but if you decide to keep on this way remember to let the steel soak for a while so that the inside gets hot as well as the surface. Otherwise it is almost impossible to avoid the fish mouth syndrome. This size stock forging typically responds better to blows with a heavy hammer. A 2 lb. hammer will be kind of tough going unless you are very hot. You may want to wait till you have a striker handy and can work with a heavier hammer. Once the blade edge is thinned out further you will be able to clean things up with your 2 lb forging hammer.Good luck. Edited October 18, 201510 yr by latticino
October 19, 201510 yr Author I am using a 3 pound sledge hammer to make the general shape, and I have a 2 pound cross pein I was gonna use for the fan shape. How do I heat the center part of the hot cut? I tried everything from water and positioning in the brake drum. Also, what part do I heat; the shank or bottom of the what will be chisel? Thanks
October 19, 201510 yr Stupid disappearing post again...When I forged my hot cut, the whole thing went into the forge. I kept the coal forge on low so it would heat all the way thru vs just heat the outside up. I will admit I "cheated" and started out with a piece of 1 1/4" to forge down and upset to fit my 1" hardy hole. Beginning part of Mark's video shows how I formed the shank and upset for the base. Like him I had a swage to use to do the upset, though now I have a portable hole so I won't have to beat on my anvil. After that I tapered the working end. I had to make a rough blunt taper when I started to draw out the blade to avoid fish mouthing. I'd rough out the blunt taper, then start to draw down the rest of the stock. Then I'd blunt the end taper again, and draw down more. The sites no letting me post the actual link to Marks video. copy past this yourself.www.youtube.com/watch?v=pxTdbC5MLRQ Edited October 19, 201510 yr by DSW
October 20, 201510 yr Author Never mind. Just saw the video and it answered my question. Thanks for the help Edited October 20, 201510 yr by Forging Carver
October 20, 201510 yr Mines a chunk of 4" square tube 3/8" wall thickness sitting on a 6x6 1/4" plate for a base. Top is 1" thick steel. Tube and bottom plate came from the scrap barrel at the tech school after the kids practice the base welds. Top is scrap a friend of mine gave me when I was practicing to do my unlimited 3G/4G mig certs. I drilled out most of the hole, then filed out the rest. I thought about drifting it to final shape by heating it in the forge, then driving a 1" square punch thru, but in the end I was itchy to get to play with it and ended up filing it all to size one night at the house.
November 6, 201510 yr One big lesson for me was to let bigger stock soak in the lower heat for longer periods. Once it's hot all the way through, things move much better. It's also a big deal to get it back in the forge when the color starts to fade. It takes much less time to reheat when the core is still hot. You'll know the core is hot when the anvil side color fades but returns when you lift the stock off the anvil. All of this applies to stuff with high carbon welded to low carbon as well. Forging an axe with a high carbon bit at low temperatures tends to move the low carbon steel more than the high carbon in the middle.
Join the conversation
You can post now and register later. If you have an account, sign in now to post with your account.