

Rantalin
-
Posts
205 -
Joined
-
Last visited
Content Type
Profiles
Forums
Articles
Gallery
Downloads
Events
Posts posted by Rantalin
-
-
Andy, I have almost the exact same forge! It's the Tim Lively design from his website. The only difference is that I didn't cut the slits in the sides for longer pieces of metal, but it hasn't become a problem yet. A deep bed of coals helps with maintaining a higher temperature. Three things I would recommend, first, I used Rutland black furnace cement. I don't remember what the temperature reating for it was, but mine is starting to crack a little. I have another pint of it, so I can repair the liner if it gets too bad. Second, if you use a couple of screws, you can attach a small sheet of metal to the far side of the forge, and that will keep your coal/charcoal from escaping over the edge. Its happened to me many times. Third, if you can find something to elevate the forge, do that. I put my forge inside an old grill. The glass was broken of the cover, so I closed it and the wind can't get to my fire as easily, which helps when lighting it. Also, if you can find some heating coal, it works MUCH better than charcoal. I got a 50 pound bag of it for christmas, I think my parents said it only cost about 7 dollars. I still have about half of it, and I've spent at least 24 hours at the forge since I opened the bag. Good luck with the forge!
-
I have no idea how long it took. When I'm out forging, hours go by without me realizing it. So this could've taken anywhere from 30 minutes to 4 hours.
-
I didn't use any special tool besides a set of tongs and a hammer, although I did use a large set of pliers to do the twist. All I have is lightweight tongs that I actually broke my last time out at the forge. I held the spike in a small vise to twist it. The spike I had was very rusty to start, does anyone think that starting out with a cleaner, or even pre-ground spike make the handle more attractive?
-
The candle that I found is in a small glass jar, and fits pretty well, I didn't fit the top to any specific sized candle, so it was a matter of finding one that fit well enough
-
This is the first railroad spike knife I've made. I put about 2.5 twists into the handle, then ground the blade to look like a small bowie knife. I used a 120 grit belt to grind the blade, and am looking into getting finer grit belts. I ground the butt end of the knife to give a contrast between the dark handle and the bright blade. The person I was making this for was in a rush, so I wasn't able to completely grind one side of the blade as well as I'd have liked. But it still came out nice.
 a
a a
a a
a a
a
Any comments or suggestions are more than welcome. -
I made this candle holder a few months ago, as a birthday present. Its 1/4" round mild steel, with 1/8" "vines" that were not textured and leaves that were chiseled to texture.
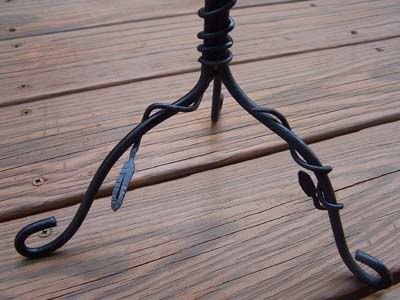
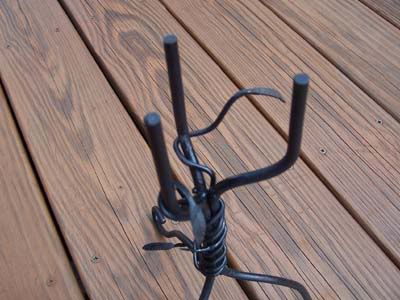
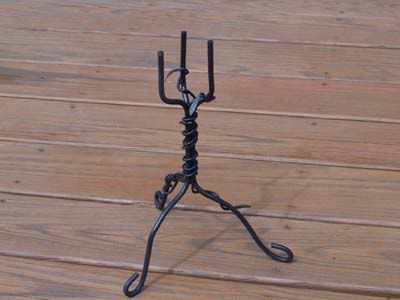
Any comments and suggestions are more than welcome. -
I was out forging from 11 in the morning till dark yesterday, I got a lot of work done, but when the sun had pretty much set, I couldn't see much of what I was doing. I have an outdoor forge, no protection from the elements. I turned on an outside light to provide some visibility, but it didn't help much. I was so close to finishing a project that night, but quit when it got too dark. Point is, when my visibility was gone, I knew I was going to make mistakes. The only thing I could really see was the fire, it was the only bright object around me. I knew it was dangerous, so I quit. I couldn't hit something I didn't want to hit, like my hand, or tripped over my anvil stand (which happens to be a saw horse with a small vice attached to it) while holding hot metal. Not a good thing to happen. Be safe when you're working. After initially reading this thread, I've occasionally looked at my hands to check for damage. Nothing has happened yet. But iI'm still being careful
-
forget to calculate the blast radius when I was helping to break up that hillside. I nearly...
-
Take Your time. If you rush, mistakes can happen. When dealing with a couple thousand degrees of hot metal, mistakes can be costly, along with ruin the project that is being worked on. Take it slow and you're good to go!
-
If you go to www.photobucket.com, you can post your photos there and then upload put them up on any other website.
-
Do you mean an upsweep like a katana blade would have, or is the blade curling up along itself like rolling paper into a tube? Is it is the former, the only thing I've found for a single edged blade, like a knife, is to pre-bend it in the other direction. If you are forging a double edged blade, the best way is to hammer both sides of the blade equally to keep it straight.
If the blade is curling itself up, I can't really think of how to help you, maybe one of the more experienced smiths could help you out. -
yes, it does. Thank you for the explanation. Excellent work on the knife Alan
-
irn, typo in your math. The total is 255.
-
The link does a good job of explaining it, but in short, the first number is the number of "112's", the second number is in "28's" and the third number is in ones, so 1.1.1 would be 112+28+1, or 141
-
how do you determine the number of layers, is it the number of times you fold the metal, or is it the total number of layers that are formed during the folding? For example, the first time you fold, it would have 2 layers, then 4, then 8, and continuing exponentially. But that doesn't make sense to me as that would be 11.224 folds in your knife, and I'm pretty sure you can't fold .224 times... or maybe I'm just picturing the process wrong.
-
JPH, yes I have only made those two blades. Being a college student living away from home, I don't have a lot of forge time, which I am not quite happy with. I began blacksmithing in june of this year, but lacked the resources to spend as much time as I wanted to at the forge. I began working full time, which restricted the time I had to bang metal. Now that school's started up again, I'm not at home to have my fun. So all my forging right now is conception of pieces and methods. This way I have a much better idea of how and what to do over winter break.
I've purchased "Practical Blacksmithing and Metalworking" by Percy W. Blandford, and "The Complete Modern Blacksmtih" by Alexander G. Weygers, a book which I have heard referenced many times and both books are quite helpful. I am trying to get a better feel for the how some techniques are performed and get an idea of what I'm going to do next time I can light up my forge. I appreciate the input and I thank you for your time. -
The biggest problem I'm having with constructing a blade is the handle. I can't concieve the best way to craft and attach the pommel and the hand guard. The best I can come up with is to forge them directly into the blade, but that seems to me to be rather difficult. And nearly impossible if I wanted a different material for the handle.
I have made two "blades" before. One was VERY poor quality, with a two piece handle poorly riveted to each side of the tang. I ended up melting that one due to poor attentive skills when heat treating :wink:
The second blade was a dagger that I'm not proud of the blade of, but the handle came out much better. I used a single piece of wood from a tree in the woods, carved and sanded to shape. I used a drill press to drill out a slot just smaller and as long as the tang of the blade, then hammered it on with a mallet. Very tight fit, no shaking at all and the blade is straight out of the handle.
I'm hoping to get some belts for the belt sander that are meant for grinding, and then I can polish my blade up a bit. Is there any disadvantage to using a 6X48" belt as opposed to one with a 2" width? Thanks for your time. -
I don't know how keen people would be about giving away trade secrets, but I think a great blueprint idea would be how to make the furniture for, and assemble the handles for knives, because these are beautiful works of art, and the handle is the part of a knife that I do not know who to craft.
-
I've always spelt it fonix
-
I'm going to do a variation of the hairstick design to make small roses for my female friends, no idea what for the males though.
-
a new powerhammer. The only problem let is that...
-
Although still a fedral offense, I have taken railroad spikes from railways that are no longer used. That waym if something happens to the train, I won't feel guilty about possibly being the cause.
-
I actually cancelled that order and bought this Paul Chen broadsword instead. It looks to be of better quality, and made from a Carbon Spring Steel.
http://store1.yimg.com/I/greatsword_1866_10773037 -
Well, my Mom find my weapons...distasteful. She does't like them just being out and lying around my room, so my Dad and I are going to be building a cabinet with a clear front to house my collection.
Rantalin
in Introduce Yourself
Posted
Hello, My name is Dan, I live in central Massachusetts, and I've been blacksmithing for about 6 months now. My forge is modeled after Tim Lively's forge, as can be seen at http://64.176.180.203/washtubforge.htm I am 19 years old and a student at UMASS Amherst. I was a mechanical engineering major for a year and a half, and have now switched to a history major. I am planning on focusing my studies on pre-1800 european and japanese history. I am a hobbyist smith, when I find time to get out to the forge, and am still improving my abilities every day. I enjoy the craft very much and hope to continue throughout my life.