james austin
-
Posts
35 -
Joined
-
Last visited
Content Type
Profiles
Forums
Articles
Gallery
Downloads
Events
Everything posted by james austin
-
Homebuild Treadle grinder questions
james austin replied to james austin's topic in Grinders, Sanders, etc
Wow! Those grinders are huge! The scale is totally deceiving, I thought that 2’ scale was a bit of wire at first. -
Homebuild Treadle grinder questions
james austin replied to james austin's topic in Grinders, Sanders, etc
Yeah filling the tire seems like an easy thing until it gets to the last bit. I was thinking clay around the inside of the rim. I figure I could run a fat coil around the rim, then spin the wheel and throw it like centering a pot on a wheel. It’s possible that this is one of those things that sound better in my head than it turns out to be. I think the next step will be to put a second wheel on there. That will add weight and give me a second grinding option. And it will give me some time to think about the flywheel. -
Homebuild Treadle grinder questions
james austin replied to james austin's topic in Grinders, Sanders, etc
Yeah, the truing and balancing is the thing I I worry about with adding weight. I wondered about tire weights, but honestly don’t know much about them, and just assumed they came individually. I’ll look around and see if the strips you mentioned are available cheaply online. I’ll definitely be adding a wheel to the other side, but can’t quite decide what it should be. The one I’ve got is a soft 100 grit alox wheel, so I think I want something more aggressive. and no worries about the ramble. Y’all rambling is one of my favorite parts of this forum. I’ll also look out for split shot lead. Balancing with the axle on end also sounds like a great trick no matter how I get weight added. -
Homebuild Treadle grinder questions
james austin replied to james austin's topic in Grinders, Sanders, etc
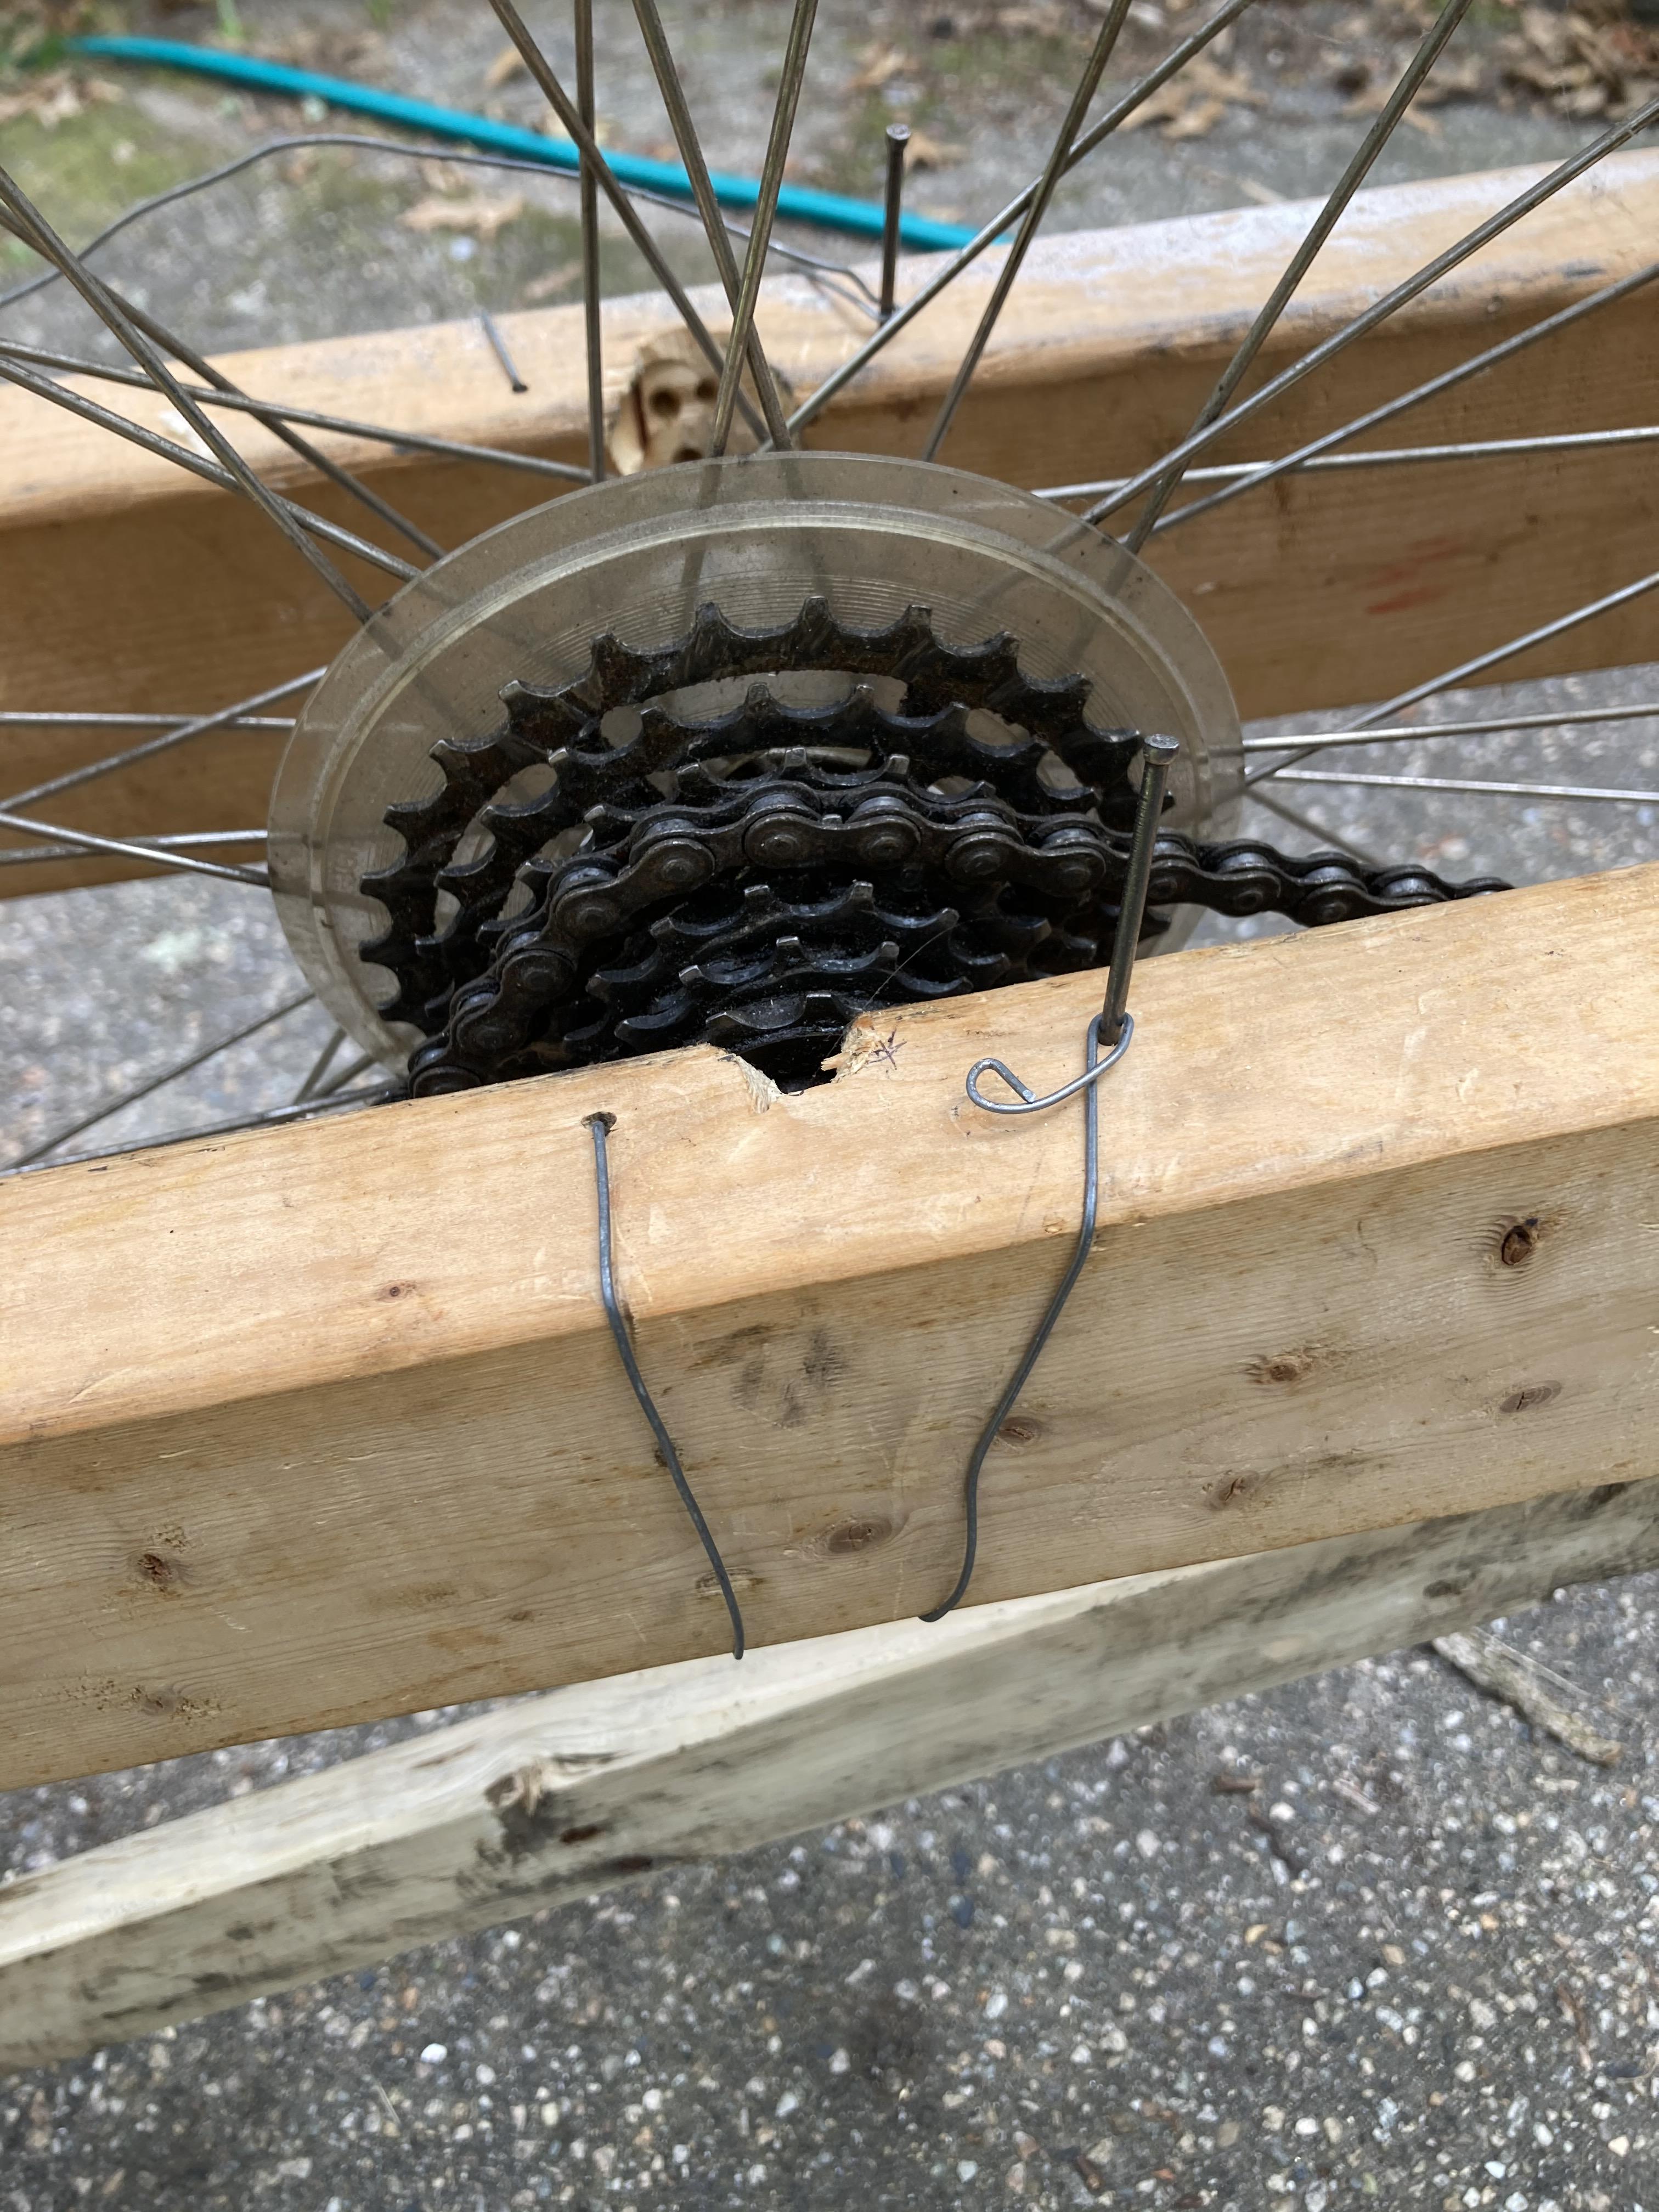
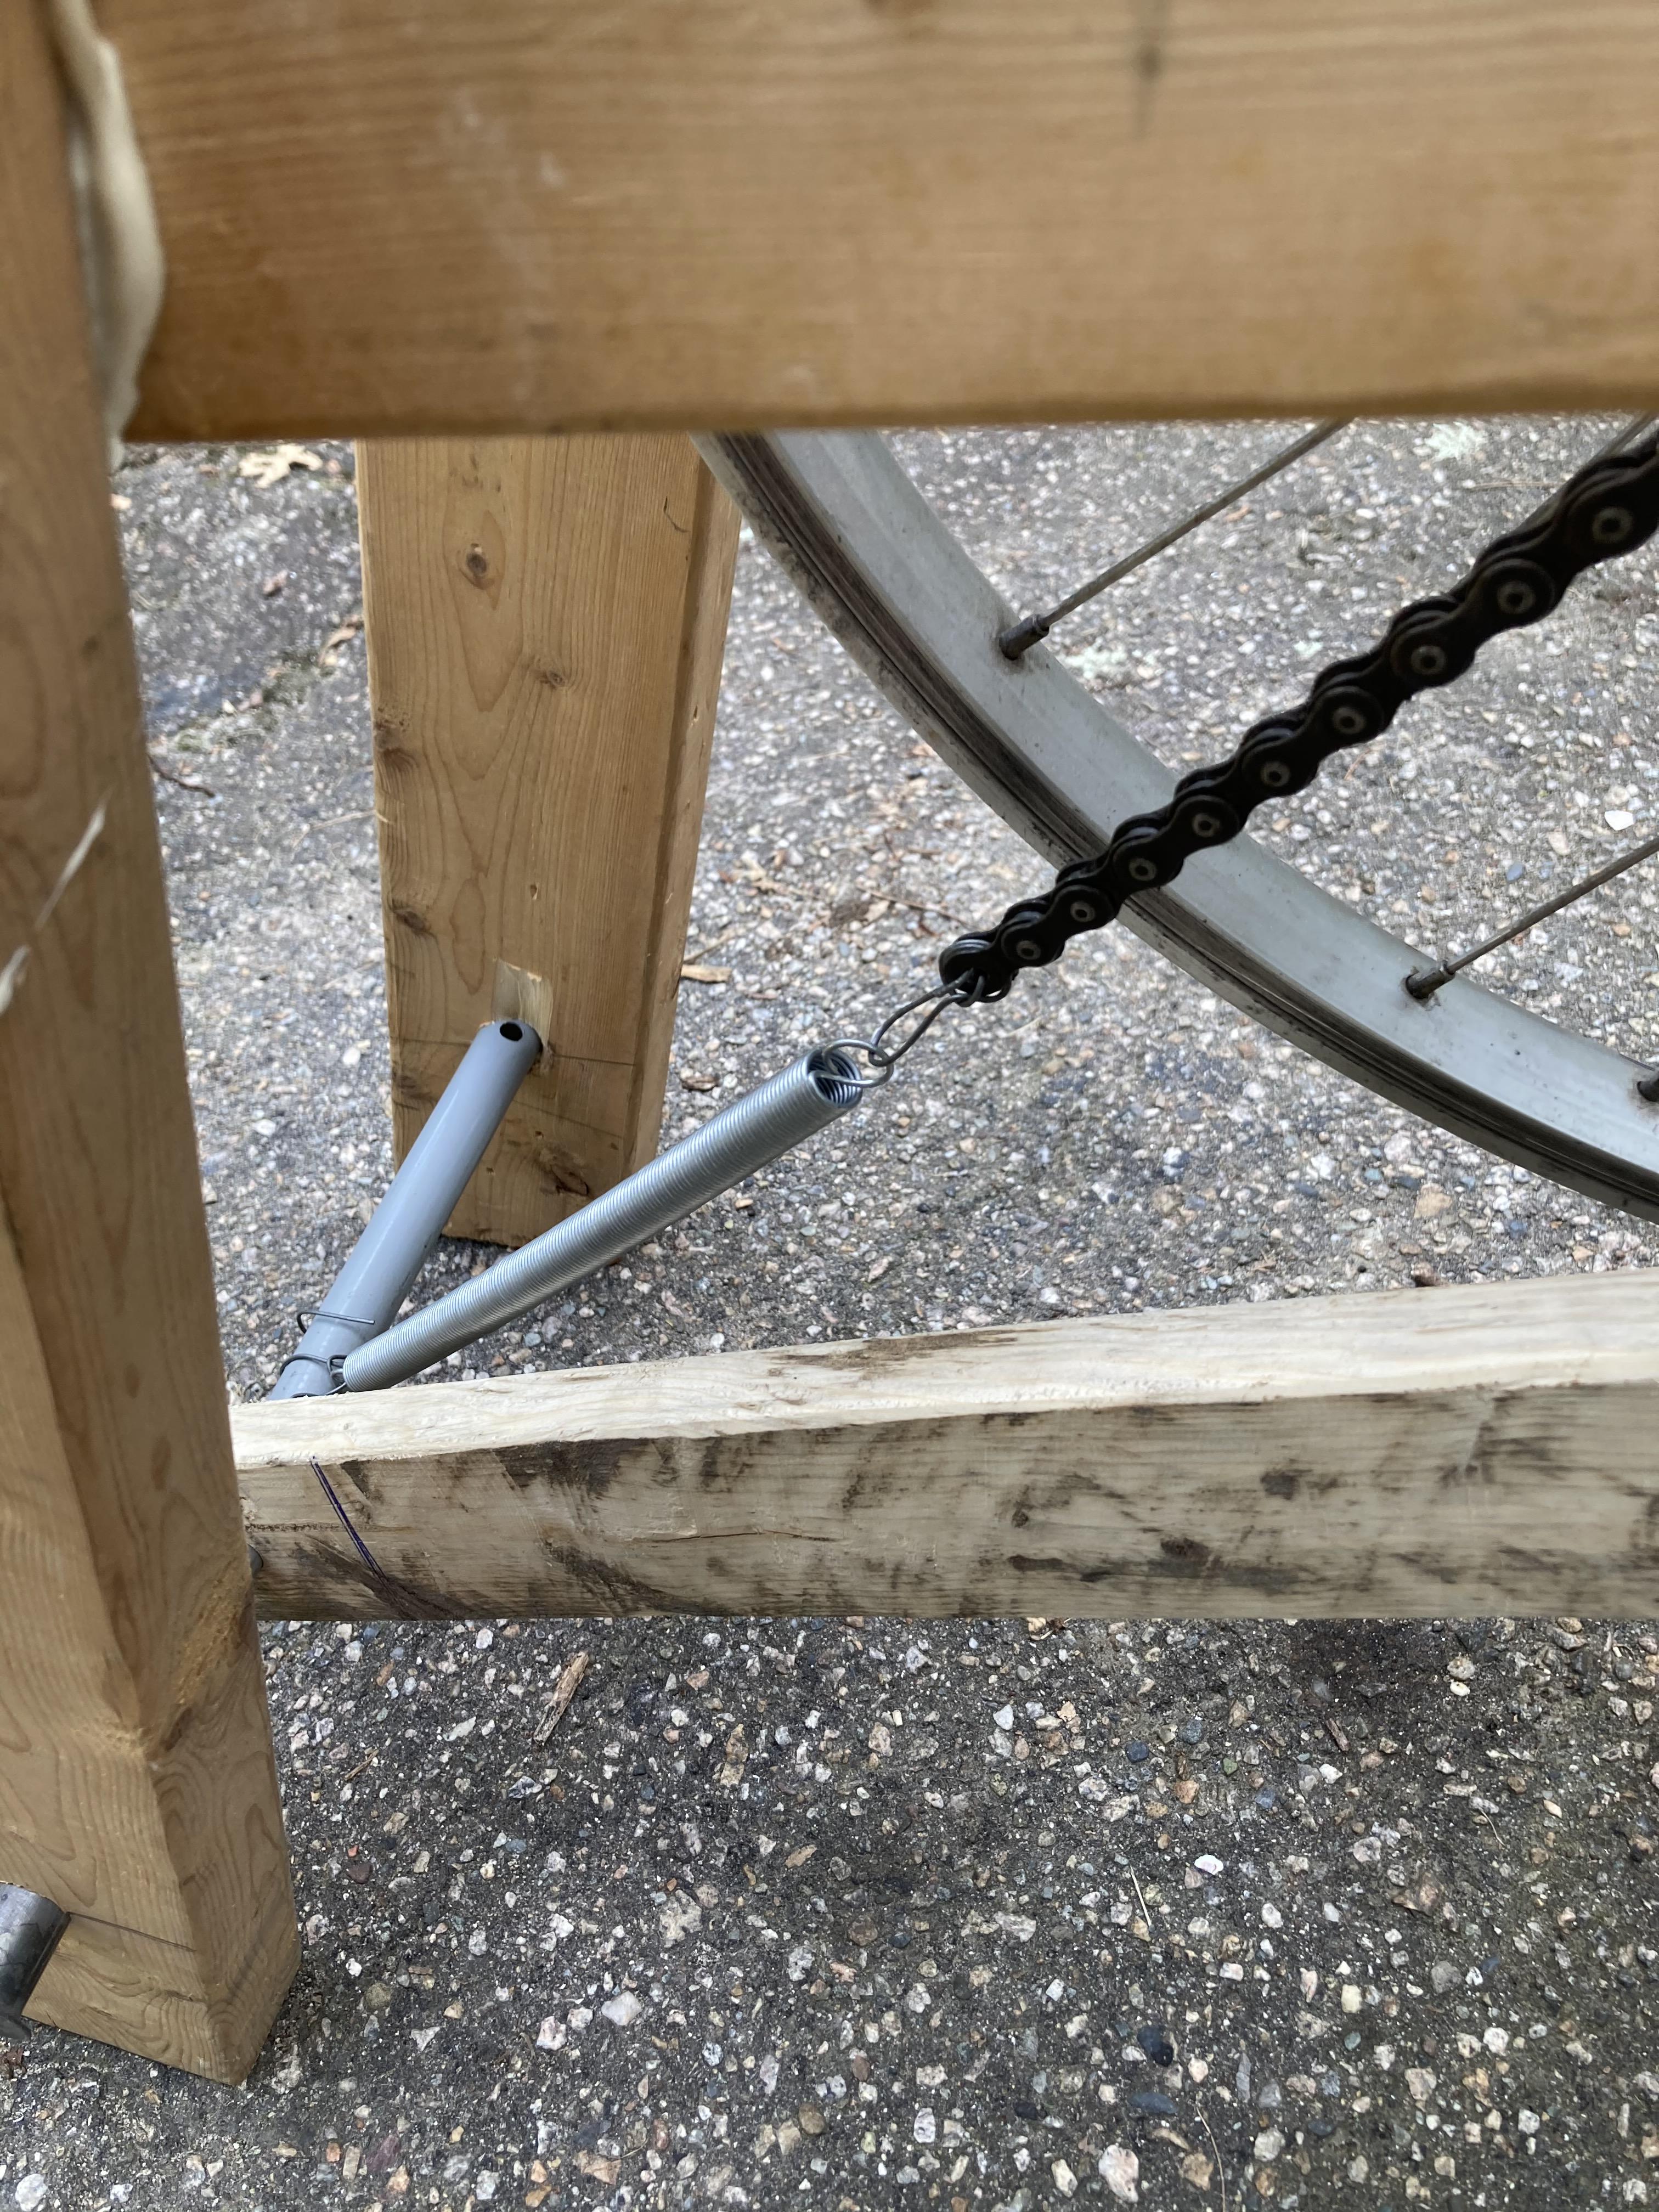
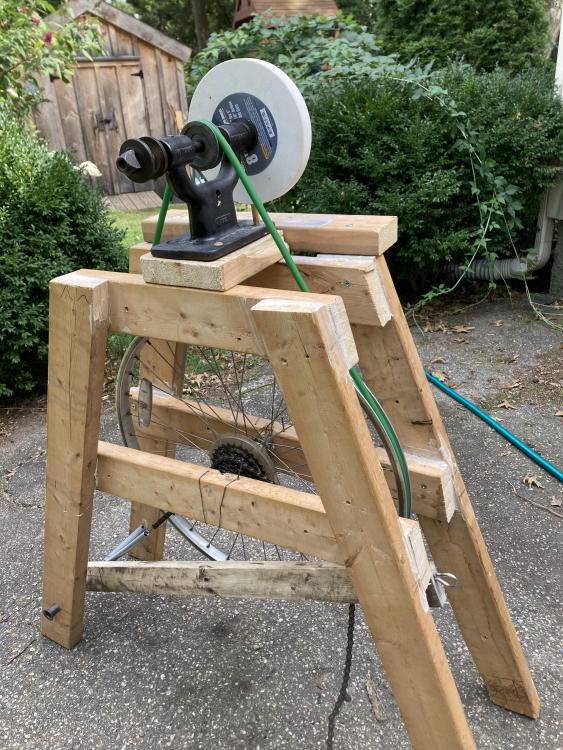
Scraped together enough time this week to get this thing working. Stone and drive belt came in Monday, but of course I ordered the wrong arbor size. Got a 5/8, when I needed a 1/2. Night the cheap wheel too so no adaptor bushings. Found a spacer at the hardware store and just filed it down right on the arbor. No slop at all now, and the wheel runs nice and true. Once that was finished I welded up the drive belt. And had to tear off the cross brace connecting the two sides to install the closed loop belt. I think I will need to add some sort of hinged brace on the short ends but I’m still thinking through that all. the belt was set pretty tight, so I had to wire the axle down. the chain is just wired to a treadle arm. I used a small spring instead of a bungee. Frosty you were absolutely right about the live treadle. It is totally intuitive, and works great. There are still a few jobs to finish, but she spins fast enough to throw sparks while grinding. Thomas, I am planning on adding weight to the flywheel, although I was surprised at how much difference the grinding wheel made to the inertia. It gives me some hope it won’t take a huge amount of weight to keep the system going. At the moment my plan is to work a fat roll of clay/adobe up under the rim, and inside the spokes. I’m not sure it will hold though, so if anyone has suggestions I would love to hear them. im also planning on making a ~12”x2” disc out of MDF for the other side, which will add a bit more rotating mass. I’m still thinking of gluing on abrasive cloth and maybe a disc on the face.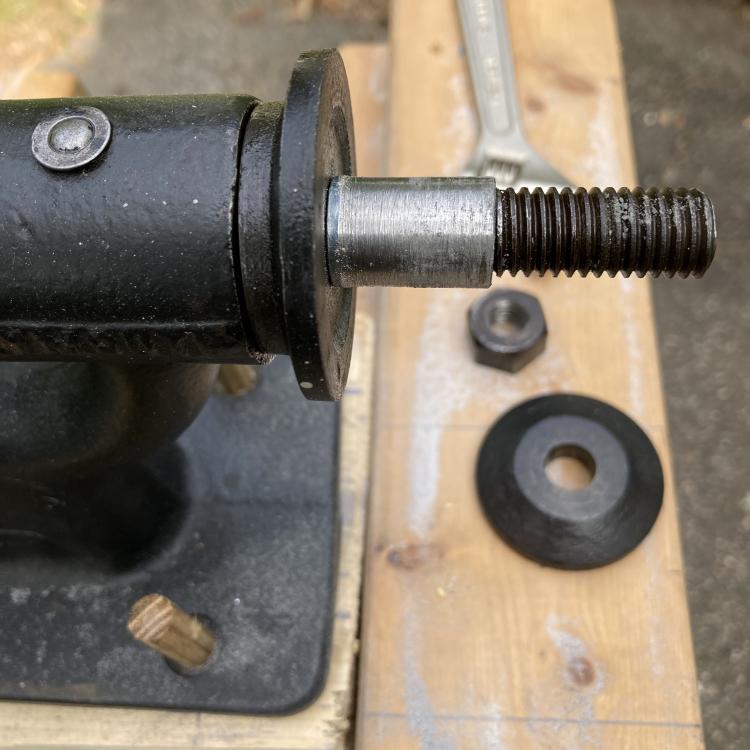


-
Homebuild Treadle grinder questions
james austin replied to james austin's topic in Grinders, Sanders, etc
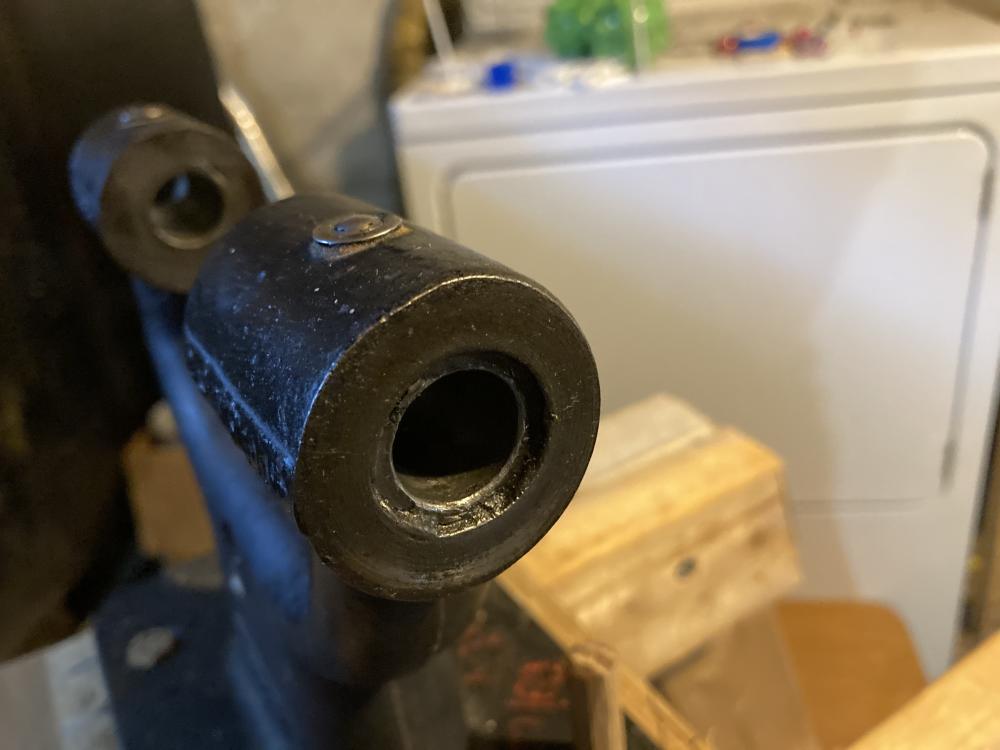
Thanks Irondragon, these really threw me off. I’m not sure I’ve ever seen oil ports like this, and just assumed grease and roller bearings. Oil sounds like it won’t be too hard to manage. Now to go read up on bushings! thanks again -
Homebuild Treadle grinder questions
james austin replied to james austin's topic in Grinders, Sanders, etc
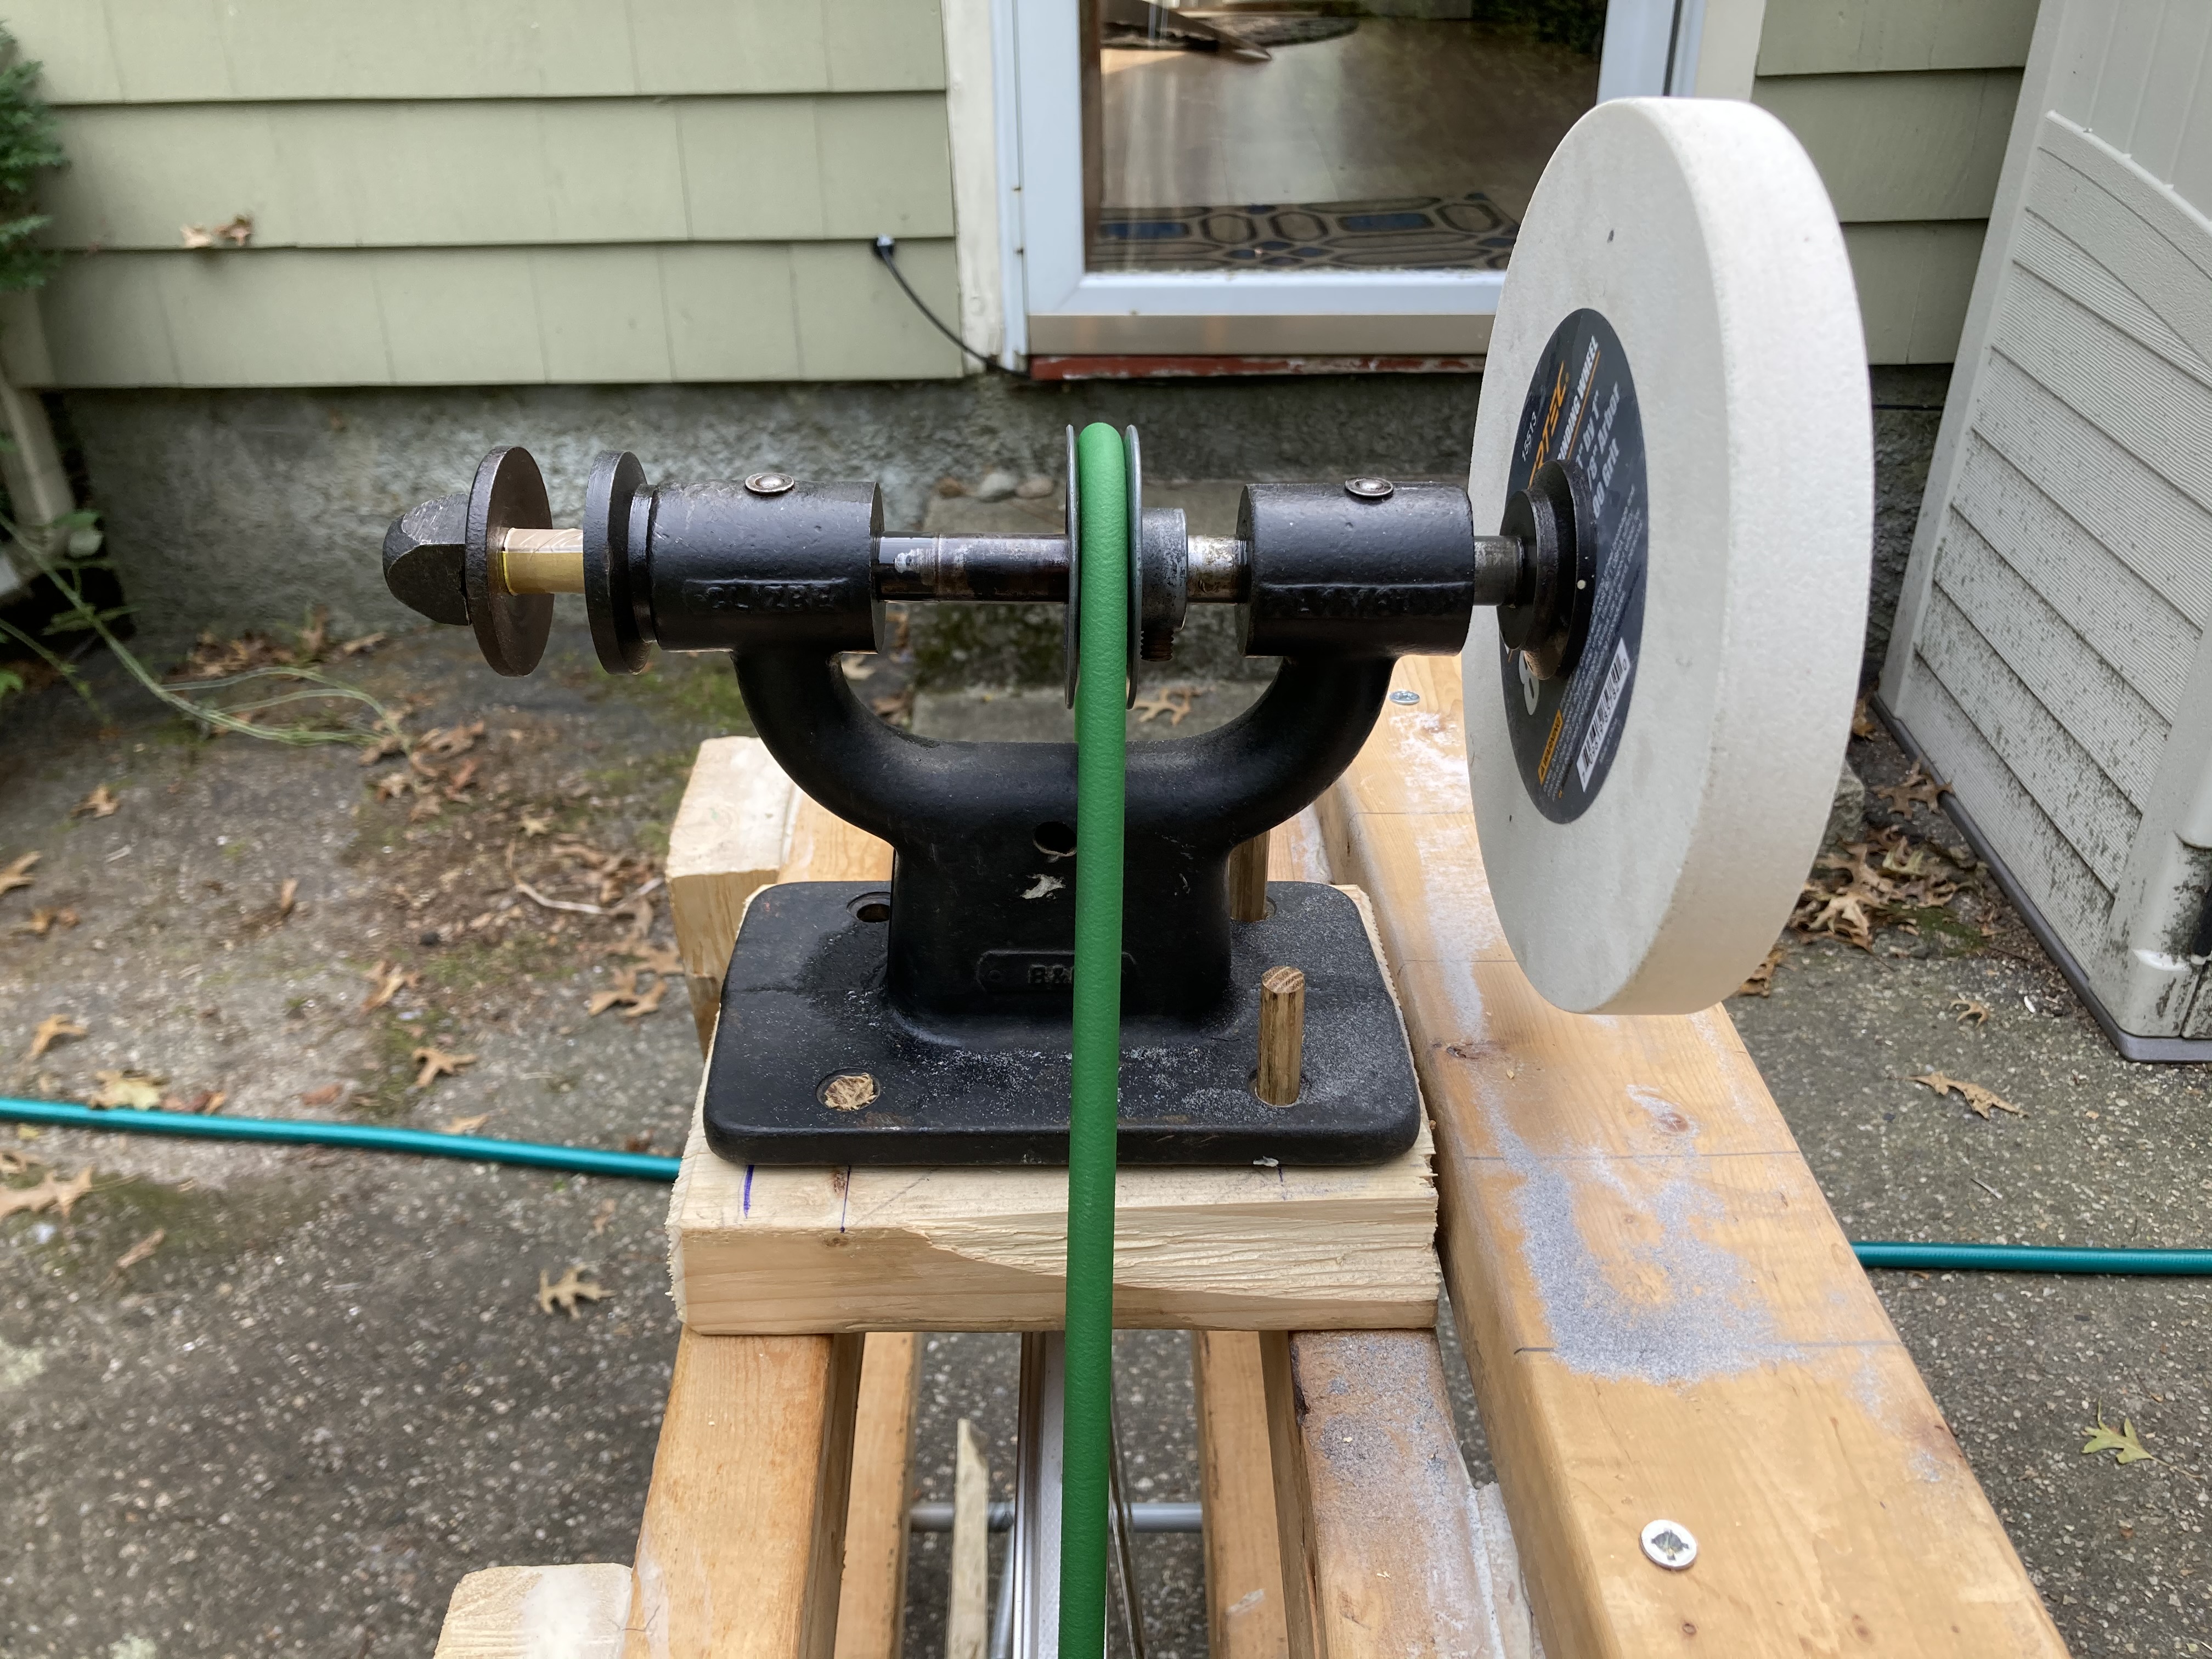
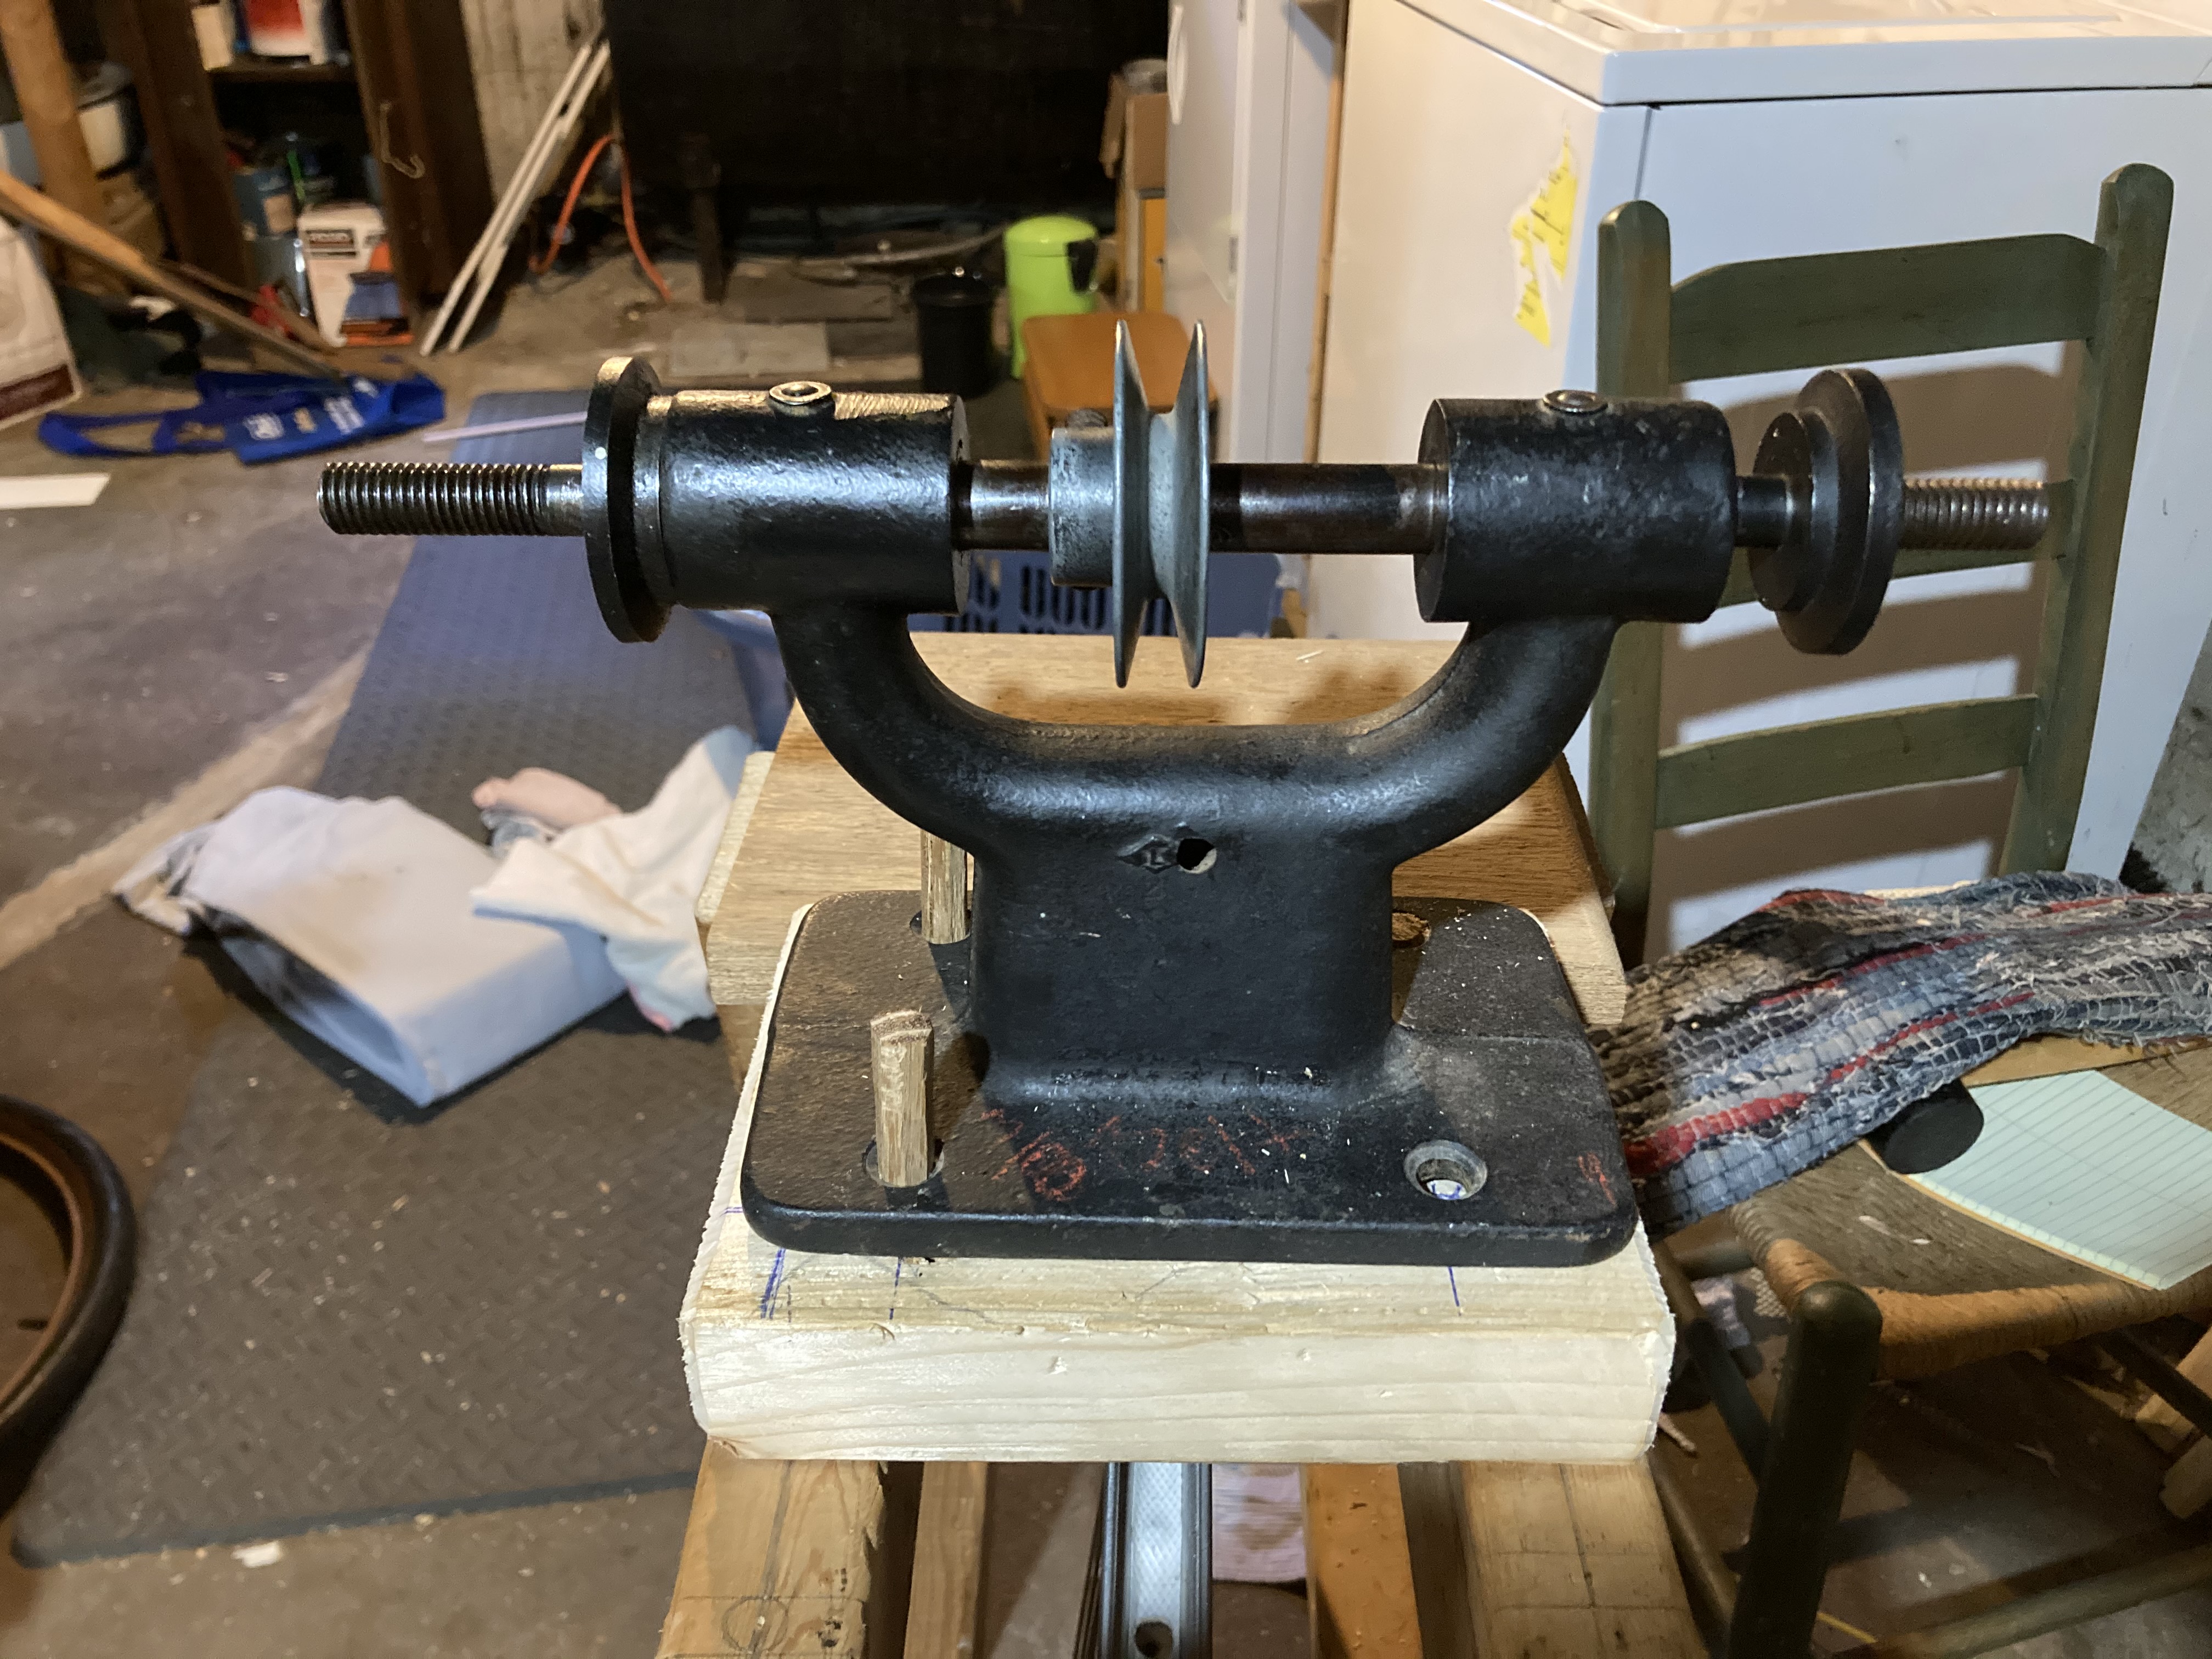
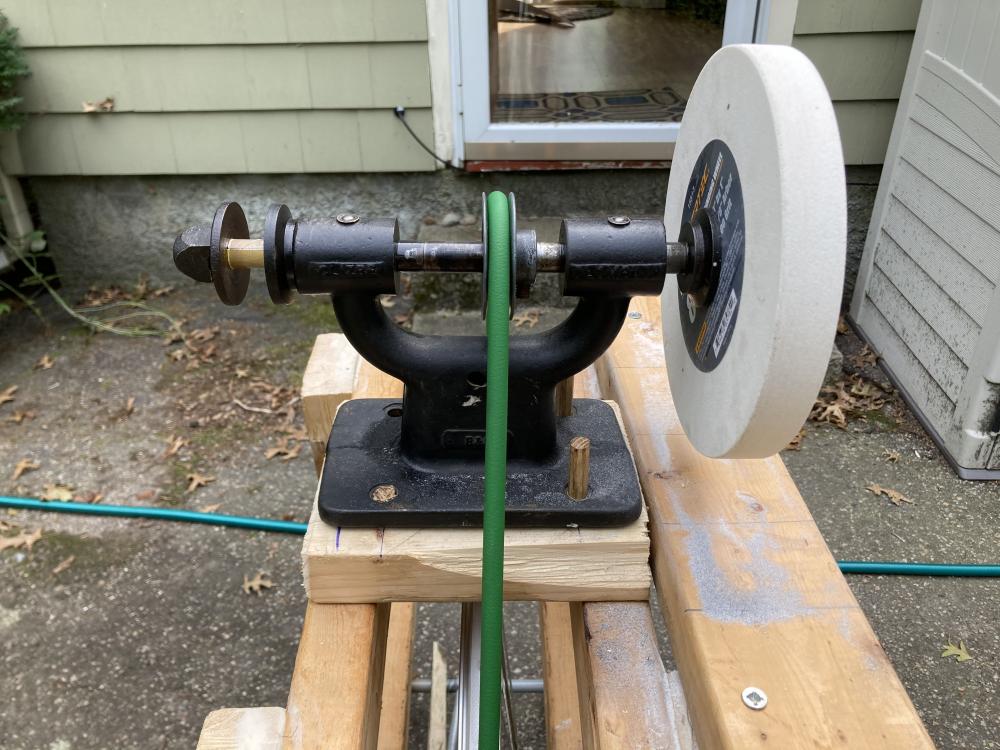
trying again with the photos side view of grinder grease? Ports Front view overall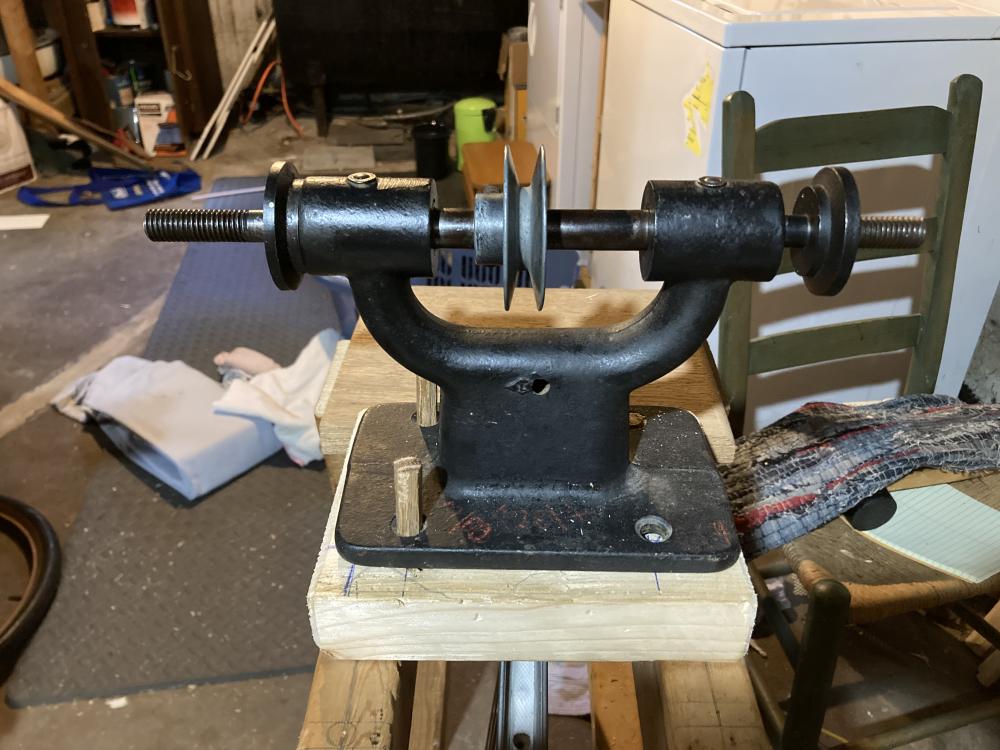
-
Homebuild Treadle grinder questions
james austin replied to james austin's topic in Grinders, Sanders, etc
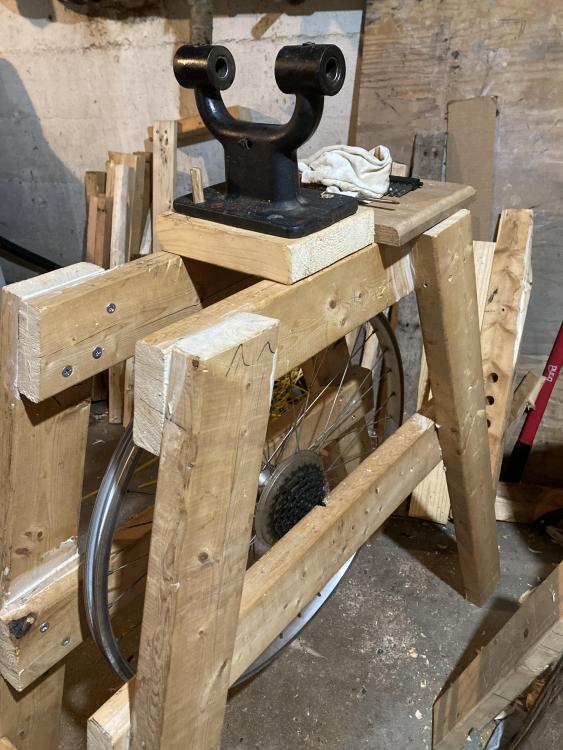
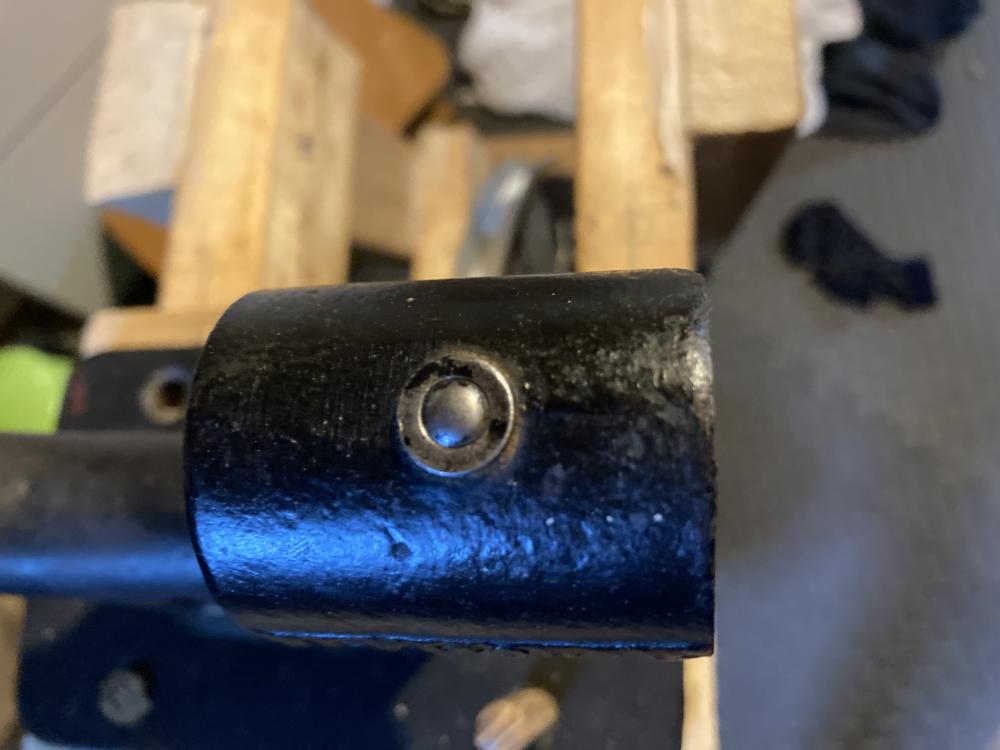
Hey yall, been a while since I've had any time to even think about building anything, but lately things have eased up a bit at work, and I've had some time back to myself. I thought I'd post a bit of an update on this project, and I have a more questions, which I will leave at the end. Spent the last weekend trying to build some of this out, and have the basic frame together now. I ended up putting the big wheel grinder on hold for now, and instead worked up a version of the grinder Michael posted up thread. I'm planning to put the treadle together this weekend. The structure is just some 2x that was left over from something, and the grinder came from a local tool consignment shop. Rather than run the spindle by friction on the tire, I am planning on just running a round belt on the bare rim up to the pulley on the arbor. I spent some time today cleaning up the arbor, and flanges, and what I thought were bearings, but on removing the arbor it appears that maybe they are bushings? They don't move at all, and the little oil or grease port at the top goes straight through. Did these types of grinders use bushings? In any case what would be the correct way to lubricate this? do I need a grease gun? will just a squeeze tube work? Hope folks are doing ok out there! Bad links removed -
Another JABOD forge build
james austin replied to james austin's topic in JABOD - Just A Box Of Dirt
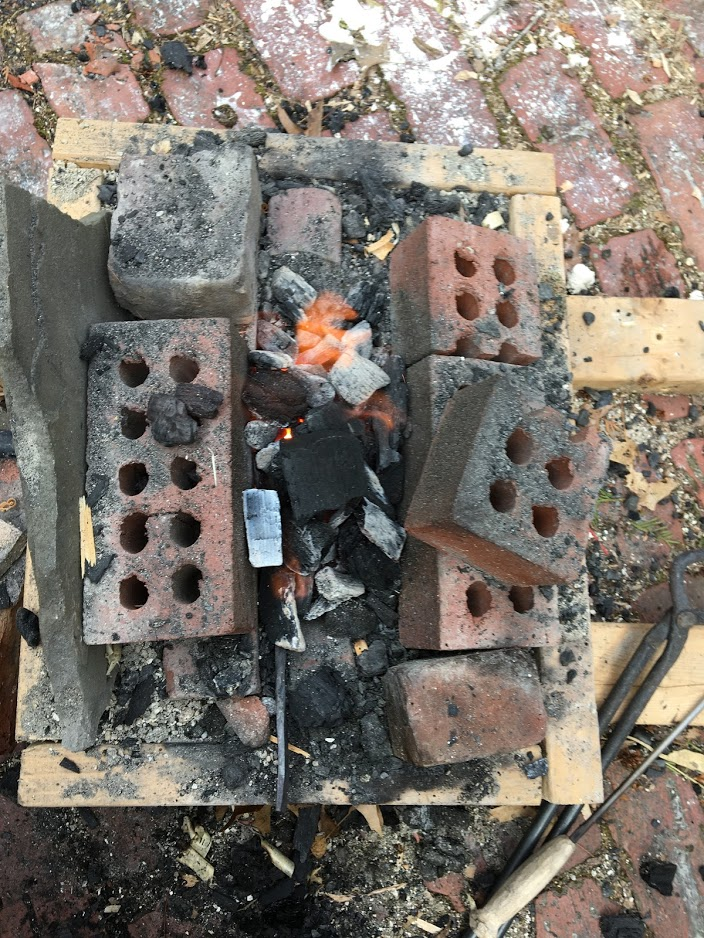
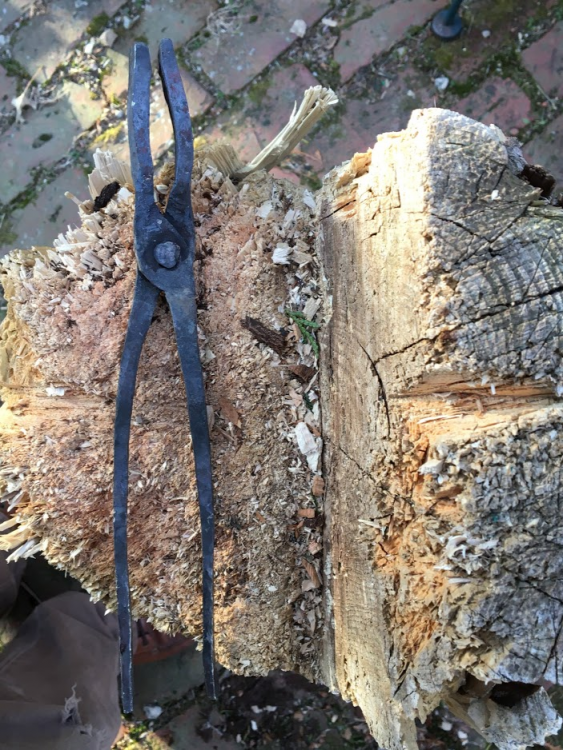
Forge has been running pretty much as well as I can make it run. I'm still getting a feel for fire management, but it is getting better. I've changed the firepot around to lean the side walls out at an angle, which really moves the dimensions back to what Charles Stevens recommended to me in the beginning... Sometimes we have to make the mistakes for ourselves. Fuel consumption is still pretty low; a handful of charcoal every other heat or so. I've also started sifting the charcoal a bit, to get most of the fines out. Save some for punching like pnut suggested, but mostly just going into the compost heap to feed the gardens. I think that made a big difference in my ability to get air through the whole fire; seems like all the powder kind of clogged everything up. Managed to mostly finish a set of flat tongs as well, although they still need to be adjusted and cleaned up. Just made from flat bar with twisted jaws. I expect they are made too light, but they should serve for now. First project finished at home on my own, so pretty exciting, even if they are pretty wonky. Made the punch and drift on the spot too from an old reamer shank i picked up somewhere in a past life.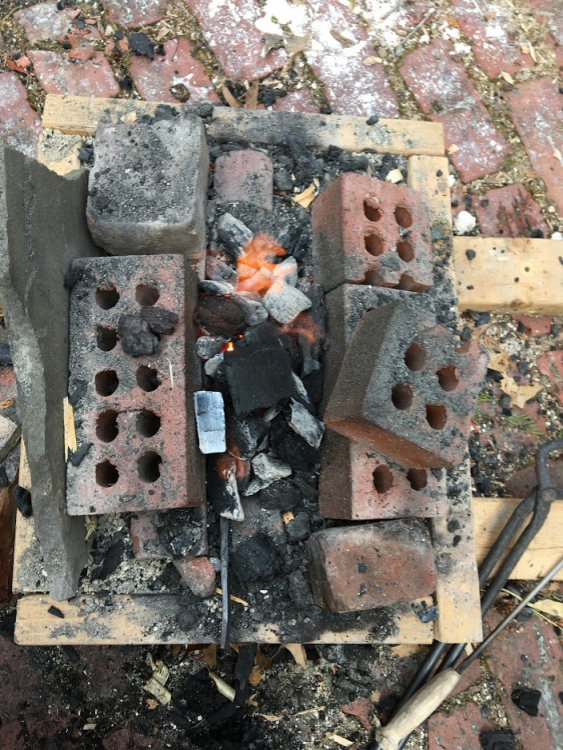
-
Homebuild Treadle grinder questions
james austin replied to james austin's topic in Grinders, Sanders, etc
Ha! Frosty your taking me back to middle school! I can still remember a whole unit on gear ratios, and the workings of a mill, which ended with a field trip to Slater Mill here in Rhode Island. I spent probably a month solving gear ratio and transmission problems. Still remember that as one of the best science projects I've ever done. Also I finally found some time to look up Practical Blacksmithing which Thomas gave earlier in the thread, and there is indeed a whole chapter in Volume II dealing with making "emory wheels". There are some interesting ideas or gluing abrasive to wooden wheels using a variety of substances, as well as some good info on hanging wheels as well. Thanks for the recommendation Thomas! I can tell I've got some time to spend with that series. -
Homebuild Treadle grinder questions
james austin replied to james austin's topic in Grinders, Sanders, etc
That is an awesome grinder Michael! I thought for a while about something like that. even went so far as to buy an arbor to run wheels on, but I never quite sorted out the mechanism to treadle it. I like this because you don't even need to modify the wheel just mount it to a frame. Is the chain return just a bungee cord? Fowllife: I chose MDF only for its weight and route-ability. So far I haven't been able to find anything that is as heavy, and as easily workable as MDF. I think there may be a good argument for casting it in cement or similar, but I'm not as confident in my ability to cast a true and balanced wheel. I had been wondering about sealing the wheel somehow, but figured I would get to that when I had the thing glued up. Guess I should give that some more thought as I am collecting materials. Thanks for the tip! -
Homebuild Treadle grinder questions
james austin replied to james austin's topic in Grinders, Sanders, etc
poking around tonight and found an old Popular Science Monthly article on casting a cement flywheel to use in building an “amateur lathe or any other foot-power machine”. oct 1919 i really love old magazines! -
Homebuild Treadle grinder questions
james austin replied to james austin's topic in Grinders, Sanders, etc
Bacon for bearing lube. Man I can only imagine the smell around town on a Sunday after church! i have been meaning to start checking the salvage yards anyway looking for some springs, so I’ll add axles to my list. and start reading up on wheel bearing assembly... Filling a tire with cement really does seem like a good idea in a lot of ways. Lots of weight, all way out at the edge of the wheel, prefab mounting system. You’d need to make some kind of mount for the end of the shaft, but I suppose you could take the whole rear wheel/axle assembly, though maybe there’s more involved there that I think. -
Homebuild Treadle grinder questions
james austin replied to james austin's topic in Grinders, Sanders, etc
Charles, I think that grinder is also one of the inspirations for this machine. I’ve thought about using bike gears for this but it adds a lot of complexity to the build. I may still though. I’ve got all the parts lying around. I haven’t had the opportunity to try an original stone Thomas. I spent most of the fall on Craigslist and the local flea markets but not been able to find one in decent shape yet. I am hoping to be able to build this do about the 75-100$ that one of the stone wheels seem to go for. I spent some time yesterday figuring possible weights for different diameters. Frosty got me thinking about existing belt sizes too. Looks like a 42” wheel should just about fit a 3x132 belt, which seem at least somewhat common and could still use shop roll. Looks like it would weigh in around 115lbs. This is one of my big gaps here, I don’t really have a sense of what is silly small, would 3/4” sound more reasonable? 1” to be safe? thanks again for the help everyone! -
Homebuild Treadle grinder questions
james austin replied to james austin's topic in Grinders, Sanders, etc
Hey thanks for all the ideas folks! Frosty: making the wheel to fit a 2x72 belt was my first idea, I decided I wanted as much weight as possible, but a 2’ OD wheel seemed like a better use of 4x8 sheet goods. I think a steel wheel would be great for weight, but I haven’t got access to the cutting, bending and welding equipment. I can borrow pretty much any woodworking tools from my dad. i like the idea of mounting the axle on one side of the wheel, but I don’t know how strong an axle is needed for that. Seems like it would be easy to bend. What size axle would you recommend? All the comments on weight make me wonder if I should increase he size. Going to a 3’ wheel would get me up around 75 lbs. 4’ would still come out of two sheets of MDF. Still not sure of a shaft size for any of these though. I’ve gone back and forth between using existing belts, and stick on rolls. Belts would be easier to get in variety, but need an open side on tv e wheel for install/removal. Rolls would be easier to apply, but are expensive, and I haven’t found nearly the variety of types, particularly ceramic abrasives. All I get for cone lock wheel is a type of nut. Are there premade wheels they go to? Looks like a good way to attach the wheel to the shaft in any case. I was thinking of using some sort of collar & set screw to secure the wheel -
Homebuild Treadle grinder questions
james austin replied to james austin's topic in Grinders, Sanders, etc
That's good to know Thomas. I was under the impression that they could be used for a bit of both. I am planning a bit more than just touch ups, but not really extensive grinding. Thinking of analogous power tools, I was thinking more of a Tormek than a belt grinder. I was hoping that the larger diameter would give more surface speed, and work a bit faster, but mostly I'm interested in using grinding jigs like the tormek, and wolverine fixtures. -
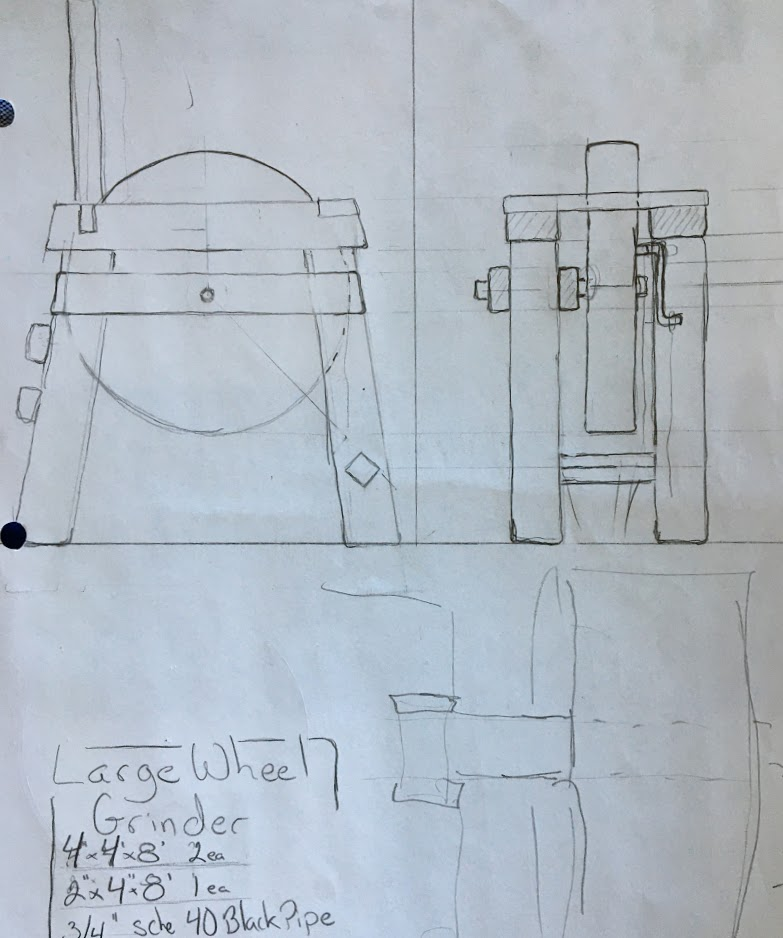
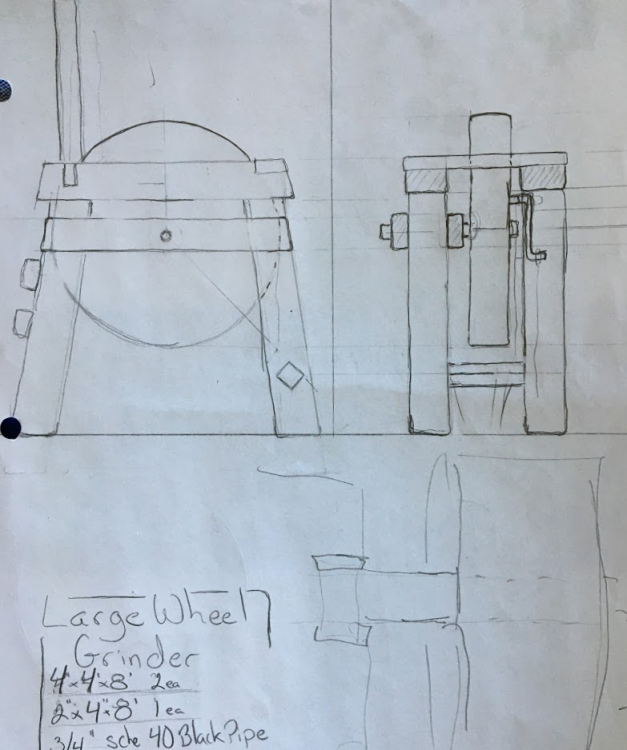
Hi All, I've been thinking for a while about building a treadle grinder for myself. I really like the look of the old sandstone treadle wheels but I've read that they are quite slow grinding due to fine grit. I've not been able to find any large new wheels, and the antique beasts have often been sitting in a garden for a decade or so, and don't really look like much fun to true up. I've found a couple of versions with wooden wheels that seem to work reasonably well, so I thought about it for a while and sketched up some plans. I'm planning the wheel to be laminated from MDF board 4" thick, with a 24" diam. I think this works out to be about 40-50 lbs. The drawing above calls for an axle (or spindle?) from 3/4 inch black pipe, but I realized after the fact that they don't make bearings to fit, and I don't have any way to turn down the OD to fit existing bearings. I was thinking that 5/8ths 1045 turned and ground stock would make a good alternative, and I can get bearings to fit. I'm planning on using pillow blocks for the bearings to limit the amount of precision drilling required. I'll be using either adhesive backed grinder belts, or plain ones with double sided tape for the abrasive. I wanted to check on a couple of things before I start ordering materials. First is there a better wood material to build the wheel from. I'd picked MDF due to what I thought was a higher density than real wood, but perhaps there would be a better material (i.e. heavier). Secondly I wanted to make sure that 5/8" 1045 will be strong enough for the spindle, which will also need to double as the crankshaft. Or maybe 5/8 is overkill? Apologies if these are obvious questions, but I don't really have a good handle on materials specs for things like this. Sources https://www.youtube.com/watch?v=F06VMPmzZCg https://www.youtube.com/watch?v=cDeoCNRuKOk
-
Another JABOD forge build
james austin replied to james austin's topic in JABOD - Just A Box Of Dirt
I'll have to look into a way to sieve the charcoal somehow. I had an older bag of charcoal that had gotten broken up a bit more and that worked pretty well, but it also included a huge quantity of powdery stuff. I know there are ways to use coal fines, is there anything that can be done with charcoal fines? -
Another JABOD forge build
james austin replied to james austin's topic in JABOD - Just A Box Of Dirt
Just a quick update. Had the forge out for a couple hours this weekend. It worked pretty well. Definitely gets steel hot; I had the bricks glowing orange by the end of the first hour. Sort of developed a rhythm somewhere of adding a handful of charcoal before pulling the bar out to hammer on. I did struggle to get longer heats on the metal, mostly working 2-4 inches at a time. This worked pretty well, but I think the narrowness may have stopped the fire spreading so much in length. I think the brick walls could be a bit stronger. they had a tendency to shift around while moving the charcoal or inserting the bar, which made keeping a good stack of coals harder. Not a lot of work accomplished over the two hours, mostly due to inconsistent heat/fire management. I'm still getting used to using a sledge rather than the London anvils we had in class. I should have a better stand for that by next weekend. I'll definitely start looking into a cover; I probably have some plastic tubs around already. Carrying this thing up from my basement is already getting old. Thanks everyone for the suggestions!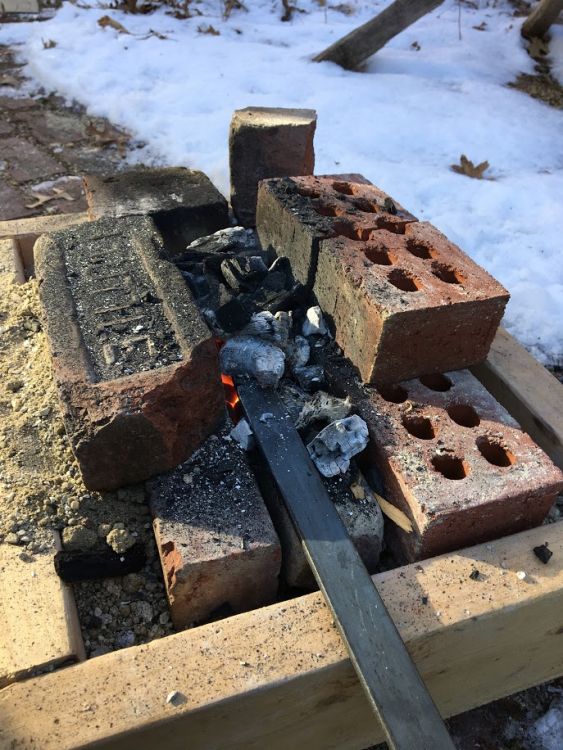
-
Another JABOD forge build
james austin replied to james austin's topic in JABOD - Just A Box Of Dirt
I'm not sure such a narrow trench will work, but It seemed worth a try. I left most of the dirt fill pretty loose at the moment expecting to want to rearrange the fire as I learn what I'm doing, and if this is a mess it'll be pretty easy to move it again. Your use of the dry kitty litter gave me the idea. The version above the firebox was really only 4 inches long, and only really seemed to heat about 2 -3 inches of steel at a time. One of the things I promised myself with this project is that I won't try to get everything right the first time, but rather try to do something, and improve on it as I go. I'm still hoping to get this version lit on Saturday morning before we get snow. On a related note, how do these forges survive outside in the weather? at the moment i'm keeping it inside, but the weight adds up quickly, and i'm not really thrilled about carrying this around. Should I make a cover? would just a bit of tarp work to keep the worst of the rain or snow? Just stop worrying , and learn to love the bomb? -
Another JABOD forge build
james austin replied to james austin's topic in JABOD - Just A Box Of Dirt
I'll be curious how that goes pnut. I had an hour last night, so I dug out the bricks started over. Thomas' comment about needing a fire to support MY work was kind of a face palm moment for me. I realized that everything I want to make is long and skinny, and I had built a small square forge. I converted to more of a trench style as well, only about two inches wide but 6-7" long. I'm hoping this will keep fuel use down still, but give me a longer hot spot in the fire. No pictures at the moment as my basement is a dark hole in the ground, but I'm hoping to fire it up this weekend. So true. I always struggle with this, and steel always seems to go so slowly. -
Thanks! I’ll give it a try once I can get that clay softened up a bit.
-
Well I guess I’ve just got to make some bricks now... Irondragon: when you say 2:1 is that by volume or weight? My father just reminded me this evening that I’ve got 30-40lbs of clay in their garage left over from college, and I’ve still got sand around from other projects.
-
Thanks! I was probably just going at it too hard. I'm more used to working clay before it gets fired.
-
Another JABOD forge build
james austin replied to james austin's topic in JABOD - Just A Box Of Dirt
Thanks Thomas and Charles. The frame is 2x6, which is probably still on the edge of too small; I did get pretty close to two inches of adobe in the bottom layer. I am still planning on building up small walls on top of the hearth with a couple of bricks. I'll try smaller bits of charcoal next time. I think my main problem may have been not enough charcoal over the hearth. I got pretty good heat if I angled the metal down a bit into the hearth, but I understand that isn't great practice. Sounds like fire tools will be a good project to practice on, and get some experience with the fire. Thanks again -
How did you cut the notches in your bricks? I tried just chiseling off corners, and ended up with broken bricks, but you have a nice clean hole through the two of them...