

FatFrumos
-
Posts
23 -
Joined
-
Last visited
Content Type
Profiles
Forums
Articles
Gallery
Downloads
Events
Posts posted by FatFrumos
-
-
6 hours ago, Frosty said:
Have you contacted Gesswein? Youtube isn't a very good place to learn a craft if you don't have at least a basic grounding. It takes knowledge to sift the good from the bad and dangerous.
It depends. If a person just says something on youtube it's one thing, but if several people on different channels are actually using beveled grinding stones to good effect on video, it's a good signifier that it can be done.
QuoteNot that I don't want to help but I'd have to contact the maker to find out what kind of stone was used and what to use to bevel an edge. I suppose there are plenty of options but . . .
I suppose I will do that. But I thought that since this is a knifemaker's forum, someone here might have dealt with it before.
-
I bought myself a set of Gesswein polishing stones to try them as a replacement of sandpaper for polishing the blades. When they arrived, they were of a standard rectangular shape. However, in all youtube videos demonstrating their use one end of the stone was beveled on one or both sides. As a result, you would get a contact patch of a specific size and would have to hold the stone at an angle to the blade to apply it to. I hope that makes sense. My question is - how does one go about creating this bevel? Is there a preferred way or should I just take it to the grinder or a file?
Thank you!
Luka
-
6 minutes ago, Frosty said:
I'm looking at a perfect opportunity for easy replacement. Make a two part mold with the tang laying on the parting line between cope and drag. Cut the old one off and clean up the tang. Lay it in the mold and pour aluminum for your new pommel.
Hmmmm?
That sounds extremely interesting, but I have never done molding, neither do I have tooling for holding liquid aluminum. One day, but probably not now.
6 minutes ago, Irondragon Forge & Clay said:I have one and there is a small pin holding the pommel. You may have to polish it a little to see it.
Good thing I asked. I guess it got hidden by all the scratches and small dents. Thank you!
-
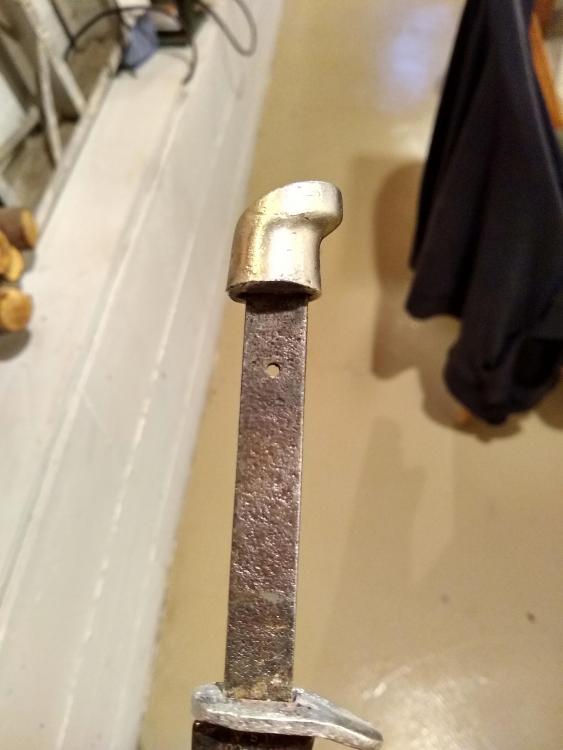
I don't think there is a cross pin, unless it had been blended very well. I'll look again. As to heating up, I was doing it to break up the structure of old glue. But you are right, I can probably try and expand the pommel. Are there any gotchas on heating aluminum with a torch?
-
Hello. I bought a nice little knife on a flea market with the intent of restoring it. It's a Wes-Cut K5 hunter, in case anyone dealt with them before. I'm stuck trying to remove the pommel - it is made of aluminum, so I have to be careful with it to avoid dents and other deformations. Looks like a narrow slot was cut in it and the tang was glued in. So far, the only two things I tried were heating up the tang with a torch to soften the glue and putting some liquid wrench in there, but it seems pretty stuck. If worst comes to worst, I will try to drill along the slot with a small diameter drill to give me a place to wiggle it off, but I was wondering if you can think of other options. Is there a chemical solution that penetrates and dissolves the old glue?
Thank you!
Luka
-
This is unexpected. Just to clarify my process - I do not use water, I use WD40 and wipe the side with acetone prior to taping it up. But I guess I won't be taping them up any more, or at least wrap them in paper before taping. But anyways, you leave, you learn. Thank you very much for your responses!
-
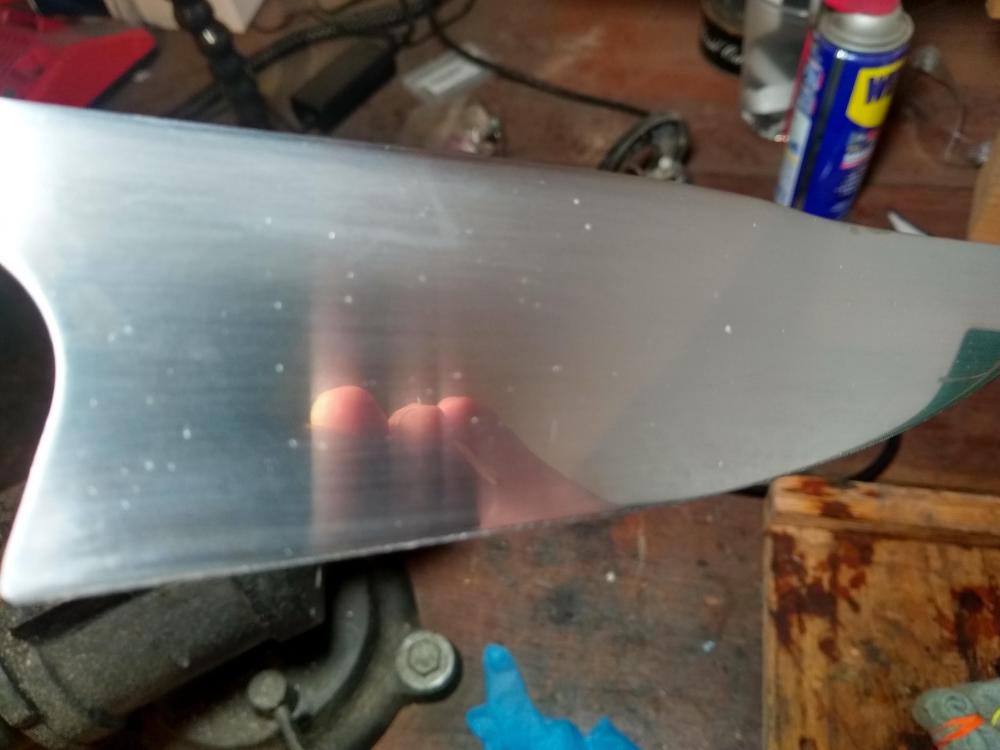
Hello. I'm finishing up my second kitchen knife. It's made out of AEB-L and I wanted to apply a satin to it, so I sanded one part down to 1000 grit, then covered it with a masking tape, flipped it over and did the other side. When I took the tape off, I discovered white spots on the blade that you can see in the picture. I tried to sand them off (but I didn't go lower than 400 grit) and wash them off with acetone, but to no avail. What can they be, any ideas? The only thing I can think of is they are gouges left by some large steel crumbs, but why are they pits and not scratches and how did they make it so deep under the masking tape? If anyone has any suggestions, I'd be very grateful.
Thank you!
Luka
-
Actually, I discovered an excellent alternative on another forum - a sawing machine LED light. They have a flexible neck, magnetic base and cost $10. What's not to like?
-
Hello. I finally got a proper 2x72 grinder. It's a lovely machine, but I realized that my work area needs to be properly and flexibly lit in order for me to see what I'm doing. What kind of lighting setup do you have on your grinder - is it a single adjustable light, multiple lights or a band of LED lights? Do you mount them on the table or on the ceiling? Do you have any tips on properly positioning the lights for the best performance?
Thank you!
Luka
-
I updated my profile, thanks for the suggestion. I'm not sure my neck of woods is where a lot of people make knives, though
")
-
-
Hi.
I've been saving for a while and it looks like I'll be buying a proper 2x72 belt grinder soon. So my question is - what kind of belts would you recommend? I'll definitely get several grits of Norton Blaze ones, because I used them on my old 1x30 and they rock. But what else should I get? My understanding is that Trizact belts are good for finishing, so I'll probably try them, but they also come in different grits, so which grits do you commonly use? Also, the name Klingspor came up a lot in my research. Is it just an alternative to Norton Blaze, just not ceramic, or do they have some other features?
Thank you!
-
Absolutely gorgeous. How did you age the copper so well?
-
I'd recommend 1080/1084. 5160 would probably work fine too, but when doing my own research I often read that 5160 works better for larger blades because this steel is very tough but the trade-off is that it doesn't hold the edge as well, as 1084, for instance. However, since we are talking about a small bushcraft knife and not a chef's knife, the difference is probably academic.
off site links removed
-
Hi. I started a build of a full-tang kwaiken, and this is the first full-tang knife I made that I'm planning to etch in ferric chloride. I was wondering what's the best way to approach handle sanding. On a regular (non-etched) knife, I would shape the handles, glue them on and sand them along with the part of the tang sandwiched between the scales. However, if it's etched and I do this, I'll end up scratching the etching off.
So far, the two approaches I thought of are:
1) Glue handles with a weak glue, shape them, sand them, take them off, etch the knife, glue them back properly.
2) Glue them properly on an etched knife, sand them along with the tang, and thus removing the etching, pour several drops of ferric chloride on the tang to restore the etching.
The first method makes more sense to me, but I was wondering if there is some other, standard way of doing something like this.
Thank you!
Luka
-
Good point. I meant between normalization and quench. Thanks!
-
Hi. I have a blade that I did normalization cycles on while heating up a forge to do a heat treat on another blade. It happened maybe a month ago and it's been sitting on my desk since then waiting its turn. My question is - does the steel structure achieved during these cycles remain the same over time or do I need to redo the normalization before HT? My hunch is that it will remain the same, but I just want to confirm.
Thank you!
-
Thank you!
-
Thanks for a detailed answer. But still, when you say "not very long" - what's a ballpark for it? A minute? 3 minutes?
-
Hello. I have a small propane forge, and so far I've been working only with 1084, doing all of my HT using magnet and waiting for about a minute after non-magnetic before quenching. I've gotten pretty good results, but I want to become more scientific about it. So I bought a piece of black iron pipe and a thermal probe to be able to control the temperature better.
Most of the sources I looked at say that I have to bring the steel to about 1500 and soak it for some time (this is where they start differing, suggesting times between 2 and 10 minutes). My understanding is that if the temperature remains around 1500, the actual time of soak is not that important because the carbon just stays in the solution. My question is - what exactly constitutes soaking time? Is it a time from the moment I put steel into the forge or time from the moment it reached austentizing temperature? If it's the latter, how long does it usually take for a room-temperature piece of steel of standard knife proportions (1 inch tall, 1/8 thick, 3-4 inches long) to go up to 1500 when surrounded by 1500 temperature in the pipe?
Thank you!
Luka
-
Thank you! I'll give it a try.
-
Greetings! First time poster here. I got into knifemaking about a year ago, have been making them after work. This is my sixth knife, that I made for my mom.
In this knife it was the first time that I put multiple brass spacers with wood between them. During the final handle polish (I went up to 1000 grit), it turned out that sandpaper works more aggressively on the wood then on the brass and so I got slight ridges on the handle where the brass is. Are there any tips or tricks on how to make sure that they are even with wood around them?
Thank you!
Luka


How to put bevelled edge on a polishing stone
in Finish and Polish for Knives
Posted
Thank you all for your replies. I will give it a try when I get a chance and report back.