Stahlmann
Members
-
Joined
-
Last visited
-
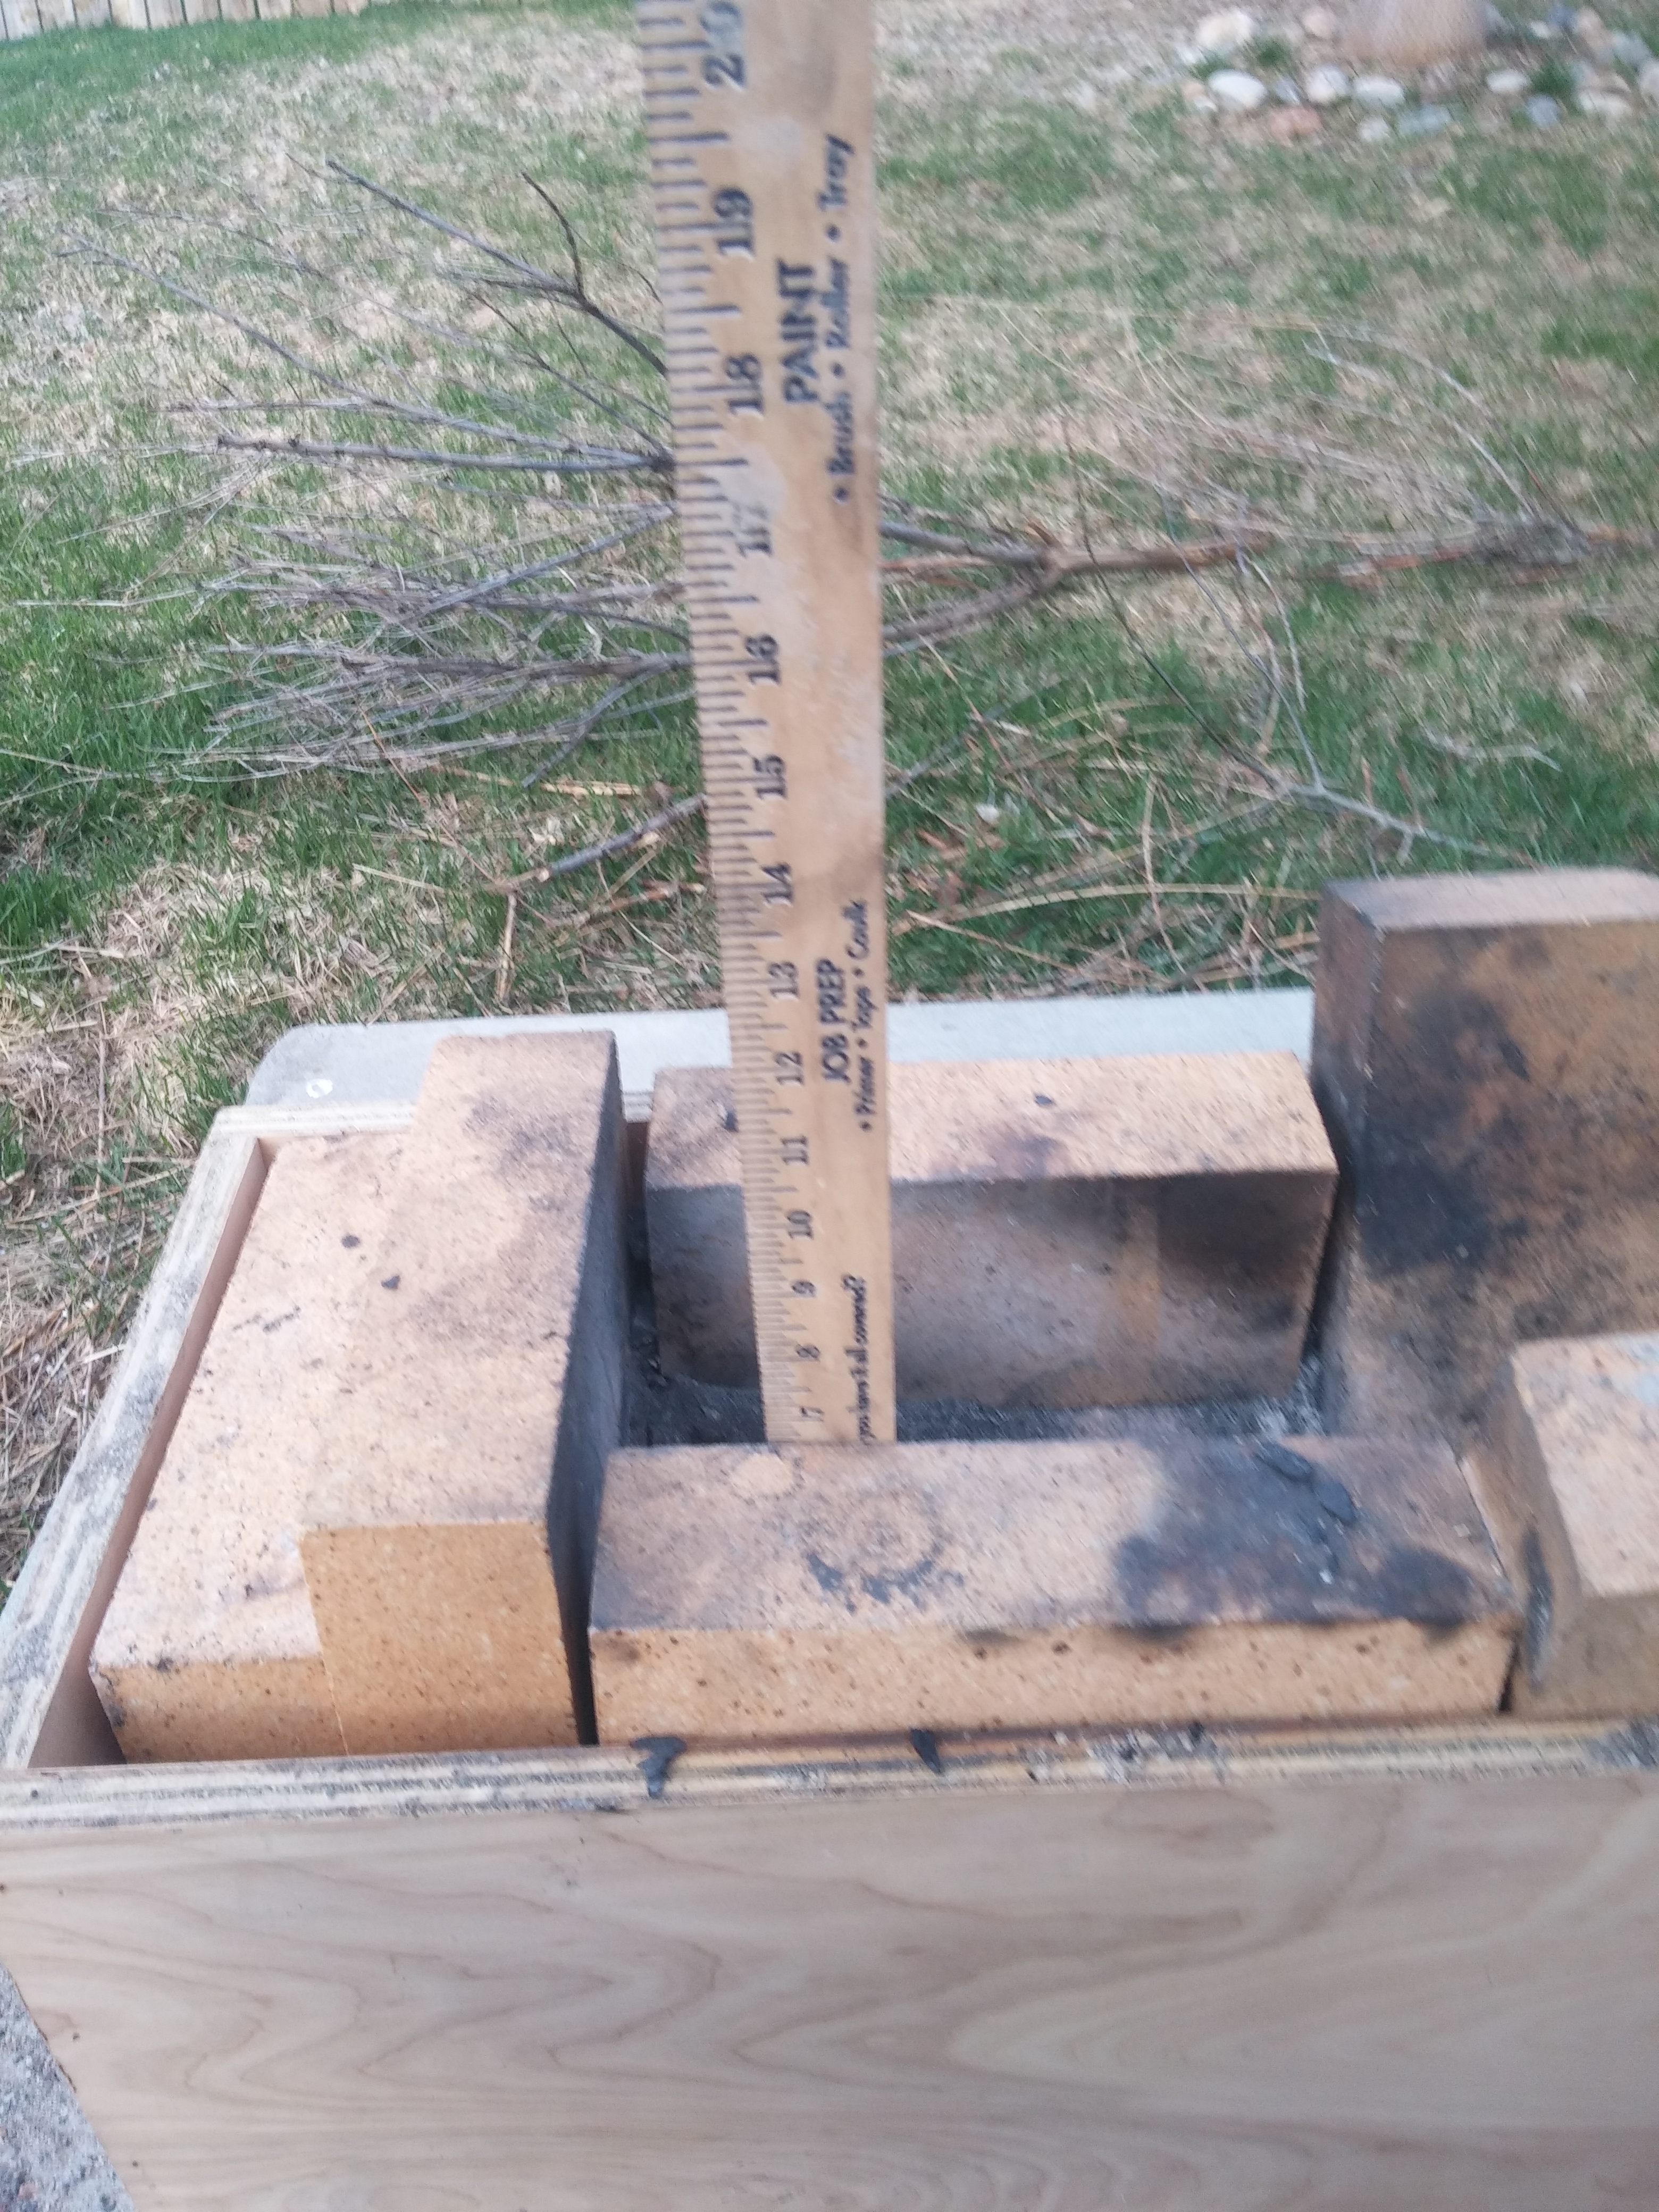
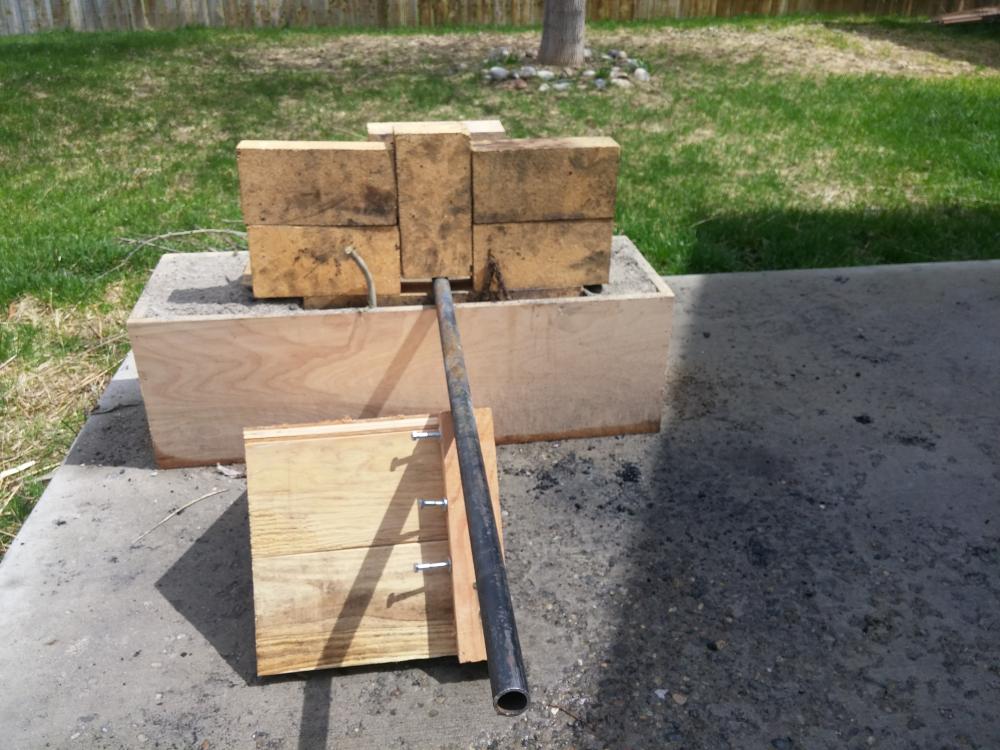
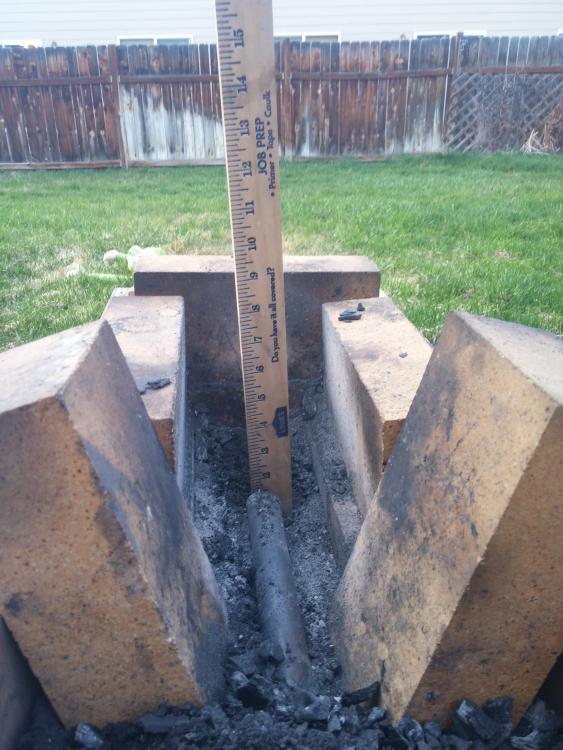
Thanks Charles and Frosty! That link to different charcoal forge types was really helpful in understanding all the different effective designs across time and cultures. Also loved seeing a Viking style forge at work in that video turning super rough new iron into a bar. Would really love to try that out someday! Hey Charles, I've got one of those plastic camping pumps stored back at home across the state, but aren't they alot like a single lung bellows? I know the blast would be much much longer at least, but don't they still pause in between plunging? Is that a big deal? If not, I'd love to use one as the hairdryer is noisy and kindof ruins the mood/feel of it all. Oh, this morning I took your advice to the best of my understanding and turned my forge into more of a side blast Viking style. I decided to fill the box completely with dirt and set the pipe on a brick instead of drilling it through the box since, with such a narrow box being close to the fire at that angle, the metal would certainly get hot enough to burn the box on contact. Anyways, the bricks are 9"x4.5", and so I made this the size of my forging space despite being slightly larger than ideal. The tuyere is actually 3/4", not 1" as I mistakenly said earlier, and is set the 1" above base brick. Despite the height, this thing feels pretty sturdy even without being mortared together. I may possibly cut a foot or so off the tuyere eventually. Looking forward to trying it out as is later today. Any thoughts?

-
Charles Stevens: I've taken a few minutes to ponder your suggestion for reorienting my forge and honestly I'm having difficulty picturing it. I think I see the logic of moving the tuyere to the side, but am not quite grasping the rest. Is it a general principle that the tuyere needs to be close to a wall-like structure to force the air upward, kind of like a bottom-blast forge? Does my current design mostly just heat a long section of bottom coals?
-
Ah, I wondered if the on-off airflow of the bellows was a problem. The opening of the hairdryer is about 3" or so across, blowing into a 1" pipe; considering that, would you guess that placing the hairdryer on a low setting directly against the pipe as shown in the picture would be about the proper airflow (since about 2/3 of the actual air released will not be going down the pipe)? So, with walnut sized charcoal, I need about 4-6" total above the tuyere and my metal sandwiched right at the midpoint, is that about right? This leads me to another question I had about proper charcoal size. When breaking charcoal, lots of little chips go everywhere, should I burn these? I found that using these small bits and the breaking of coals already in the fire by stirring, I created a lot of charcoal dust/ash mix that I suspected was blocking full flow of air from the tuyere (which I concluded because the area of steel gaining heat was concentrated in a very small area). I'm not even sure if most of this accumulated dust was actual ash, as it was grainy and mostly black. Eventually I pulled all my big coals out and scooped out a bunch of this black dirt from the bottom, which was literally more material than the actual coals. Then I used my good coals to start a new fire (which still didn't work, but I gave it a shot) How often would you recommend stirring the fire? Someone somewhere in a video I think said to regularly push coals downward deeper toward the fire, which I tried and just ended up breaking them down smaller and making more of that black dirt crap.
-
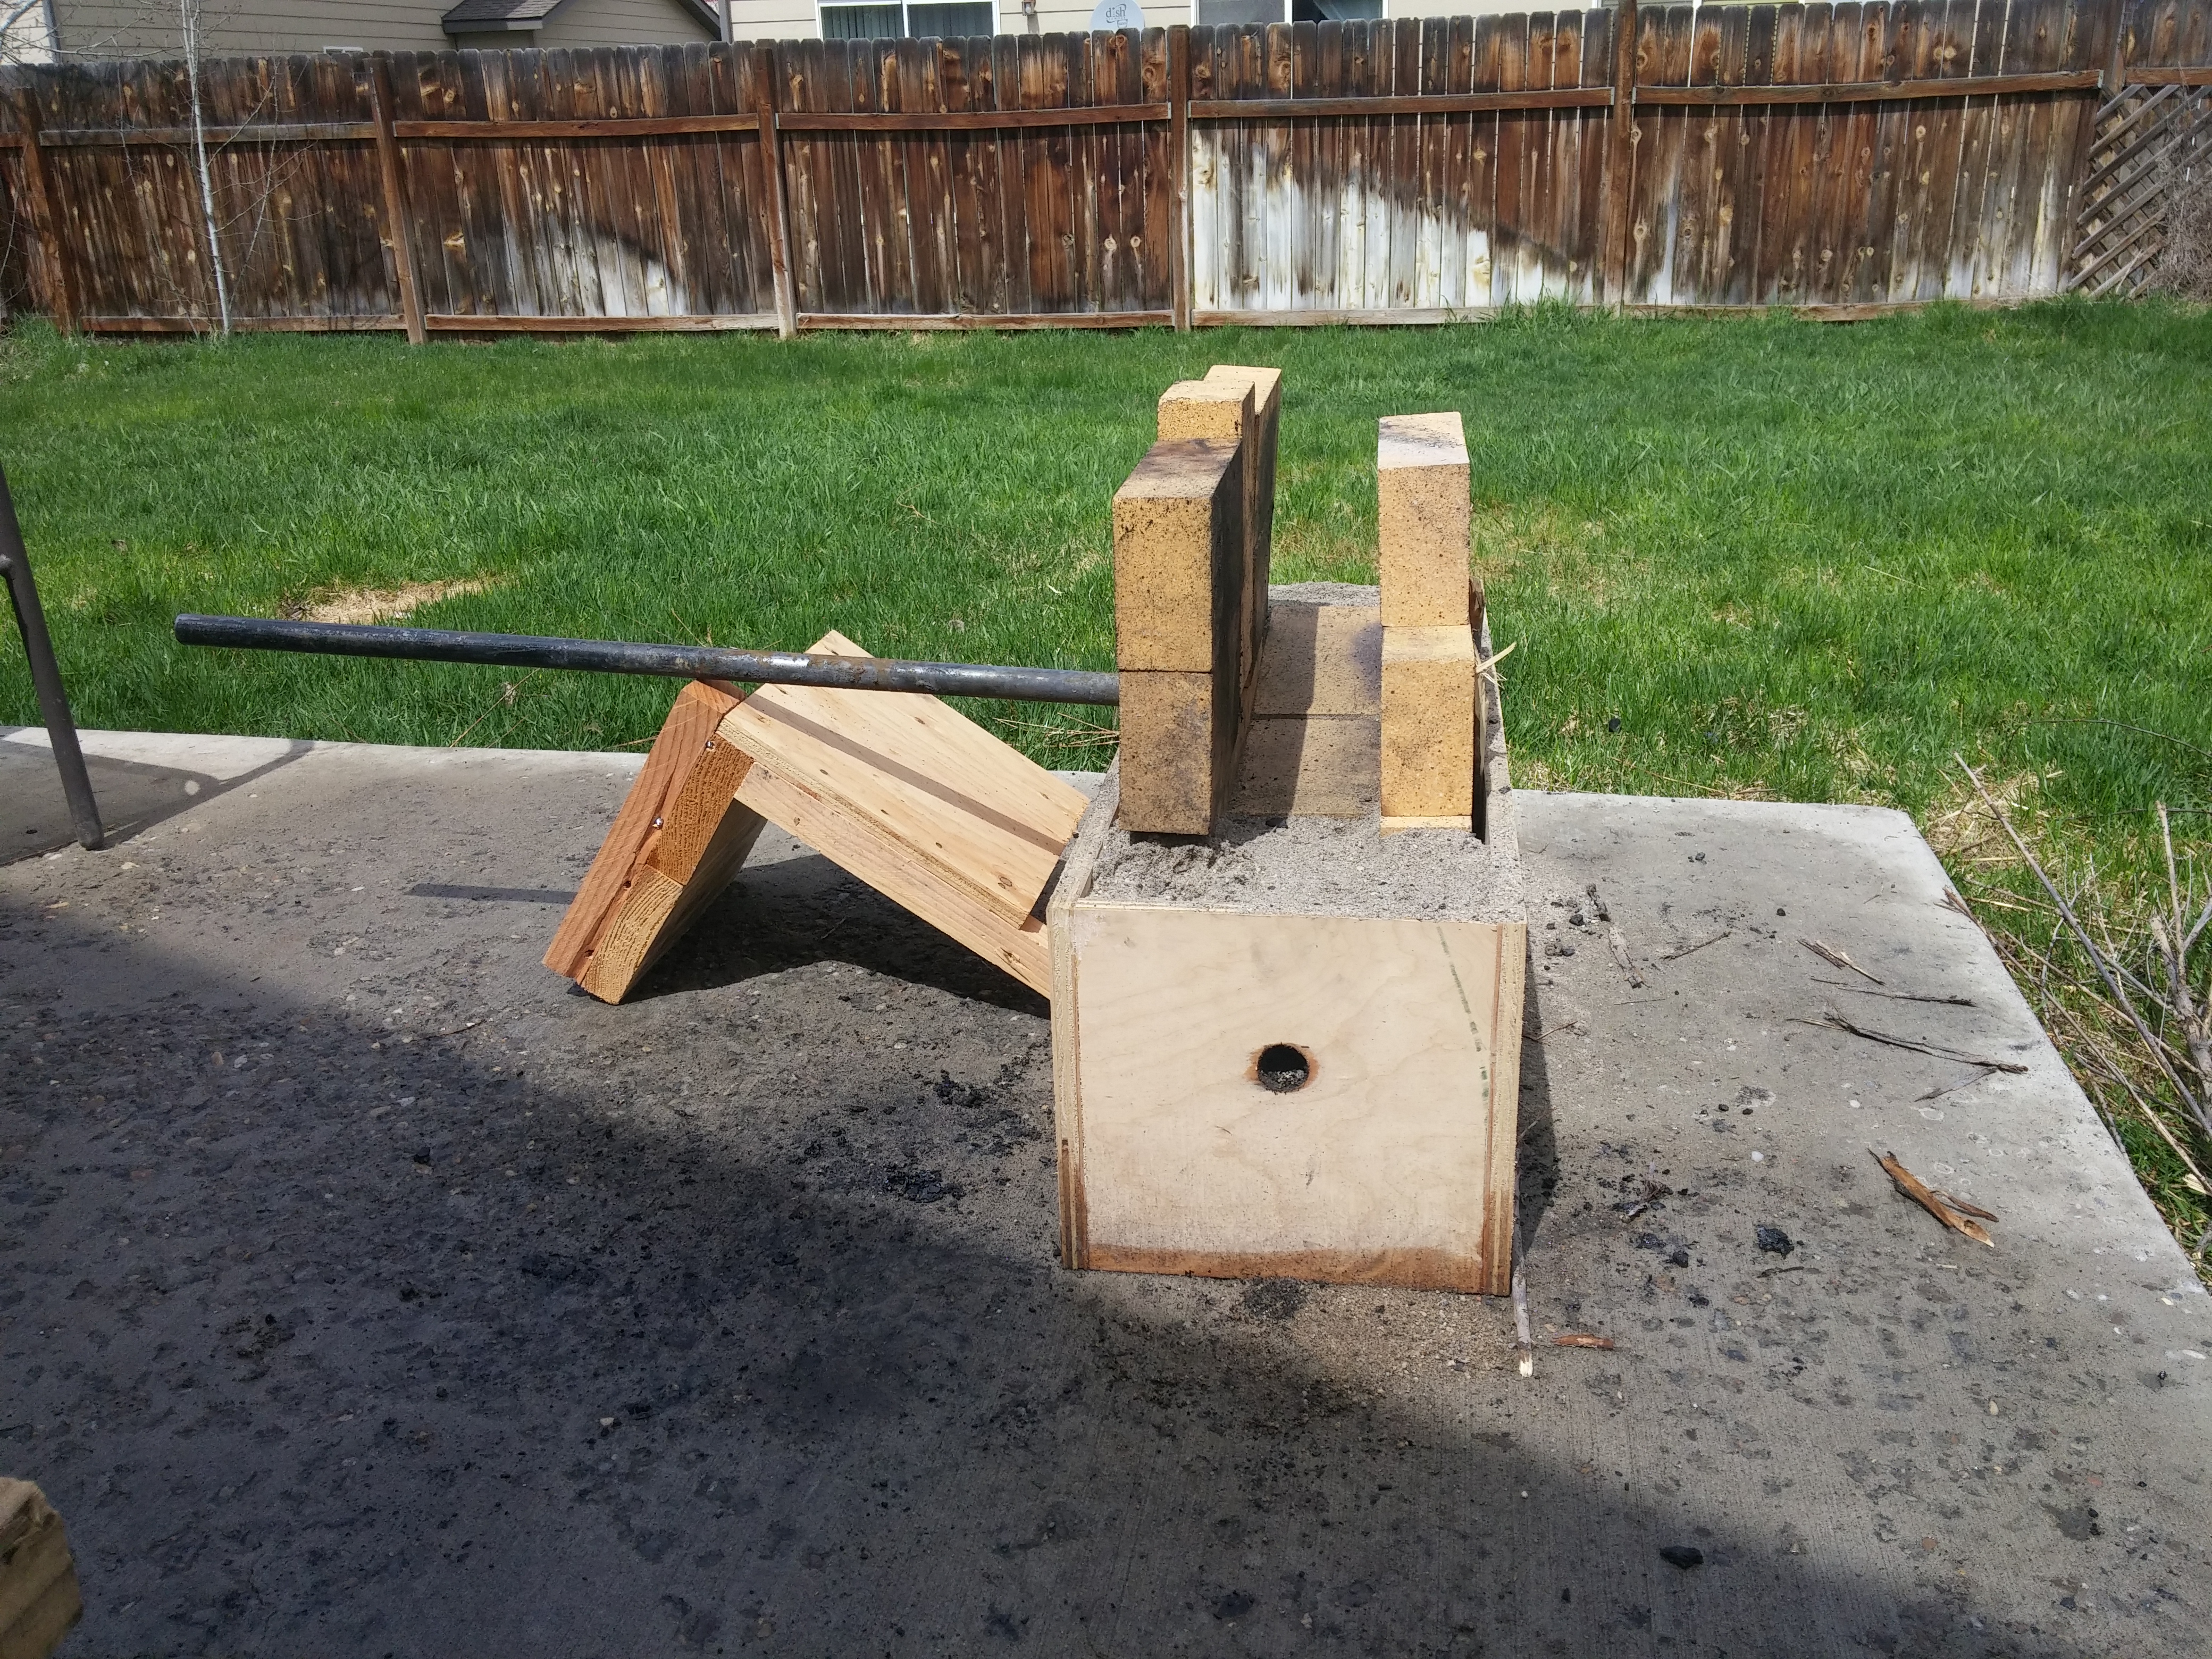
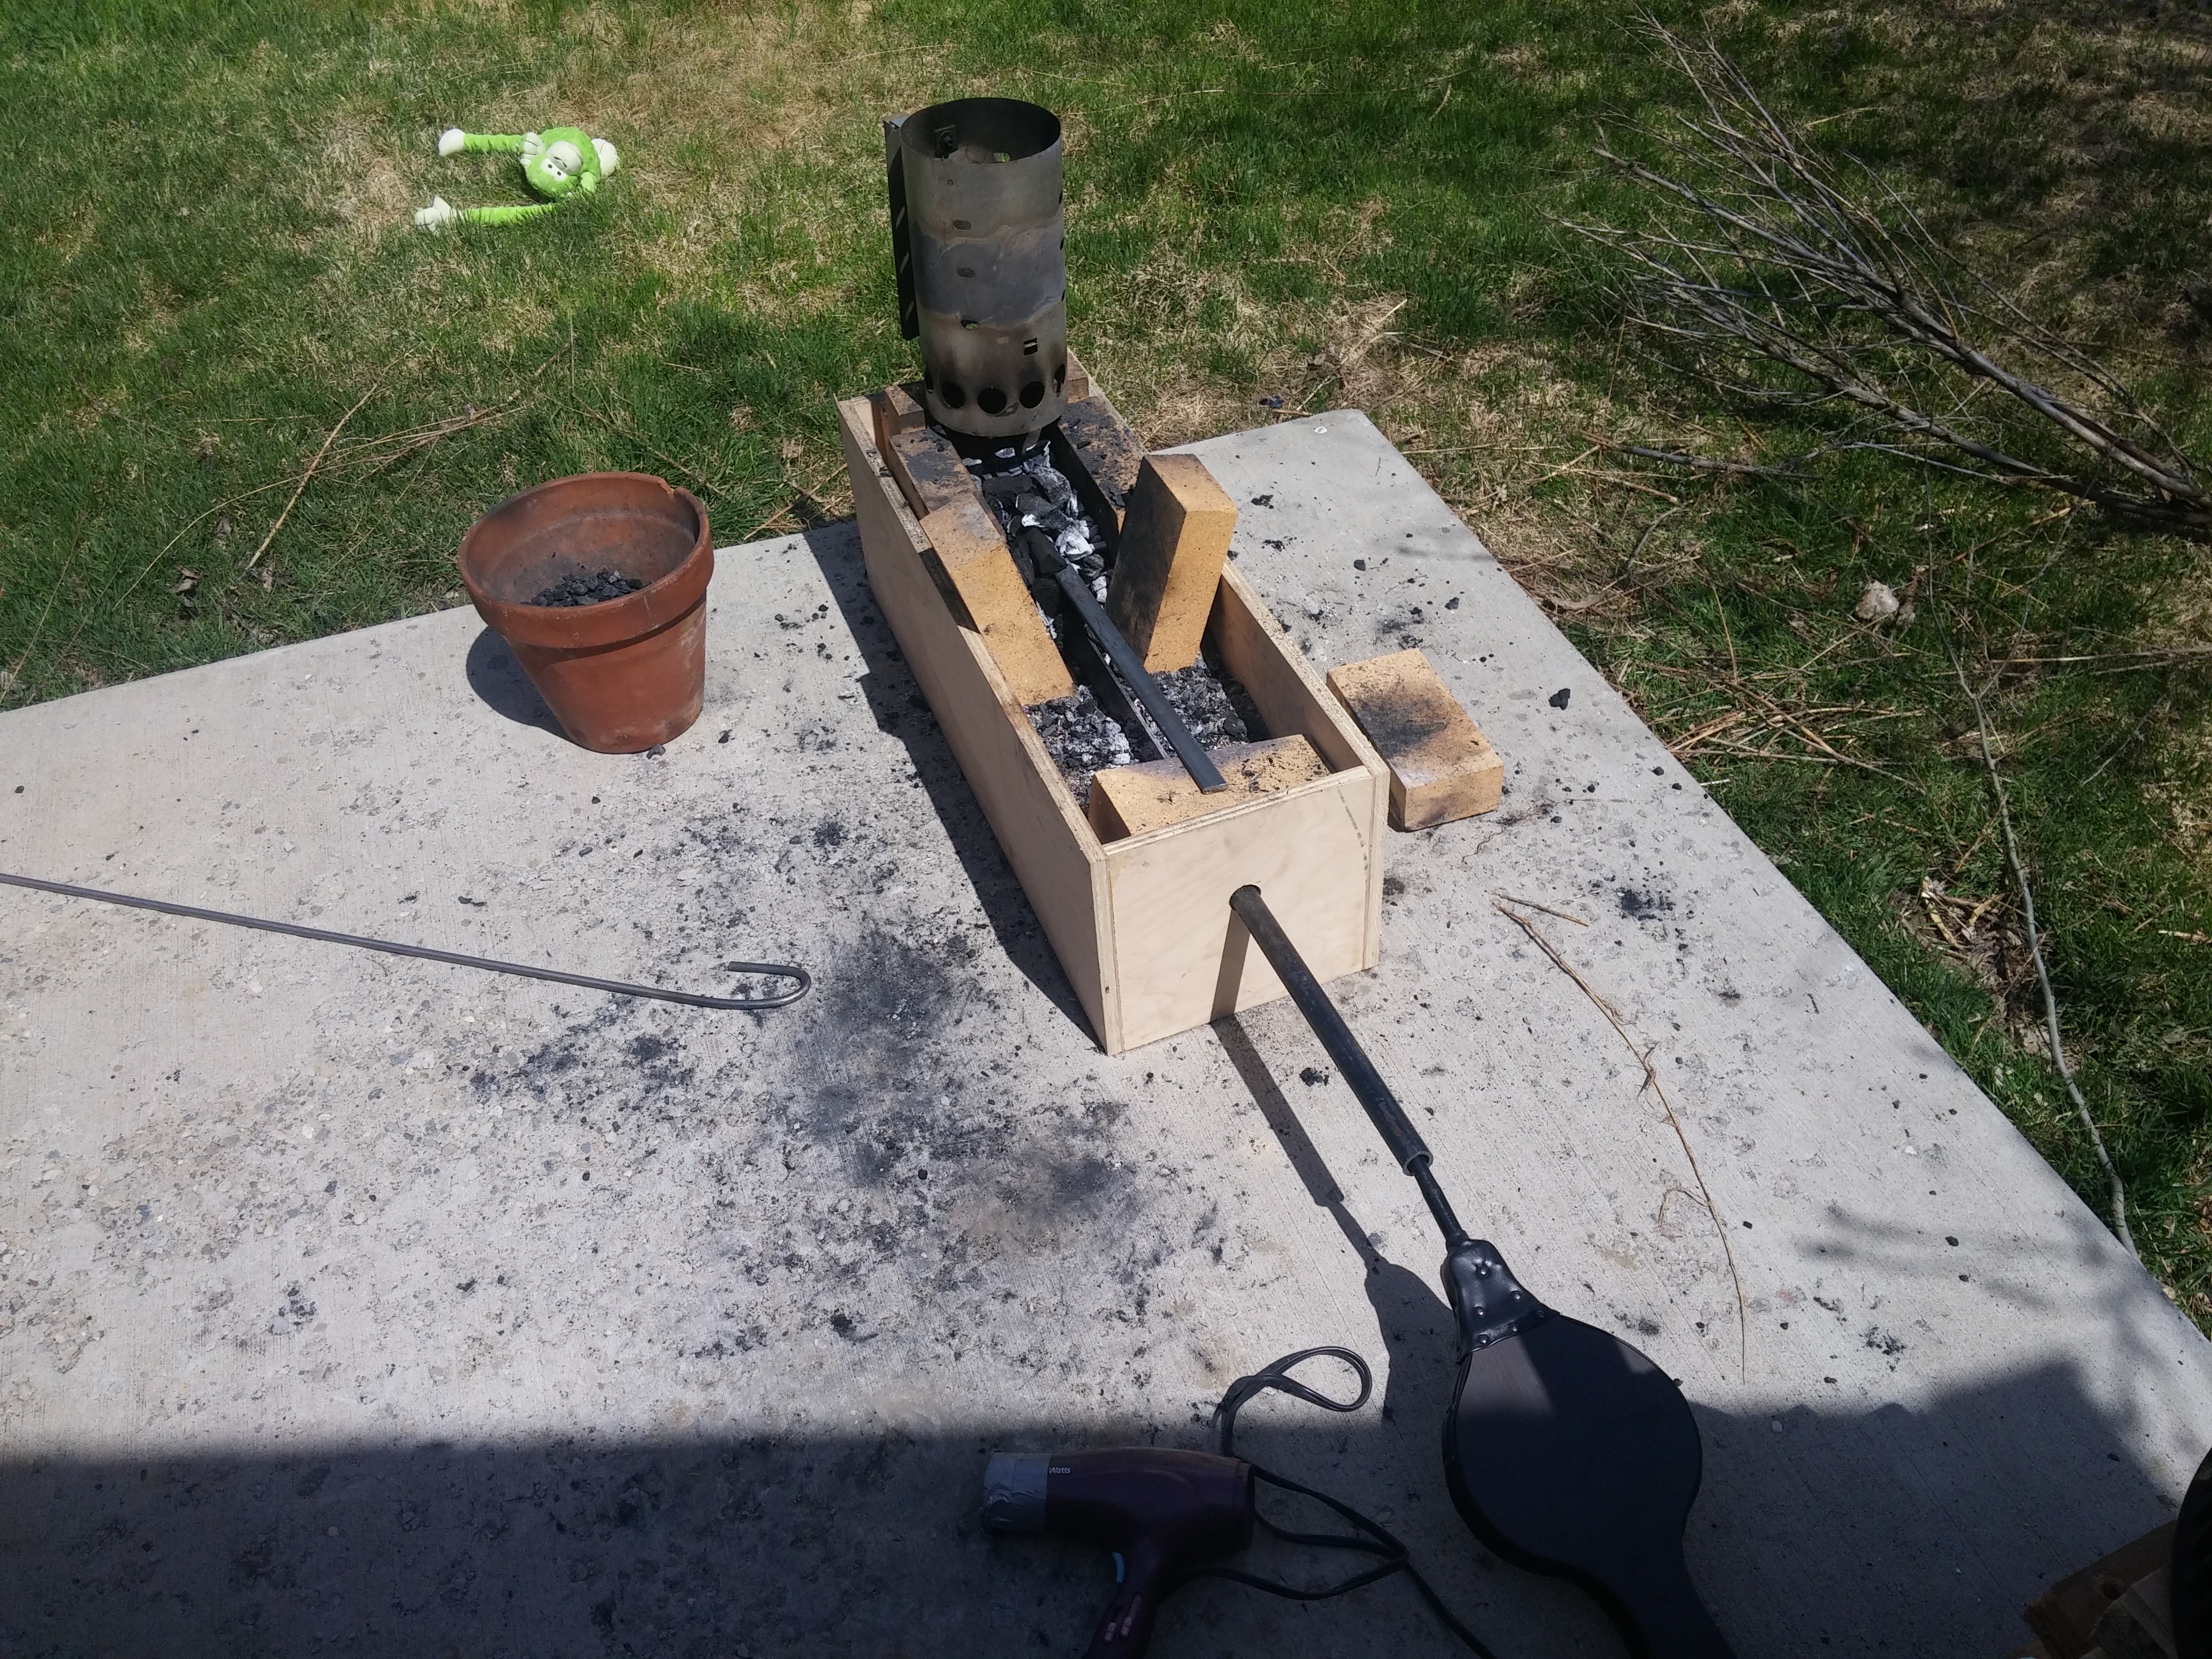
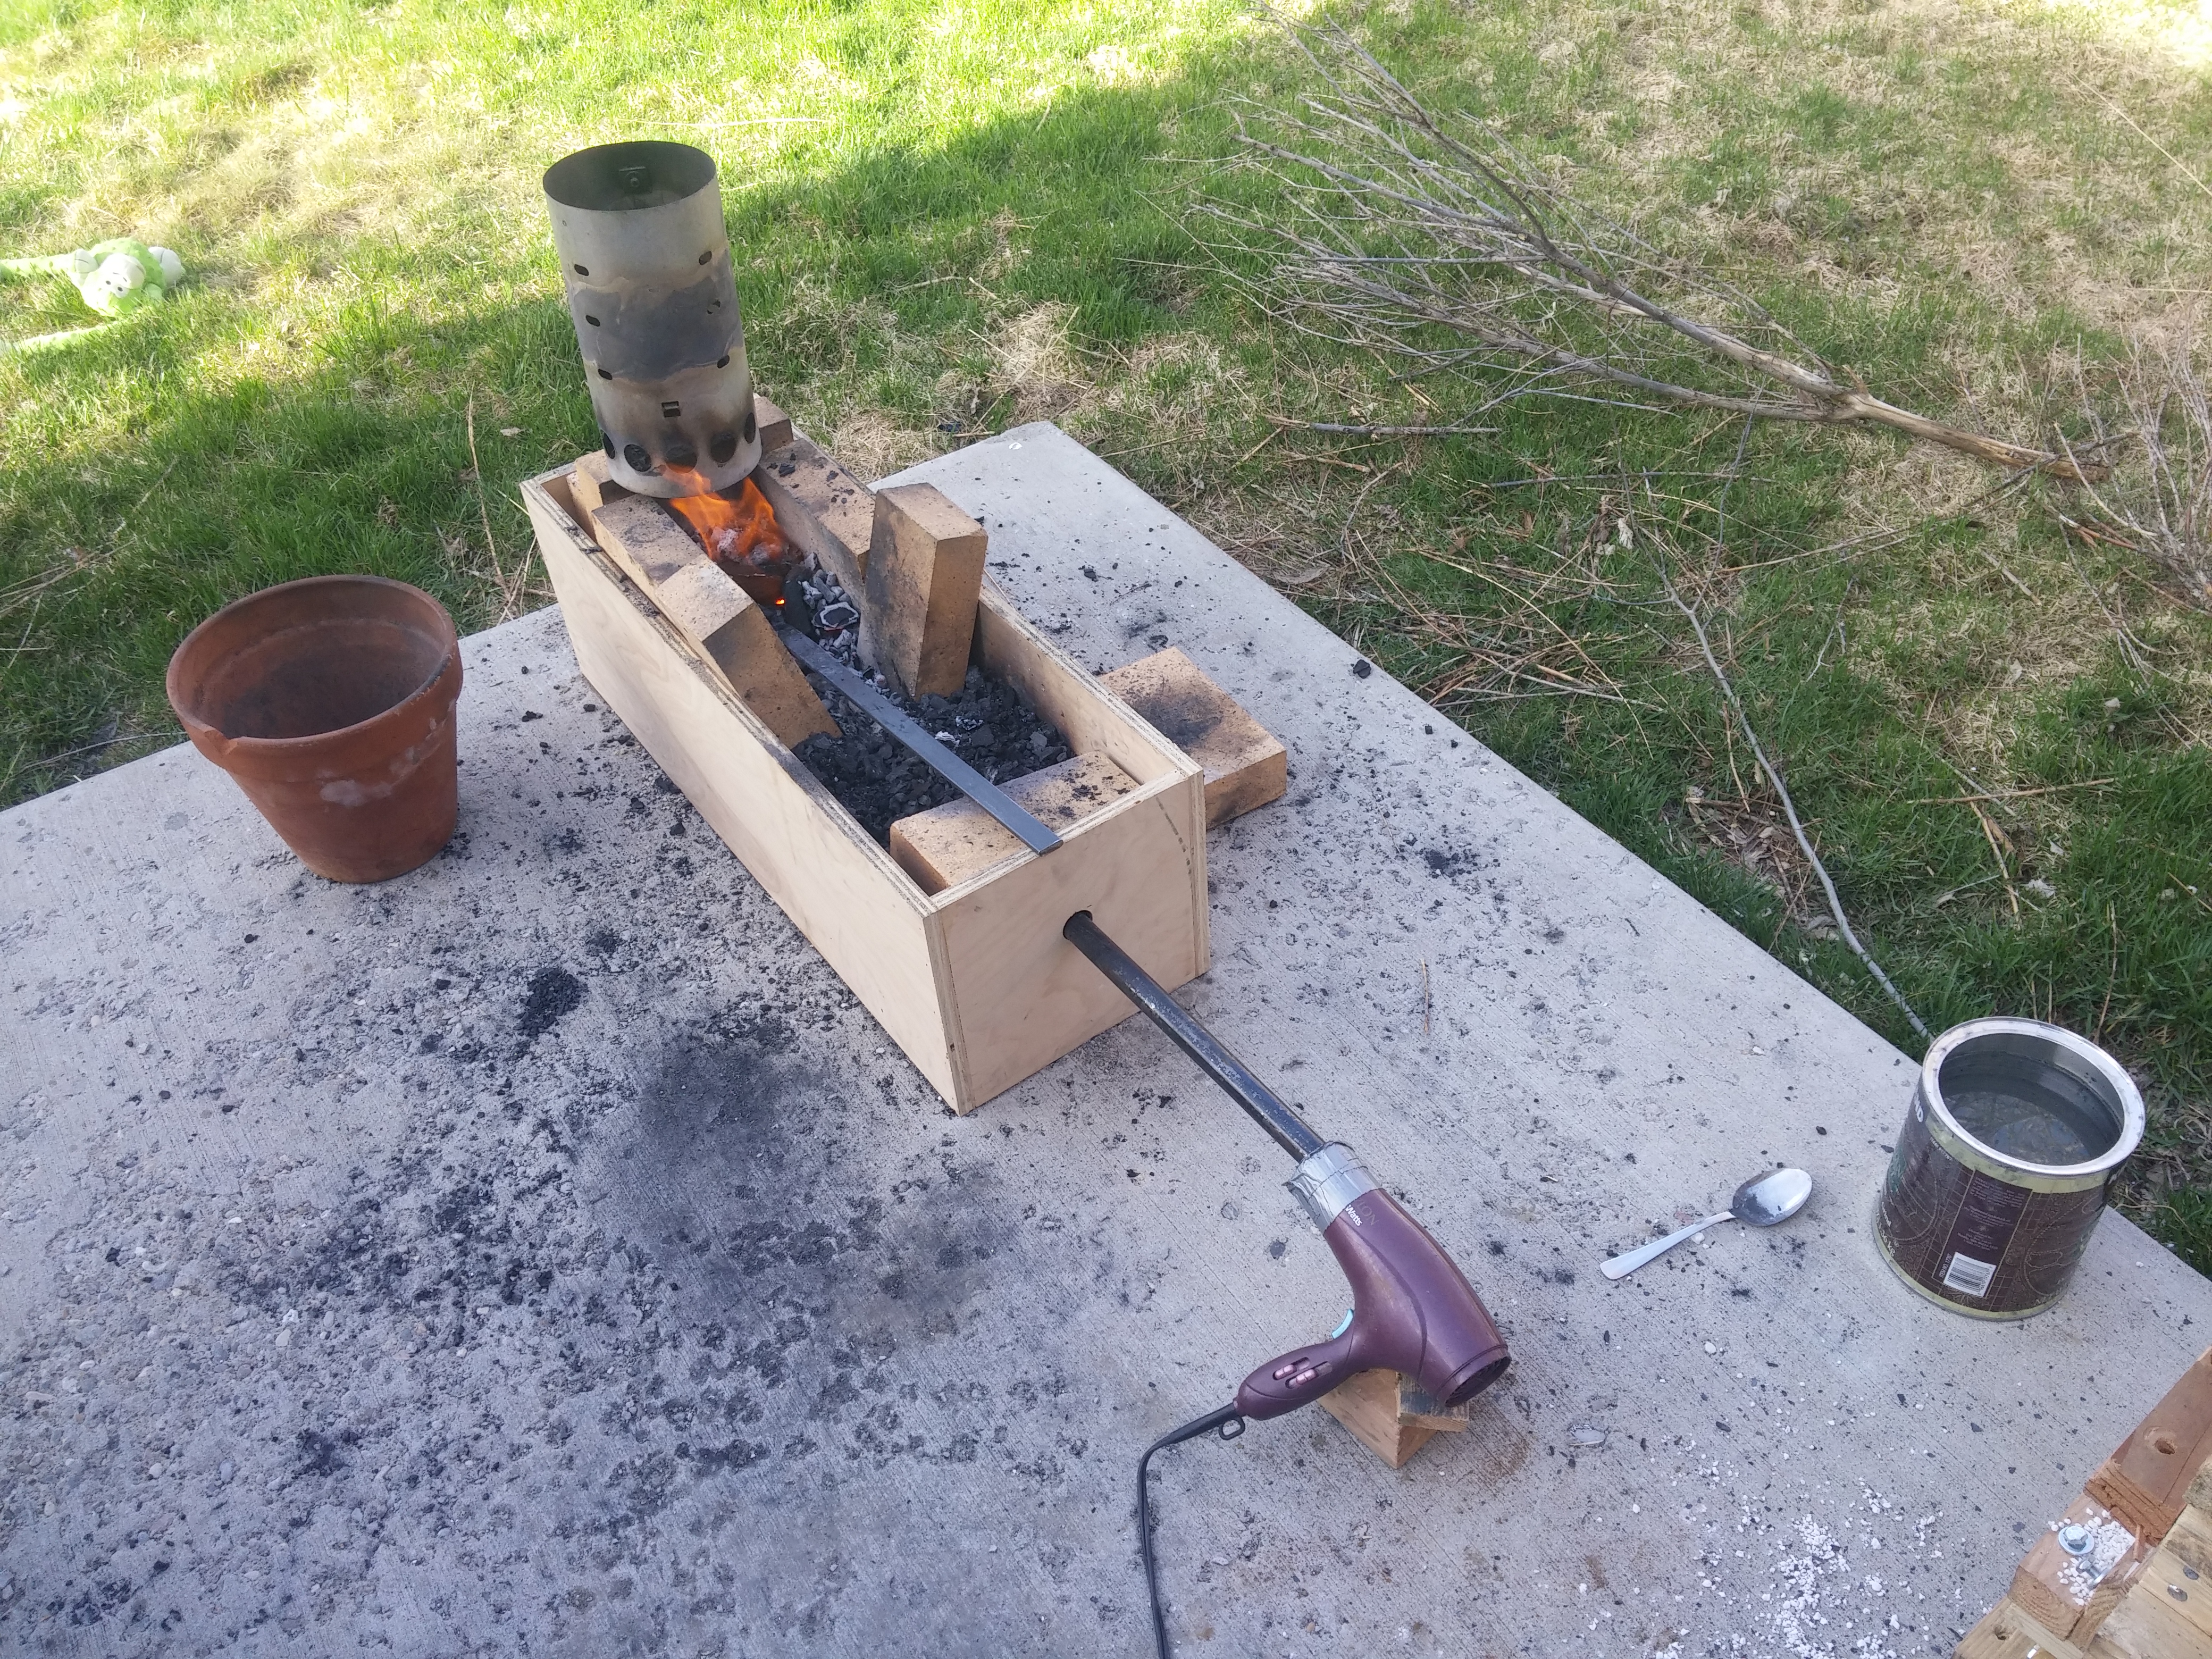
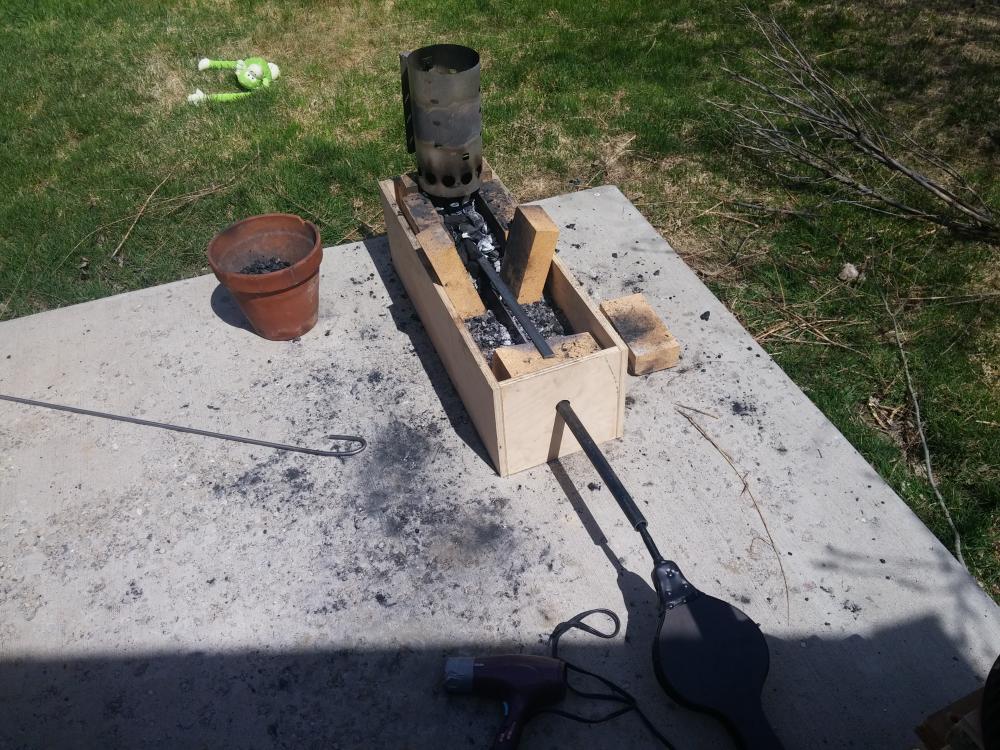
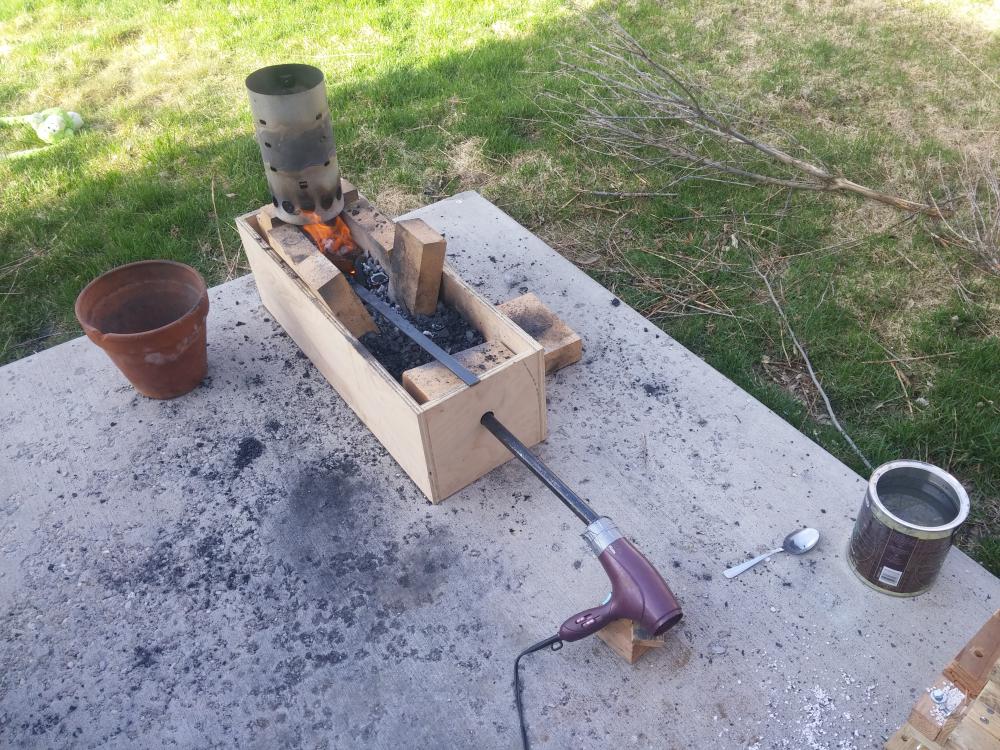
Hi all, it's been a long time! Over the last few months I've been waiting for my barbecue-frame forge cement to dry. We've only just recently gotten decent warm weather so I can set it in the sun to get it drying faster. But, I couldn't take the wait anymore and decided to use a wooden box frame that was given to me and turn it into a small JABOD style forge so that I can finally whack on some metal. As you'll see in the attached pictures, this is a longer, narrow box that I've set a 1" pipe into (3ft long), filled with sand, and then surrounded the bowl area with firebrick. The top of the tuyere is set 3.5" below the top edge of the wood box, and the bottom of the tuyere is just a little more than an inch above the bottom brick of the fire bowl/rectangle. The crappy smokestack thing is just the charcoal starter pulling the smoke ever so slightly upward. The last two days I spent a combined 14 hours or so desperately trying to figure out the secret to an effective charcoal fire with this arrangement in order to make a set of tongs. I tried different depths of charcoal, different placements of the bar stock, different airflow levels, different sources of airflow, everything....and in those 14 hours was only able to move the steel maybe 2" (sad, I know). I'm using what I believe to be oak charcoal, mostly the Cowboy brand stuff. I alternated between a hair dryer and a small cheap fireplace bellows that will likely fall apart soon from over use. Both got the coals glowing and flames all happy, but didn't do much to the steel most of the time (which was mild steel by the way). I tried the first day to mound the coals several inches above the tuyere, approx 4-5" as I've read in some past posts somewhere or over. With this arrangement, I was lucky to get the steel an extremely dull red that went black within a second. On day two, I made the fire much shallower as I saw someone doing in a Youtube video (all pictures are from day two shallow fire): with this arrangement it was hit or miss. Sometimes I would get no results while other times I could get the steel to orange in about five to ten minutes (one site said optimal forging temp for mild steel is yellow...?) I'm afraid, however, that at this shallow depth I might be oxidizing the steel, but it's the only way anything's happened yet. I also had better results having almost no charcoal on top of the steel, which I don't understand at all. So, anyways, before I end up writing a book, I can't seem to figure out a simple charcoal fire. I've had extreme difficulty finding helpful resources, as a Google search specifying charcoal brings results almost entirely on how to start a coal fire.... I've tried light airflow, as I've been told charcoal needs almost no air (this wasn't effective at achieving forging temp), and I've tried heavier airflow from the hair dryer which was effective sometimes, others not so much. Is there any more info I can give on the problem to inform your answers? Hopefully this will be a helpful resource for other people struggling with efficient charcoal fire maintenance.

-
I'm sorry, but I just felt that Thomas' approach to telling me to improve my forge was rude and condescending. I was making a temporary arrangement for one job, and from the sound of it the only thing I may have been missing is insulation (firebrick etc) to stop the heat from bleeding out the top. I read several different sets of instructions on how to do the heat treat, and all they said essentially was to cover the inverted striking face in hot coals and wait. Most of you have given me great feedback and suggestions, but what I read from Thomas was "You're too stupid to read and research." My original question stated that I was unable to find info on heat-bleed, not that I'd never found a thread on how to build a forge. I'm sure Thomas is a very experienced smith who does excellent work, and has a very effective forge arrangement; this is the third time I've even made a charcoal fire at all and I only have un-applied book knowledge of the subject. I don't own many tools, don't have much extra cash for nifty equipment, and never had a dad to teach me how to use anything. His basic points were valid, but making a student feel stupid doesn't help anyone learn. I mean no disrespect to anyone, I only ask the basic respect due to someone trying to learn a new and fascinating art.
-
@JHCCGood info in there, thanks. The info on the search feature is especially helpful. I'll also try to keep quoting to an absolute minimum. @Daswulf That's a good idea, unfortunately my landlord wouldn't appreciate me digging up his back lawn I'll probably buy some firebricks (they're fairly affordable here). I'd go out in the boonies and improvise with a hole in the ground, but it's pretty cold here right now and quenching in a frozen river might not work so well!
-
This was just for a one-time project to heat my anvil. What I couldn't find was about exposed sections of anvil/rail line drawing heat from the striking face. I'm trying to learn. I'm new. Your snarky sarcasm is "appreciated", and really "helps". By the way, I used actual real true genuine hardwood charcoal. Thank you for your constructive and truly helpful input JHCC. I'll make the fire bigger, deeper, and with some fire bricks added as well.
-
Hi guys, I've looked around on the forum and through other sources, and haven't found this exact question answered, so I'll go ahead and ask. Yesterday I went through the process of trying to heat treat my anvil carved from railroad line (marked 1939). I've read many instructions on how to do it, including the oft quoted/referenced Weygers book, but have not seen this issue addressed... As instructed, I set my anvil upside down on the coals and then buried the striking surface. I covered the surface deep in super hot coals and had a hairdryer going on them just about constantly from all angles. As you'll see in the attached picture, I used pipes on one side to get air up under the coals, while also heating the surface coals on all sides. The blower was kept on low, and at times alternated from 6in to 2-3ft away from the fire depending on the heat coming off of it at a given time. I did this for over 2 hours, trying to get the surface to cherry red. The hottest it ever got was a visibly dull red which, when water quenched, did not pass the file test. My question is, will it hurt the anvil performance to bury it entirely in hot coals? The exposed base of the anvil, I believe, is acting as a heat sink and pulling the heat away from where I need it. The obviously dated Weygers book suggested using asbestos as an insulator (no thank you), but I'm hoping I could get the same effect with a full pile of charcoal. Are there any drawbacks to this? Also, one book I'm using "The Complete Bladesmith" by Jim Hrisoulas suggests an easy way to temper the anvil post-quench by heating it in the oven for several hours at 325 F. What are your assorted opinions on that method as well?

-
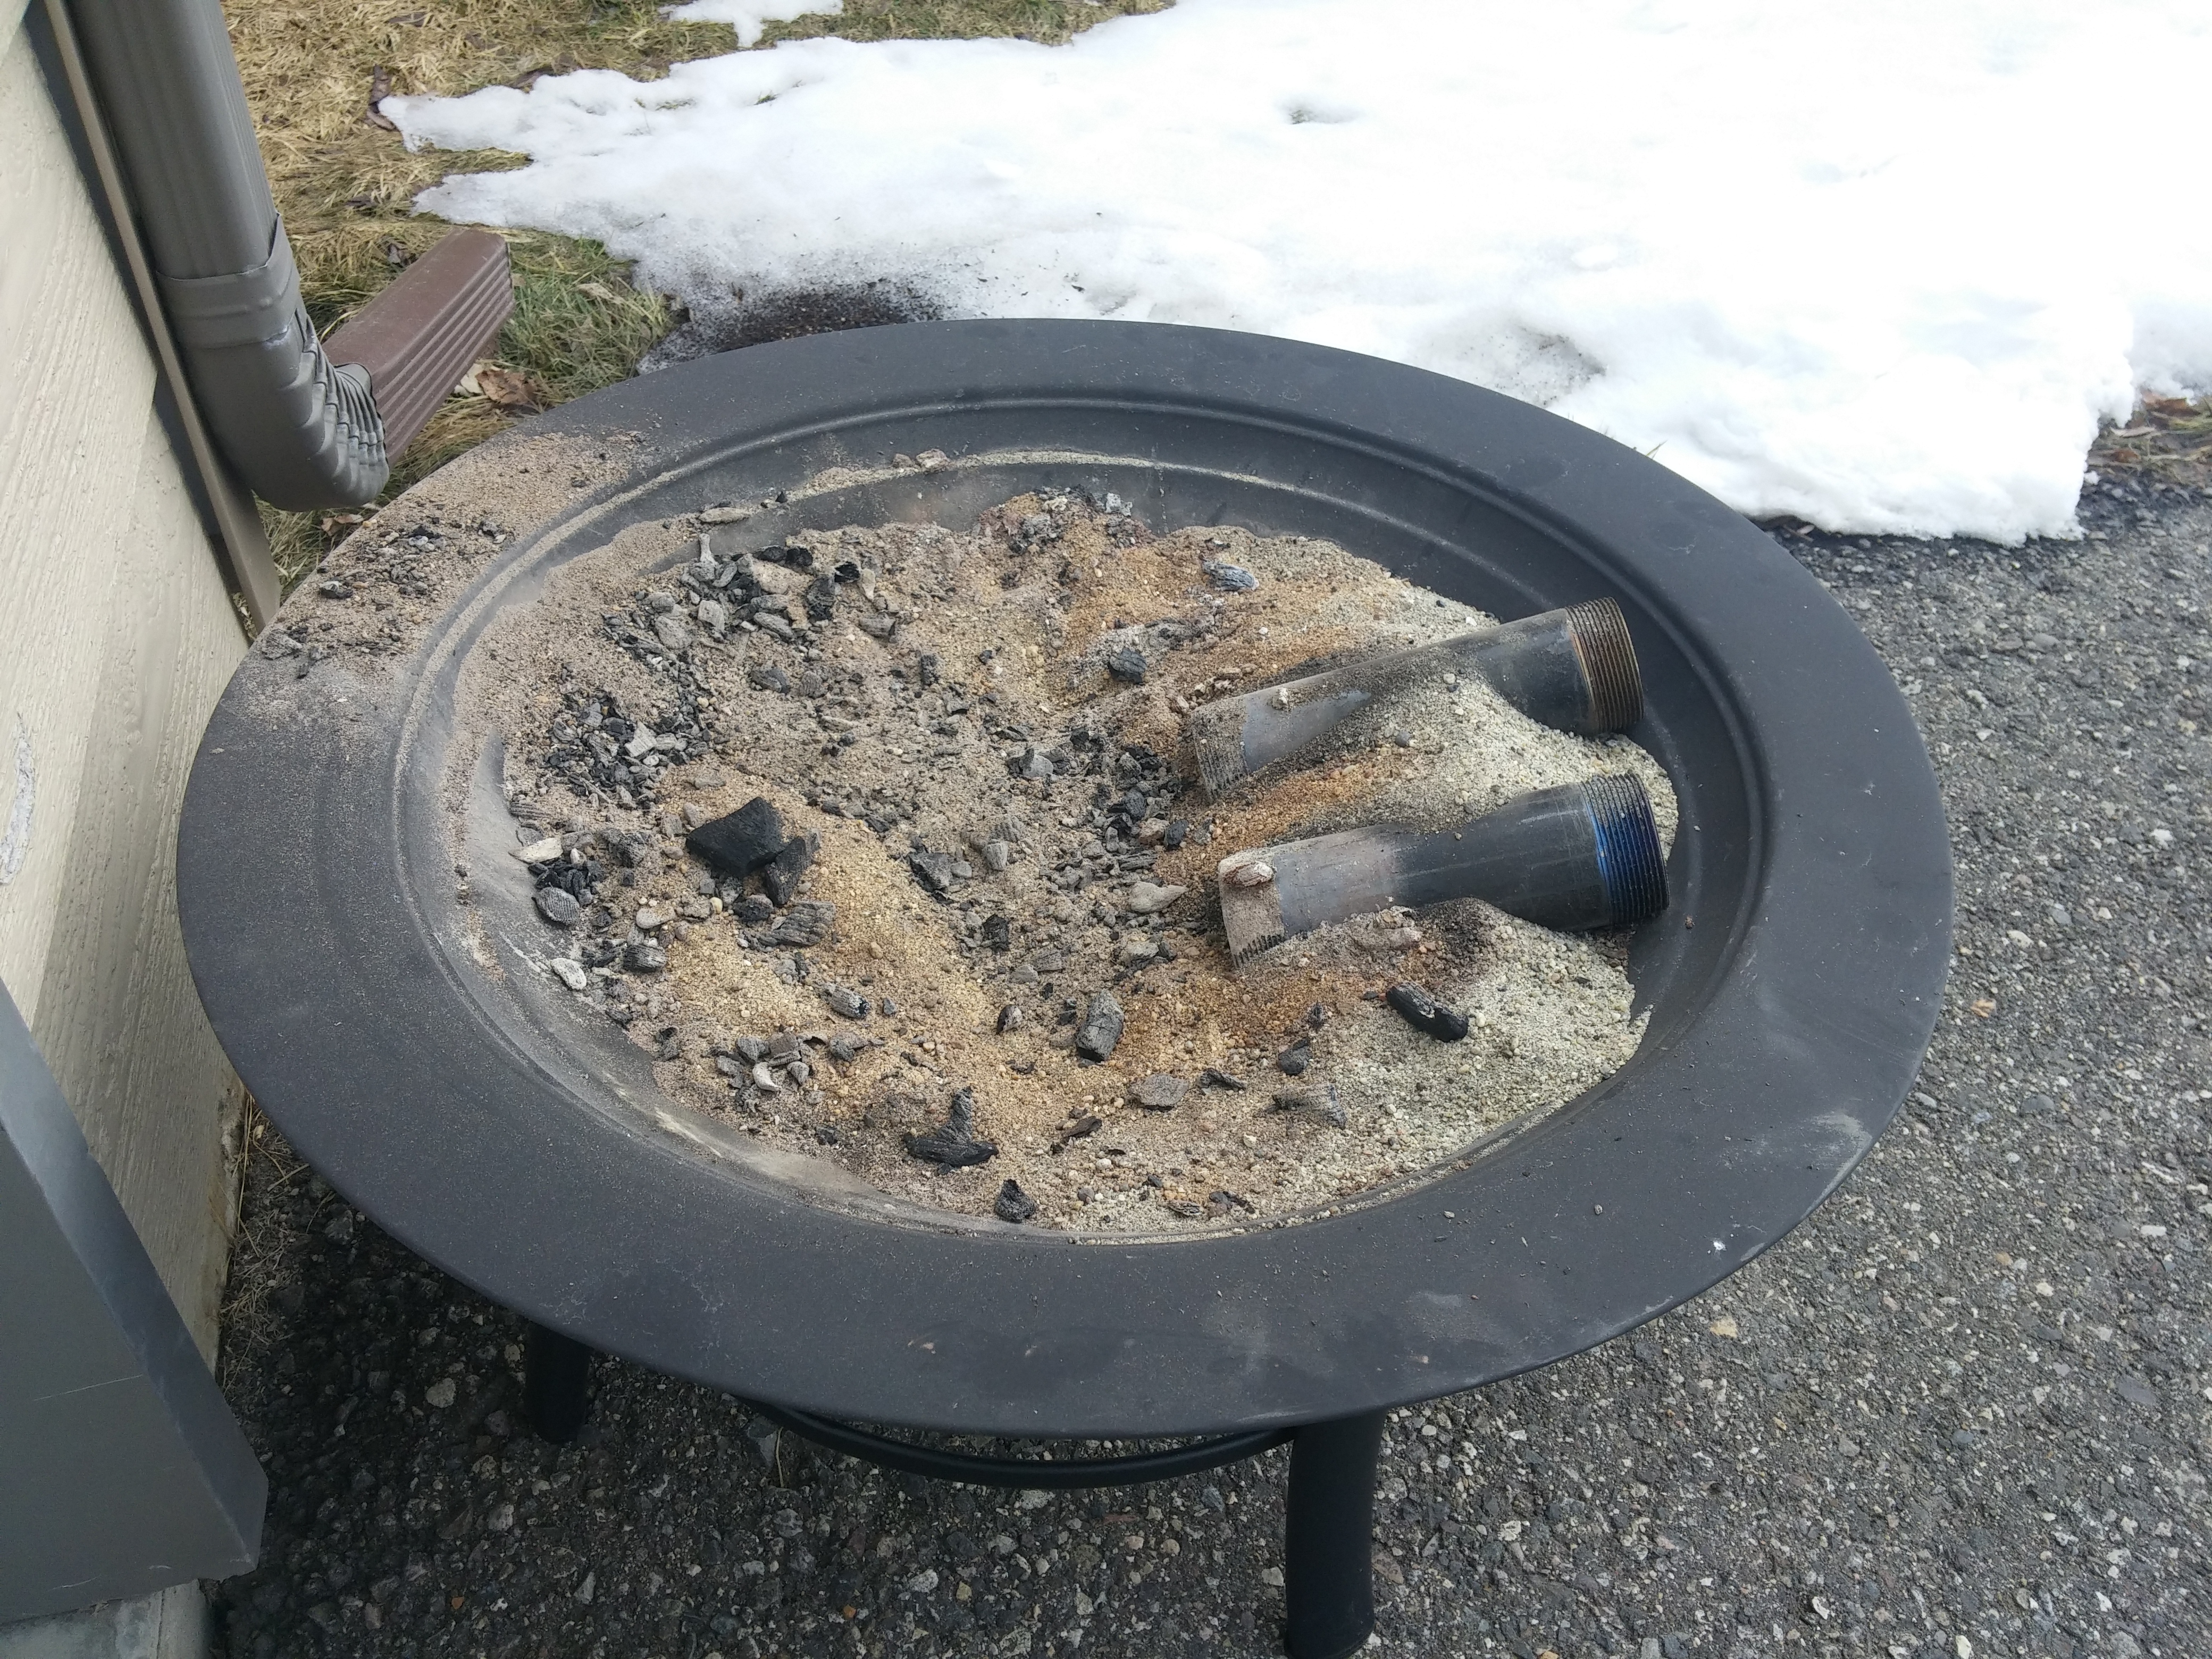
Great info and links guys, thanks! That JABOD style forge looks like a great idea! I think I can get mine similar with the grill setup. I have a couple bags of perlite I can fill the bottom with to keep the weight low, then add a sand/cat litter mix above it up to around the top of the drum. Or does it work better to mix the perlite in with the sand/clay? If I ever needed to remove the clay to make the forge even more portable, I think keeping the perlite by itself would allow me to reuse it and save money rather than throw it away with the heavy clay. Just an idea. Am I understanding correctly that I should put insulation/fill material under the brake drum to raise it to the grill's edge? If so, is there a reason I can't just fill the area around the drum to at or slightly above the drum edge? How many inches of charcoal, minimum and maximum, should I have sitting above the tuyere (both horizontal and verticle forms)? I'm considering keeping the piping below the fire pot so that it can still act as an ash dump, and if necessary in the future be used as a bottom blast for coal. Good idea? My interest is in making knives mostly, and so for longer blades would it work to make a furrow in the clay above the top edge of the drum so that longer blades can still lay horizontal? Would that make the fire pot too deep? I'd like to keep the drum in there so I don't have to destroy pretty much everything I've already done, and so it can work as an ash dump and potential coal forge, but is the brake drum pretty much mostly in the way at this point?
-
Hey thanks guys, Someone in that recommended thread mentioned a kind of current dampener to limit weaken the flow from the hair dryer. Is that a good place to start? I had no idea until today that the forge design I chose was ideal for coal rather than charcoal. I'm not interested in coal personally, making this thing out of a grill is already non-traditional enough for me (I'm a history nut). Right now I'm about out of investment money to add much more piping to this thing until I get some paychecks, but I can see converting this into a side-blast someday as long as the current bottom-blast design with weaker airflow is at least workable for now....which I hope it is. Did anyone have thoughts or ideas of how to incorporate a smokestack of some kind? Also, ideally once I get everything going, about how full of charcoal should I fill the drum when I'm ready to heat steel?
-
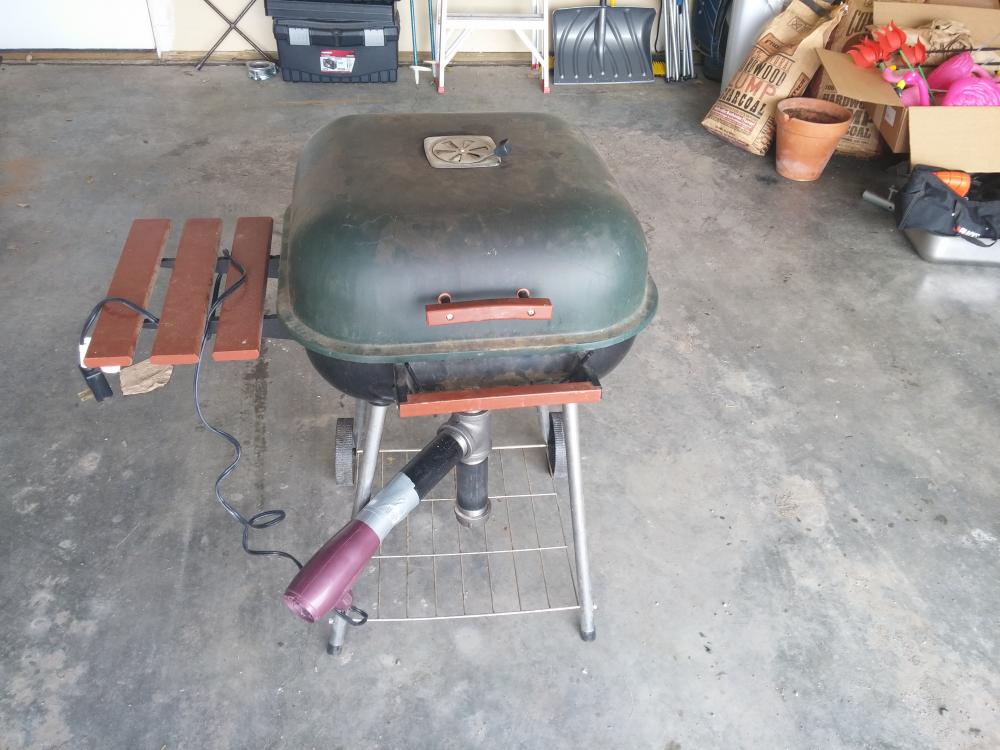
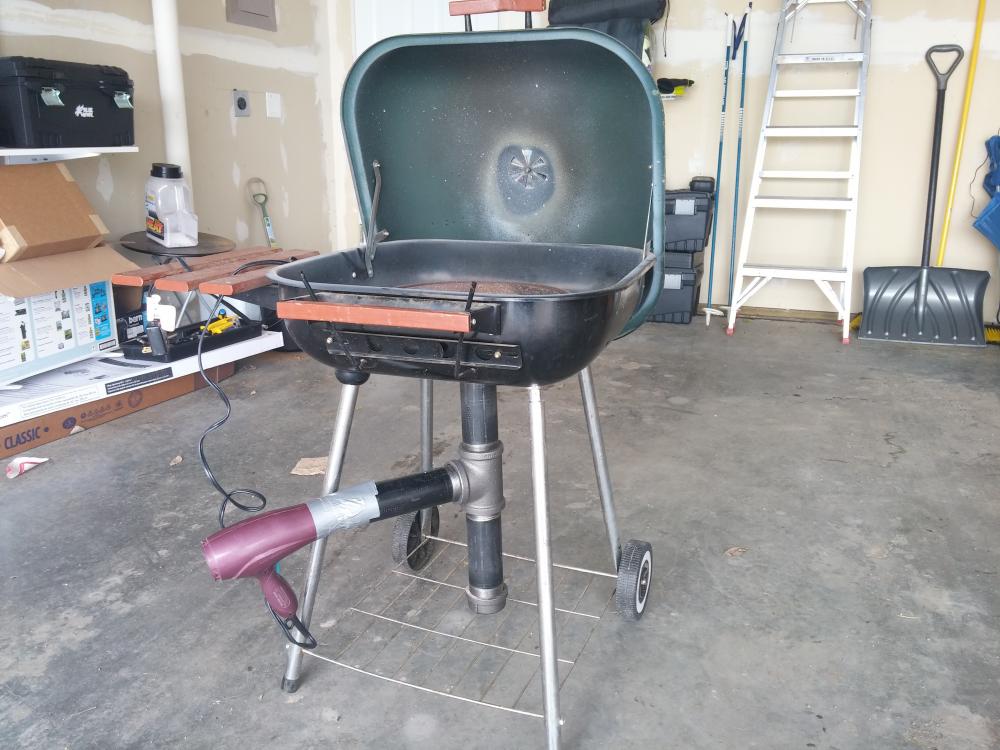
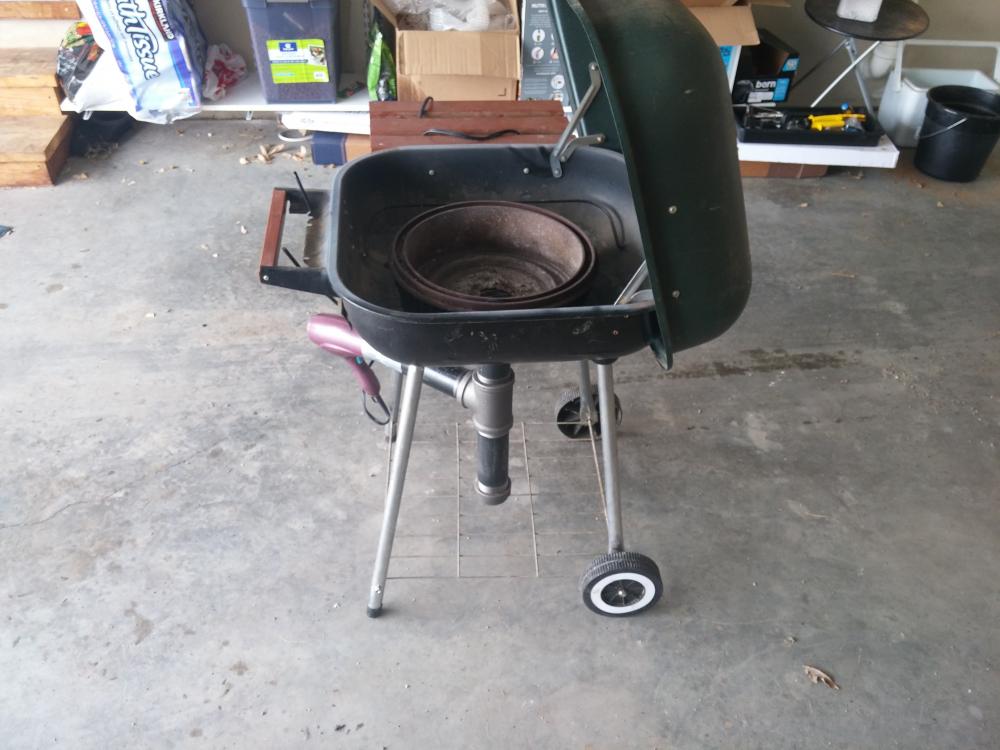
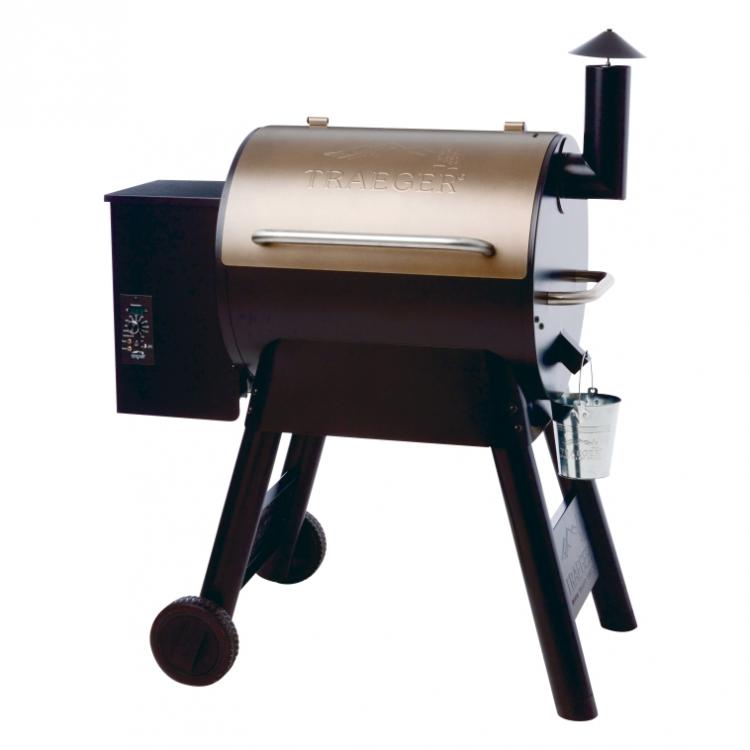
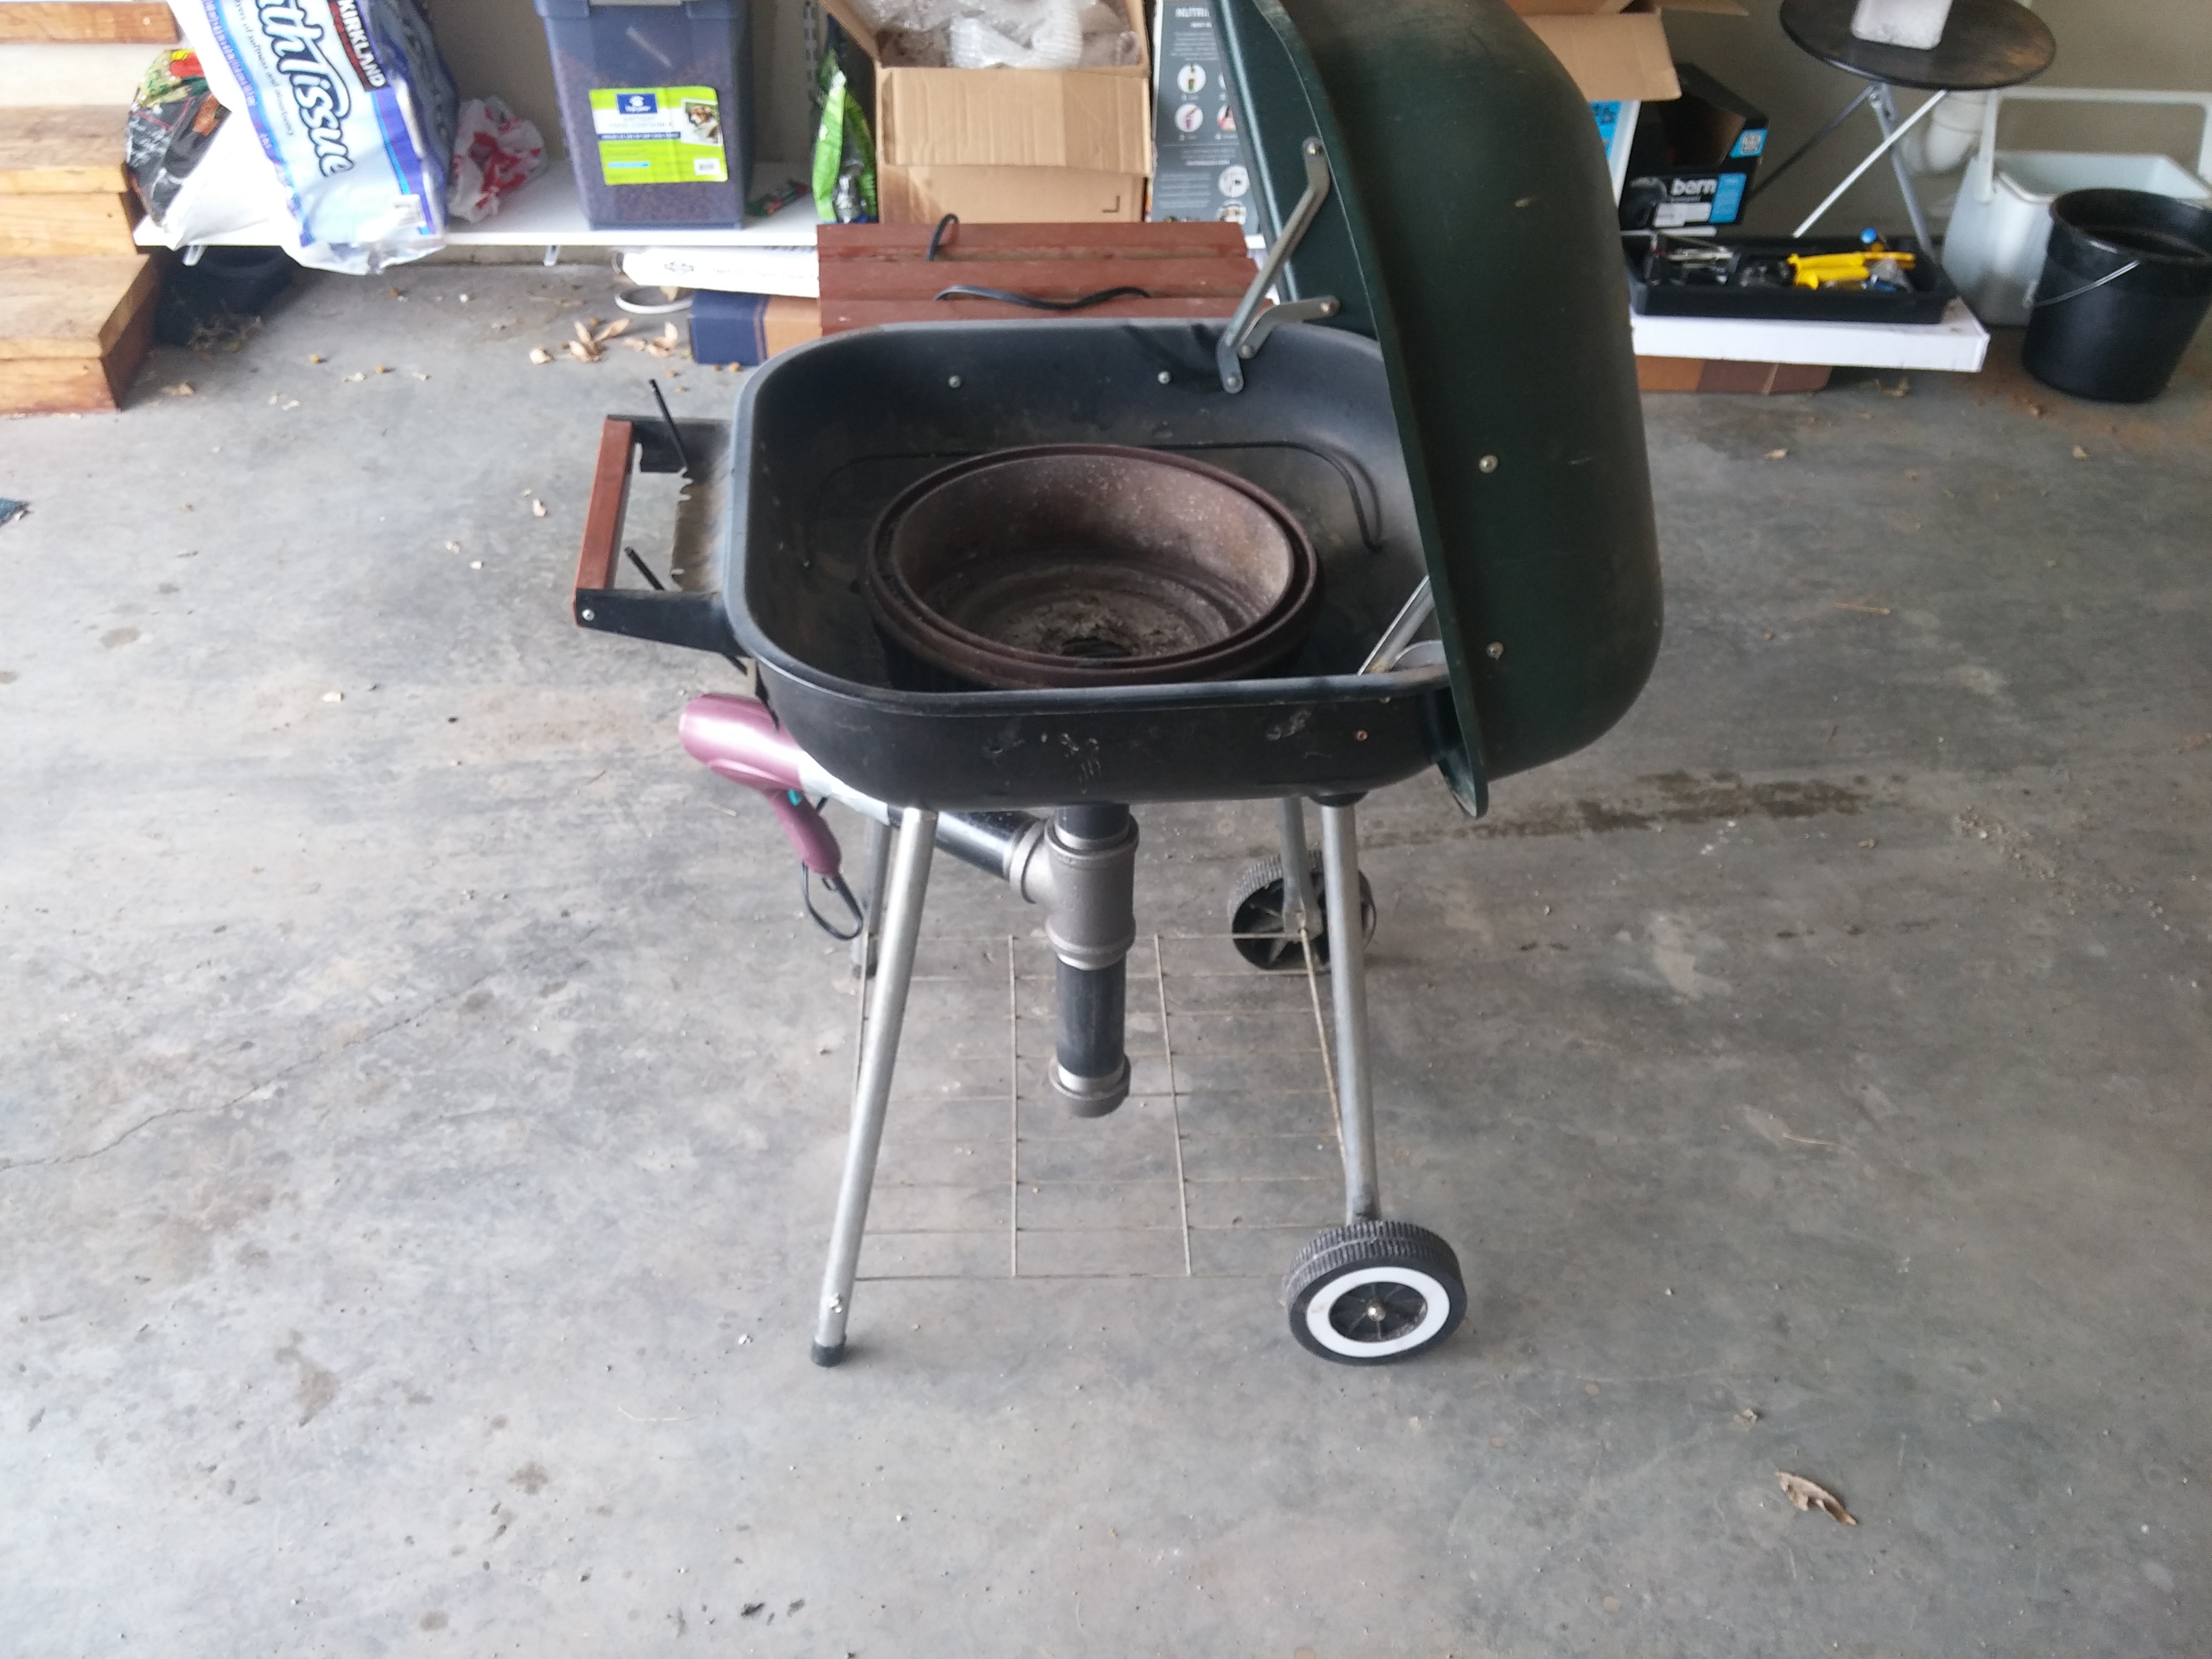
Hi everyone, This is my first post so I'll introduce myself; my name's Jared from Montana, USA. I'm technically finishing my second forge now, a barbecue grill/brake drum combo charcoal burner (the first forge years ago never worked out). Anyhow, last night I lit the forge up for the first time and it definitely got hot! The only problem I had was the mass of smoke and sparks that flew everywhere even on the lowest blower (hairdryer) setting. I live in a tight packed residential area (no noise or nuisance codes, thank goodness for me), and I'd rather not risk burning someone's house down especially when summer comes around. I've been reading around here since last night about how to make a chimney flue to pull those wild sparks and clouds of smoke away from me and nearby flammables. Unfortunately, many of the threads are old and picture links are broken. All I know so far is that everyone recommends at least 10" dia pipe, and some places mention a shelf inside the pipe that stimulates the draft. Besides this I know really absolutely nothing. I'm on a shoestring budget right now, and don't have a welder (or know how to use one). So, I'm attaching pics of what I have so far and reaching out to people more knowledgeable than myself for advice on how to install a working flue pipe to a charcoal grill with standard tools. What i'm pondering so far is making a pipe like those you see on some Traeger pellet grills on the side of the body (pic attached). Maybe create some kind of metal box next to the brake drum that still fits under the lid, which connects to a pipe that goes out the side of the grill body below the lid line? Would this have any hope of creating a draft? This forge is meant to be portable from the garage to outside, so the pipe can't be too massive... Thanks!