Anthony Mans
Members
-
Joined
-
Last visited
Everything posted by Anthony Mans
-
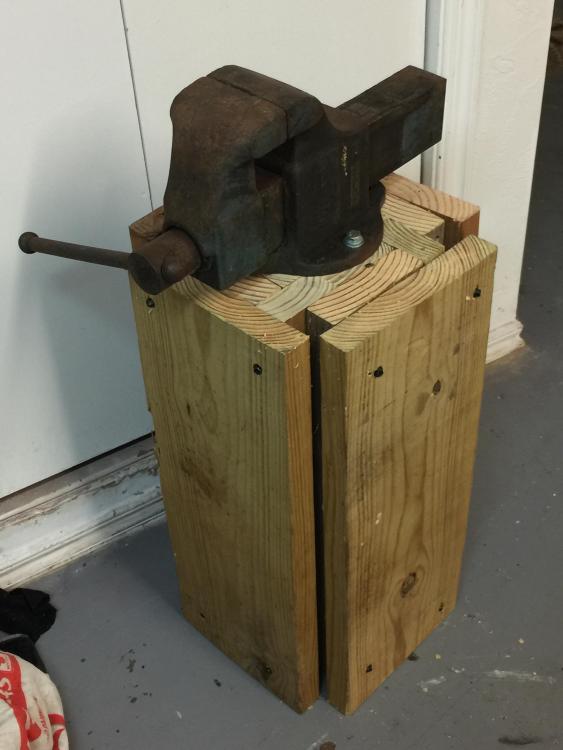
So I have spent a lot of time in my life working with metal, welding, cutting, bending, etc. also I have spent the majority of my life working with wood and different projects. So I finally decided that it was high time to build a smithy and start doing what makes me happy and that's working with my hands and creating things. This thread will be a live record of my smithy build from start to finish. My goal was to build a basic setup to suit my taste and wants for as little money as possible. I will post pictures and commentary as I go and I would love to know what you guys all think about it! Your input is much appreciated! My first project basically chose itself because it was something that I already felt I had the materials for laying around my house. The Anvil block: Note: all the wood in this was farmed from my own scrap pile at the back of my property. However, when I started hogging out the hole for my anvil to recess down into, I quickly noticed the critical downfall to my design. The 8" lag bolts I used to suck it all together intersected at the middle and prevented me from going down any further than 1 1/2" and I needed to go down 4". So a little brainstorming, and a little frustration resulted in me repurposing my "anvil block" and making it a "Vice block" as I do not currently possess a work bench to mount a vice to

-
That would be neat though but I emptied the bucket Haha
-
I loaded them up, every last one of them and carried them a mile and a half to my truck. The ones I thought were 1/2 were actually 3/4, and the ones I thought 3/8 were actually 1/2 so it turned out good. 20 of each size
-
I recently found a whole 5 gallon bucket worth of 3x3 steel plates. Some look to be 1/2 inch and some look to be 3/8 inch. Was wondering if there's any hot uses for these because if so, I may have hit a small payload because they are free! Any input is much appreciated! im sure there are about a billion different things that can be made, just wonder if 3x3 is too small to bother with
-
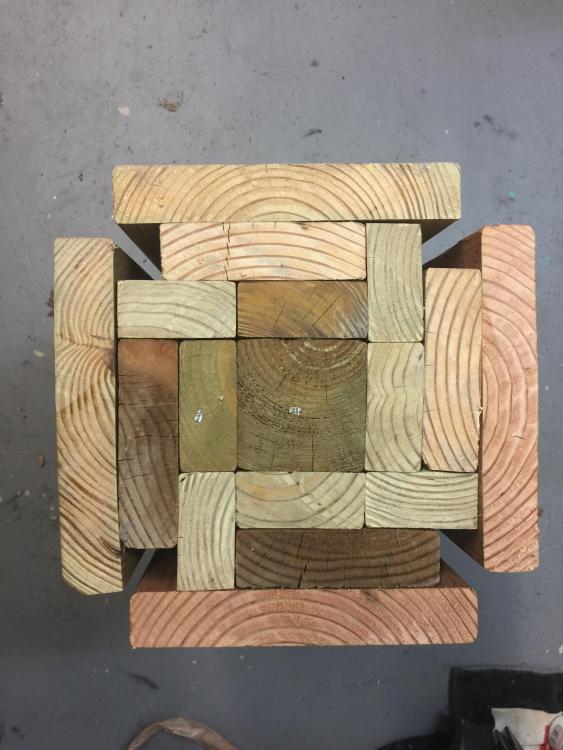
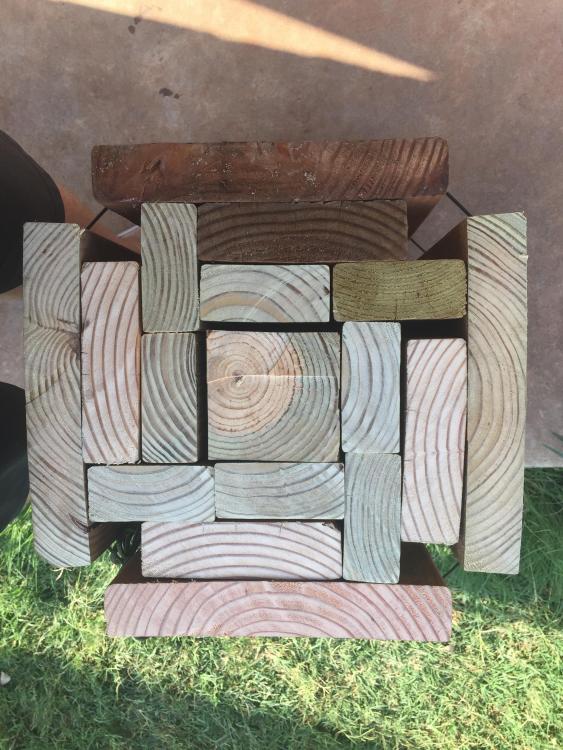
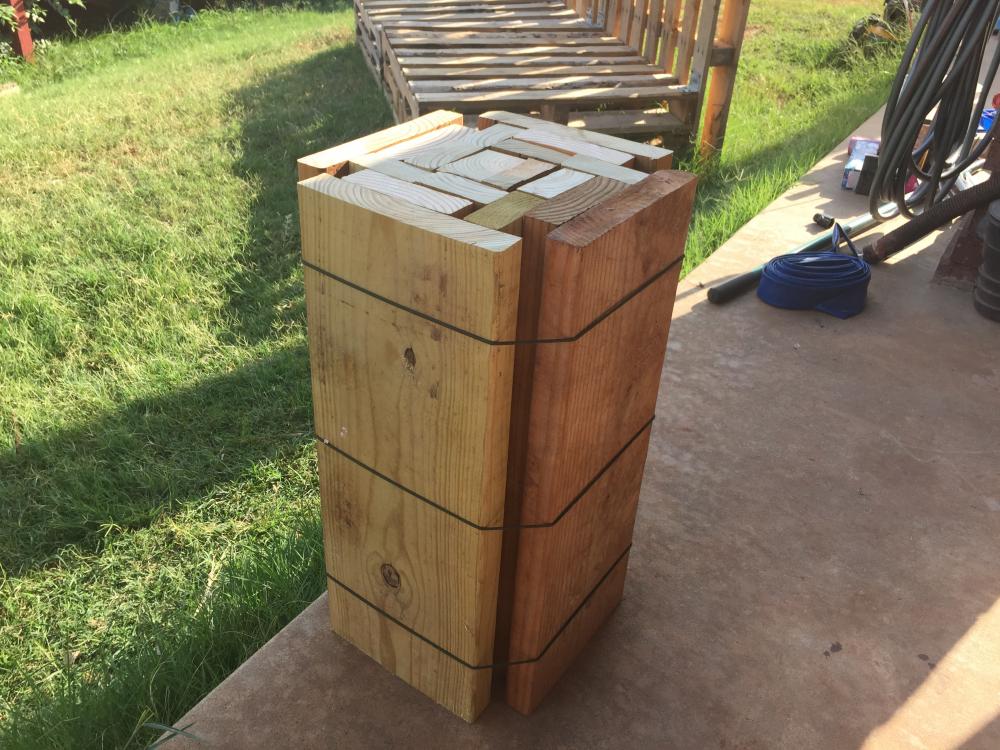
Well I've been up all night working on it. I decided if I was going after an anvil object this weekend, then my block needed to be ready to mount up... so here it is. Each board is glued and screwed to the boards touching it and then 4x 8" lag bolts from each side. All that's left is to smooth out the top with a quick belt sander pass and to slather it up with polyurethane to weather proof it and fill any cracks. What do you guys think? I know it isn't perfect, each piece was cut from scrap that's been under my deck for almost a year so a lot of work went into pulling all the bends and bows straight. Regarding the holes at each corner, I'm planning to drive a piece of 1/2" pipe down each hole to use for accessory holes (like a Hardie?)

-
Also, I wanted to add, I hope I'm not offending anyone by my desire to build a nice smithing setup. I enjoy projects a lot and right now my "project" is building my setup. I'm not ignoring the JABOD or the 55 build, I've studied them both and read up on it as well as the wash tub style forge, customs where the maker has a flat table, brake drums and disks, etc. And that's not to say that any of those styles aren't nice because they are, im just trying to learn more. Just like 3 days ago, I was dead set on a propane forge and now that I have done some more homework and studied up a little bit, I can understand why I should be building a coal forge.
-
I'm going to try to head over the that scrap yard this weekend on my way home from Lawton and see what I can see. They open for the day right around the time I'll be passing by Chickasha. I'll take 30-45 minutes and walk around. Hope I find some stuff I can use. Might even see about some angle iron to fashion a box frame that I can close in with what's left of my 2x scrap and have a coal bin.
-
I think you're probably right lol but I think that's a guy thing. If you look at it, *most* of us do it in a lot of things we do. For example, I just built a new book shelf for my wife out of some oak veneer plywood. Sure, I could have easily ripped it into 12" wide sheets my simply making a quick edge guide but why do that when I can completely justify a new table saw? I mean it was a bookshelf for HER so...
-
I'm really excited about this. I think I'm drawing just as much pleasure from building everything as I will from actually forging. I *could* slap together a quick stand in 10 minutes or just use this big ol stump that I throw in the bed of my truck when roads get slick, but I find a lot of satisfaction in building a nice looking custom stand for this anvil. As I will also be a perfectionist when it comes to building a nice work table and a clean, nice looking, and functioning forge.
-
That's really good to know. I'd rather buy the Salt Fork coal, I just don't know where I'd store 2,000# of coal except outside and storing something that can't get wet outside in Oklahoma is as big of a gamble as any. 110 degrees today with sun that would tan the devil and 70 degrees tomorrow with a chance of drowning.
-
I think I will be following Charles advice and start out on a coal forge. The money makes sense as I already own pretty well everything I need to build a nice one but mostly because that will get me going and learning. I'm a relief operator for Goodyear Tire & Rubber Co. and in a given day, I operate several hundred million dollars worth of machinery that takes months and even years to learn. When I equate that to forges, it would make much more sense for me to learn on something like a basic coal forge and then work my way into the more advanced propane forges. I also sourced some coal here in Oklahoma. I can buy it for $140 a ton from Salt Fork, or I can buy it from TSC right down the road from me @ $5.99/40#
-
All the lumber was cut from scraps that I had left over from a deck project that I did. Most of them have bows and bends in them so I was planning the slather it up with wood glue and then use clamps to pull each piece straight before being screwed together. I'll start with the 4x4 In the middle and work my way out until they are all one piece at which point I am planning to run 2 pieces of all thread from each direction and finish with steel straps accompanied by a hearty coat of poly as this will probably spend a lot of time outside. I hope I'm not missing anything. Arkie that stand looks nice. I have a little extra 4x4 but was trying to save it for legs to a small work table to sit next to my anvil stand.
-
Mr. Powers you are an inspiration regarding the corners! I think I have just the thing. I maybe should have clarified but the gaps between the pieces are only there because the boards aren't attached to anything yet, I stood them up on end just to take the picture. Once it's finished all the bends and bows will be straight and it will have kind of a butchers block look to it.
-
Would you happen to know the name of those 2 places? Chickasha is only about 15 minutes from my front door, but we haven't been up here long and I haven't quite figured out where everything is. I know there's a huge steel yard in Norman but I think they really prefer to deal commercially. Might still be worth a phone call but I definitely want to check the two places in chickasha
-
Maybe it would be better to put some piping there and use those holes fitted with pipe to affix the accessories that I was going to add like one hole for different size radii that could be swapped out based on need. If the hole is always plugged then nothing can get stuck in it
-
Well there's no bottom in the hole so shouldn't be too hard just to move it in the event I drop something small enough to go down a 1x1 hole?
-
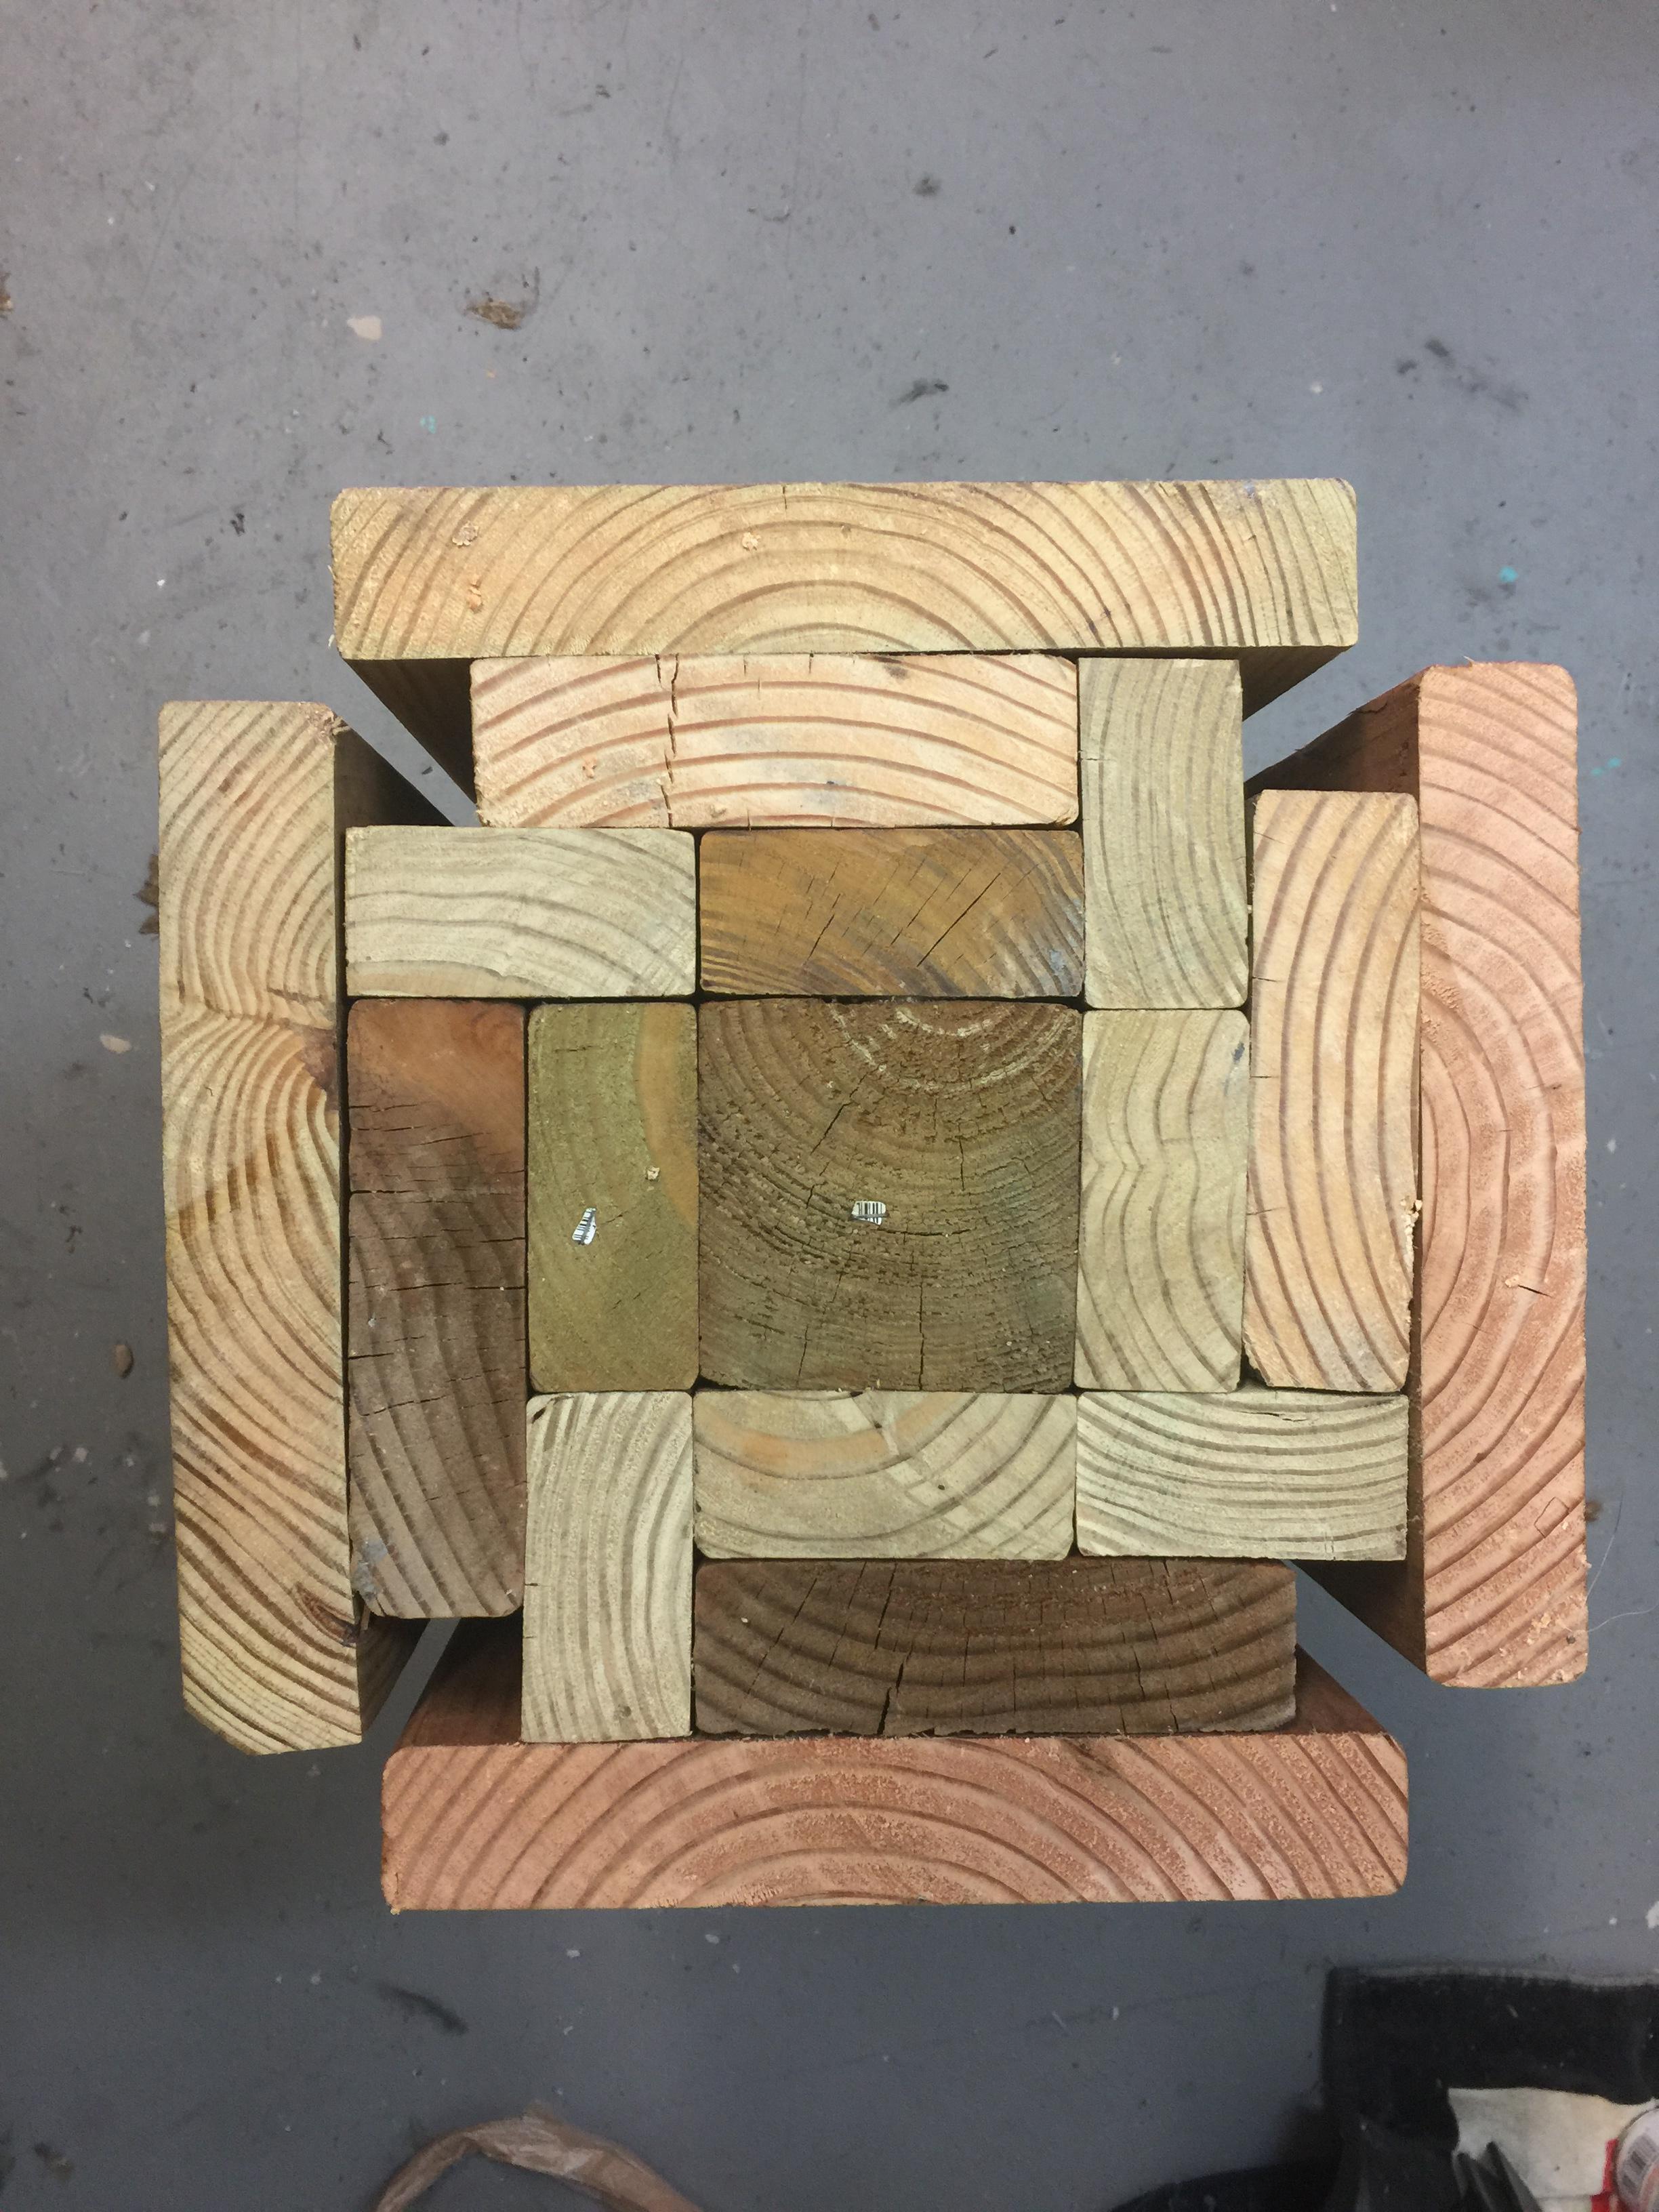
I raided my scrap pile today and put in a little saw work, and here's what I've got so far. I'm brand new at this so this will be my first stand. Planning to mount a 6" diameter steel cylinder as my anvil object into it. I also left a 1x1 hole at each corner for build in tool holders and then will affix more to the outside its not glued, screwed, or strapped yet hence the gaps when it's done it will all be flush and solid. They're just tied together with 550 cord to hold the shape


-
I think it will. I measured wrist and knuckle height before I started cutting and came up with 30-32", I cut my block lengths at 24" which gives me a anvil height of 6 inches. Providing that I would prefer to recess the anvil object at a minimum of 4 inches but more if necessary, that gives me plenty of room to work with as far as the actual length of my object. I've got an old Ford bumper weight that weighs in at 125# that I could use if I wanted but kind of wanted a more practical shape like a perfect square block or cylinder.
-
Haha yeah I know the feeling! Thankfully my wife does her own nails but those hair appointments.... you know... lol Anyway, I've had a productive afternoon of digging through my own scrap pile and after a little circular saw work and some puzzling, here's what I've got. Not finished by any means but glue, strap, and sand and it's ready for an anvil. I figure before I actually glue and strap, I'll know exactly what shape and depth my anvil object will be at and I can precut at least the 4x4 in the middle to fit. I may end up going with a 20# sledge head for now and having the 4x4 in the middle would make for an easy fit. I think I'm going to leave the 1x1 holes at the 4 corners to make for 4 extra tool holders in addition to the ones I will have off the sides
-
I'm rebuilding the staircase in our house today but I'm hoping to finish it early and start building my anvil block and getting it ready for The steel to go in. I only asked about concrete for the purpose of locking it in permanently. But I can see what you're saying about crumble. Also molten metal + concrete can turn ugly. Seen that first hand as concrete shrapnel doesn't feel good
-
No it does not! And you're so right, safety is key. There's no sense in doing something that will get you killed because then you can't do it again. Another idea with an accessory hole maybe instead of putting it in the wood itself, I could put it in the anvil so that if the accessory is something that needs to be hit on, it has the mass of the anvil under it? Think it would make a difference to hog out a big hole in the anvil block and fill the difference with concrete? Or just a nice tight fit in the block is sufficient?
-
That is true. i would prefer to build my first forge. I looked at some of the ones that I can get from the farrier supply in Purcell and while they look nice, I think I can just about clone the body of it for pennies on the dollar myself, but I do want to look into the cylindrical shaped ones. I saw a build for one out of a steel 5 gallon bucket that could work. I also have an old steel washing machine tub that I think would work with a healthy layer of kaowool and a good refractory cement. Im not opposed to coal, just kind of had my mind on propane. I like the freedom you have with a coal forge but I like the user friendliness of the propane. Not having to stoke a fire to keep it hot and nurse it. Sometimes when I think I have hours to work, I end up only having minutes and sometimes when I think I only have minutes, i end up being able to run for hours. So the propane setup fits that better. Same reason that I have a propane smoker and a full size woodfire one that I built out of 100gal propane tank. The woodfire one does a better job because I can pour a lot more smoke in and cook a lot more product but it takes at least an hour to get it burning how I like it whereas with the little propane one, I can spark it and throw the meat in almost simultaneously. Was also thinking when I am fitting the anvil into my block, I could also fit in some smaller ones to provide smaller radii to work form around and fitting the outer perimeter of it with hooks or straps for hammers and etc. to sit in.
-
At least I'm headed in the right direction! I'm really thinking I might lean more toward a gas forge than solid fuel due to the fact that my entire house is fueled by a 500 gal. Propane tank that we have filled several times a year. If there was a way to feed the forge off of that it would be great but may also look into leasing a smaller tank just for the forge and just have them come fill it when we have our big tank filled.
-
Actually now you have me thinking! I have 6 wooden pallets on my back porch that are left over from some pallet patio furniture that my wife had me build. I'm thinking break them down, cut to length and band them together to make an anvil block. And then I know where there's an 8 inch long 6" diameter piece of steel that I could mound to my pallet anvil block. Car parts are nearly a no brained as I am still on very good terms with the owner of the shop I used to work at. I bet I could even get my hands on some old iron chevy small blocks and cylinder heads if there's a use for them. Engine block = swage block maybe? I'm still way too green for that as I haven't even built a forge yet, but I'm just snowballing here. Also with that big piece of steel that I mentioned above, it is marked 4140, which by the reading I've done on here, seems very capable of handing the hammer blows Thank you guys for the help and the warm welcome for sure!
-
Really good advice here. As for myself, I have been bouncing around kind of my whole life chasing an honest dollar. I worked 6 years for a Auto shop building their racing engines and modifying cars for the strip or the oval. My Ag teacher in school was very focused on welding and fabrication and I spent everyday for 4 years learning to weld, braze, run a torch, plasma cutters. I also have dabbled on and off in residential construction and remodel projects. Currently I work for the Goodyear plant down in Lawton. It's a production job that doesn't allow much for enjoyment but it's great pay, great schedule, and unmatched benefits.