
Meridianfrost
-
Posts
53 -
Joined
-
Last visited
Content Type
Profiles
Forums
Articles
Gallery
Downloads
Events
Posts posted by Meridianfrost
-
-
The filter is on the return line, not the intake line. You suggested to put it on the pickup line. Is that not the intake? Sorry if i'm not understanding what you mean. I appreciate your patience!
32 minutes ago, Frosty said:Which assessment? The one where I opine you are not using a filter with sufficient pressure or volume rating? As I said then and below filtering the intake side of the pump is a least desirable location that will work.
Nor am I Brian, though you CAN hear cavitation in time to prevent damage. IF you pay attention to the machine of course. It's just an alternative to using a filter large enough it won't burst in use.
Dayne could certainly be correct and there is debris blocking the flow in the filter housing.
Frosty The Lucky.
On 10/20/2020 at 10:26 AM, ThomasPowers said:So why are you asking us and NOT the MANUFACTURER?
I'm asking because i have done everything according to the manufacturer's instructions, and I am having a problem. I lack the testing equiptment to see what the pressures at the filter are when it's in use. so I was hoping that someone might see something that immediately looks off to them, or who have had a similar problem.
55 minutes ago, Dayne said:I'm only chiming in not because I'm an expert but just through what might be dumb luck, I stumbled across a tripod equipped youtuber (fire creek forge) who just built something similar. He describes the same problem in his video. there is a little valve in the filter housing that broke off and ended up blocking the return line after the filter. He replaced it with a new filter and "housing"? that didnt have the little valve in the top like yours does.
Thanks for that. Yeah yeahs, ill get a tripod lol. I have ordered a new filter and manifold, so I am going to try replacing the whole housing. THanks very much for the input!
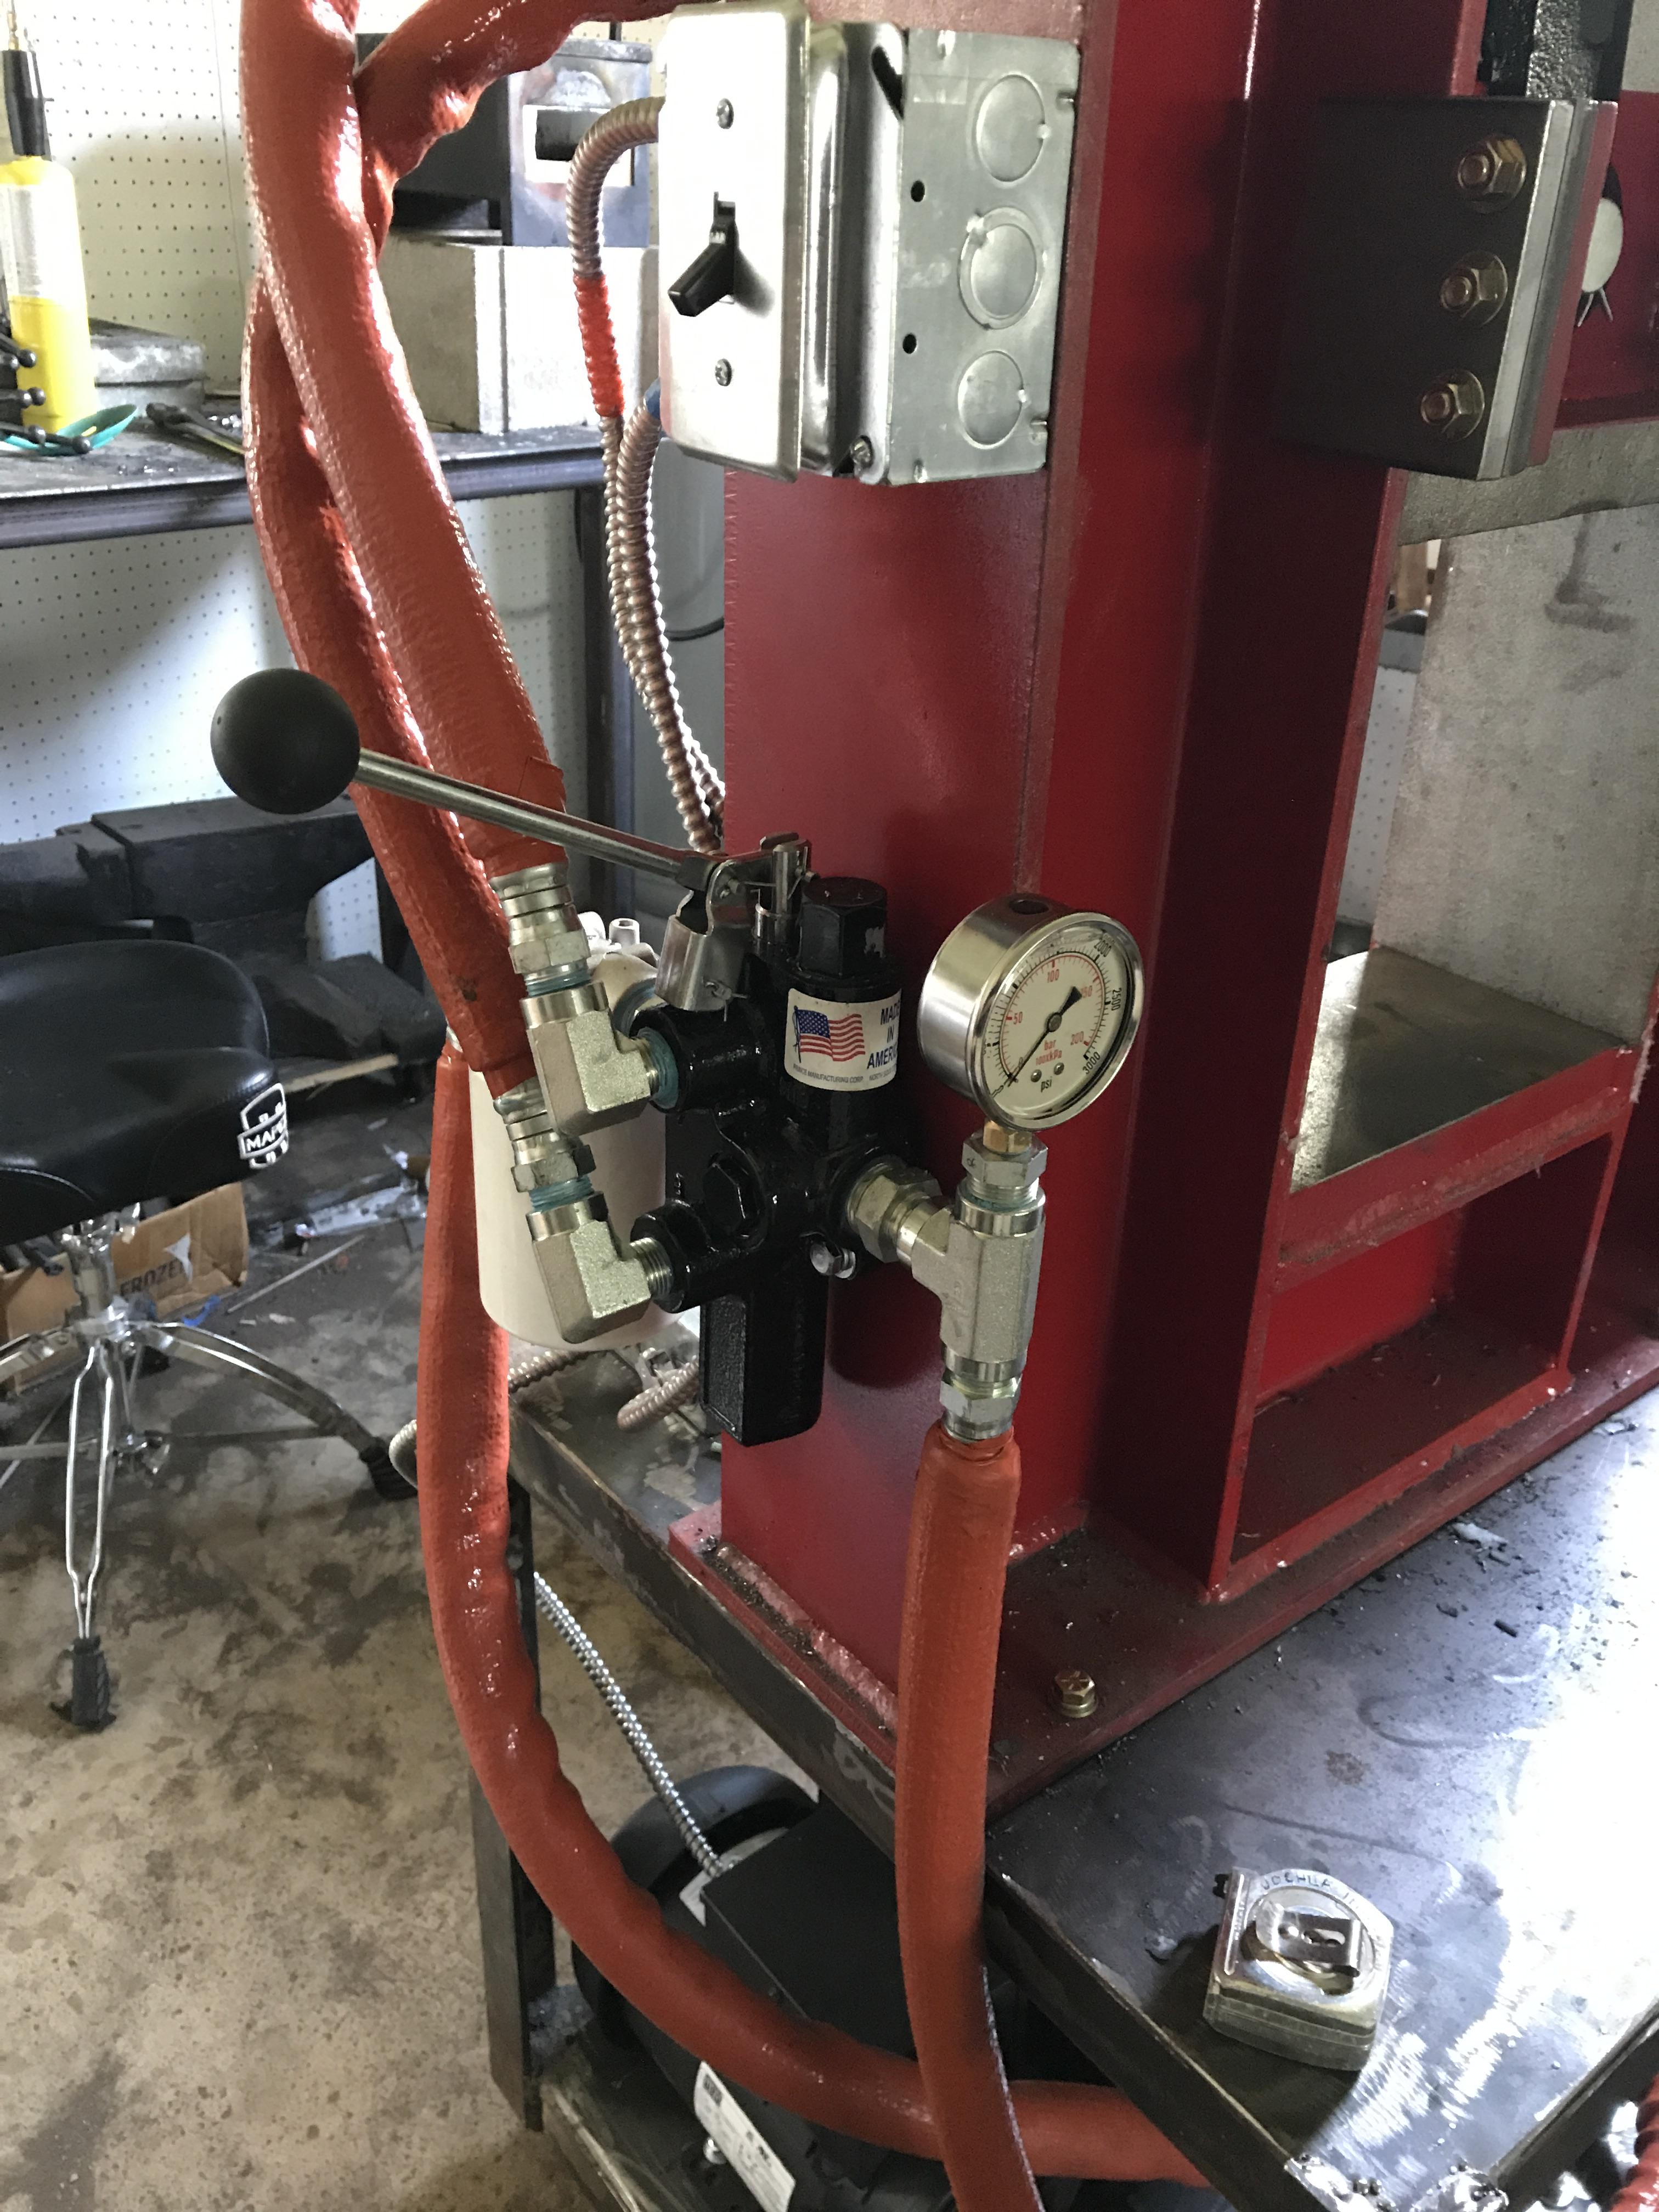
On 10/20/2020 at 9:55 AM, brianc said:What does your gage read when the valve is not actuated (center postion)? This will show what it is taking to pump oil thru your basic circuit (back pressure). If it is above 75-100 psi you have a restriction somewhere and that is probably the source of your problems. Slamming the valve open and shut and inducing huge pressure spikes while forging with everything close coupled isnt helping either. Hoses do have an accumulator effect to damp out spikes. Nothing wrong with a low return filter, as long as the return truly is low pressure. Im not a huge fan of pump inlet filters because if they start to plug then your pump gets starved and cavitation could occur.
Regards,
Brian
Thanks very much for the input. Its the nature of a forge press to have those pressure spikes, and that was a concern going in to it. I will check out the back pressure tomorrow, and get back to you. I don't know why I didn't think of that.
-
The manufacturer disagrees with your assessment, frosty.
-
Hello!!
i am having a problem with my hydraulic press. After normal, periodic use, I blew out a filter and thought the filter must just be defective. But now the new filter is deforming, and I don’t know what the problem is. I made a YouTube video explaining my system, and the problem more in detail.
Any advice anyone could give me would be amazing. Thanks for your help.
-joshua
-
Hi there!
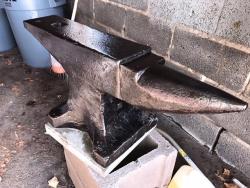
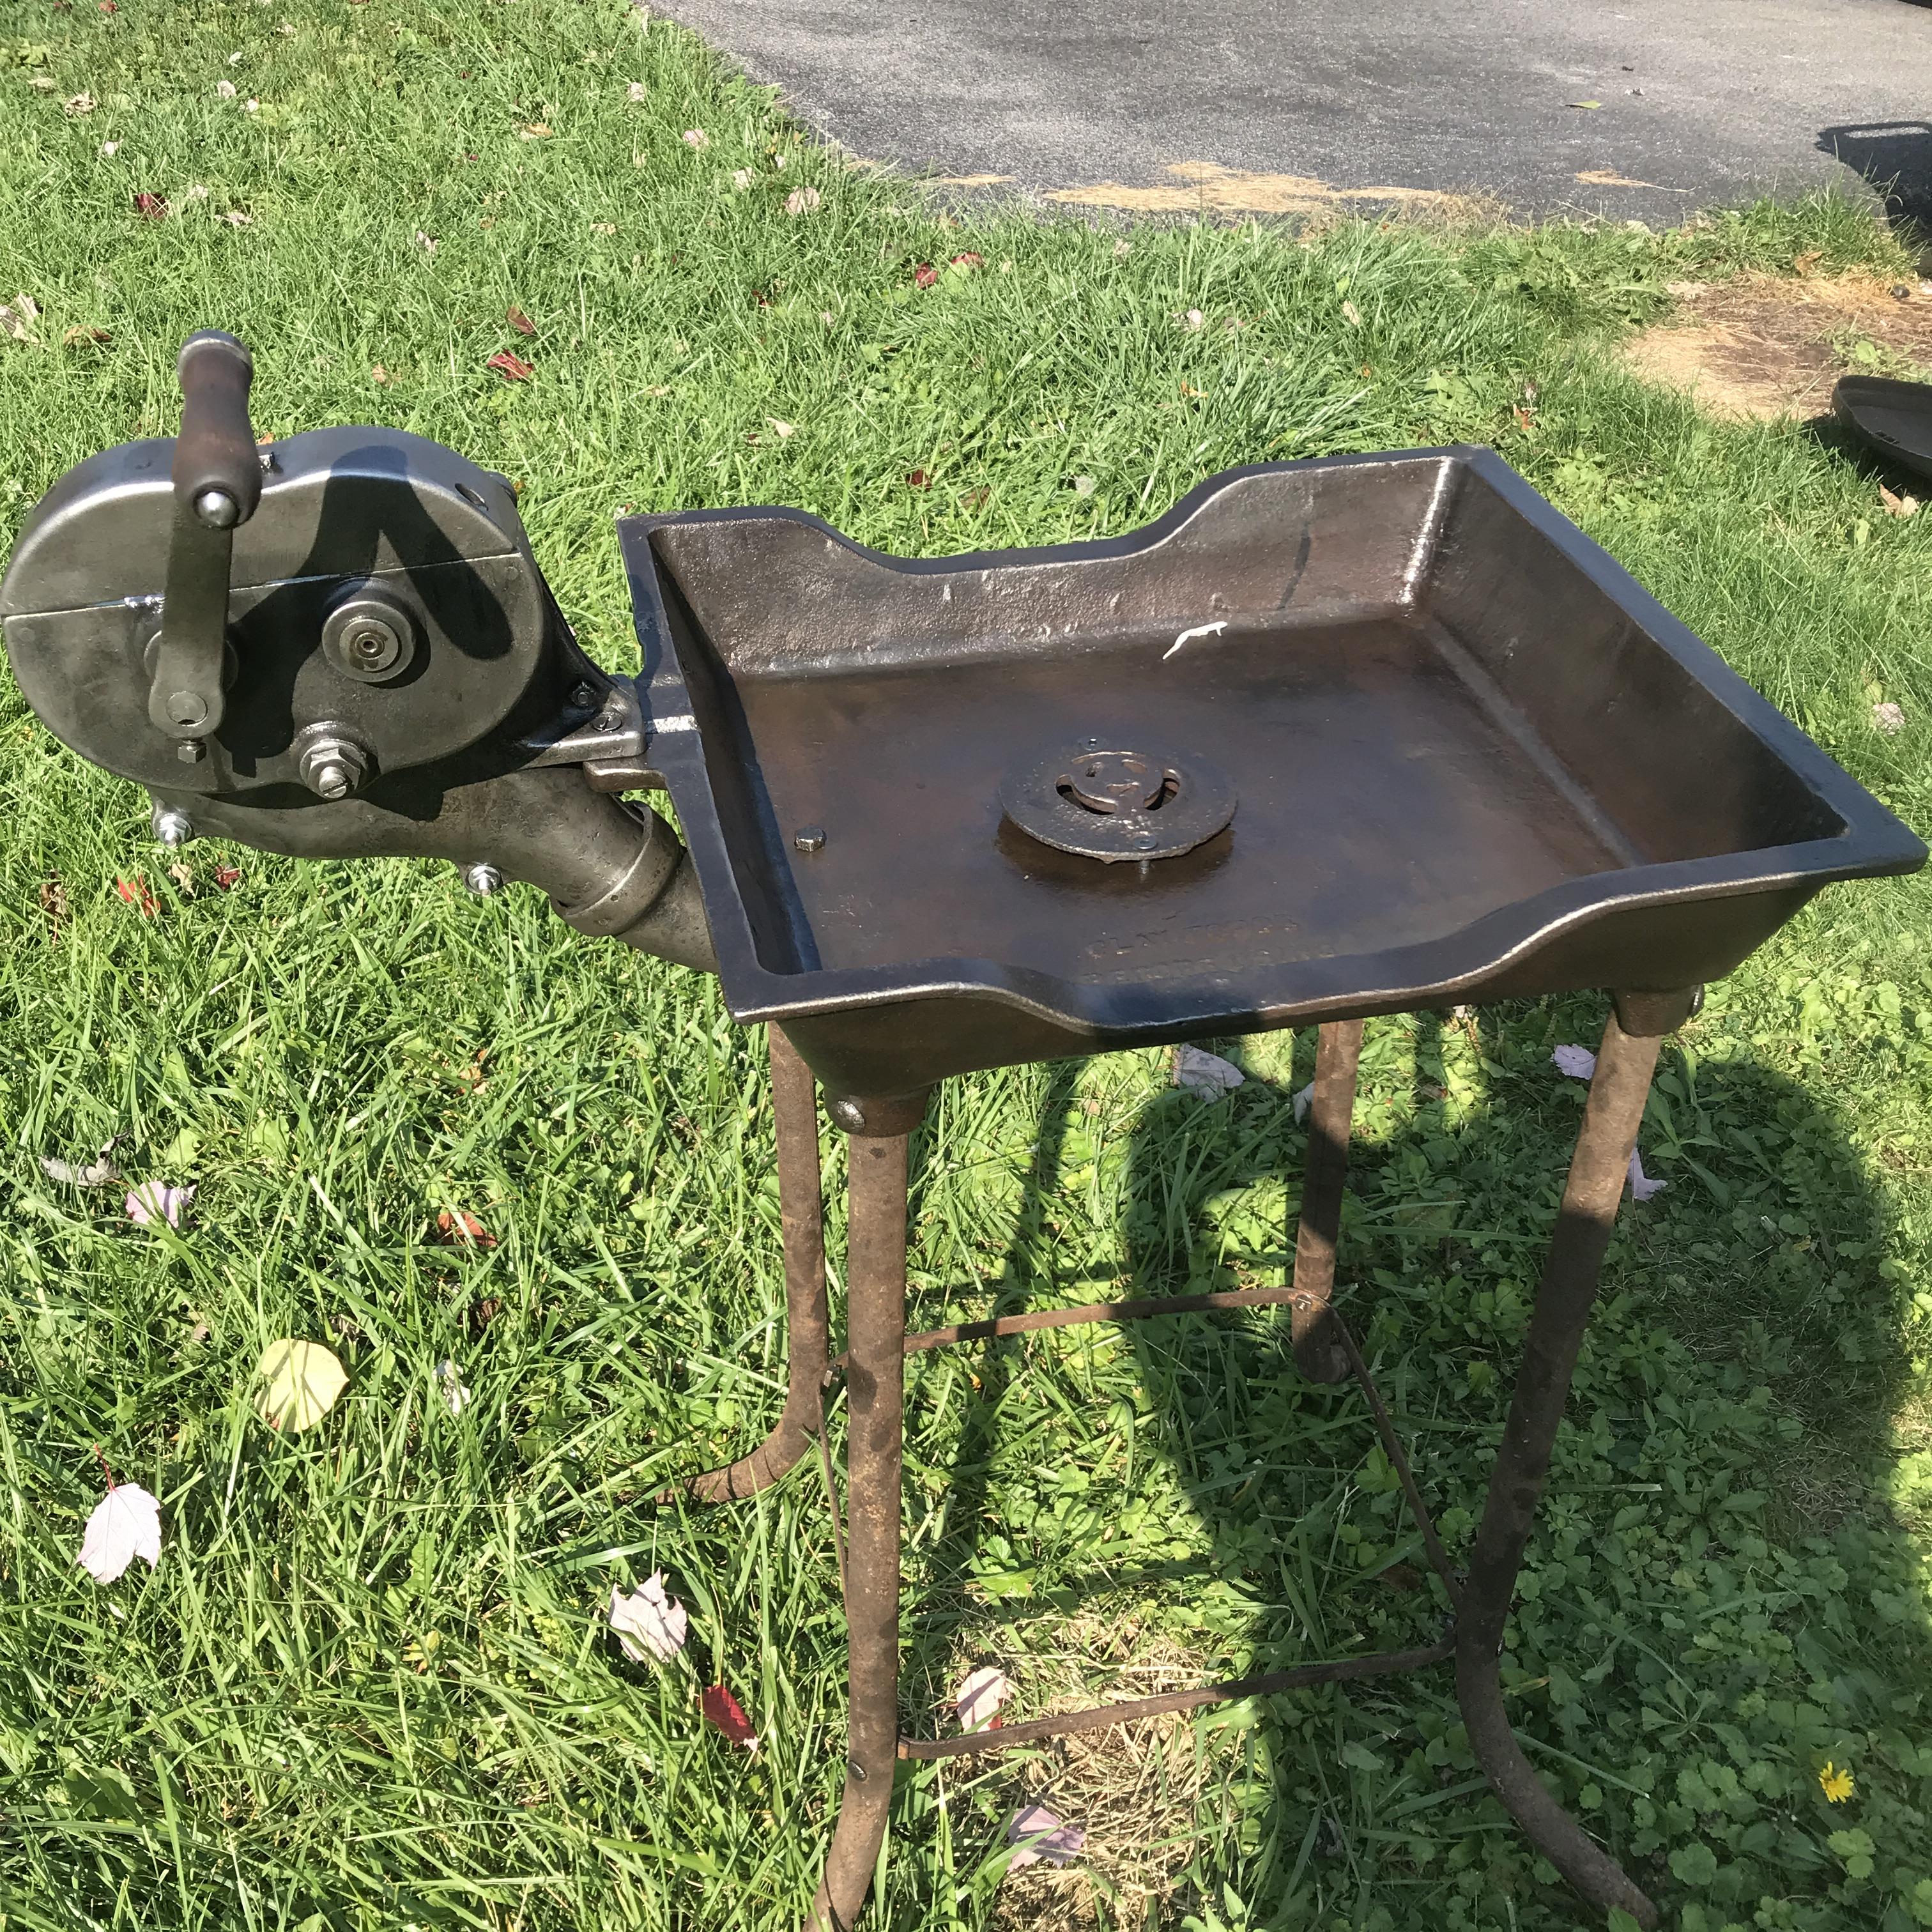
I recently purchased and restored a champion 104 rivet forge. It’s a cute little thing, with the smallest champion gearbox I have ever seen.
it’s in remarkably good shape. Under the thin veneer of rust it looked like a forge that was seldomly used, and obviously taken care of.
My question and my difficulty is with the blower. I took some video of it and I will try to upload it here. Edit: I uploaded it to YouTube. Here is the link
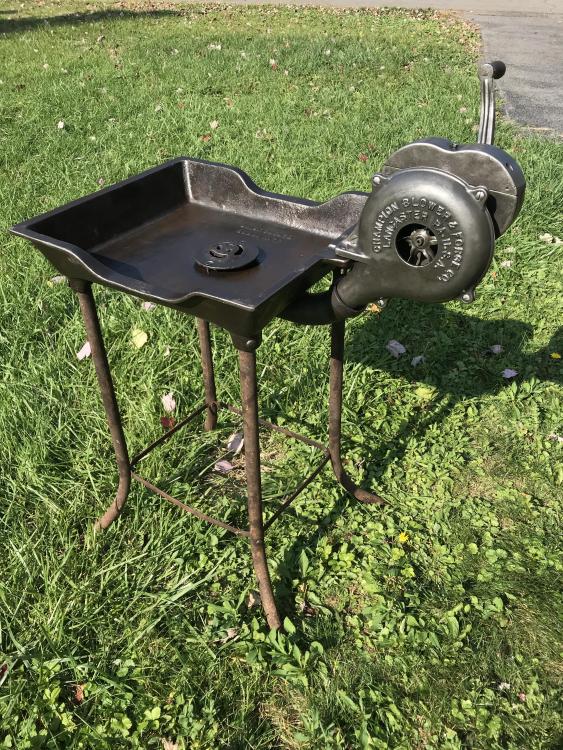
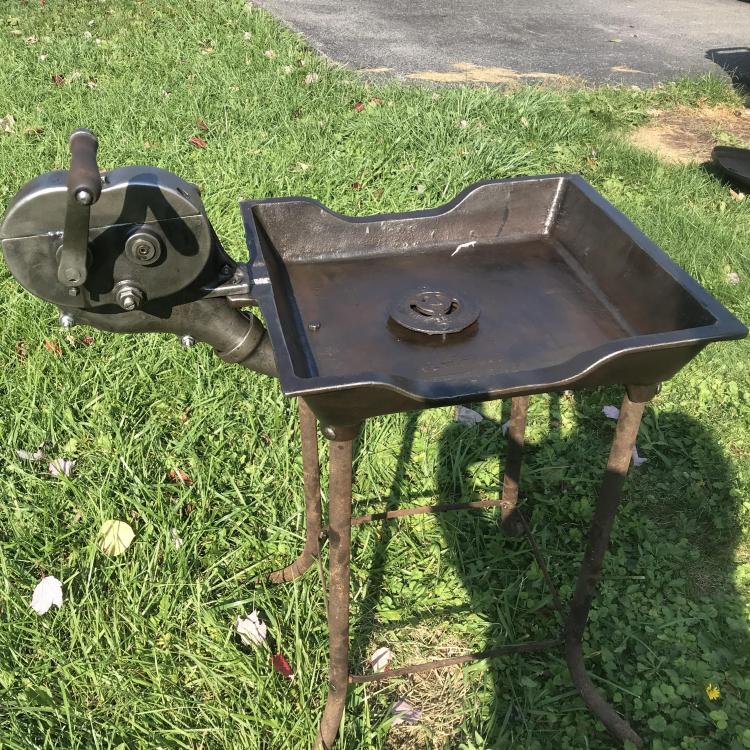
the blower is loud, and I am getting definite gear noise. Every champion blower I have ever used has been relatively silent. I know the fan mechanism needs to be balanced, so it doesn’t cause a wobble, but the gears still seem stiff. The gears look great, there is no pitting or damage to anything inside or out of the gearbox.
is this normal? I realize it’s a smaller forge, but are the river forged inherently stiffer than their larger counterparts? I know the 400 blower has ball bearings in it, so that will make it smoother in general. I haven’t pulled any of these gears, so I don’t know if there is significant wear on whatever bushings are there. Any advice would be appreciated.
-
2 minutes ago, Steve Shimanek said:
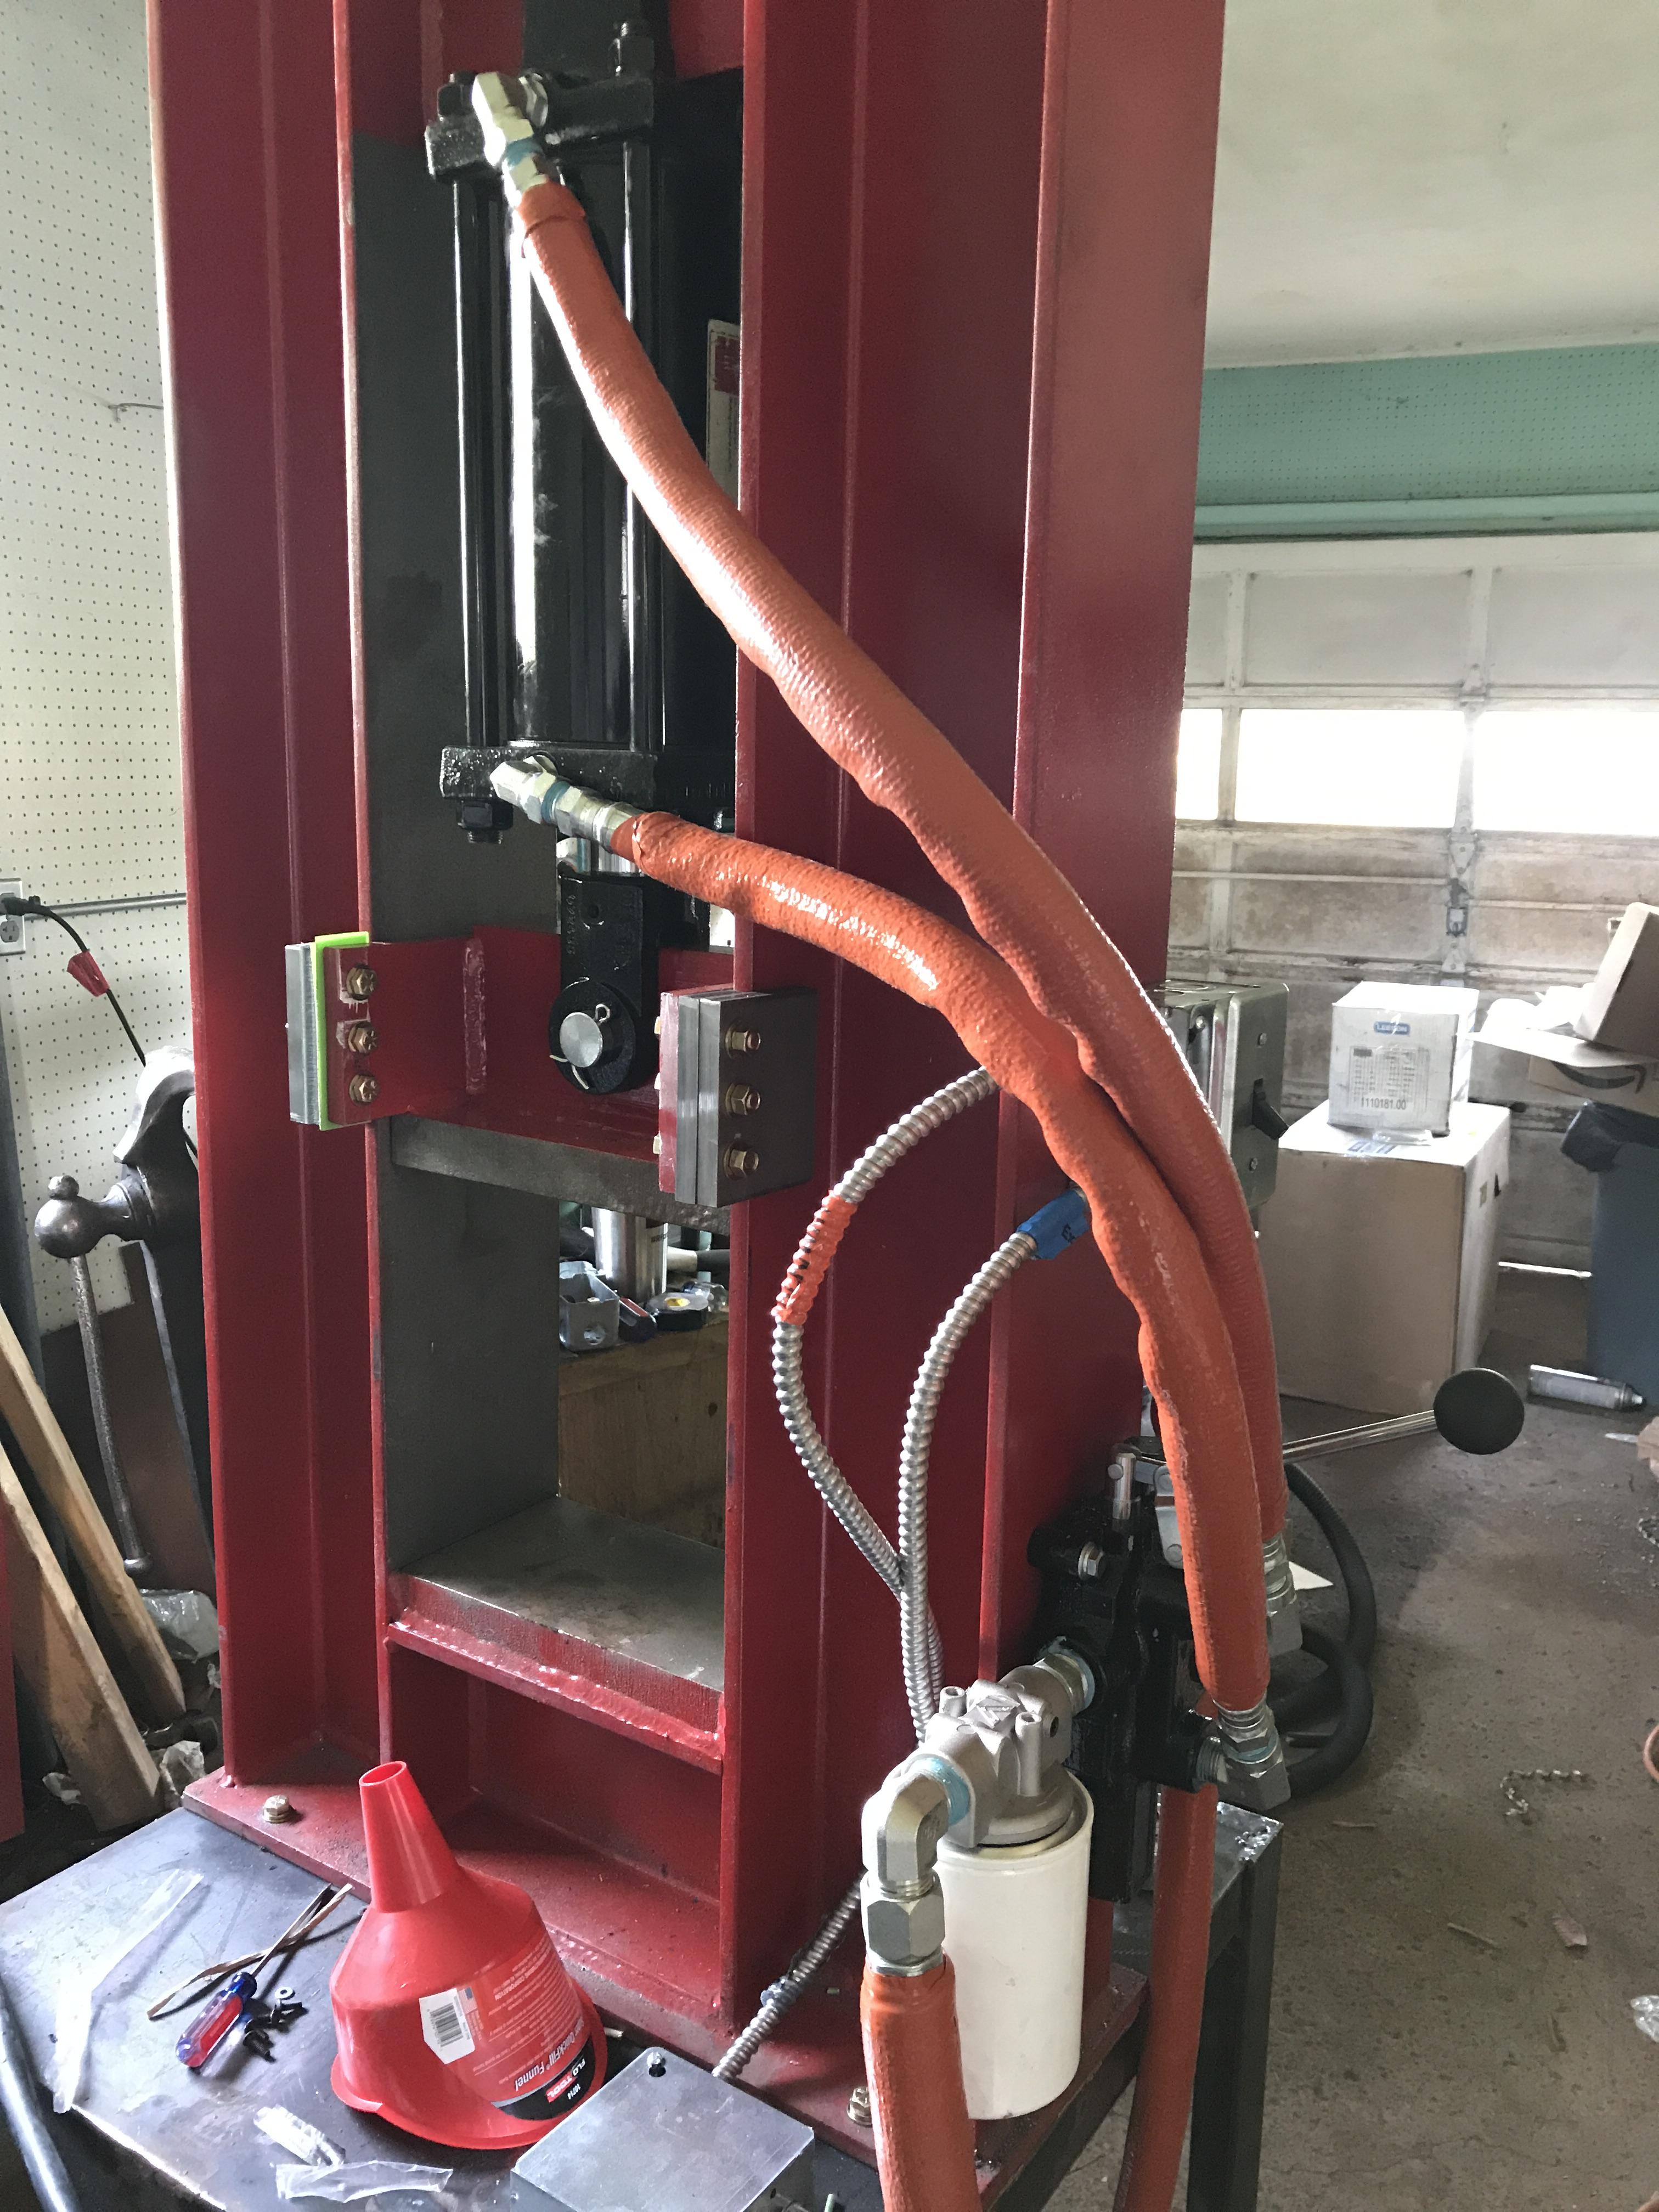
What is going on with your hoses...they look lumpy which could indicate failure. Pressurized hydraulic fluid is dangerous.
They are wrapped in protective fire sleeve in case they accidentally come in to contact with hot steel. I thought it was a necessary safety feature given the environment they are operating in.
-joshua
-
34 minutes ago, Goods said:
Unless your cylinder is a thru rod type the force retracting is reduced by the area of the rod itself. From the pics you have a normally cylinder, so if you make a ratio of the rod area to the cylinder area you can use that ratio to calculate the reduced tonnage on retraction. Inverse the ratio and you can calculate the increase in max return speed.
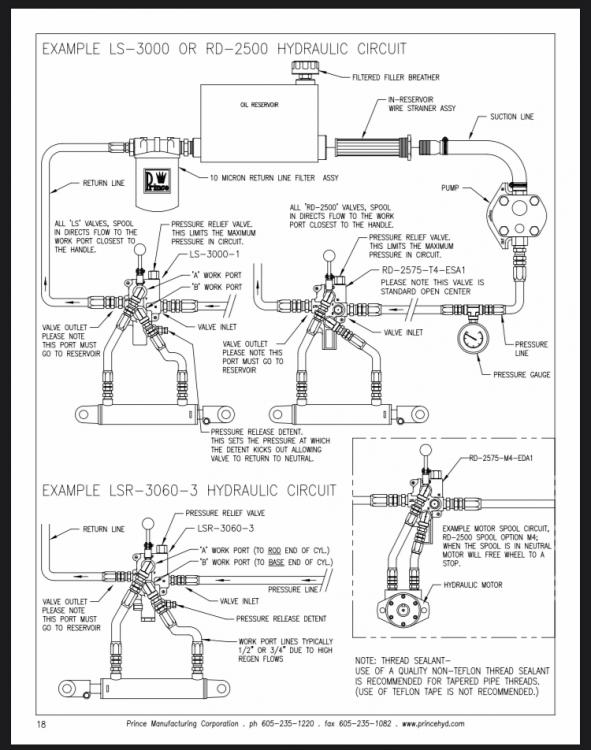
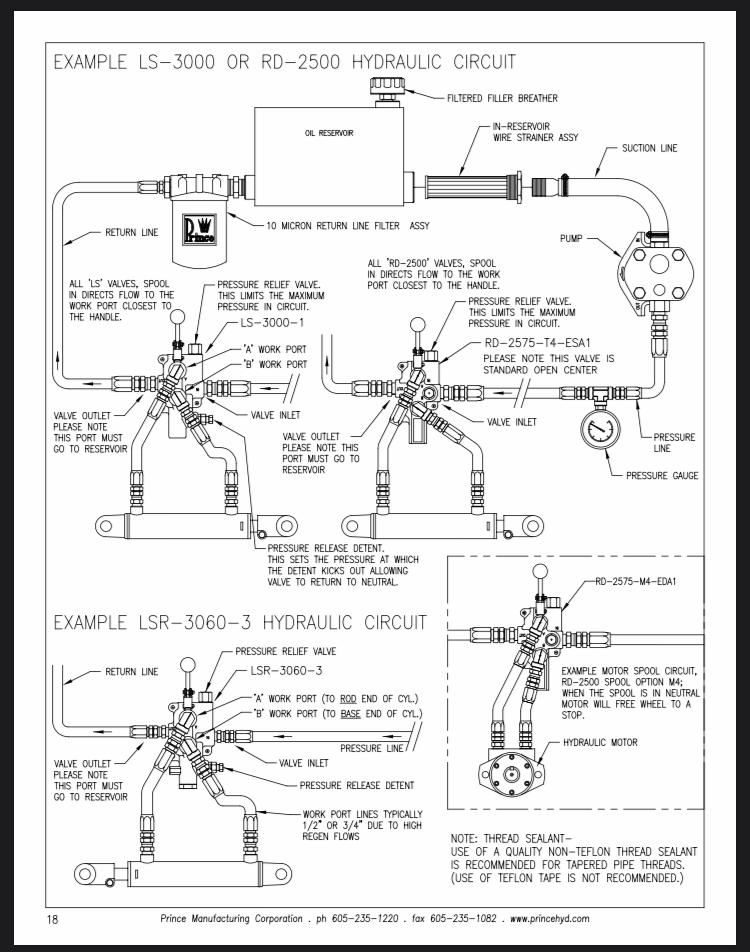
There could be a difference in the valve also, but I would need to see the valve diagram to help out there. A power stroke option would be awesome for a forging press, especially if it has a large rod to bore ratio!
I like the idea of having the action lever reversed. If you hit the lever accidentally the press opening could be a much safer failure mode.
Either way, enjoy the press,
David
Omg DUH. I can’t believe I didn’t think of the volume of the rod taking up space in the cylinder on the return stroke! Thanks for pointing that out. Now I feel like an idiot. I don’t think it’s a problem with the valve, although I’d love a power stroke option too!!
And I don’t know, maybe the action of the lever is something that I can get used to. Your point about safety is well taken.
Thanks very much for the reply!!
-Joshua
-
I’m running the system at about 2750psi. It’s a 5” bore, 2” ram, 8” stroke.
-
Hello! I have a question about a 4-way directional control valve. I have build a forge press for my smithy, and I’m wondering if there is a power stroke port on my control valve. The system is a 25 ton press, but I don’t feel like I am getting the power that the system is designed for. I’ll attach some pictures. I’m wondering if I have my hoses from the control valve and DA cylinder connected correctly. I installed everything to the manufacturers specifications. Also, regarding the control valve, I have to lift up on the handle to articulate the cylinder downward, and push down on the handle to articulate the ram upward. Can I reverse the hose positions on the control valve ports to reverse the direction without sacrificing tonnage force? Is the force equal on both ports? I think I remember reading something on the cylinder spec that the return stroke is much less powerful than the pressing stroke. Any help would be greatly appreciated. Than you!! -Joshua Frost


-
Thanks to everyone for their encouragement. I really appreciate it. Yeah, for now I am going to just keep my eyes peeled for a good used press, and just keep on saving my money so I can afford uncle Al's. Whichever comes first. Looking for a local group that is toying with doing a workshop is a great suggestion, or maybe I could get the ball rolling here with my local abana group. We shall see what the future holds. Thanks again everyone.
-josh
-
9 hours ago, jeremy k said:
I don't think Frosty was in any way implying that at all -
Yeah, I get that. But it just isn’t the case with me, and a lot of other bladesmiths/blacksmiths I know. I work as a bladesmith part-time, and have a full time day job. If one is selling their knives in a market that is already saturated with makers, you’re going to need at least a few pieces of specialized machinery to keep up. Even if you only make a couple of knives a month, they still need to be quality knives, with creative patterns. Forge welding by hand isn’t fun, and it takes days at the anvil to produce one billet of 200 or more layers. And that is just random pattern. Then you have to worry about decarburizing your steel because of having to put as many heats as you need to make a quality billet. A press accomplished this in hours, so more time can be spent with the detail work that is necessary for the kind of quality you want to put out there.
Does it sometimes bum me out that I need a tempering oven, bandsaw, Forge press, power hammer, variable speed grinder, surface grinder, drill press, mill, chop saw, mig welder, and acetylene torch to do it right? Yeah. It does I just need to decide what is critical to the operation, and chip away at it as time passes. At the rate I am going, I’ll have a full bladesmith shop ready to go in about 10 years. That is of course, unless I can start selling knives at $1,000 a piece! Which I would be more than happy to do.
My point is that it IS apples and oranges. I’m not a full time bladesmith, and I don’t have the kind of capital to work these expenditures into the price of my product like they do. The big makers who sell their product for thousands of dollars absolutely incur cost as time marches on, and riverside machine is no exception. They have to make a profit from what they are doing, because people should be paid for the things they create. We aren’t all in this because of some altruistic drive or obligation to the smithing community. I don’t usually give my knives away, and I am certainly aware of the labor and skill it takes to make them. So I understand. It’s a bummer, but I understand. This post is about seeing if there were any makers that I was missing where I could find a cheaper press. Only that. Thanks for the feedback.
-
1 hour ago, Frosty said:
Costs to the equipment maker go up and he has to maintain his margin or stop making.
Well, as usual frosty, I just disagree. Prices for knives of people who aren’t Fisk don’t enjoy the kind of markup that comes with outfitting one’s shop. So yeah. Apples and oranges. You may have the money to simply pay any price for any machine, but most of us lesser mortals have to almost break our necks to get it done. And yeah. I NEED a press for what I WANT to do. I’m doing the normal human thing, and asking in a place where someone who makes presses is likely to hang around. I’m not punishing anyone, and if you had read my post, you’d actually see that I adore uncle al, and the quality and utility of his press. Since I am on a limited budged, that additional $600 needs to be spent somewhere else. And no, I’ll probably buy uncle als press if I don’t find someone who can make one for me cheaper. Not to mention that the two presses you mentioned in your post have entirely different designs, and utility. This post is about seeing if someone is out there that can do it cheaper, because money is tight. I don’t think that is an unreasonable thing, and I don’t think it’s that difficult to understand.
-
Yes yes, very true. I haven’t raised the price of my work, but that is apples and oranges right there. A lot more difficulty involved in having a press shipped, hydraulics, etc. it’s easier for me because i don’t really have to keep up with increasing prices on that scale. I don’t necessarily think that I have my answer though, especially if someone who is out there makes these cheaper on a smaller scale reads this message
") I am maximizing every avenue I have, since I’m not independently wealthy. Thanks though, frosty.
I am maximizing every avenue I have, since I’m not independently wealthy. Thanks though, frosty.
And yeah, Thomas, I guess it could be worse. And I’m sorry about your yurt! If I knew anyone who built them I would definitely send them your way.
-
So I am a little bummed out. I am finally ready to buy a press, and Uncle Al was my guy. $3,500 for a 24 ton press, and I was home free. Well the good folks (and I do mean good folks. Nice as can be and make fine machinery) have raised the price of the 24 ton press by 17%, and it now costs $4,100, and $500 to ship it in the continental United States. I sent them an email, and asked what they may have done to the press to merit such an increase, and Uncle Al told me that the price of the parts have been gradually increasing over the past couple of years, and he needed to either raise the price or quit making them. I should have pulled the trigger last month, but I wasn't financially ready to do it. My loss. I have used his press, and I love it. I love how it cycles, and the way it feels.
SO! Now I am faced with a dilemma. I can buy a 16 ton xxxx xxxx press for $4,600 and free shipping, or I can buy an Uncle Al's press, and pay $4,600.
I have read through a couple years of posts, but I haven't seen any that put a comprehensive list of people they knew that were out there manufacturing presses.
Uncle Al's 24 ton now $4,100 + $500 to ship. $4,600 total As far as I know still the least expensive in the mix for the tonnage.
xxxxx xxxx xxxx 16 ton - $4,600 with free shipping.
xxxx xxxx 50 ton - $8,000 + 500 shipping
xxxxxxx 25 ton - $7,000 +300 shipping
And of course, the elusive Craine Press, who have not gotten back to me about cost.
I don't trust my welding skills enough to build one myself. I don't have the jigs set up to do it properly, and if I am going to invest $1.5k into a hammer, I don't want to wind up with a heap of scrap metal when I finish. Everyone wants the tools they use for the trade to be cheaper. Part of taking your operation to the next level is investing in good tools that will enable you to do the job you want to do. I am a bladesmith, and I will use the press primarily for forging damascus, or pattern-welded steel. This question has been posed a few times with varying results, but does anyone know of a private individual who is making these at a better cost. I know that there are some people here that are looking for a $1,000 press. I'm not that guy. I know how much the parts and steel cost for a 20 - 25 ton press, and I am looking in the $3,000 to $3,500 range. If anyone is building presses in that range, I would love it if you could hit me up. Or, if I am leaving out a manufacturer that you know of, I would greatly appreciate the reference. Thanks everyone for your effort
-
5 hours ago, Zrognak said:
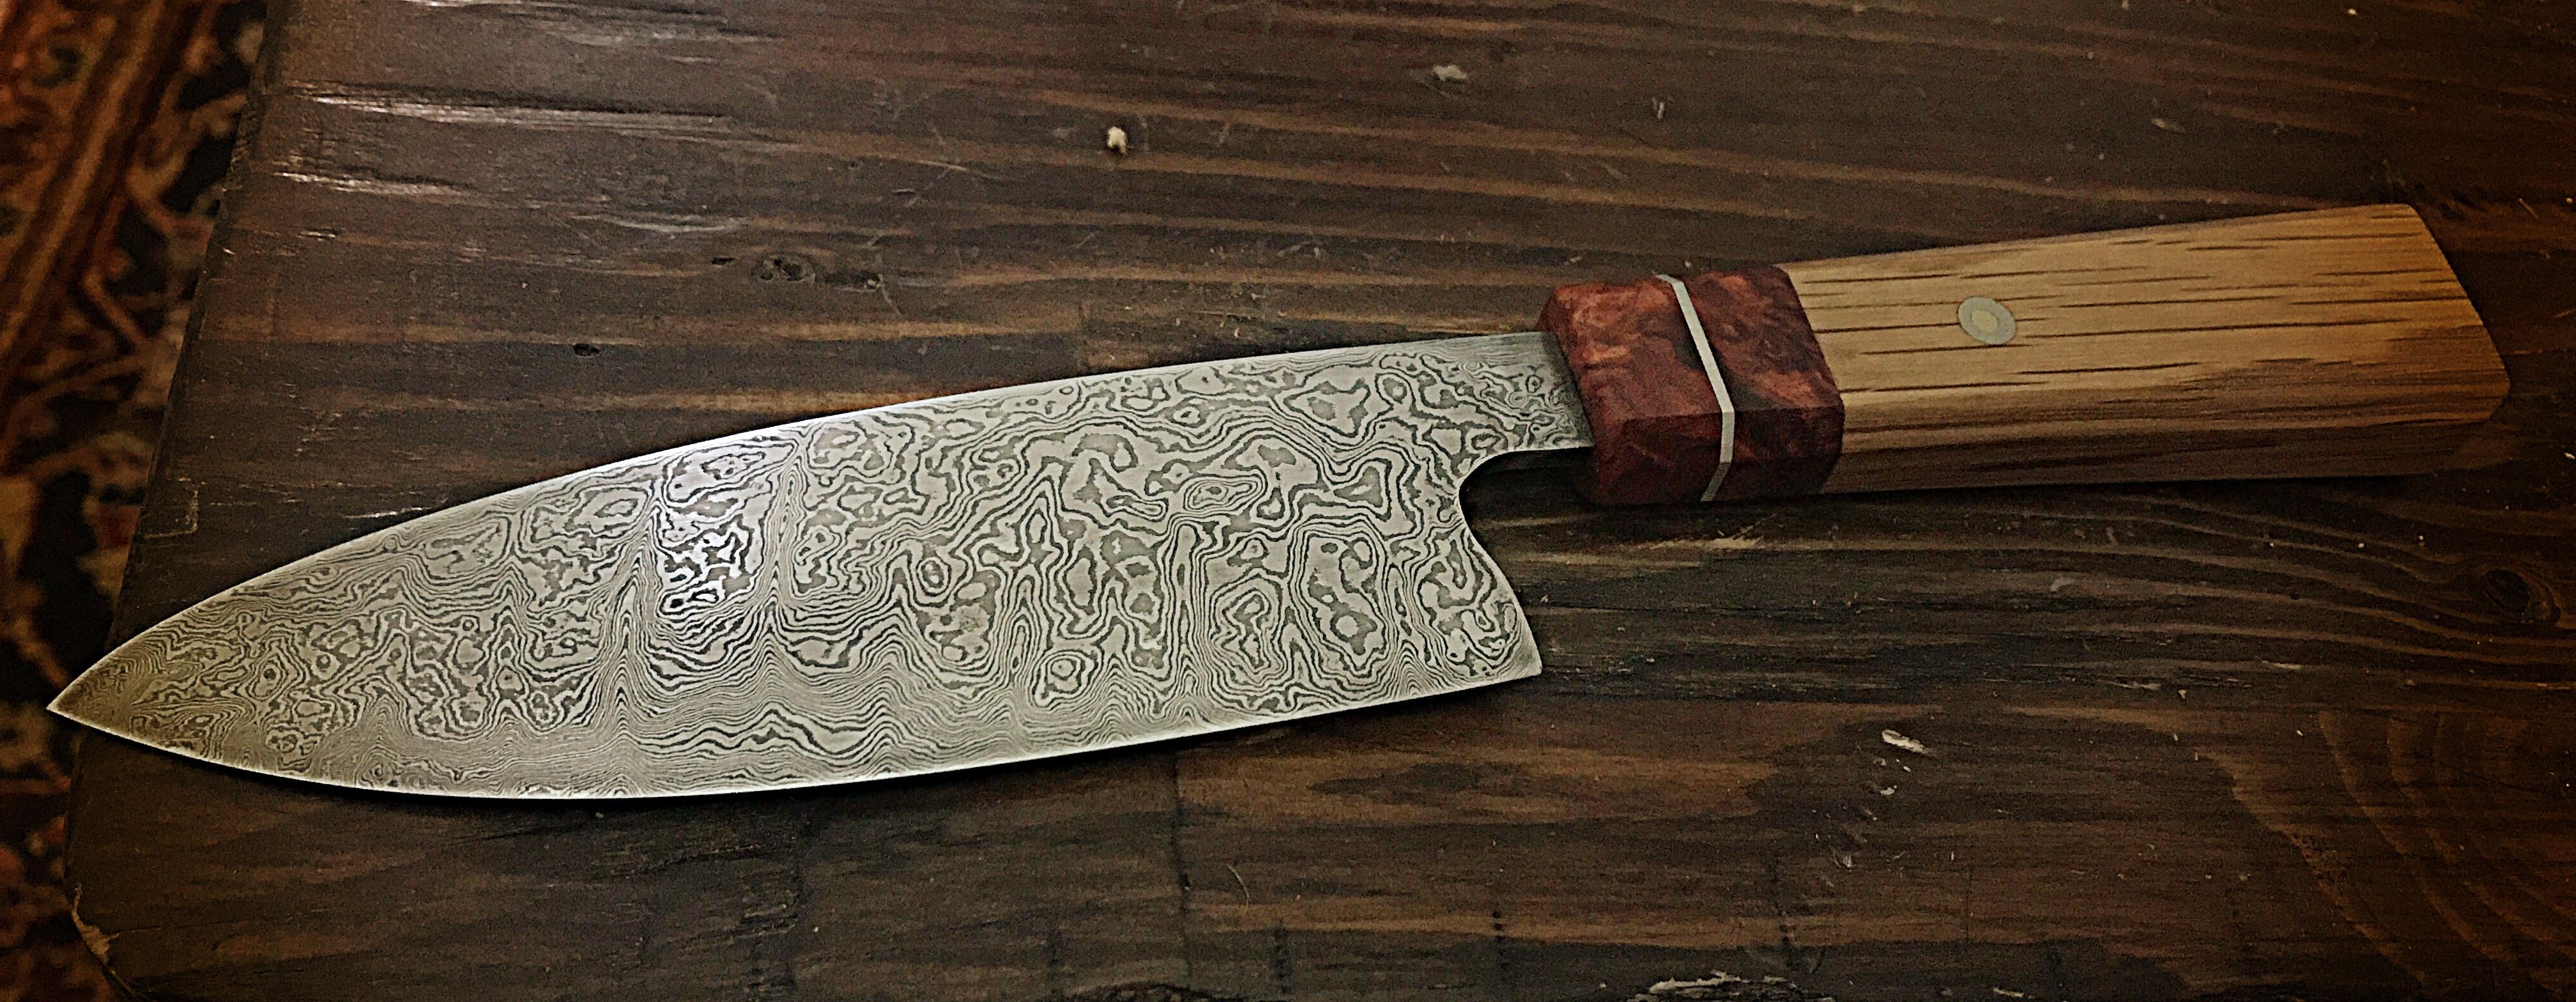
Yet again you keep impressing me good sir, I can see as Steve said you didn't quite get the ladder effect fully there and I can understand that since it is a thin blade but to be fair it still looks really good, I like the patterns you make cause they are not all even everywhere I never been a fan of pattern welded steel where the layers are so perfect its like every layer is perfectly straight and flat, so this gives it so much more life, reason I prefer hand forged over pressed cause it will be a lot more life in the pattern.
The shape of the blade is great Im not a chef but I do cook a lot and the shape is useful for a lot of things. Good work on the finish the handle looks really good, not sure about the wide shape but I think I would have to hold it in my hand to judge it, it looks great.
Thanks very much for the feedback. It’s definitely a much more “organic” looking pattern. One might say that hand forging pattern-welded steel is sloppy, but I really do like the patterns I am making, and hope to continue my journey with new and exciting things!
The handle is definitely better feeling than it is looking. There is a 2mm taper on all sides to give it more control. I don’t think it could be anywhere near a production knife, and I’m sure there would be some fatigue after a few hours of cutting with it, but for the home chef I think it will do nicely.
Thanks ahmgain for the kind note.
Cheers,
j. Frost
-
5 minutes ago, Frosty said:
You can fuller then grind rather than grind the groove and forge flat for the same effect can't you?
Frosty The Lucky.
No idea, but that actually sounds like a good idea. The fuller should disrupt the pattern enough, and grinding out smaller grooves. I think I may try that.
-
17 minutes ago, Steve Sells said:
looks good, but in order to get the ladder effect, you need to cut 1/3 to 1/2 way through the bars, so you dont grind through them like you did here. Also do not make them back to back, but off set from each other
Thanks very much for the advice, Steve. I really though I cut through the piece enough when I did the cutting, but it definitely ended up not being deep enough. I didn’t have great control over my angle grinder when I made the cuts, and was scared to death that I was going to cut the knife in half. The ladders showed up, but not like I wanted them to.
-
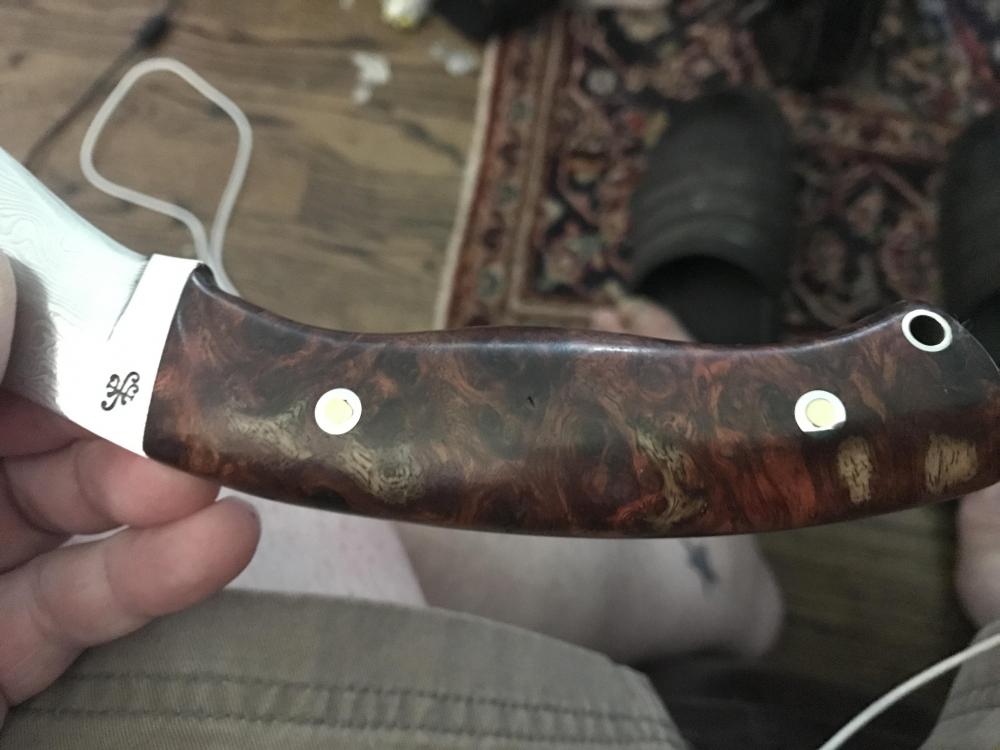
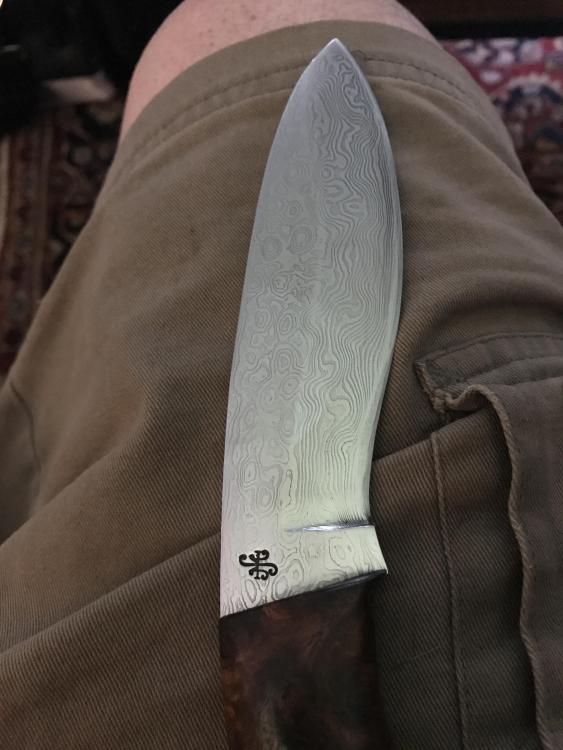
So! I just sharpened this up, and it is finally complete. Started on it last week and over the days, finished it up (no power hammer or forge press).I started with 3 pieces of 15n20 and 3 pieces of 1084. The pieces were close to 1/8” thick, 1.5” wide, and 3” long. Hand forged and folded 5 times to achieve 192 layers. It is a ladder pattern. The handle is two pieces of through-tang cocobolo burl with a small piece of nickel silver sandwiched between them. I used white oak for the frame to create contrast and a loveless rivet for a good mechanical connection. Glued it all up with 24h g-flex, and finished with tung oil. My first chef’s knife, my first ladder pattern. It’s hair-poppin sharp and ready for use. Let me know what you think!

-
Thanks very much everyone. I appreciate your feedback.
-
On 8/15/2018 at 5:53 AM, DuEulear said:
nice clean work on the knife overall and a good grind too
Thanks very much.
On 8/15/2018 at 7:56 AM, Cincinnatus said:Great looking knife!
Thank you.
On 8/15/2018 at 9:32 AM, Zrognak said:I always been a fan of raindrop pattern, but most of the time people make it to generic, but this is amazing work cause the pattern has much more of a natural flow its beautiful, also it being your second attempt at it is really impressive:
Thanks very much for the encouragement. I will continue to make as much as I can. I’m going to post some more photos down in Frosty’s comment.
On 8/15/2018 at 11:50 AM, Frosty said:I'm not a blade guy but I am a tool user. It looks comfortable to use, the lanyard hole is a good feature it puts a nice swelling to the handle where you want one without sharp edge. I'm a big fan of low count high contrast patterns and this is right in my happy zone.
Thanks very much, Frosty. Photos of my knives are something that I have always struggled with. I took a couple pictures in shade, but there is still some reflection on the steel.

-
13 hours ago, MikeTausig said:
Looks nice. What is the final thickness of the blade? Looks like it could have easily accommodated another fold. Well done.
Final thickness was 3/16”. I was losing so much material after each weld that another one would have just reduced it too much.
On 8/14/2018 at 11:24 AM, TheoRockNazz said:Wonderfully done! On to the next!

 On 8/7/2018 at 5:32 PM, Zrognak said:
Dam that looks great, I always got a soft spot for low layered patterns. Good work.
Thank you!
I wish posts had a thumb’s up like option here! Thank you all for your kind words. I really appreciate the support.
-
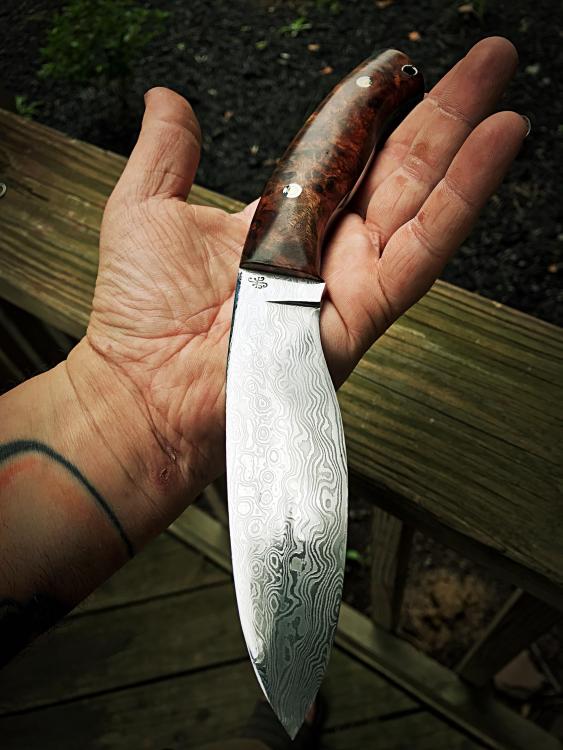
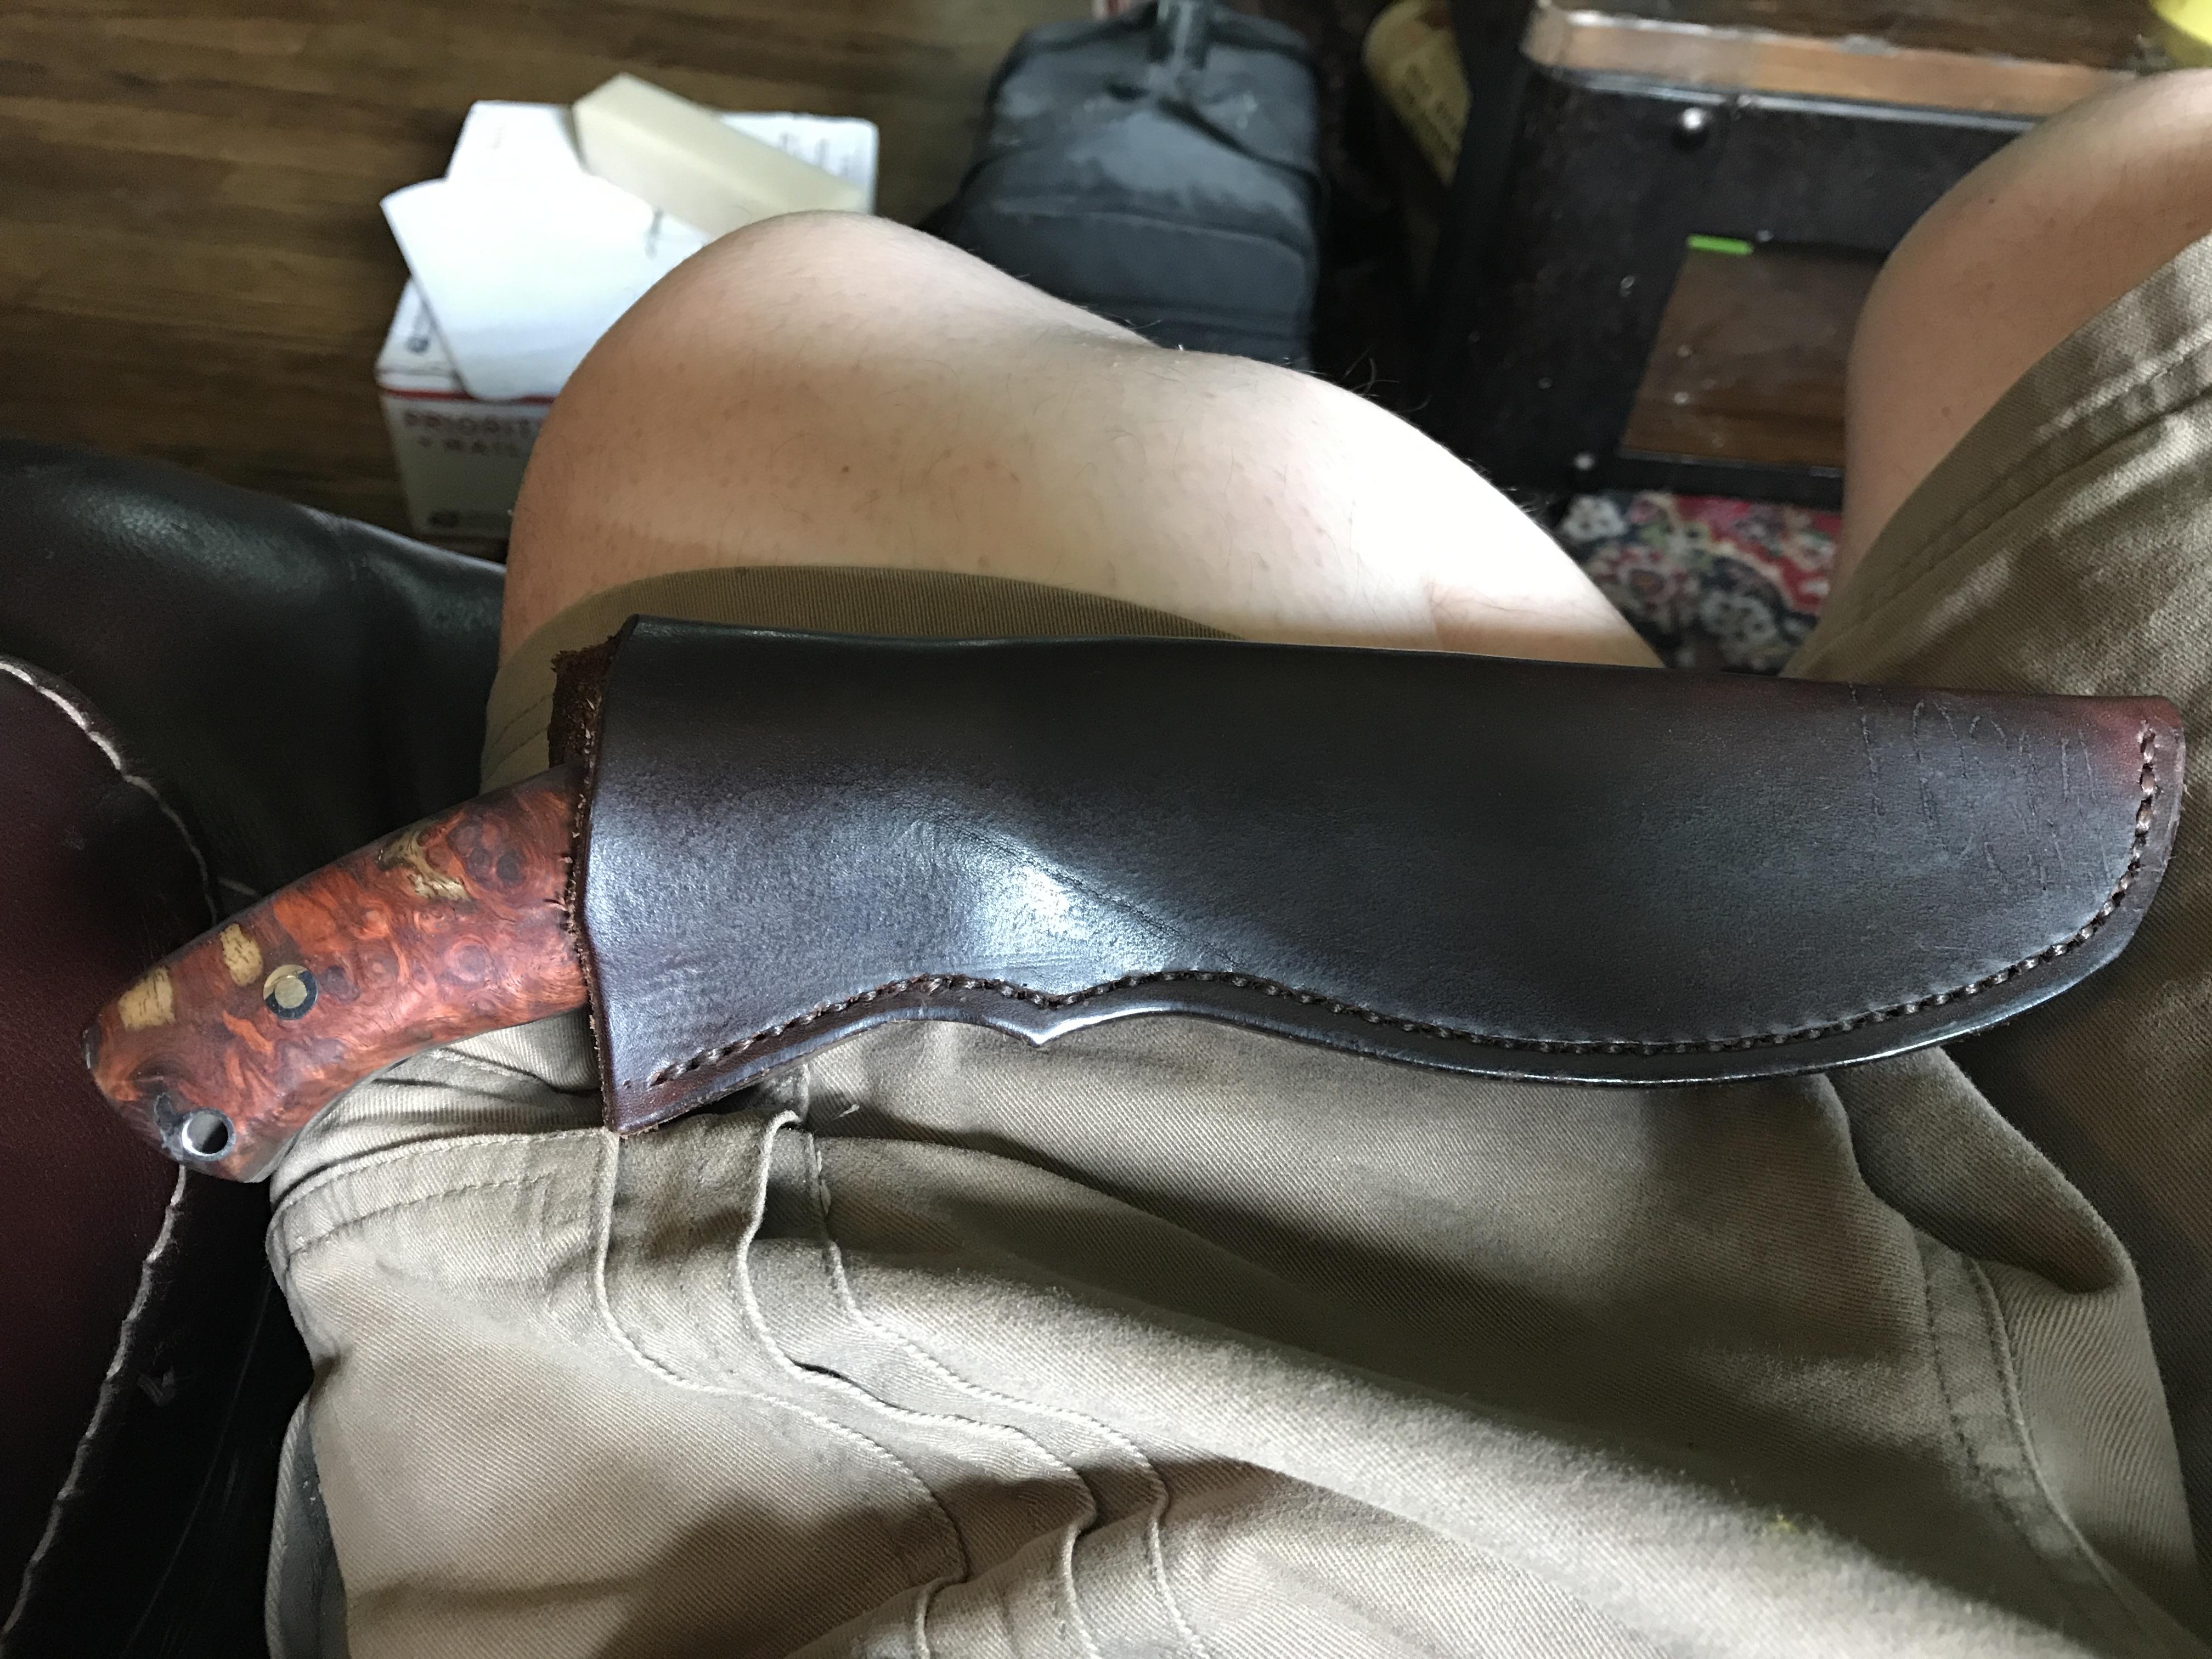
So here is my second go at pattern welding. As you can see here, I did another raindrop pattern, because with the tools I have, it is either raindrop or ladder. I think I’ll try a ladder pattern next, then a feather pattern. Anyway, it’s 128 layers of 15n20 and 1084. I did a kukri inspired profile on the knife with a convex edge. I also included my touchmark on this knife, which was a first. It is a full tang construction with cocboloc burl scales, loveless bolts, a nickel silver thong tube, all held together with 24 hour g-flex epoxy. I really love this knife. Let me know what you think.
-
This is great information. Thanks very much for the response. Powder arrived today, so I will be mixing and etching. I’m going to use this formula. Thanks again.
-
Thanks very much! As I would heat the steel to welding heat for each weld, I lost a lot of material to scale. It may have been my inexperience with doing multiple forge welds on the same piece of steel, but the volume of steel decreased as I went through the welds. I also did not start out with a huge billet. 6 bars of .120” thick 1084 and 15n20 that we’re only 3” long and 1.5” wide. I knew I would end up with a small piece, but I really thought I’d be able to get another fold in this billet. In the end I opted to just stop, and keep it at 48 layers.
On 7/15/2018 at 5:21 PM, Steve Sells said:there is an instructional thread about this in Alchemy
I found it. Thanks very much.
On 7/15/2018 at 5:10 PM, MrDarkNebulah said:an easy way to get ferric chloride is to buy some muriatic acid from home depot or lowes and then to let some iron to dissolve in there for a few days and then add some hydrogen peroxide and viola, ferric chloride.
Great info. I was just at a bladesmith meet where Matt was doing a demo of no-flux Damascus. He’s great. I should have asked him about the ferric chloride when I had the chance darn it. I just didn’t imagine I’d be attempting Damascus so soon. He was the one who Partially inspired me to do it.
-
On 7/13/2018 at 12:37 PM, John in Oly, WA said:
there is never any need to quote the preceding post that we all just read
Thanks very much! Yeah, it would be nice to have a forge press. I will definitely be adding one to my smithy when I can afford it. I think it benefits me to do this by hand to get a thorough understanding of it. That is what I’m telling myself anyway

I left it in the instant coffee for 2.5 hours, and while it gave me great contrast, I don’t have any texture differentiation. I’m confused by the ferric chloride part of this process, specifically where to buy it, whether I should buy powder and mix my own, or buy a pre-mixed solution, and what percentage solution to buy, and if I need to dilute a pre-mixed solution. I posted another question in the knife making forum to see if I can get some guidance there.


Crucible Steel Questions
in Smelting, Melting, Foundry, and Casting
Posted
Hello everyone!
I hope you’re all having a lovely day!
I have recently decided that I want to try making some crucible steel, and wondered about recipes, and material quantities that you use. (By weight?)
I have searched the forums and haven’t really found anything of use. I have read pretty much everything that is available on crucible steel. I’ve read all of the Pendray and Veerhoeven stuff. I’ve read Anna Feuerbach’s crucible steel dissertation, but I still have specific questions about how you personally make your crucible steel.
I’ll be using a hard 3000 degree firebrick hand built “kiln” with charcoal and forced air.
my questions are these:
1. What kind of crucibles do you use, and where do you buy them? Do you make them?
2. What is the exact recipe that you use for your crucible steel?
3. How long do you fire your crucible before letting it burn out and cool?
Thanks very much for sharing your knowledge!
-Joshua