Hoenirson
-
Posts
39 -
Joined
-
Last visited
Content Type
Profiles
Forums
Articles
Gallery
Downloads
Events
Everything posted by Hoenirson
-
1st-Timer Forge Build Fun ( or 'Hey look, still not blowed up')
Hoenirson replied to Hoenirson's topic in Gas Forges
Kiln shelves for door plates. Of course! That would nicely fit and keep the weight down for ease of adjustment. Noted. Plate for now, more shelves added to shopping list for later. I am still tracking kiln shelves down locally by networking with local potters and eventually with local blacksmiths once everyone returns from holidays. The potters sourced for me some personal stashes of ITC-100 (yes!) for a good price that I am slowly re-hydrating. I am hoping I can get some used broken shelves from them as well. There is JUST some room for a burner portal sliding choke plate. Might have to be one made of 2 washers with a diminishing window (when one is rotated). Once I get the liner fully dried out (I am getting so impatient) and get to do some sustained burns I will play with this idea. What I googled on 'secondary entrapment' and related combustion tech is humbling and well over my head. I will study it further, but thank you for sharing your understanding. I appreciate the leg up. Some deep waters there. In an attempt to contribute something back, I stumbled across a reference to a 'Meker-Fisher' burner which reminded me of many of the attributes of ribbon burners discussed on this site, in that it is quieter via a mesh output producing multiple smaller flames. Granted the flame density is higher than the nicely spread out ribbons, but it made me pause. Here is a quick video showing such a burner output. While I have seen other burner exit modifications, I discounted their value to my project, thinking they simply aided in mixing and could interfere with flow. I wonder if a such a mesh would be quieter and survive forge burner application? I should go check the oven to see if the turkey, in mean forge, is done cooking yet. Thanks again. Mike. -
1st-Timer Forge Build Fun ( or 'Hey look, still not blowed up')
Hoenirson replied to Hoenirson's topic in Gas Forges
That makes perfect sense. Ok, sloppy slide channel tolerances, it is! I will use a threaded keeper to set the door height (as shown by example pics) and leave the door extra loose. I guess I can always pull it out and re-flatten it when it exceeds even those tolerances. It is just a plate. or I could also build the plate as a lipped box, with ceramic and liner inside, facing the heat. Hmm ... harder to correct if or when it distorted. I will start with the plate and see if more is needed. I will create the door slide channels with a future lipped box in mind. Thanks for the heads up, sir! -
1st-Timer Forge Build Fun ( or 'Hey look, still not blowed up')
Hoenirson replied to Hoenirson's topic in Gas Forges
Seeing as the doors slip OVER the end of the forge (potentially as much as an inch overlap) I think I might just bolt them to the body. Do I really need to open them constantly? With the needs for a variable sized front and rear port, depending on burner settings, a guillotine sliding vertical door seems like the way to go. Here is a visual of another fellows forge that does a guillotine style door: Will this door style be an obstacle(zero insulation) to achieving welding temperatures?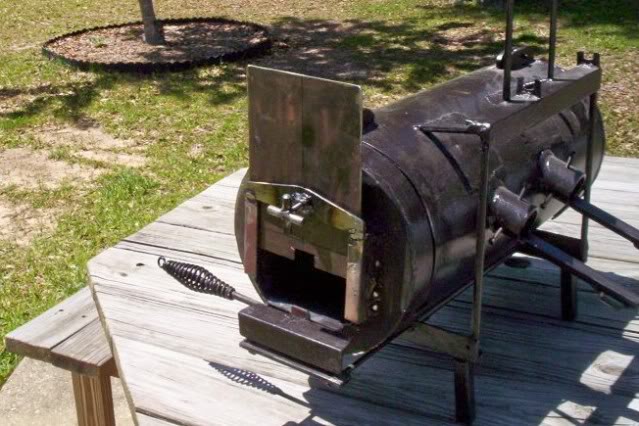
-
1st-Timer Forge Build Fun ( or 'Hey look, still not blowed up')
Hoenirson replied to Hoenirson's topic in Gas Forges
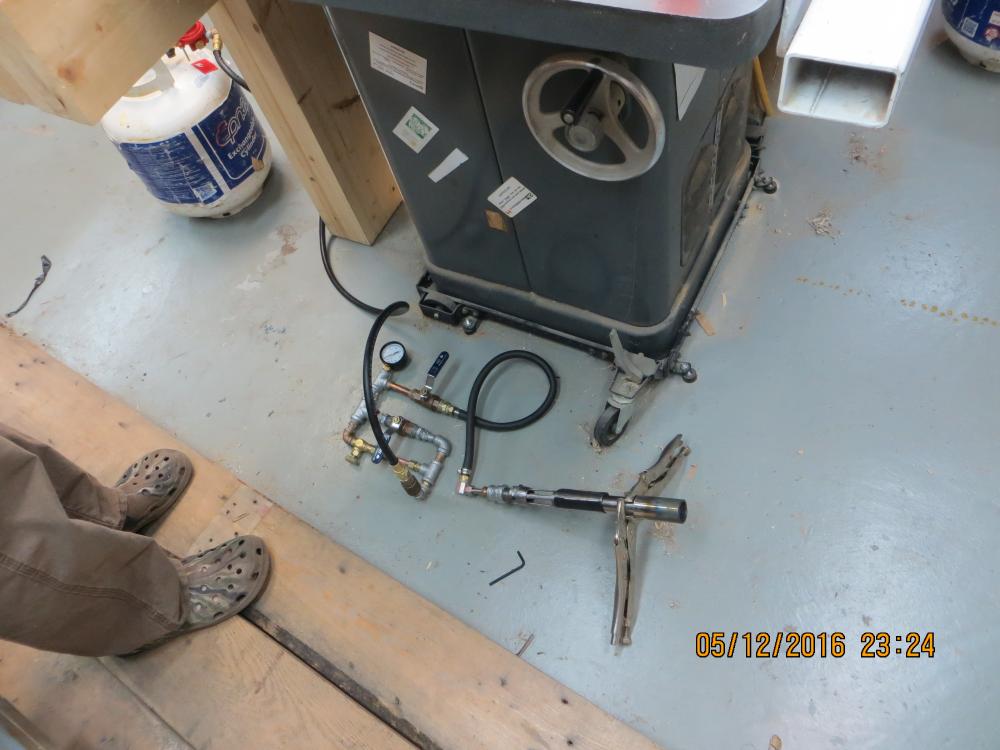
The final fittings arrangement was definitely an evolution involving more than one supply run. A silver soldered solid copper version would have been cheaper, but the threaded option while more expensive allowed me the flexibility to change it based on needs and my learning. There was definitely a couple Lego moments there. The hardest part was getting the lengths in parallel to mate properly, thus the pressure fitted copper line. Testing for leaks was and then fixing them was ..... interesting. The project parts purchasing started over a year ago, was put on hold til I moved, rebuilt and started at it again. It was also done via someone else, while I was house bound due to surgery healing. Next one will be all soldered copper with galvanized iron pipe if needed. On the other hand I AM still learning AND its not operational yet...so take all this with a grain of salt. Hope that provides some insight. ps. I type this having just sent the wife in for another part (a 90 elbow) with the complete rig in hand. Its sort a nice to have a wife that WANTS this forge to get up and running. -
1st-Timer Forge Build Fun ( or 'Hey look, still not blowed up')
Hoenirson replied to Hoenirson's topic in Gas Forges
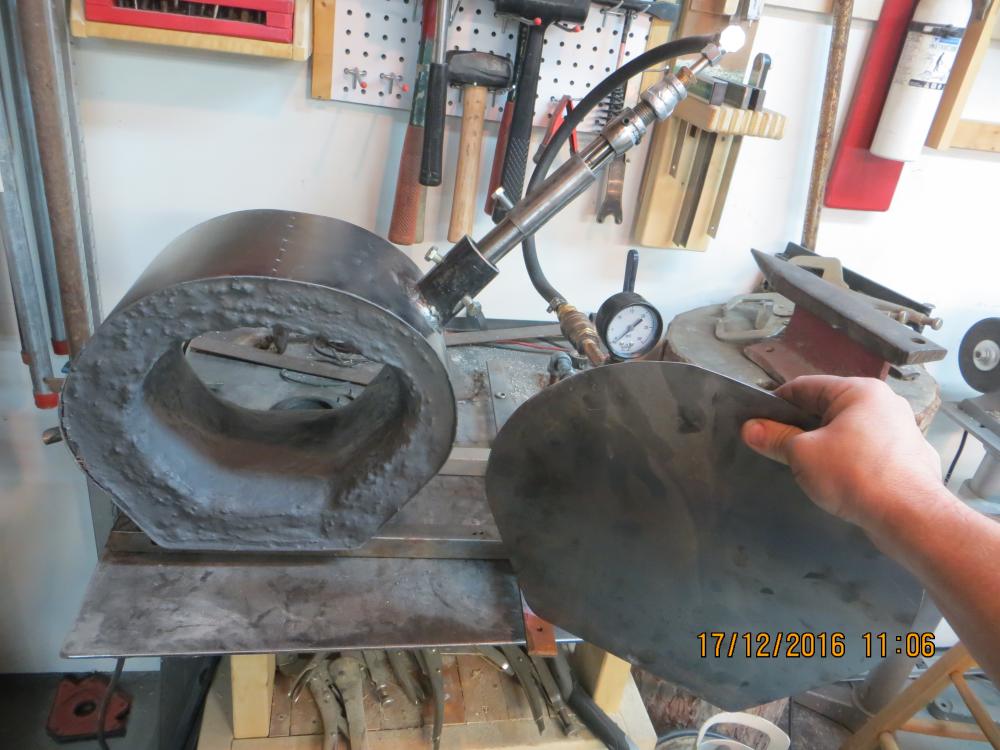
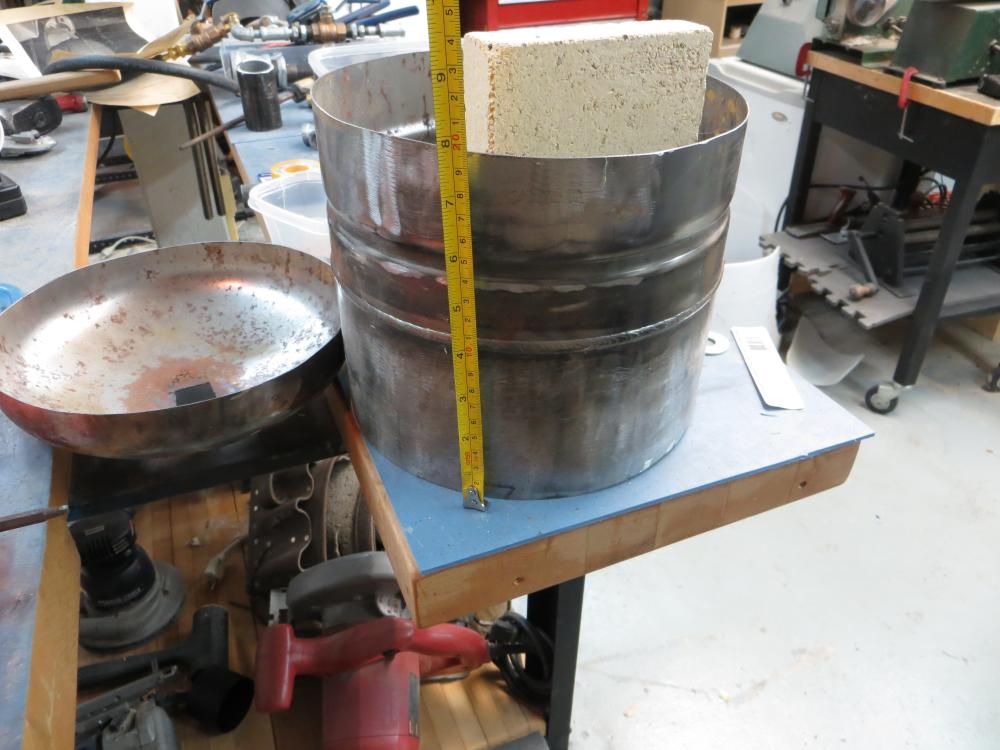
Good morning folks. The build is still going on, despite a brief visit from the knee surgery fairy. I just have to take a lot of sit down breaks. I WILL see this running before end of the holidays. I tried one liner and removed it as it was just too crumbly. It gave me a chance to fire it up though, and give me an idea of heat containment. The new liner has a higher heat rating and seems durable and should protect the 2" kao-wool . It is dry enough right now I can keep going but probably needs another couple of days till its 100%. Here is a quick video showing the lining. So here is a quick mock up of what I am thinking. The base will attach to the forge bottom via bolt stand offs and extend to the copper bar for reasons of balance (forge was tipping toward burner) and supporting the fittings. The gas fitting will be supported by the base and a couple extensions from the forge body as well. I need to redirect the rear of the flexible line with a 90 away from the rear forge opening. I think I might move the entire fitting section further away, as well....just, cause. Hmmm...what side to have the doors open. There will be access openings in both, so in use I see the doors being kept closed. I might put a plate as a heat shield between the fittings and the forge openings as well. Not sure though. Thoughts? I will continue to post the progress till its complete and in use. Thanks for all the feedback so far.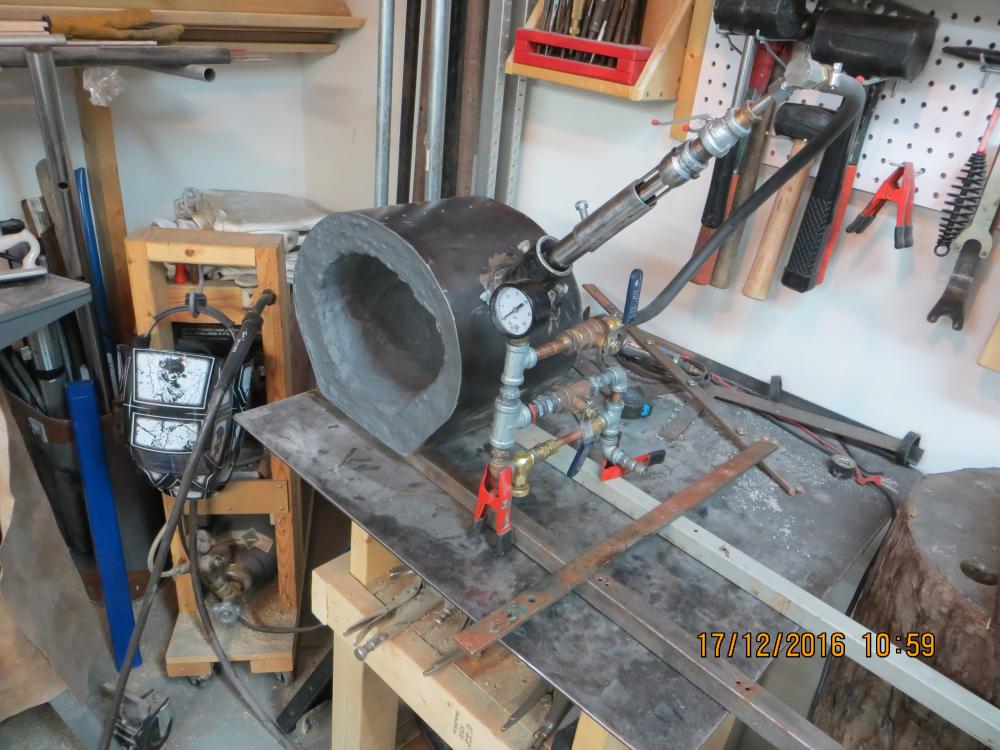

-
1st-Timer Forge Build Fun ( or 'Hey look, still not blowed up')
Hoenirson replied to Hoenirson's topic in Gas Forges
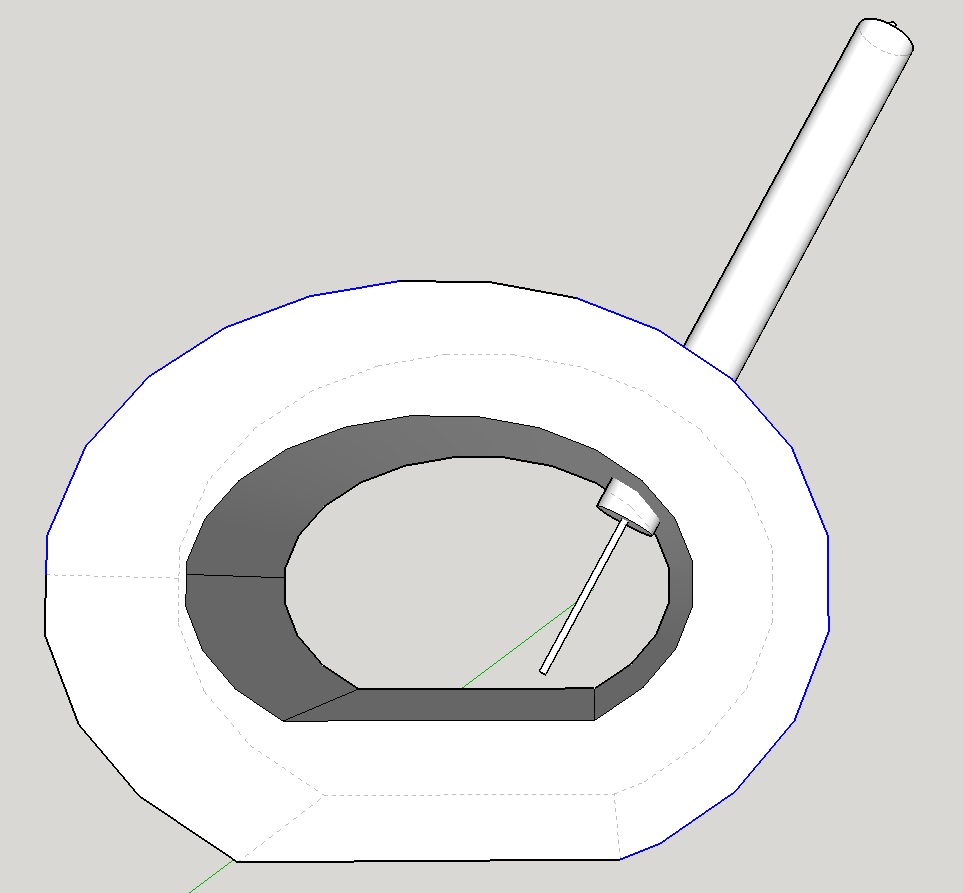
I appreciate you folks sharing your insight. I take the point on the strength of slightly thicker cement on the floor. I will do that. It is an interesting flow dynamic, almost a balancing act with flame/gas speeds. Sadly the morning ends the last of the freezing and my leg is all about reminding me that its been opened (!) so I suspect I will be stuck on couch driving my wife nuts for at least this one day. What I can do is brush the dust off of Sketchup and see if I can do better than a cardboard cutout. Is this the angle you are suggesting Mike? Or tighter to the wall? I will happily adjust the model based on your impression. (small thin tube represents center of burner)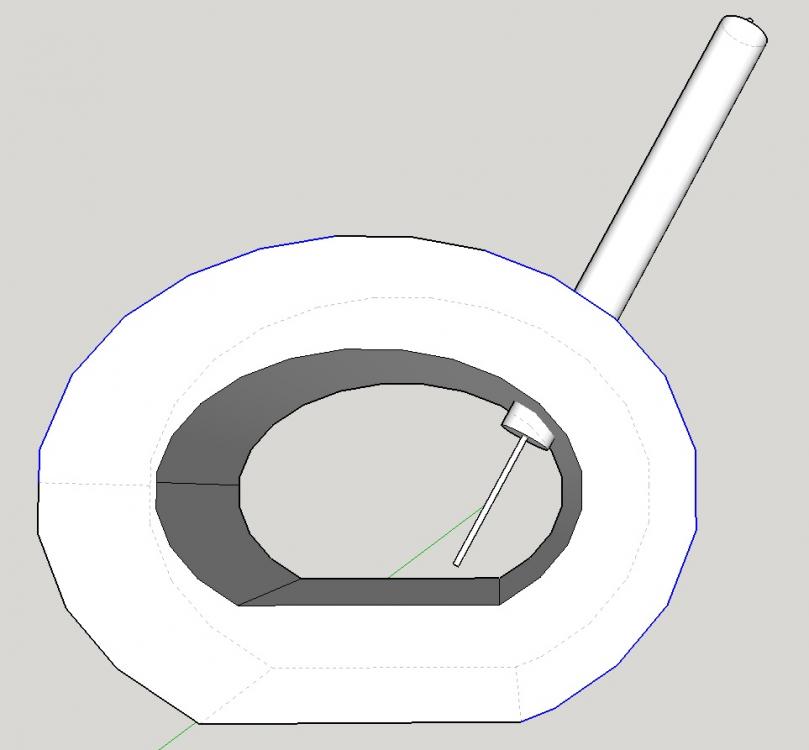
-
1st-Timer Forge Build Fun ( or 'Hey look, still not blowed up')
Hoenirson replied to Hoenirson's topic in Gas Forges
Hi folks Knee surgery went well, but I will see how I feel in the morning. While I am too stiff to get to the shop this evening, I can at least acknowledge the advice given here. Thank you for your continued input. 1. Ok, sounds like firebricks are off the build list for several valid reasons. Instead a removable castable refractory pressed floor will be attempted. 2. For the doors I had hoped to show what I had in mind but for now a brief description as requested. Two side hinged flat faced 16g doors, shaped the same as the forge outline, given a 2.75" depth for 2" wool plus cement coating via a perimeter 2.75 strip of metal 1/8" thick on the outside of the face. This when hinged shut to the forge profile forming an overlap for a slightly better air seal and assist carry the weight of the door when closed. Nice little welding task. The rear door with a removable heavy metal 'flap' that covers a small rectangular opening to allow air pass as needed and long stock to emerge as well. Another larger opening for the front door. Not sure about a covering for this opening at this point. I will adopt a wait and see approach for this. Both door openings to be level with floor of forge and be framed inside the door (providing support for wool and cement) and outside of front door to provide a small lip for setting stock. 3. The forge frame as shown will be elevated, not resting as shown in picture. I definitely want some air flow under the forge...maybe a good use of these firebricks as well (smile). I am still waffling on a stand build or workbench placement. Which ever I go for will have to be stable enough to secure the plumbing and idler circuit on the right side of the forge frame. 4. The suggested outboard move of the burner would then point at the 'F' of the 'Fire Brick' label of the diagram? Or do I have that wrong? I assume that is to assist with a swirl of the heat distributing to the entire forge volume? -
1st-Timer Forge Build Fun ( or 'Hey look, still not blowed up')
Hoenirson replied to Hoenirson's topic in Gas Forges
Ok, that makes a lot of sense. Thank you. Kiln shelf is indeed on my radar of the 'best' heat/flux/wear resistant material. I see me adding it later and replacing the fire brick with that. I just do not want to hold up the build while I source and budget for that. Its pretty much lumped in with an IR reflective coating.....a purchase/order for NEXT month. I am interested in the concept of replacing the firebrick with just more castable refractory...like the stuff I was going to coat the Kao-wool with? I guess I could whip together a form to ram a brick like shape. If I 'dished' it a bit could it capture dripped borax? In the meantime I have formed the new forge outline. I have to call it for this evening...knee surgery first thing tomorrow morning...wish me luck!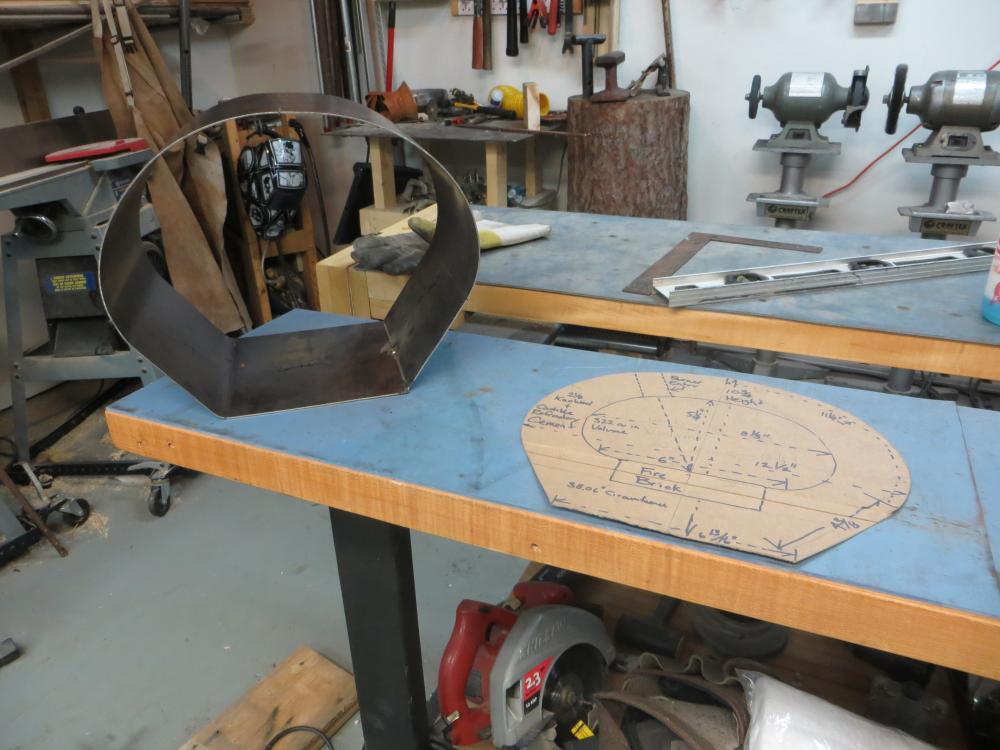
-
1st-Timer Forge Build Fun ( or 'Hey look, still not blowed up')
Hoenirson replied to Hoenirson's topic in Gas Forges
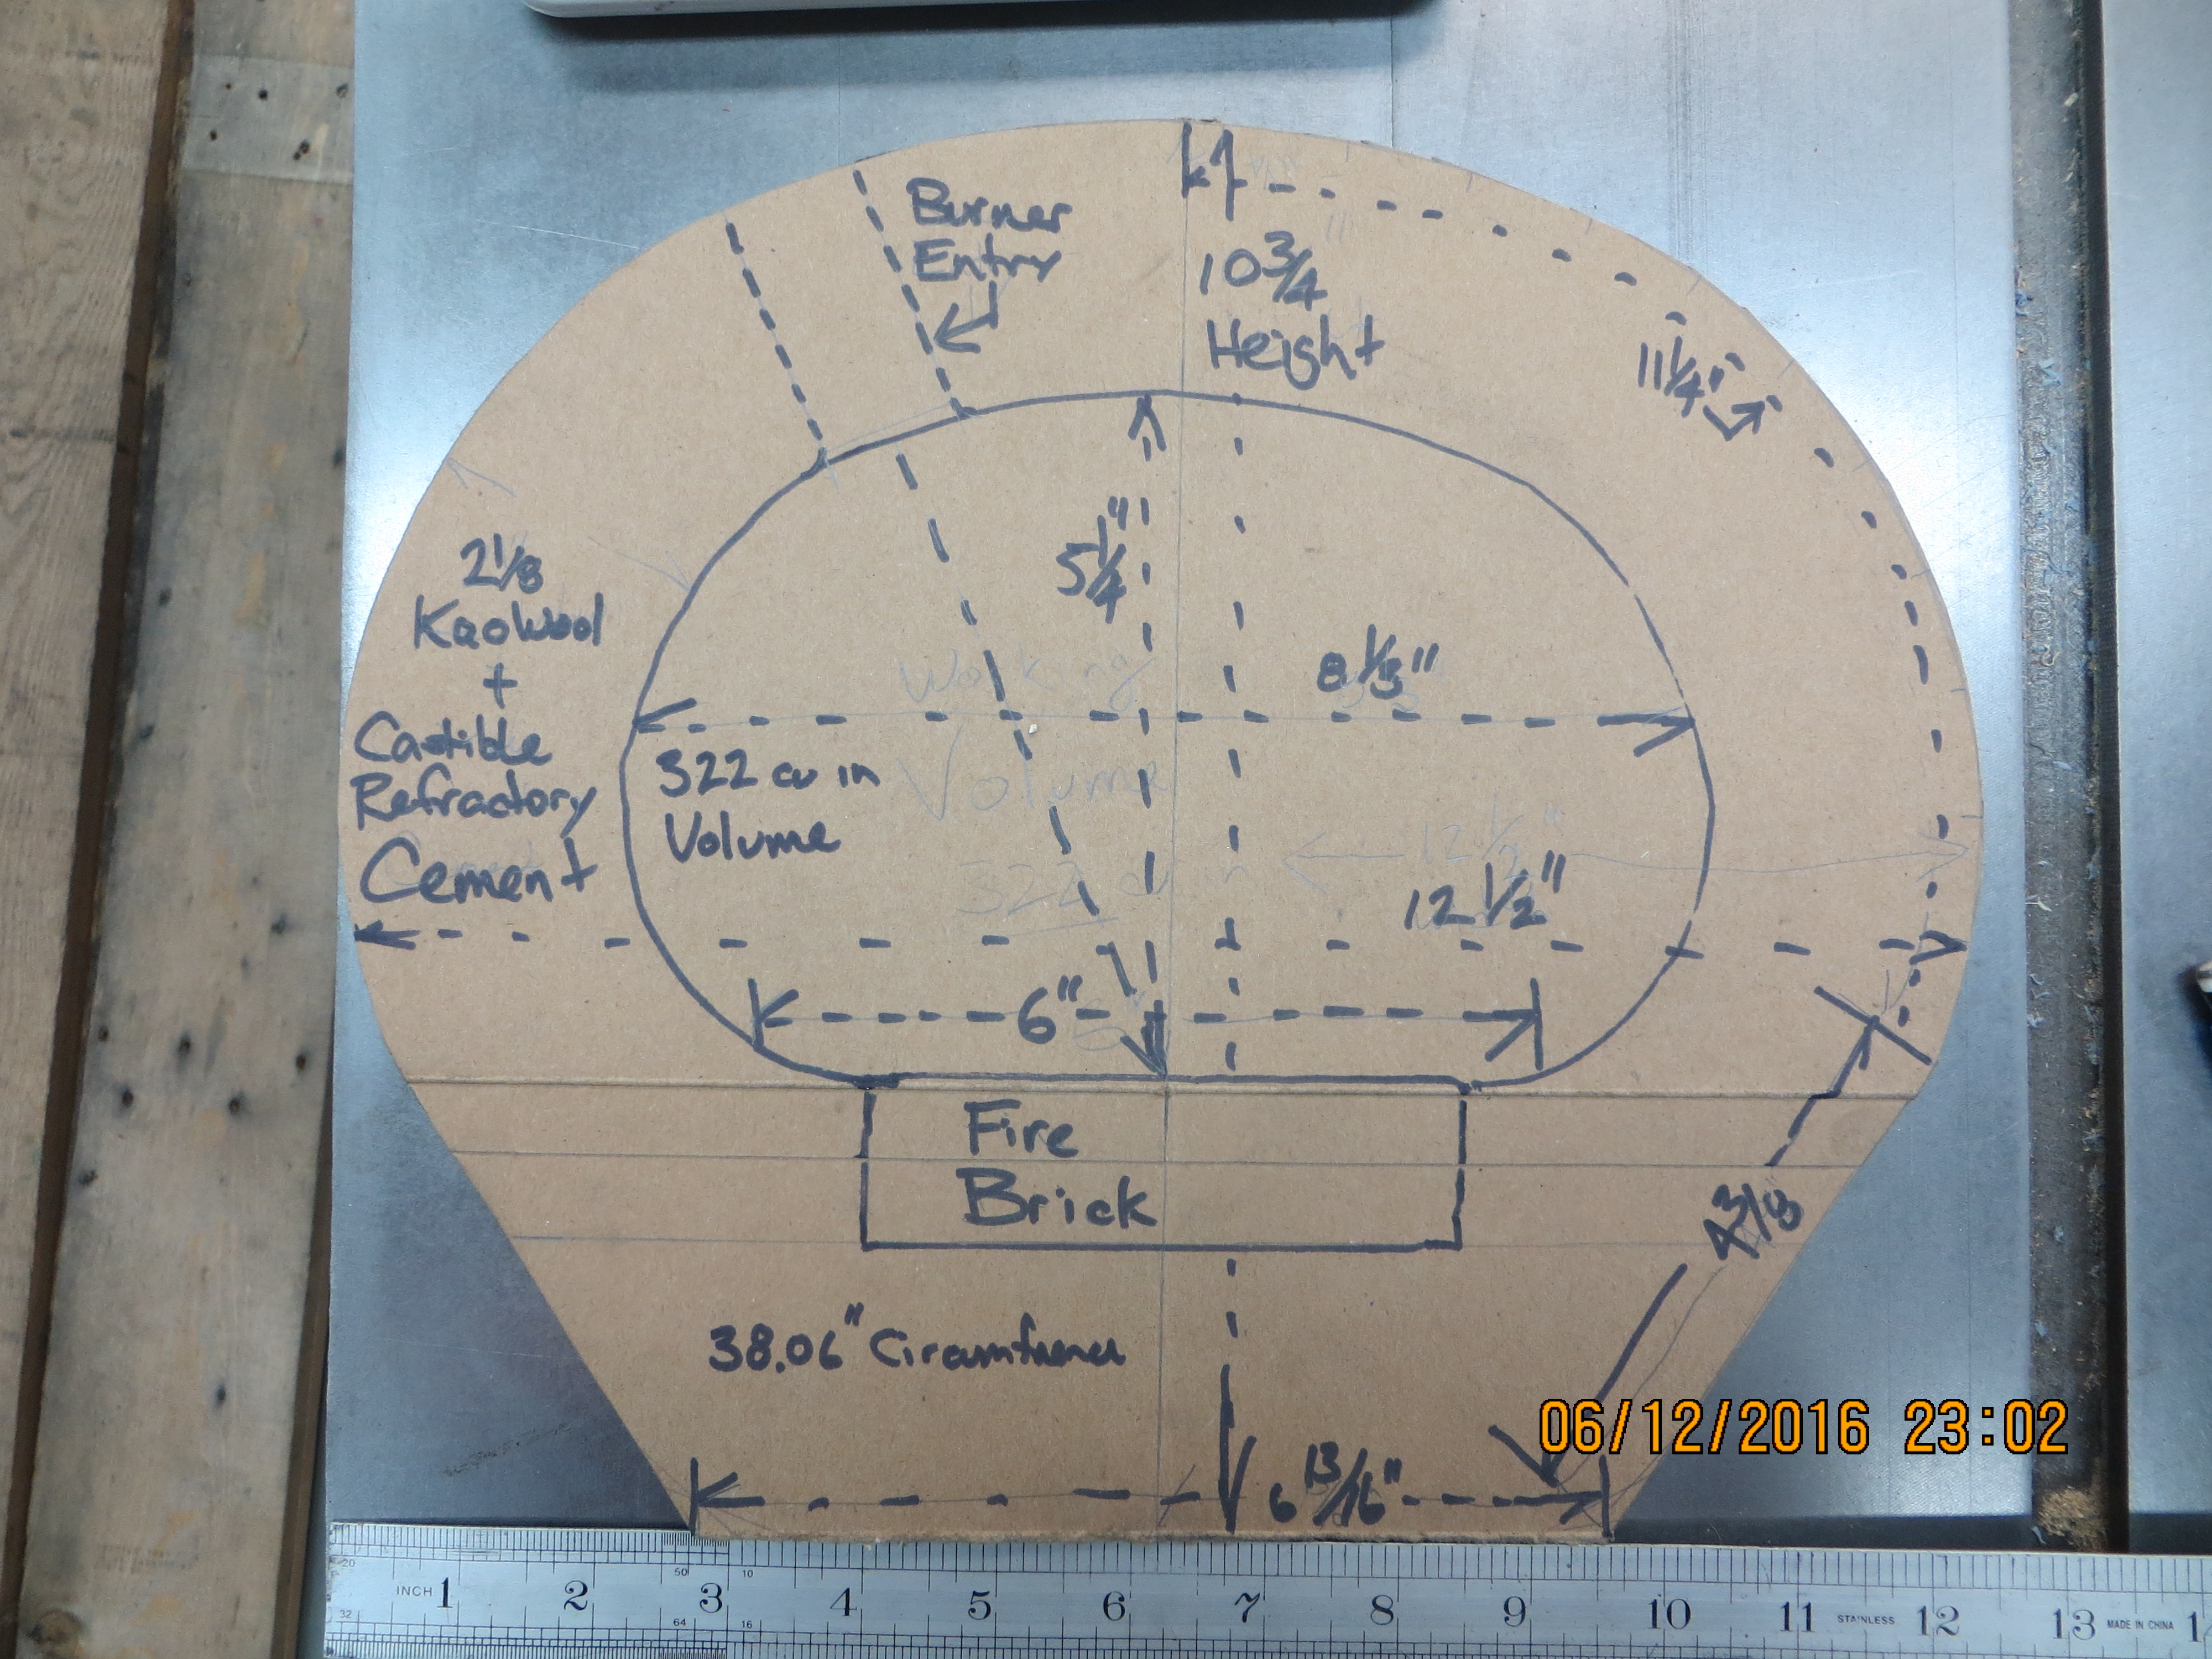
Here is a sketch of new forge profile showing all elements and some dimensions. Does the firebrick work in this configuration? Its surrounded by 2" kao-wool plus a thin layer of castable refractory cement.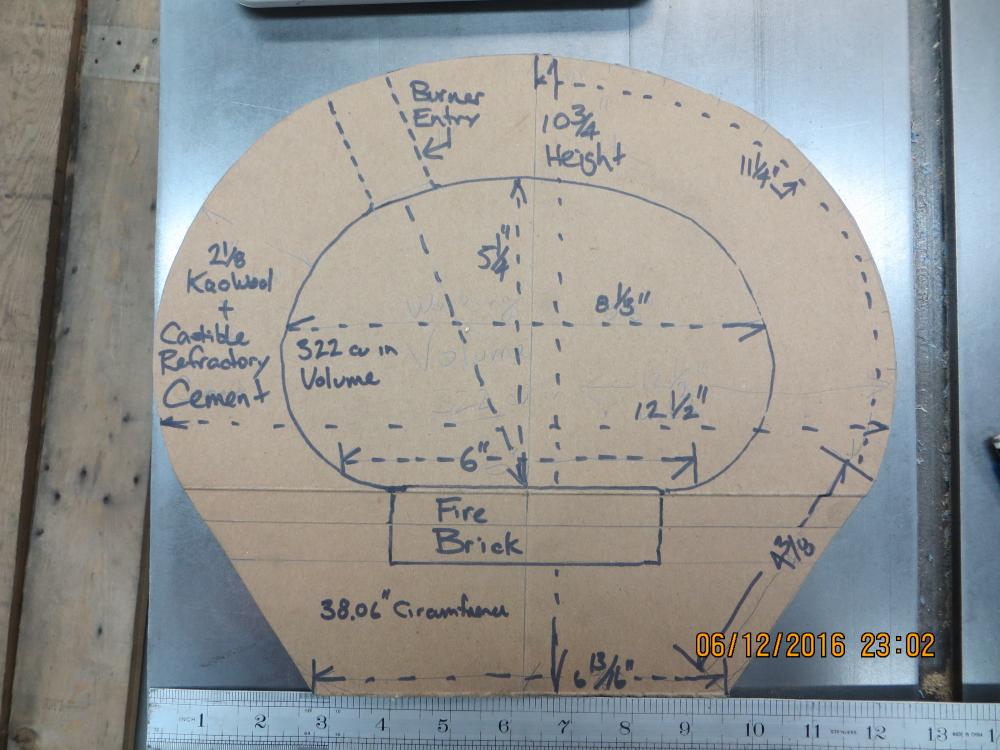
-
1st-Timer Forge Build Fun ( or 'Hey look, still not blowed up')
Hoenirson replied to Hoenirson's topic in Gas Forges
Thanks for the feedback folks. Wider mouth. Done. I am drawing up a 'slumped' oval shape 8" wide by 5" high More Volume. Done. I am extending length of working space to 8" (12" external frame) gives 322 cu in. Do not use firebrick for floor. ? I thought firebrick was a good sacrificial material assuming it takes the brunt of the wear of objects placed inside the forge dropped borax flux from forge welding direct flame hot spot Am I off the beaten trail on this? -
Hi Folks. Mike H here. In the interests of posting build stuff in the right sub-forum (instead of my Introduction) I thought I would share my progress so far. I have so far cut open a small water pressure tank measuring 9" high by 7.5" long. Assuming 2" kao-wool plus ceramic refractory I am NOT looking at a lot of volume in the forge. (147 cu in") I have now also have a (mostly I think) working 3/4" Mikey Burner. So I have concerns that a - the burner is too big for the volume causing extreme back pressure. b - the mouth of the forge will be a major obstacle to getting things in. ie coil springs for reforging, armour bits, curved s hooks and such. I can roll my own forge body out of some 16g cold roll I have here...I was thinking a slumped oval profile might be an efficient yet wide style. Or I can widen the existing shell into an oval (the doors will be pain though) or I can length it (but then I wonder if the heat will get to a 12" long forge from just one burner) Here is some video of the burner. (Audio is a bit low) Here is a quick vid of the flame with lights out. Thoughts? ps. Pretty happy so far with this burner design. Thank you Mike. Any feedback is most appreciated.

-
Hi Neil. Good to West coast is still kicking. Is it still raining there? We just saw our first bit of snow. Actually family is recently a transplant from BC and we will move back when we are done here. In fact, I THINK the first time I got to hang out over a forge was at a Blacksmith demo, just down in Washington. I did check out the MBA site, looks like they are pretty dormant right now with no events posted. I will drop them a line though inna bit. Just gotta get this forge going....Its been delayed for over a year with a move, then setting up the shop again. I have some enforced down time coming soon thanks to knee surgery, so maybe work will leave me alone long enough to finally be able to heat and beat some iron. Even if I have to do it sitting down. I am thinking winter will be my chance to build, so I have to make the most of it. Any thoughts about this tiny forge and 3/4" burner? Do I have a hope or did I just build a bomb. Lord knows that is what the guy at the hardware store thinks...har. Seriously, am i gonna die? (grin)
-
Hi Frosty. Thank you for the confirmation. I will bring it to a 12" length, just to give it less back pressure. That is exactly what I was worried about. Brick will sit on 2" kao-wool + castable refractory coating. It is also my intention to have both ends with side hinges, with access port in front and pass through in the back. I really do want this forge to stay small, but part of that is containing the flame as well. I get that this is probably just my first forge as I know how needs can grow based on a new toy. If I may ask a second question, would it be worth tilting the burner back slightly towards the back door to try and heat the longer length more evenly?
-
Hi all. Mike H here. A few minutes ago I called it a day, poured a beer and looked over my first Mikey 3/4" gas burner. I have had a small water pressure tank cut out for several months, but finally got time to get back to this project. Seeing that this forge inside dimensions after 2" Kao-wool added will be about 147 sq inches I am pretty sure this burner may be too big (maximum 340 sq in for the 3/4" burner apparently). I am going to add 5" to the length of the forge to try and match the burner a bit better. (245 sq in.) Anyone think that will be big enough for the 3/4" Mikey burner? I have been wanting a forge for sometime. I have built a lot of SCA armor over the last 30 years, but always worked the metal cold. My intent is to use the first forge for some chisels and gouges, a variety of medieval camping and kitchen implements, and the occasional knife and spearhead. I have read every gas forge sticky I can find here and elsewhere, so I hope to keep the stupid questions to a minimum. Anyways, beer is almost done, time to pull a second. Shoulders and neck are a bit sore = good day in shop. Anyways, Mr Porter please accept my highest accolade for a great burner design. Thank you.