Micah Burgin
-
Posts
75 -
Joined
-
Last visited
Content Type
Profiles
Forums
Articles
Gallery
Downloads
Events
Everything posted by Micah Burgin
-
Now that is just incredible. And educational! I'd never heard of non-shoe reeboks before this post. The more you know!
-
The "Happy accident" iron bloom
Micah Burgin replied to Micah Burgin's topic in Smelting, Melting, Foundry, and Casting
Sorry about dropping off of the face of the earth for a few months there. I was going to billet it (Which I believe is the correct term for ingots forged from blooms) but my lack of tongs struck again... Channel locks did not help very much. Sill, I got it reasonably well formed before things started burning and I decided proper tools are pretty much necessary. Anyways, I'm currently working on setting up a fire clay bowl for my forge and getting some charcoal to light it a bit more easily but once that's done I'll be getting back in the swing of things with summer coming up. -
Yeah, I'm planning on getting some known steel for the next one. This one was mainly designed to look good, and I needed to test the ability to normalize, so I used this for both. Turned out quite well, actually. I just left it in the forge right after the blower had been turned off for the day and the steel was held at curie for probably 30~ minutes and then gradually cooled to resting.
-
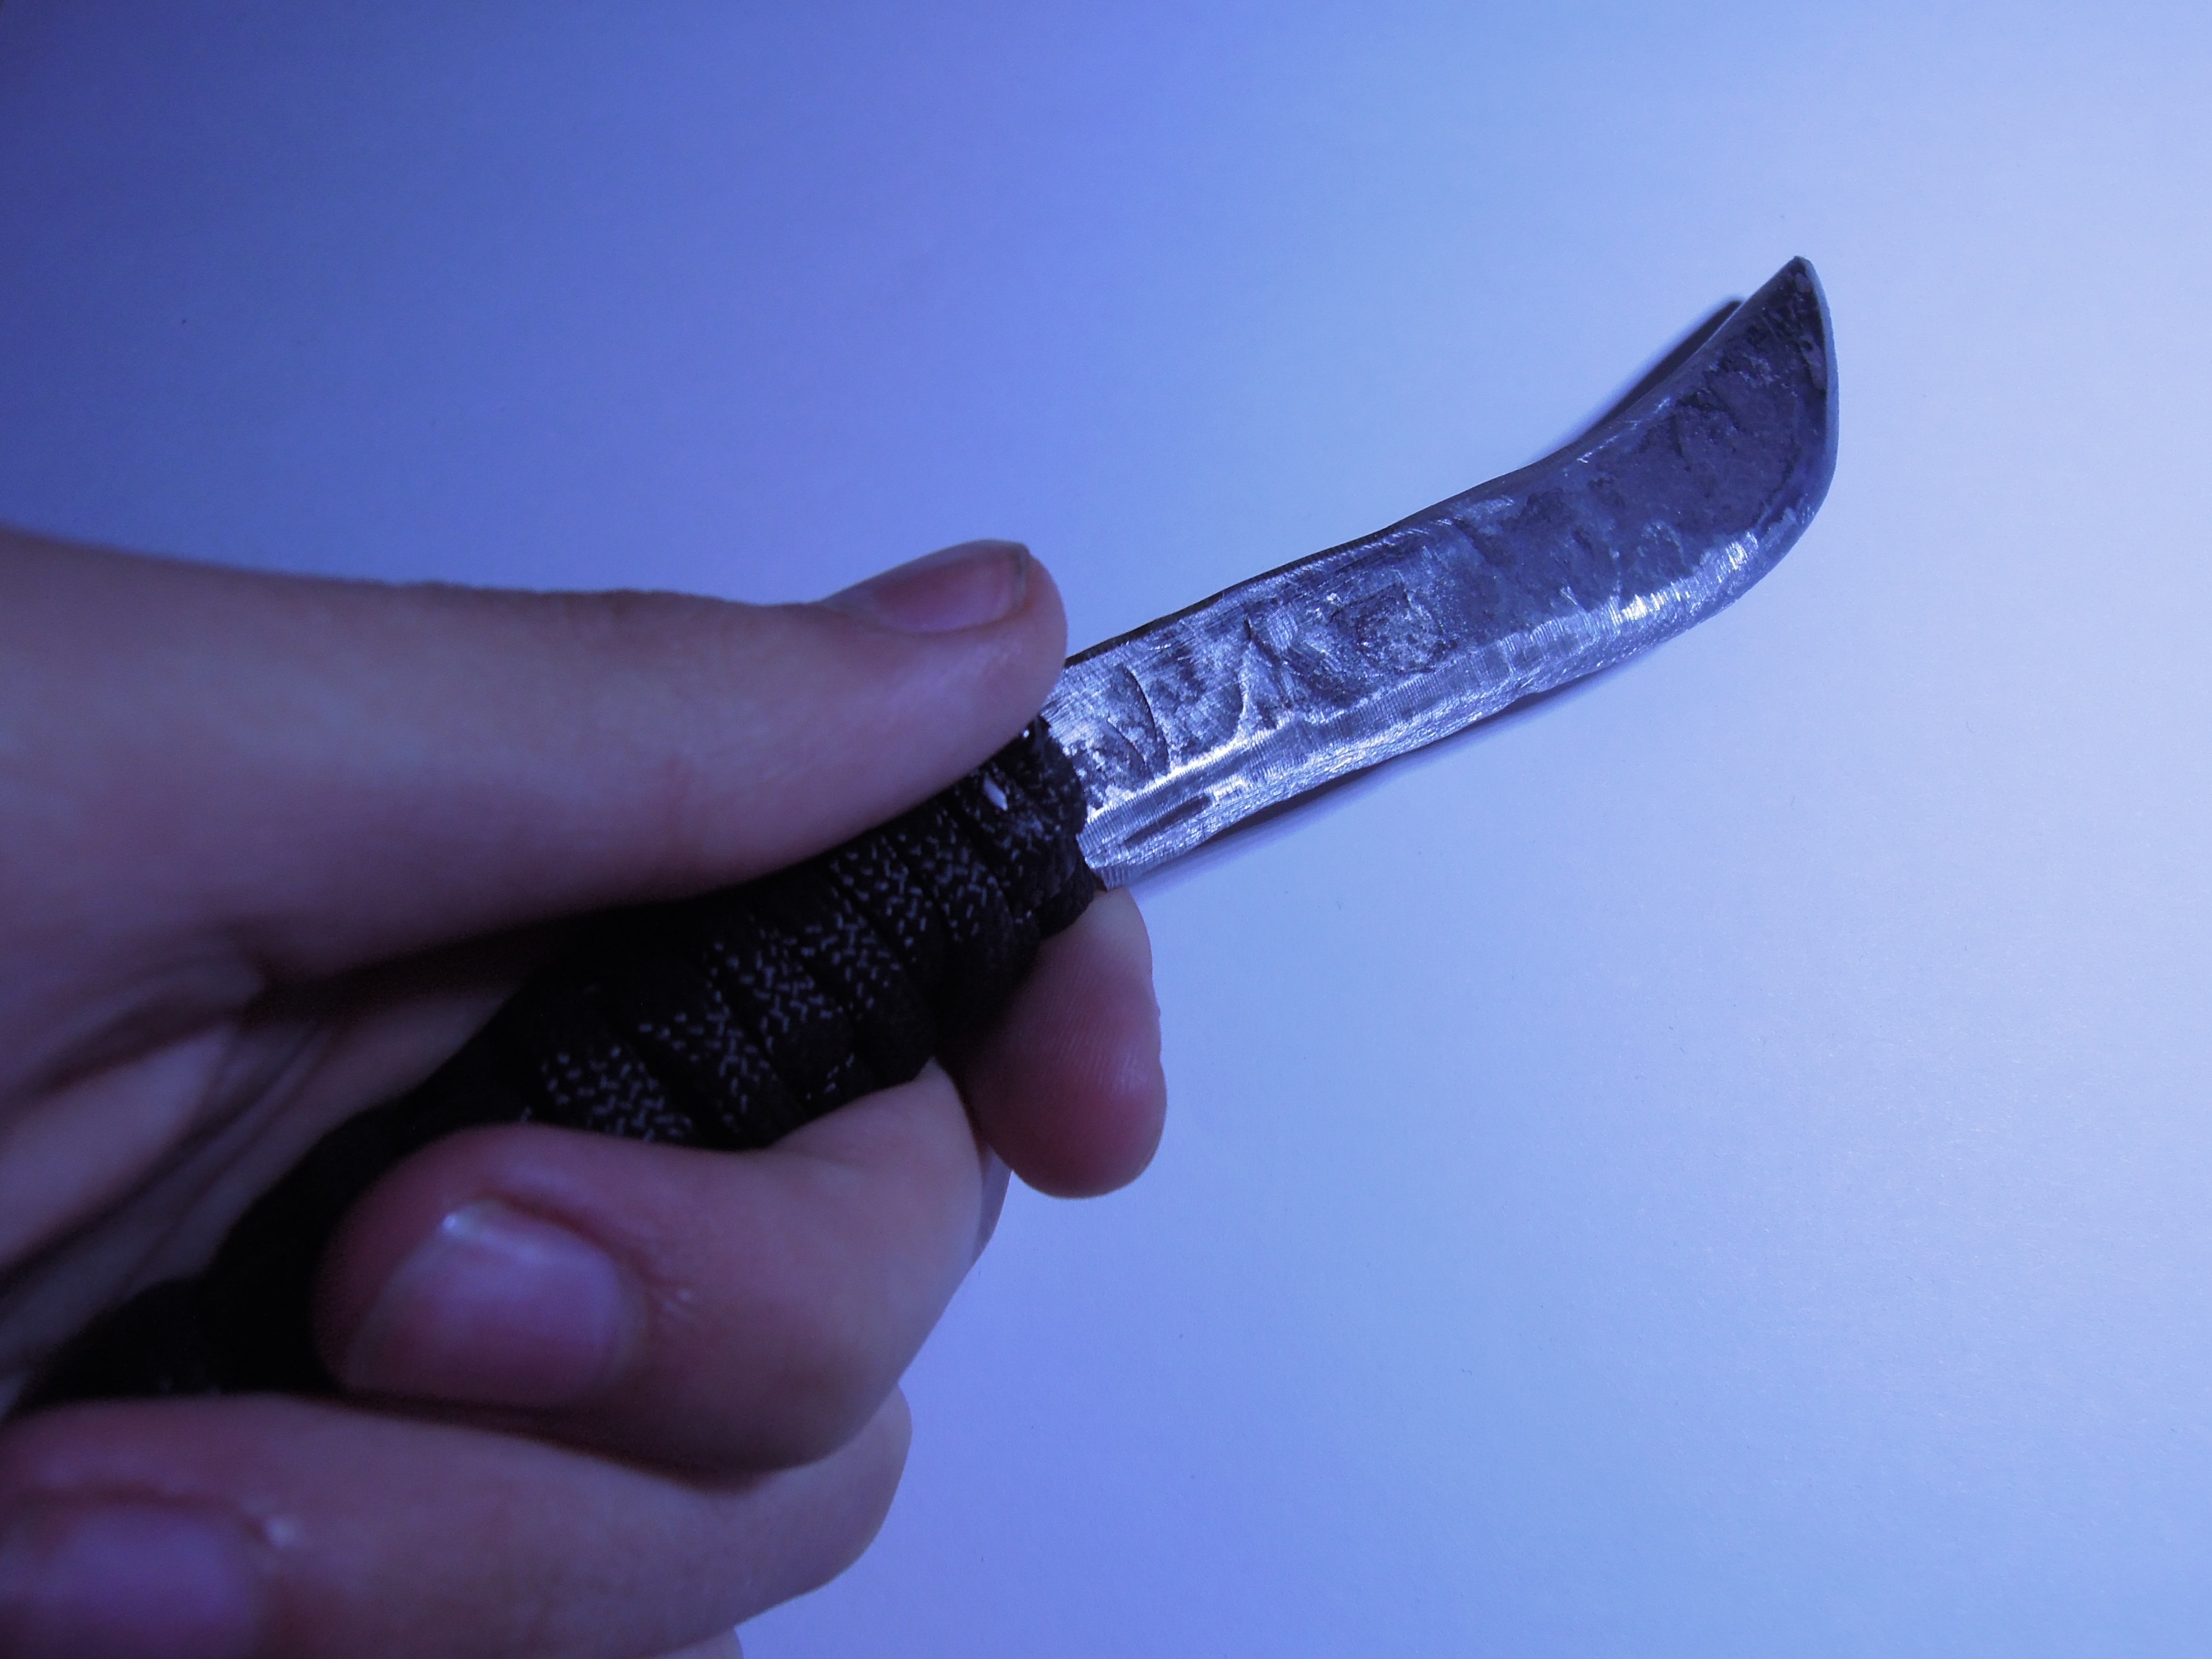
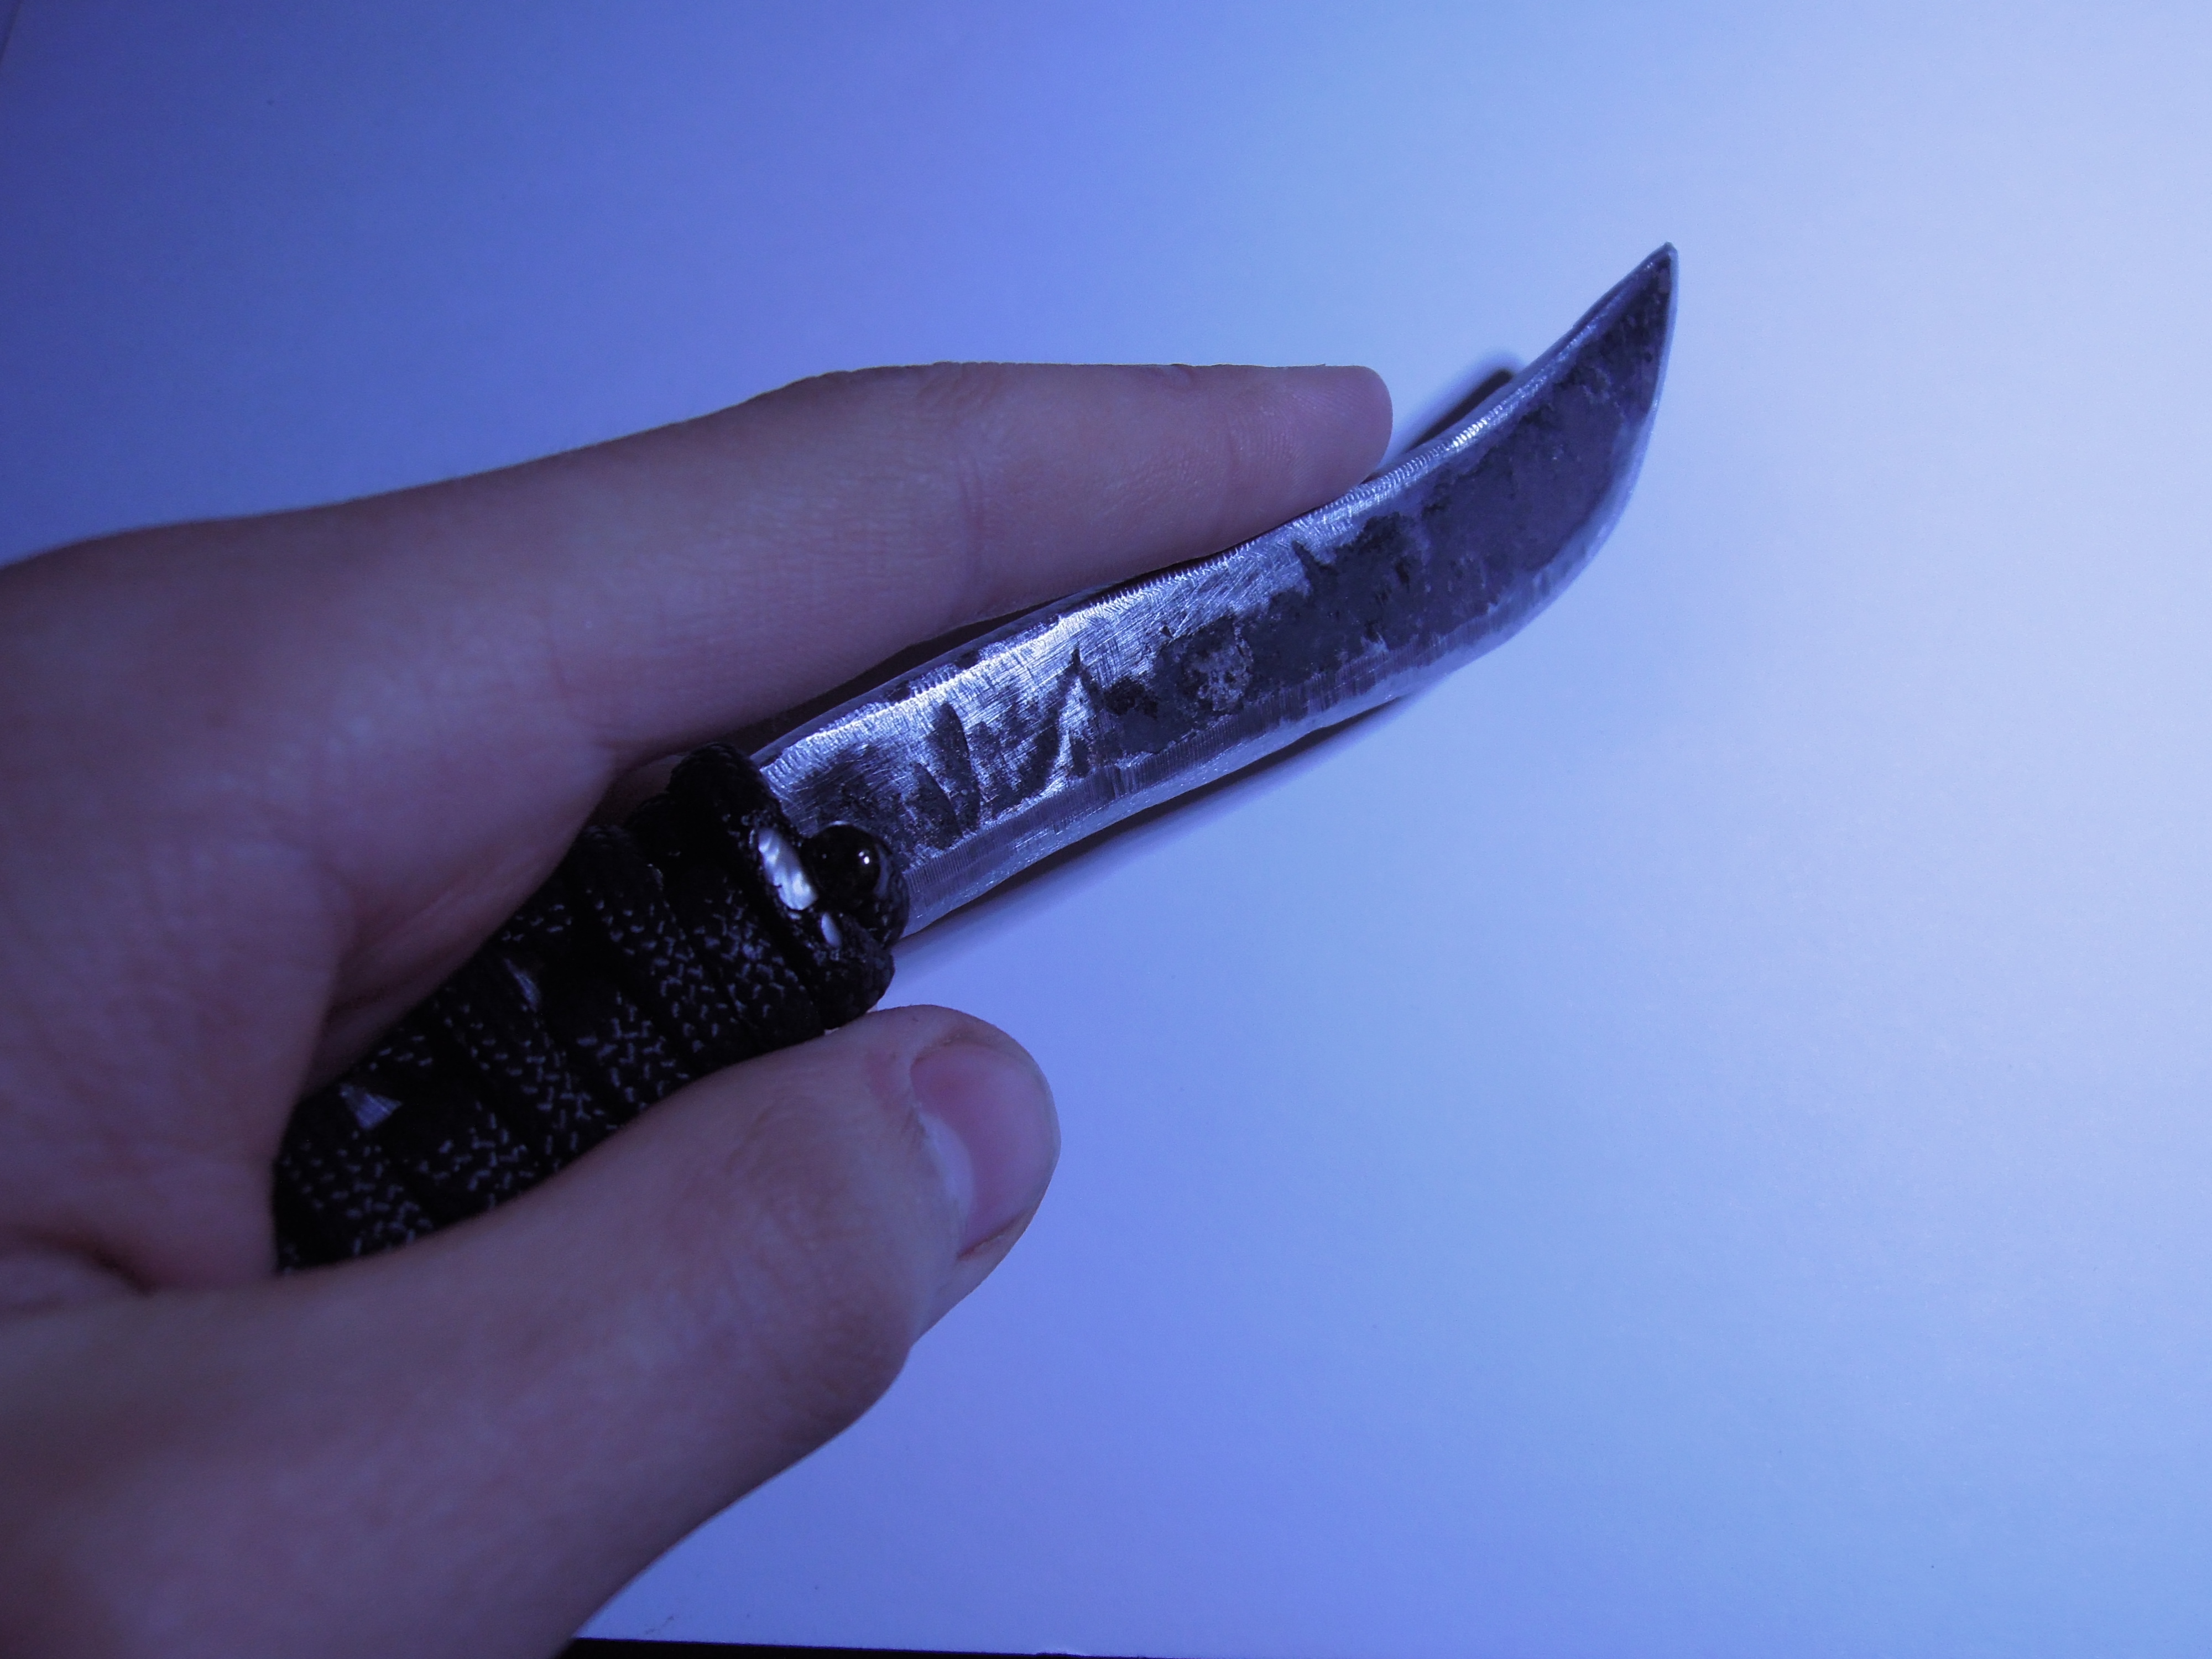
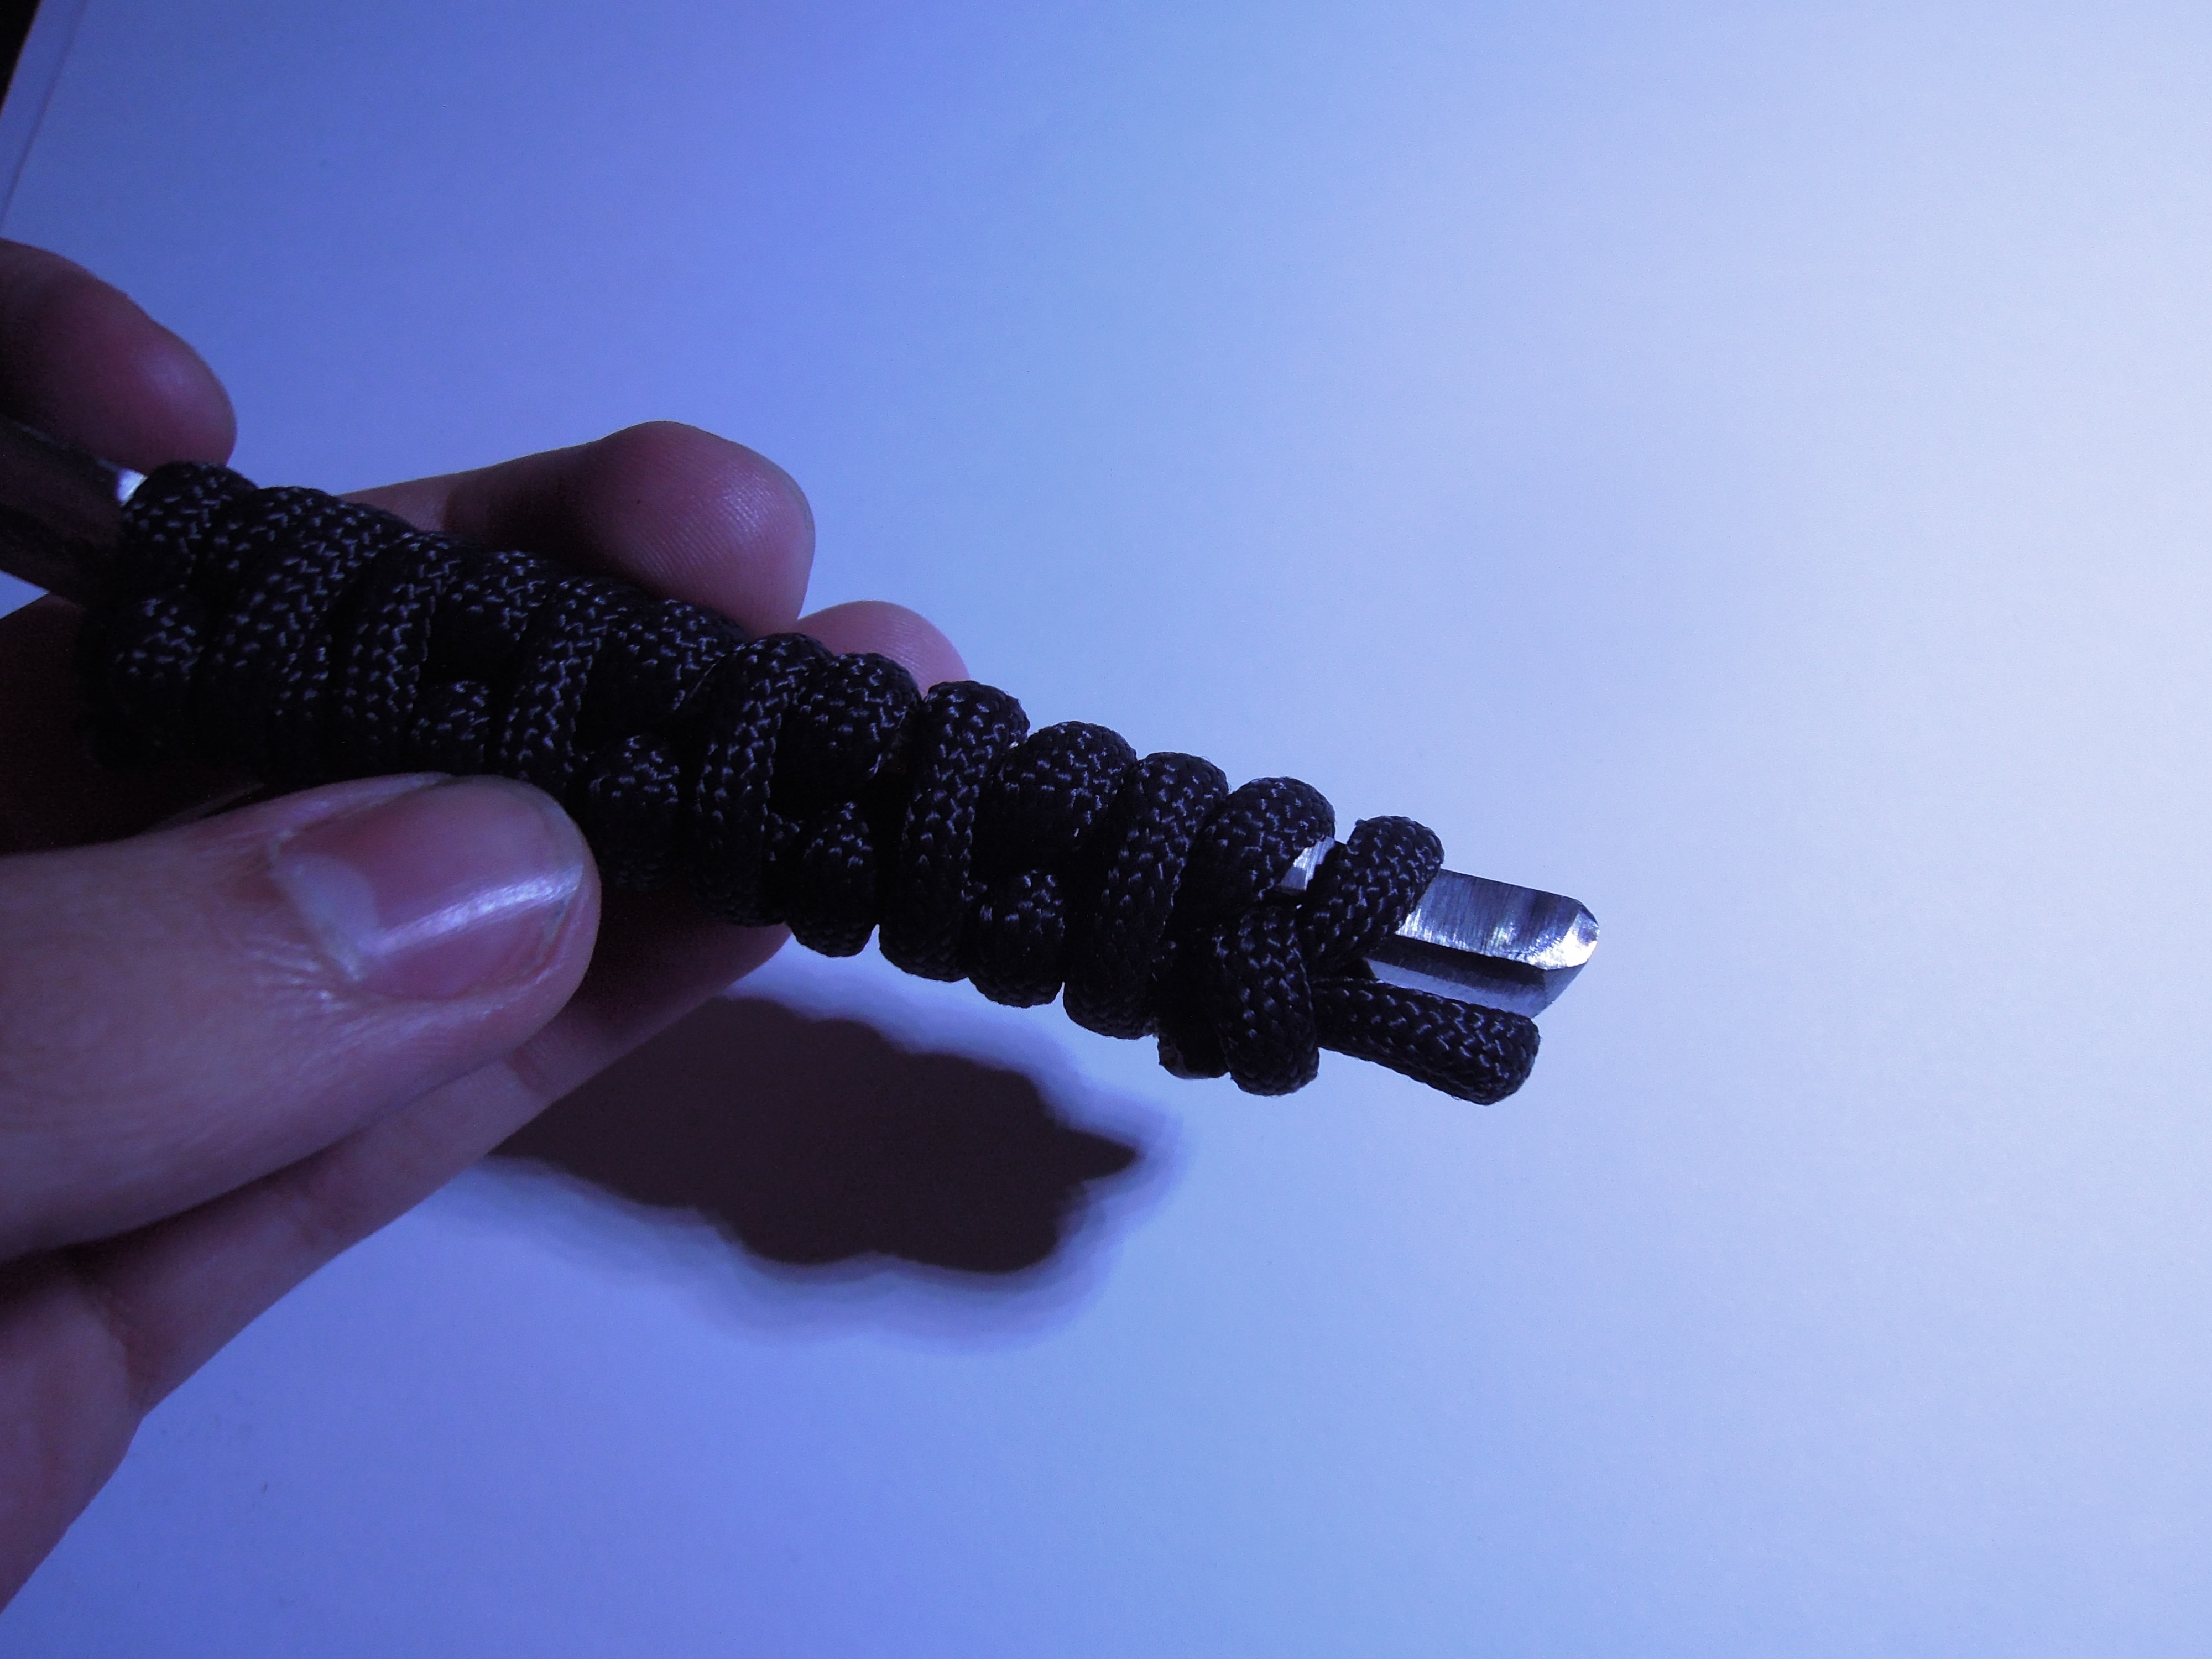
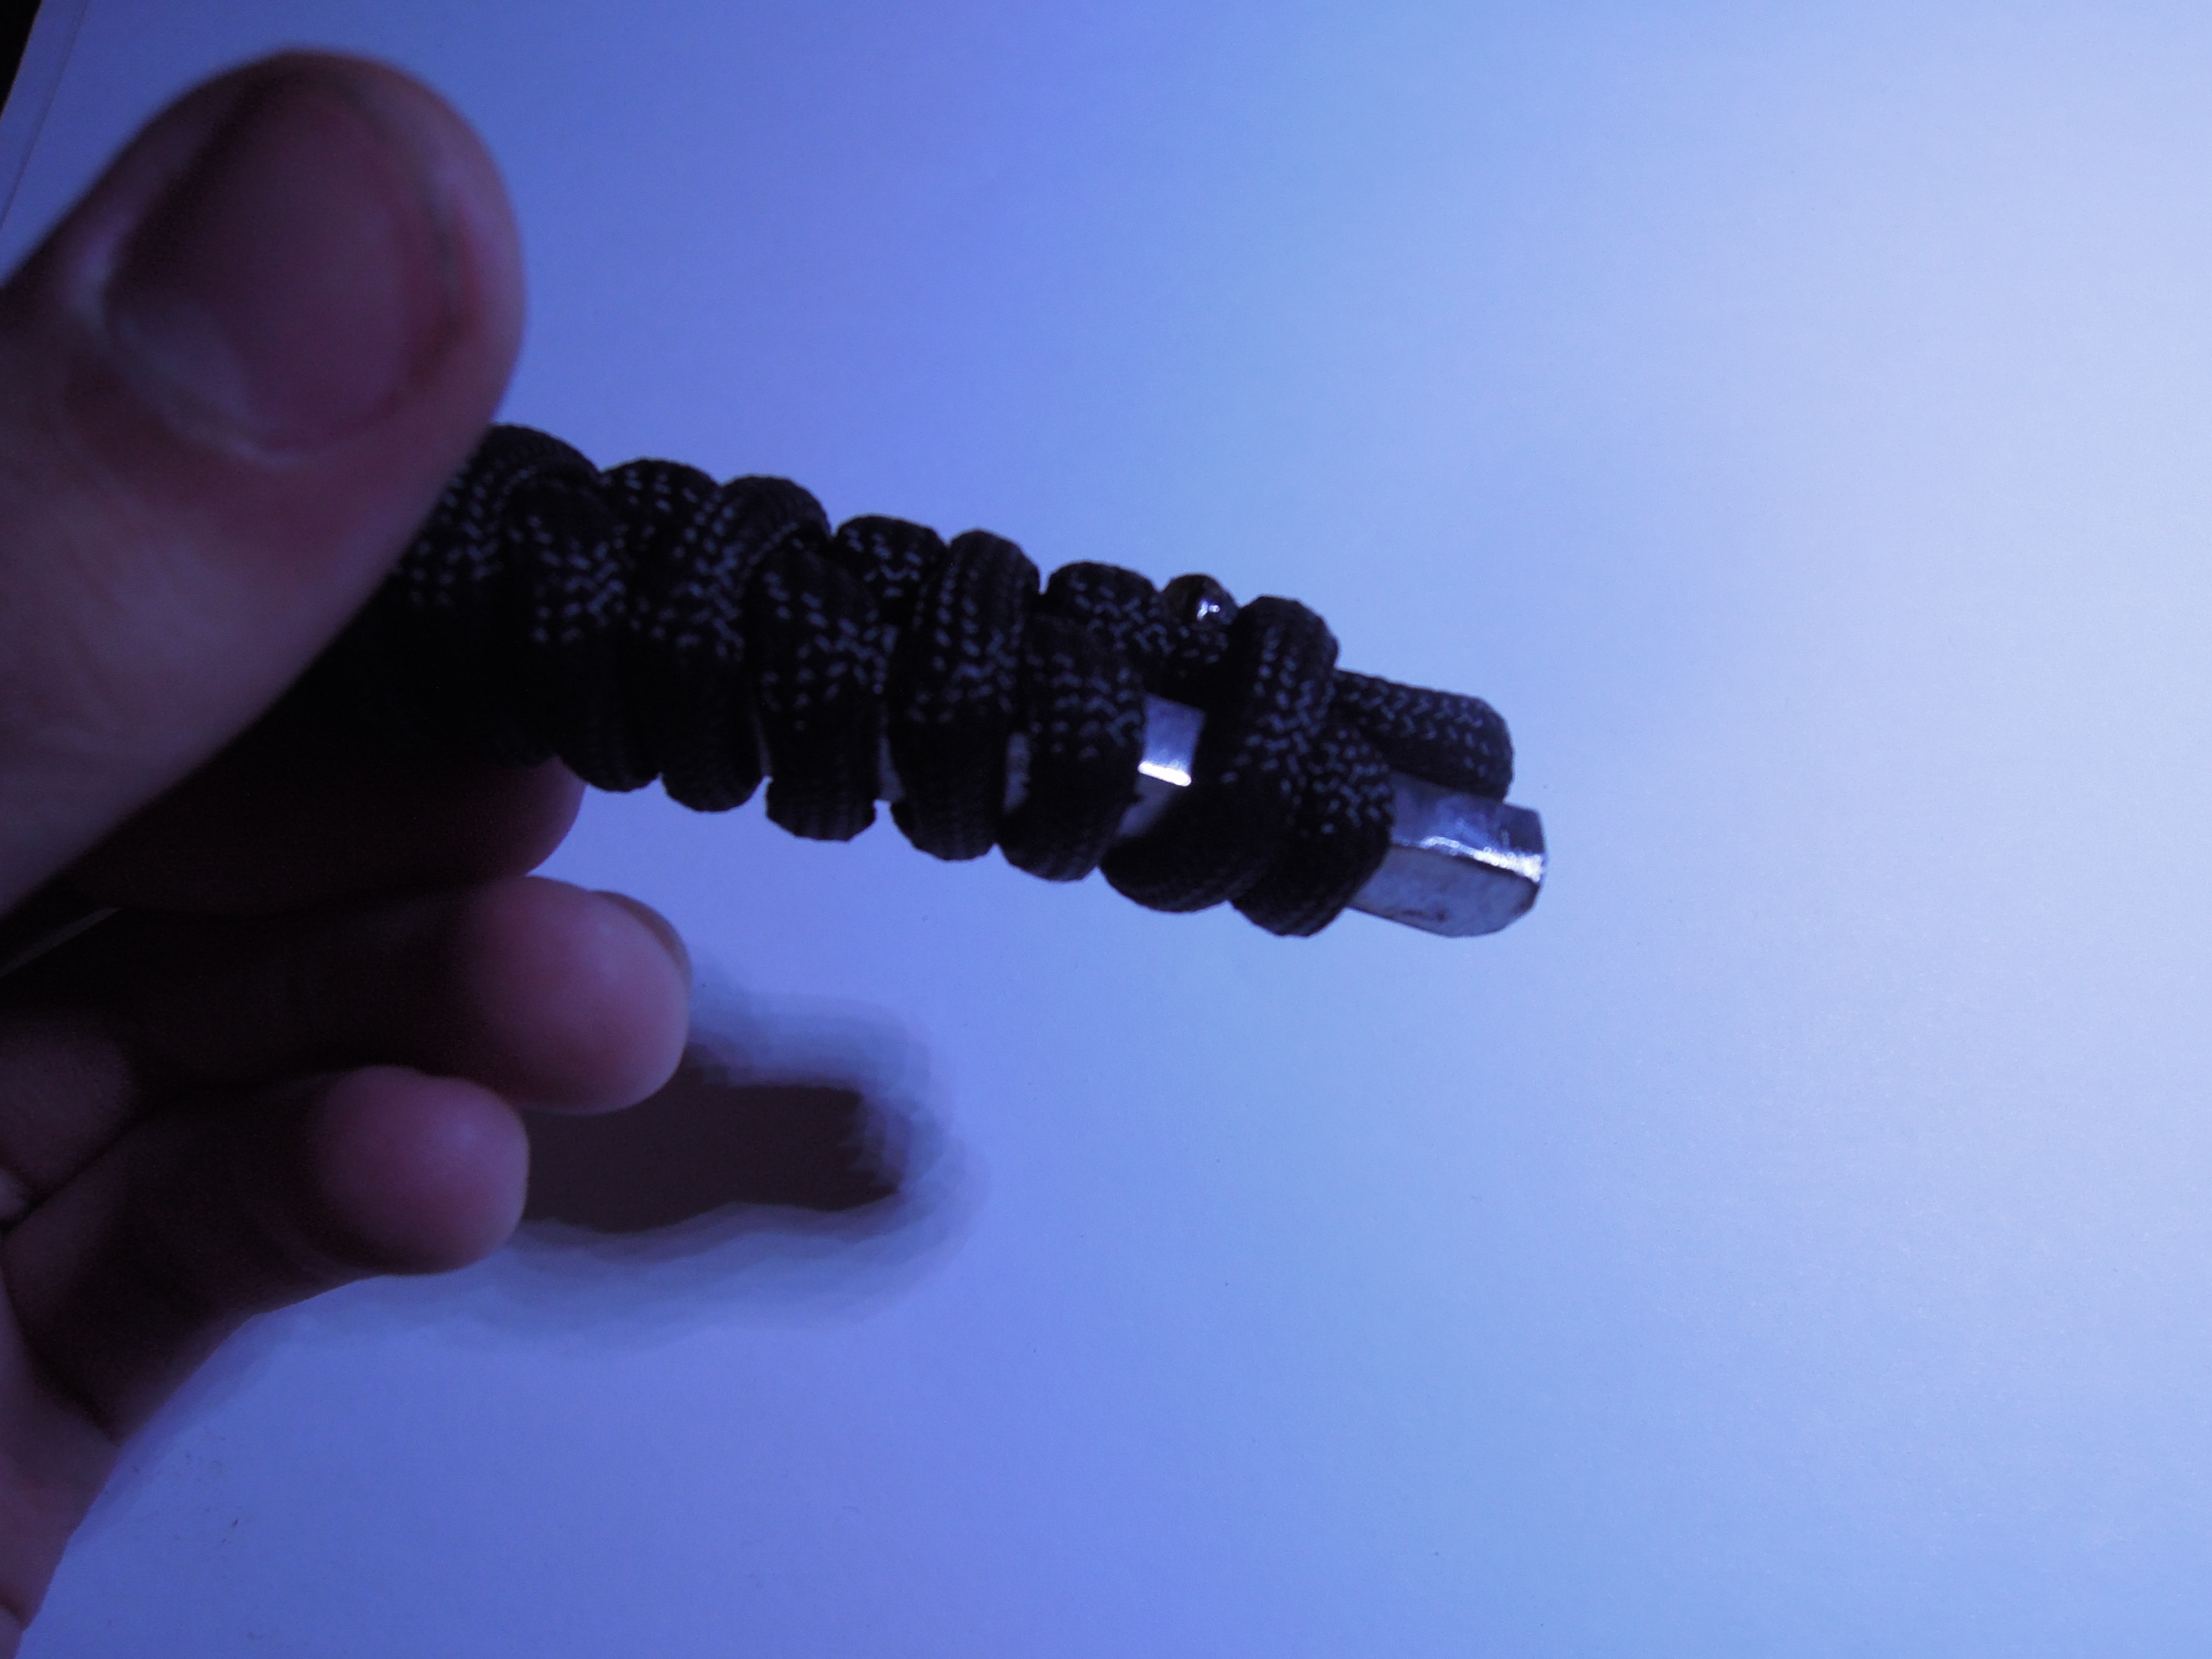
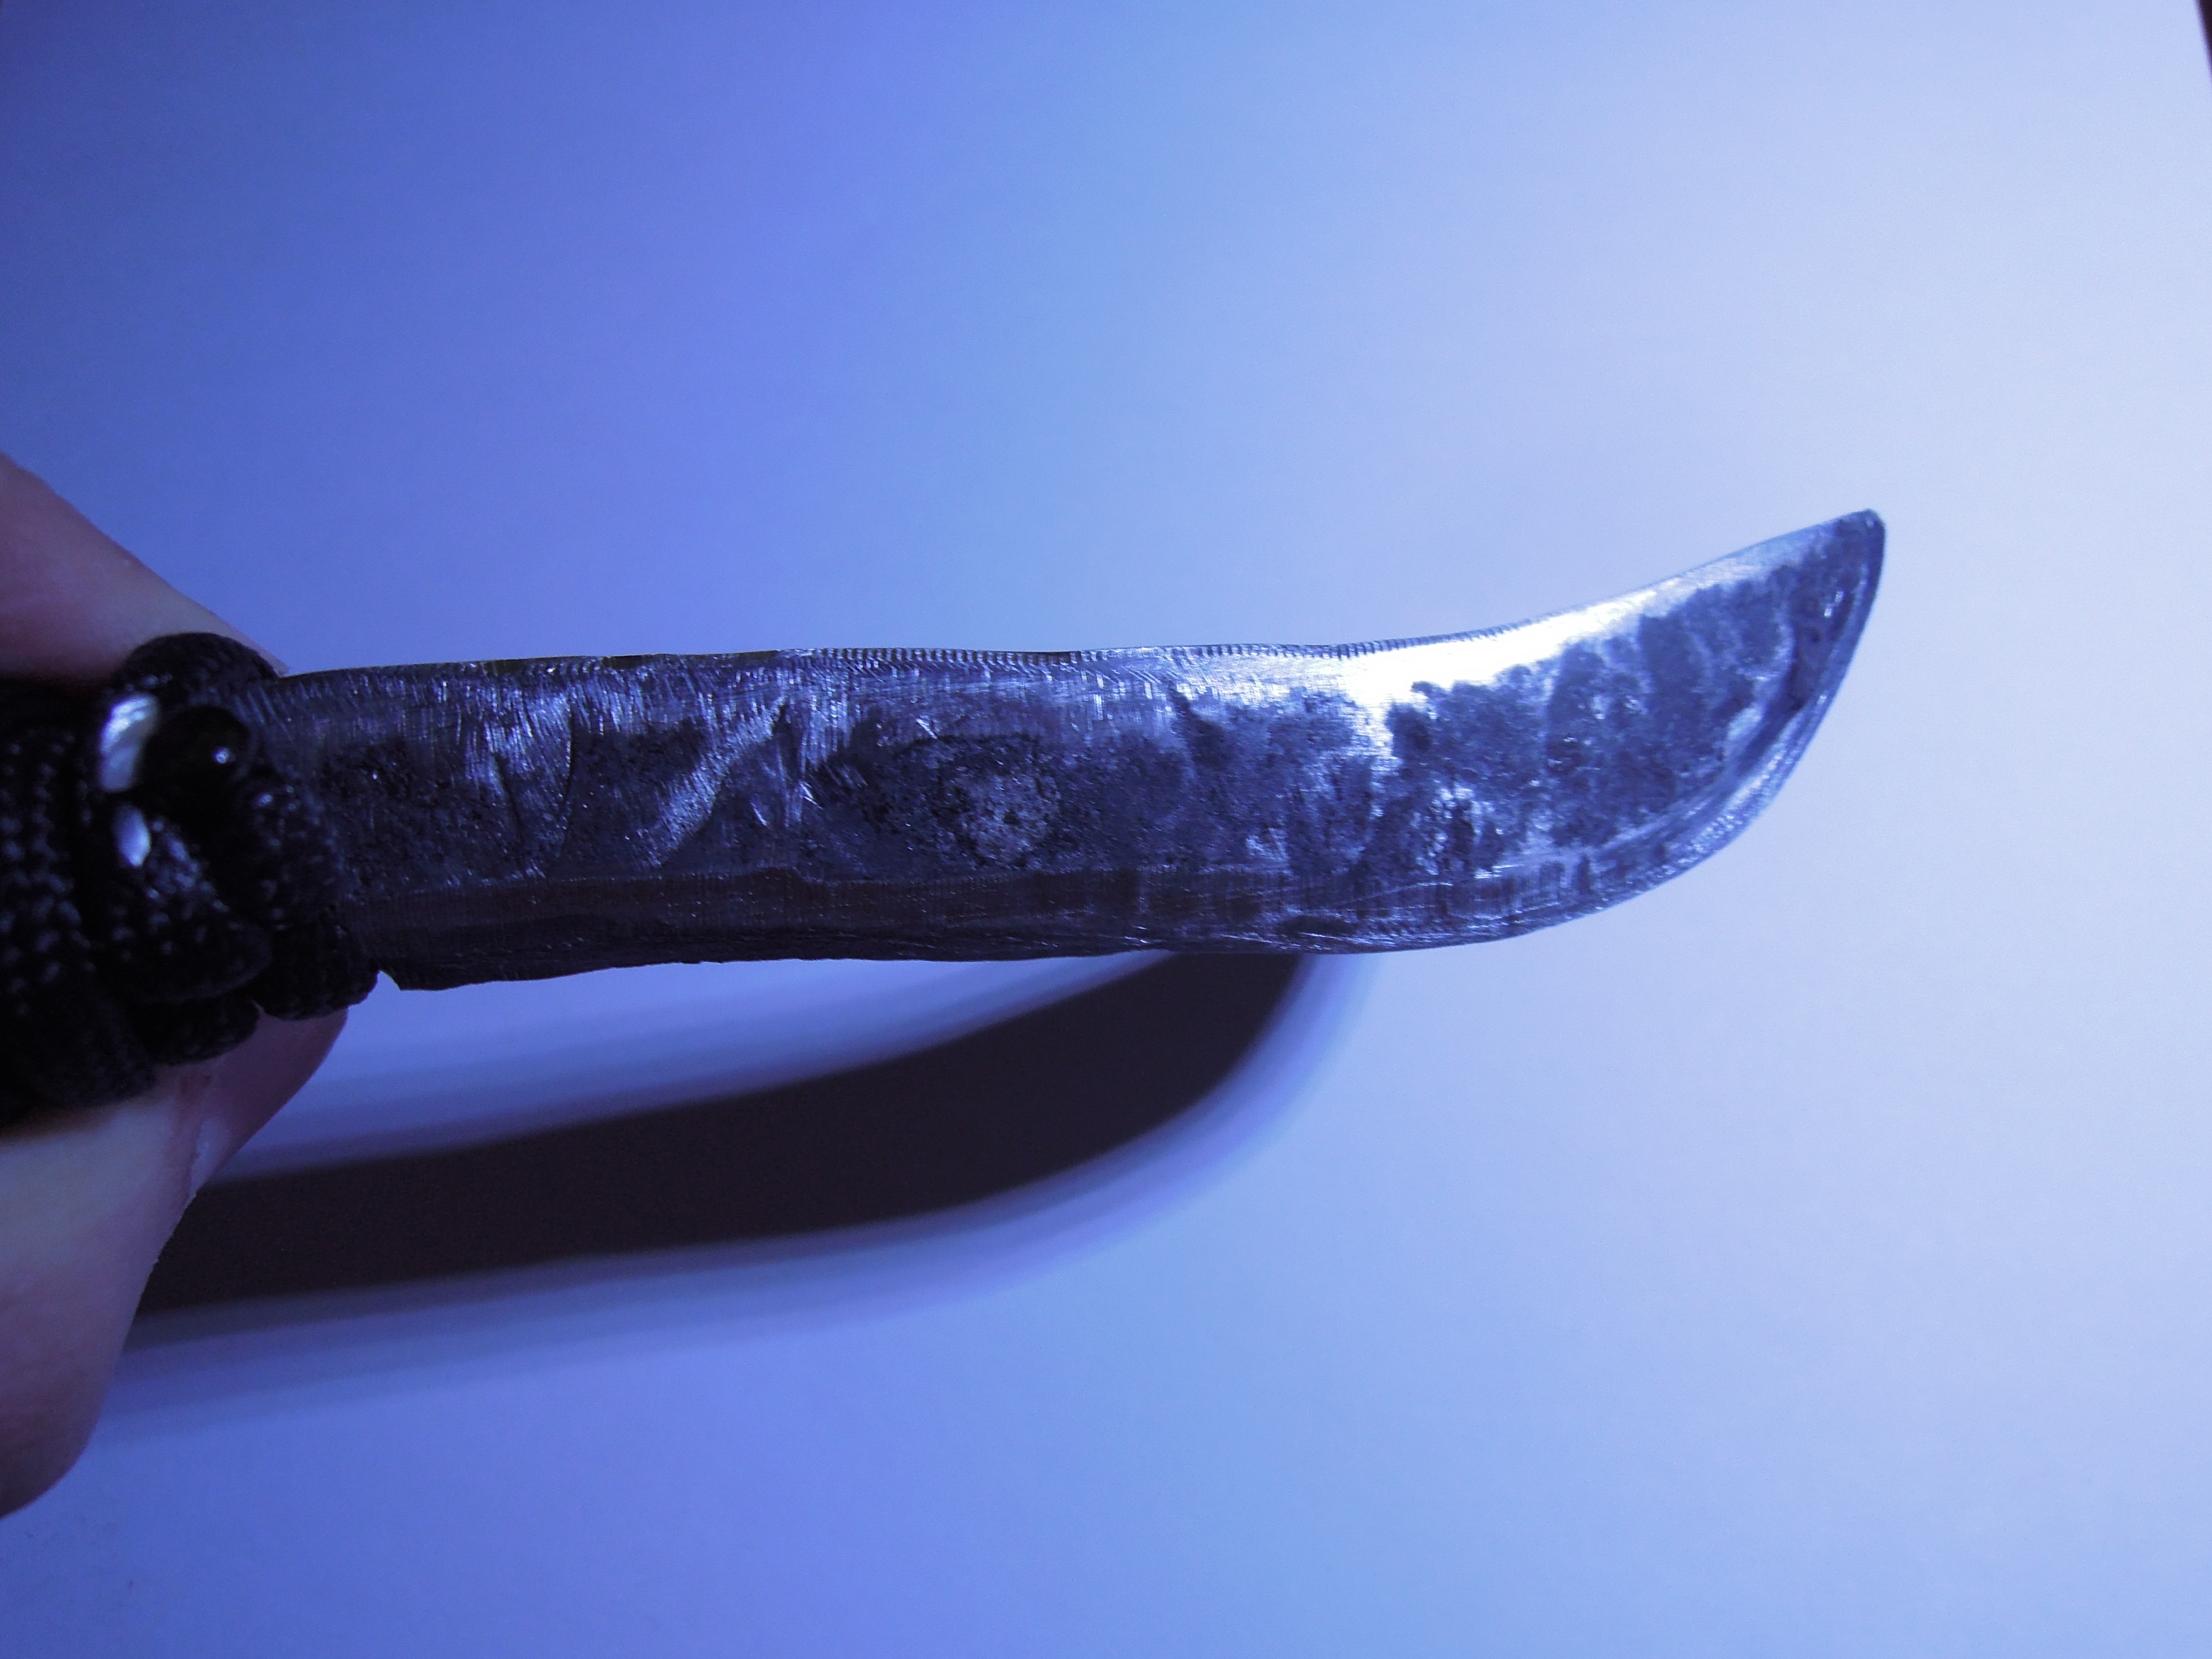
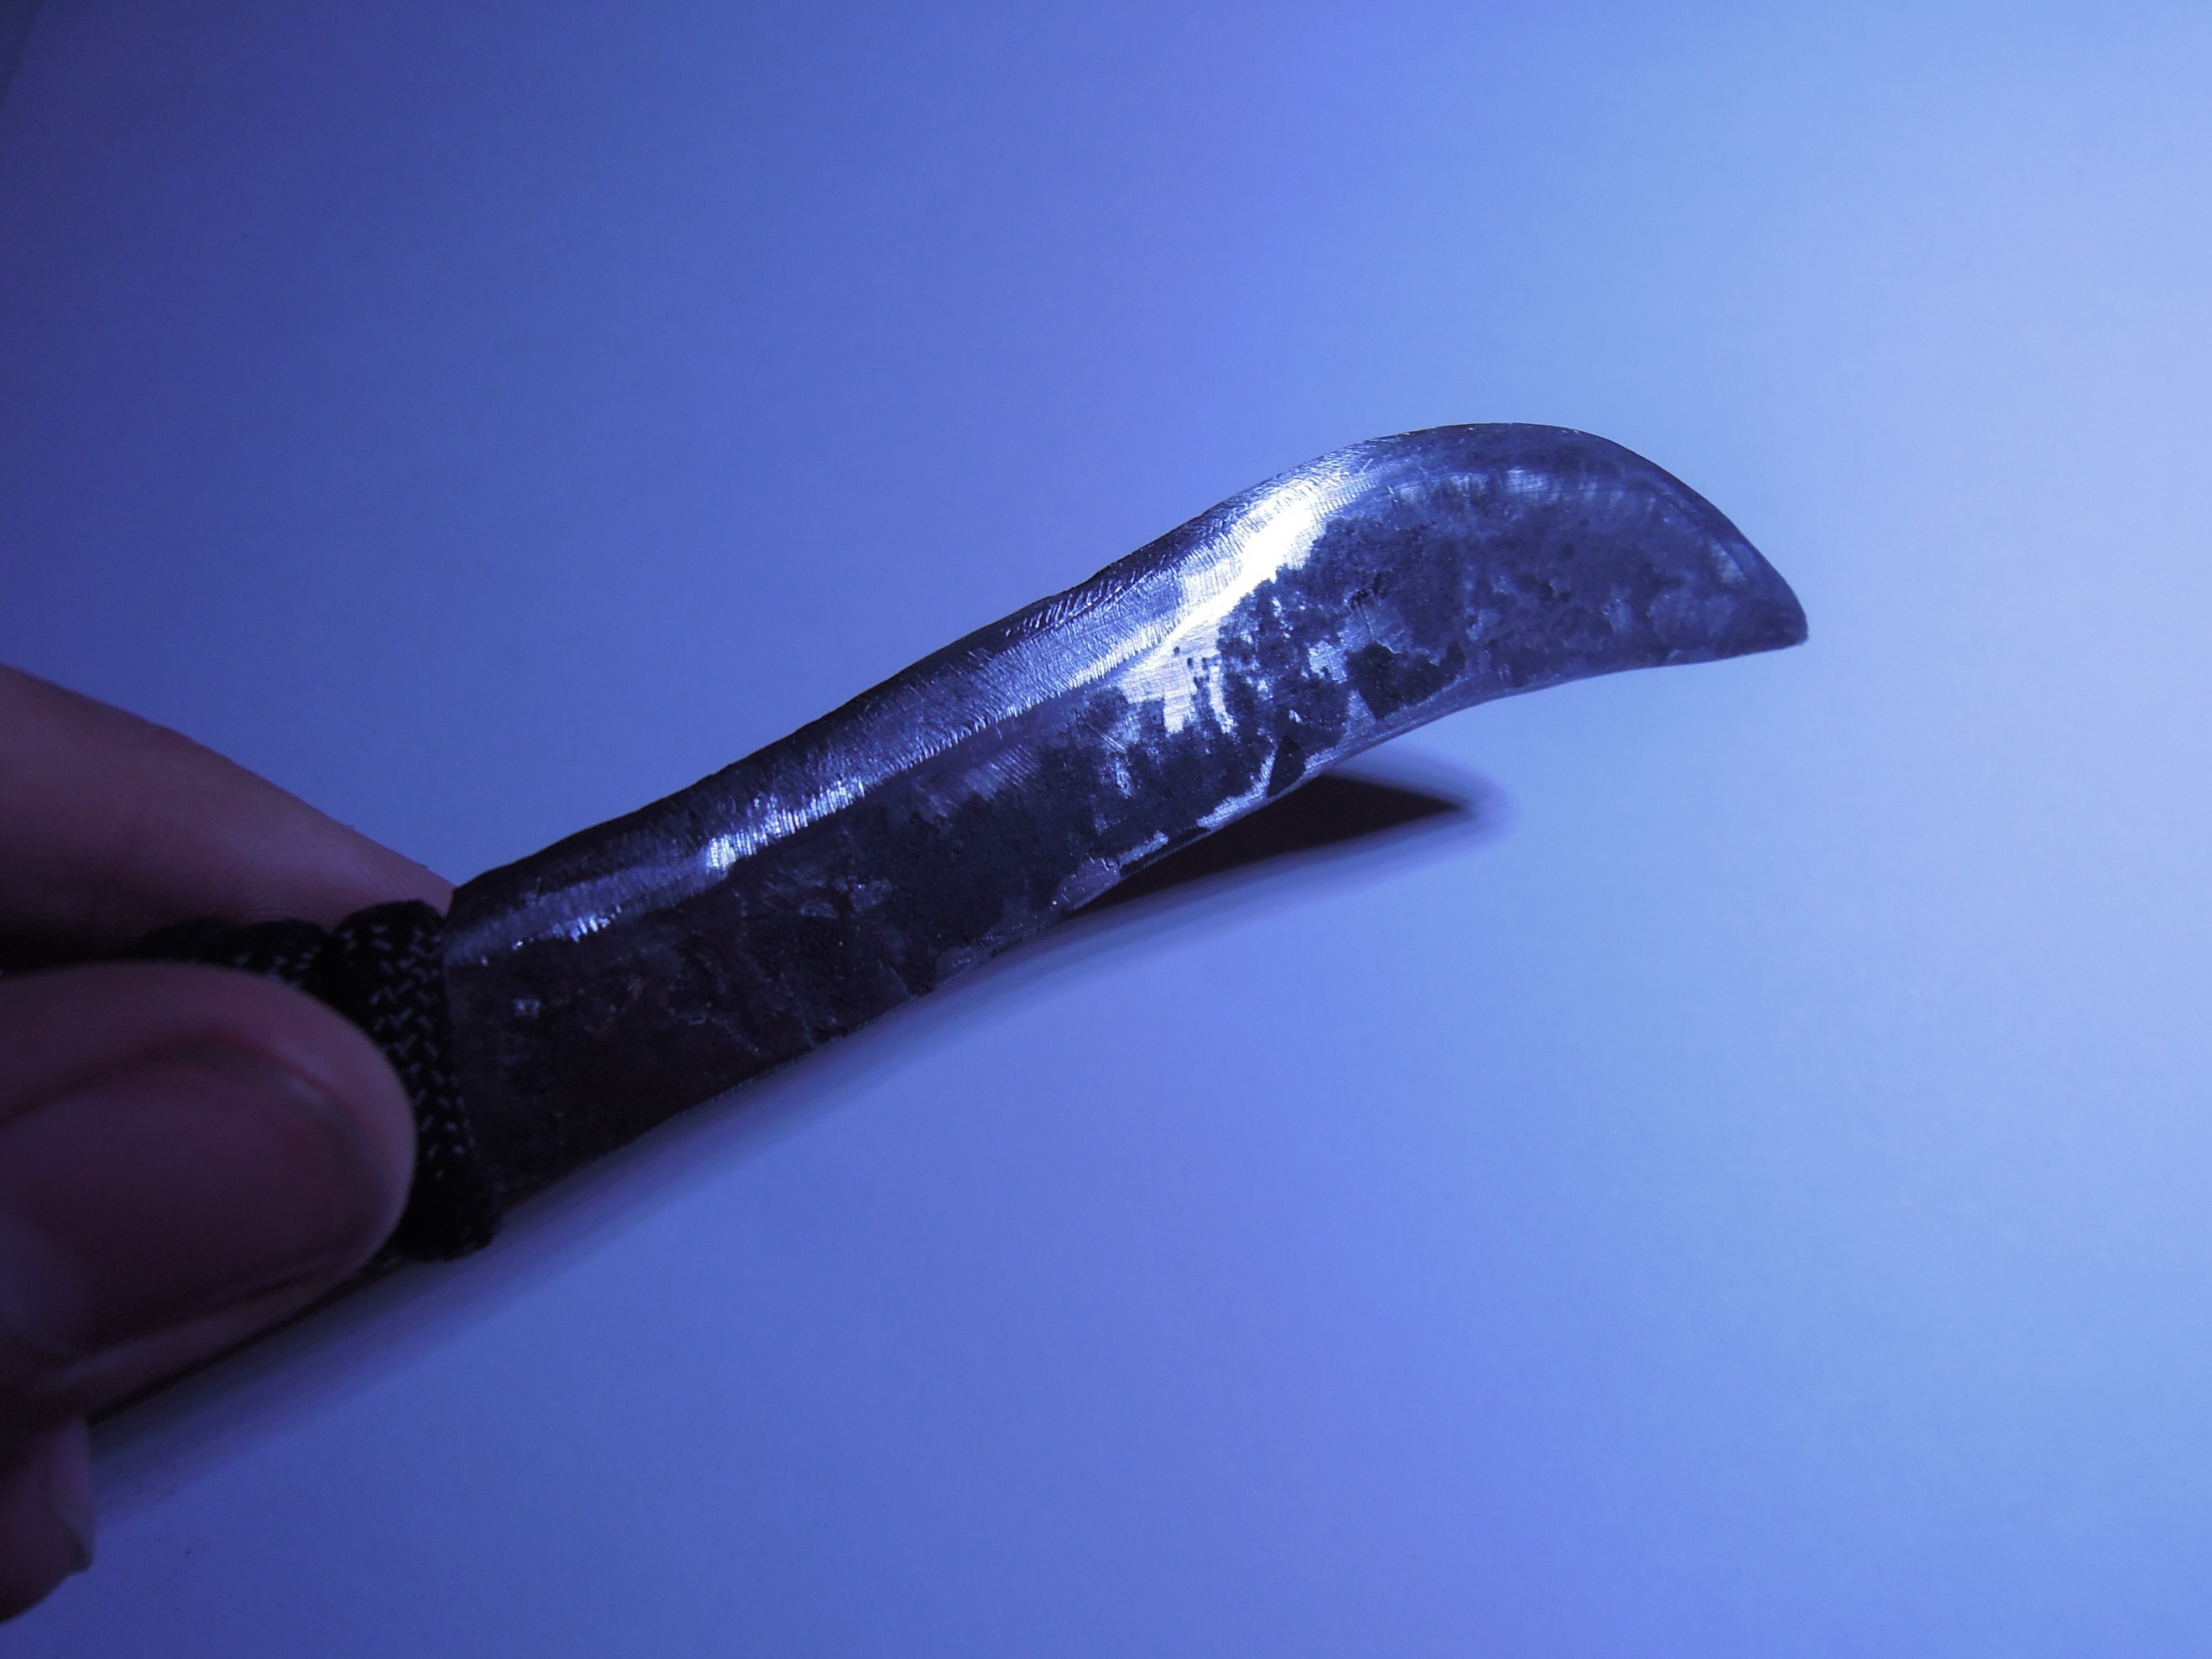
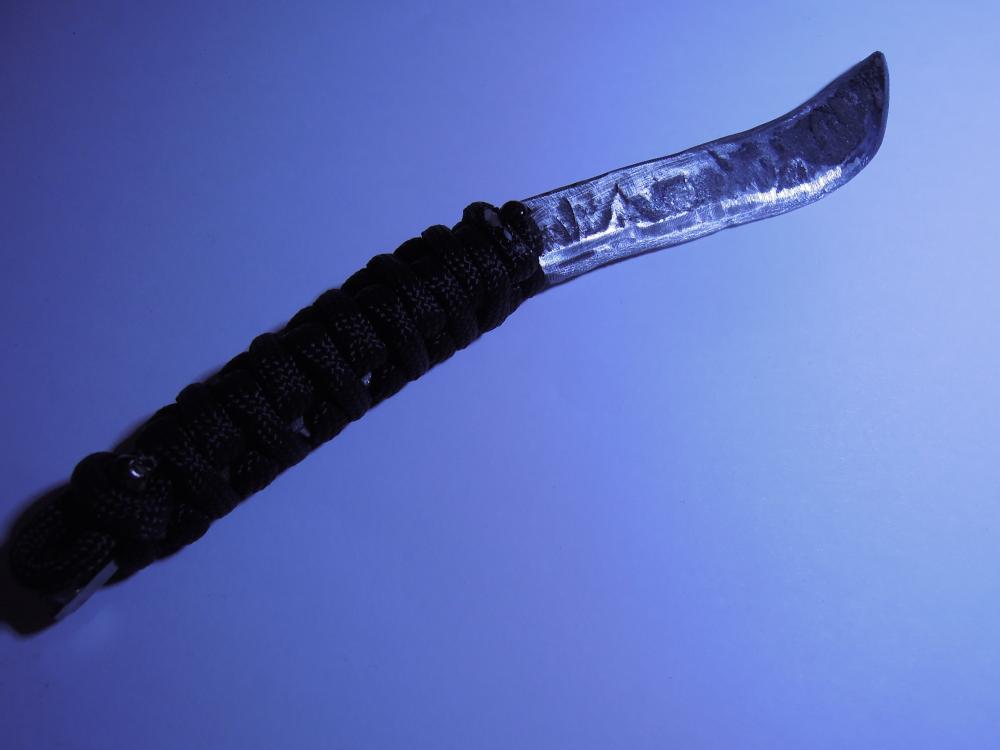
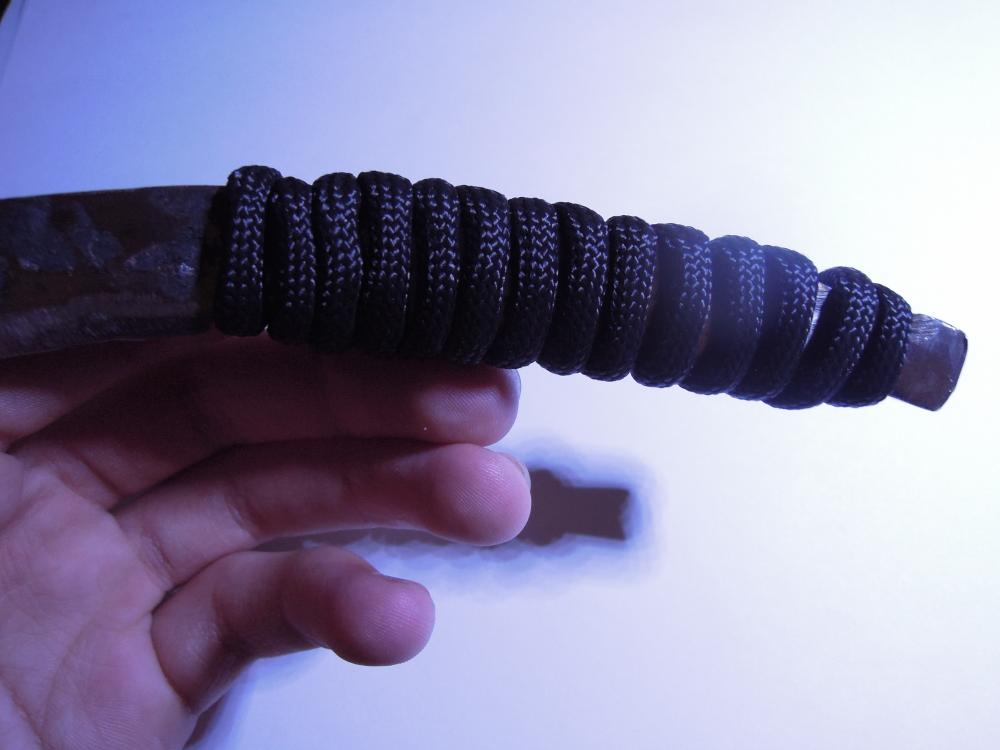
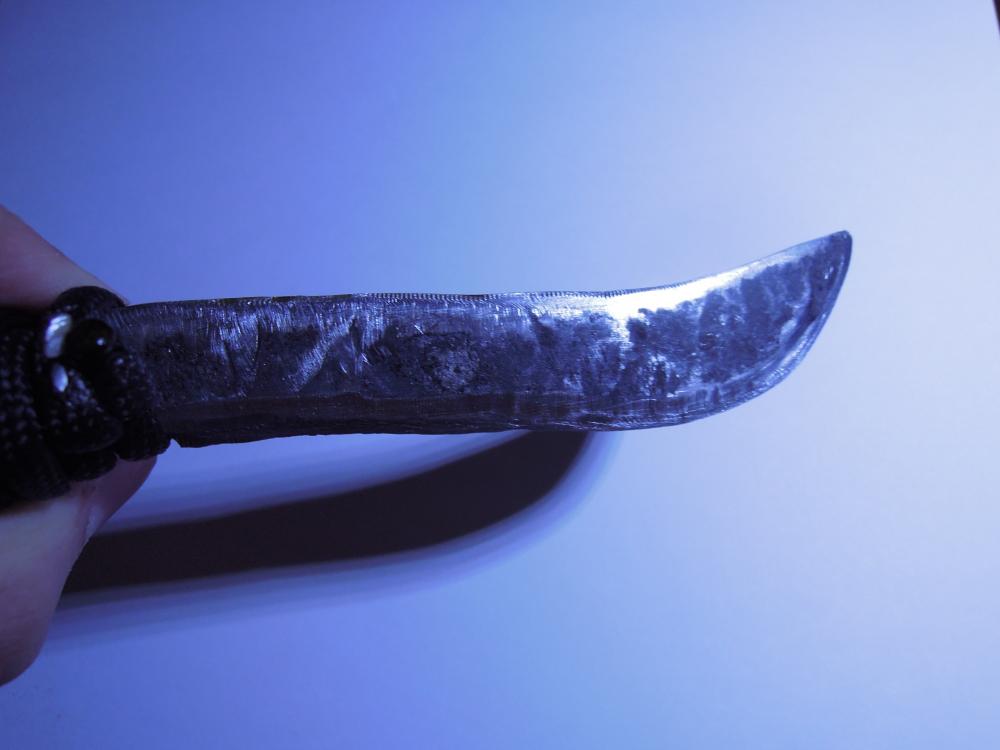
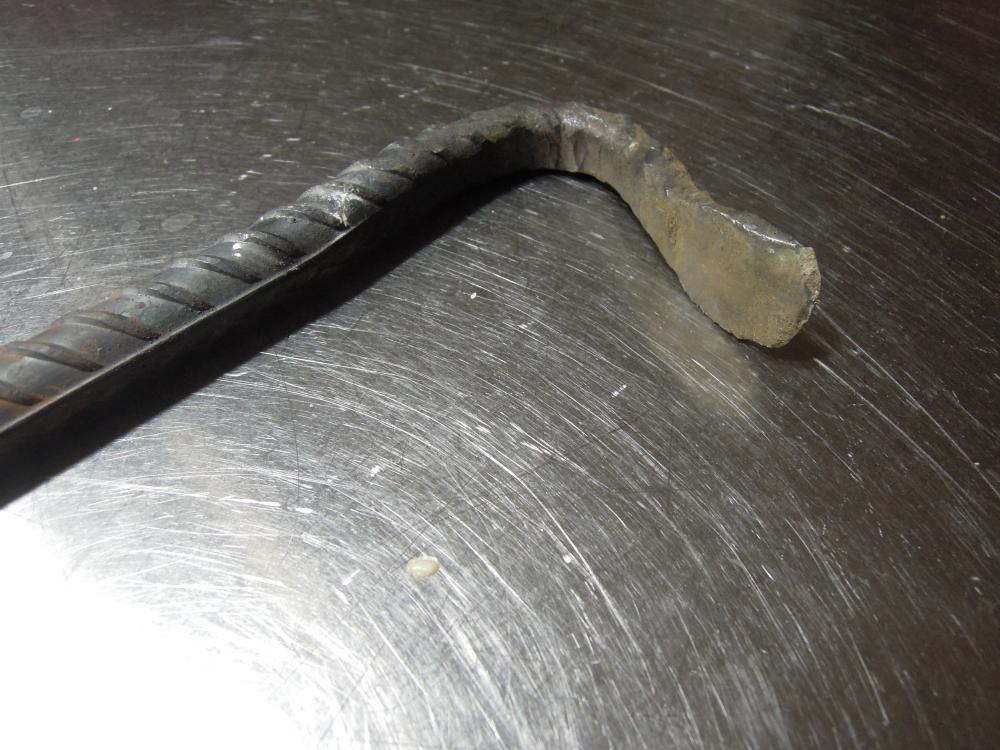
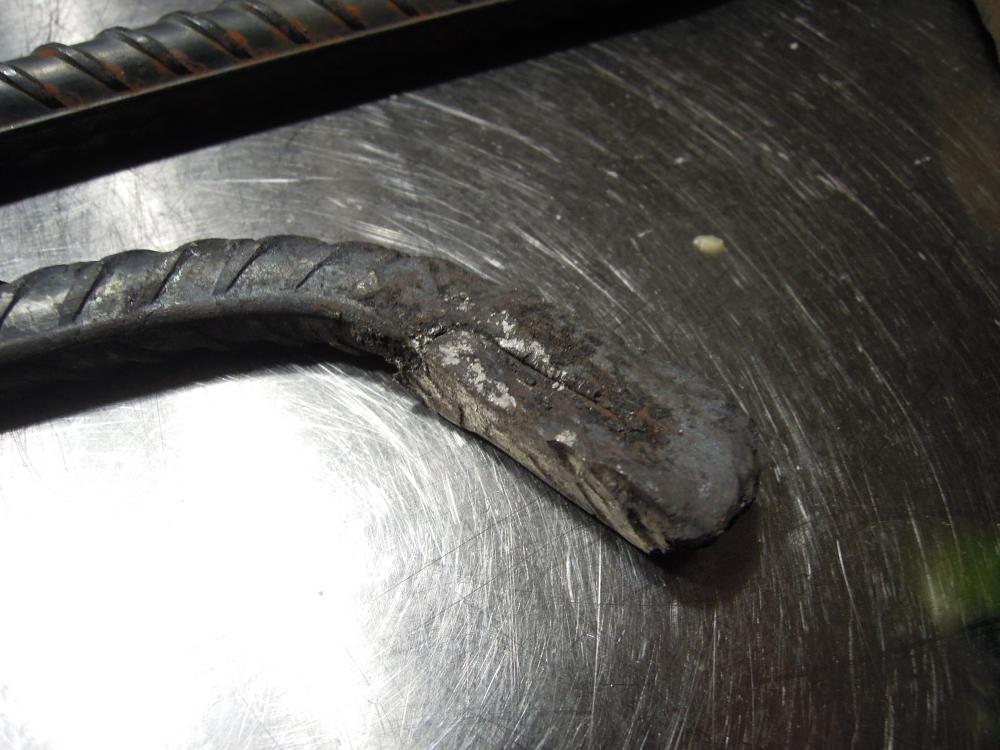
Suprisingly well balanced, this miniature Kukri is a birthday gift for a friend. The finish was mainly left so dirty to make it noticeably hand forged, since the friend in question is a scout and has many knives, making a unique design much more exciting. I'm going to make a matching leather sheath, pics when completed. I left the blade unsharpened because of my friend's preference of blade geometry for sharpening being a bit odd. But we're here for pictures! The knife is pretty small, about 4" of blade and the same in the grip. Quite well balanced with the bulged tip accounting for the thicker base. The steel is left pretty soft, because I would prefer blade folding over shattering since it's easier for me to repair, and I have no skill in heat treating but I know how to anneal well. That said, it still held an edge through being thrown at wood, so I think it'll do fine. All he has are commercial stainless knives anyhow, so this is an upgrade, This was mainly an exercise in shaping practice. If it weren't for rebar's frustrating texture, this would not have needed so much grinding work after it came out of the forge, but it still worked well enough. Personally, I like the smooth look of hammer finish more than the end grinder finish though.


-
Yeah, I'm working on that, also trying to source waste oil from the chic-fil-a my sister works at. Problem is, I can't pull the six-pack trick, being under the age of 21... Now that, that is exactly what rebar is, Actually, we were driving to new york at one point, and I saw a truck carrying 2+ inch rebar and my brain was going mile a minute with the things I could do. Just imagine, rebar horn for your sledgehammer head anvil. The ultimate homemade anvil setup on the cheap, :3
-
Yeah, I can't wait to get some known steel. Hopefully christmas comes through, that was essentially my christmas list right there, welding gear and known steel, :3 I tested this stuff, actually, it appears to be relatively high carbon. It's not going to be used for too much heavy duty stuff either, otherwise this would just be the prototype!
-
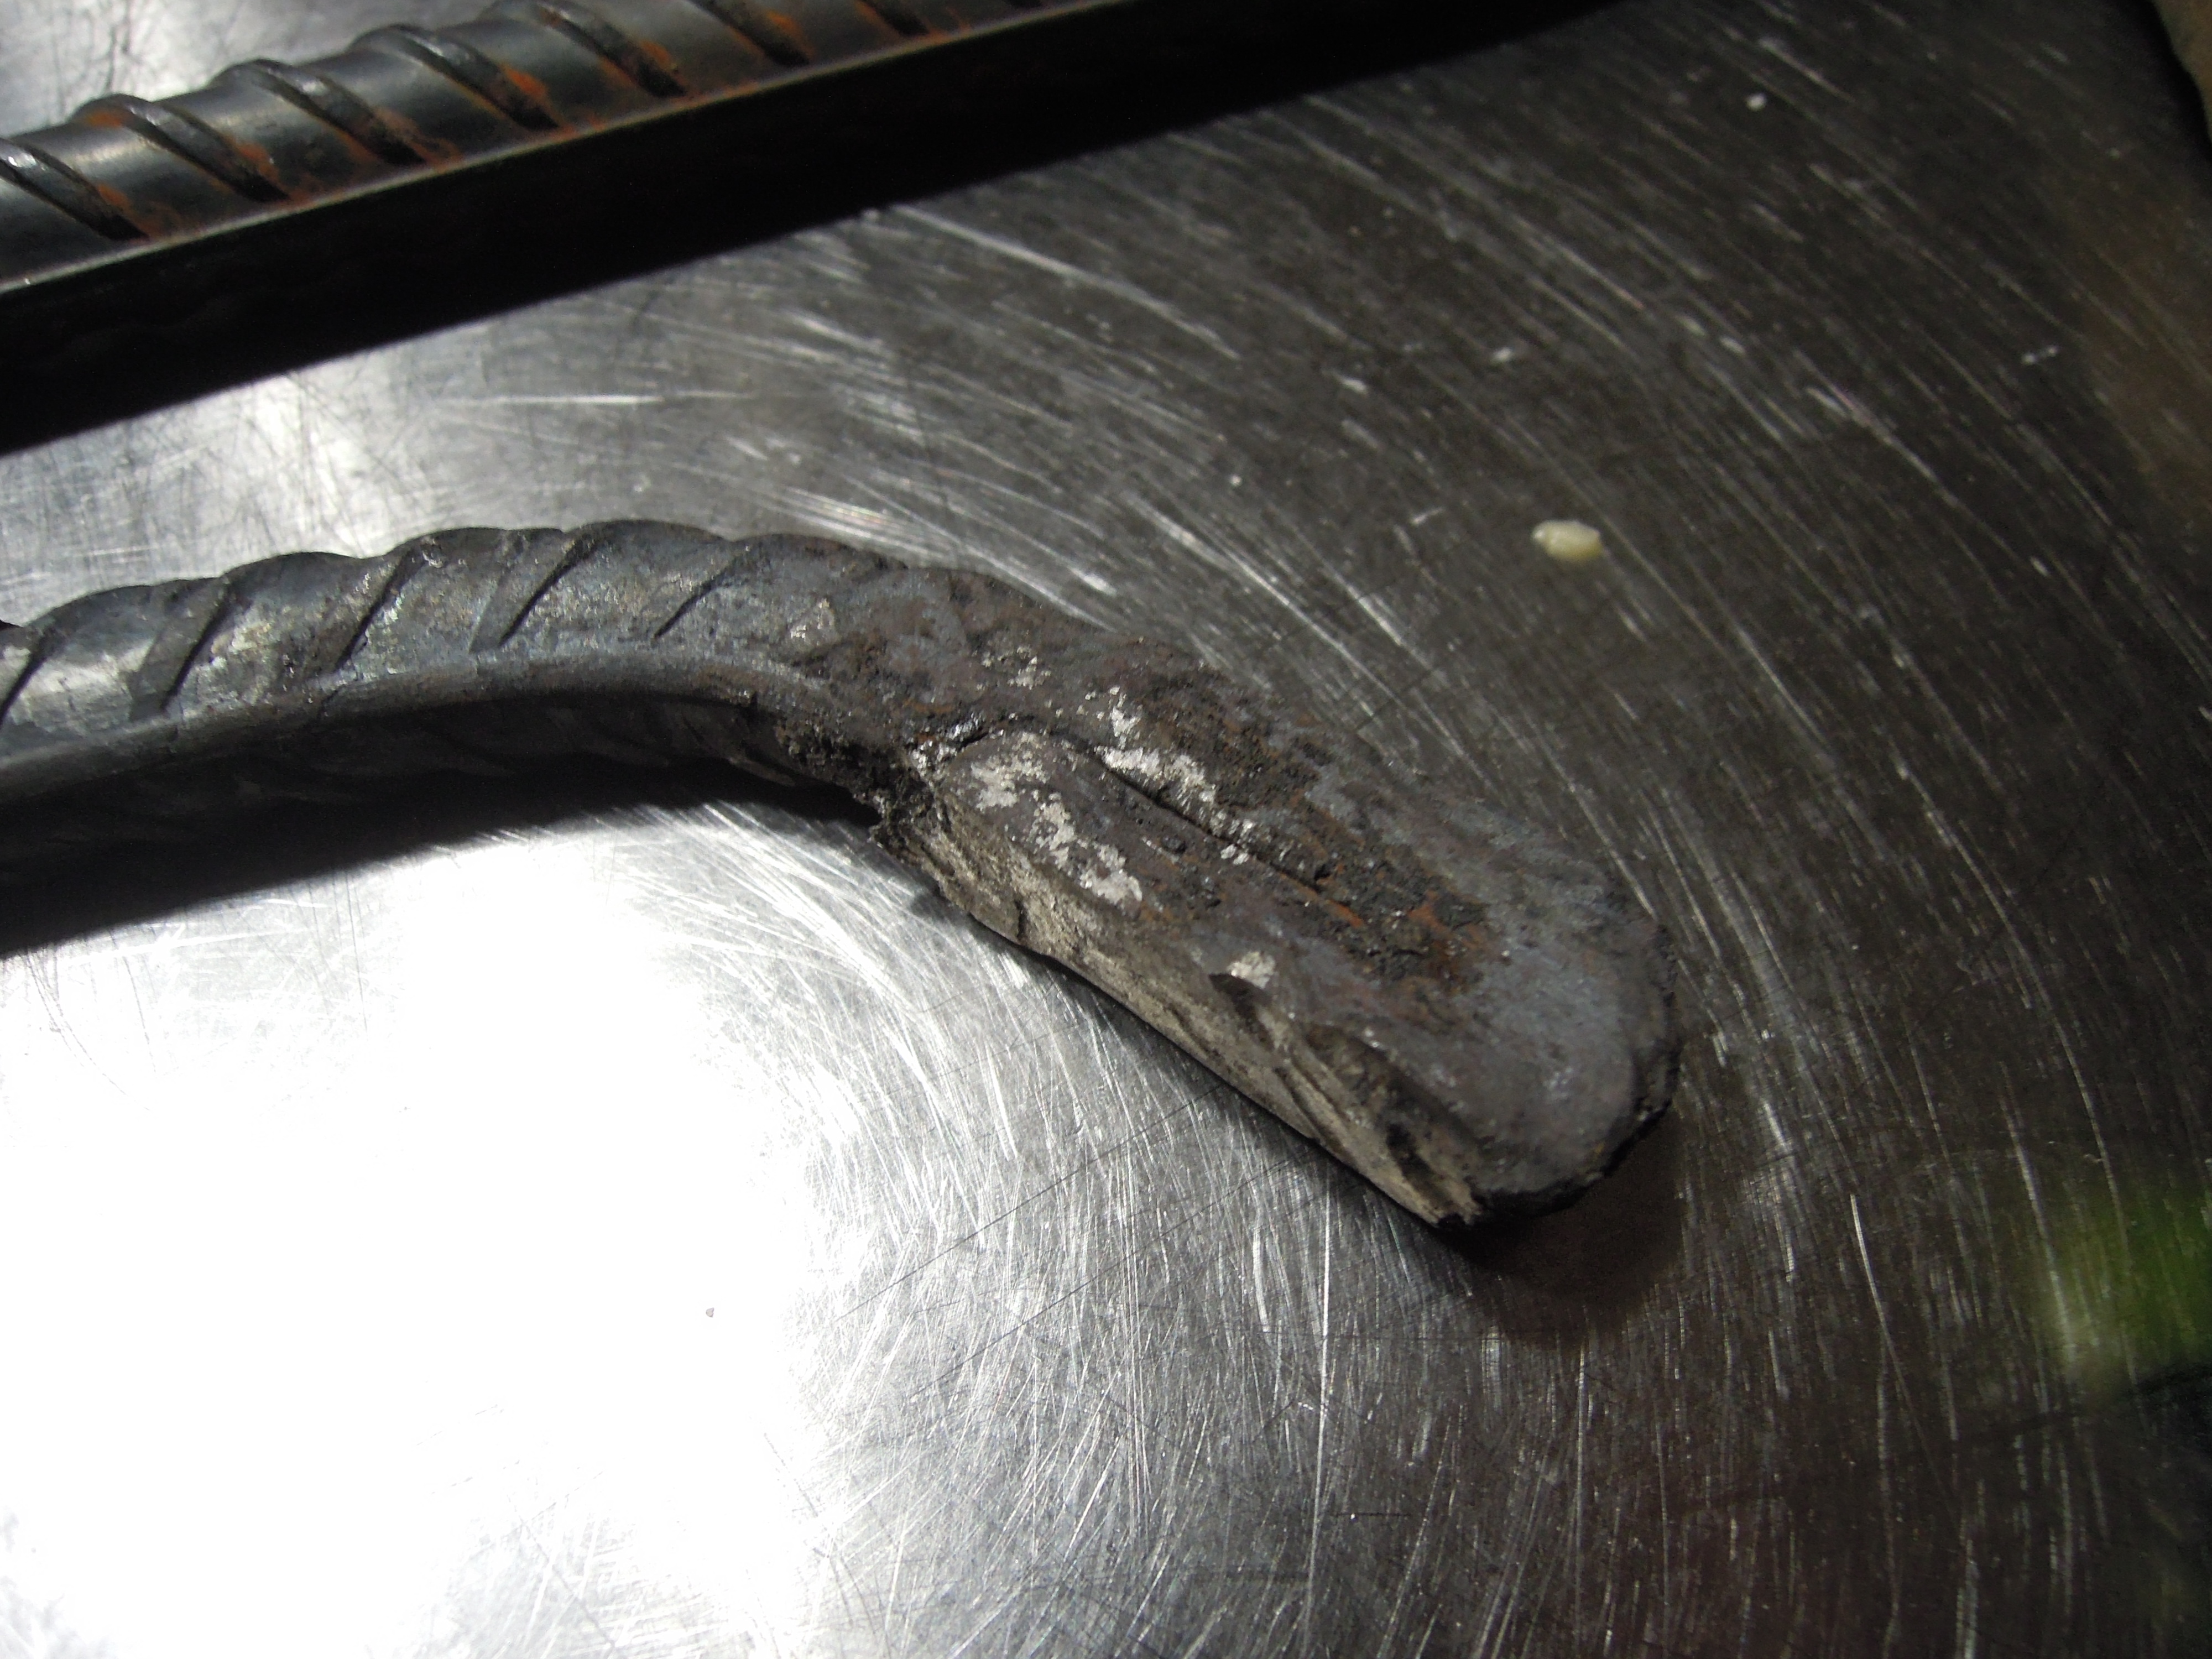
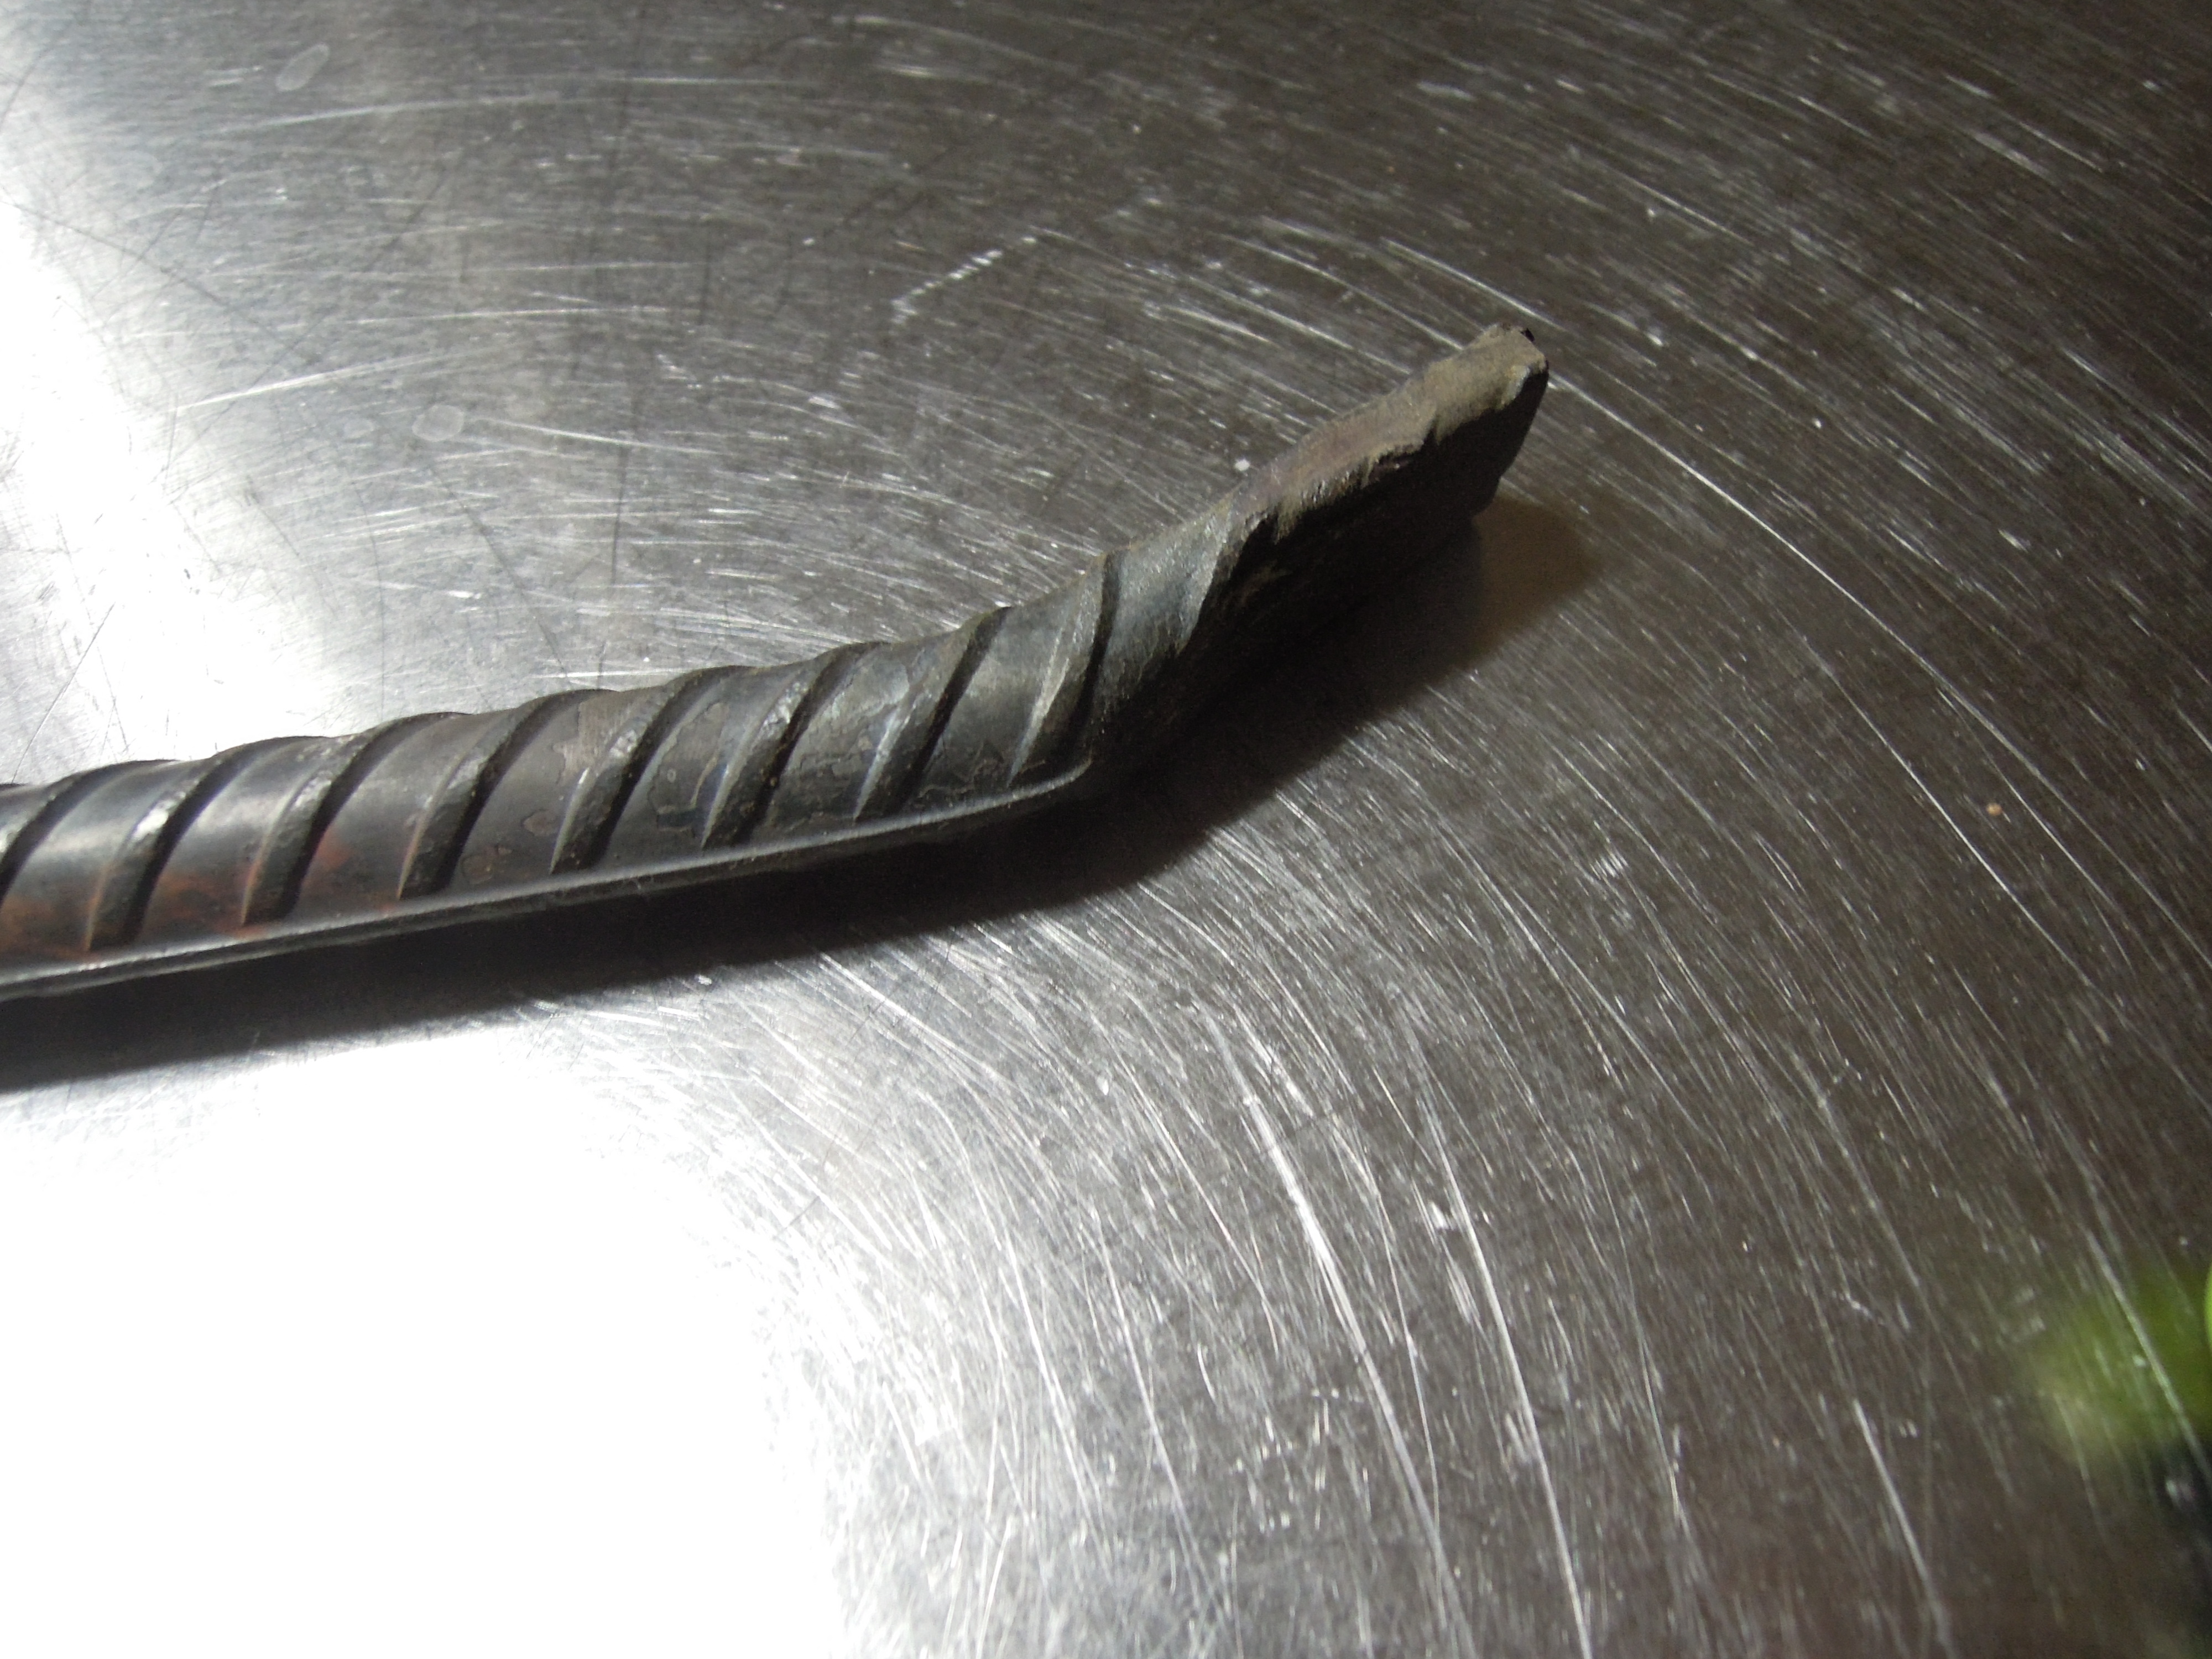
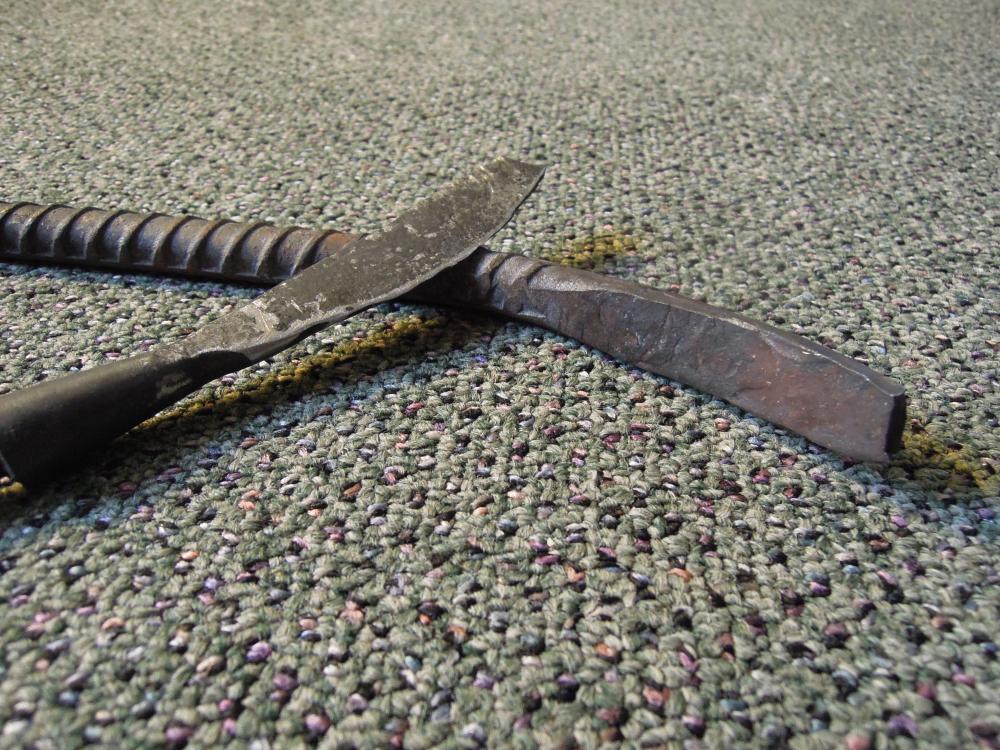
... so I figured, piece of rebar, bit of time, and I've got one! I took a piece of rebar a little over two feet long, and made an out-of-my-depth attempt at a pickaxe, so I realized that wouldn't work halfway through and looked at my interestingly shaped apprentice mark. Thought about it a second, and went, "Wait, wait, I got real lucky here, this is definitely a crowbar!" So, I made a crowbar. This thing isn't half bad either, I got my workbench (A 200# bench without anything on it loaded down with the majority of my shop, so let's say... 400#) an inch off the ground with it, so I'm calling it good. I needed a pickaxe (TP knows why, I've got dreams of iron ore!) and a pry bar for rock moving (That one's just to make getting clay easier though) so I was very happy with the results. I also ended up with my approximation of a micro-pick, but sadly, the weld didn't take. Usually my welds take, but the fire must've been dirty. (Did I mention that the first thing I got good at was not missing the metal with the hammer, and the second was forge welding? Yeah that happened) Anyway. the shovel end didn't work out so I had to just grind the spike and I'm planning to use the back to crack apart partially broken rocks. Anyway, here's some pictures for the curious. I'm still leaving hammer marks but I managed to only leave three or four on this one, and I'm re-mounting my anvil tomorrow so that should solve (*some of) my issues .
-
The "Happy accident" iron bloom
Micah Burgin replied to Micah Burgin's topic in Smelting, Melting, Foundry, and Casting
So, I made a magnet sluice, and it works great. I'm going to set up a slurry maker (Bad term, I know) which can filter the rocks out of the dirt and then I'll cycle the water (Let settle and siphon with a pump) in order to keep from wasting it. The slurry will probably get run through the magna-sieve two or three times just to be certain all the magnetite is out and then I'll just use it as clay (Which it appears to be... A low temp clay that melts really easily) from there. Hopefully as I get deeper the magnetite concentration will get greater (Sampling the dirt from different layers has suggested this will happen) but I have gotten a fair bit of the stuff already (Not much, but considering dirt from my backyard is the source of it, a lot for twenty minutes of work) Hopefully, I can set up a well oiled system from ground to bloomery, and hopefully this clay will work for bloomery outer walls. The inner will need to be some sort of non-melty clay though. -
Small batches of magnetite ore?
Micah Burgin replied to TimeToWaste's topic in Smelting, Melting, Foundry, and Casting
You could probably just burn some peat and check the ashes (With a magnet, of course) in order to find out if a bog precipitates iron. I mean, that's not much of a hassle. -
The "Happy accident" iron bloom
Micah Burgin replied to Micah Burgin's topic in Smelting, Melting, Foundry, and Casting
Nice! I'm going to go down to the nearby beach and see if I can pick up anything from the sand. Nice part is, it's on the side where the runoff is coming from (I'm on a peninsula, and we have beaches on both sides, so I can see which is best) so it's likely to have something there. On to the exciting bit: There's magnetite in the dirt! Tiny bits, sure, but there's some sort of magnetite deposit under the clay or something like that! Considering that the geological survey says that our quartz is all mixed up with the three oxide ores of iron (I can attest to this, there's always black stains, yellow inclusions, and rusty bits inside of any sort of quartz you find here) and there are some magnetite mines somewhat near me, so it's at least believable that I'd have some under my house, but now I at least know there's something to look for. -
The "Happy accident" iron bloom
Micah Burgin replied to Micah Burgin's topic in Smelting, Melting, Foundry, and Casting
Alright! I've been smashing up some of the slag and getting little globs of iron out (Magnet to extract) so at least I can get the iron back. I'll post some pics of the slaggy masses I've been getting. I have not gotten a chance to burn down a slag pile all the way, but the slag actually lights pretty easily (The coal in it has been mostly burnt) so I can just keep on burning it bits at a time if need be. I can't believe I forgot to check the geological survey, should've done that first! I'm going to dig down through the seam to see if I can find some sort of stone bearing iron or something that may be leaching up through the ground/had been weathered down to form the claylike deposit. I live in a coastal area (Within walking distance of the beach, no less) so that opens up a lot of mineral wash-up possibilities if my geology isn't as rusty as I thought, so the survey may not have anything on it. I'll be back with some pictures of the slag and what the survey has to say about ore concentrations in warwick. There's the trick! It's washoff of cumberlandite! https://en.wikipedia.org/wiki/Cumberlandite Apparently, my state is so cool, it has its own iron ore, XD On a more serious note, geography aside, I'm in the Narragansett bay area (I live off of the bay itself, that is) so this is probably some sort of weathered clay that came out of that rock. Hopefully some more digging (Both information and dirt) will help me get to the bottom of this. I also have a friend in cumberland, so we're going prospecting next time I'm at his house... :3 -
The "Happy accident" iron bloom
Micah Burgin replied to Micah Burgin's topic in Smelting, Melting, Foundry, and Casting
Alright, I'm not going to get very far with this testing until I have a proper baking drum for cooking the ore prior to dropping it in the bloomery and I need some sort of sifting tool as well, so what do you say I use one of my flat-rate USPS boxes to send you some of the stuff to test? I've got a huge seam of it and if it's hematacious earth you can probably get something out of it and help with processes for me to use. I've got quite a few boxes lying around and I can package up 5-6 pounds so you can really test it out. My best guess from the coloring is that if it's an iron ore pigmenting it, this is hematite based, so 30% of whatever content it has would convert, correct? By that metric, we can see exactly how much other stuff is in there. -
The "Happy accident" iron bloom
Micah Burgin replied to Micah Burgin's topic in Smelting, Melting, Foundry, and Casting
Oh it was just an example reaction for balancing, nothing more. Anyway, I've got sulfur burning around the edges of the fires so I'm fairly certain it's reducing something. I need to get a stack so I can charge it properly but once I do that it'll probably work better. -
The "Happy accident" iron bloom
Micah Burgin replied to Micah Burgin's topic in Smelting, Melting, Foundry, and Casting
Ahh! Okay, so no limestone. My chemistry book lies apparently. XD -
The "Happy accident" iron bloom
Micah Burgin replied to Micah Burgin's topic in Smelting, Melting, Foundry, and Casting
Haha, I'm sure "They" are! I'm doing some more testing, but I am consistently getting some sort of iron oxide or sulfide residue binding pieces of coal, which means I'm going to need to burn it in the presence of limestone if I remember correctly in order to convert it to iron oxide or do something similar to that. Also, seeding with a bit of rebar was really helpful and allowed more beads of metal to collect as opposed to just the sulfides. I didn't get a proper bloom like last time, but I still have more to sift through before I'm sure I didn't just miss it. -
The "Happy accident" iron bloom
Micah Burgin replied to Micah Burgin's topic in Smelting, Melting, Foundry, and Casting
Yeah! -
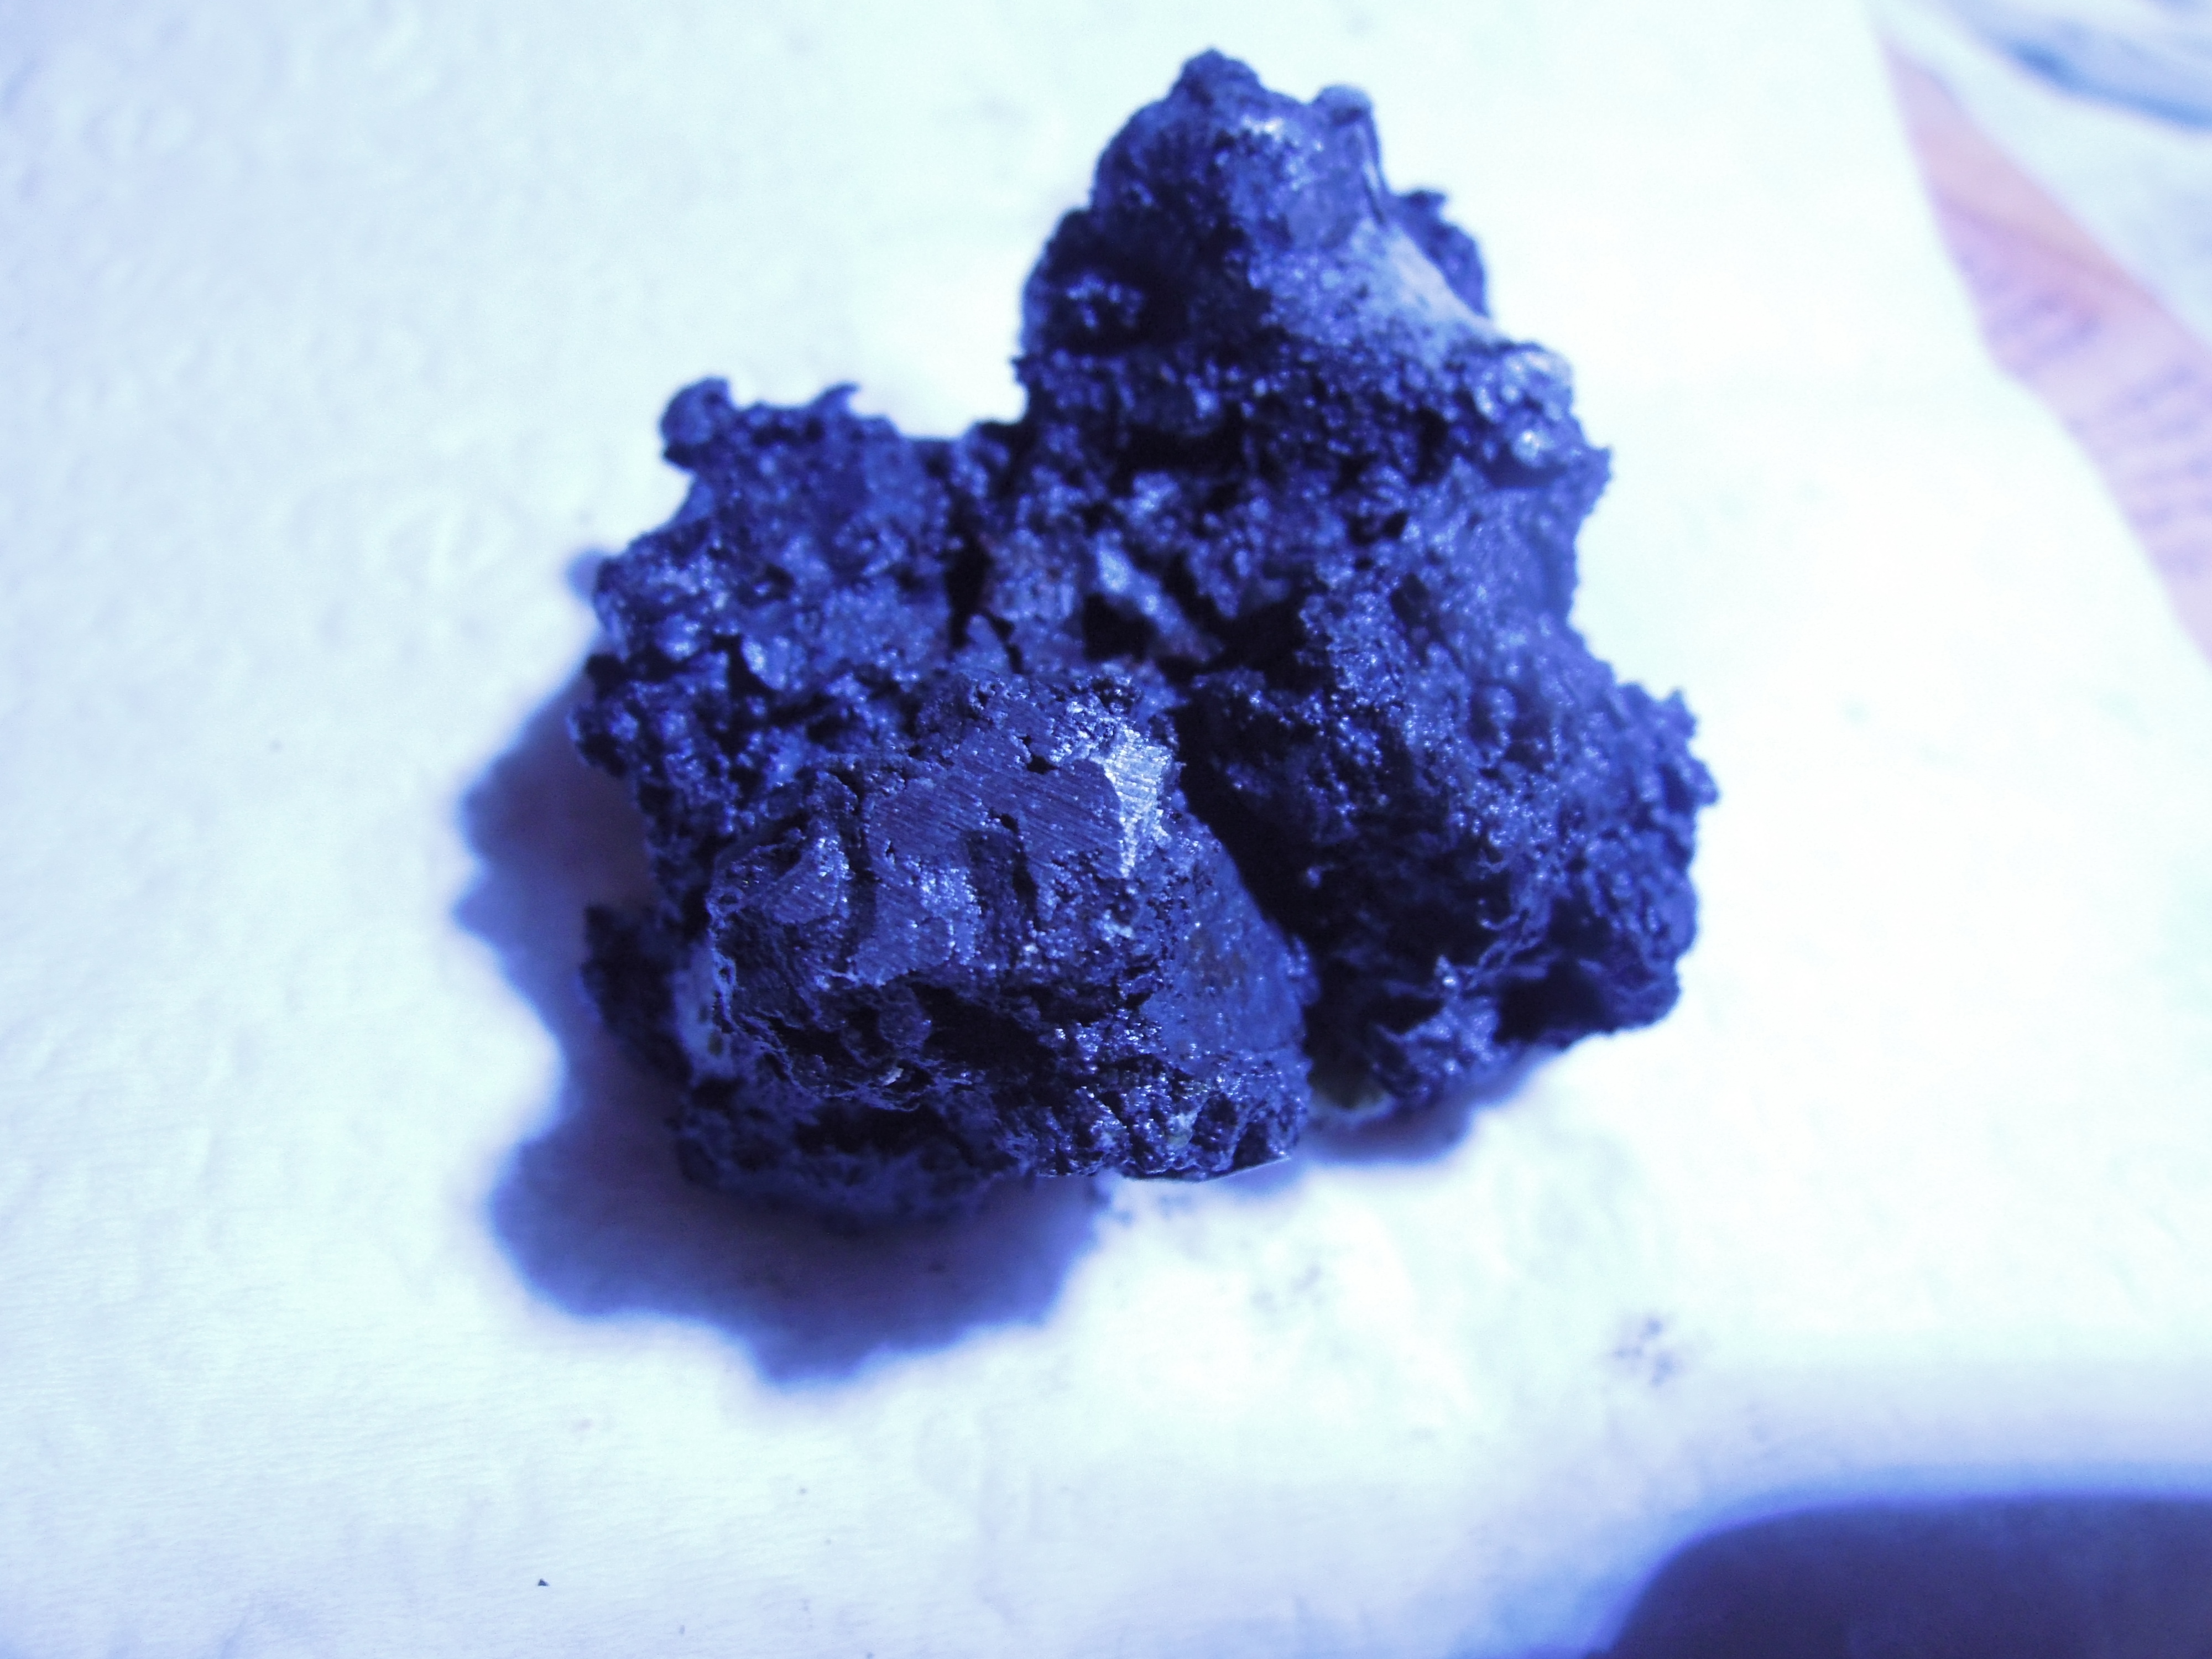
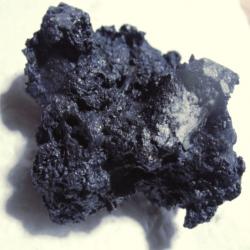
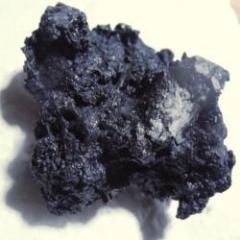
So, this is going to sound strange, but I recently lined my forge with what I THOUGHT was clay... but in reality was some form of iron ore sand. When my coal started ceasing randomly in the center of my fire, I mixed it up and found a small bloom. Of course, I had to see what was up, so I layered coal and the clay-like ore in my forge, and I got this. You can see a small face in the bottom most visible part of the bloom in that picture, it's been ground down and sparks flew when I was doing the grinding. This lump of bloom probably has a lot of sulphorus inclusions, because it was refined through anthracite coal, but it actually did reduce the metal through some chemical process (Possibly the sulfur burning off, because the tell-tale blue flames were around the edges of the firepit throughout burning it down.) and this is only a part of what I got. In the future, I'll probably bake out the impurities of the clay-ore stuff, but I'll be testing a lot of things to see what does and does not work. Who knows, the clay could have an inclusion that allowed the iron to be reduced in spite of the dirty environment. The nugget weighs 5 1/4 ounces and is quite dense, plus it survived some real hits from a 2 pounder, so I'm sure it's the real deal. Anyways, I need a new forge, preferably one that doesn't have walls made out of iron ore that will randomly decide to turn into blooms. While that's fun, it's really impractical. I'll post some pictures of it on the thread once I pull it into an ingot form. (I don't really know if this goes here, but ore refining seems to go with foundry and casting)

-
HAHA yeah, a quick attack and it'll work again.
-
So, I'm thinking I'm going to be buying one of those sets of ball pein hammers at harbor freight (The crappy ones, with fiberglass handles) in order to make a horn, punching die, cutoff tool, rivet header, and maybe a tool heading punch (There's a 32 ounce hammer (Horn) 24 (Cutoff tool?) 16 (Tool punch and punching die combo [die on back, punch on front]) and 8 (rivet header)) Cutoff and tool punch/puch die may end up getting switched though. I'm also thinking about getting an additional 8 pound hammer and making it into a second anvil with a bowled face and squared edges, or something like that, in the near future. Anyway, I have a lot of projects lined up, which is good because christmas break is coming and I like to keep busy.
-
I actually prefer the clay forge I have now, it works very well and it's simple to fix. Not to mention it cost the whopping total of nine dollars to get everything for it, :3 I'm going to be re-finishing them and I recently ground a 90 degree surface on the edge of my anvil so I'll have the ability to square things off. I don't consider that finished, XD
-
I guessed that those would be the next steps! I'm going to fill a 5 gallon bucket with clay and put it on that until further notice. I got very lucky though, my yard has a clay seam and my firepit just so happens to expose it.
-
Interesting! Thanks for the tips. I'll try the cold work method soon, and I'm hoping to come into some scrap for one of the header designs, but currently I have no such metal.
-
Ahh, thanks for the tip. Harbor freight has some really well hung hammers (And actually good steel for the heads no less, it gets me every time) so I'll probably get one from there and dress it down in order to lighten it up. Yeah I was thinking about making a rivet header, just need to get an appropriate chunk of steel for it. I did use the flip method on this punch, and I have a car jack which could work as a a punching block. Pipe cut off come later when I get into more complicated stuff. Also, do you think that upsetting a piece of round stock would work for forming a rivet head, or would a header be better for that purpose? Or rather, necessary?
-
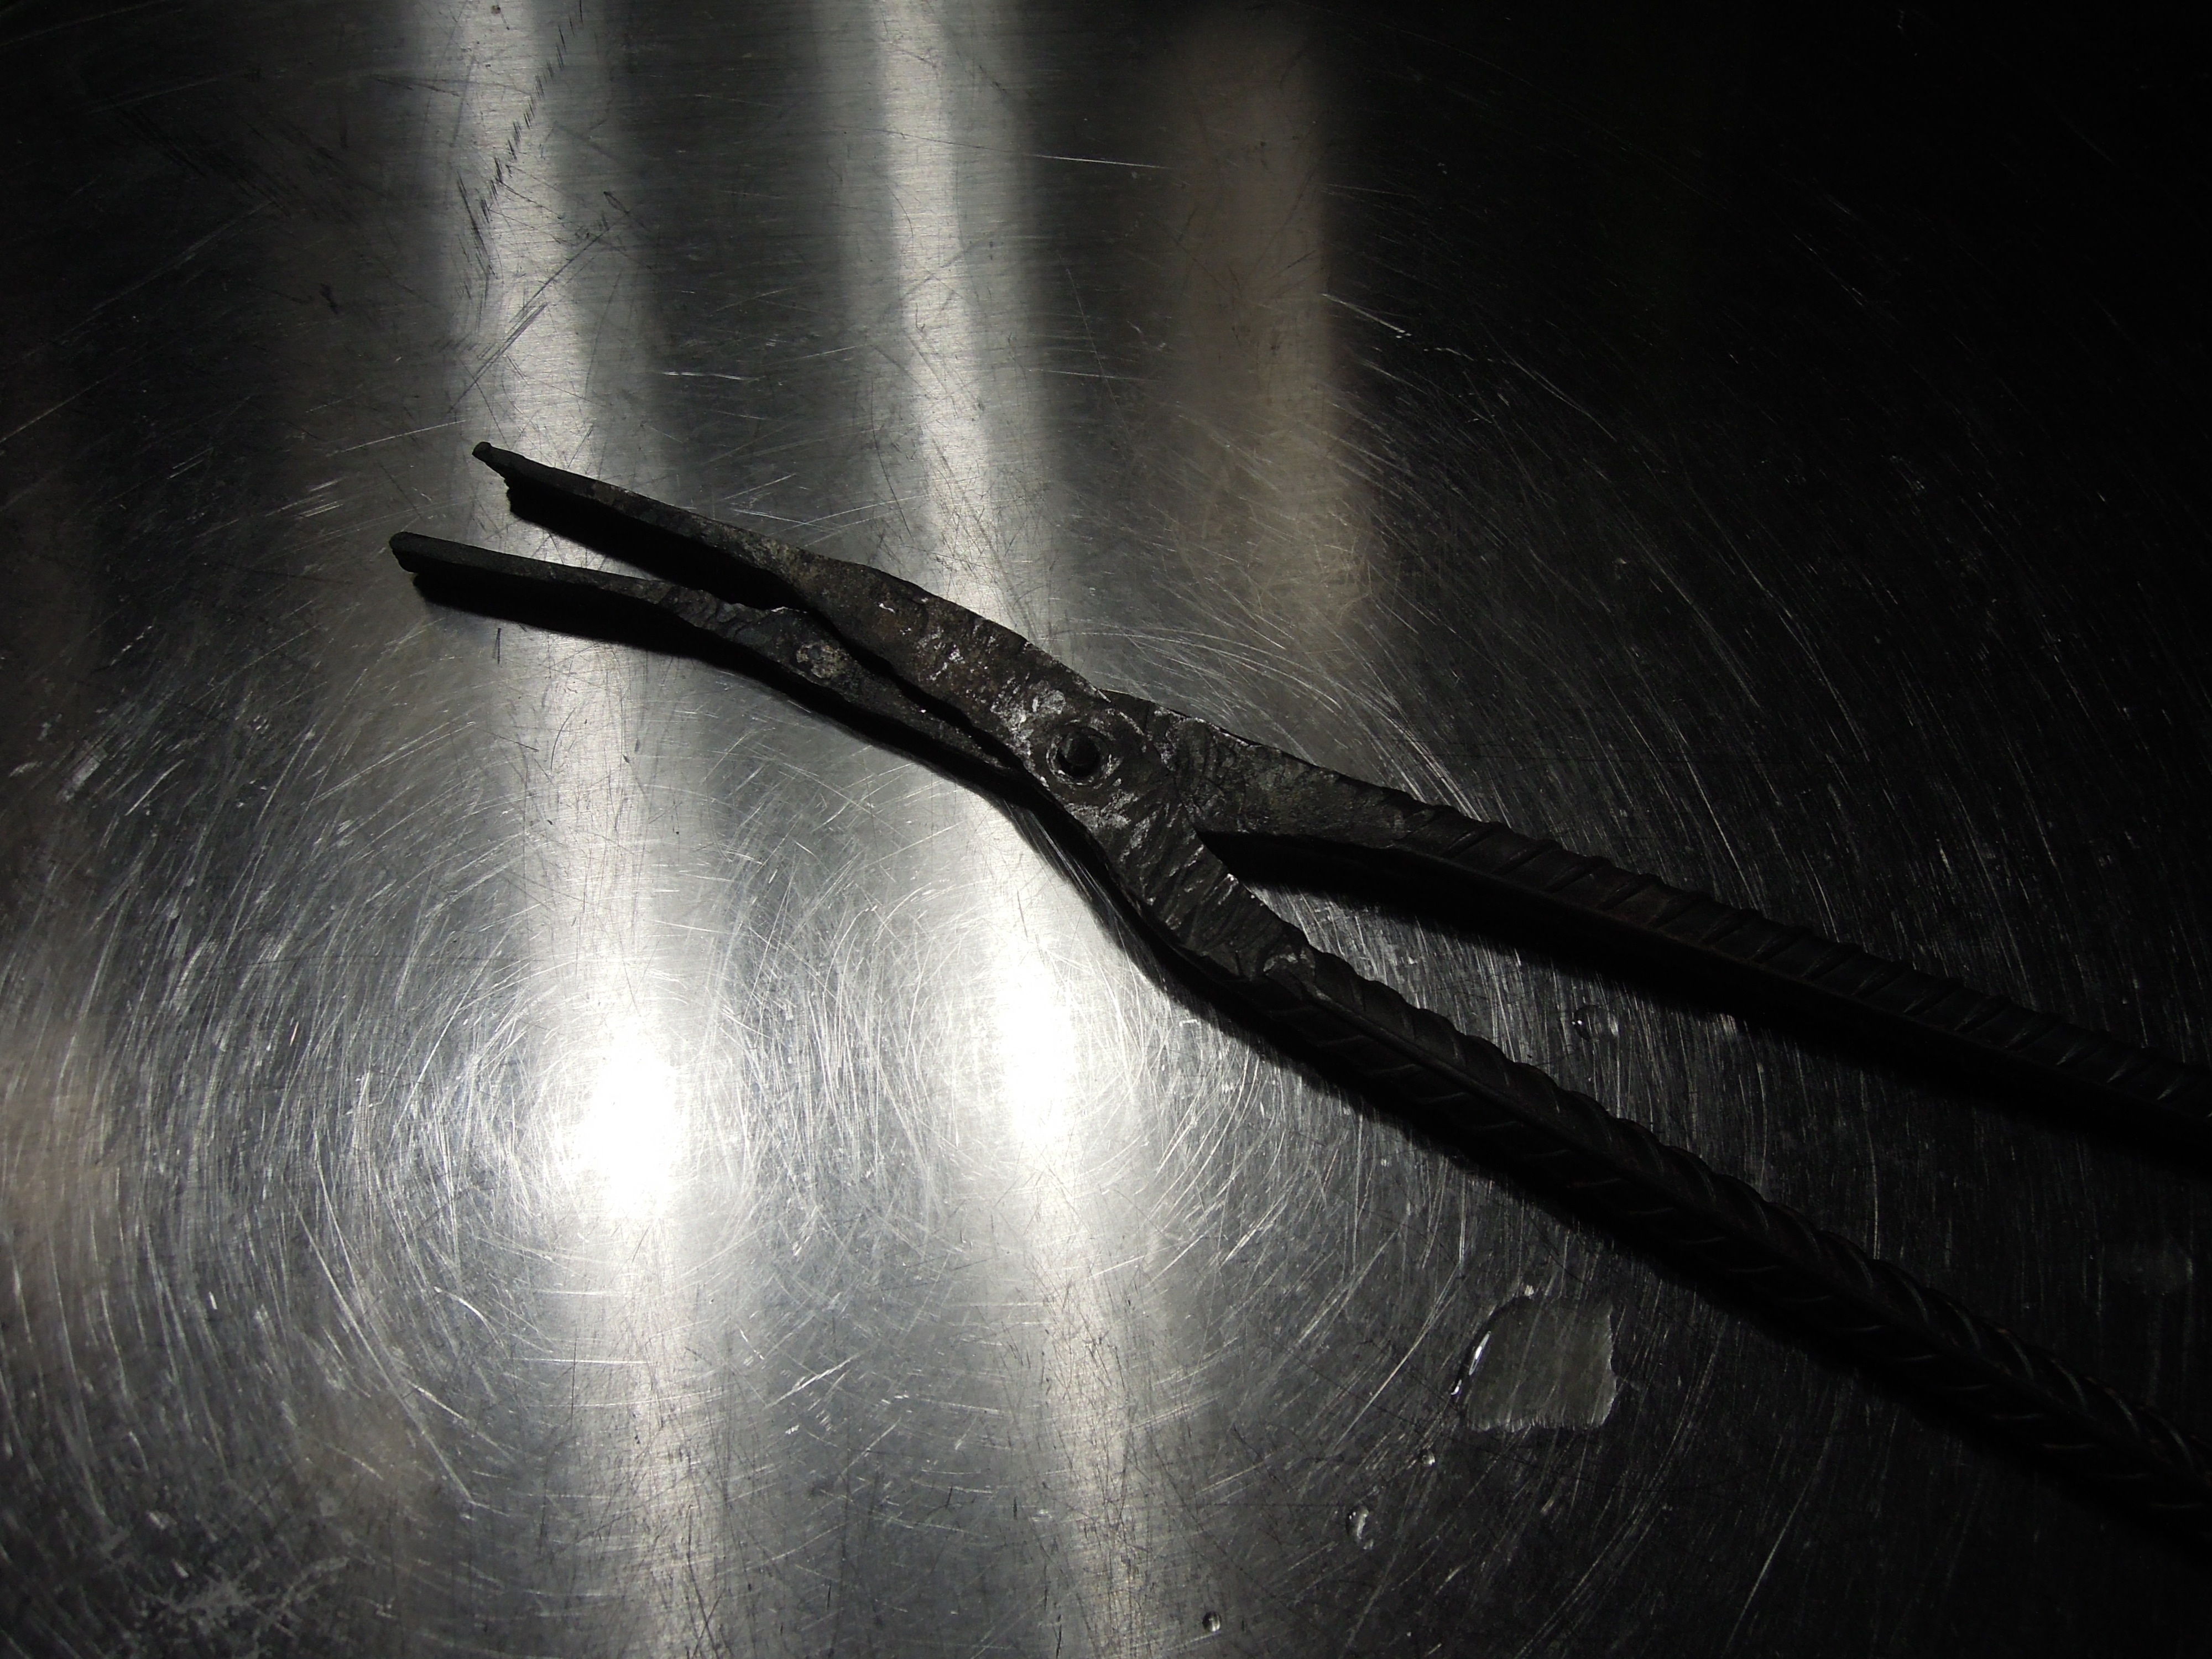
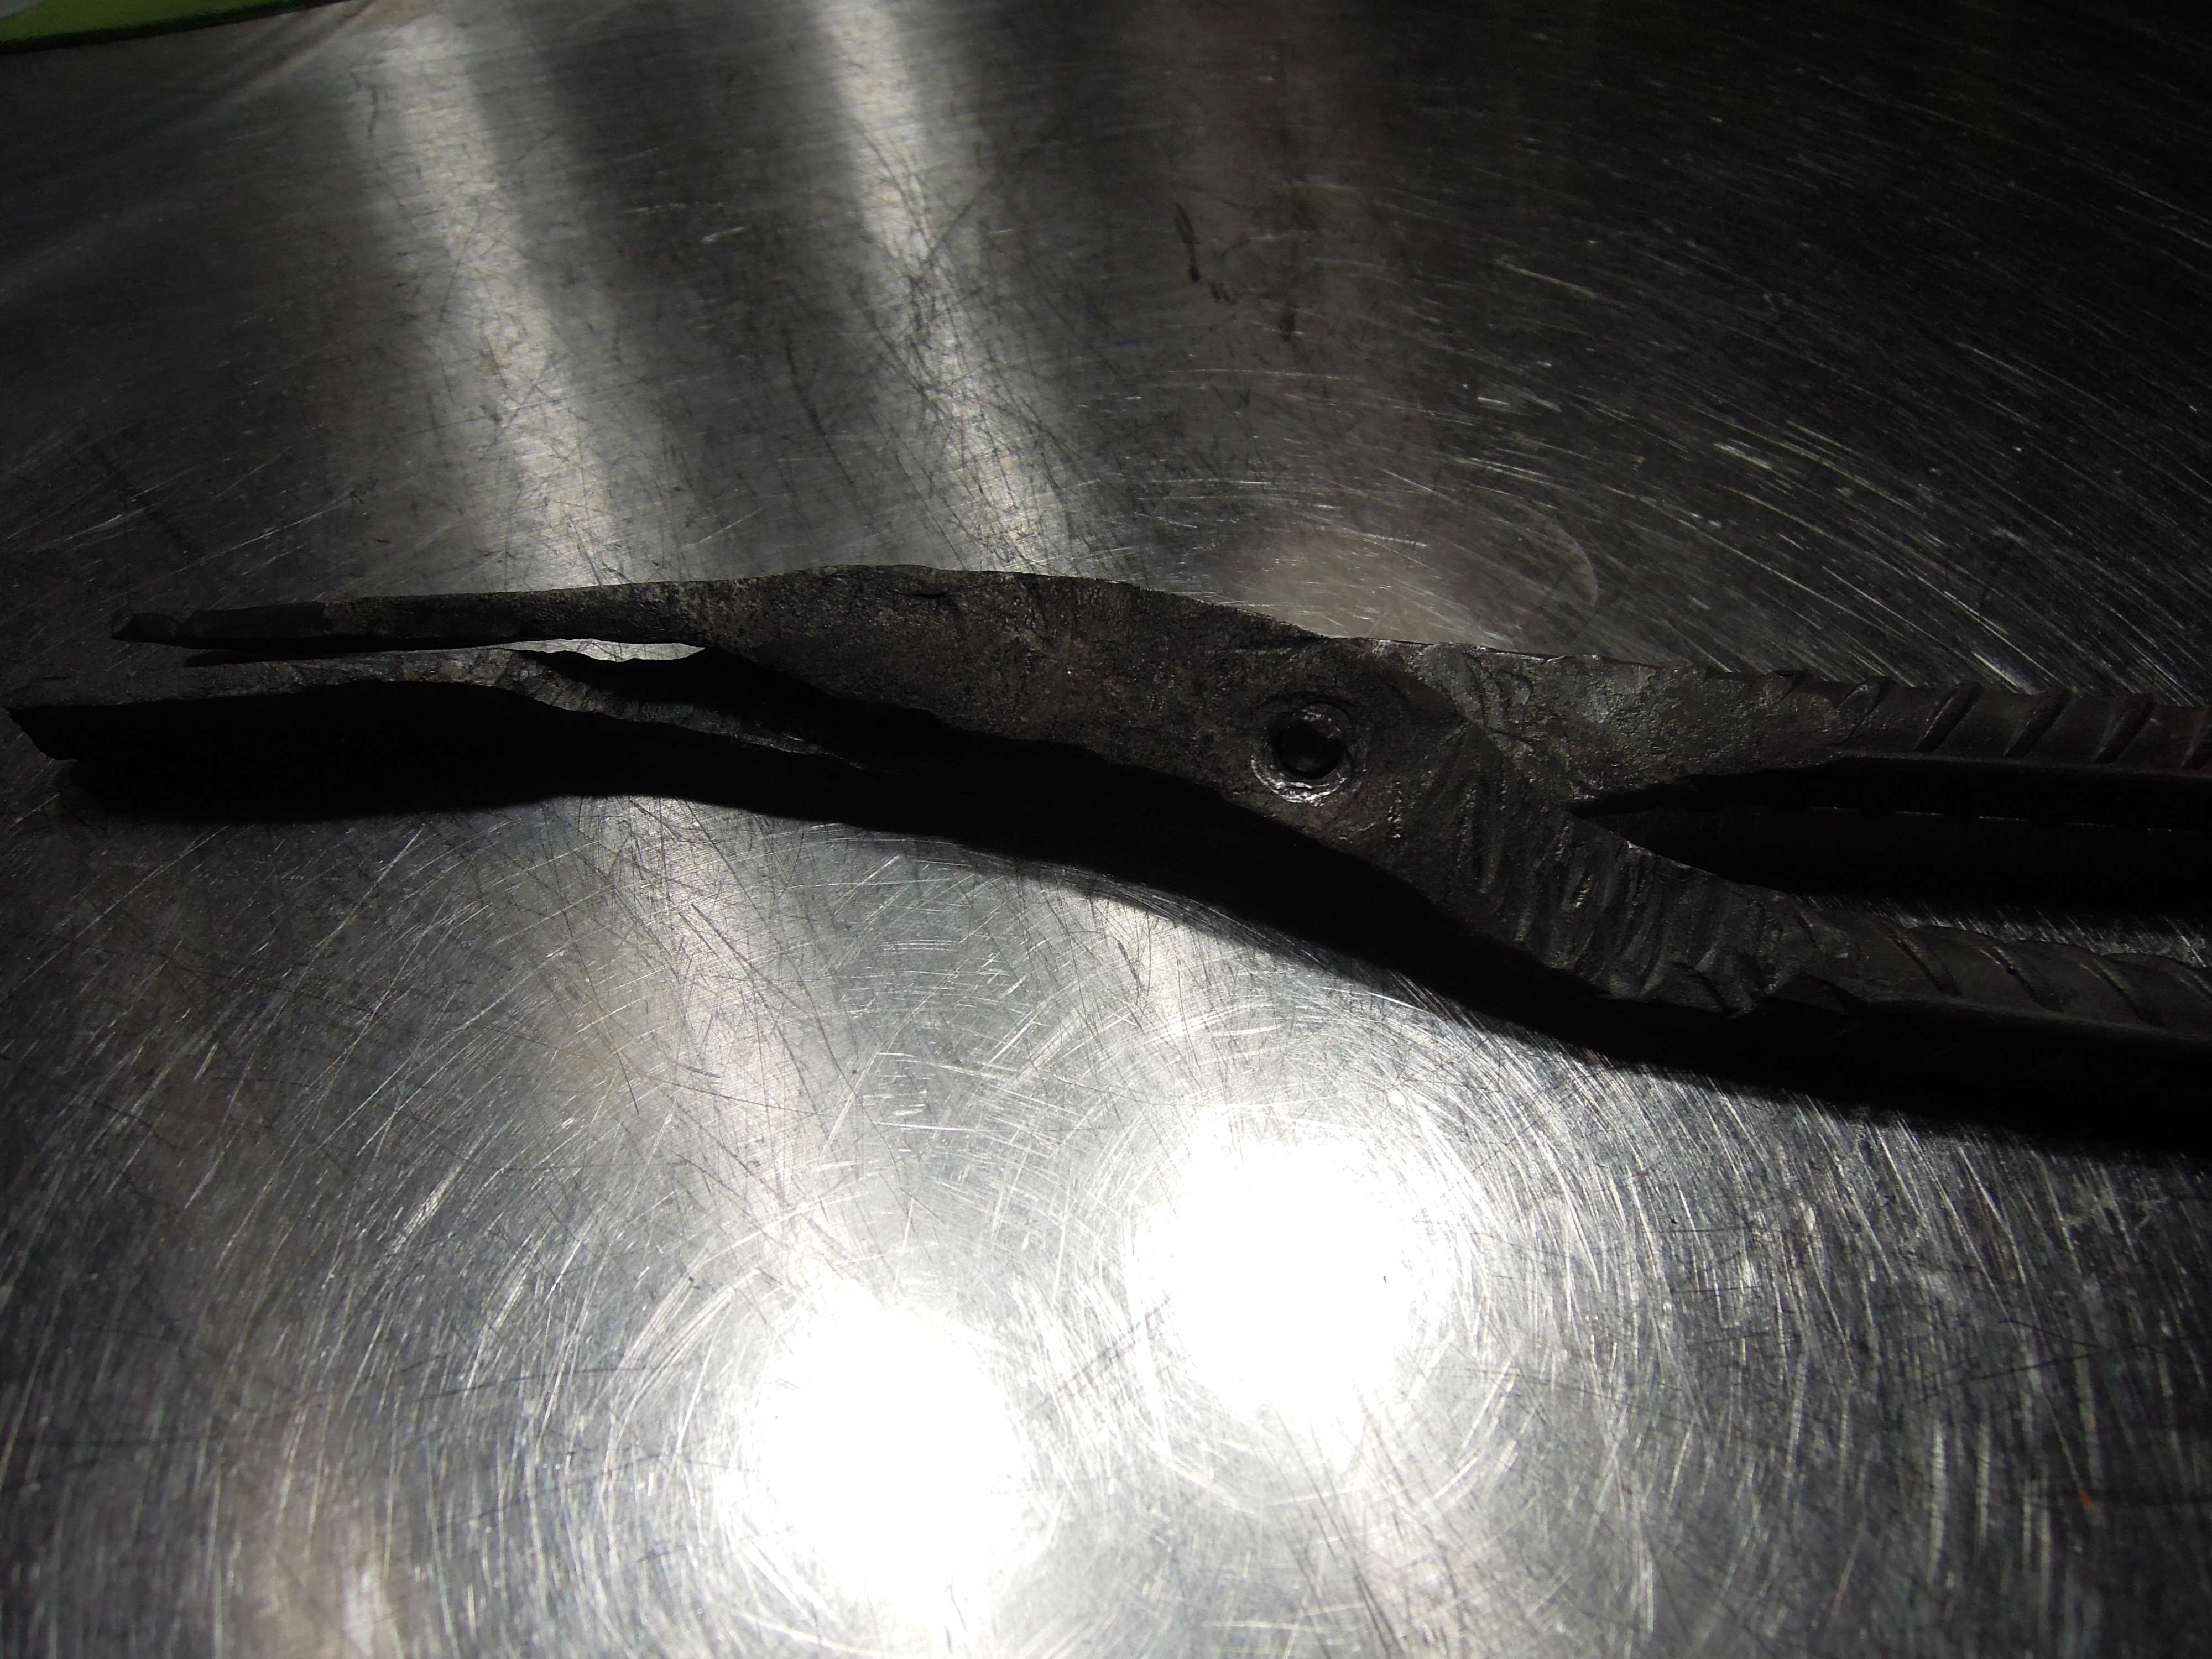
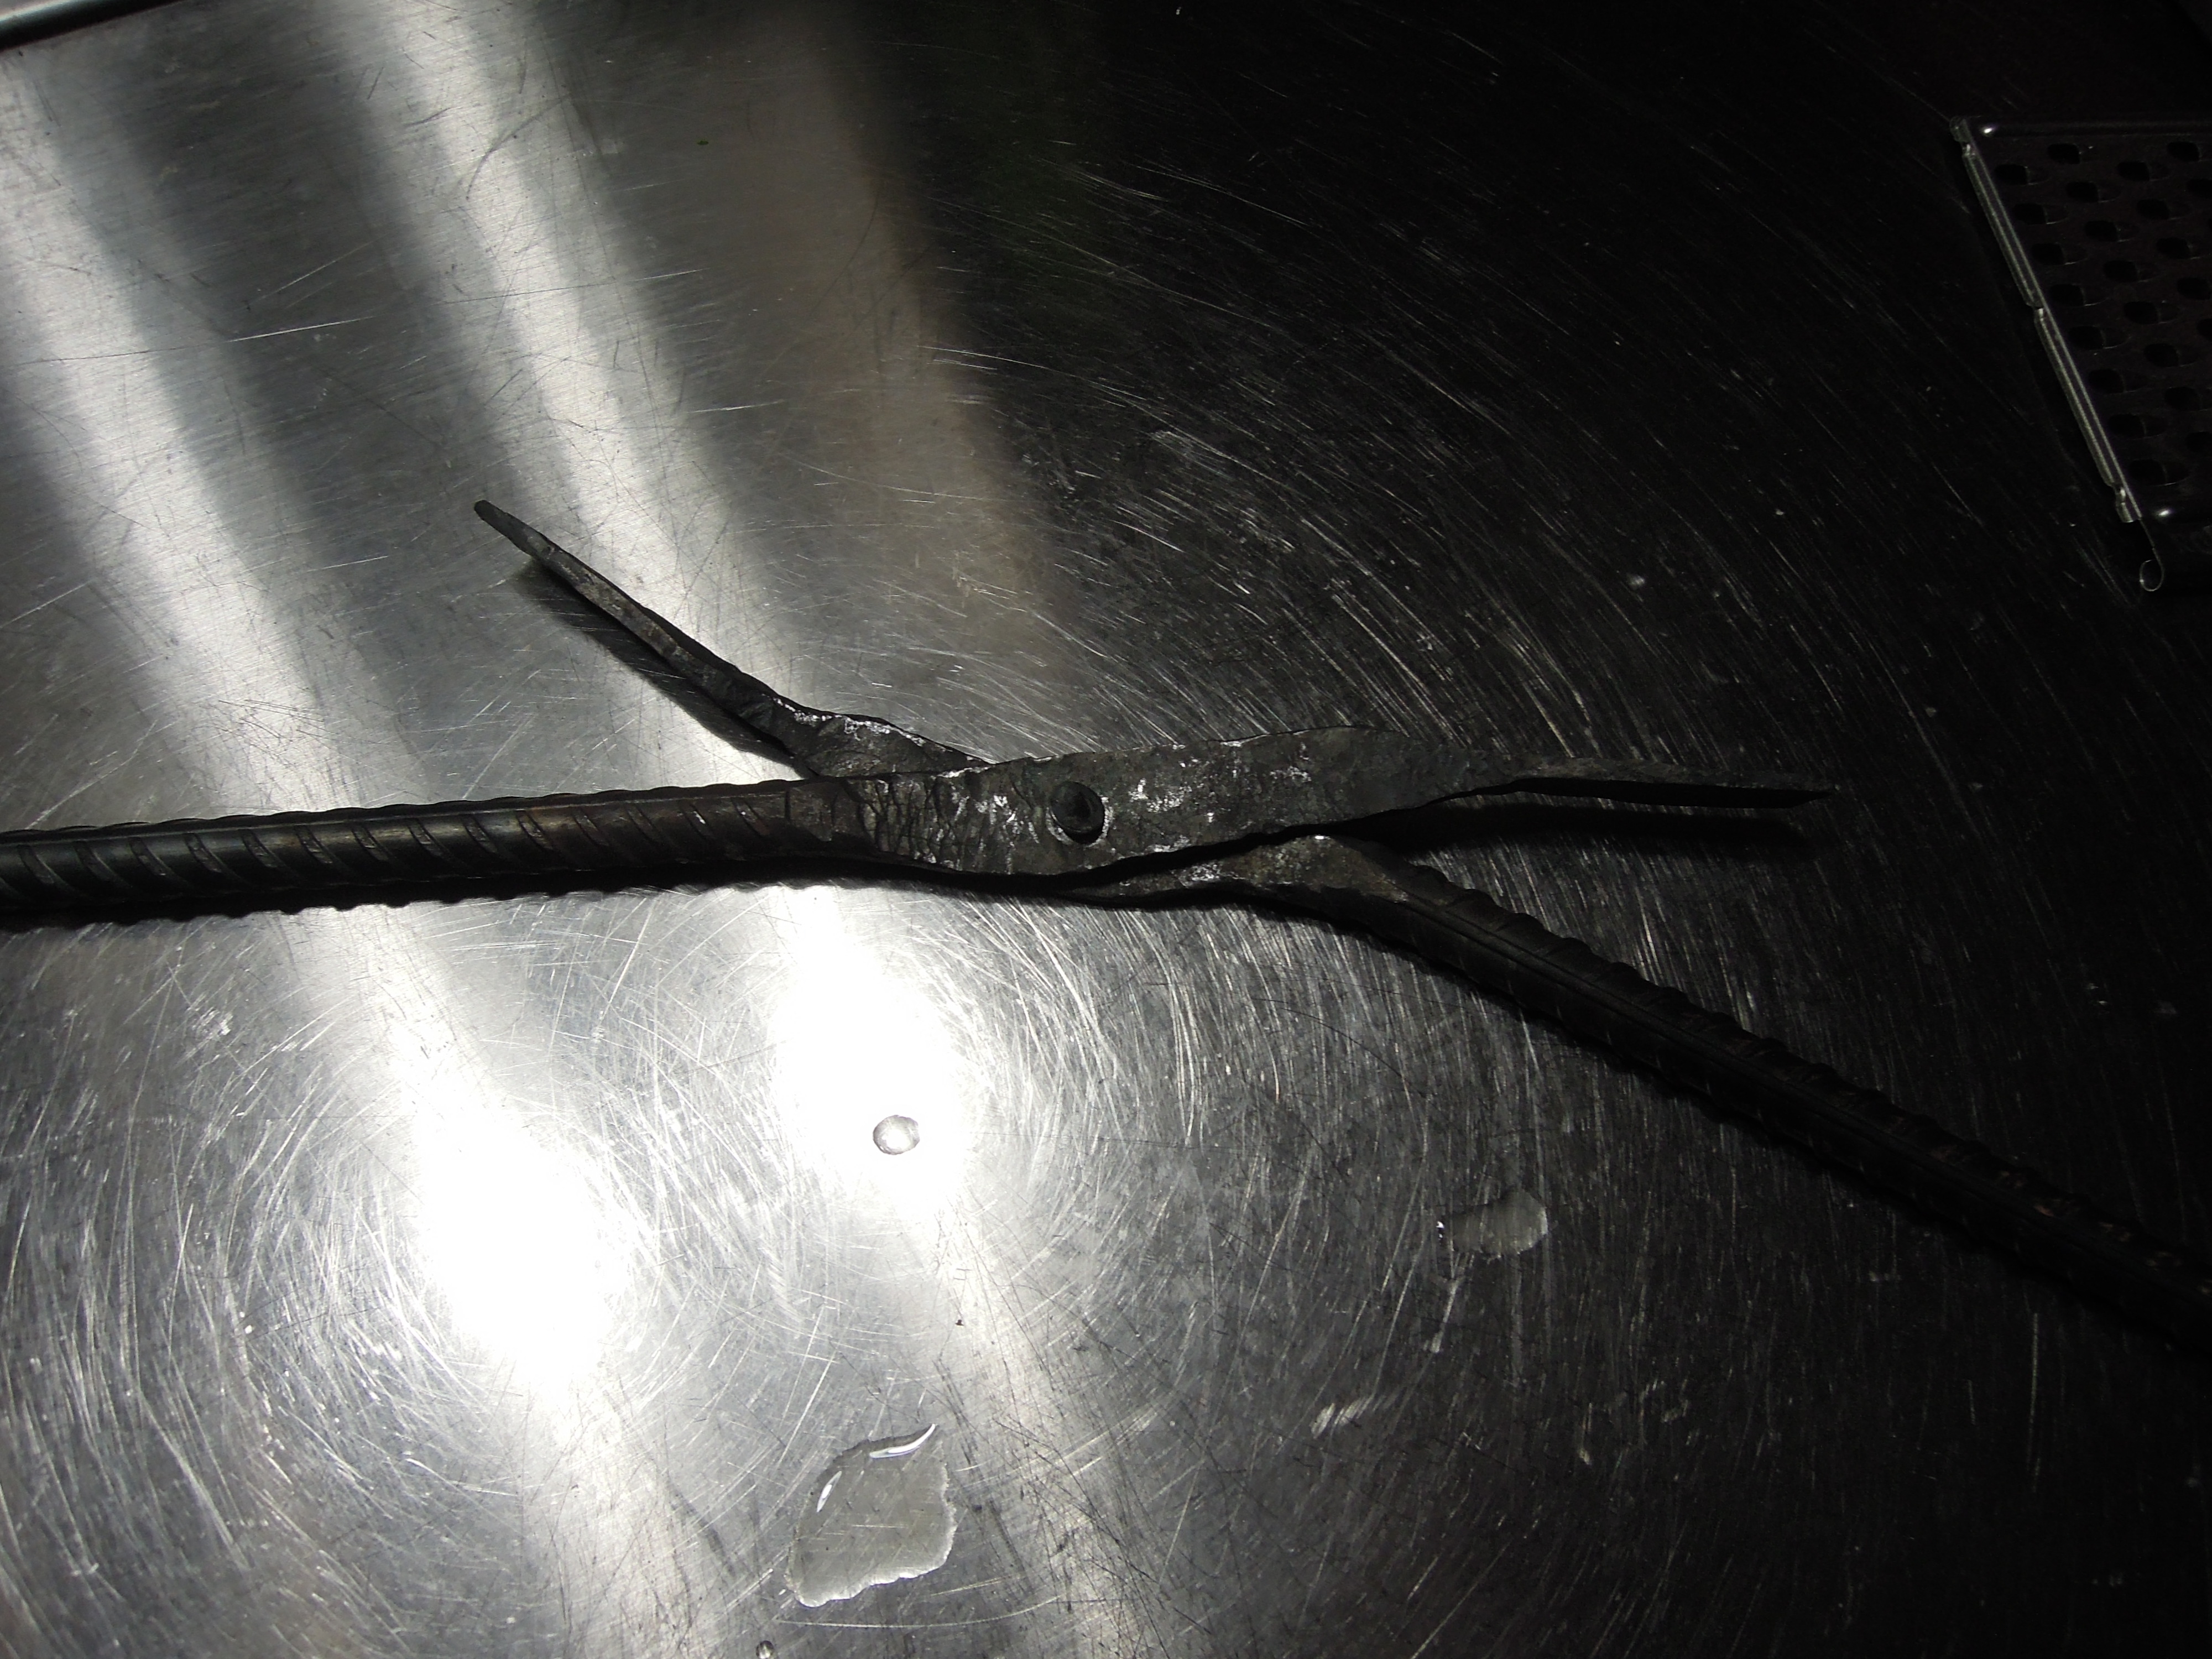
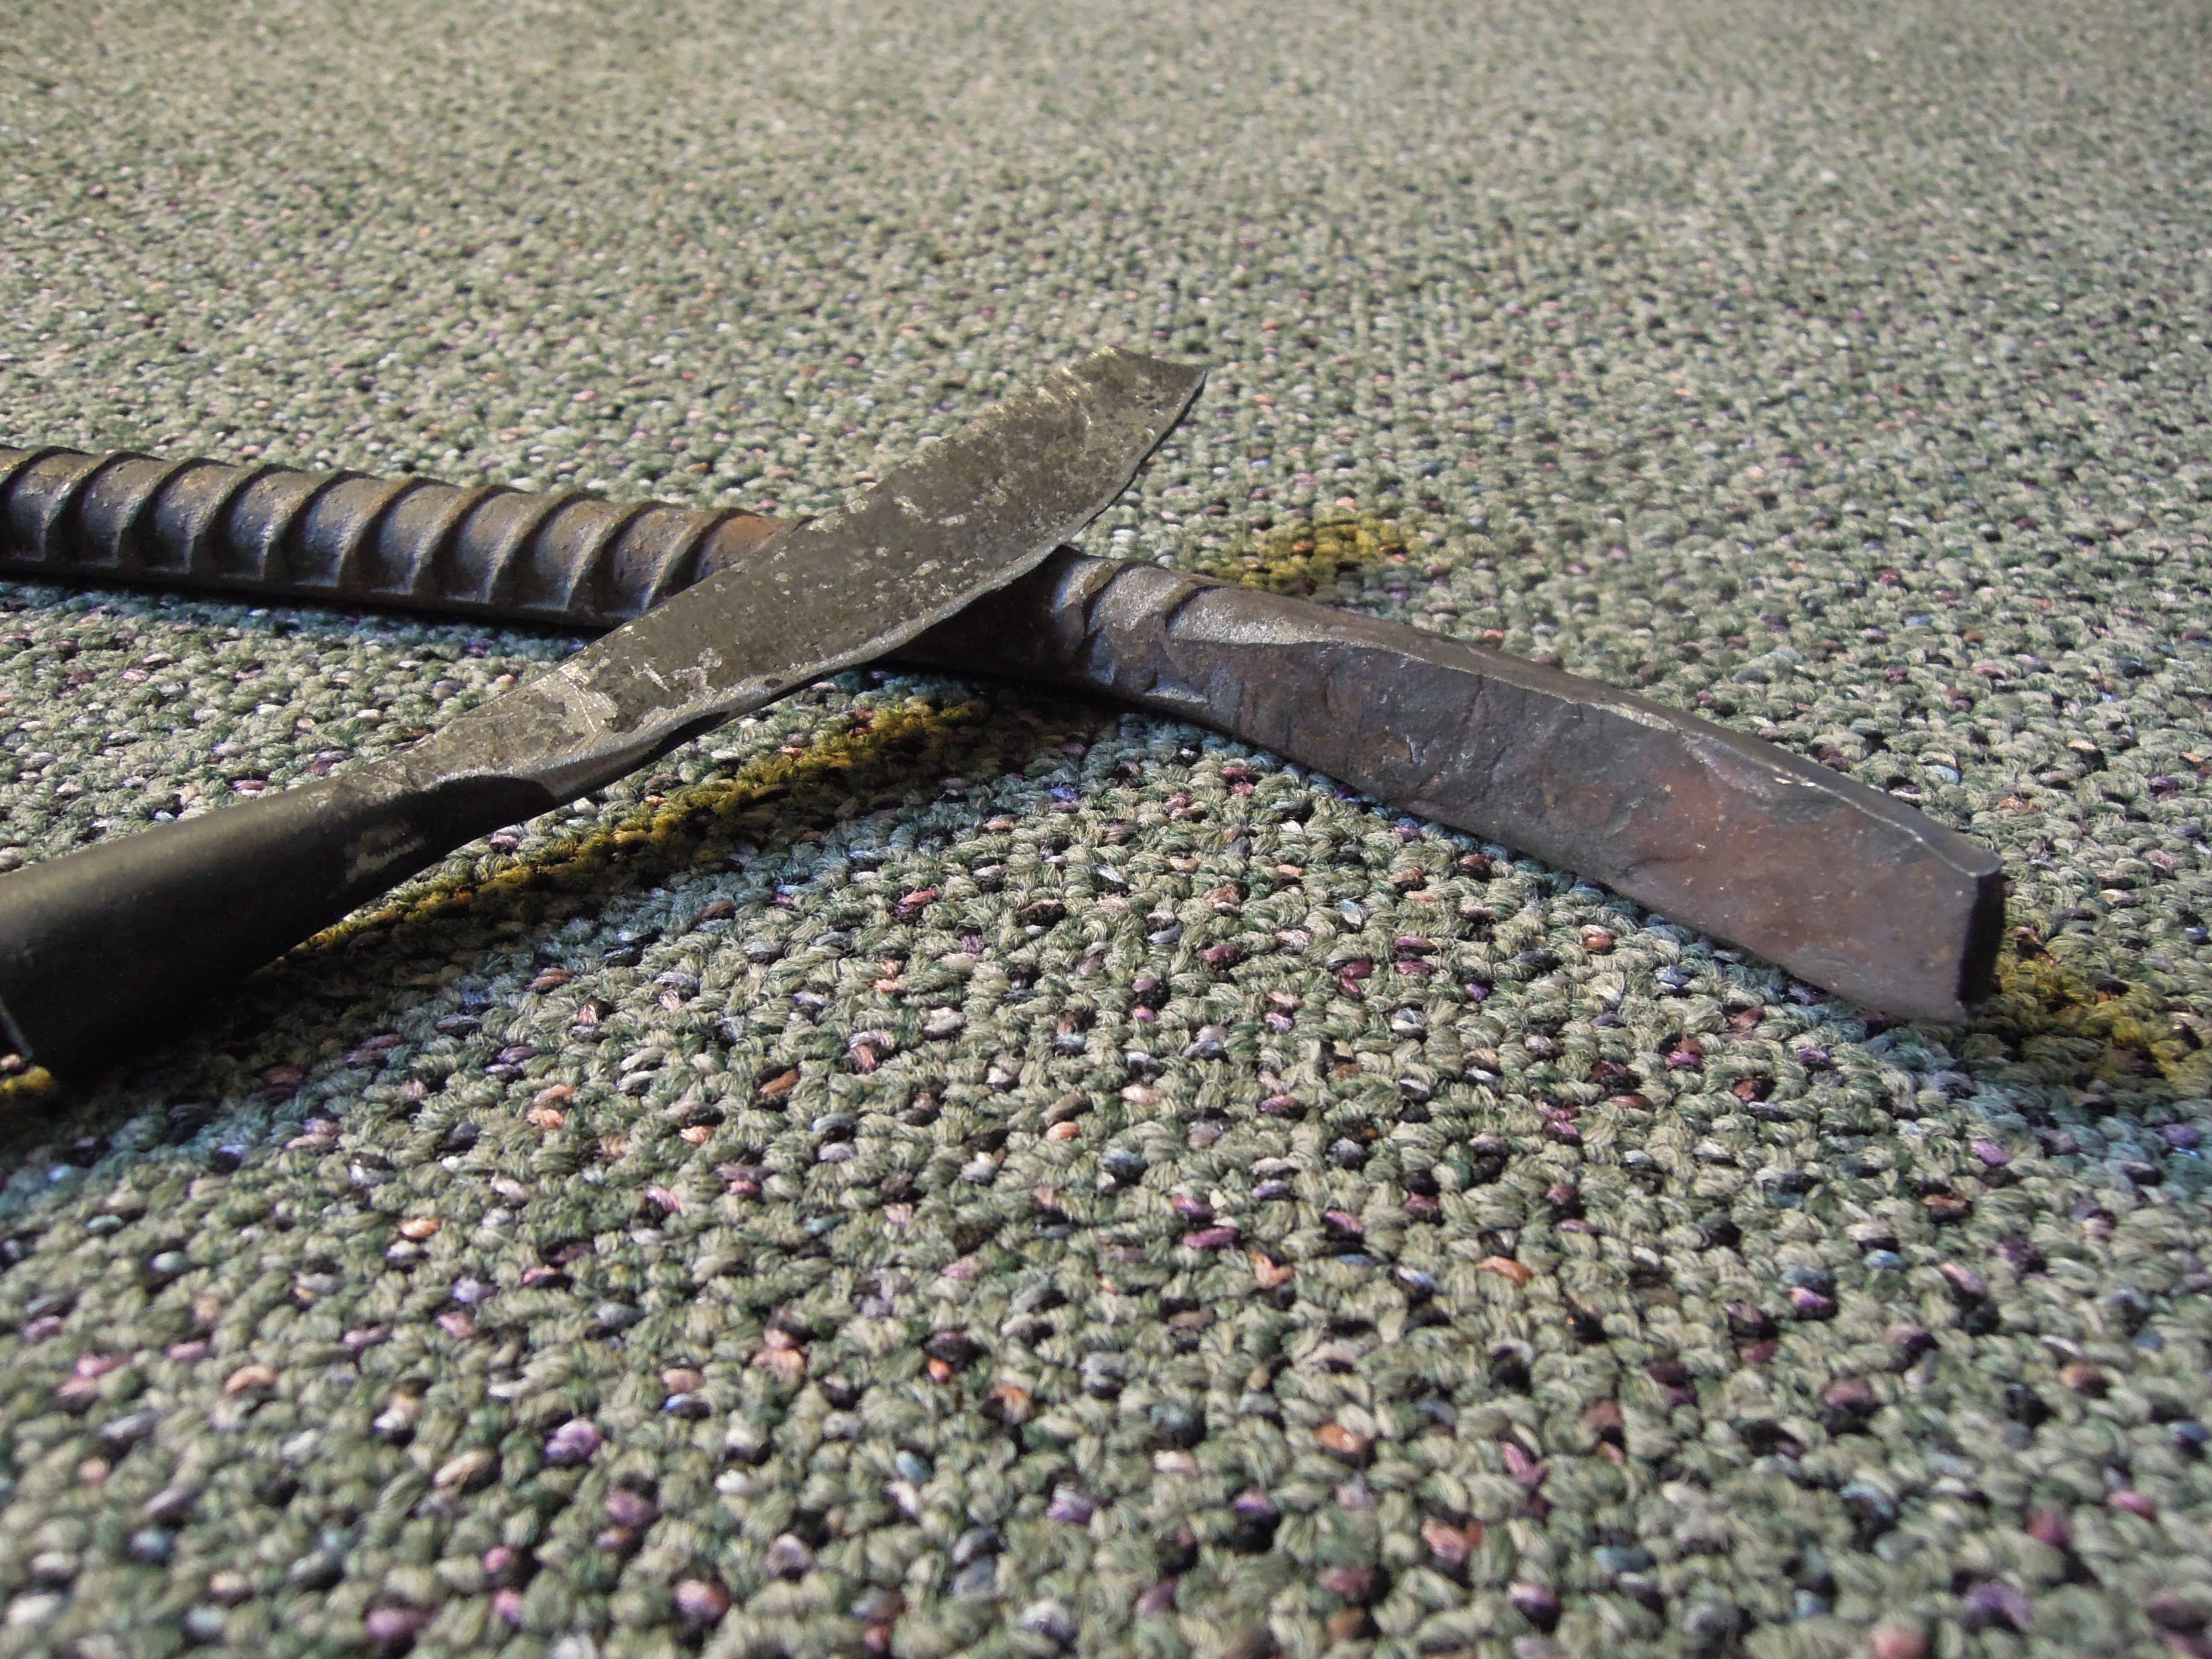
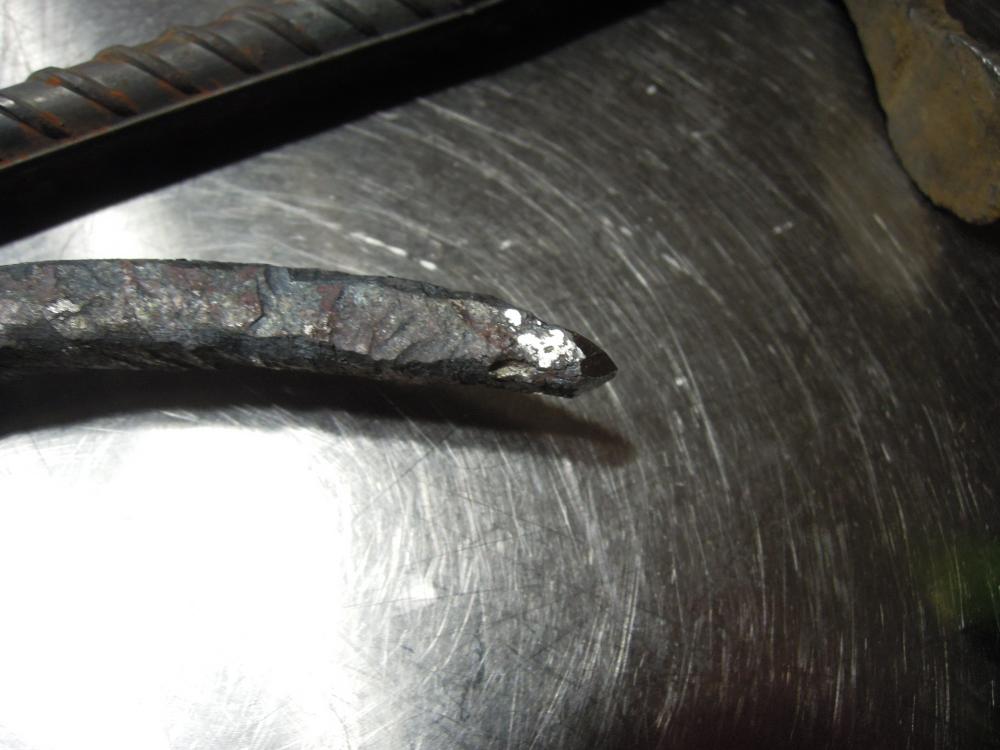
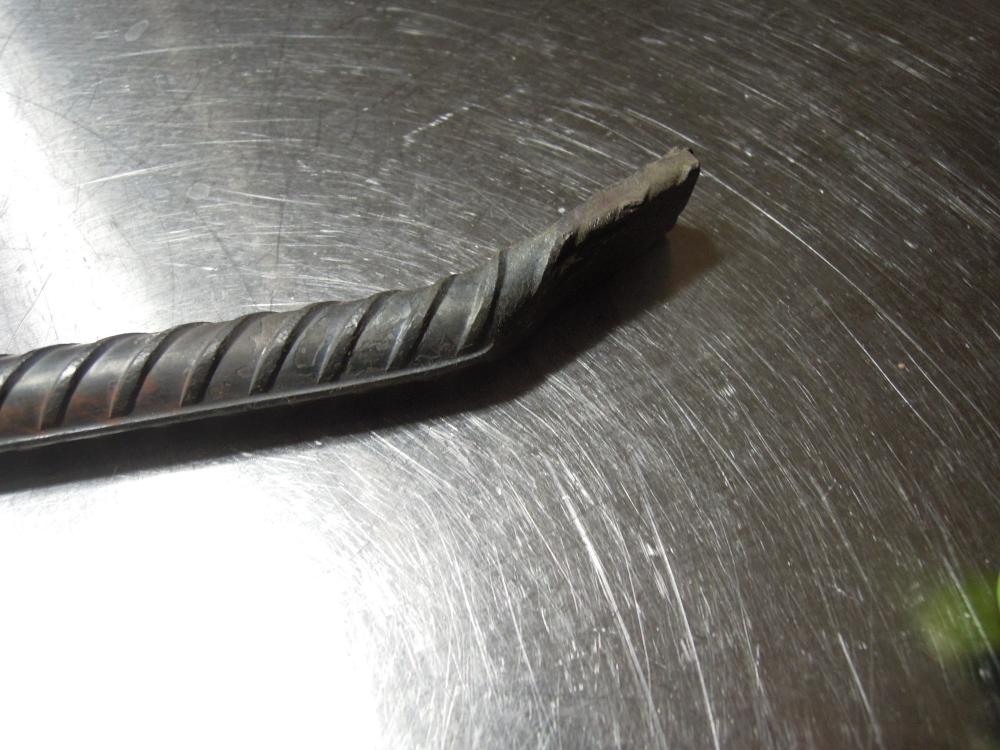
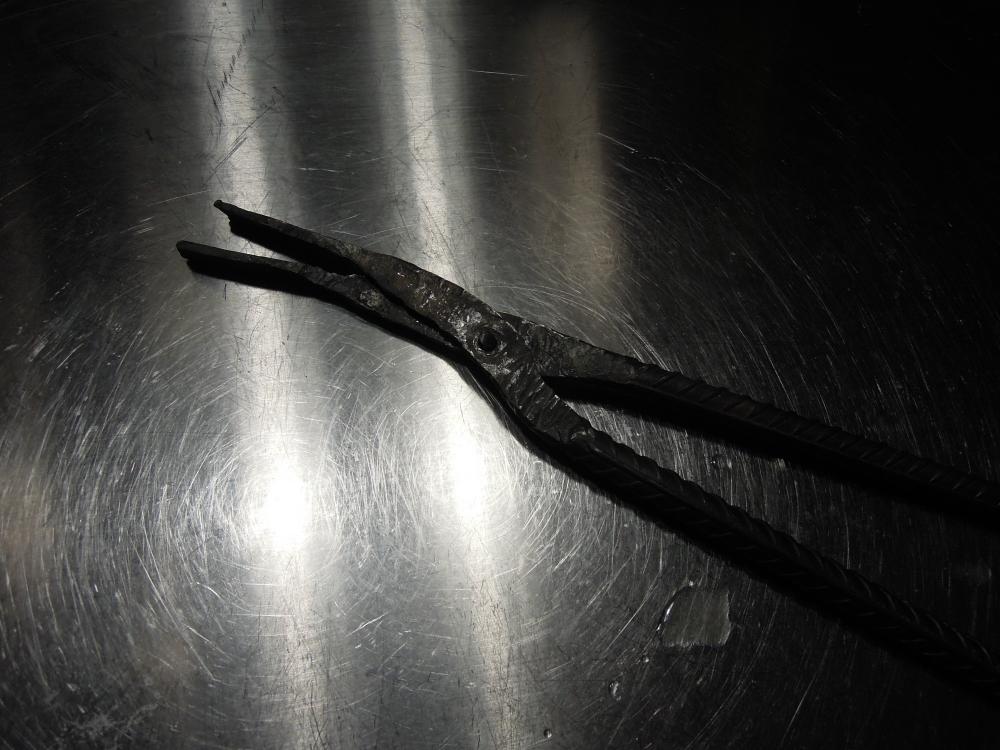
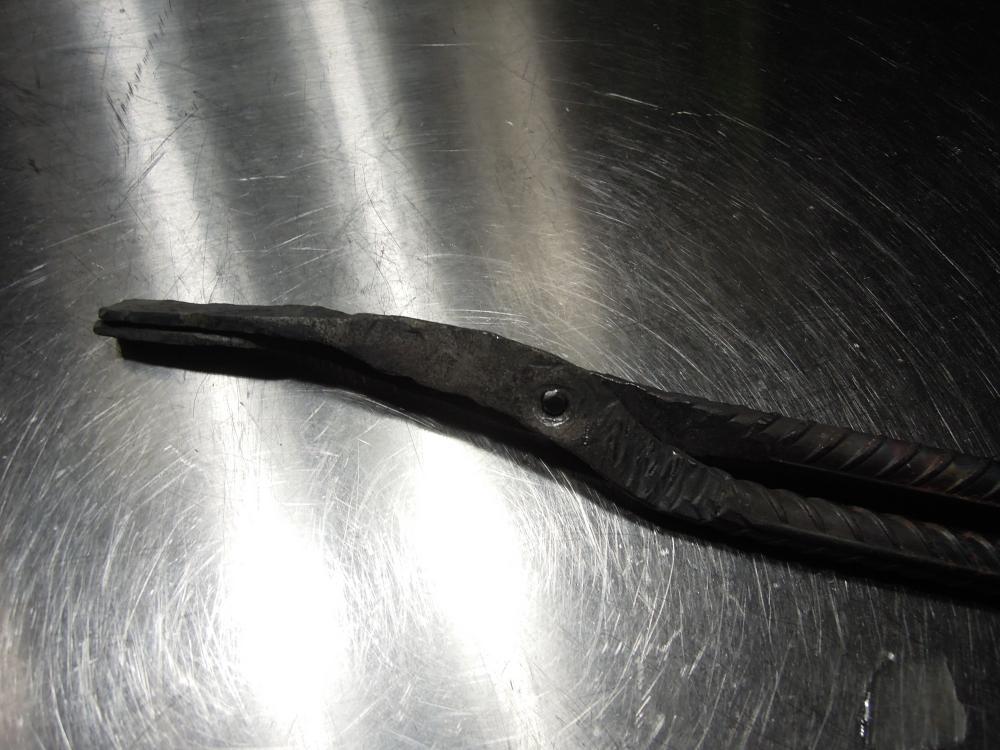
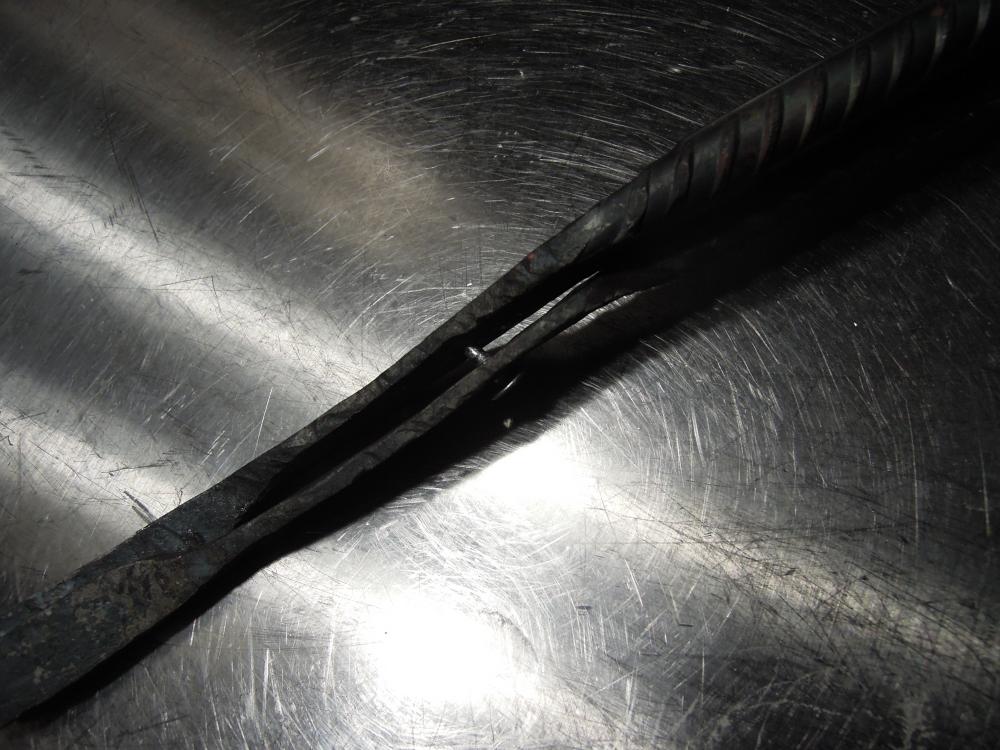
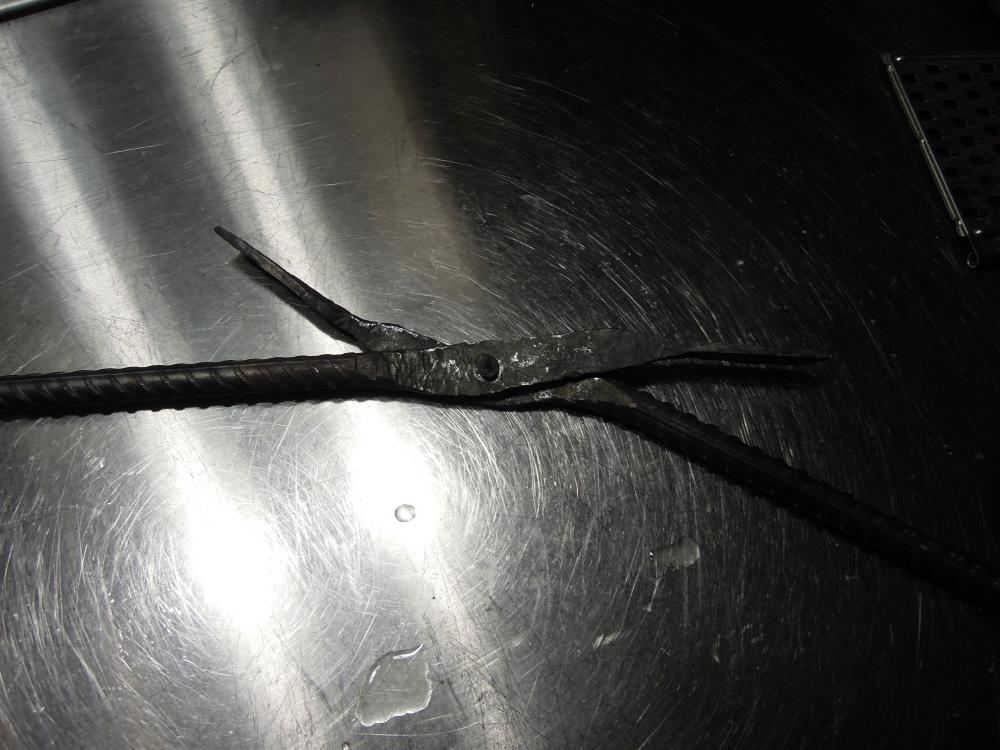
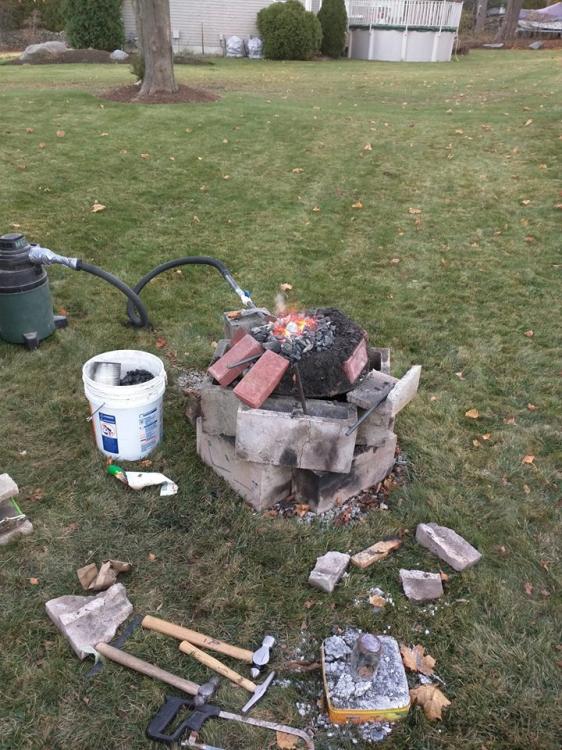
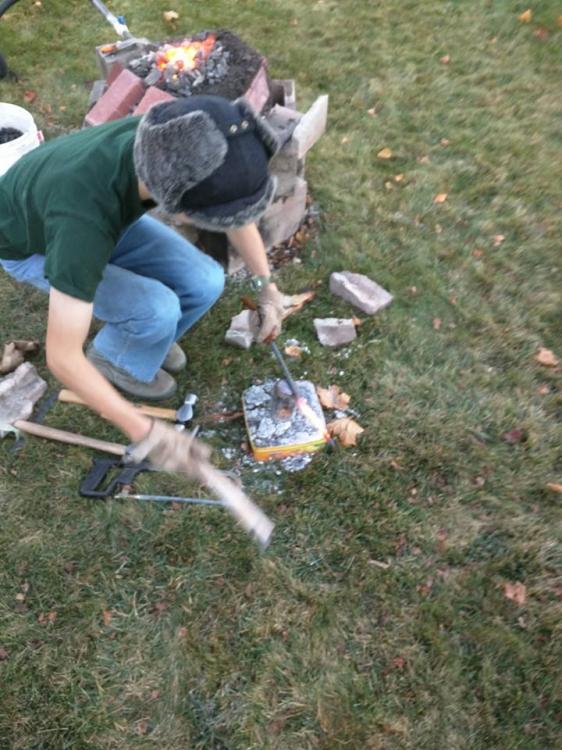
So I needed some tongs in order to make a tang on a chisel-turned-knife I made recently, and I needed the experience of working with metal because that's invaluable. So I cut a bit of rebar and got to work. Things I learned: 1. Forge: Anthracite from TSC works great, I did 2 part nut 1 part rice, got hot and even made me take my coat off. Also eats a lot of air, full weld was about complete open 1/2 inch valve with a shop vac pushing the air, and normal forging was 1/2 open or 1/4 open, as opposed to the 1/8 open from my homemade charcoal. Positioning is tricky, but it helps to have some bricks for smaller workpieces so you can prop them up and keep the coal in the fire pot. I seem to be on the money about 90% of the time with my guesses as to where the heat is, so metal is getting hot. Timing is key. Flaming steel is pretty, but not good. Melty bits had to be knocked off with the tack hammer before work could continue. 2. Anvil: this is really important: Have a square edge somewhere. My splitting maul anvil was really not performing quite as well as I needed it to because there was no 90 degree edge for making shoulders, but otherwise it's great. I have it sunk in some concrete in a tea bag box. 3. Hitting the metal: Not too hard to get the hang of, but easy to slip out of the rhythm. I found that for small work like tongs the 2# was great for getting the metal flat or stretched but the 1# was needed for edging and getting rid of the apprentice marks. Bending and getting the curves for the tong handles/rivet spot was surprisingly easy to figure out, but I'd like to hear any methods you use. What I ended up doing was bending the tongs at the point where the handle meets the rivet flat and then bending it back by hitting the grabbing edge over the end of the anvil (That made no sense, I'll make a video of the action sometime) Only problem was everything needed to be put back into its place as far as width and such goes. but that's no big deal. 4. Punching: bring a buddy. Or your dad. I have no pritchet/hardy hole so we had to put the punch onto the anvil and hit the metal down over it. but it got the fidly bit out just fine. 5 Swivel rivets: I need real rivets. roofing nails are not working. I think I'll upset a piece of round stock that matches the hole then cut it off with a grinder and pop it after that. 6. Wire brushing does a world of good. 7. Anthracite coal holds on to heat very well, unlike charcoal. be careful when picking up drop-outs. 8. Tack hammers are actually REALLY useful. 9. I need a cross pein, but nobody has 2# ones, only 3# or 2.5# ones and those are a bit much for me. Not to mention the fine work I'm doing right now. 10. my local home depot has reasonably high carbon rebar! It's very springy and the quenched tips are really tough, so I'm going to be using this as tong stock from now on. All in all, I consider these tongs to be a happy apprentice mark! I will bring them properly into square and do some more bending sometime soon but tomorrow and the day after aren't clear for forging. I also need to procure some steel for my horn making mission, but first I'm going to need a set of tongs for holding them. That'll probably involve my first forge weld attempts in order to affix pieces of angle iron onto rebar tong bases. May look into creating a replaceable jaw tong system using threads and drifted holes, but time will tell on that one. Picture time! While it's hot, and the most recent iteration of my forge, plus a picture showing just why I really need an anvil mount (And am working on figuring one out) Oh yeah. and a tool rack too, I don't like having them on the ground at all. And a bigger forge shelf, The coal keeps falling out, which is quite obnoxious. Anyway, temporarily riveted, here's the "Finished" product: Note hefty apprentice marks. The jaws are actually really clean though, Which I am pretty proud of. Sorry about the long post, but today was pretty eventful as far as my journey goes because it's my first real product of smithing! (Oh and I do have a forge pick that I made, I suppose that counts. Pic of that for fun. That's the knife blank too.) Anyway, Lots of pictures, sorry, but I figure you guys might want a blast from the past reminiscent of your starts, and I certainly need your help on this project!

-
Hole in the ground side blast forge
Micah Burgin replied to Micah Burgin's topic in JABOD - Just A Box Of Dirt
Oh, dangit, forgot about those old danish cookie tins. Bag of concrete will prove itself useful some other time, danish cookie tin for the slack tub.