

ClevelandGuy
-
Posts
30 -
Joined
-
Last visited
Content Type
Profiles
Forums
Articles
Gallery
Downloads
Events
Posts posted by ClevelandGuy
-
-
On 11/14/2015 at 9:31 AM, Michael Cochran said:On 11/14/2015 at 9:28 AM, DSW said:On 11/14/2015 at 9:28 AM, DSW said:
The Smithin Magician like John B shows is available from on line. The style like Gary Huston shows is available as the G2 from Yesteryear Forge.
I like the G2 as you can use it to fuller the length of a piece as well as across the work. So if you want to put a groove down the length of a small blade, you simply turn the work to come in from the side vs the end.
Awesome! Thanks for the link, DSW. That's what I was looking for. And I see they offer a sweet bending jig package as well....
-
On 11/12/2015, 11:20:29, Smoggy said:
Gary Huston does a good build video, well worth a watch
 https://www.youtube.com/watch?v=Xh9TDVDm93s
.....and a follow up using it.
Wow, you're right, Gary. That was a great video. And it re-emphasized my desire to get a MIG...I wouldn't want to try those inside welds he performed, using my stick welder.
So, I'm assuming that when everyone was talking about modifications to allow 45 degree angles, they were referring to how he notched the side pieces out? The reason I restarted this thread was because, yes, I'd like to buy a SM, but if there's a modification that substantially increases its usability, I'd prefer to go that route, even if it requires fabbing up the pieces myself. -
On 11/9/2015, 9:58:26, John B said:
This is an old prototype version I made many years ago and still in use today,
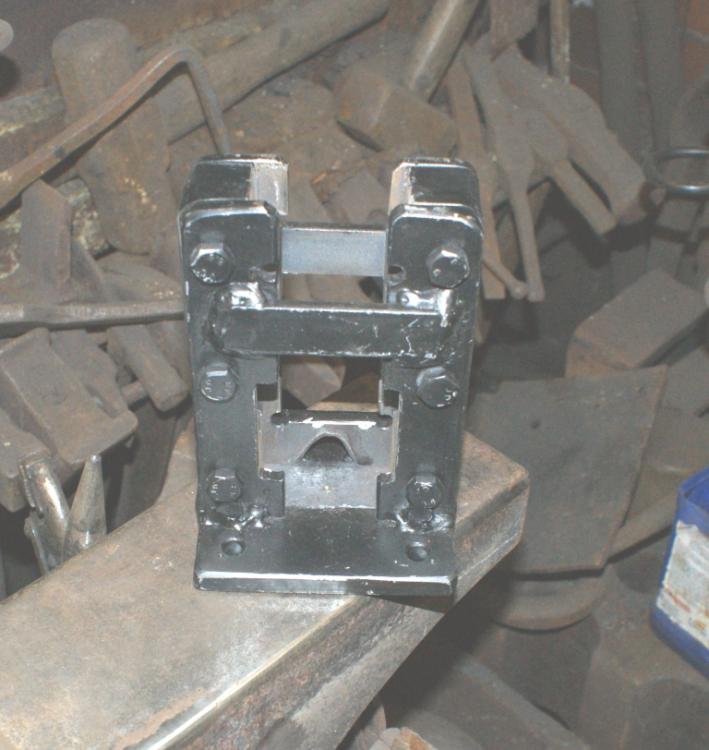

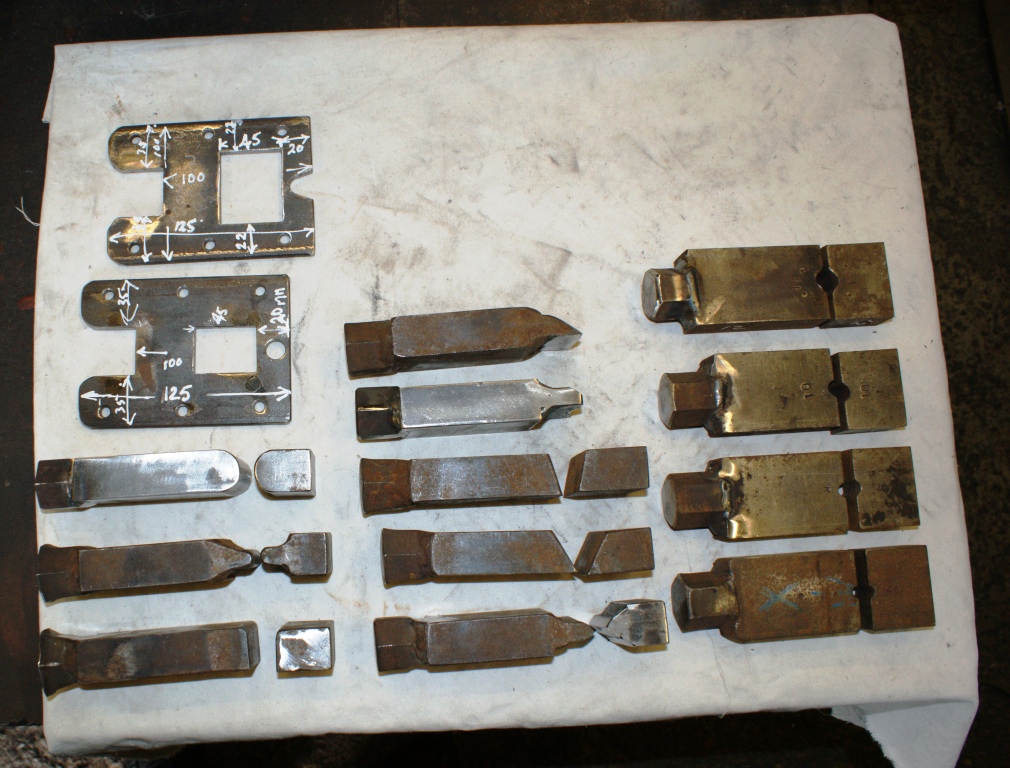
This was my next version using flat plates for the front and back instead of the welded straps I used on the prototype (Material was what was available at that time) dimensions are in millimetres, 100mm x 6mm MS plate used
The dies are from 2" x 1" as I find this more useful for me.

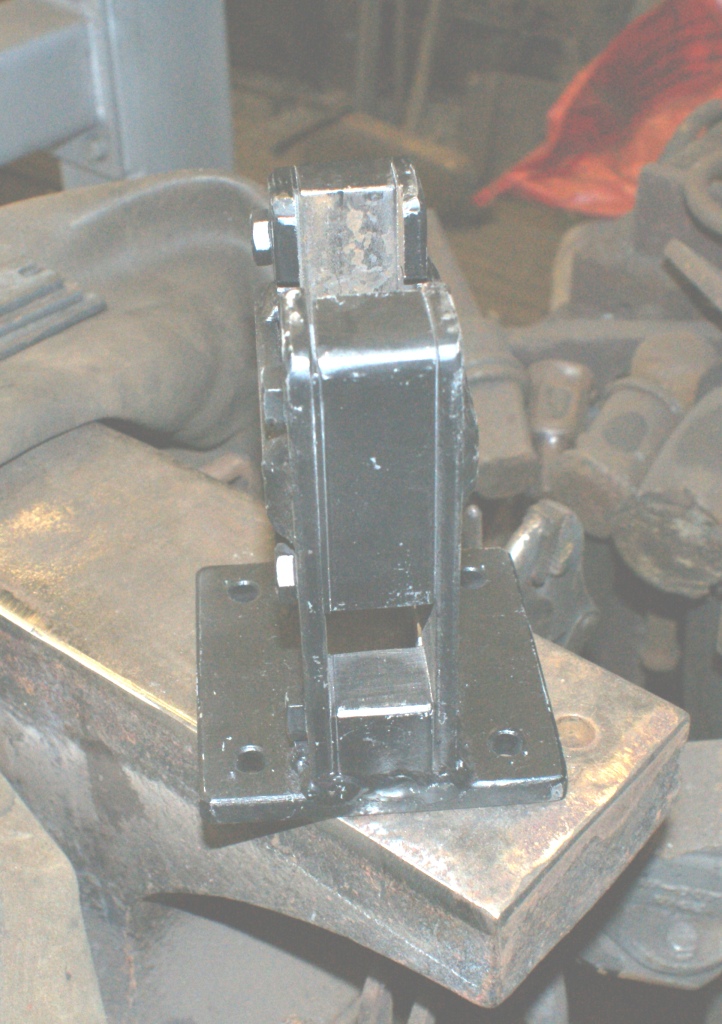
The mounting is a flat plate that fits corner wise into the hardie hole on my anvil, I can also use it in a vise if the situation demands it,
This mounting method presents the tool at 45 degrees to the anvil which I also find convenient for my puposes
Dies are from Bright mild steel, some case hardened, some with an insert of or faced with spring steel and welded to the body, depending on their use.
The striker button is some Hex section bar I had lying around, but could be any shape, it just prevents the top of the die from mushrooming and concentrates impact onto centre of it.
You can also incorporate spacer buttons in the bottom die to give predetermined sizes for tenons etc
Hope this is of some use, I am currently about to make some more to be used on the courses at Westpoint Forge (Exeter Devon UK) for the students to use and assess as they are most handy when you are working on your own, and don't have a striker handy to assist you.
Feel free to ask any questions you may have, this is just my version.
Thanks for the detail, John. It looks like your dies are of two different widths. How do you prevent the thinner ones from tilting? Some kind of spacers inserted alongside them?
-
On 3/15/2010, 8:00:36, RichardT said:
I confess I stole my design from Irnsrgn. I can see the advantages of the more open designs, but this one allowed me to work within my meagre talents. It is constructed 100% from truck leaf springs (generously donated by our local suspension modifying company who considers “Standard” springs to be worth less than scrap.
Starting with a flat leaf (there are usually several in a spring pack) and angle-grinding lengths of spring into pieces, then using a length of spring as a guide, I was able to weld together an extremely robust frame that, without any skill on my behalf, has exactly parallel guides, with radiused edges, cost me nothing beyond a cutting disk & some welding sticks, and works a treat. Tools are constructed from spring steel, so they’re hard and tough.
I guess it’s horses for courses, but since I benefited from Irnsrgn’s design (found in a blueprint last year), I thought it only right to share my humble alternatives which don’t require access to a milling machine.
Cheers,
Richard
Showing the cut pieces resting on the "future die" to ensure accurate spacing before welding.
The "finished" product in my stump.Sorry to drag out an old thread, but I'm new to the forum and every link I click says it's not available. Is there something I'm doing wrong here or is there an expiration date on old forum links? Really like to see some of these smithin magician mods.
Thanks


Smithin Magician
in Tools, general discussion
Posted
Agreed. The pricing on these things isn't high to begin with, and if you figure in the time, material and aggravation spent building your own (unless you like that kind of thing), it's kinda a no-brainer in my opinion.