
Indianer
Members
-
Joined
-
Last visited
-
Follow-up after I'd had a chance to cold down. Thanks to anyone who who took my reaction as what it was - a REaction. velegski, I had no idea the OP was that misleading. I thought it pretty much on point, given the title. In retrospect, mentioning the mini forge probably didn't help. Thomas, the wooden version based off real things is a great idea. In fact, I had long planned to set aside a tapered mid-process blank in mild steel. Makes it easier for me not to forge anything down too far before the grinding. And frosty, while I appreciate the offer of continued support I think that if my answers were "pretentious" to you, then maybe you should have asked different questions. All my "talk" about what I planned to do with the shots, that unfolded AFTER I'd been asked to explain. Anyway... still offering to buy photographs as described. Cheers
-
Alright. Obviously my inquiry here wasn't appreciated. Thing is, much as I tried not to lash out, I'm gonna go to bed feeling like xxxx after another day being what feels like assaulted and ripped to pieces in spite of all politeness and demureness I could possibly muster in the light of being once again confronted with a deeply routed elbow mentality. I didn't come here to ruin anyone's day, I didn't come here to impose or force myself upon anybody, nor did I do anything even closely related to anyone. And yet I feel... like xxxx. Mostly sad really. And disappointed. Not because there's not gonna be anyone willing to help out here, but because I came to a forum that once had the purpose of helping people and apparently has fallen into an attitude of forcibly having people believe they will forever stay too stupid, lazy, incompetent, uneducated and ungifted, even unworthy of attempting something new. That makes this forum just another place like the rest of the world. Good night folks. Mine is gonna be crappy. Again.
-
Right now I'm really just looking to buy a photograph from someone who makes those regularly...
-
Yes, the long handles on these make them Hand-and-a-half swords. I personally find those appealing too. When I get to forge some for myself they'll have a blade length of 29-33'' (74-83 cm). The counterguard though does not seem to be what I meant by "flare" - the Lothric knight sword has a pointy wide section in the blade just above the grip. In my browser I can see that right here in the thread in the video preview above. I mentioned those flares because I wasn't quite sure at what point to put them in - I believe I found someone put them into the tapered "blank", so they seem to be established before the edge bevelling, albeit blunt like the rest of the blade. Would be a nice additional info in the drawing. As for the statistics, these are for the Seraph Aegis prototype linked in the vid above: Overall length: 45.5 inches Blade length: 32.5 inches Blade width at widest point: 1.5 inches tapering to 1 at 4 inches from the tip Blade thickness at base: 3/8 inches tapering to 3/16 at 4 inches from the tip Cross width: 9.25 inches Grip length: 10.25 inches POBalance measured from end of grip: 4.75 inches Weight: 3 pounds 7 ounces
-
Hi Thomas, double edges straight longsword with or without fuller, preferably with flares (that what they are called? The pointy wide sections along the blade?). Along the lines of these:
-
Good evening Frosty, I tried to keep the OP brief and therefore didn't go into the details. I write. Whatever I learn, by hours, days or weeks of research, theory or practical, I put in personal notebooks. And I like to pretty them up with artful drawings, long as they get something valuable across. To that end I sometimes convert photographs or screenshots to gray-scale images. I could show you some, pm me if you want a sample. They are a lot of work. And still, I like doing and/or having them. It's a labor of love. I won't argue you have a point. I could extract much more info from images if I had your knowledge as well as mine. But I also have mine. And in days-long sessions I found one thing - I am getting nervous and confused about the physical blade-making process where I don't need to. In the last forging I did I hammered the blade out and constantly checked...just too much. Because I didn't have a clear gameplan. Getting the contours right, tapering it, getting the bevels in. I tried to do all that at once, which was an unpleasant experience. Naturally the processes are interdependant to a degree. But I still should know what exactly I'm working on right now, or I just get lost. This particular drawing should remind me of the following: Lines can meander a bit. A blank like the ones above doesn't demand perfectly level edges. And I don't start bevelling anything before it got a blank that has the strength I later want at the spine, or along the fuller, and tapers and thickness and width. It's not perfect? OK. I'll do some grinding anyway. Is it good enough to reliably clean it up in the grinding once the bevels are in? I should ask myself that when I hold it in hands. Now I could simply put all that as text into the notes. And I probably will. But I'd like to do it as a capture, not a paragraph. Simply because. It would make me happy to have it as a picture. Those renderings were simply meant to show exactly what angle the photographer might take so I can work with the pics. All that said everyone here is more than welcome to point out more things I could watch out for, or should take care of. But that is like asking a swimmer "Ey, how do you move through water?". I would't do that. velegski, I never heard of either of them - thanks for the reference! That book is worth checking out, I'll look for it Best, Indi
-
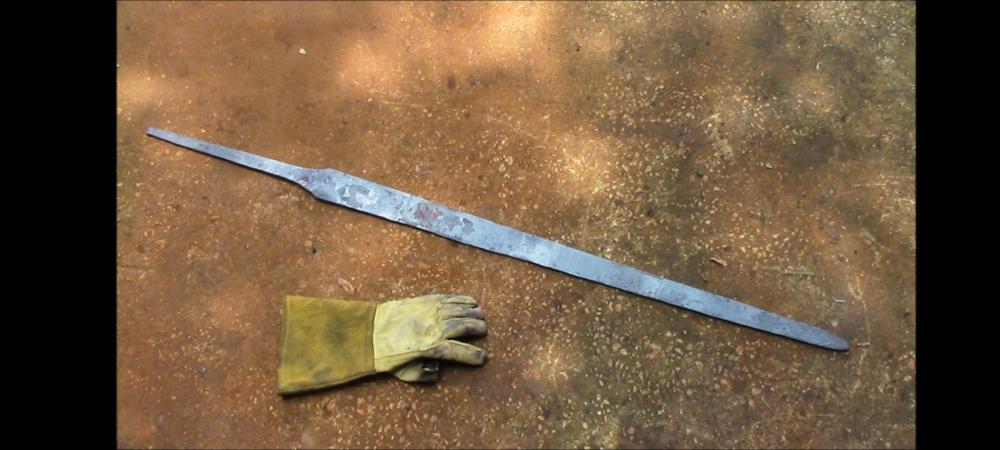
Weell... it doesn't really matter how the blank comes into being I guess. What I like about the un-bevelled shot is that from there it's good to be processed further - bevelling with the hammer, or grinding them in, as one wishes. Creates a clear succession of worksteps for the beginner. Of course one can get there with the hammer. Might even be valuable to see where one might call that forging done. So if anyone happens to hammer out a sword in that stage, I'll be happy to take a look
-
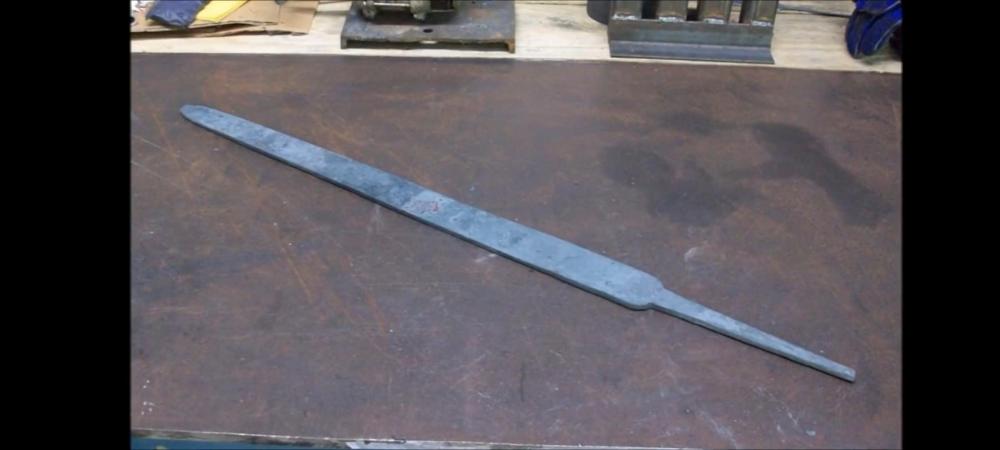
Hello guys, I've been busy watching Brother Banzai's videos again. Thinking about building a mini forge press myself I found some profoundly meaningful frames. Those are blades he either just finished forging under the press or, one step further, hammered the edge bevels on. The blades are scaled, rough, and thick at that point. The lines a bit wiggly. And yet they are perfectly fine, tapered and ready to be taken to the rough grinding. This is an important message and I'd like to capture the nature of a blade blank in that condition for reference. And while I'm at it I'll make a beautiful concept drawing from it. If someone could help me out with the photographs that is. What I'd love to have is a shot from right above the blade, taken from a distance so as to minimize distortion. And maybe one at an angle so the thickness becomes clear. Like these... > A 1-handed blade fresh from the press maybe. It would be an extra perk if there were flares along the blade. > The same blade fresh from the edge bevelling. The background would be cut away, it doesn't matter. Some light to make out the surface texture is more important. What's impractical about the screenshots is that the blades lie in an angle to the camera. I can not rotate them digitally. Plus I had hoped you could produce a higher resolution...? This takes time, so I'd also like to indemnify the one taking the pics. Can't reach Jeffrey Robinson himself. Let me know if it's possible All the best Indi


-
So, another way to hang the helpers. Helper on the short side of the table, suspended in the long frame right beneath the table top plates. Red is 30x30x3 in 40x40x4 in a cut-off 50x50x4. I have no confirmation yet that red telescopes into 40x40x4. In general though, this gets it a lot less complex and probably just as difficult to align in right angles. Fine-tuning after I have confirmation. A good thing is, I now can place the legs yet a little farther apart.
-
So, I found weights for the bars and calculated the parts again. While the frame is lighter than Glenn assumed, all components could still be taken down a notch. ATM, weights per [kg]: H-sections 6.9 Bottom Supports around H-section 3.5 Top supports 7.3 1 Expander ~14 Long side of top frame, with expander bearing 9.1 (still haven´t had an epiphany on how to suspend it simply inside the top long frame without loosing the "plug-in connection" there.) As Glenn said, steel part of top plate 23.4. Best divide this into 2 sections. Reducing the thickness means the holes get too short..I guess? Planned to modify a few clamps like he does at 8:04. I found smaller tubing with the same wall thicknesses which should do the trick. 40x50x3 & 50x50x4 ---> 30x30x3 & 40x40x4 (30mm =1.2'', 40mm = 1 3/5'') The rectangular tubing at the end of the expander(s) can be aluminum. No reason for it to be heavy or bomb-proof. I´ll see about another suspension system for the long bars... Anyone have a recommendation what weight I should aim for so I (80kg) can with no trouble apply a little force to something clamped onto the table/into a vise on the table without it shaking? Basically, what you´d expect of a good workbench, hobbyist size.
-
Made may day, had a hearty laugh there^^ Although that tool stand like like a well inhabited retirement home for tired tools... :/ You mean like the red thing? Bought! For those with the space for both, sure. I figure, a heavy one will do for all lighter work too.
-
Thomas, a couple years, some years, xxxxxx, longer ago than I like to think I first came here to ask about what steel to use for armour. All I had back then was Jim Hrisoulas book on swords. It might just have been You who pointed me to the ArmourArchive. I´ve since never stayed off the archive for more than a few days. All I could do so far is learn about how to make armour and write on a notebook on it. But still, without the archive my world would pretty much end. I´ve not had the pleasure of mingling with like-minded folks in person though..no SCA or HEMA, not even conventions. Which I regret btw, but cannot change. Ugo is a legend on the archive, a myth shrouded in enigmas. I´ve only see a few pieces, but they were stunning. He appears rarely though, at least during the last few years.. I do like women, very much so. And I´m really not opposed to the thought of an Elena for my Damon (Vampire Diaries...). But I can neither afford them nor will I suffer being ever again restricted in my craftsmanship. One has to make decisions, this is mine. I am wed to my stakes, vise and angle grinder. And soon a table. Being a lone wolf is better for me than being a sheltered hound.
-
Sure thing! Intended to to leave conducting areas blank, including all of the surface and the paths I would like my current to run...where it actually does run is another story. Oh, and that´s a non-issue. Now and forever. Some pretty colour might be nice though...I´m thinking black Alright, let me try: Jewellry hot work (hard soldering, small oxy/ace or just oxy/propane torch like smiths little torch), small-scale lost wax casting. A sword pommel is not considered small anymore. Any filing and polishing that might be needed. Leather work as far as leather armour goes - cutting, embossing, riveting... Small scale welding projects like this: Mid-sized welding projects up to the size of armouring stakes (shaft of 1'' square with diverse heads, the largest being ball stakes of ~3'' diameter.) The largest welding application I can think of is making the frame for the table I am planning here. It won´t be my everyday business, my interests are armouring and sword-making. But this should be possible if push comes to shove. If I ever plasma-cut something, it will be thin sheet. I do not intend to support a piece of rail-road track on the expanders and cut it into an anvil. I do, however, have a RRTrack anvil and it would be niece to have it seated on a table while grinding a saddle-shape into it, not down on the floor. All thing armour related: Cutting sheet, maybe on a beverly 2 shear, or with a nibbler. Drilling holes into the sheat (vertical drill or drill stand), support a manly buffing motor on the table. Clamp things into a vise and cut them with the angle grinder, or grind, or polish them. It´d be nice if I could seat a saw into an expander, as seen here at 12:15. Not much of a wood worker though. I need the main section to withstand the shock of some armouring work on a stake. I plan to weld a stake-table for this, on this very table. But still, this one must be robust enough. That´s all I can think of. So...Can I go down to 5/64'' (12ga, 2mm) for the inner tubes in a tube, including the legs?
-
Hi Glenn, thank you for this!! Those numbers are shockingly beyond what I had in mind. Technically, the tubing for the legs is 40x40x3 and 50x50x4 (short segments). Still, that needs addressing... I´ll look for lighter material. What about the wall strength though? Can I go down to 5/64'' (12ga, 2mm)?
-
Take your time Frosty, thanks for getting back to me. And yes, it is a rabbit hole, isn´t it... The intention to make it modular alone, so one can simply clamp single components under the arm and carry them around, makes it all so much more complicated. With expanders in it get´s even more interesting, no matter in what shape they come. Curious what you come up with. So long, and thanks to all Thomas and Glenn ruminating here with me!

