

Square Nail
-
Posts
87 -
Joined
-
Last visited
Content Type
Profiles
Forums
Articles
Gallery
Downloads
Events
Posts posted by Square Nail
-
-
On 5/24/2017 at 9:54 PM, Square Nail said:
I will have to give that a try! There is a HVAC Service company just an hour away! Thanks for the tip!
Contacted 3 different local HVAC companies and none of them had any pieces they would give away or even sell. Did find one that would order a role for $635.However I did find a supplier called High Temp in Portland that carries everything. Will call them Tuesday .
-
10 hours ago, Welder74 said:
Awesome work I too am trying to build a forge, a forge pretty much like yours it's in the "insulate or not to insulate " topic but it's cut down now. Anyways about yours I love it I wish I had done exactly what you did I like the space you have. And I'm not sure on a door, but your design looks like it will work really well.
Thank you Sir!
-
4 hours ago, Frosty said:
Well okay then. We'll call off the thugs sent to straighten you out.
Frosty The Lucky.
Thanks for calling them off, I was starting to look over my shoulder!
-
5 hours ago, ThomasPowers said:
County/Country I don't see where you have edited your profile to show either! We strongly suggest you put in a general location; sure helps with MANY smithing questions and allows for the odd "I'm in the same area, stop by some day"s
Now as was mentioned If you are using loose firebricks as part of a forge you really need a set of hot firebrick tongs! I adapted mine from one of the crudest and ugliest set of home made pulloffs (wouldn't work as nippers even though there is high carbon steel forge welded to the ends) Anyway I think I have US$1 in buying them and a couple of heats for each side reforging them and they work a treat for moving hot firebrick. I'll try to get a picture of them next time I'm collocated so folks can make gorgeous versions of their own and taunt me with them here.
Sorry Thomas, My profile showed my location but it didn't show on my profile name, it has been amended.
I won't be using fire brick in my forge, but thank you for the idea/tip!
-
Thank you Irondragon for the idea. Maybe I could use the tab as an anchor point to hold the door open! Gives me "stuff" to think about!
-
2 hours ago, John in Oly, WA said:
May never happen, but how are you set up with the front door that if the piece you're forging gets to a shape that won't fit through the opening, to be able to open the front door and have it safely stay open when everything is hot as blazes, so you can finish the last bit of forging on the piece?
Hopefully I will be aware enough to have it opened and fixed in place before starting it up. The hinges are made with nut and bolt to tighten them into place, that holds it well now, but time will tell if it will hold up in use. I will eventually make a hook and eye arrangement that would hold it in place, but haven't got that far yet. You do bring up something I hadn't thought of though. A quick easy way to grab the front and lift it while hot! Maybe a handle or knob, something that can be grabbed easy with tongs, this could be used also on the back. Thanks John.
1 hour ago, ThomasPowers said:Wayne Coe sells refractories to fellow smiths and ships (at least in the USA---I don't have a clue what country YOU are in!)
http://www.waynecoeartistblacksmith.com/Forge_Supplies.html
He usually gets a chunk of my "excess cash" at Quad-State as I live in New Mexico USA and so a bit remote by many people's standards.
Thanks Thomas, I live in Oregon, That was county not country. I looked up Mr. Coe's site last night. He will be my go to if the tip Frosty gave me doesn't pan out.
-
Always be nice to secretaries! they just about run the planet!
-
2 minutes ago, Frosty said:
Open the yellow pages (paper book!) and find a: HVAC, furnace, boiler, etc. service company. Give them a call and see if they use 8lb. ceramic blanket refractory to repair furnaces, etc. Code in the USA says they must use new ceramic blanket off a roll, not rems from another job. HVAC service companies must by law toss it in the dumpster and for a box of donuts and friendly conversation will usually let you have what you want.
The guys I buy refractories from in Anchorage, "Distribution International" load me up on 30 gl. trash bags full when I drop by.
Frosty The Lucky.
I will have to give that a try! There is a HVAC Service company just an hour away! Thanks for the tip!
-
1 minute ago, Frosty said:
Looks pretty good. What's the problem getting (I assume) ceramic blanket refractory?
Haven't I relayed the hot trick for getting it free enough times? I haven't paid for any in at least 20 years.
Frosty The Lucky.
I must have missed your hot trick! I finally found a company six hours away from me that will sell me a sheet of Kaowool but won't ship. I live in a very rural area ( There is not one single stop light in the whole county!) Which has been an issue on everything I do. I am also a woodworker and experience the same issues with trying to find exotic wood species.
I'm sure I can order Kast O Lite and rigidizer with out a problem but the duraboard or blanket is proving tough to get. Probably have to take a couple day buying trip!
-
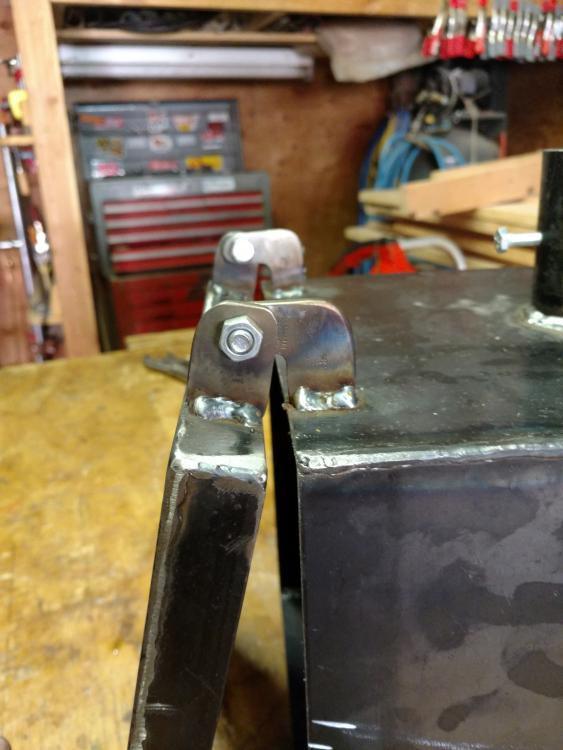
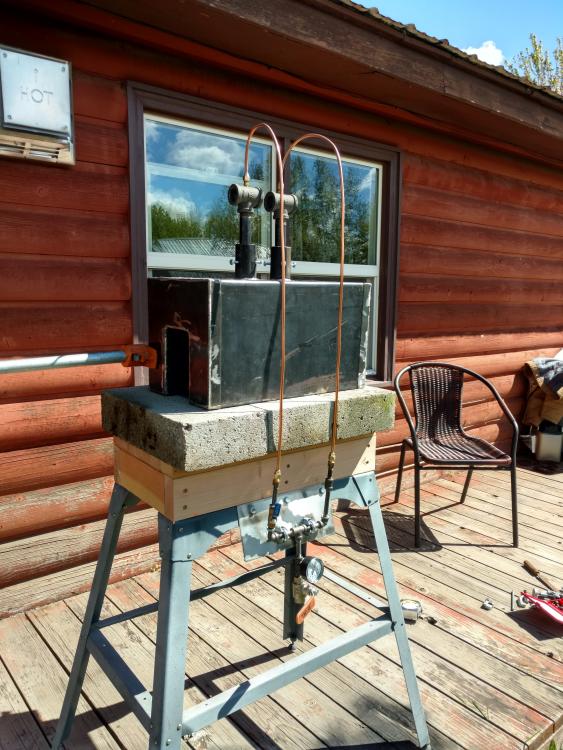
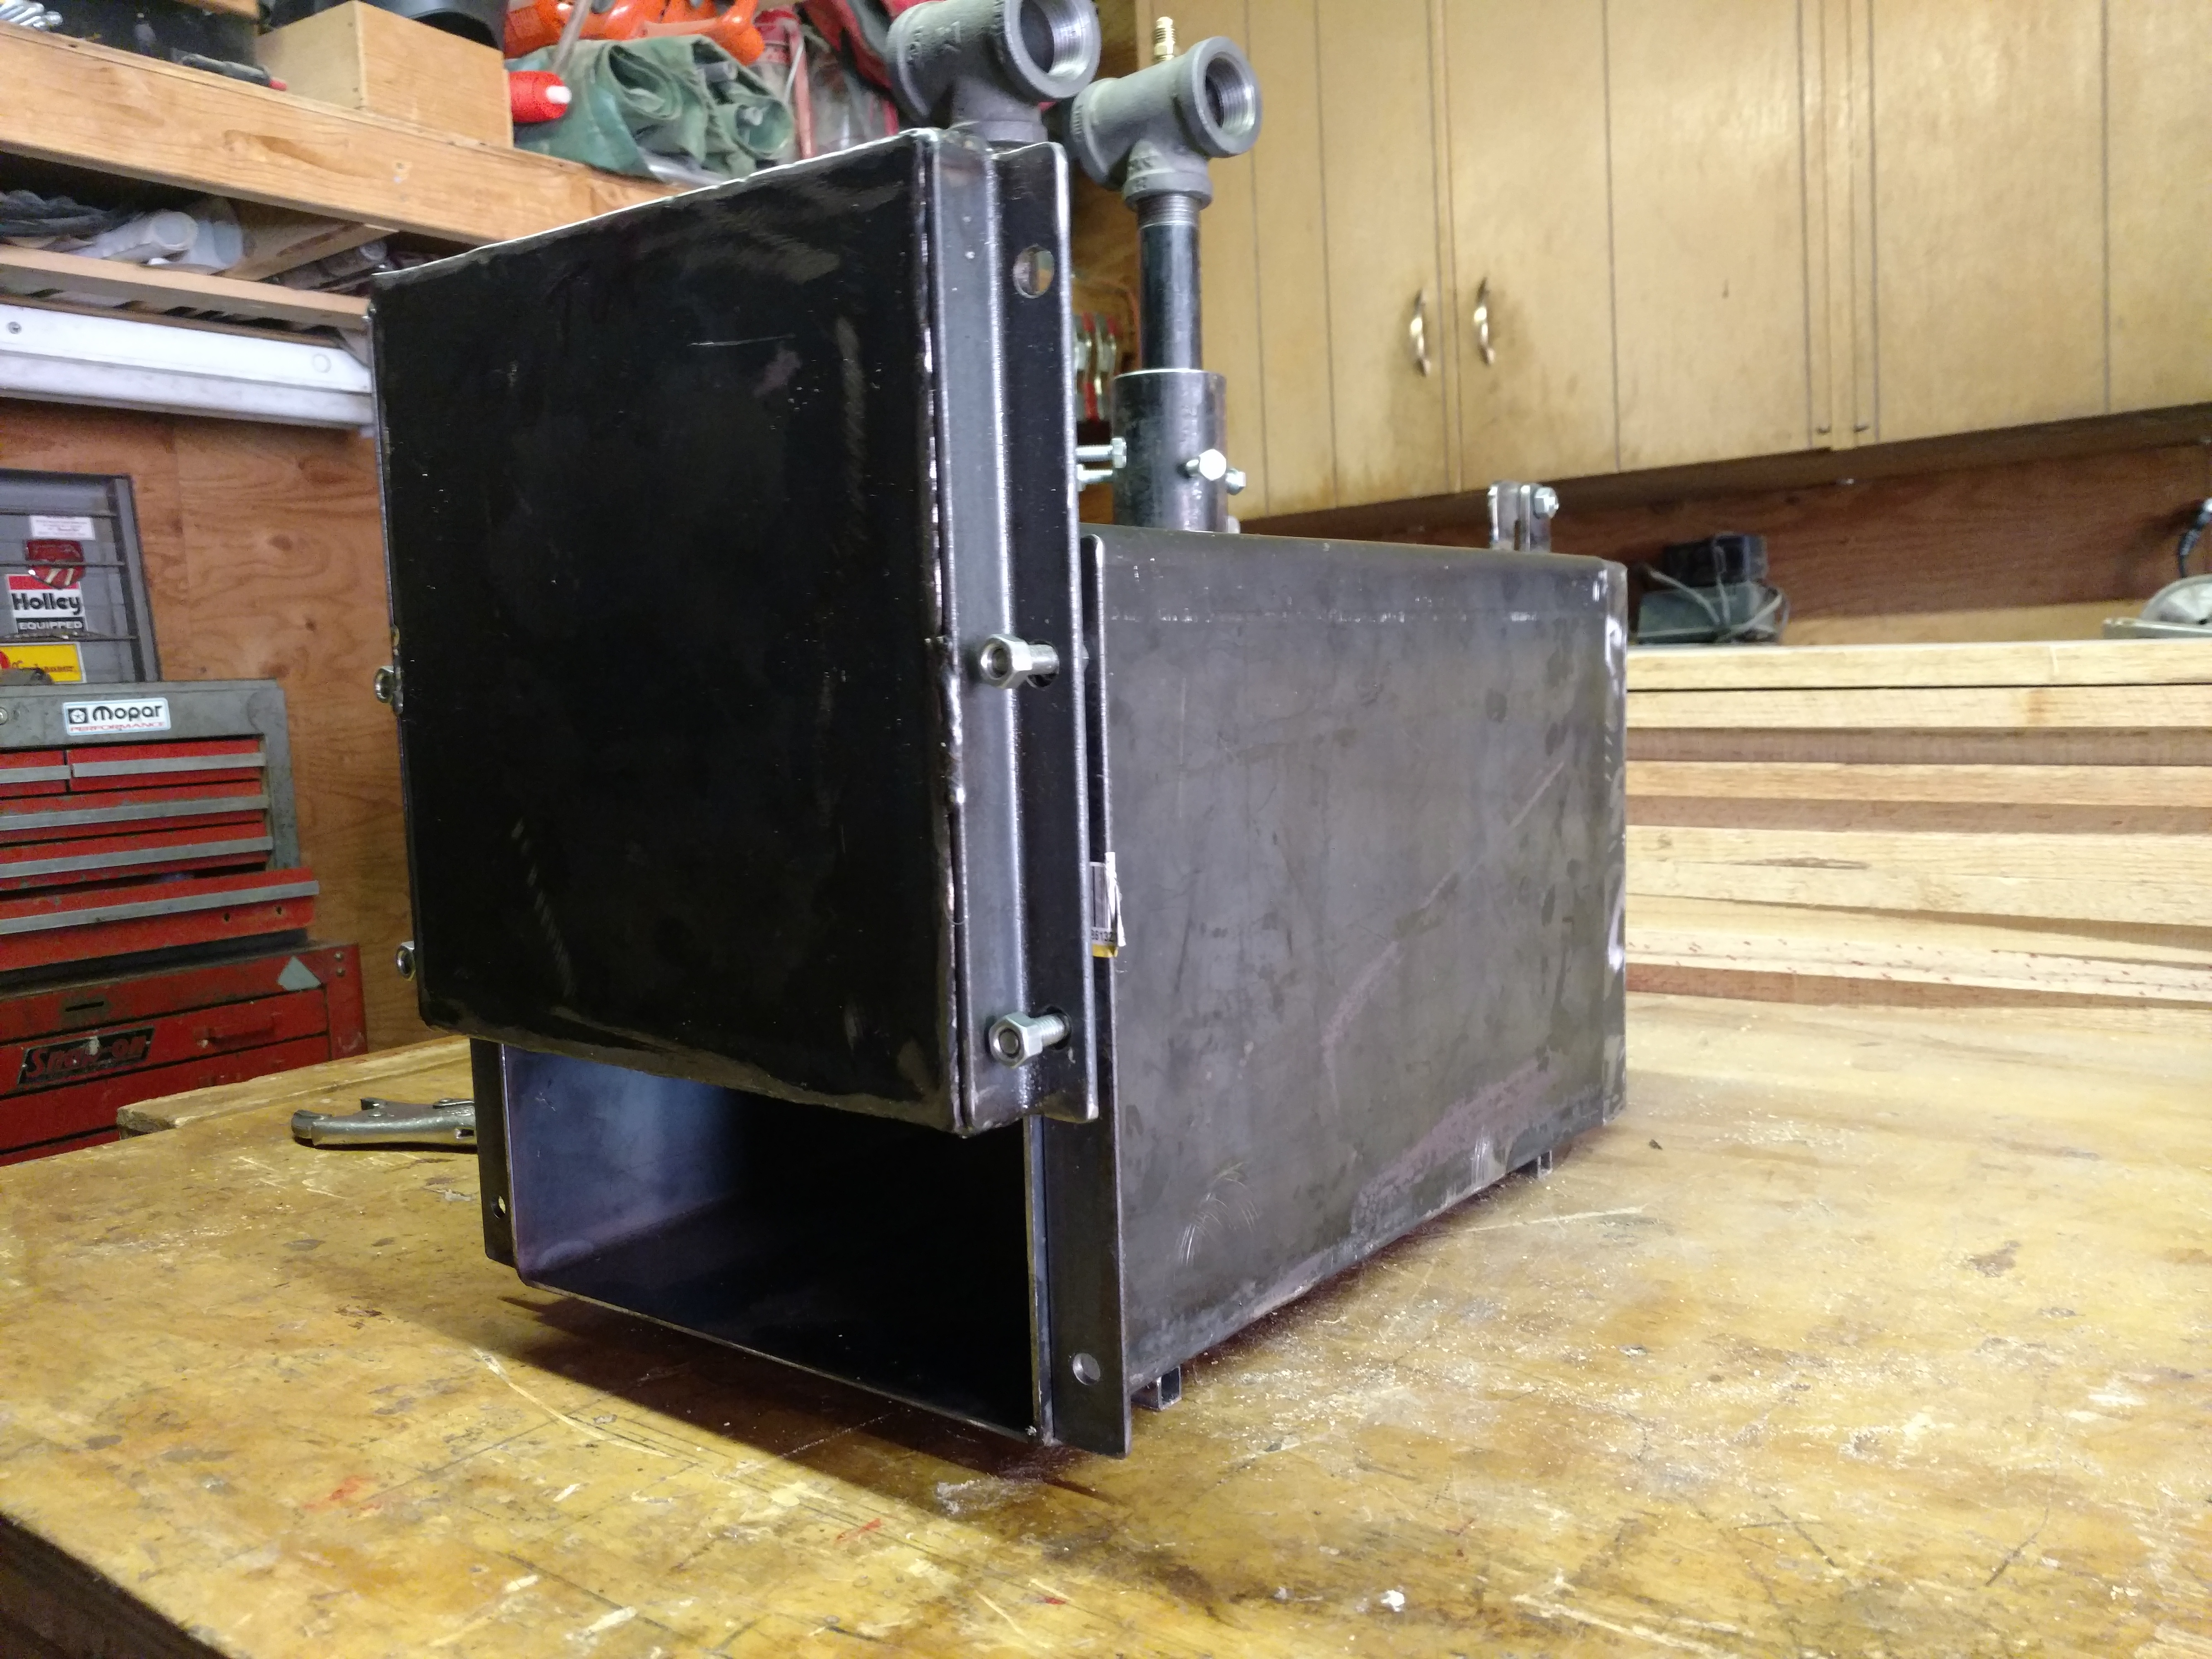
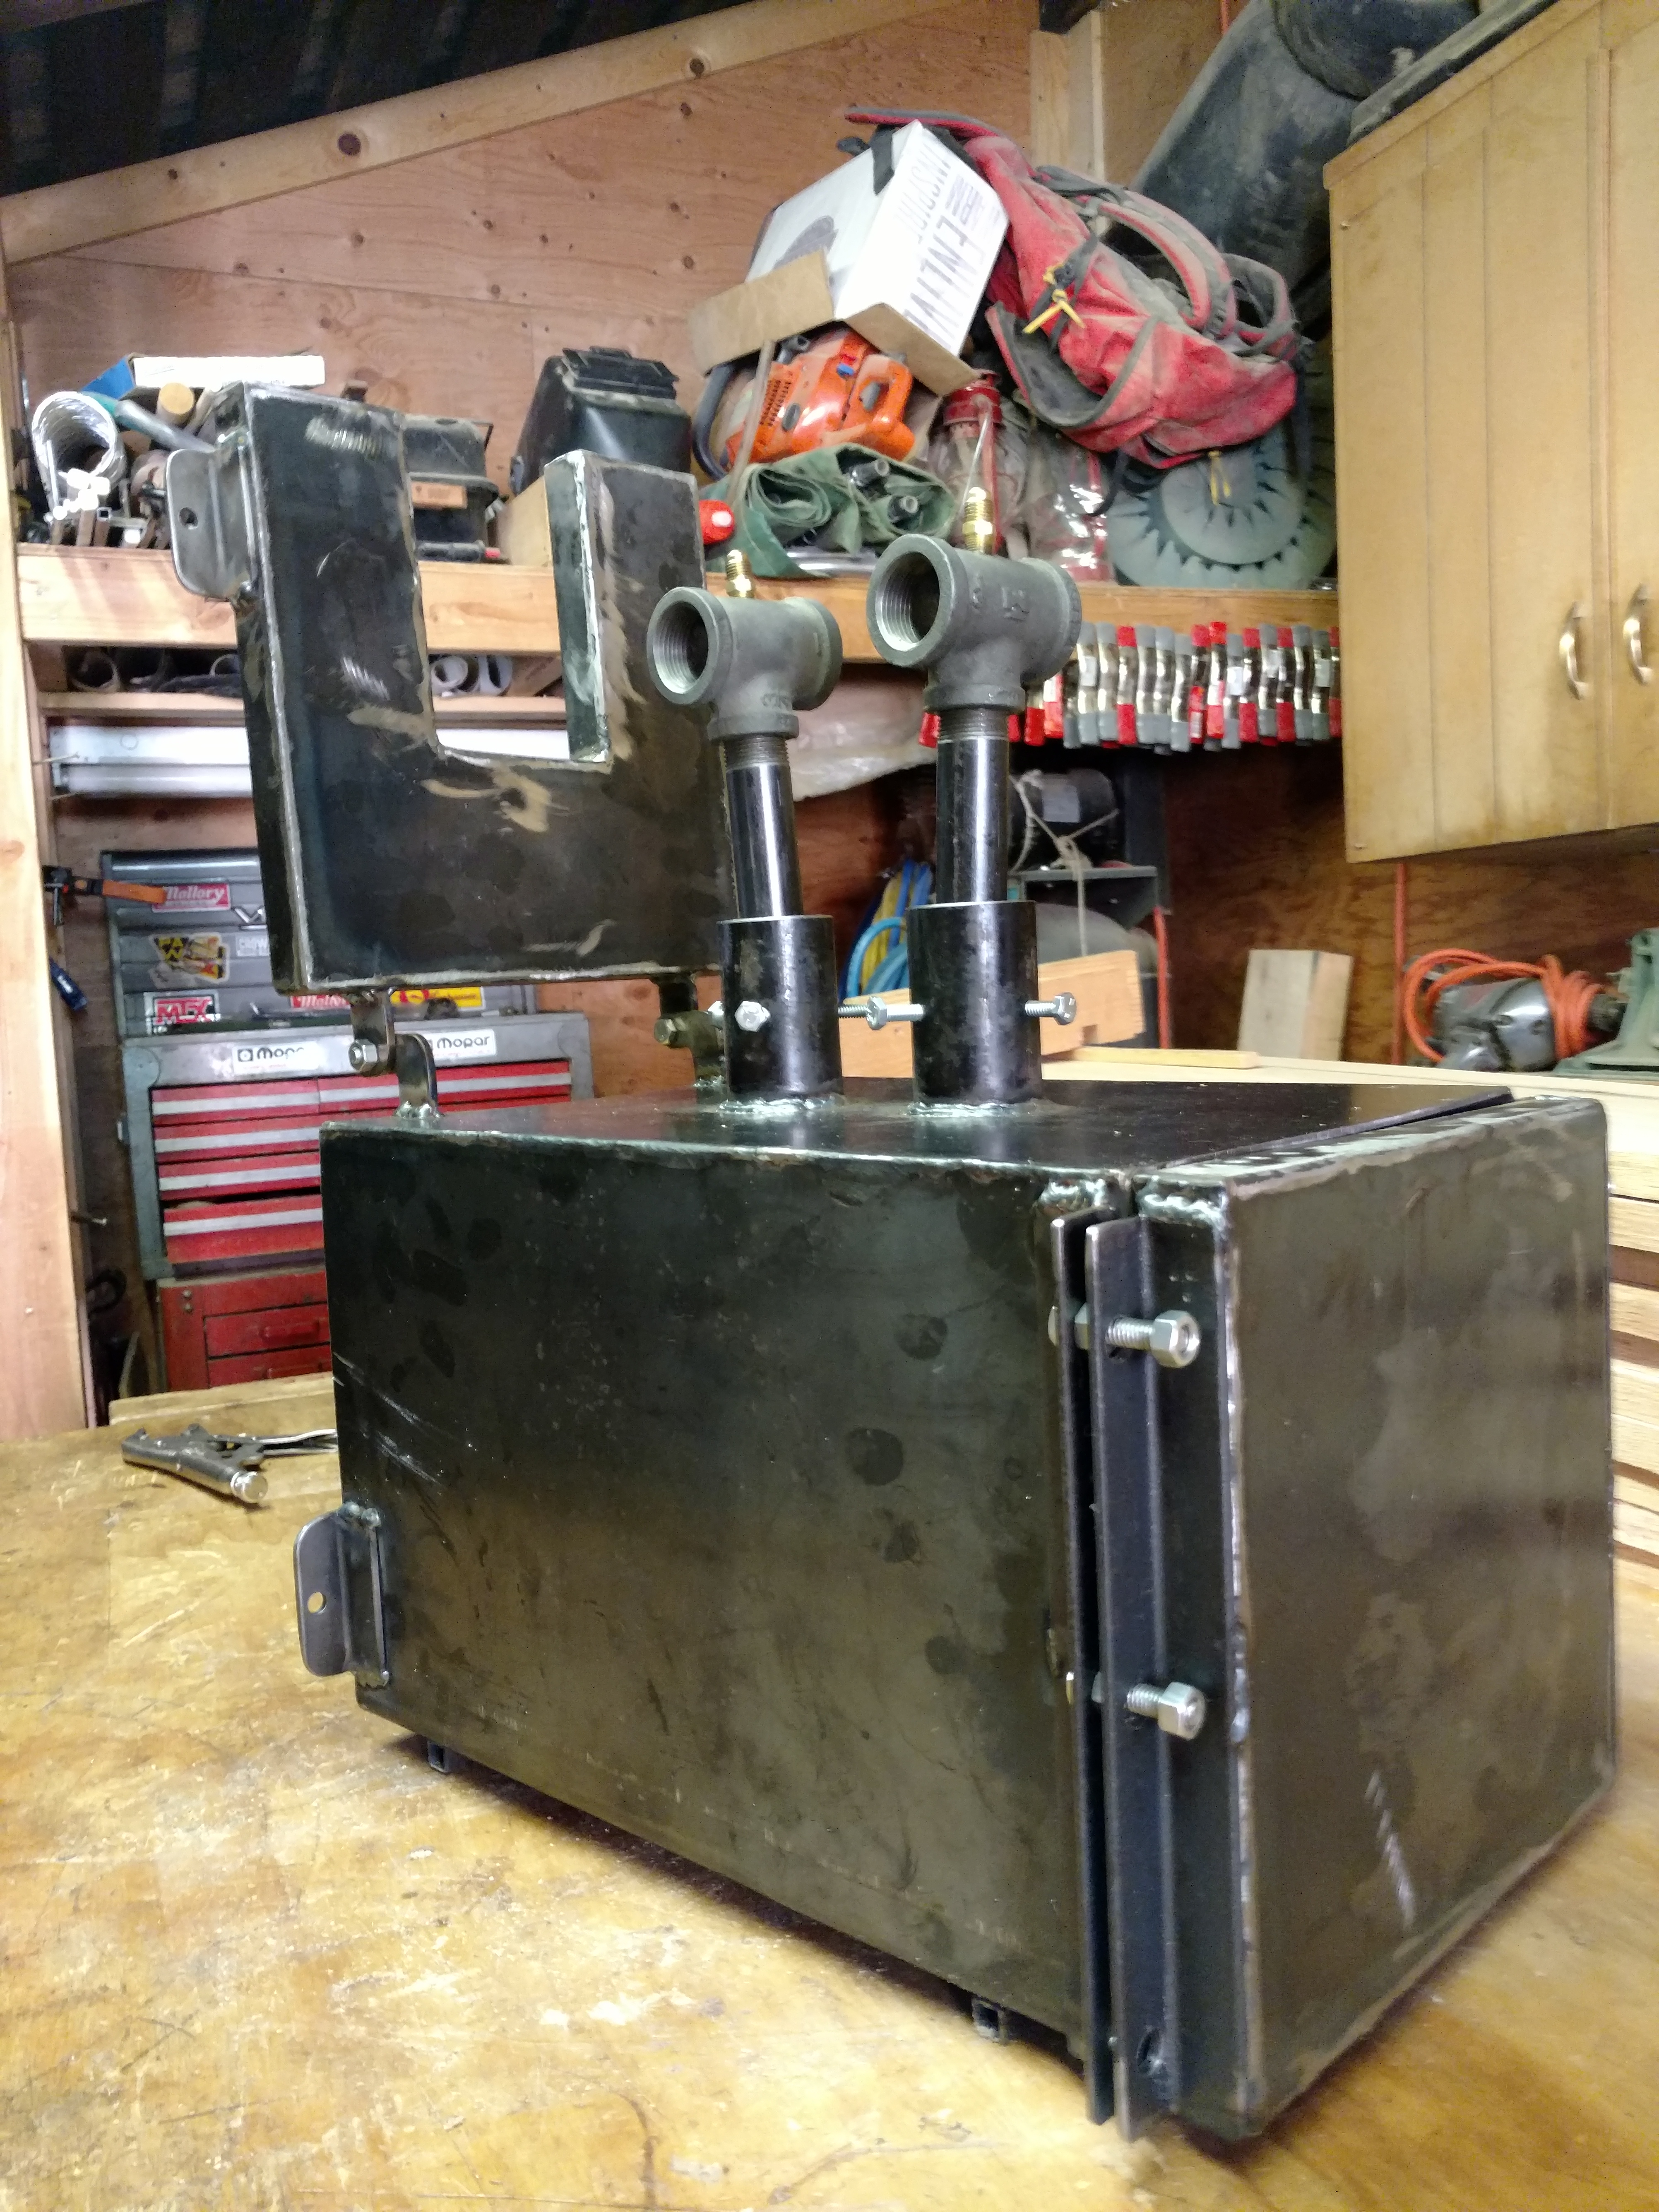
This is the completed forge box with hinged front and adjustable rear. Just need some cleanup and paint, and some insulation (which is proving to be very difficult to get) and it is ready for final assembly and testing.
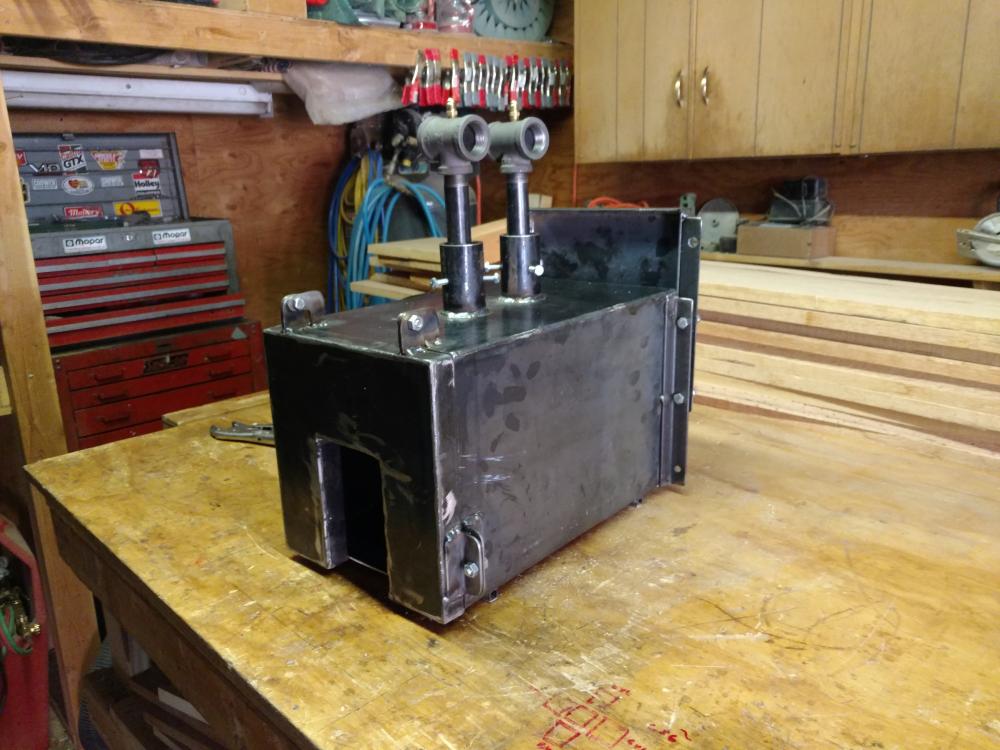
These are the hinges I fabricated for the front
This is the adjustable back,

This view is from the back showing the front open and the rear in the closed position

-
35 minutes ago, Scrambler82 said:
Is this the correct board ?
Fiberfrax Duraboard Ceramic Fiber Board insulation: http://store.armilcfs.com/high-temperature-insulations-refractories/boards/fiberfrax-duraboardr-ld.html
Suppose to be good to 3000F.
I believe so
-
2 hours ago, Frosty said:
You tells em and you tells em but they still . . . <sigh> No bricks! Hard fire brick is a heat sink and insulates only slightly better than limestone. Either coat it with hard water set refractory, Wayne Coe sells small quantities for reasonable. Or lay a high alumina kiln shelf for the floor.
Frosty The Lucky.
Sorry Frosty, I had the idea that with 1 layer of the Duraboard under the fire brick that it would would be OK. So thanks for setting me straight. Two layers all the way around with the coating for me!
-
7 hours ago, stockmaker said:
I'd say you learned something by reading this forum. I hope you are going to insulate, without it you will only heat to a dull orange at best. Looks good, let us know how the burners perform. You may need to rotate your burners slightly to allow each T to gets it's own air. I would have them facing across the forge to avoid gas's from the doors.
As it stands now, I intend to use two layers of 1" Duraboard with a refractory coating of an undecided nature yet. Probably will use some type of fire brick for the floor. 1" Duraboard on both the door and back end also. With the forge being 10X16 this should leave me with about 480 Cubic inches of forge area, which 2 - 3/4" T burners good for around 700 inches should be plenty! May end up dropping to 1/2" burners later!
Thanks for the tip on turning the burners! I had thought about that but wasn't sure!
-
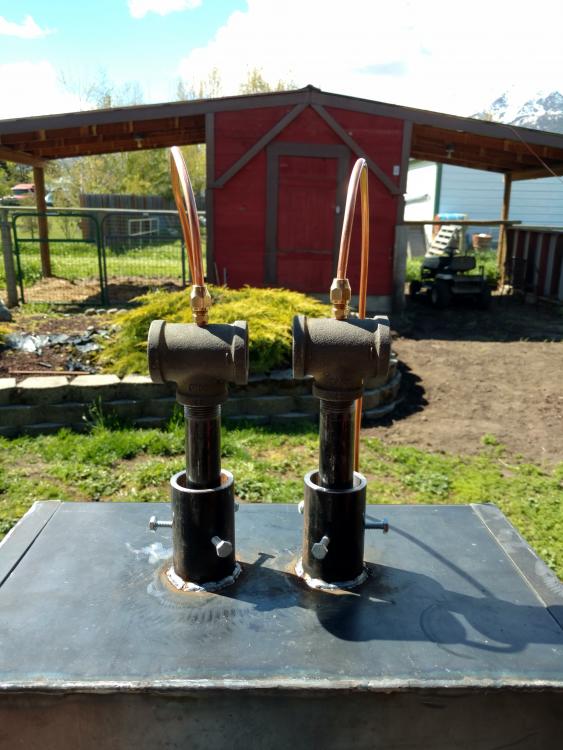
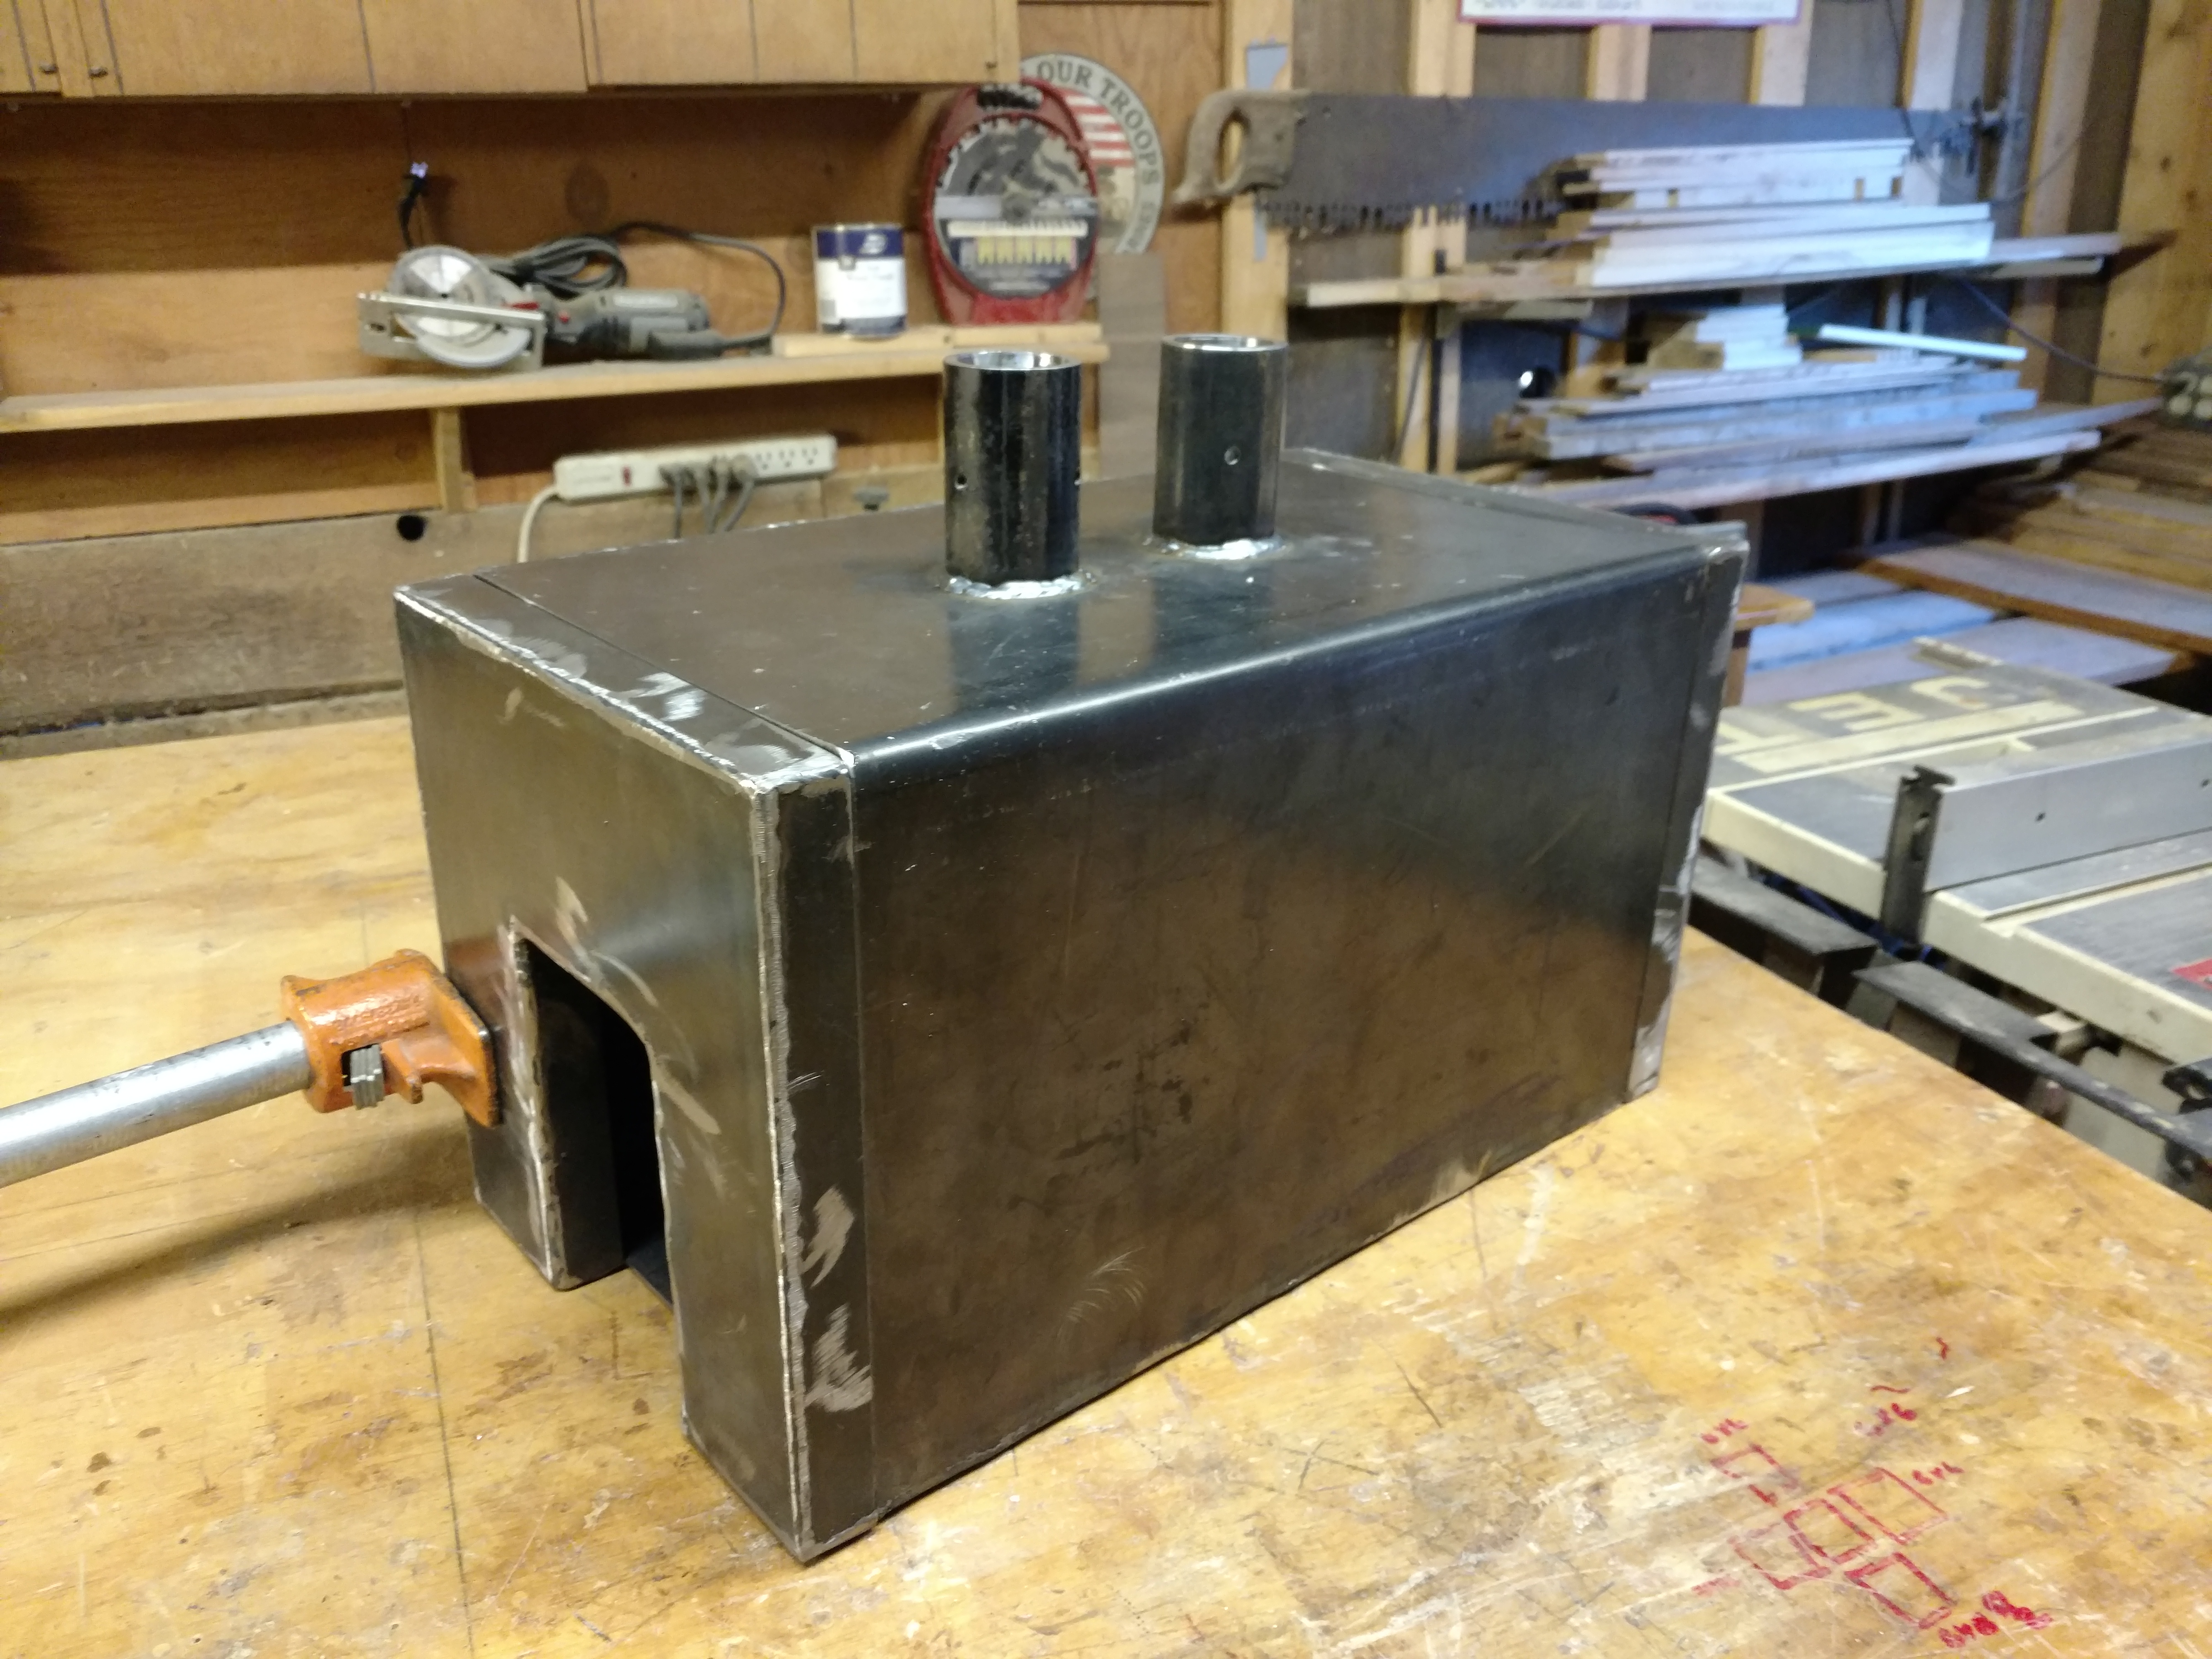
After getting the forge body back, the next step for me was to mock up the whole affair and see how my ideas would play out.

Still trying to decide if I want to hinge the front, but plan on putting some tabs on the back for some adjustment. The burners are 4" apart.
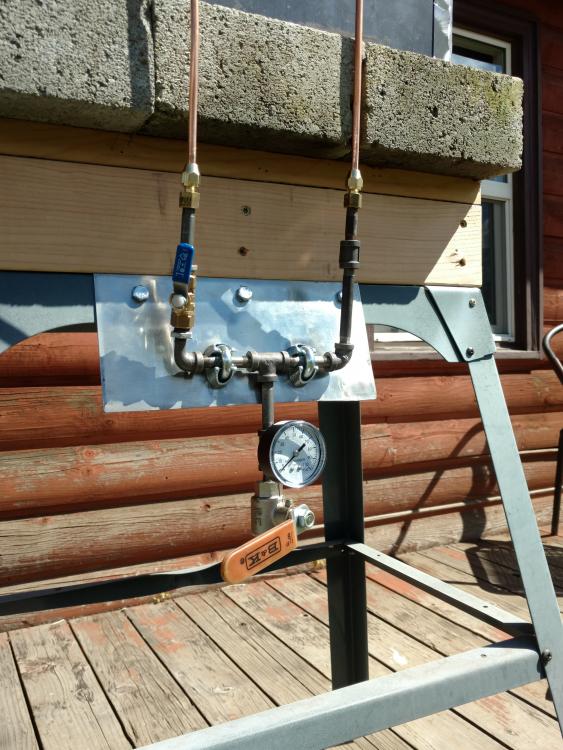
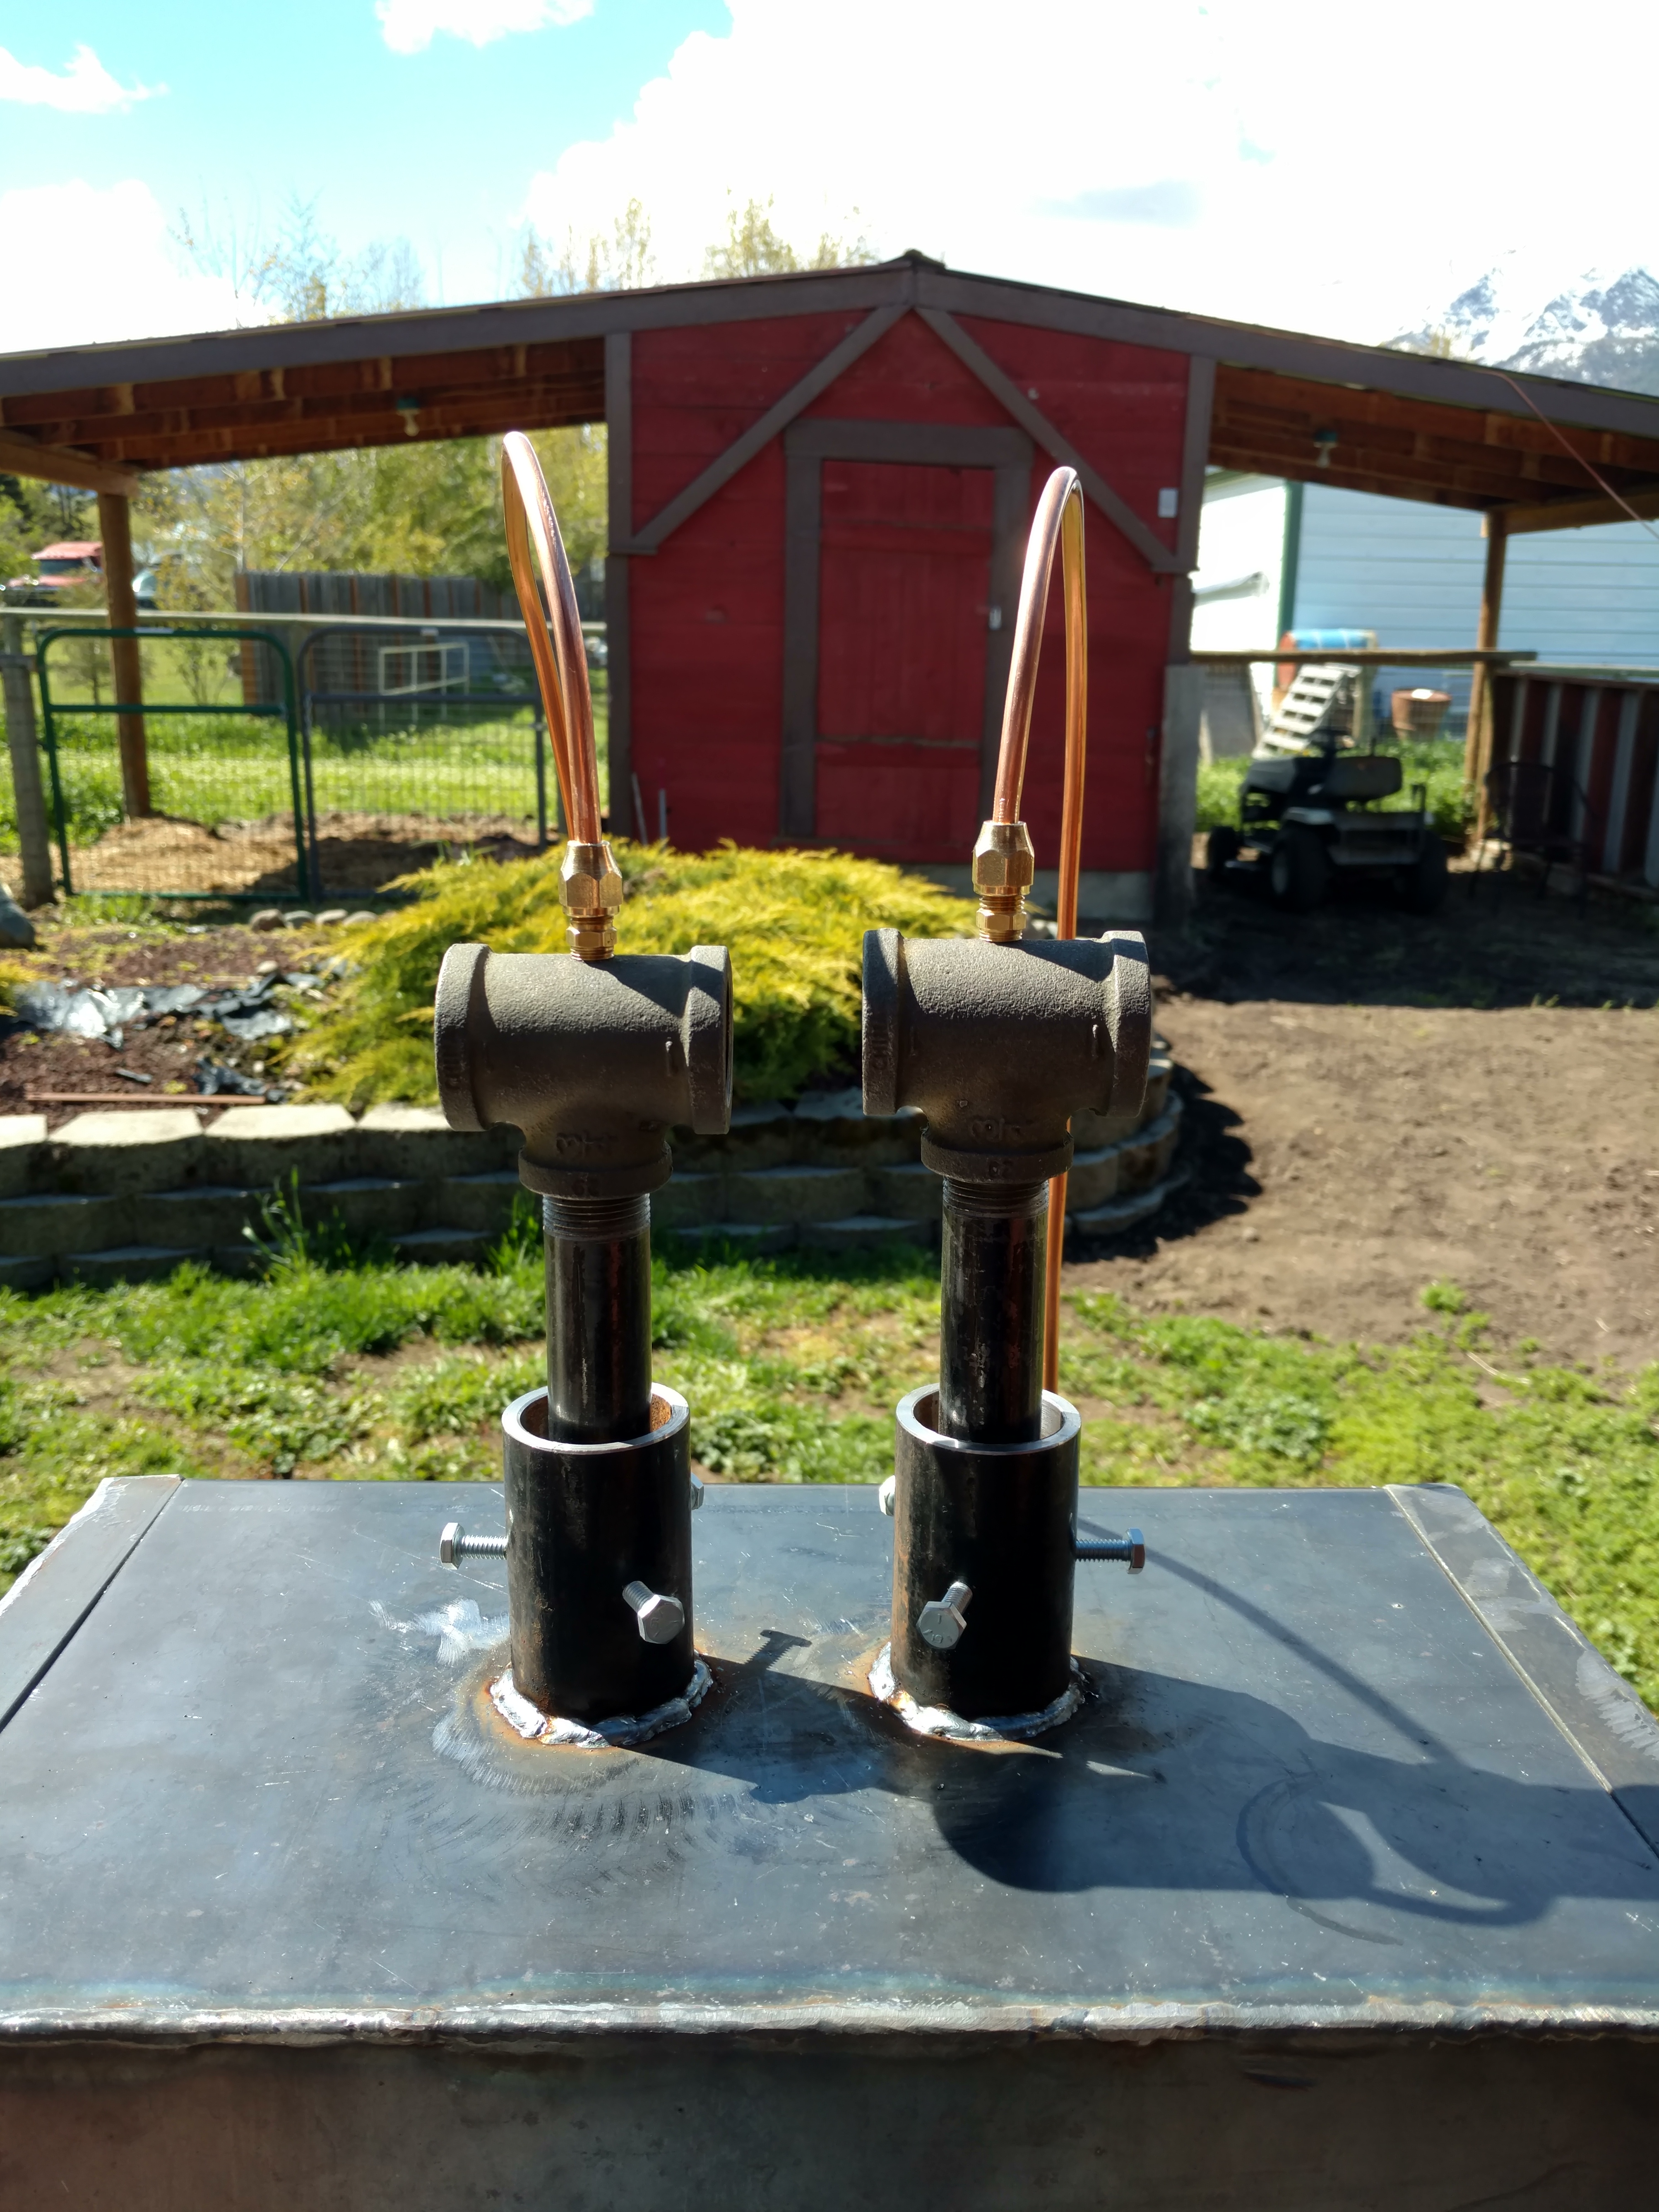
The next pictures are of the plumbing from a main shut-off through a gauge (I haven't found a good gauge yet) then to the manifold with a shut-off for one burner so you don't need to run both if you don't need to. The pipe is 1/8" black pipe to 1/4" flared copper. The regulator is just off the tank and not shown here.
-
After perusing this site night after night for weeks and trying to understand the basics of forge design, I am still as lost as I was when I started! So with this in mind I decided to build a forge and post the results, good and bad as the build progresses. I have decided to use Frosty's T burners and a modified Zoeller square tube forge. Not being a very good welder, I have had a local shop weld the basics of the box together leaving some of the less important aspects of the forge to my own devices!
Please feel free to comment on things you like or don't like or suggestions of different ideas.
I intend to document this build and post on here with enough pics to explain what I am talking about, showing my successes and failures. The first thing built were Frosty's T Burners. Using his instruction guide the process was fairly simple and straight forward. To elaborate a bit on some of his notes, the ridge on the center line of the T's can and will deflect a drill bit if you don't take extreme care to make sure the bit is centered. I found by filing a small flat spot before center punching for the hole makes it a little easier to stay accurate.
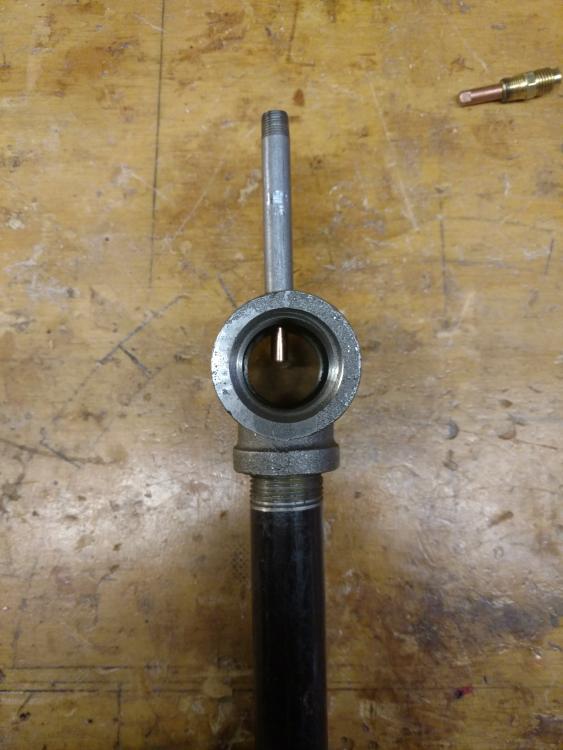
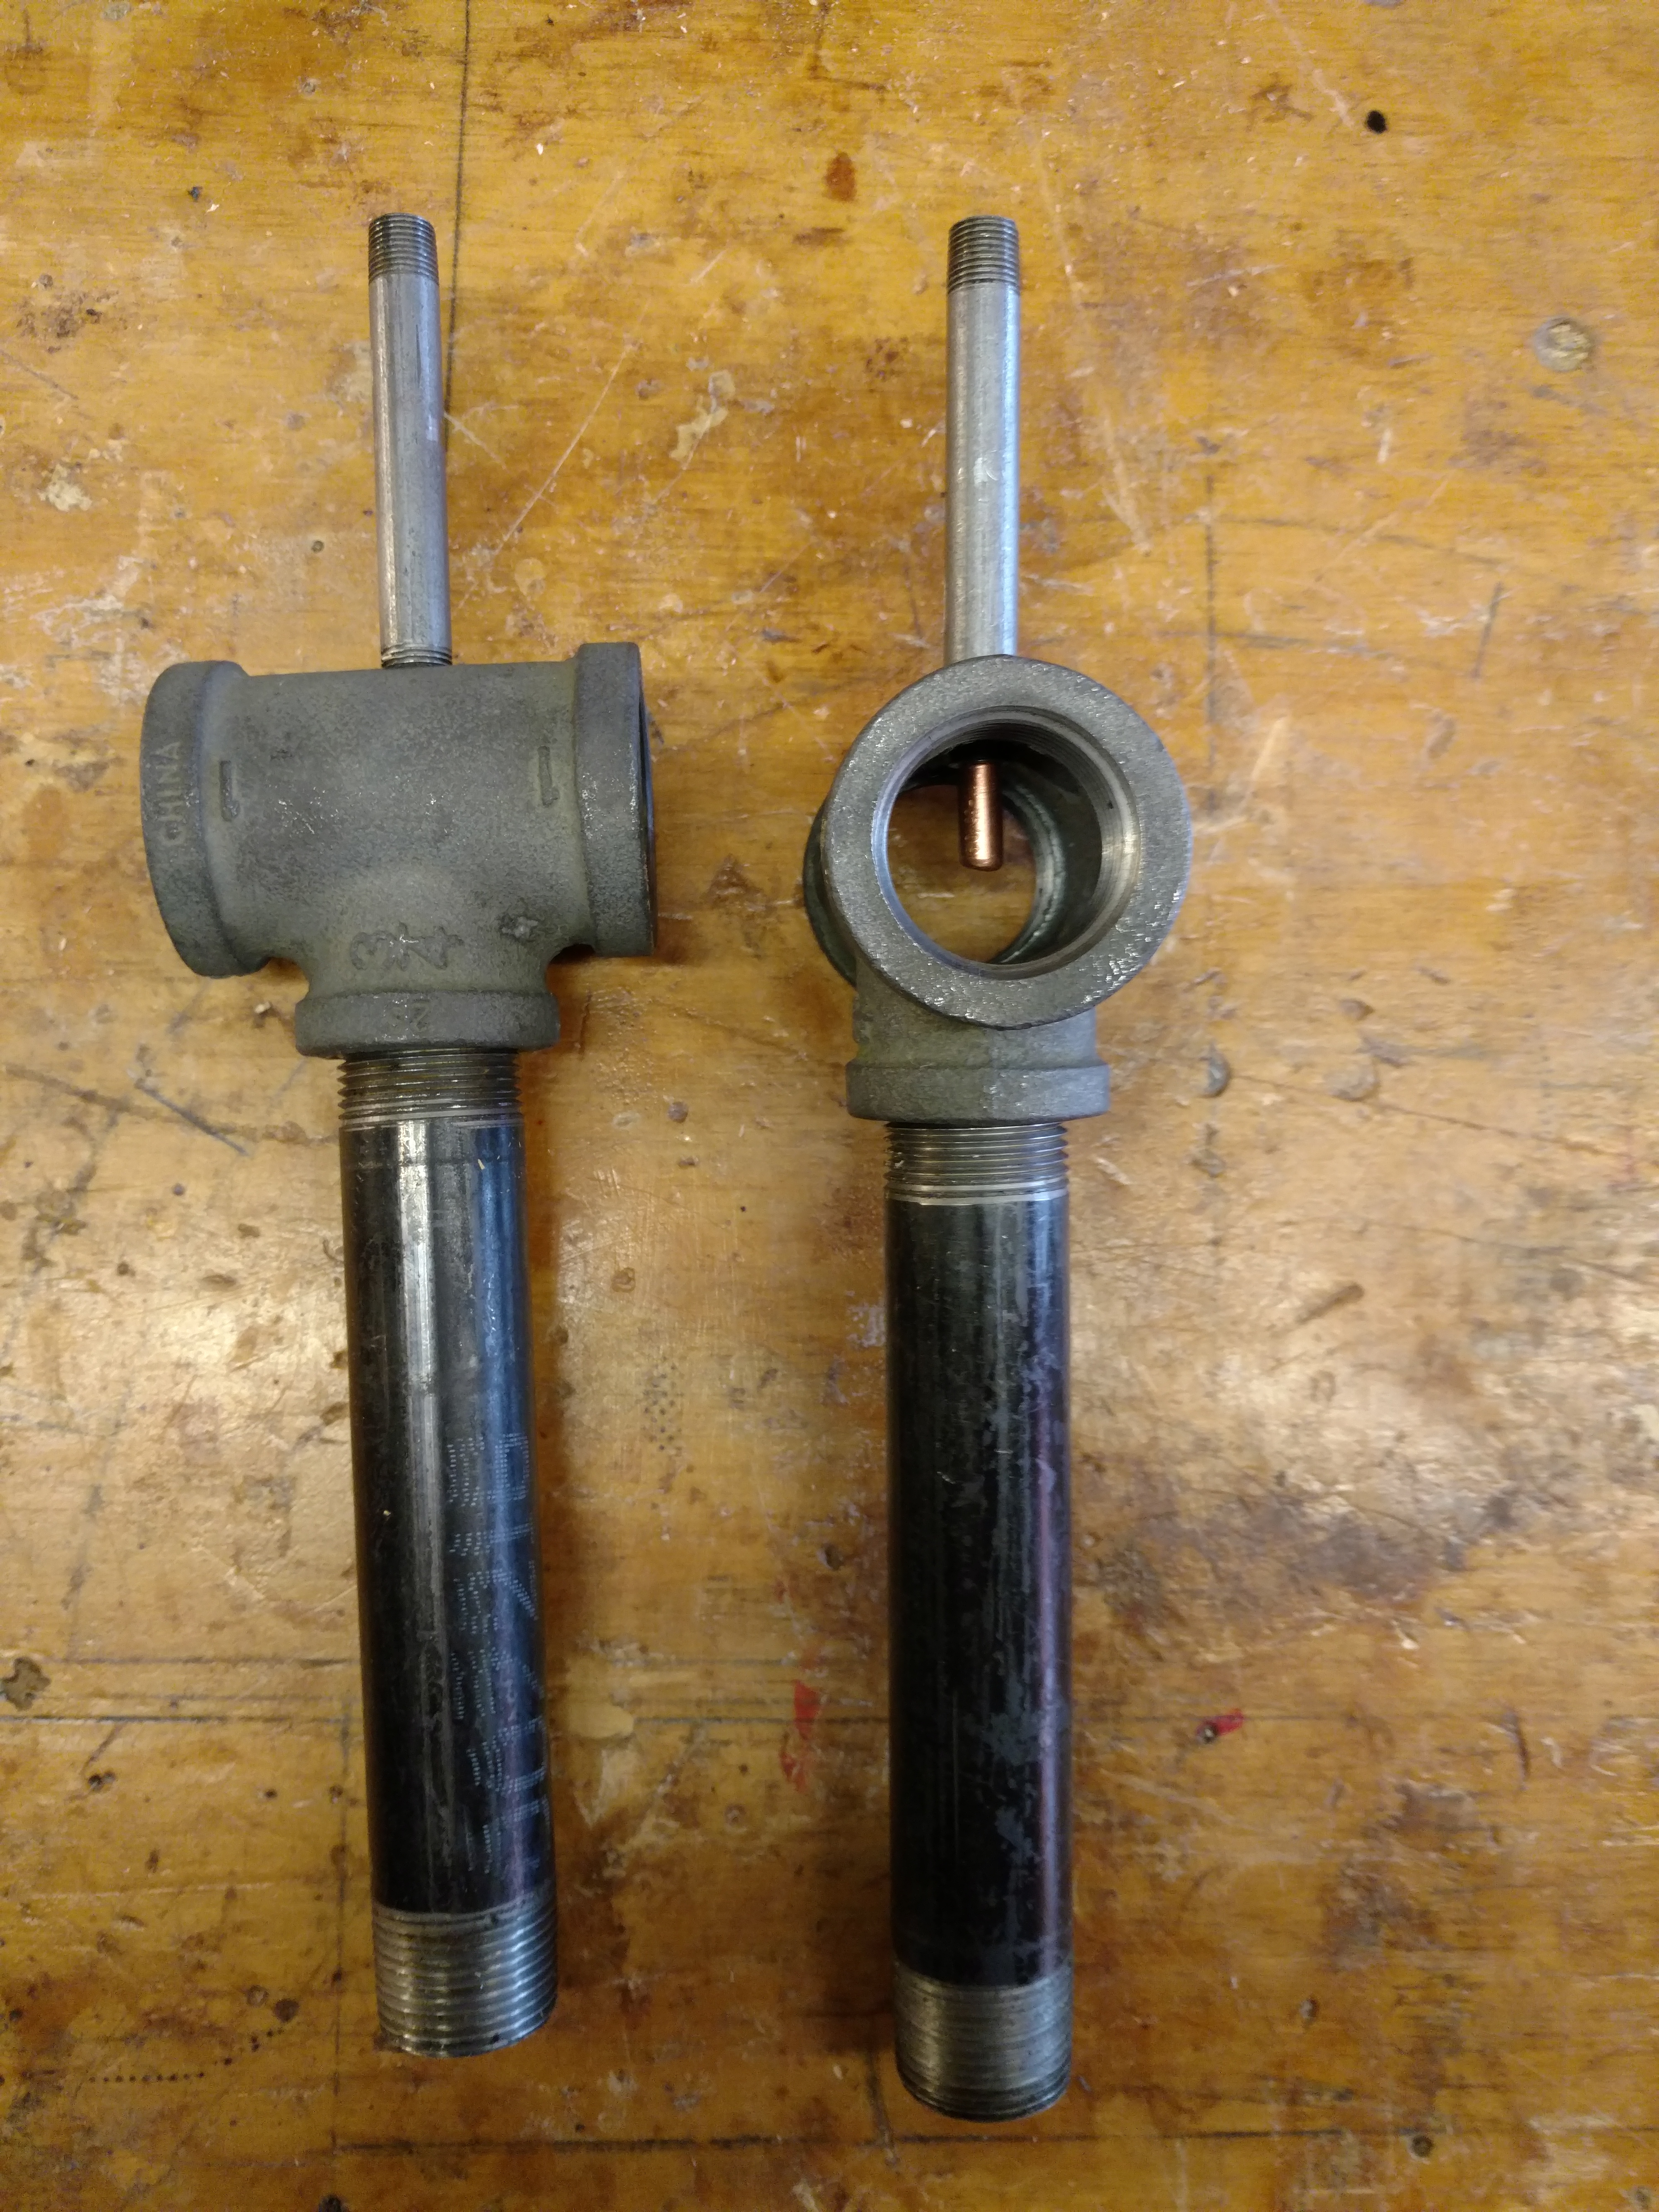
As you can see by this picture that all though the fitting is straight up and down it is still offset to the left. Had to redo
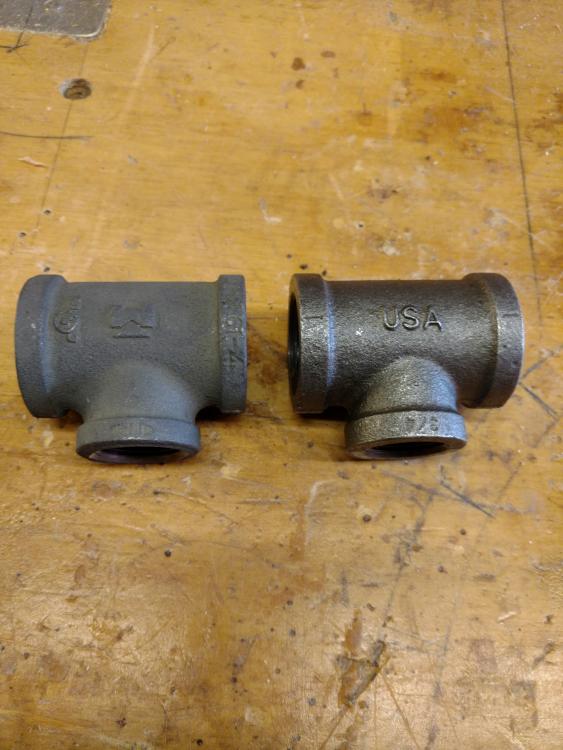
During this process and not wanting to spend a million dollars on a learning curve by buying all black pipe, I tried soaking galvanized fittings in vinegar to see if they were a viable option. The galvanized were $6.00 while the Black are $17.00. As you can see the T on the left is a Galvanized fitting soaked for 36 hours in vinegar with the black one on the right.
Was finally successful in getting a couple of decent 3/4" T burners. Still not sure whether I will use the Schedule 80 3" nipple with the Tweco .035 tip or the Brass fitting.

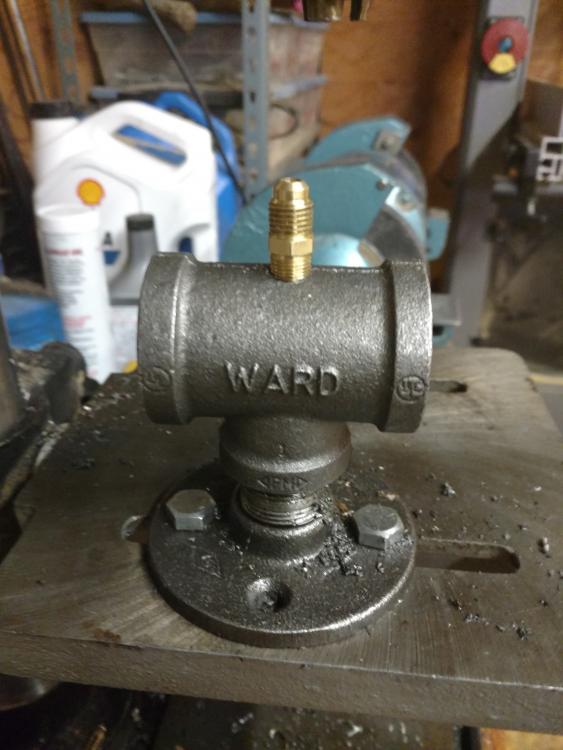
The last picture shows how I adapted Frosty's idea of the floor flange and bolting it to the table on my drill press. So far it seems to work pretty good.
-
Thank you sir! I'll post results when I finish the build!
-
Frosty, a question that has been kind of touched on in this post but I'm still not clear on.
In your instructions (which by the way are excellent and easy to use!) the flare is listed as "if needed/optional". So what conditions would make it necessary to use the flare or is it just a overall efficiency boost for your regular T Burner? I have 2 of your burners complete with the exception of the flares and not sure if I need them or not!
-
When neutralizing with soda, do you make a slurry and "paint" the parts with it or just dump some in the pot you are soaking in?
-
On 5/8/2017 at 7:05 AM, JHCC said:
quotes removed
Thanks, will do!
-
Not sure if this is the right spot or not, but I have started my forge build and would like to document it on here as I go along. With Mikey's and Frosty's how to info, it should be a fairly simple and straightforward process. Is this the best place to post pics as I go through the process?
-
8 hours ago, Mike Hall said:
I'm having trouble finding the 1/8" mpt x ¼" flare fitting locally. I just checked Lowes and they don't carry them from what I can see. Where have others found this fitting?
Mike
Our local hardware store carries them. Try Ace or True Value.
-
The only Fastenal local that would help me had a box of 25 for $105.00. McMasters-Carr sold me 2 for $2.68 ea.
-
34 minutes ago, Mikey98118 said:
Masters-Carr carries 1/8" schedule #80 pipe nipples, which can be cut in half, in their online catalog.
Thanks Mikey! They will ship in the morning!
-
On 1/29/2017 at 2:42 PM, Mikey98118 said:
Another look at gas accelerators
"Accelerator" is my term for the gas tube, and wire feed welder (MIG) contact tip that serves as a gas jet; Together they become a gas accelerator assembly for your burner. The gas tube is just as important as the gas jet, when it comes to exchanging the potential power of compressed gas into kinetic energy to power the induction and acceleration of air molecules in the gas/air mixture being mixed together and pushed at high speed down the mixing tube, and into the flame nozzle.
I originally used a schedule #40 1/8" pipe nipple, with one threaded end cut off, to use as gas tubes; it needed a spacer to narrow its inside diameter down enough to hold 1/4-28 thread for a Tweeco MIG tip. This not only required silver brazing to hold the internal spacer, but gave a large area for the gas to squeeze down enough to enter the MIG tip's orifice. The advantage of this part, was that it was easily found at your local hardware store.
Larry Zoeller, bless him, changed the original gas tube out for a #80 1/8" pipe nipple that is small enough inside to take 1/4-28 thread directly tapped into it. Obviously you are trading ease of purchase for ease of construction in this part change. But you are also increasing efficiency of the burner in this bargain. My original gas tube needed to be 4" long to work. Zoeller's gas tube can be 3" long and still work better than mine.
Tweeco tips aren't the only brand of MIG tips, or even necessarily the best tips to use; just remember that other brands may have different thread, and see that your drill bit and thread tap match them. A schedule #40 gas tube requires a minimum length of 1-1/2" on the MIG tip. A schedule #80 gas tube only requires a minimum 1" long MIG tip.
Finally, 1/4-27 IP (Iron Pipe, or IPS for Iron Pipe Standard) parallel outside thread is only important for linear burners (which employ reducer fittings).
Mikey,
I have spoken to suppliers in three states within 150 miles of me and no one carries schedule 80 pipe. Do you know of a supplier that will sell just a couple nipples on line without having to buy case lots?


Forge Build
in Gas Forges
Posted
Yes these were Service companies and the local wood stove outfit didn't have any 8 LB. The one company that had about a half of a roll they would part with wanted over $300 for the piece, I said thanks but no thanks. I will probablyvjust put everything on hold until I head to Portland in about three weeks and pick some up then.