

matei campan
-
Posts
405 -
Joined
-
Last visited
Content Type
Profiles
Forums
Articles
Gallery
Downloads
Events
Posts posted by matei campan
-
-
it's "old" because I made it something like... 10yrs ago?
-
thank you all.
the balls are attached by riveting, no brazing.
-
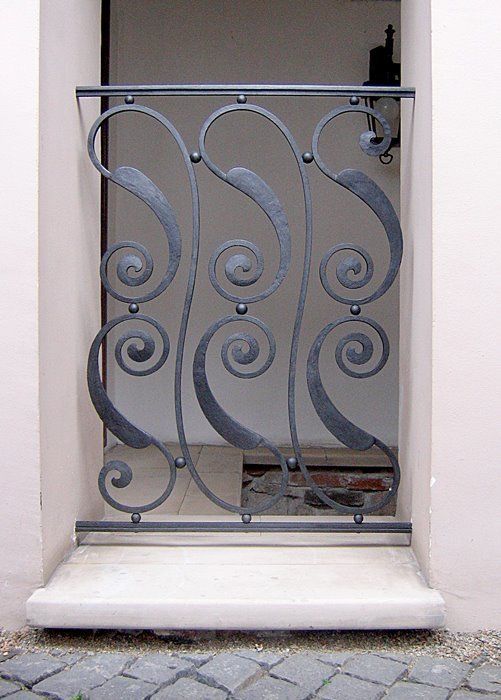
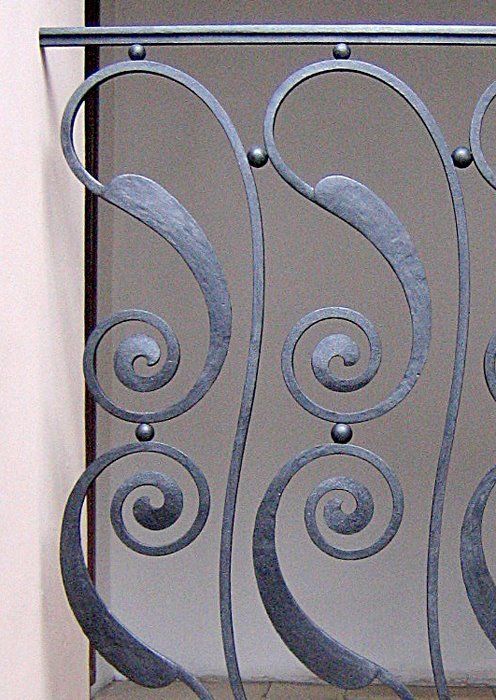
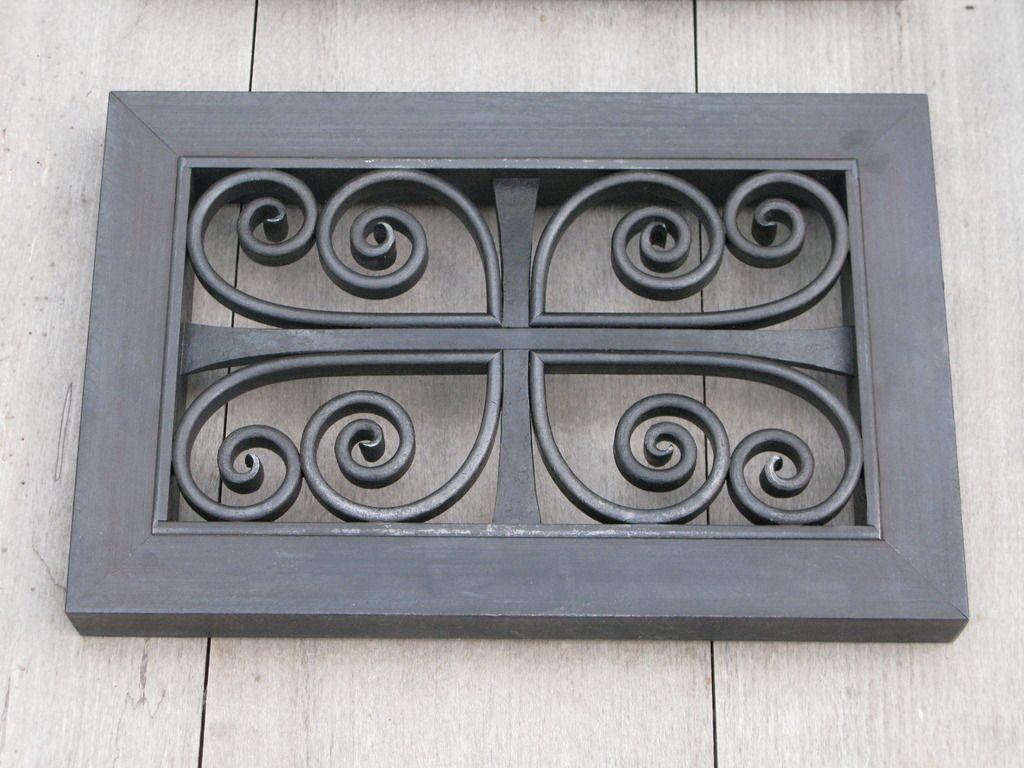
I don't know how to exactly call it - railing, grille... In fact there is another one which is installed as grille in front of a window.
It's an old work, bad pictures
-
you can put some wheels on that plywood. I bet you moved it near the bed before going to sleep. at least you had the envy to do that. I'm lucky that my last one weights only 31 kg
") . I use it as feet rest under my computer desk, I take it out to have it in my sight when I go to bed... just because is a bit difficult to have it under my pillow...
. I use it as feet rest under my computer desk, I take it out to have it in my sight when I go to bed... just because is a bit difficult to have it under my pillow... -
thank you, either manufacturers are good ones and I'm happy with it. American anvils are very rare here, but I managed to have two of them - I also have a 100lb Fisher in almost mint condition.
-
check this: https://www.ridgid.com/au/en. they may import Peddinghaus anvils, double horned pattern, more versatile than the London pattern
-
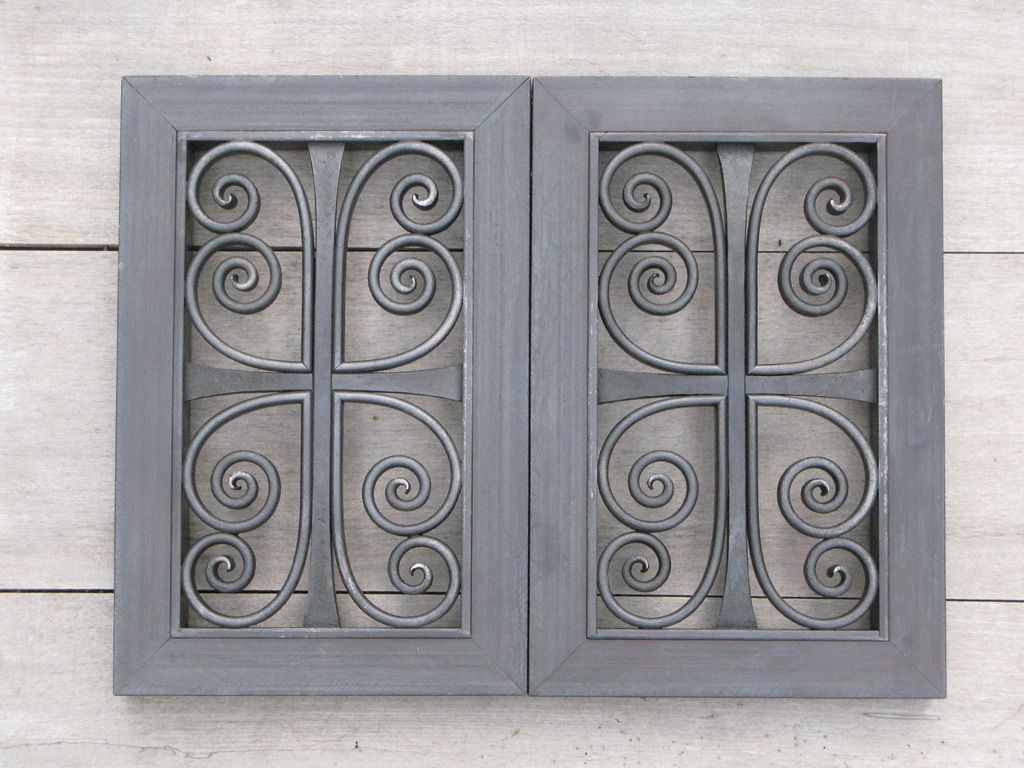
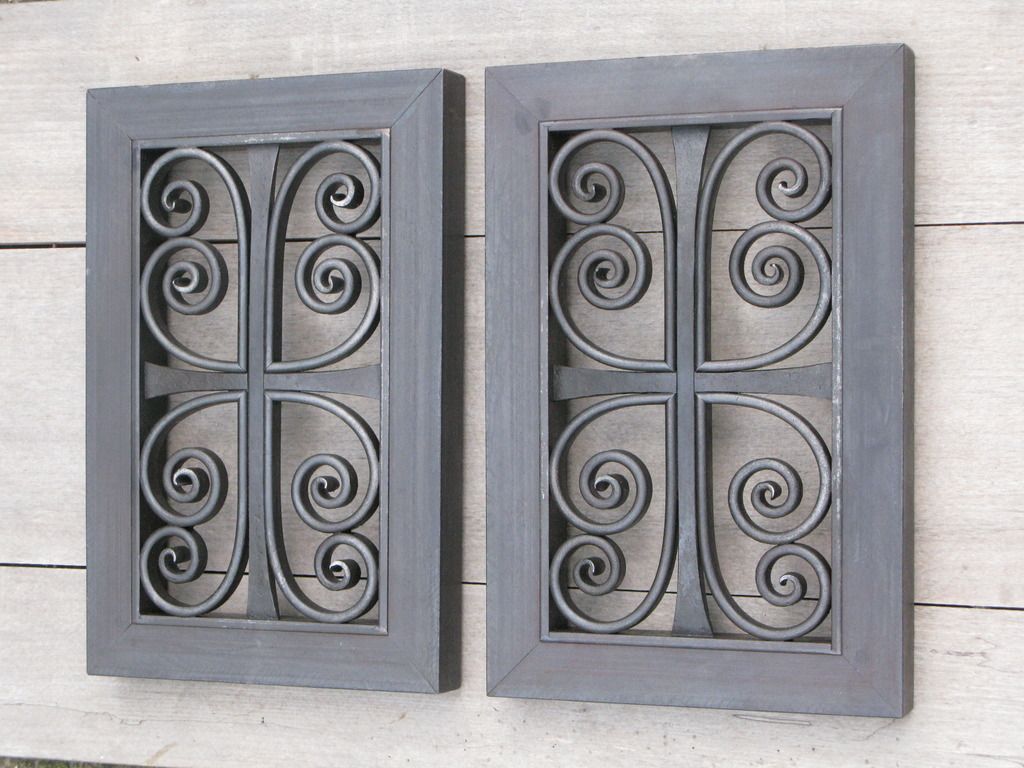
hello
here are two grilles made for a fireplace, to decorate two venting openings
-
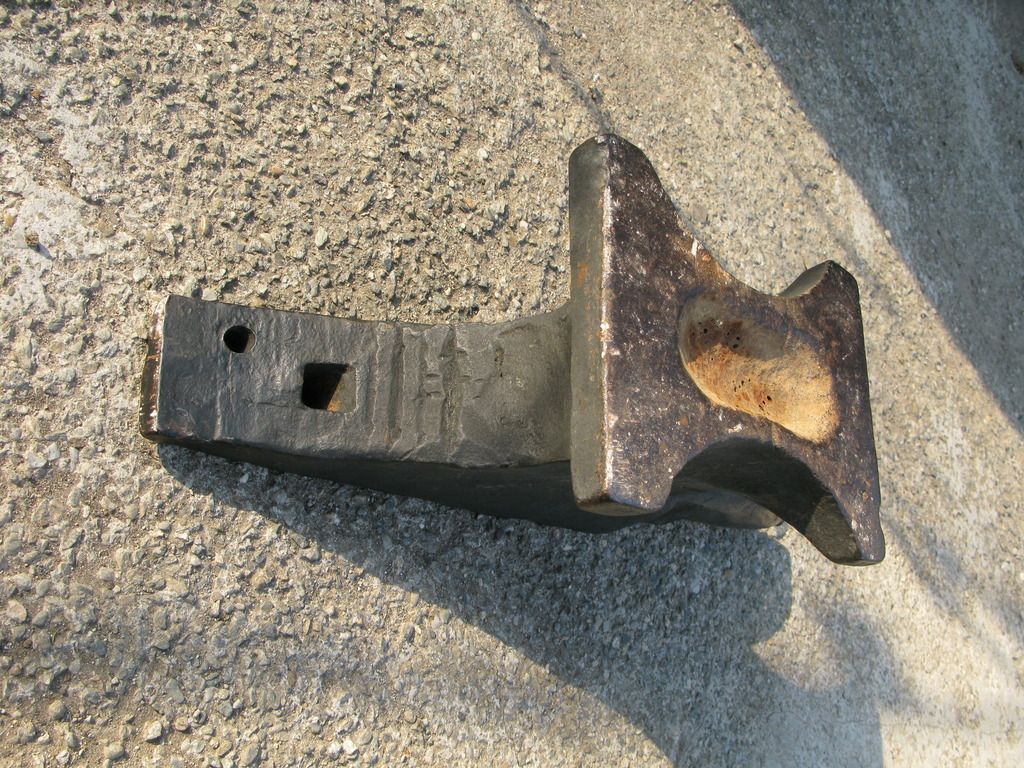
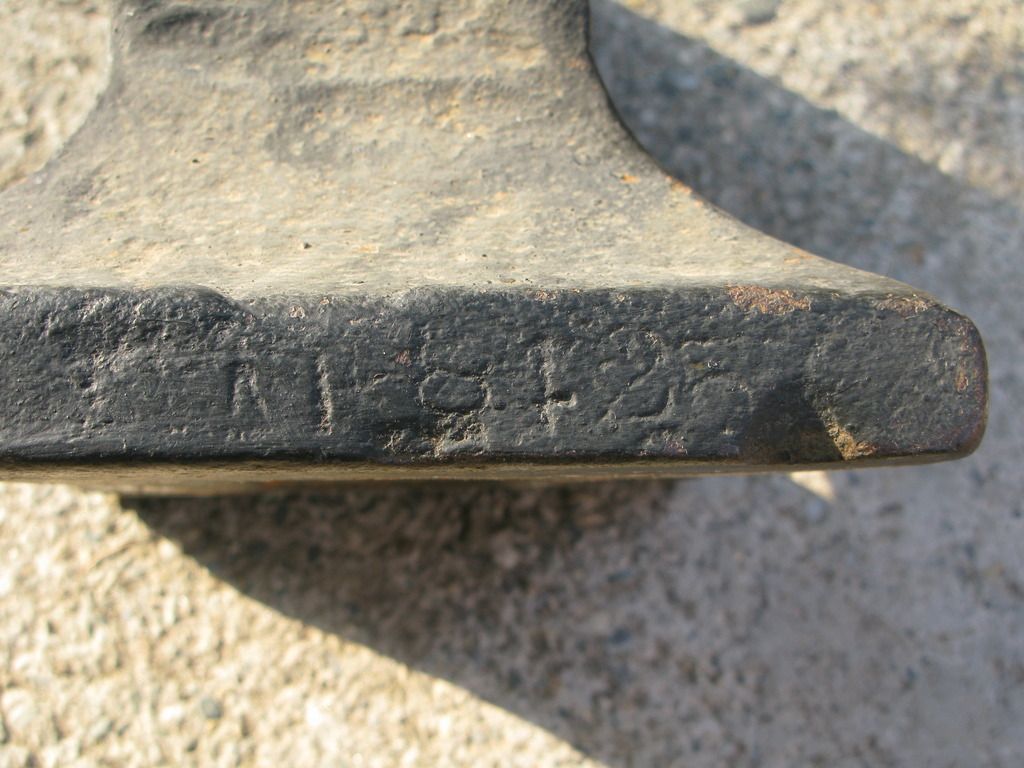
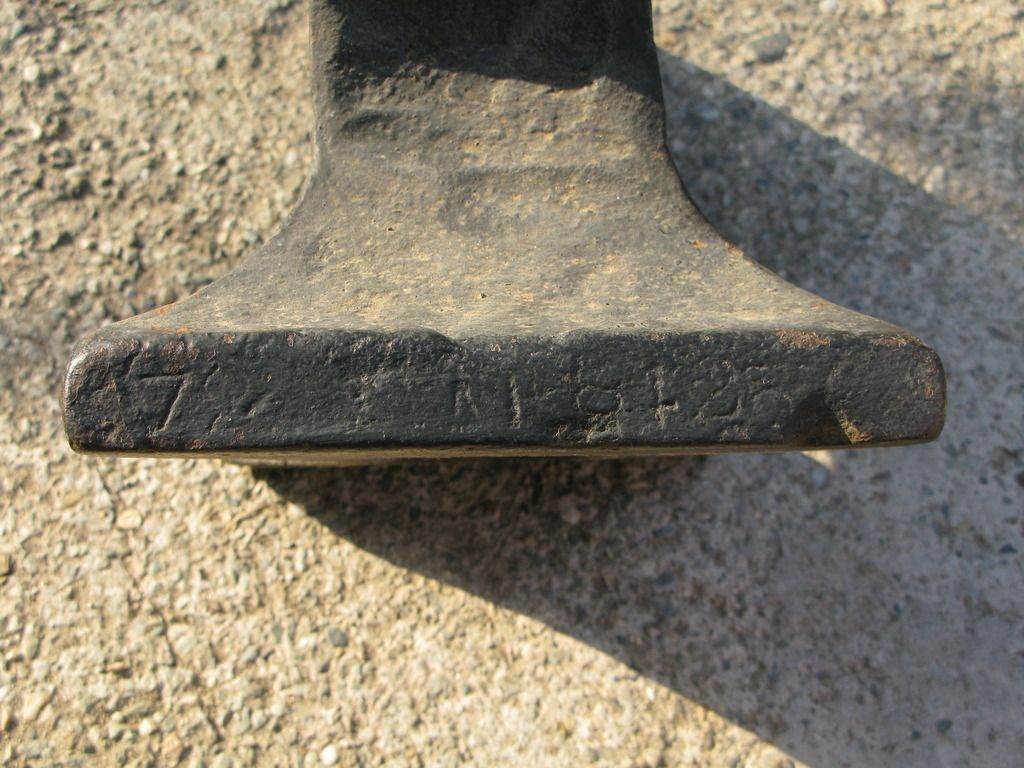
Thanks. I think that there is another digit which is "under" the dent on the feet, maybe a 7? or a 3?
-
what is the "caplet"? how many digits have to have? I seem to read something like A 18425? or that's not an A?
-
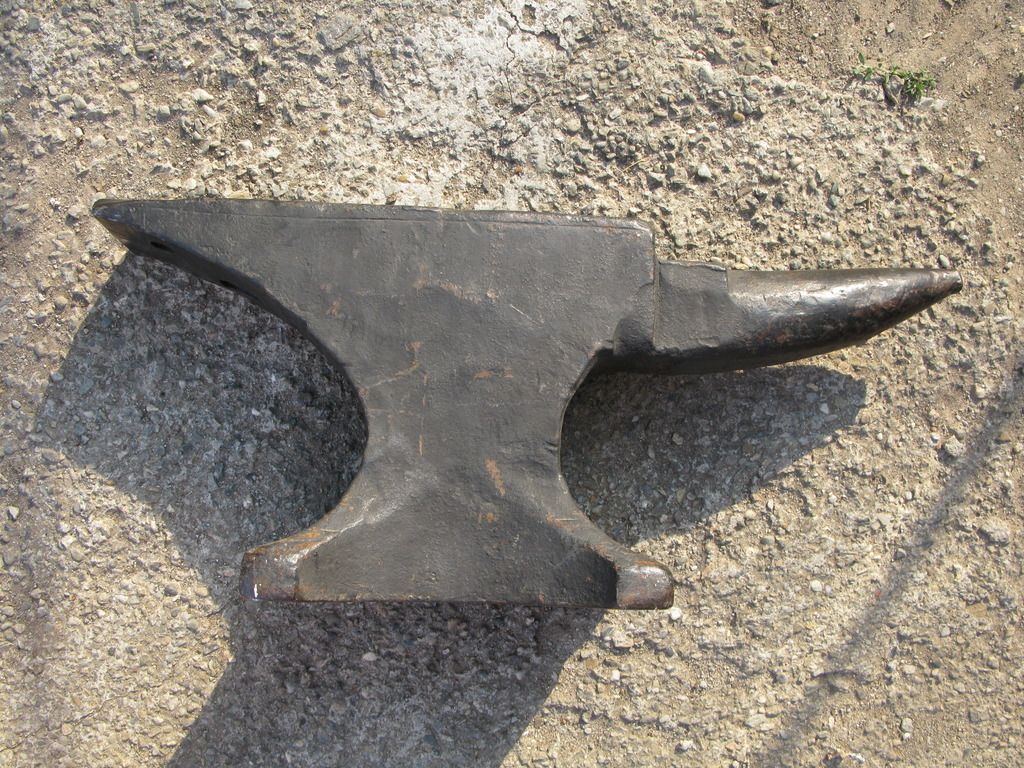
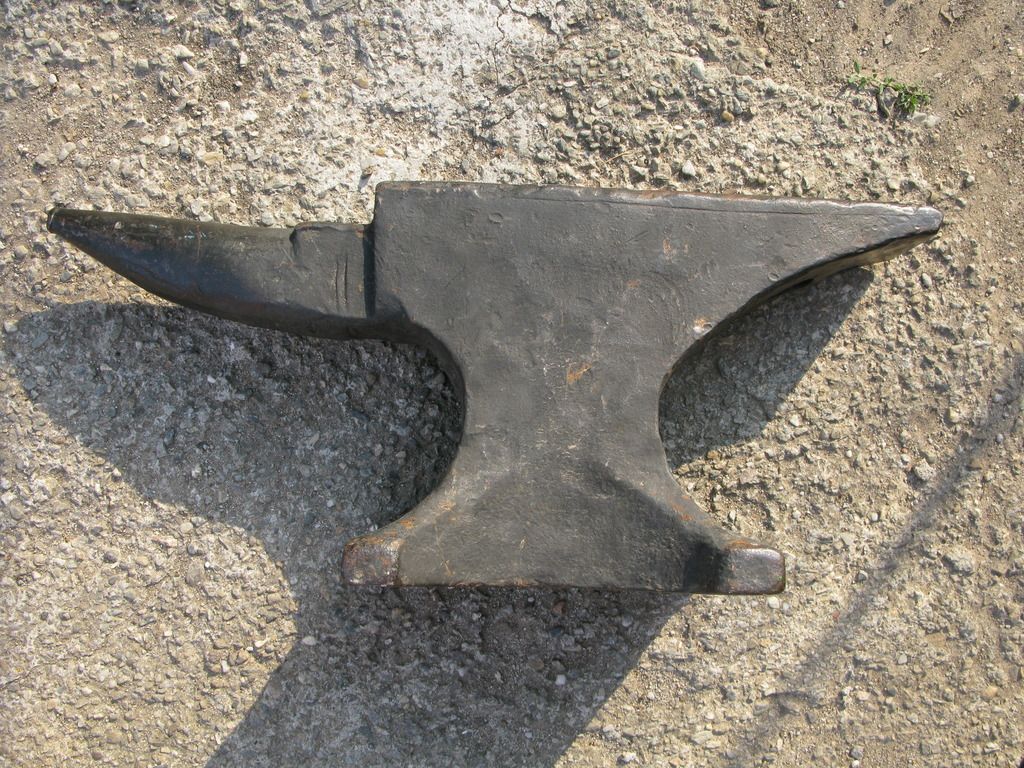
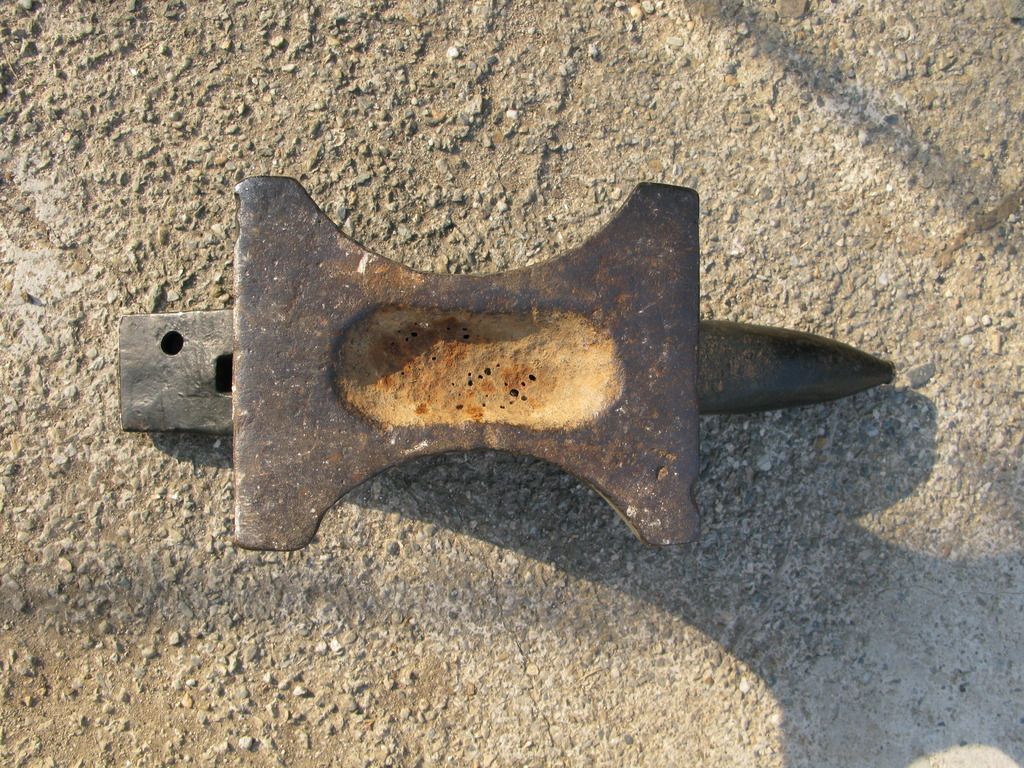
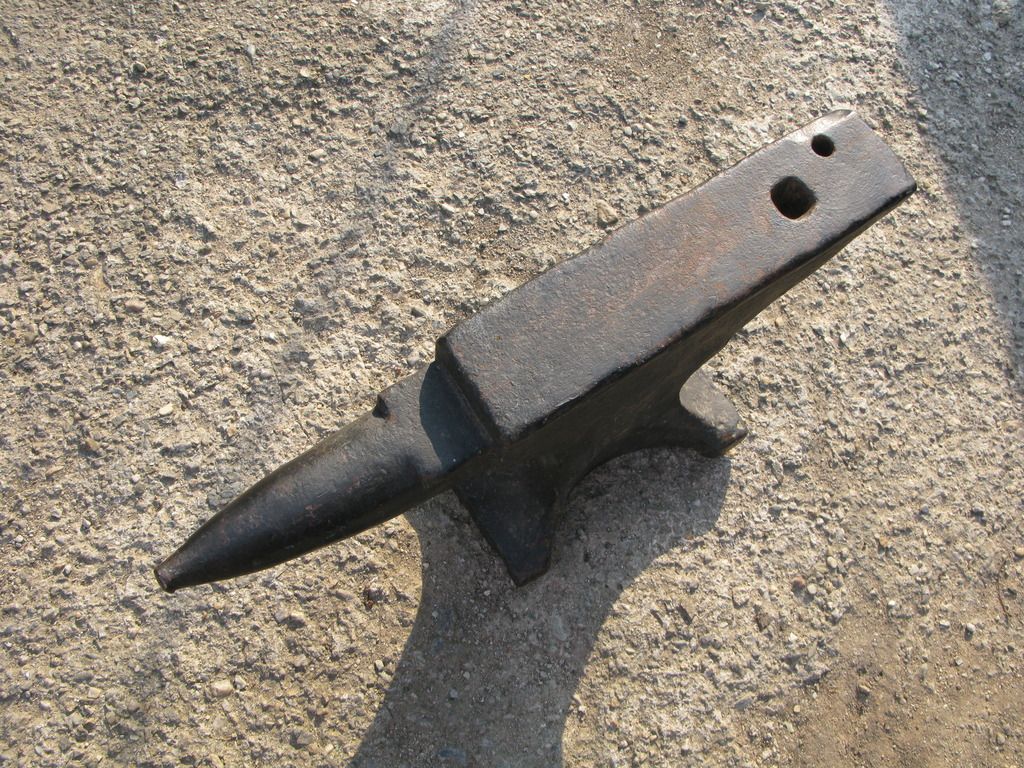
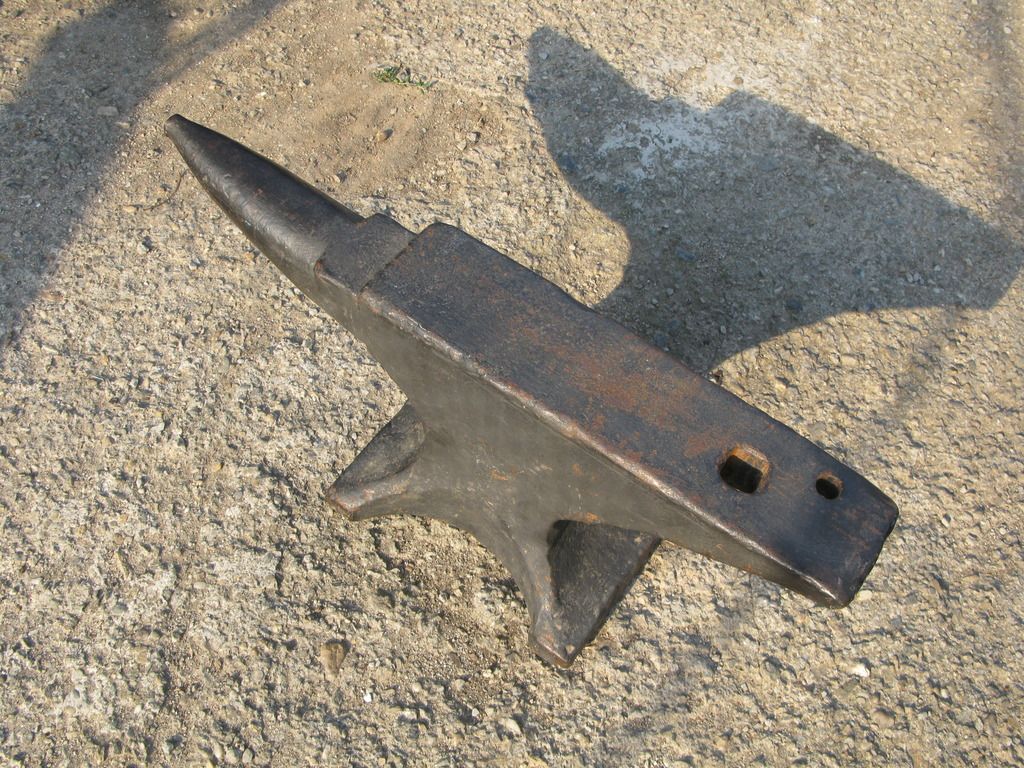
I got this from the flea-market this sunday. It was for sale from more than an year, but it seems that it had my name written on it, at the beginning I didn't consider buying it, too small, not in excellent condition, the price too high to my taste. but recently I done some work for a client, and, as payment I asked him to buy this anvil. so, now I have a foot rest under my computer desk until I'll make it a stand.
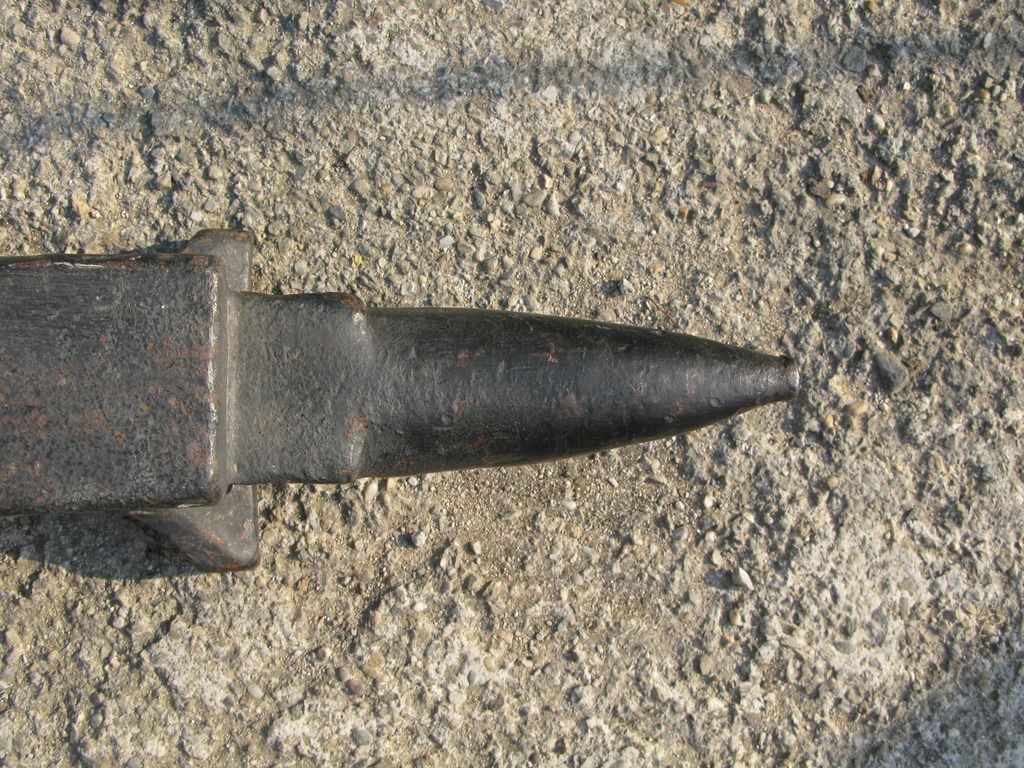
the only problem is that I don't know who manufactured this, any ideas? it seems to have cast feet, forged body and a faceplate, if that line just under the face, on the side is a welding line. the face seem as hard as glass.
-
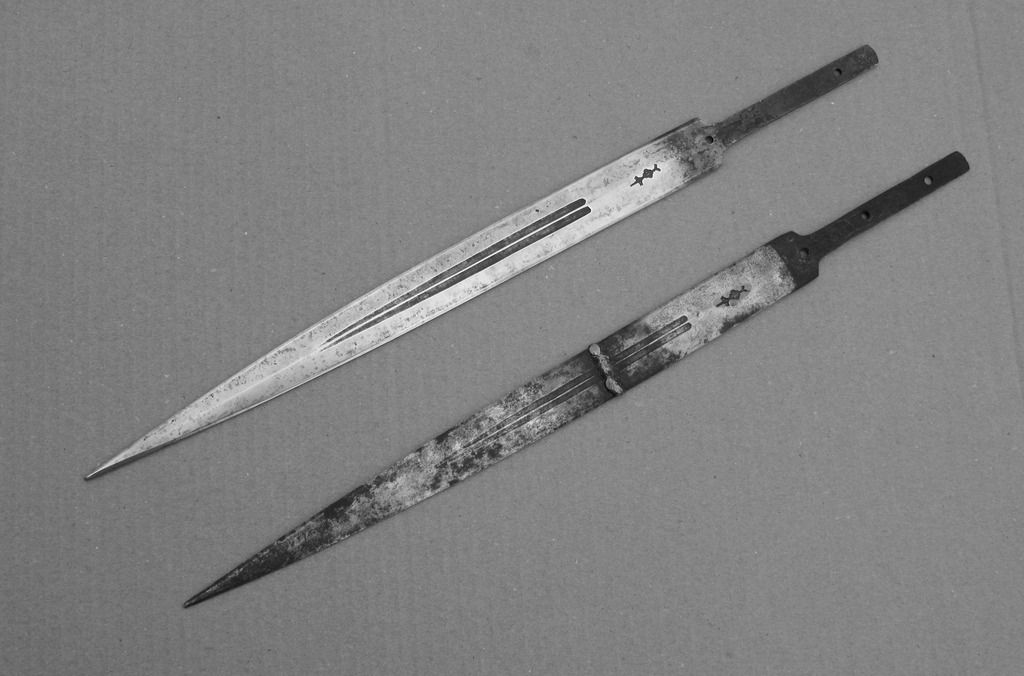
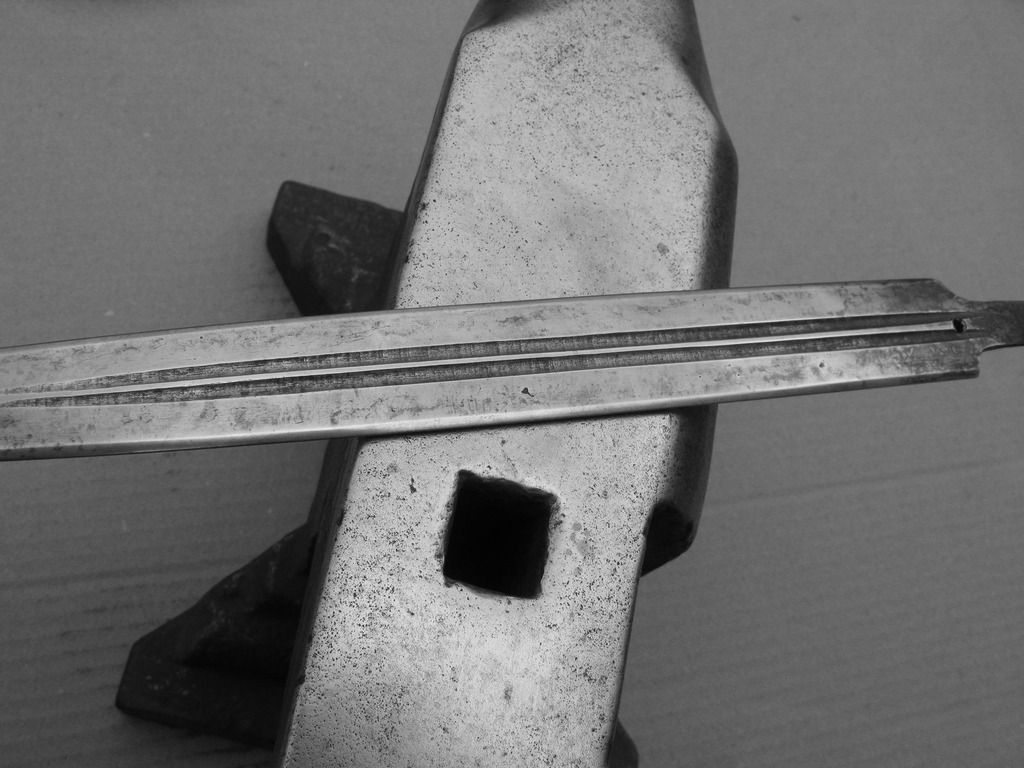
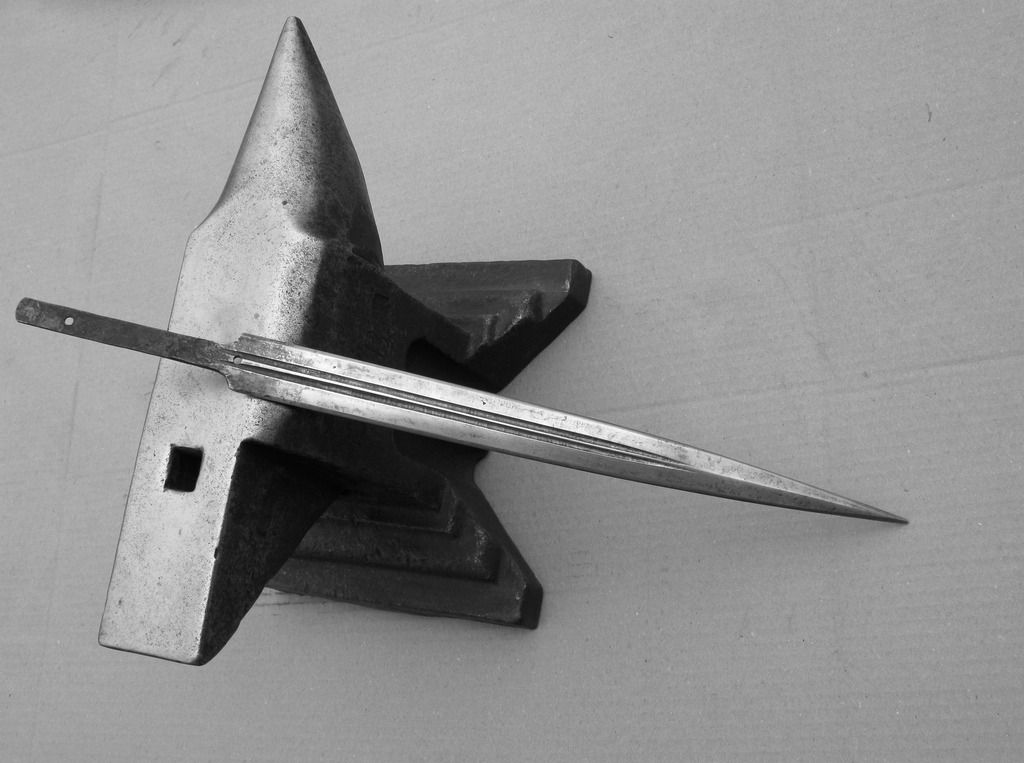
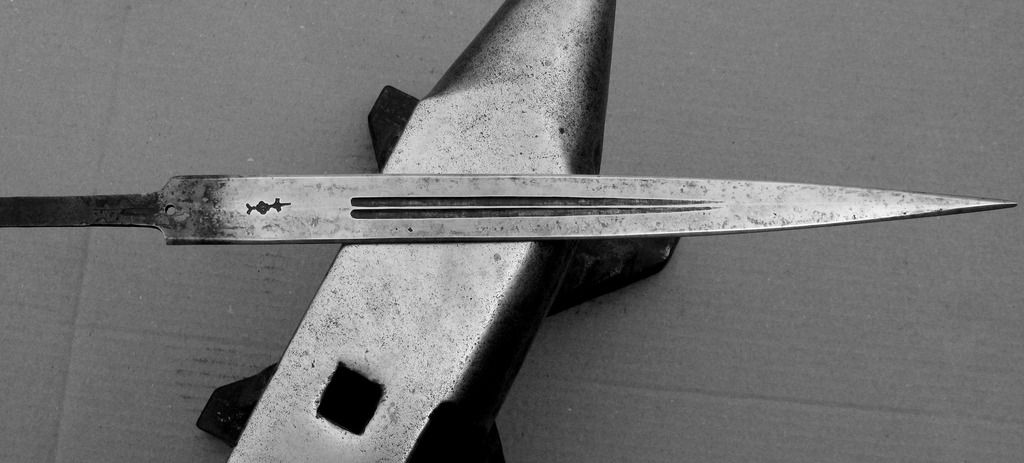
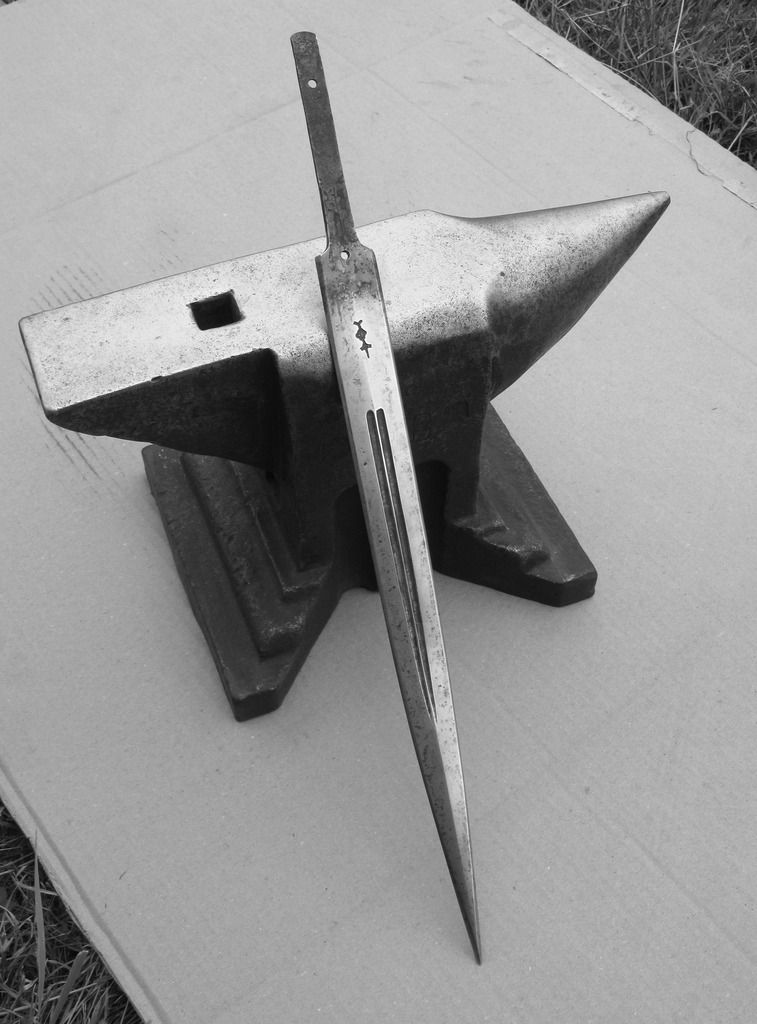
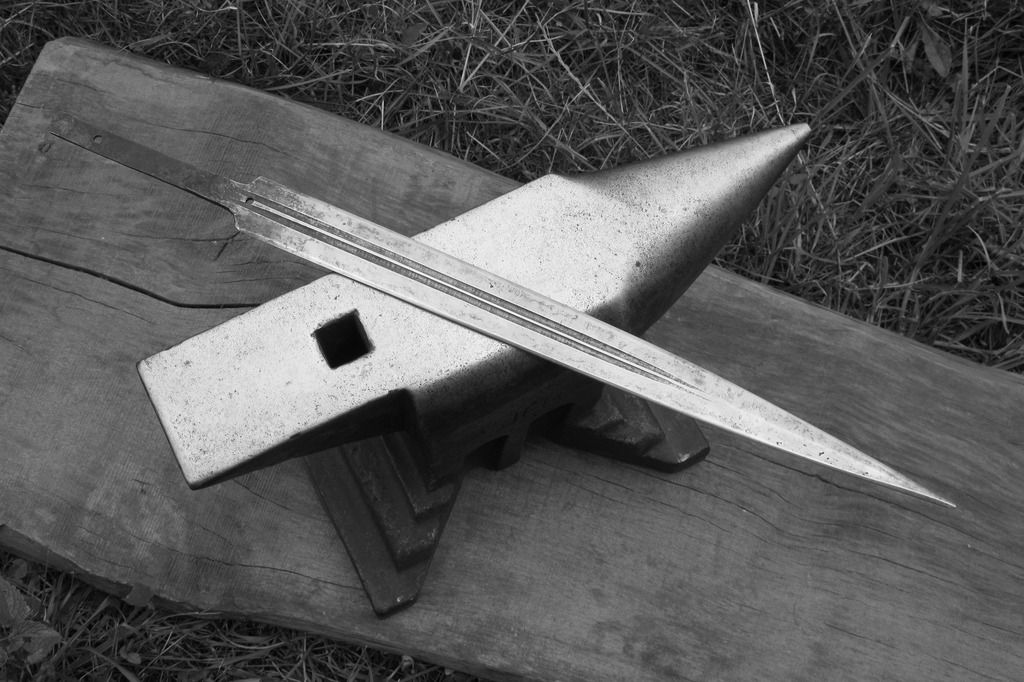
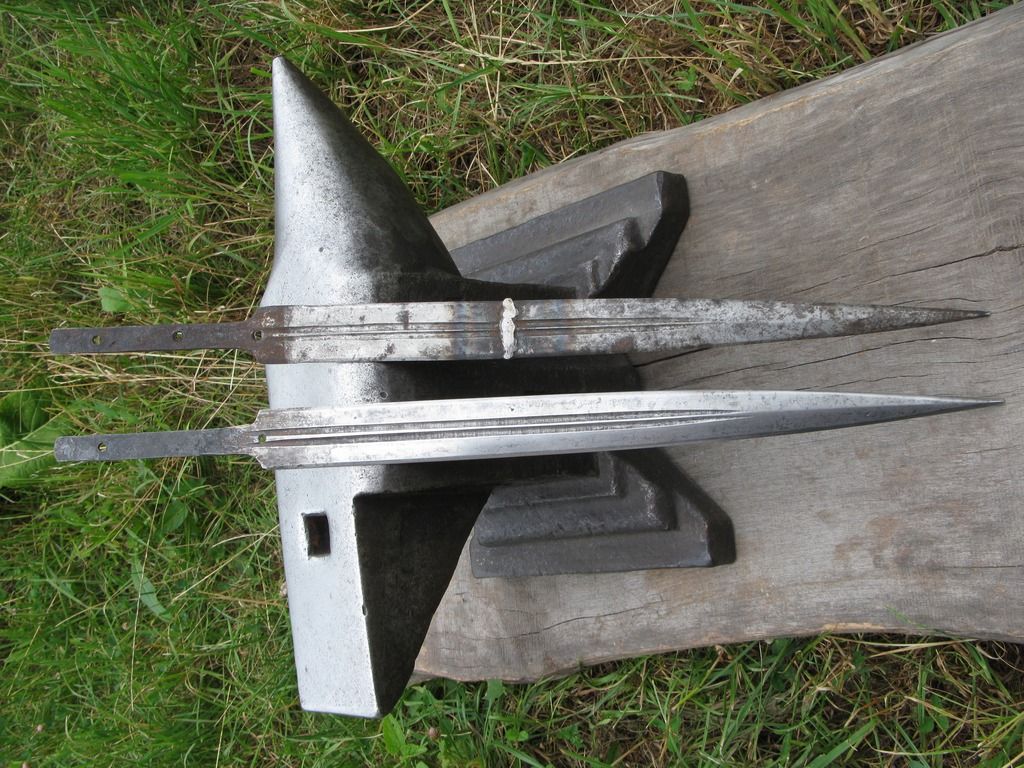
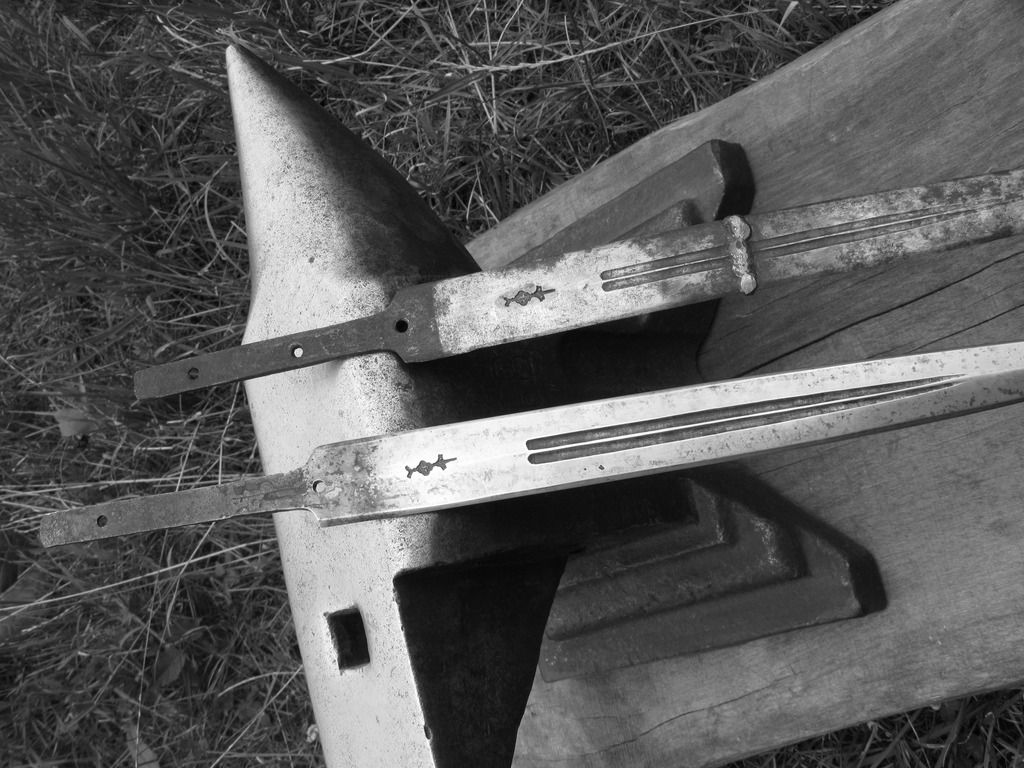
hello, I hope that I'm in the right place to post this, because it's not quiet a sword, but it's more than a knife. a friend of mine asked me to make a replacement blade for a kindjal, the original has a repair attempt which make it worthless, as you can see in the pics. so I have to make something that look plausible. the kindjal has very nice hilt and scabbard, made of silver/niello with some gold accents. as blade material I started with an old file, which had a similar shape to the blade, but significantly shorter and with a "D" cross-section. I forged it and I obtained the exact shape of the blade, just the right thickness that after removing the forge oxidation, to have nothing more to grind. that was a big luck to find that old file
there was a little challenge - to find the methods and the tools to reproduce the maker's mark and the grooves. for the mark I took a piece of coil spring steel, widened and upset the end to match the mark's size. then I took that end to yellow heat and "pressed" it on the mark, so to "copy" it to later "paste" on the new blade. all went all right, just the "pasted" mark on the new blade came out a bit tilt, but it doesn't seem such a problem as I saw some other marks on kindjal blades not beeing perfectly aligned.
as for the grooves, after examining them, i realised that they aren't ground, but scraped with a draw scraper (if I'm using the terms well). I had to reproduce/mimic the same teture and irregularity as on the original. to make the tool I took a broken drill-bit of matching size to the grooves and weld it on the flat side of a piece of flat steel, perpendicular to the length. the cutting edge of the tool was made by cutting the drill's ungrooved side to an angle of, let say, 80 degrees. I hope you understand... It proved to be the right tool and method - the grooves get identical, with the same texture and irregularities as the original.
then, after finishing the blade I gave it just enough patina to seem a bit aged. as usual, I put a lot of pics because I'm not able to choose between them
-
that anvil it's smaller that you may imagine and that pitting it may be not so deep, the tangent light makes the pitting look deeper. if that anvil were MINE, I would just take an angle grinder with a flap disc, I would take that risk. the pitting is quiet deep just on the far edge
-
thank you guys!
@ Senstrom - the name is etched with ferric chloride. I heat the blade just enough to melt some beeswax on the surface (that's not enough hot to affect the hardness). after cooling I take a fine tip pencil and write on the blade. using a pencil avoids scratching the blade, and it slides better.
@ Stormcrow - it's a brass rotary brush. if the brush it's too hard it's easy to overdo it.
-
I managed to buy some stuff from France even if it's more than 2000km away. the shipping for an anvil may be 100euros by the trucks which come back home. in Romania there is not much to find in terms of blacksmithing tooling. most of the anvils are the austrian pattern, genuines or communist era copies. I'm a big fan of the french anvils, especially the double horned ones and I own 3 of them (another one, a "cube" anvil qaits for the opportunity to be shipped).
It's a good thing that I don't live in France. check this: http://www.leboncoin.fr/annonces/offres/ile_de_france/occasions/?f=a&th=1&q=enclume
-
the price of 30 nice French anvils... real ones. a couple of weeks ago I saw one of ~150kg for sale at 20 euros...
-
a very expensive anvil. it's a ACME anvil, don't you see?
-
glad you guys like it.
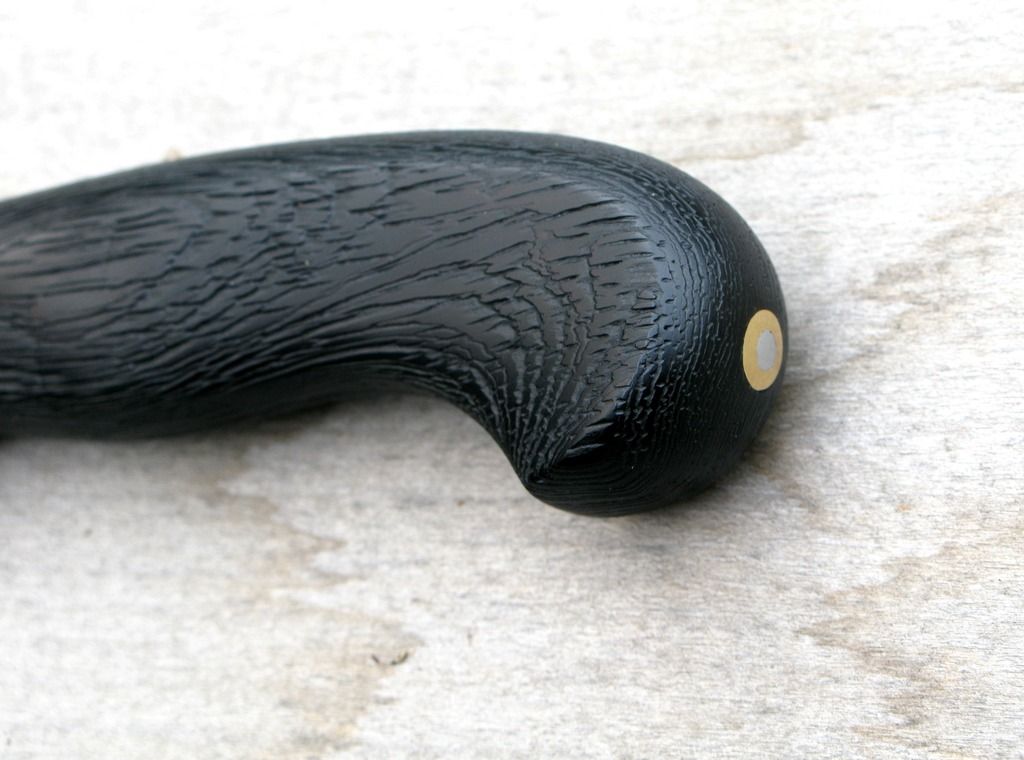
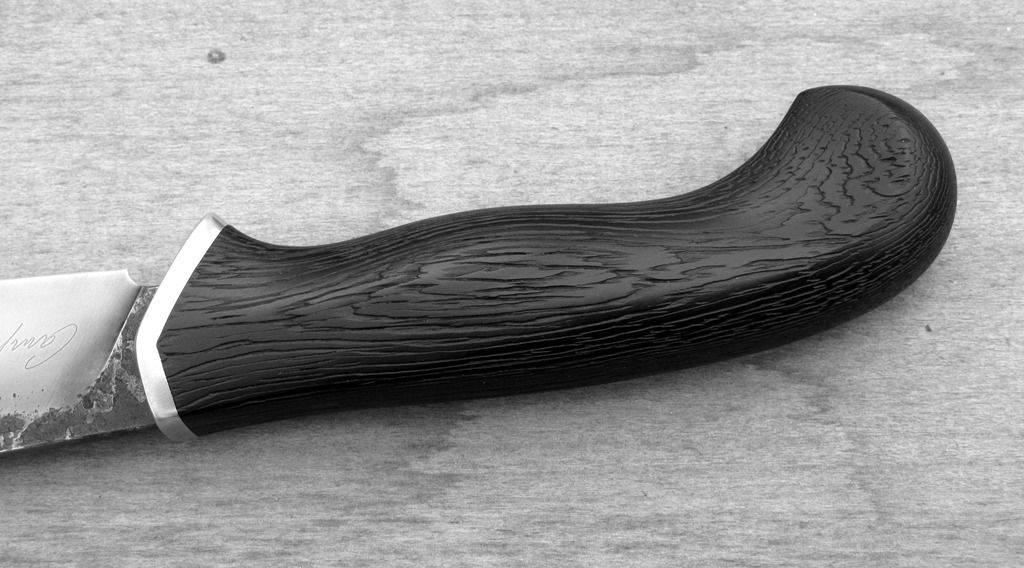
yes, Charles, you're right about that ricasso type on chefs, I always advice people against them just because of that reason, even that that knives are regarded as "superior". I treat that handles with some kind of oil based varnish which penetrates wood and harden. I apply it and heat the handle with a heat gun until the oil doesn't penetrate anymore, then let it dry. after it's dry, I apply another hand of that varnish and wipe the excess with a cloth.
Frosty - well, I already used that wood on many knives. the truth is that I like it too, it looks good and is very pleasant to the touch. also is a wood which is quiet stable.
-
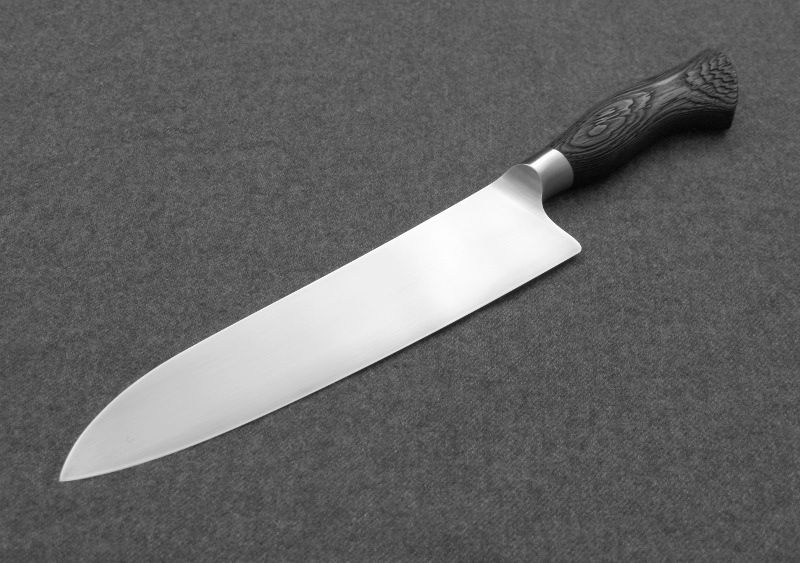
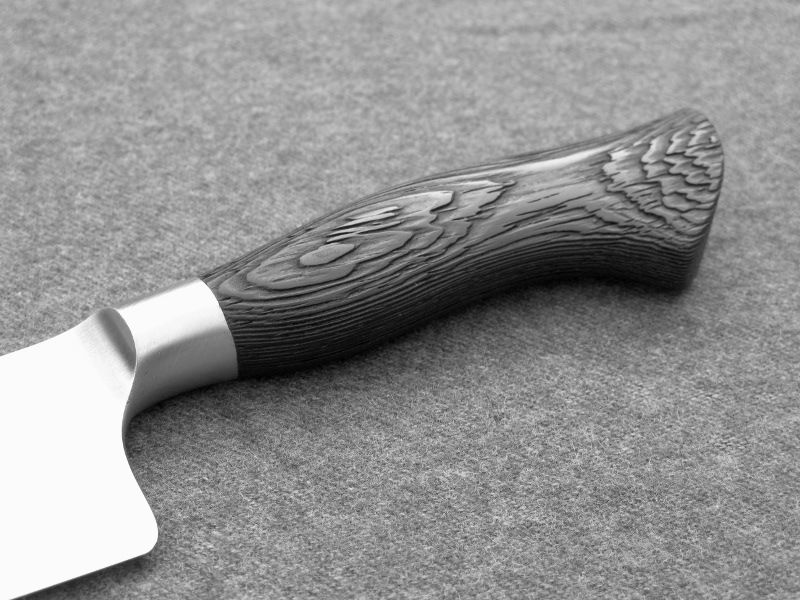
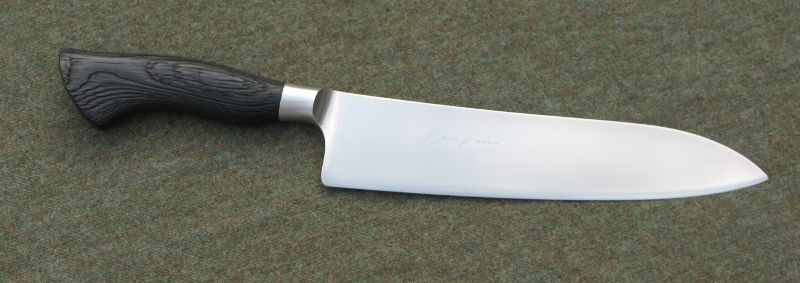
hello all
here is a chef knife forged from 115CrV3, "german silver-steel", a very fine steel for very fine blades. it has a blade of ~ 20cm long (8inch) and ~ 5cm (2inch) wide.
the handle is the "classical" for me already brushed wenge (because the people wants it, and who I am to be against it?)


-
Lovely little utility knife, forged from pretty unforgiving steel. Like everything about this one, proportions, construction, fit and finish, handle design, forged finish... Only thing wrong here is I didn't make it myself
that's why I no longer look at the other's knives too often - many times I think "I would
make it like this!", which is frustrating.
-
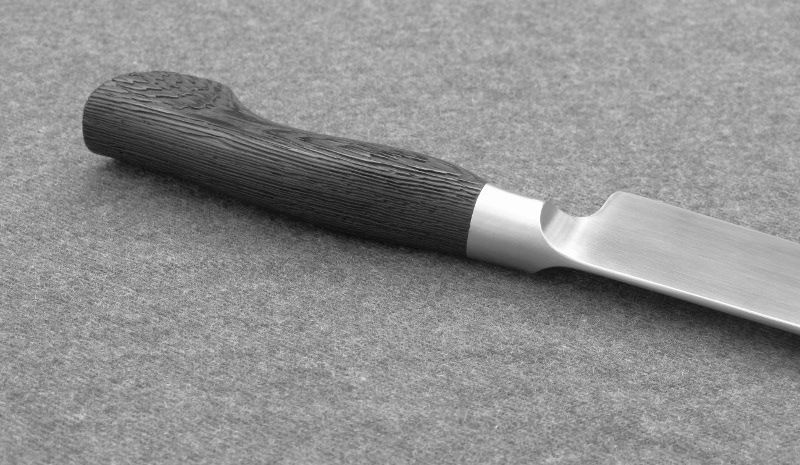
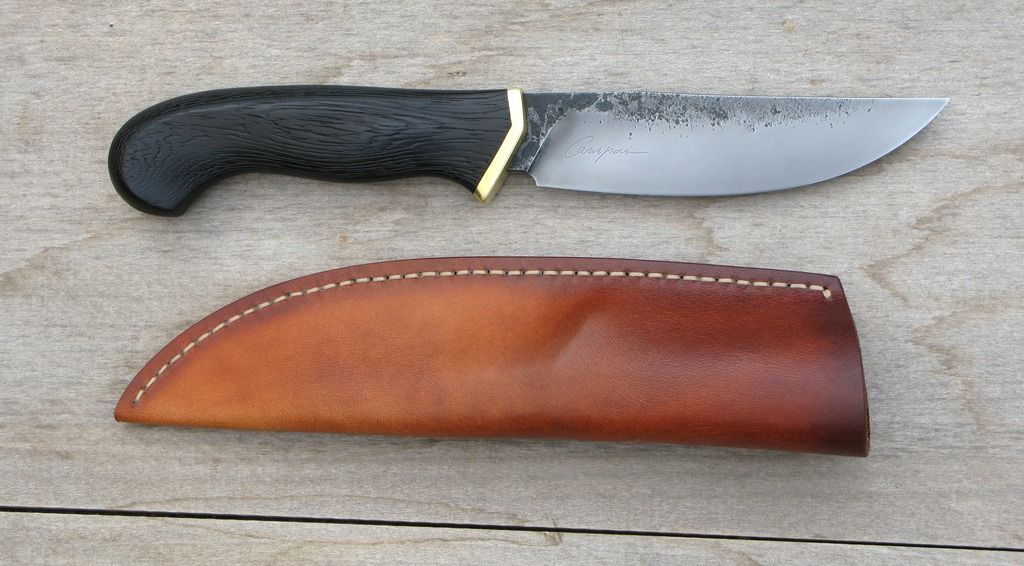
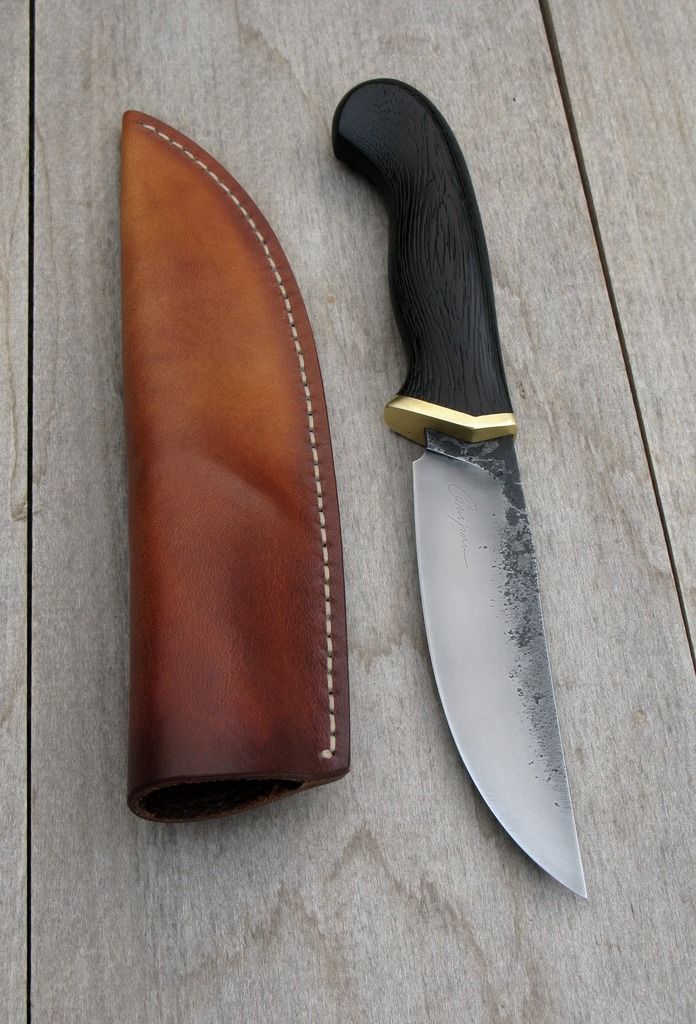
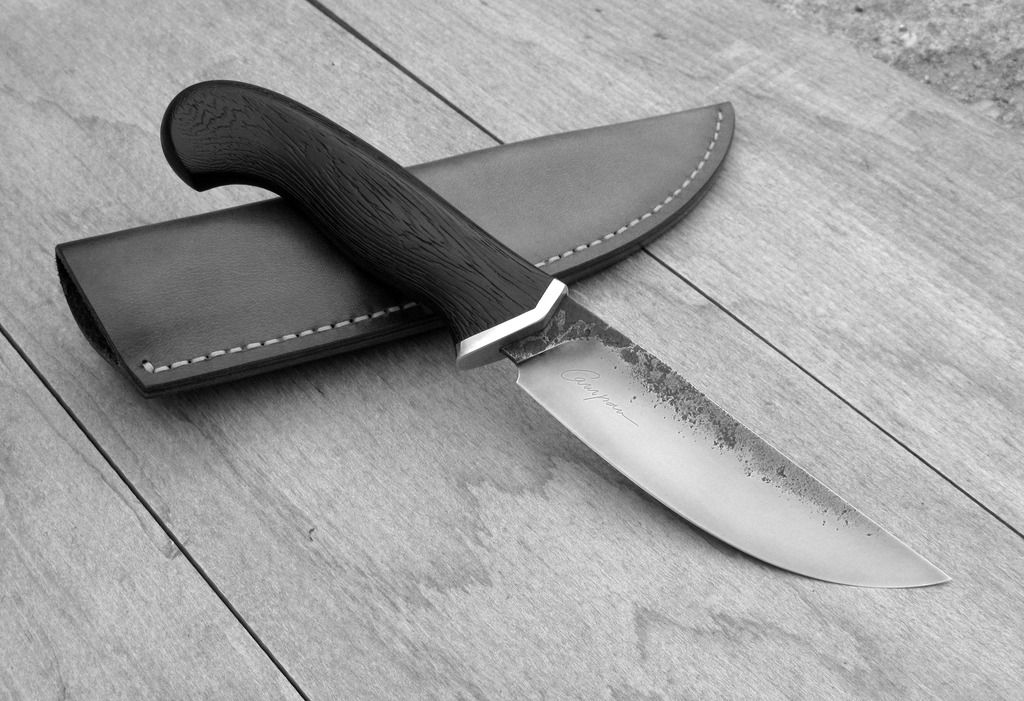
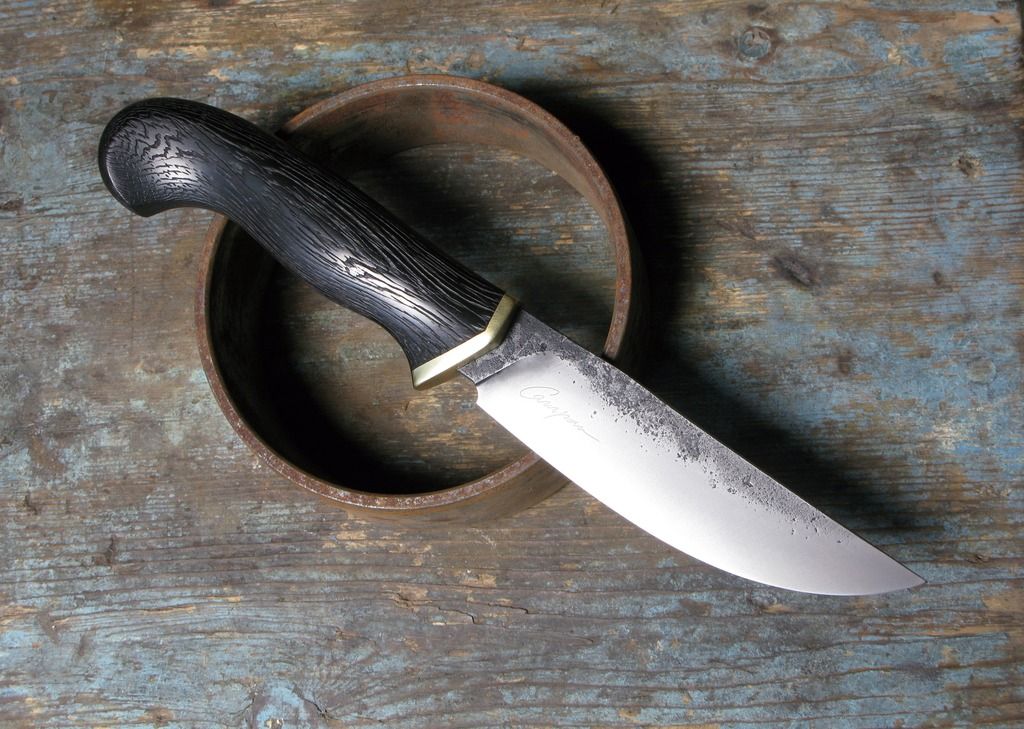
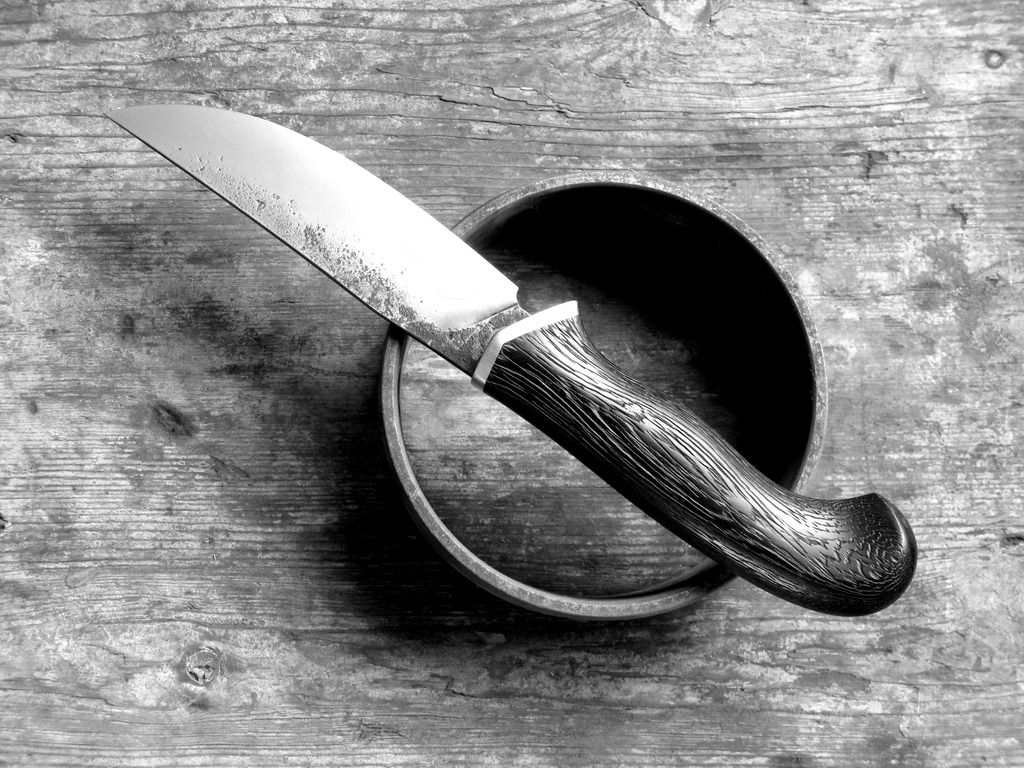
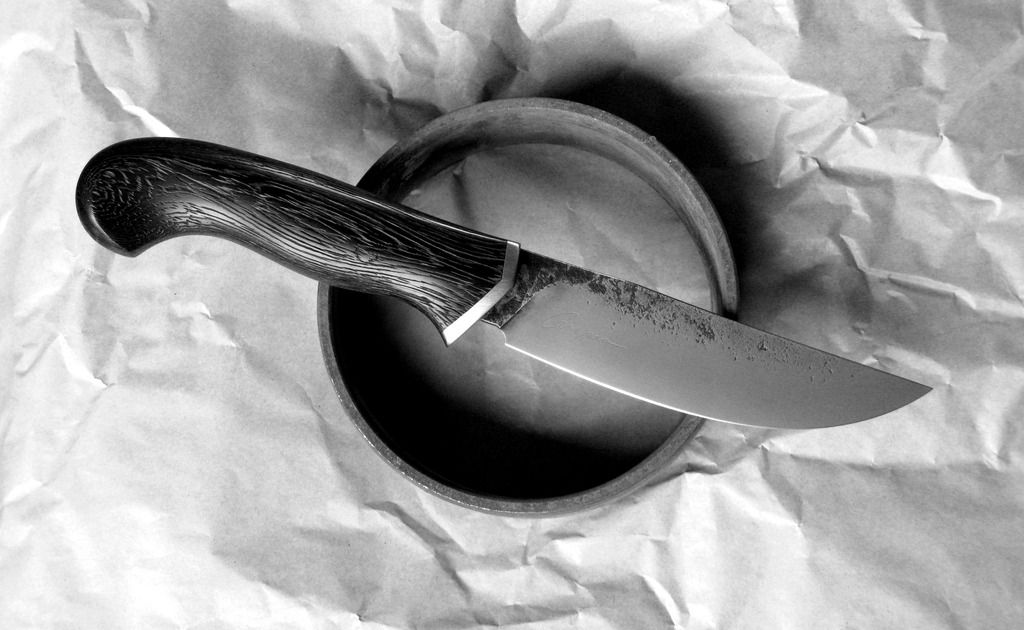
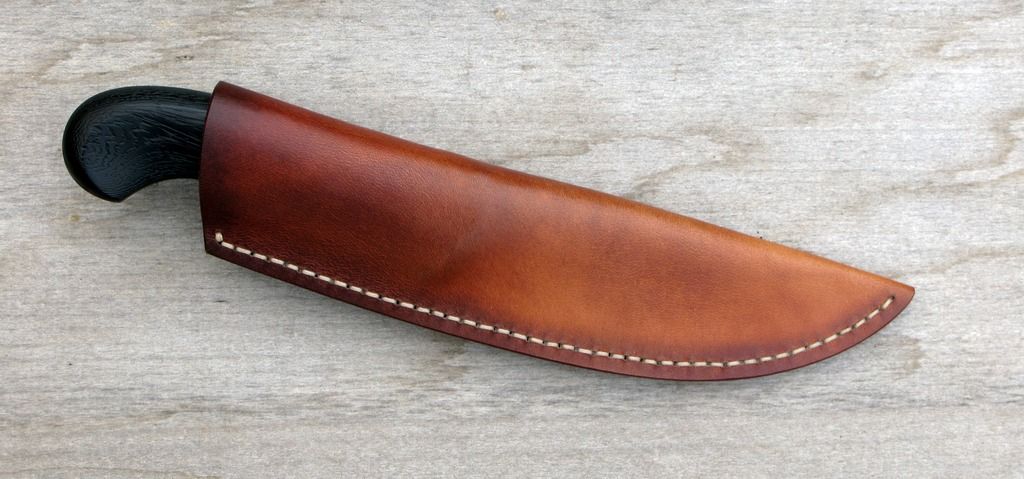
hello friends, here is a knife, well, just a knife - I don't have any inspiration to give a title to the topic on it.
the blade is forged from 52100 steel, it's a full flat grind (very, very slightly convex), the length is 13,5 cm, max width 3,2cm, max thickness 4mm. overall it has 27cm. the handle is from brushed wenge with a brass bolster
-
just oil or wax it, it will look gorgeous!
-
what I do when I want maximum width from round stock I do that: first just hammer a bit the round stock to have some small flatness upside on and under the bar, just enough to "stabilise" it. then, I take a quiet "sharp" (~10mm diameter) cross pein and hammer it with it parallel to the length (obvious), alternating the faces. when the bar achieves some width comes some closer to the desired thickness, I take a less aggressive cross pein (~30mm dia) which helps removing the marks of the previous hammer and widens the material more. just when I'm close to the final thickness I take a flat hammer and finish the surface.
-
Nepal is some thousandths years away in technology compared to this: https://www.youtube.com/watch?v=PKoSUSlvQLo. but that guys still manage to get their work done
-
nice anvil, Ivan! I would use that bolt holes, just think that Fishers have 2 of them and nobody is afraid to use them. and you have 4. maybe you can use some thick leather washers under the steel washers if you would use bolts. like that you will not have steel on steel contact. but that's something I would do and that's your anvil...
that "circled" part of the anvil shouldn't be polished, it's not part of the face. maybe has a reinforcement use, to make the edge less likely to break, or it's there just by "tradition", because the older has that feature too. note that the anvil has the horn to the left, as many Austrian pattern anvils.


My rough freebie
in Anvils, Swage Blocks, and Mandrels
Posted · Edited by matei campan
and how far from the forge is the anvil ...and in spite of that, how long a heat lasts...
that anvil tapping will come naturally, do not force yourself to do it. I was asking myself what's about that tapping when I started blacksmithing, and, even without thinking, it arrived to me, it didn't come consciously, when I became aware of it, it was there already.