

FoxFire
-
Posts
80 -
Joined
-
Last visited
Content Type
Profiles
Forums
Articles
Gallery
Downloads
Events
Posts posted by FoxFire
-
-
I also think it looks to be steel but have you tried cutting/bending 90* from the cut in the pic? I've had a piece or two that were refined enough that it was hard to tell until I was cutting/bending through the layers.
-
When curious about a forge weld I sometimes quench or hammer on them below normal forging temps. Basically all the things you're not supposed to do. From the point that I've "decided" that it is a good weld (and I'm ready to move on) I generally treat the weld as I would any other piece of steel/iron.
-
Yup, there were cheaper ones but I got to reading the reviews and went with the ones that read the best. Can't wait to get the rest swapped out. The difference reminds me of when we got our HD tv.
-
Sorry about not following up on this, my computer died and it took a little while for me to get a new one...
The hammer did come from Petersvalley.
The lower die is roughly a full inch shorter than the top. The face of the lower fuller was much broader than the upper. What I ended up doing was to just shim everything up and reworked the dies to get them better matched. Still getting used to it's quarks but it works well.
-
i just swapped out half the florescent tubes in my shop for 40w soft white LEDs and I'm pretty happy. I'll do the rest as money permits, but it does help to justify the cost of LEDs when you see them side by side with the florescent tubes. I paid roughly $128 for 12 tubes shipped and I think that's pretty fair considering how much I hate changing out ballasts which seem to go as often as the tubes. I have tried a few different color temperatures and i have trouble seeing markings on shinny metal with anything above soft/warm white. I got an email from the seller the day after I bought the bulbs saying that they have had more than a few customers return the soft white bulbs because they were too yellow and that they would happily work with me if I had an issue. I thought that that was decent of them considering how subjective color is. Luckily for me I'm not one of those customers.
-
So they used gas to light it and then switched to pressurized air once lit? Huh, seems a bit goofy to me but they must've had a good reasons...those farrier guys and gals are all about speed.
-
Just a quick thought, if your neighbors are close enough to see in your garage and possibly be bothered by the noise you might want to think about a gas forge. While we all love the smoke they may not...
-
Post a pic of your hammers face if you can. Sharp corners and heavily rounded faces will show more than nicely eased corners and gently rounded faces. It also could be that you're not striking your work squarely. If your getting mostly crescent shaped marks then that is the part of you're making contact with first so you should try to adjust your grip or roll your hand/wrist (whichever is more comfortable) away.
-
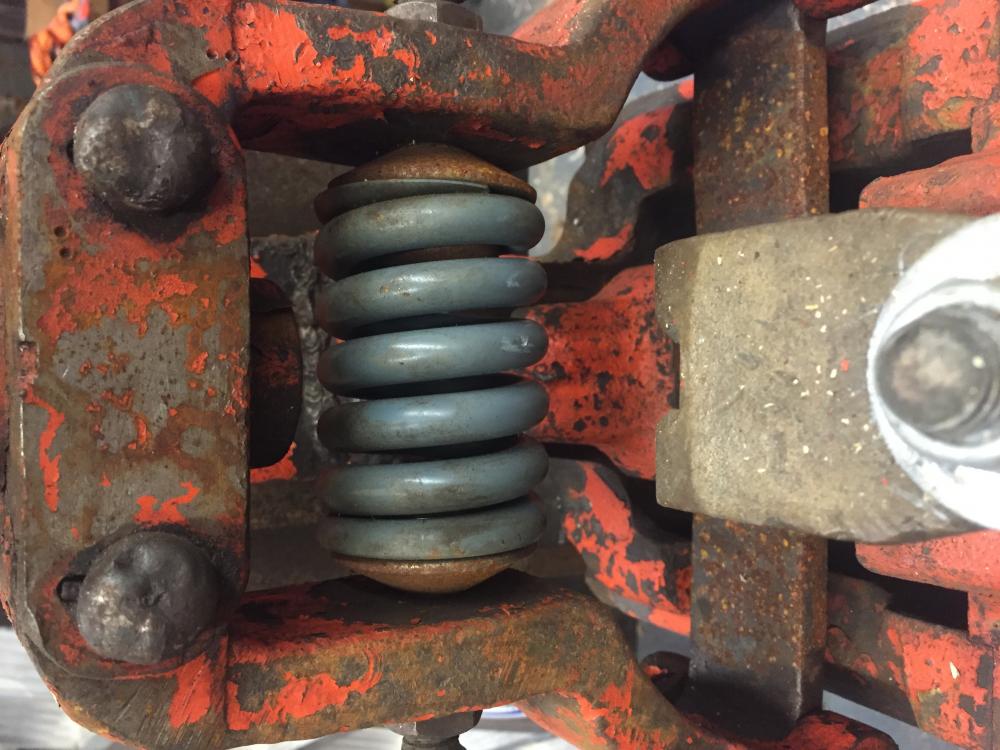
I went out to the shop after posting my post and it dawned on me that the spring controls the throw of the ram as much as anything else. The hammer didn't come with a spring so I got one for a 25lb. Little Giant. With the spring cup backed out basically all the way I've got a solid 1/8" between the coils which is the minimum I've seen called for.
In my "new to power hammers" mind that tells me that at best I'll get 5/8" (6coils, 5gaps x 1/8") of throw from the spring assuming the spring will compress 100%. Sound right?
-
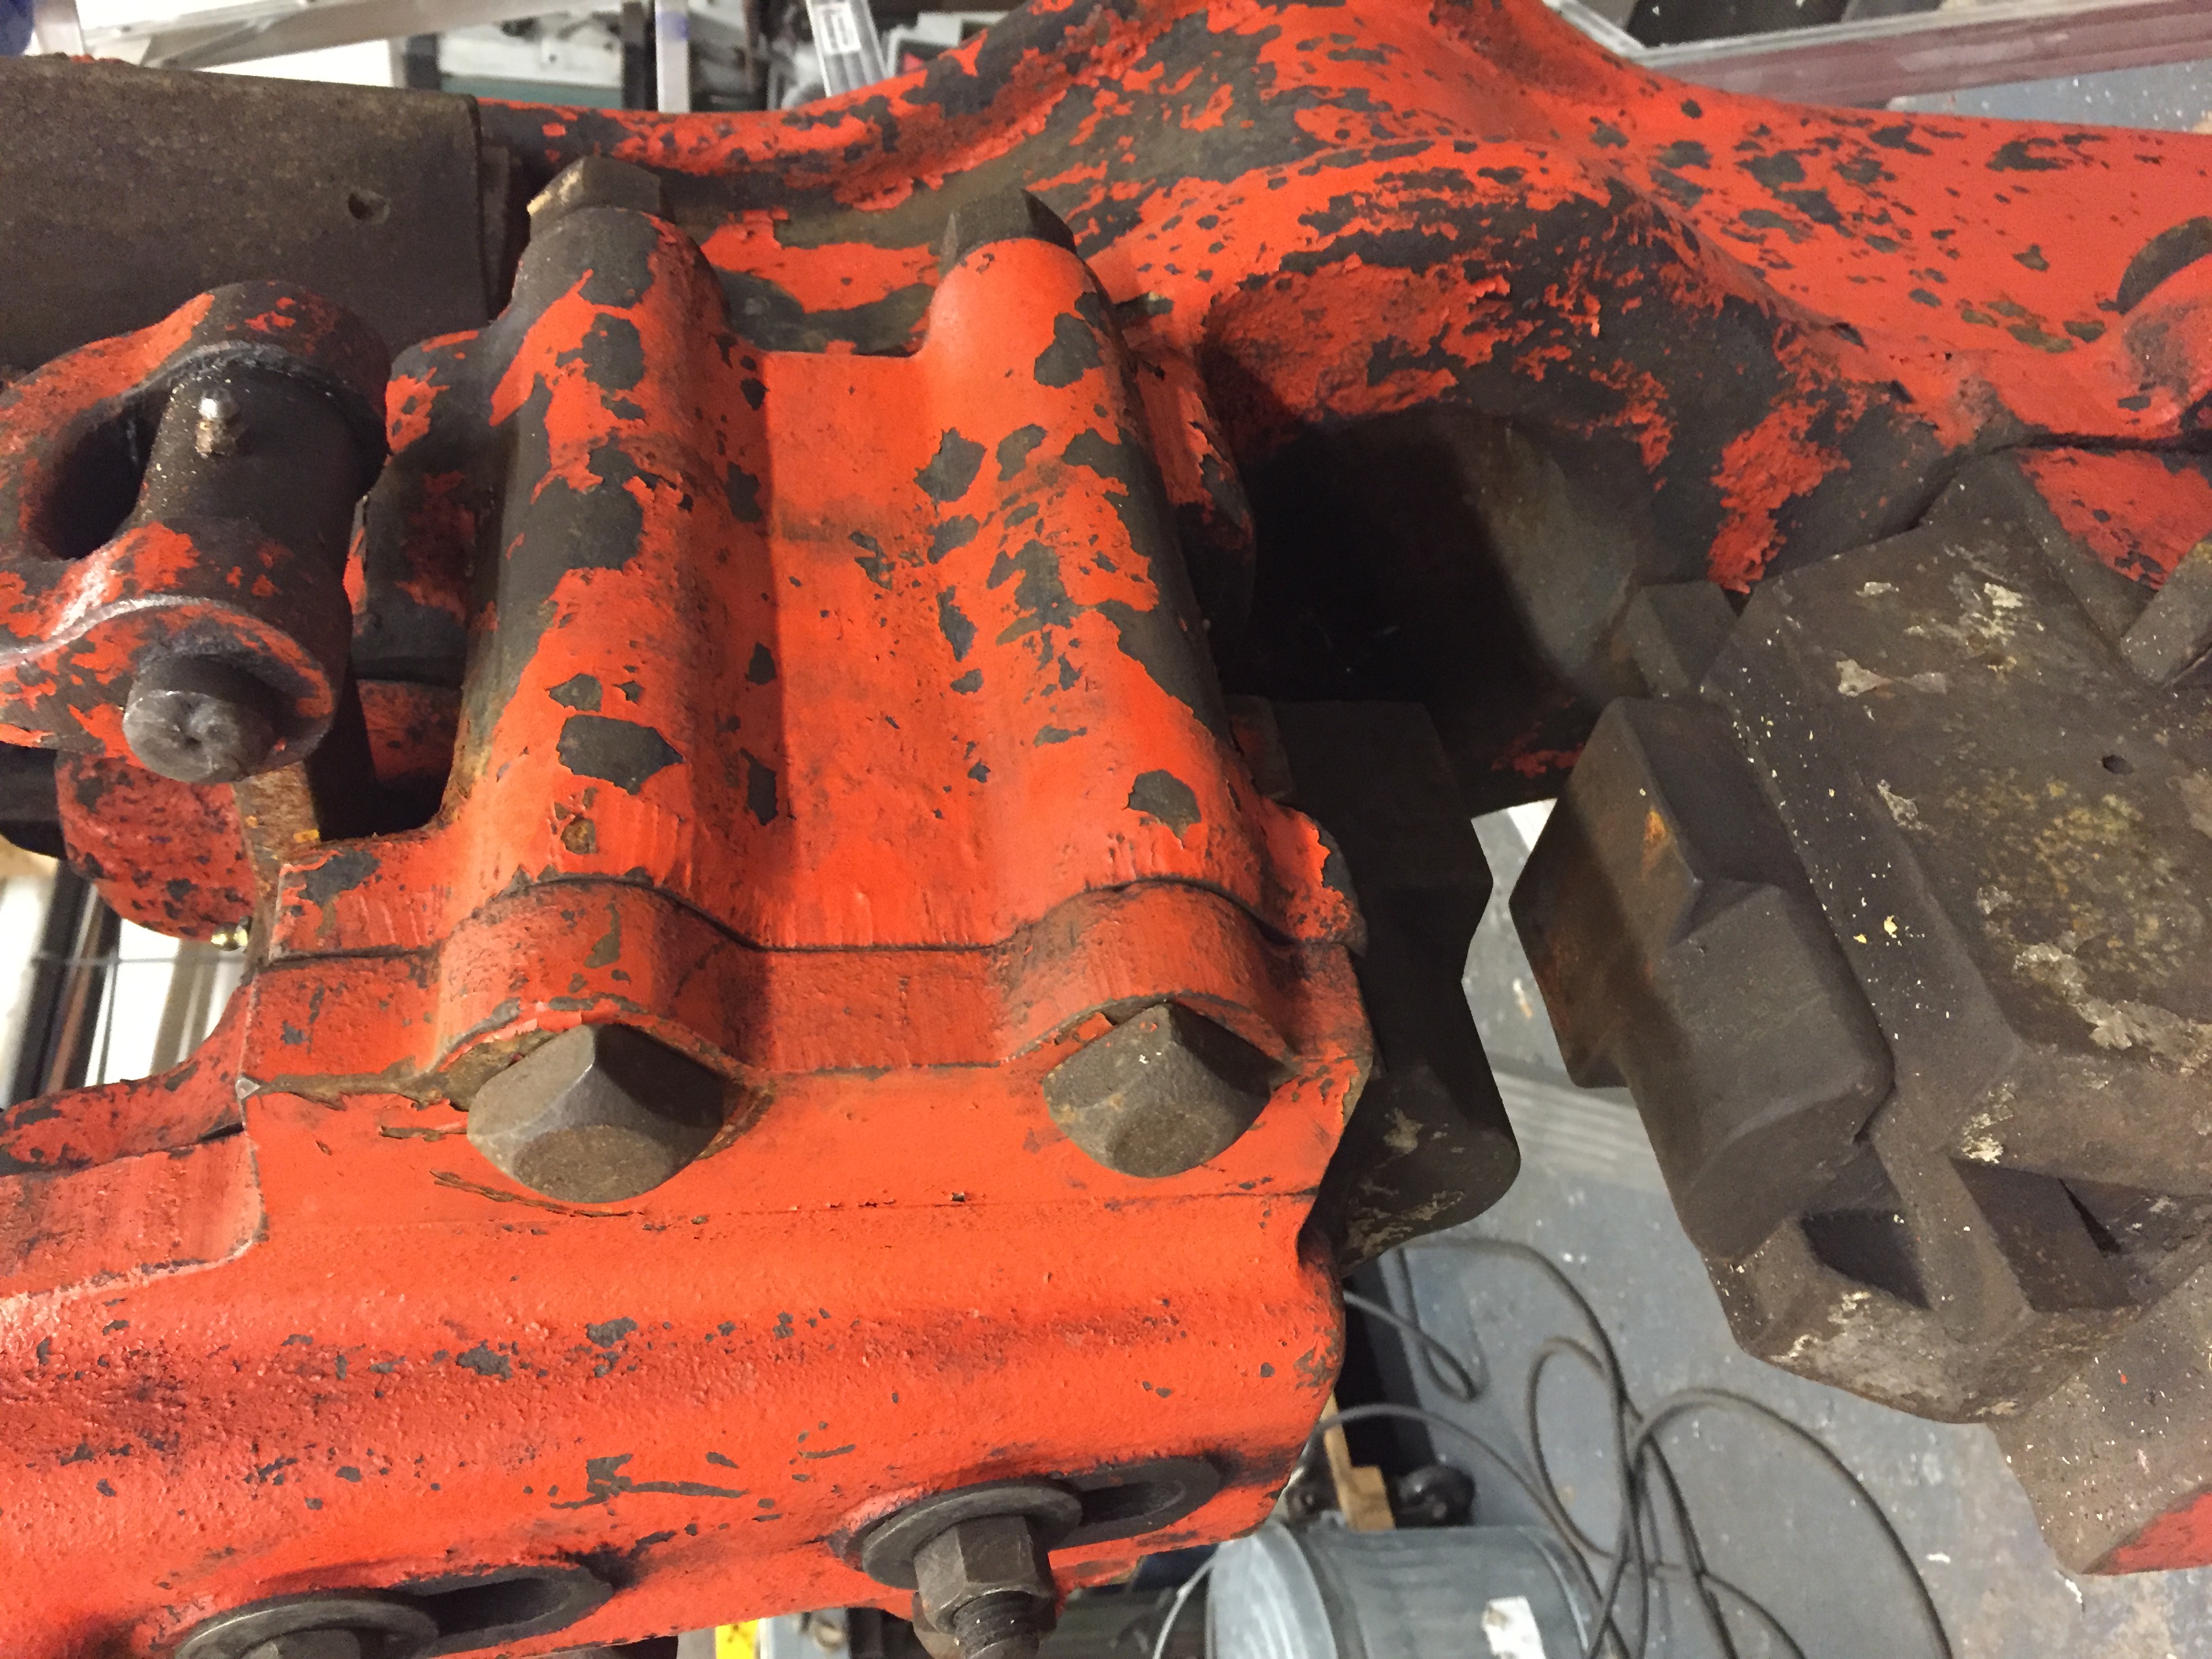
I'm Finally setting up my Fairbanks/United "0" or 25Lb hammer. I've noticed that my bottom die is much shorter than it should be and I suspect that the top die isn't what it once was either. I've never seen the hammer run and the guy I bought it from hadn't either so I don"t have any history/clues to offer. I only just started setting it up so I can't run it yet to rove os disprove any of my concerns.
As it sits, I'm pretty sure I'm gonna have a problem working small to medium stock. The bottom die is noticeably shorter than it once was and the suspect the top die is somewhat shorter also. With the ram in the down position I have 1" of air between the bottom of the toggle links and the ram guides and 2" of air between the dies. I just guessing but it sure doesn't seem like I'm gonna get nearly 2" of throw from the spring without the toggle links hitting the ram guides. I can't afford to have new dies made and I'm not setup to make them myself so my plan is to shim up the bottom die and it's blocks. the die blocks are separate from the body so it should be fairly easy to do.
My question here for anyone familiar with Fairbanks (and or anyone else) is, what would be the ideal ratio of gap between the toggle links/ram guides and top/bottom dies? I hope to be able to work as full a range of stock as is possible on this hammer...obviously I can just keep adding shims till it's working well...my hope is to get some measurements from some of you to start with and maybe not have to lift the the hammer anymore than is needed.
Thanks

-
20 hours ago, Crazy Ivan said:
I've made hot cuts out of a36 and used it to cut a 1 1/2" thick round bar of 4140 steel and it was still sharp afterwards. If I can cut medium carbon alloyed steel with A36 without it deforming, it will be fine for your anvil. If you work at a proper forging temperature and don't strike the anvil with the hammer (you shouldn't anyways) then it should be fine. Brian Brazeal and Alec Steele among many other accomplished smiths CHOOSE A36 for their striking anvils. If it's good enough for pros, it ought to be good enough for you.
I've made hot cuts out of a36 and used it to cut a 1 1/2" thick round bar of 4140 steel and it was still sharp afterwards. If I can cut medium carbon alloyed steel with A36 without it deforming, it will be fine for your anvil. If you work at a proper forging temperature and don't strike the anvil with the hammer (you shouldn't anyways) then it should be fine. Brian Brazeal and Alec Steele among many other accomplished smiths CHOOSE A36 for their striking anvils. If it's good enough for pros, it ought to be good enough for you.
Btw, I just looked at your location. Your right down the road from me. Every single scrap yard around me sells willingly. I'm going to my tool steel scrap yard near Redding tomorrow to pick up some h13,a2,4140 and s7. Same place also has MASSIVE steel in their yard. It's called MOSES GLICK. Another good one is Saads in Columbia and there is also Rubin Steel on Fruitvalle pike in Lancaster. They all sell to the public.
SHHHHHHHH, I can hear all the good stuff getting sold...
-
It looks cast to me, parting lines and a lack of hammer marks on the body. My cast Soderfors has handling holes so seeing the handling holes doesn't tell me anything either way. All the Brooks anvils I've seen have a pretty tall step down to the horn from the cutting table but I'm no Brooks expert. that's about all I've got.
-
4 minutes. That's about how long a mouse will try to not drown. So I've heard at least...
-
My buddy has the same pot and it works fine although he likes to use a grate partly cause he doesn't need a fire that deep and the handle isn't easy to get to. I know the breaker works well because I burned up one of his grates...
-
You may find a need to add some stops or redo the clips to prevent the anvil from moving when hammering laterally towards the anvil. I had an anvil setup the same way and it kept on trying to escape...
-
Might also consider a longer post so you can turn it around and have it sit on the face if you find yourself wanting to work larger stock.
-
Can you put it all together sans sealant and light a fire to find out just how hot it'll get? Seems as though that's the only way to get a true answer and to avoid a possible fire.
Thinking about it some more, are you talking about where the chimney/flue connects to the hood or where it goes through a wall/roof?
If it's the connection to the hood, assuming the connection is mechanically sound (relatively tight) I wouldn't bother with sealant. In fact I didn't bother on my hood...
If it's a matter of sealing at a wall or ceiling then there are too many variables for any of to give you a safe suggestion.
-
1 minute ago, JHCC said:
Left-handed backscratchers.
How embarrassing, I'm left handed and I didn't even recognize them...
-
Whatever they are they sure would do fine for bending stock. Might need to knock off a corner or 2 but that's about it.
-
They are great anvils but without knowing what kind of rebound it has, what anvils usually sell for in your area, and how badly you need a 90lb anvil I can't really say...
-
The breaker is meant to swing in to the outer slots so if they are not a matched pair you can always make a spacer out of some pipe to get the correct height.
-
There was a Power King for sale near me with either a (I forget which) Fisher or Vulcan mounted as a rear weight. They ran a bolt down through the center of the anvil to bolt it to the draw bar...
-
I recently heard of, bought, and tried a product called evapo rust. It works very well. Unlike electrolysis it wont last "forever" but the process is very much like electrolysis. One nice bonus is that once you've rinsed and dried the item you can dip it back in the juice to protect it from rusting.
According to everything I've read it's about as people friendly as it gets. No nasty fumes and if my hands were already dirty I didn't bother with gloves. It reminds me of antifreeze in appearance and smell. I got a 5gal bucket (something like $86) of it and cleaned up a post vise, 15 or so files, a few wrenches, and just about anything rusty within eyesight and no complaints. I threw in a big old rusted (I mean a 1/3-1/2 had rusted away) wrought iron pin and after 3 days or so it still had some rust so it's not perfect but I wouldn't be able to afford it if it was...
-
14 hours ago, 01tundra said:
Just a side question, I keep hearing about HB's "later" 2-piece design.
My 155 HB was manufactuered in 1895 (confirmed) and I always assumed it was a two piece design because of the large line across the top of the waist that I assumed was where it was welded together, but now I'm wondering if it was just rough casting marks because the manufacturing date doesn't seem to coincide with the shift to two piece design?
Along with the obvious weld I see what looks like 3 numbers stamped in to the side back by the heal which tells me it is or at least should be a later 2 piece Hay. I can't double check AIA right now but my guess would be that either it was stamped incorrectly or a number has been misread.

What's wrong with this weld?
in Blacksmithing, General Discussion
Posted
Have you done a successful forge weld before? If you haven't I'd suggest practicing on inexpensive (relatively easy to weld) mild steel. Also try just tacking one end of the billet. By tacking opposing ends/edges you can limit the movement of the steels which can make welding much harder.