
Wroughton
-
Posts
307 -
Joined
-
Last visited
Content Type
Profiles
Forums
Articles
Gallery
Downloads
Events
Posts posted by Wroughton
-
-
Wish I could forge that fast black frog! ; )
-
Mr. Turley are you suggesting there might be "knuckle Draggers" among us?
Well, I am. But blacksmiths make sparks when they drag their knuckles. -
How industrial/rural is your area? You can do the trench with coals from a fire too if you don't have coal or coke. A blast helps but you might get away with a torn up HARDWOOD pallet or two. Stack pieces to allow for good airflow while burning so they combust at the same rate, reduce down to coals and insert your piece. If you want more heat supply some air. You don't need much. Hair dryer could work if you put a cover over the trench. Control your fire. Enjoy.
-
Not really mine to give away Ronin. But I'm gonna feed it and treat it nice and see if it wants to stick around. ; )
-
Beaudry 125, strayed up on my porch.


Anyone help with aging? Growth rings?

-

The anvil surface is at my waistband. I really like this thing for setting edges and corners, setting rivets. It's too high for repeated pounding but my go to surface for a lot of small items. The corners step down from sharp to about 1/2" radius. The steel is soft so I just redress with grinder as needed.
Don't know what the cones were. Maybe out of a small crusher. They have threaded holes in each end and are connected by a stud.
My first "anvil". The big chunk. It's the picture in the center with the post vise. It's height is about 2" above my knuckle dragging height.
Got to the point that I didn't care about a real anvil. And, like the ladies, when u don't care anymore, or you already have one, the anvils start raining. The rebound is crazy off this one over the post.
This is where things get pounded with strikers and heavy handed blows.
This plate is 1 1/2 thick and weighs about 150lbs. It gets slid around, welded to the table, flat or on edge and used for all kinds of whacking. Also makes a good backer.
Oh yeah, an actual anvil. 345lb PW. Set 2" high of the knuckles.
.
162 lb Trenton set up for shorties ; )


Whew, forging is easier than sharing pictures! -
Glenn and Charles "nailed" it.
But, if I may, the more anvil objects the better. I have some that are too tall but work great for planishing and fine tuning. I feel strain all over if I go to really moving metal there so I move back to a lower surface while really pounding and the strain dissipates. The best height for me seems to be 2" up from the end of my knuckles. Having a choice I move back and forth to the anvil/surface I want for the task without thinking about it much. So, I would rather have choices, and I can always find a block of steel or RR track to set up for another forging die. I'll take some pictures this afternoon. -
Wrought iron averages around $3 on eBay. Assorted or mixed lots. Large pieces in mixed lots seem to comand the highest price in the $4+ range.
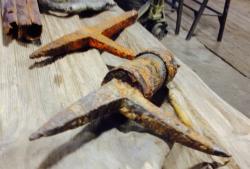
Some pictures of iron recovered from a 1880's sawmill site. Large bolts and shafts. Note the keyway.


-
All good points,
My powder coater is my blaster too.
My metal supplier is my cut man AND my delivery guy. My water jet guy (not that cheap but I'm not as accurate as CNC cutting by hand either) is 100 miles away so my
metal supplier does the shuttling back and forth for free due to their volume of traffic through the area.
My metal supplier offers plasma, HD plasma and Laser cutting also, so I'm up to my eyeballs in precision if need be.
I have been the sub for whole finished product, parts, pieces, nails and rivets.
Evaluate (analyze, as stated before) where your time and resources are best spent and go from there. Pride in doing everything "in house" may keep you in the poor house. -
Admanfrd,
If you belong to your local ABANA affiliated group they may have a scholarship. -
Gerald beat me to it. Copper gutter/standing seam roof installers frequently have scrap bins of cut offs and screw ups and might even let you buy off the roll. Sometimes a damaged or remnant roll is for sale also. $3 ish a lb. your local scrap yard might also resell scrap. Plumbers sometimes rip out BIG copper tubing while remodeling drain lines and like the gutter folks keep boxes of scrap.
This is where I scrounge.
I buy new from my local metal supplier and if they are too crazy on prices or just won't do it I go to Atlas metals in Denver. -
Looks like the love child of a double horn and a London pattern. The natural EVOLUTION of things. Anvilus porcinus
-
Quit doing the math. Go get it! ; )
Just trying to help. -
Jim,
Octoberfest openers? How long does it take YOU to make?
Wings forge welded on the back? -
Propane filled.
Wood cut.
Window replaced, new framing, run to town to get more screws............
Shop cleaned and ready for work tomorrow.
It's supposed to be 7 degrees Saturday night
-
Santa cheered me up with a first edition of the PRACTICAL METAL WORKERS ASSISTANT by Oliver Byrne.
I've been packing it around like a little kid with a puppy.
-
Yes, two 1/2" bolts. I tightened them down before. Now I use a lock nut and just worry about keeping them in place instead of really tight. The saddle itself keeps them aligned. I don't invest a lot in new dies and the saddles
make it easy to test new combinations without getting crazy. If your material is forging hot even mild steel dies like this make it quite a while.
They are 2" x 4"
-
Trying this from my phone. Did a good job on smoking my laptop screen with a fire poker!
Pictures are said dies. The round stock is obvious. Smaller round stock I squishd
In the press. Textured dies for bark and forging bark onto pipe and tubing.


-
Play with it as you go. Feather back the edges of the landing in the beginning. You'll be able to do different things with and without the landing.
I have modified dies that came with my Stryker and I've used the fullering dies that came with a Saymak SM50 in another shop.
Both were good for fullering down the length of pipe and tubing without leaving a big divot.
A full, but shallow radius will give you a working center. Fullering dies like this draw metal out FAST once you get used to them. Depending on how
tight you leave the landing you can fairly replicate the blow of a rounding hammer on both sides on solid stock.
I drilled holes through my flat dies for saddles and started experimenting with different radi and landings by forming mild steel into
shape. Some didn't work, were ground wrong, or were just generally "wonky", but you'll find some that will steer you in a direction that you can
refine using harder die stock. Cutting 2" (the short dimension of my 55lb Stryker dies) round stock in half, lengthwise and welding them to a saddle in place on the hammer is the easiest and quick way to make fullering dies. You can experiment with the long radius. Then you're experimenting with just tops or bottoms.
We'll see if the remember button is working for taking pictures.
-
Thanks Michael and Nuge!
Michael, Wow as usual.
My pile of random wrenches resembles a dragons hoard. Plenty in triplicate, foreign and abused. There are many scrap metal artist in the area
that use unmodified old tools in their creations so I tend to stay away from that. Changing the form is quite different. That covers two genre with the mechanics category and the ever snarky, "does it fit in a doublewide?". Would forging a top shelf name tool be like destroying coinage? Snap-on trucks menacingly lurking around the corner at night?
Nuge's cross reminds me of gender symbology. The Mars and Venus would sell well and command I fantastic price in the right time/place.
Most of us would get bored over time, but if you made two of those a day for the rest of your life you'd have a rather large savings. Hoping they
still make bottles that need the tops pulled off. The forms themselves are worth working on. $$$
-
Very nice Black Frog. Most people won't know what wrought iron is but the rest of us know that it takes more than a moderate amount of skill
to not have it split or fall apart when you're making the business end. I like the heat colors too.
-

This is the type that sells the best for me.
-
Butter knife, or mayo spatula?
Is it actually honed or forged into a edge shape or fairly uniform through out the draw?
It might be a one off that just got tossed back in the pile after it's purpose was served. It might have been and offset for a handle or other mount that was to be joined by welding and someone got carried away. I have some rail car handles that the offset would have been bent, the hard way in the narrow dimension, making a curve to distribute the load.
And perhaps "Steel Making before Bessemer, vol I Blister steel" might be of interest if you have a perverse yen to get into the details of historical ferrous metallurgy. (vol II is "Crucible Steel"...) (and yes all of these are on my shelves as a bunch more too!)
OK, I was wondering if there was something in the wagons or other period hardware that might have been imbued with carbon for a purpose. Might have something on blister steel. Perverse? Obsessive I'll give you. Sooo, I'm happily going down the metal hole without feeling all dirty.
-
You can have high carbon wrought iron you know.
No Thomas, I don't know. Where do I insert the quarter for more info? :D


what is the dumbest/weirdest piece of metal working equipment you ever acquired
in Blacksmithing, General Discussion
Posted
[i would love to see a video of the sts in use. Got time for that?
It certainly looks interesting.