

JME1149
-
Posts
381 -
Joined
-
Last visited
Content Type
Profiles
Forums
Articles
Gallery
Downloads
Events
Posts posted by JME1149
-
-
Probably not a bad price for the amount of work involved to waterjet that piece, but I went with the Holland Anvil block. Beautiful casting and extremely reasonable pricing when you go to the manufacturer and not buy it off the CL or EB scammers
-
For the restore part, just wire wheel and/or brush to remove the loose rust, a little gold accent paint for the lettering and coat with boiled linseed oil. Should provide a nice dark patina and make the old gal pretty again. You could fab up something to attach a new handle to the coupling or replace the coupling entirely, hard to tell how it's attached from the photo.
-
Here's another direction you may want to consider. Rather than softening a hammer, depending on the design of your guillotine, you could weld a small slug to the top edge for a consumable contact point. This would focus the impact. Or you could just take the top die out when it begins to mushroom, throw it in the forge and re-shape the top surface back to flat.
-
I don't think I am completely understanding the concept of use for your build. I see what appears to be holes drilled in the long pipe section toward the back section of the vertical brick walls (1st pic) and I see expanded metal sheet possibly covering this area, cemented in place in the 3rd pic. Are the roof bricks mortared in place (looks like it in pic #2) or are they loose? Does the feed pipe penetrate the end of the barrel and if so, is it accessible to clean out? Forgive me if this has been covered in another post I haven't seen. I'm just going off what is offered here.
This will tell me how you will be adding coal to the fire, i.e. pour it on top or push it in thru the front opening. The question about the clinker removal is valid because not all clinker comes out as a big solid piece. Smaller pieces, as well as ash, will deposit and collect in and around your feed pipe, thus restricting air flow and heat production.
-
That is a nice looking little anvil. I've never seen that style of marking on a HB before, thanks for sharing.
-
Very nice chandelier, and lots of other hidden gems of blacksmithing around the room.
-
The color of the wood really looks like hickory to me. Might want to try out this site for identification purposes
http://www.docs.dcnr.pa.gov/cs/groups/public/documents/document/dcnr_20029752.pdf
Look for other similar standing trees in the same area to try to get an idea on leaf shape to further narrow down the species.
-
I'm liking this version. I agree that it needs a little something, maybe forge the horns to octagon before twisting for a little more subtle twist? One other observation, if the head is flat down on the shank, it might be hard to keep the fork clean between uses. I really love the shape and expression you capture in the steer heads.
-
I like the concept, but rather than having the horns swept forward, maybe try bending the head over at the neck and sweeping the horns back (from the cow's perspective) so the head is staring at you wile you are cooking?
-
Looks pretty nice. I'd definitely recommend to remove the handle if you plan to operate it using the belt setup.
-
That's awesome, hope they have a good mentor leading the program. Thanks for sharing the link, I never heard the little known fact at the end of the story before
"The Catholic church once prosecuted blacksmiths as witches because the work they did in cathedrals looked so three-dimensional and lifelike that the officials couldn’t believe it came from flat pieces of iron."
-
And using the magic of Paint and Excel...
-
Personally, I really like the patterning of the lacewood and would'n't have noticed the slight glue line if you hadn't brought it up. Beautiful knife all around in my eyes.
-
To answer your specific question on the hammers, the one on the left is more "finished" in my eyes. You took the additional time with the flatter, grinder, file, whatever to remove the fuller marks on the cheeks and pein. But, this level of detail also brings it closer to the appearance of "factory made" spectrum. To some, the fuller marks add character to the piece and proudly proclaim that it is hand made. To others, it is a sign of quick and sloppy work. Does it affect how the hammer functions? Does it make one better than the other? Not at all. Beauty is in the eye of the beholder, as they say.
I've heard that the level of acceptability for smiths from 100 years ago was to not leave hammer marks and rough surfaces. Whatever the trend of the day is seems to dictate what is acceptable, and every customer is looking for something different, even if you are that customer. As the person making the piece, we will always see the flaws and the part will never be truly finished in our eyes. But we must be able to see when a part is done.
-
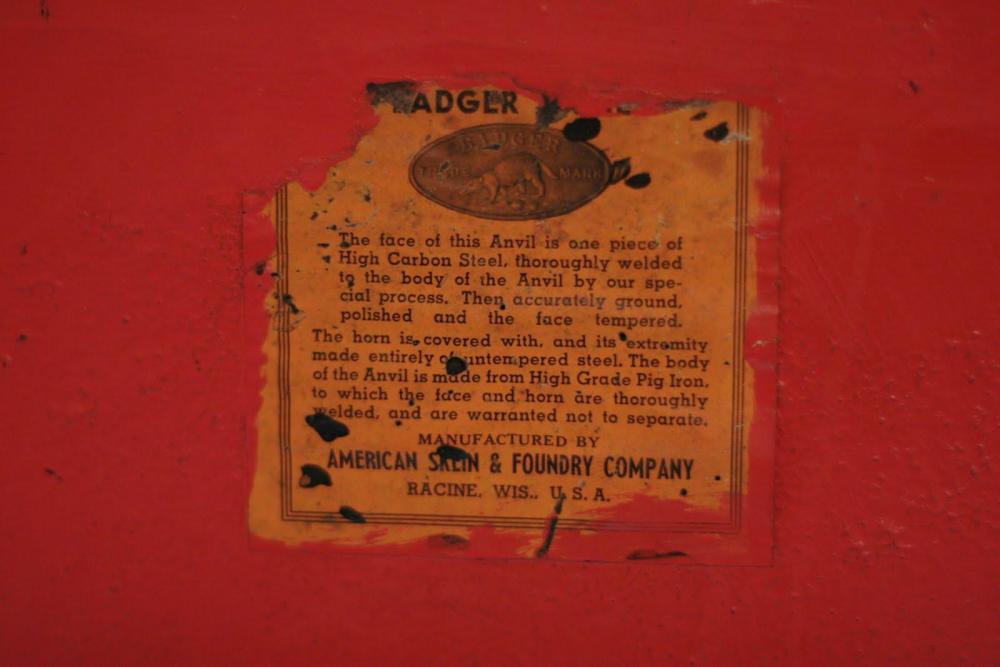
I would agree that it is probably a Badger. They are supposedly rare and were one-third the cost of a similar sized Trenton back in the day, according to an advert I have. I also found a label online that details how they were produced.
-
That is a beautiful piece of work. Thanks for including the close-up photos of some of the details. It looks like he may have used angle iron for the individual scroll parts where they meet up with the main frame and with the S-hook scrolls. Definitely one for the inspiration folder.
-
I saw the ads on Ebay and Craigslist. Personally, I'm blacklisting both people. But I have to agree that people too lazy to do the research to find the manufacturer, especially when the foundry name is so clearly shown in the photos, are destined to pay more.
I'm very pleased with mine and took it to my local club meeting to show it off.
-
Very nice hammer and an excellent video showing the process. Thanks for sharing.
-
As has been already mentioned, it's your anvil to do with as you choose. If you still want to flatten up the top face, you should first grind/mill the bottom face. Set the anvil upside down on the working face to make the base parallel with the top face. That way, when you flip it over to kiss the top face, you'll be removing as little material as possible from the hardened face.
If you don't do this and the top/bottom aren't parallel to start with, you might end up removing a lot more to get rid of the .100" sway.
-
A good photo of the eagle may provide a clue to dating this anvil, specifically what the eagle is clutching. It looks surprisingly like one I just recently sold. Does yours have a chunk missing from the underside of the horn out near the tip? Looks like it in the first photo.
-
Nice story. I'm curious to know how many hours of burn time produce how much charcoal that gets you how much forge time.
-
How about a conical tapered groove on one face? Looks like you could fit in a 4" long trough coming straight down from the Ø120" surface, longer if you move the two larger squares off toward the right side.
-
Welcome Will, and thank you for your service.
If you haven't yet, please take a few moments to read this post, it will help to answer many of the questions you didn't realize you had yet.
-
If I remember correctly, the cones are hardened steel, so yes brass would work, just not for long. Also, I recall it's an odd size thread in the cone. Search the topics here for Champion 400, I know it's been discussed before.

Celtic iron
in Spears, Arrows, Pole arms, Mace/hammer etc.
Posted
Very nicely done, beautiful work. I always like to see the intricate file work along the spine of the knife.
Both knifes look like they would be awkward to hold or use. How do they feel in hand?