
K.C.
-
Posts
100 -
Joined
-
Last visited
Content Type
Profiles
Forums
Articles
Gallery
Downloads
Events
Posts posted by K.C.
-
-
I was thinking the quality and condition were fantastic too. I'll know more when I go see it. Wanna laugh? Remember what I said above about prices being crazy here? A guy just said he'd sell me a fifty pound Vulcan for 200 dollars.
-
240.00 2.40 a pound.
-
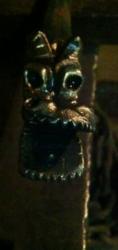
Here are the pictures. Tell me what you think.


-
It does protrude.
-
In my area people try to sell 100 pound vulcans for 400 dollars... Cheap taiwan anvils for 2 or three dollars a pound ect. Good anvils are very expensive. Any idea on the maker of this one? I'm guessing you know your brands since they seem to be multiplying in your area... Lol I'm jealous!
-
Update* just got this info from the owner.
It is 23 1/2" long, 9 1/2" high, 3 3/4" wide. It weights right at 100 lbs. It is marked with a ( m ). If you look on each side of the m, you can see where a name was put with a welder. On the top plate on a portion of the edge, it Has a few dings from a hammer. I will take $ 240.00 for it. -
Ok guys... I would love your views and knowledge befor I commit to this oldie I found. First, is there any way to upload pics from my phone?? I will as pics when I get home this afternoon. Now for the good stuff! The anvil belonged to a mans grandfather. The man who owns it is 59. It seems to be in really nice shape. Comes with two hardie tools. Nice big work surface (measurements to come) estimates it to be 100 pounds. Looks a bit larger to me. The only marking is an M on the side. His father welded two letters one on each side of the (M) the edges look super clean. He is asking 275 but said he'd be happy to work with me on the price. It is about two hours from me but he plans to come to Fort Worth soon. I know y'all need a bit more info and I will provide it when I have it just thought I'd get the ball rolling.
-
There is a 300 pounder in Houston with clean edges one small chunk out out the front corner. Otherwise super nice. He's asking 1000. Seems a little high to me. But u can make it all back with your projects. I'd say 2.50-3.00 a pound is fair. Just my two cents.
-
the first picture is of the improved burner. 3/4x2 bell 10 inch 3/4 tube 1 inch flared to 1.5 tip 1/4 jet tube and drilled #57 jet. the second pic is the first burner that would only burn if i used the little fan on top.


-
Ok, here we go. I did some experimenting tonight. I used my same set up but added a small fan blowing on the brick the burner was going through. Believe it or not it made the flame uniform. I used that flame to forge a better burner flare. I went from a 3/4 to 1&1/2 bell to a 3/4 to 2. Changed the 1/8 inch jet tube to a 1/4. #57 drill for the jet. Ten inch 3/4 burner tube. It blows a really nice blue flame without blasting out the front of the forge. Gets the metal hotter and stays hot longer. I am still tuning but was able to start forging a set of tongs. I wish I could upload pics from my phone. I don't have a computer. So far this set up is working great. Can't wait to see what it will be like when I am done. Thanks so much for all the info guys. It really helped me start to pinpoint some of the.problems. There were several. When I perfect my burner I will ad another to the forge and start turning out some neat projects. If y'all have any more ideas keep them coming!
-
The jet is a #57 drill size. I tried to use the regulator in as many different was as I could. It seemed to be most stable at full open. When I backed it off it would sputter more. The flames were BLASTING out of the front of the forge. I had to shut it down every time I removed the RR spike. The burner did have a nice blue flame when it was steady but the forge looked like an angry dragon trying to melt down the fire brick castle. And again the spike was so hard to work I pulled out a 20# hammer... Lol it cooled with in 30 or 40 seconds. Not much working time.
-
Just a quick update. I messed up my dementions lastnight before I went to bed. The ID of the chamber is 5&1/4 wide nine inches deep and 4&1/2 high. Then I changed the depth to 18 to attempt to controll the flames comen out. When the burner wasnt sputtering it was a beautiful blue. Orange and yellow flames shooting out of the forge. It was the burner is exactly like the plans drilled hole and the spike was dark orange more info to come.
-
I built the Ron Reil EZ burner. I have another post but this is another project al together. I have abandoned the forge that post was about. Too big and too costly for me. I need to get things together better before I go so big lol. Back to the point. I placed the burner TDC. I stacked a row of fire brick (standard size) for the base, 4&1/2 high, and 9 inches deep and then 18 deep. I also covered the back opening. Now for the problems.. I had flames blowing out of the front six or seven inches and up at least 15 inches high. The burner would sputter and was not an even clean flame. The rail road spike turned an orange color and was extremely hard to work. (I'm no wimp guys..) It wouldnt get any hotter nomatter how long i left it in there. I did work it but it didn't seem to get hot enuf. It seemed ro get that orange color when it was just outside the blue flame.What am I doing wrong? This was just a mock up before I put it all together. Trying to work it all out. Any help would be great.
Thanks guys. -
I was thinking the same thing after thinking it over. I plan to use only half the forge most of the time. Ill block off half the forge and two burners. I made 4 new burners leaving the original I made a while back. Now I will have "biggen" and a small 9 brick table top forge for the small work. After I get more experience under my belt I'm sure I'll use the big forge more.
-
Thanks for helping on the anvil search.
-
I know it's kinda big but I plan to do heat treating. The last knife I made was 20 inches long. I had to send it to Houston to have the heat treat done. That's why I left it 27. I didn't want to cut any off the drum. As far as the ID I figure after the inswool and refractory the chamber will be much smaller. Plus I plan to block off most of the forge chamber when it's not needed.
-
I decided on the 35 gallon drum. It is 27 inches deep and 14 ID after the inswool and Kast-O-Lite 3000 I think the chamber will be small enuf to heat well and large enuf to have a fine working forge. I welded the legs on today and cut the guide pipes for the three burners I will install. I will use standard size fire brick in the bottom. I plan to make a 4X6 opening in the back for long material and the front will be whatever size I have after the above stated material fills the forge. I will cover the hole with a door of some sort. I will also close off chambers with remaining fire brick as needed so I don't waste fuel on two or three burners. I think this will turn out nice. What do you guys think? Pics to come.
-
I have a 35 gallon drum from a parts washer. Would that work instead of a propane bottle?
-
Thanks guys.
-
So I have started my forge. I made it 40 inches long,14 wide and high. It has 1/2 inch steel doors on both ends. I made the simple burner out of 3/4 pipe with a 1inch flare on he end. It burns well. What I'm wondering is what BTU and PSI am I looking for? I was looking at HP regulators that top out at 10 PSI. Will that work? I will be forging as well as heat treating. Also wondering about burner placement: I put the burner on the side middle of the forge about three inches down from the top. I am hoping to get a nice heat swirl to avoid hot spots. I figured it will bounce off the opposite wall and swirl around for the even heat I want. What do you guys think?
Thanks a bunch! -
So I have started my forge. I made it 40 inches long and 14 wide and high. I made the simple burner out of 3/4 pipe with a 1inch flare on he end. It burns well. What I'm wondering is what BTU and PSI am I looking for? I was looking at HP regulators that top out at 10 PSI. Will that work? I will be forging as well as heat treating. Also wondering about burner placement: I put the burner on the side middle of the forge about three inches down from the top. I am hoping to get a nice heat swirl to avoid hot spots. I figured it will bounce off the opposite wall and swirl ar
-
I know I don't have to have a horn. I just love the beauty of an anvil and the symphony they create when struck just so. My rail road track works great. I just desire a larger working surface and a hardie hole. Can any body give me a hint on the super thin straight razor? The last one I made from A2 started out at a 1/4 inch thick. I made it into a wedge style and ground off most of the bulk. Turned out nice but I want to hammer one out and have never worked something that thin.
-
I do a little more than knives and plan to do much more later when I have more time in the trade.. Lol I am new to all of this. I have been aging with metal for about twelve years but never like I am trying to do now. I am in Bedford TX on the edge of Fort Worth. I search Craig's List every day when I can but they seem to be a few hundred dollars higher here than anywhere else. I ask at every garage sale I go to and they direct me to northern tool.. Lol I have had a Taiwan anvil... Don't want another. I found a Fisher Norris an hour from me. It was a hundred pounds but was missing about a 2-1/2X5 inch section on the face. He was asking 4 dollars a pound. I also found a Peter Wright that had been beat on really hard.. It was in very poor condition. 160 pounds at 2.50 a pound. If it were a little cleaner it would have been a great price but it had a HARD life. I know it's a long shot but I was hoping some one on here would have an extra laying around.. Hahaha thanks for all the response! This site is much better than NTBA.
-
Looking for 150 and up. The bigger the better. Style isn't a big deal but a straight horn will work best. I'm making knives straight razors and spurs. I use a short rail road track milled flat right now. It's not big enuf and no horn.


May have found my first REAL anvil
in Anvils, Swage Blocks, and Mandrels
Posted
Just found out this old girl has a welded top plate. Got to hear it ring over the phone and from what I can tell it sounded good. He said his great grandpaw was from Germany. Not sure if he passed it to his son (the grandfather of the man who owns it now). Seems to be a keeper. Thanks for all the replys! Anyone else have any other info on the protruding M? I thought the columbian hardware co had an upside down triangle. I really don't know for sure.