
ripleycopa
-
Posts
103 -
Joined
-
Last visited
Content Type
Profiles
Forums
Articles
Gallery
Downloads
Events
Posts posted by ripleycopa
-
-
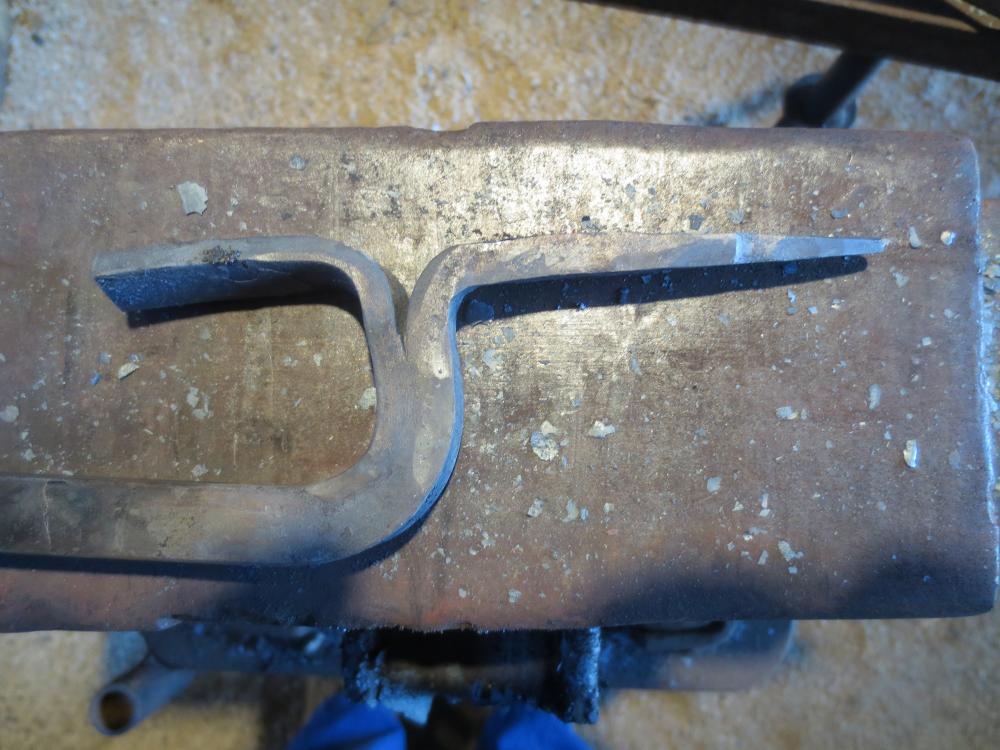
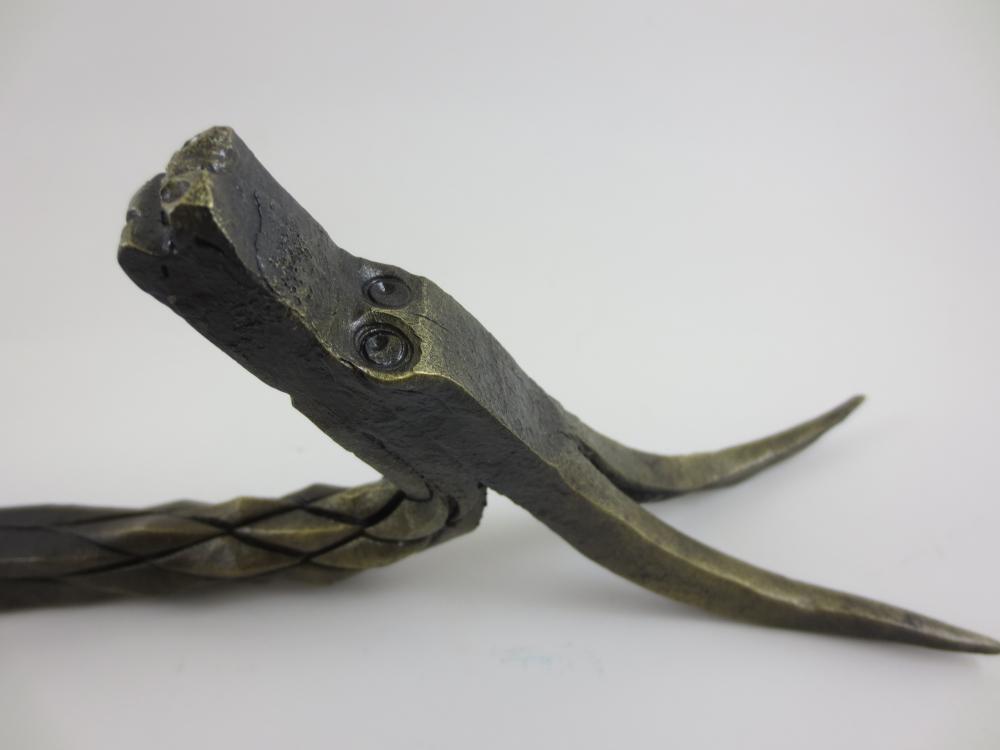
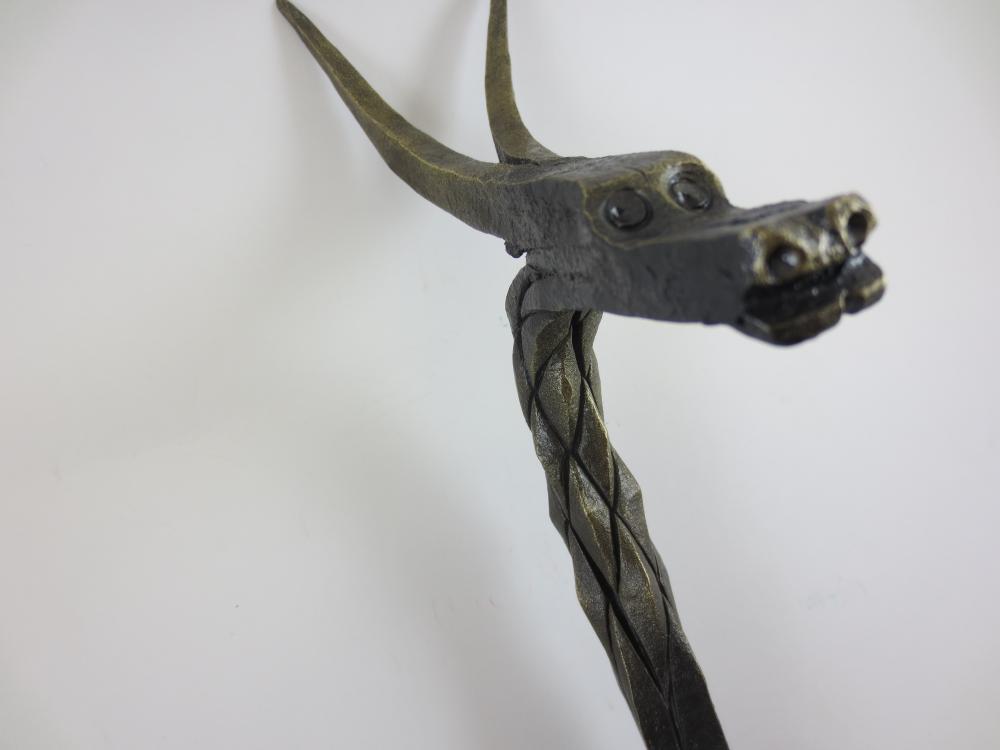
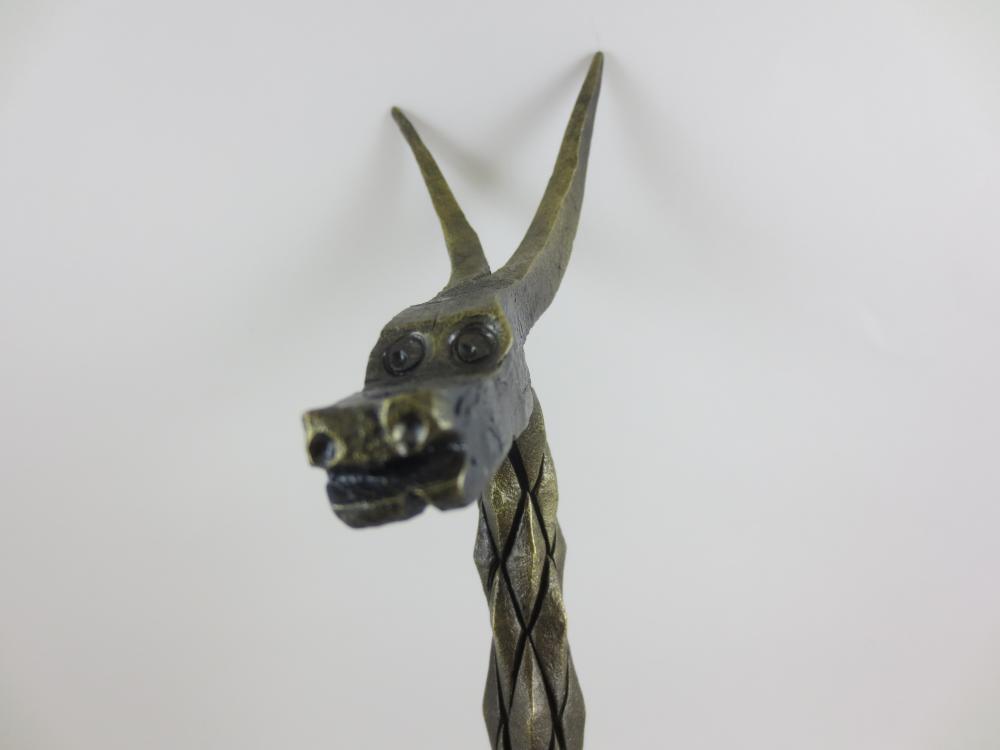
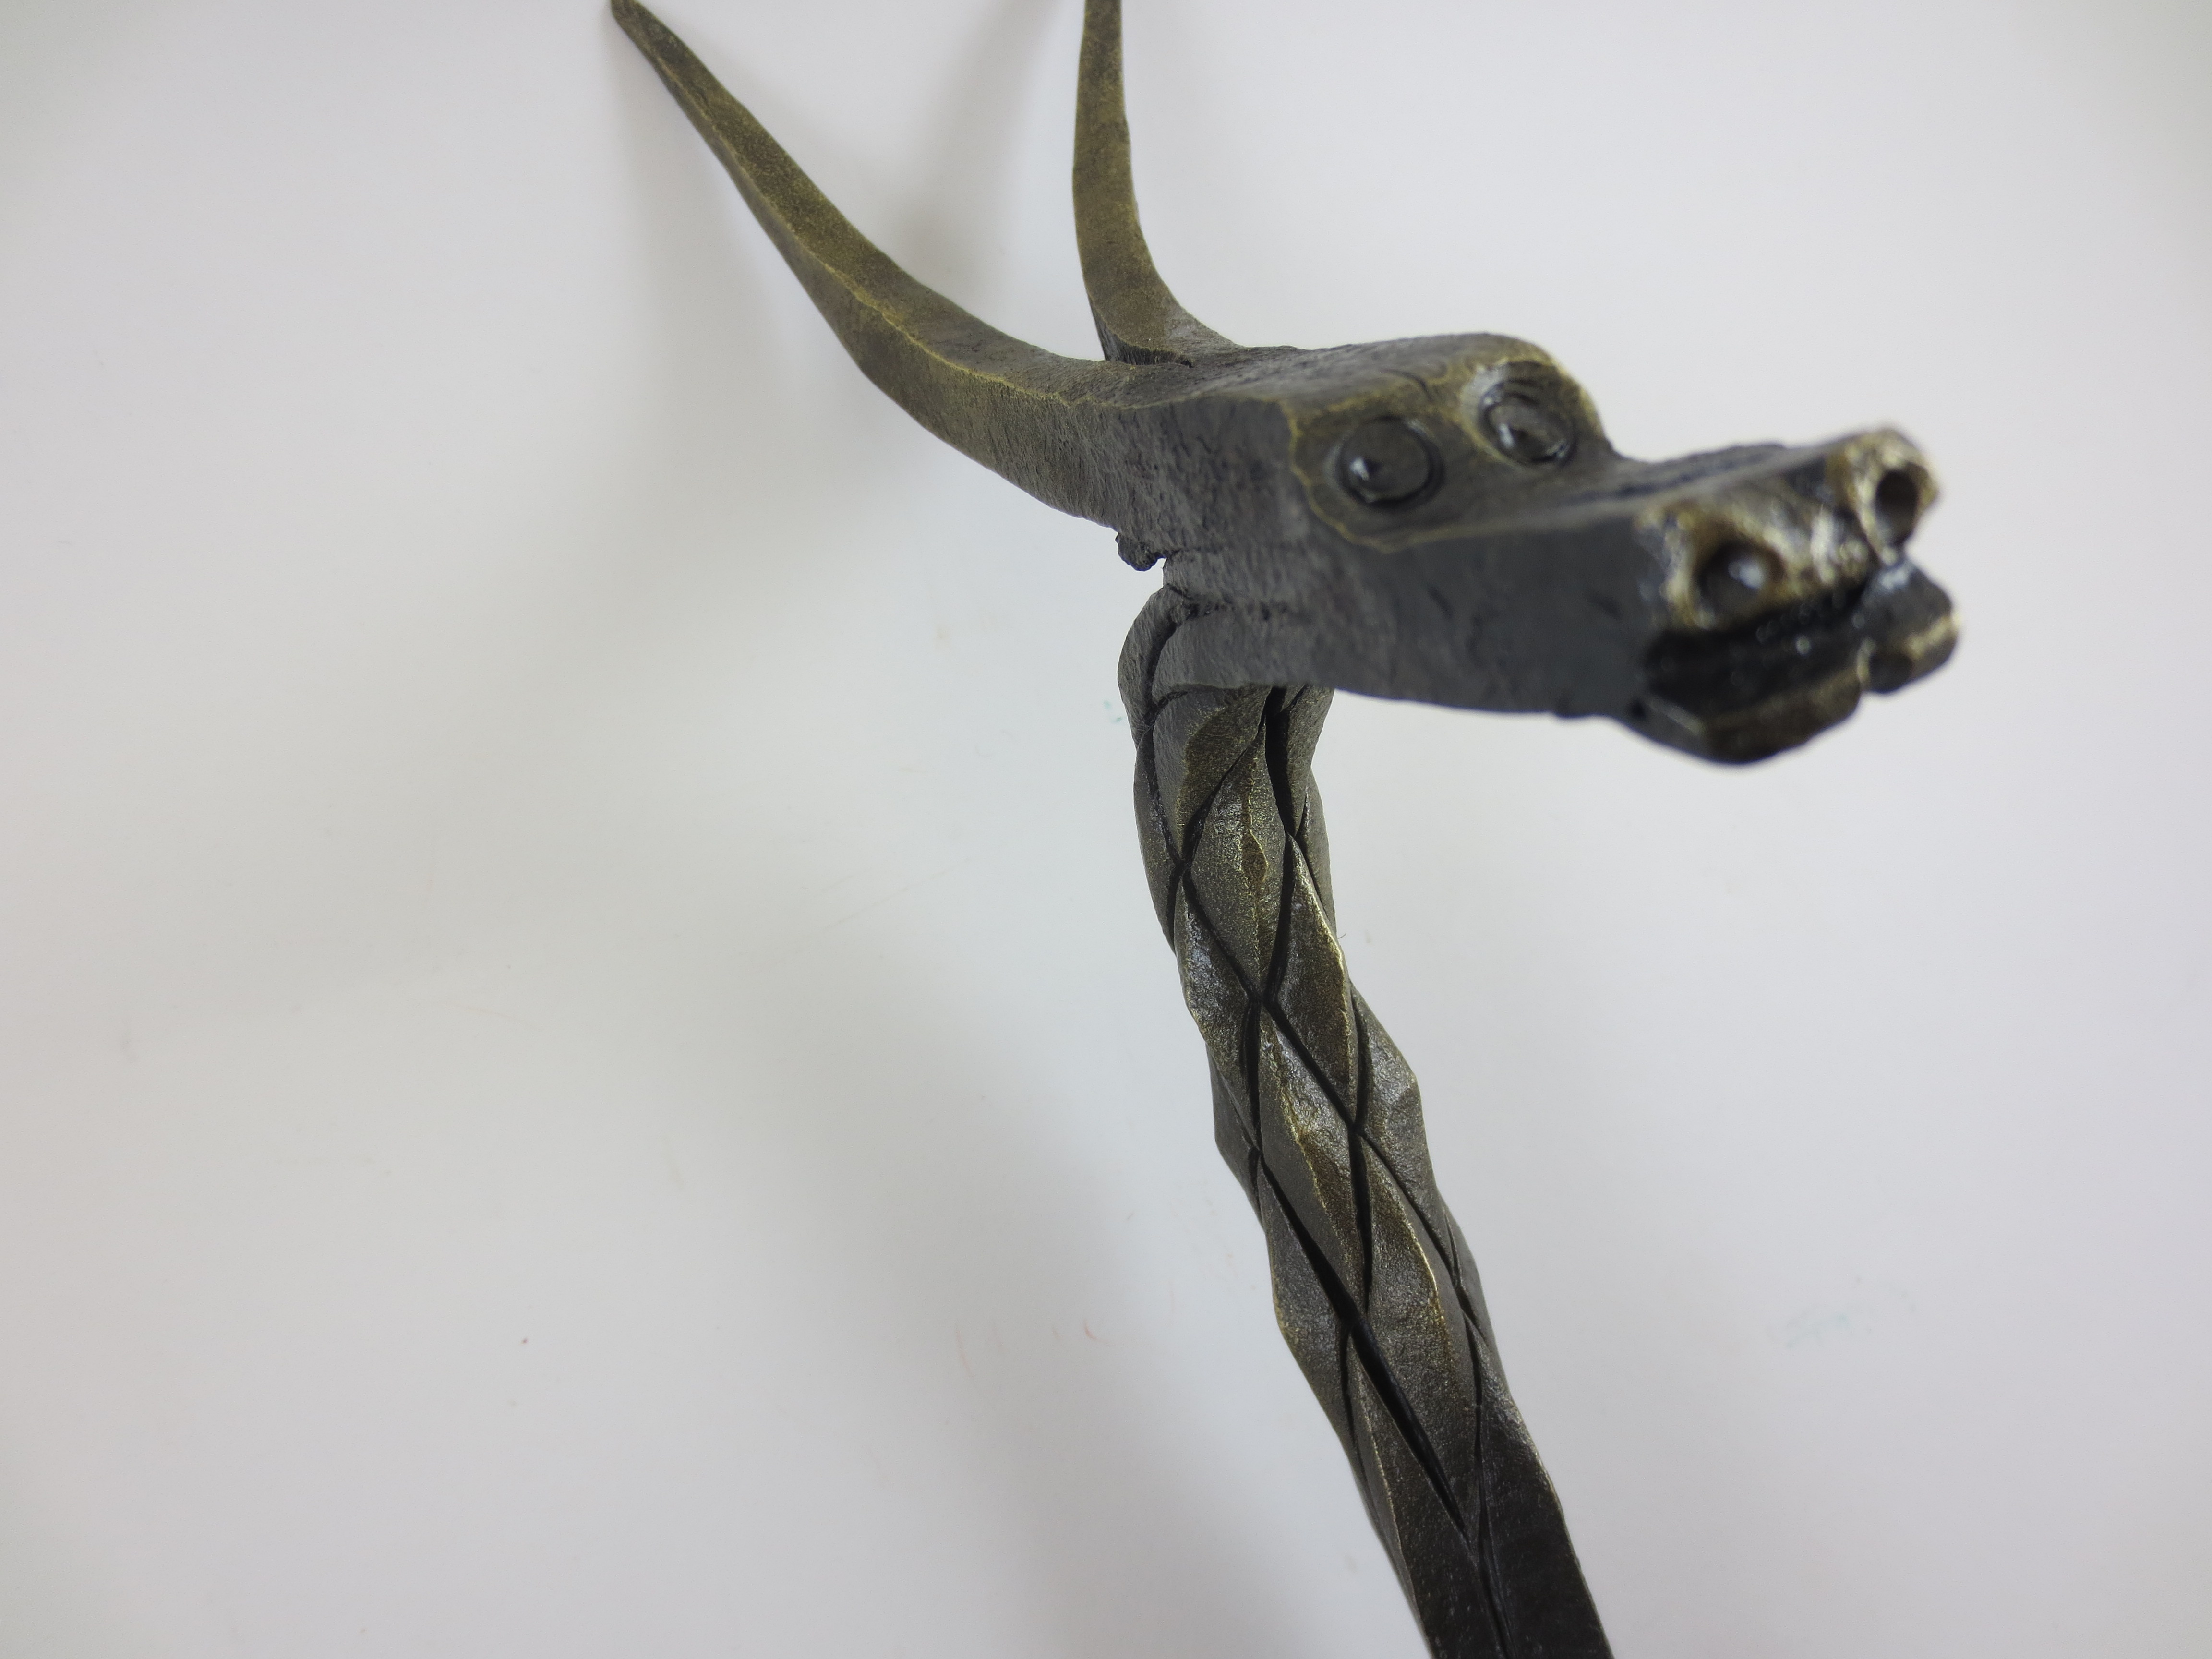
Michael, I like your chisel cuts on the snout and will use them from now on along with Frosty's suggestion of rounding the edges of the snout. The horns and head are done after the pineapple twist; I leave enough room at the end of the bar to slit the bar in half for about two inches and then draw them out with a square taper and then put them back together in line with the bar. The bar is then folded back onto itself with the end of the horn split lined up about even with the beginning of the pineapple twist. The doubled bar Is then faggot welded to form the head. Half faced blows near the end of the welded bar with the horns down then forms the snout. The horns are left in line with the bar until the head is finished and bent over. You have to be careful not to distress the pineapple twist during all this process.

-
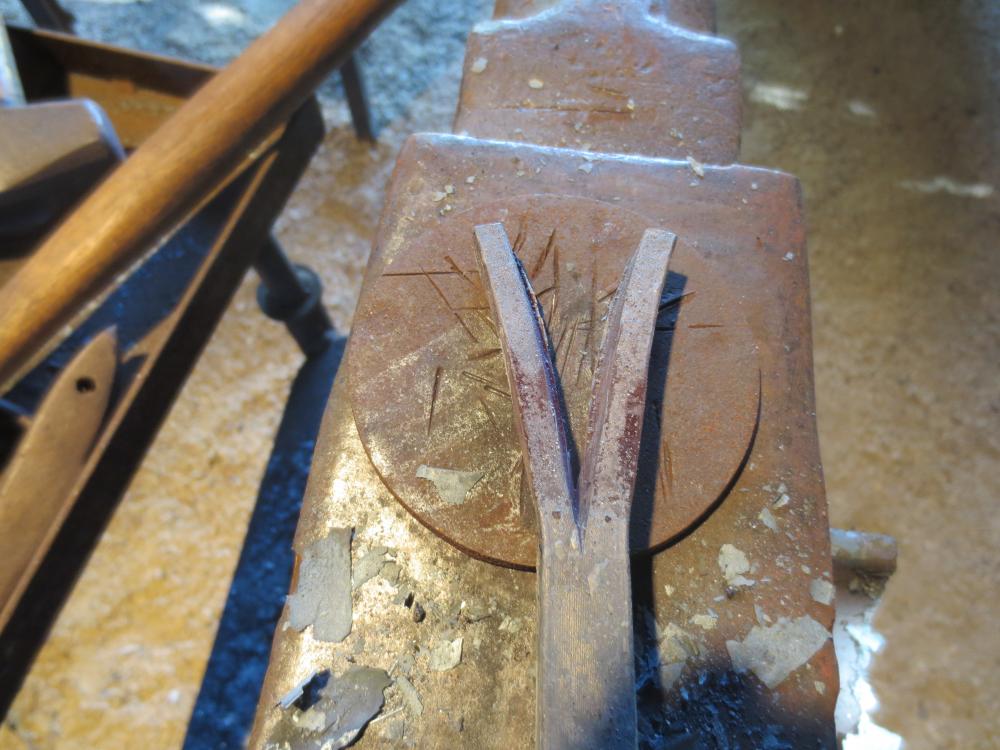
I decided to try forging a dragon head for the first time in several years; my earlier efforts left me unsatisfied and I moved off into other projects that I felt better about. This effort began with using a 30 inch length of 1/2 inch square stock I had left over from a class project. I gathered up a number of chisels and punches and found a slanted head frame for my vise. I used the standard technique of cutting and forging the horns, bending them back on the bar and faggot welding the overlapped bar to provide mass for the head. Half faced blows established a nose. After that it was working with the chisels and punches. I liked the result this time but it still needed something so I tried to forge dragon scales on the neck using a texturing hammer, but it did not stand out very well. I finally decided to try a pineapple twist on the neck before I forged the head and the result is quite satisfying. I am thinking about scaling it up to 3/4 or even 1 inch square stock but without a power hammer that may be a bit much for me to attempt.


-
I like your design, especially the curve in the handle; I will give that a try next time. I also like the pineapple twist; I do the pineapple twist occasionally, but I can make twice as many with a standard twist in the same amount of time. How do you apply the finish on your work?
-
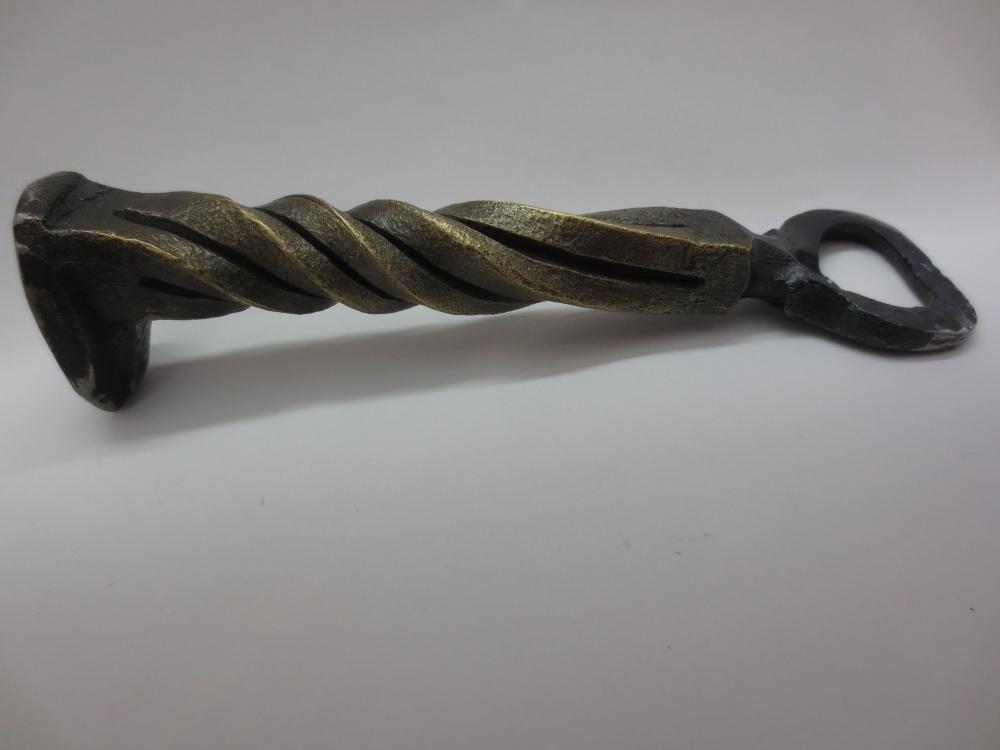
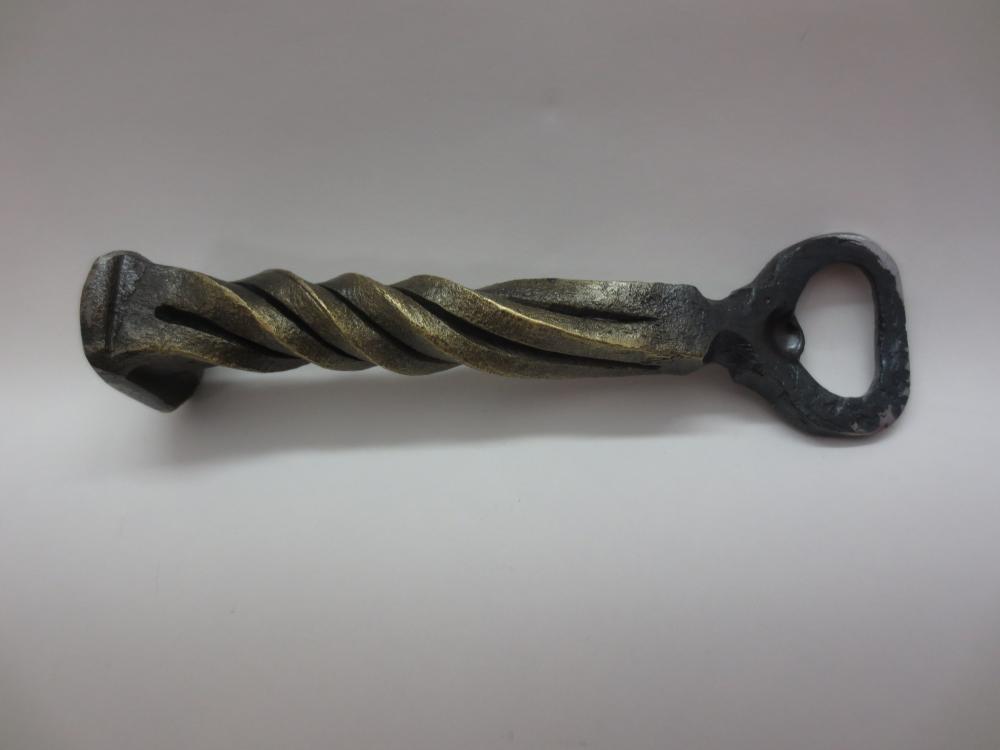
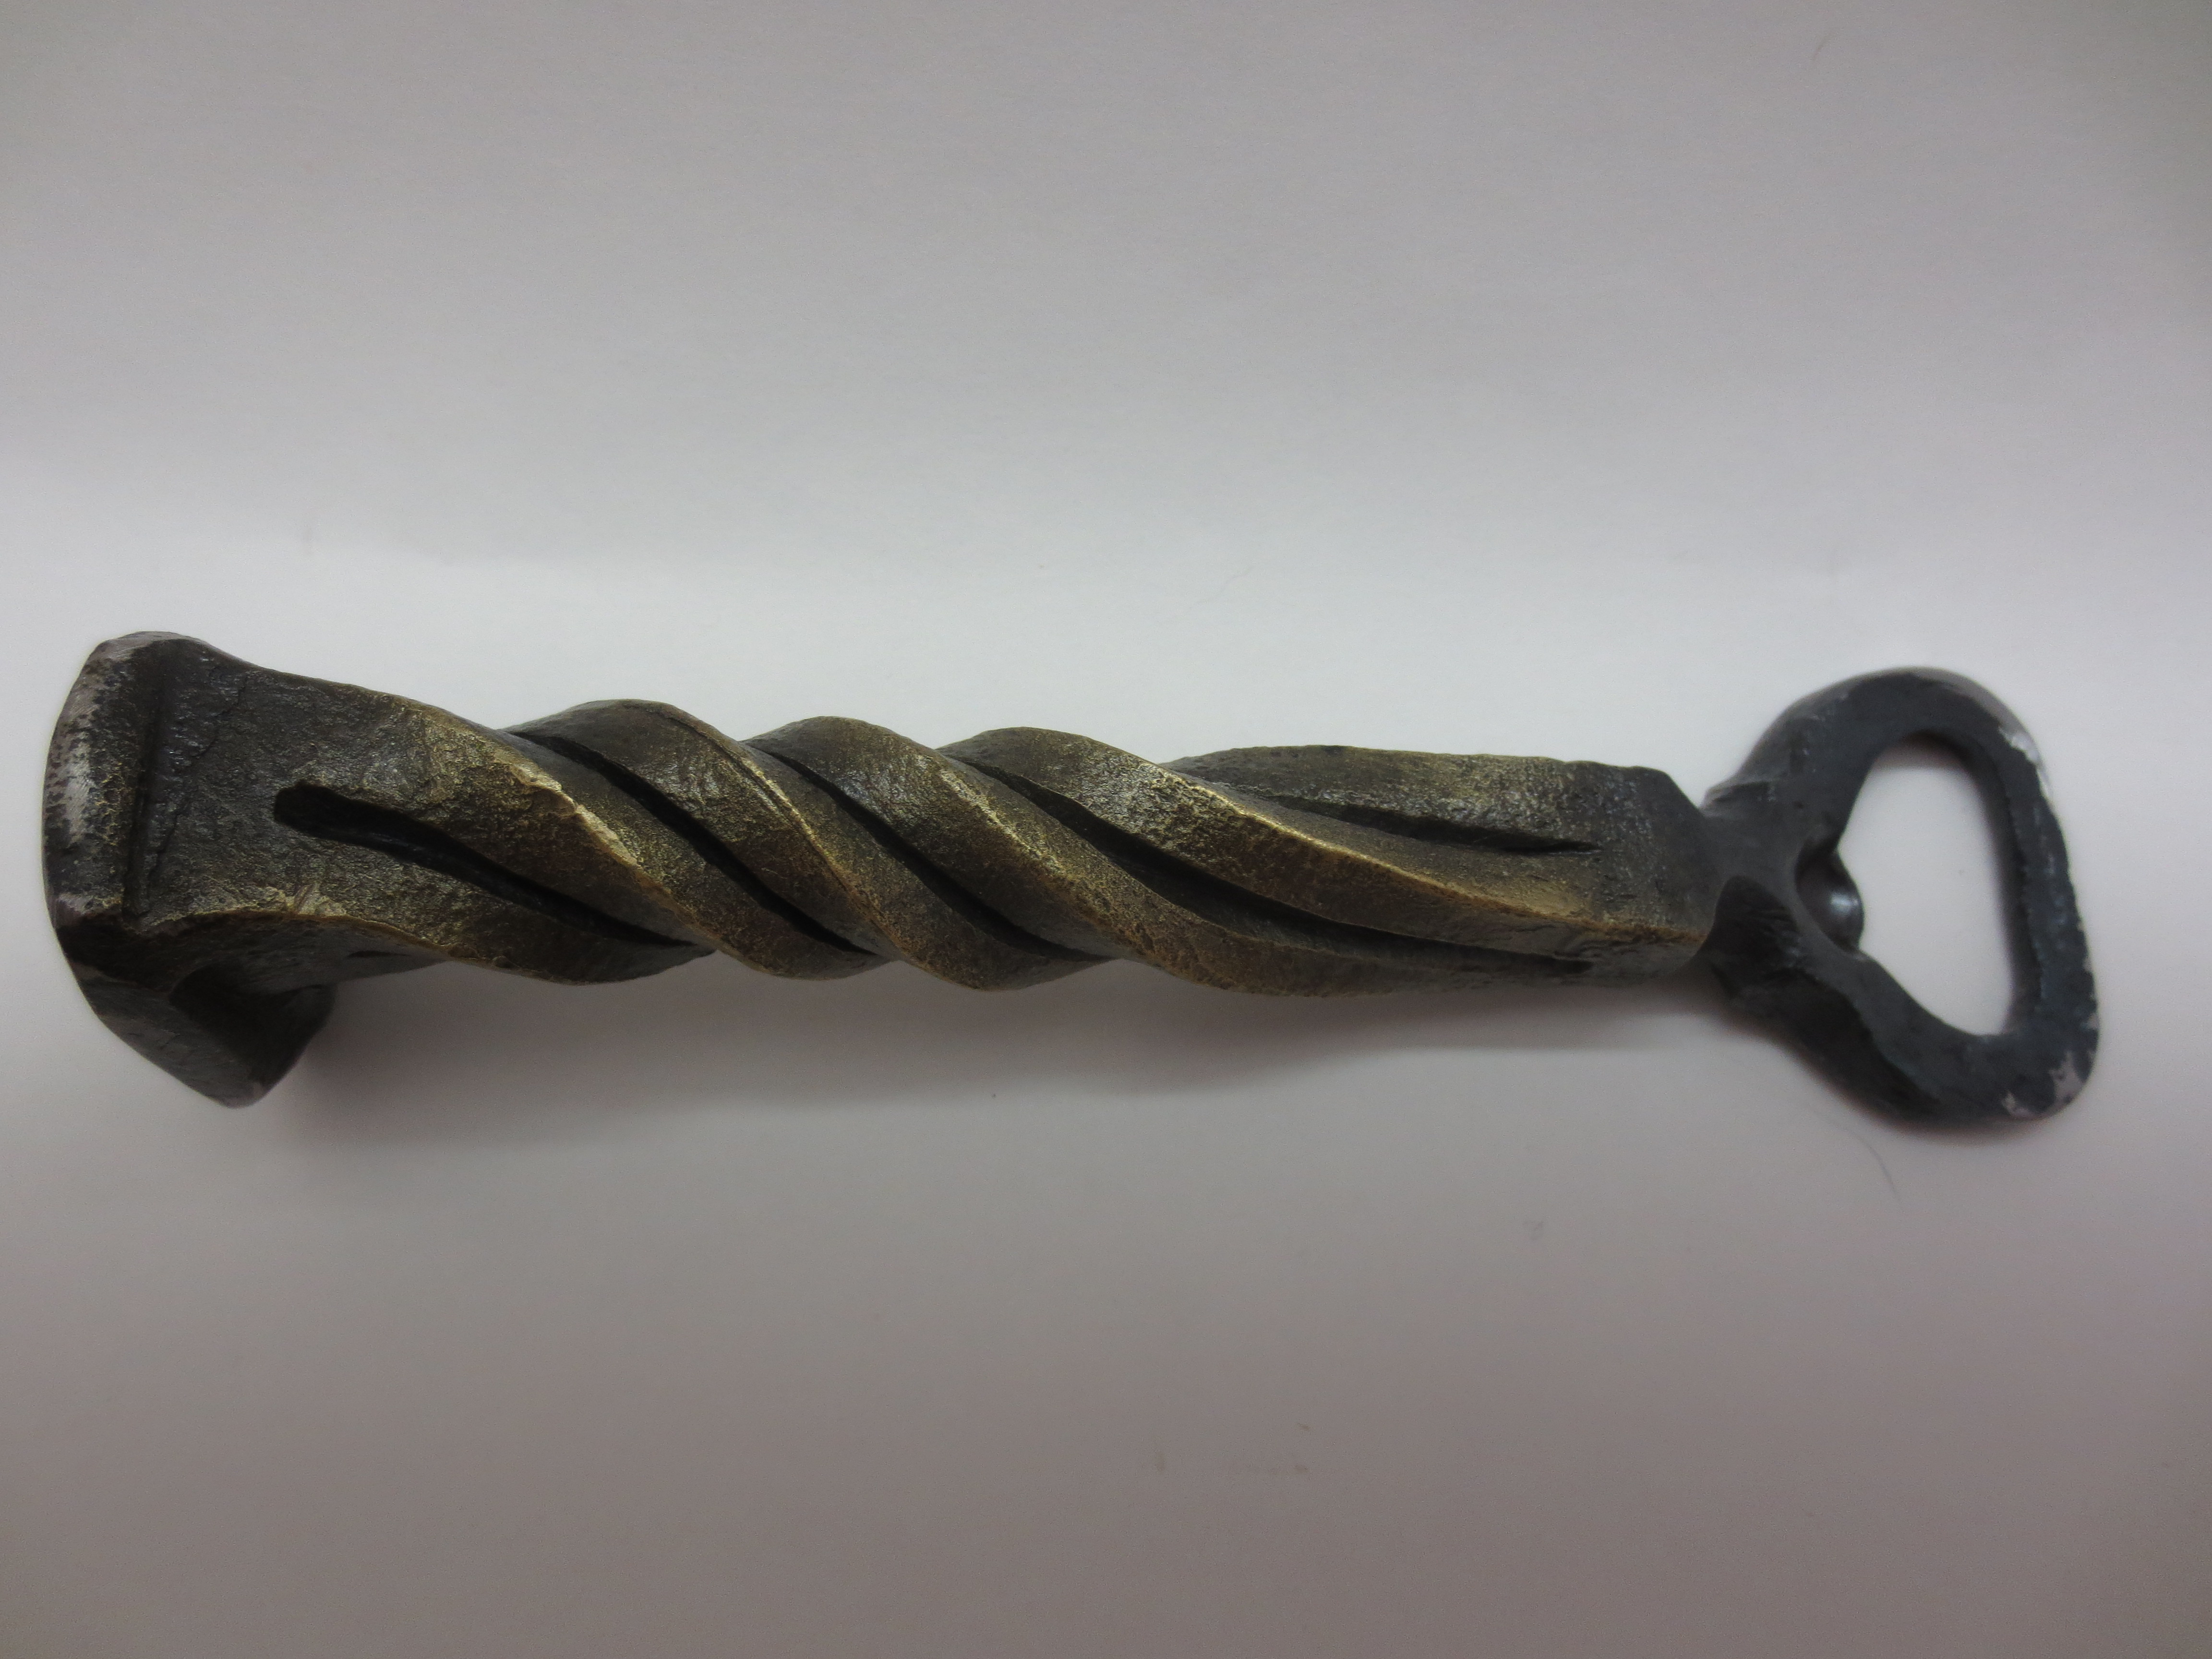
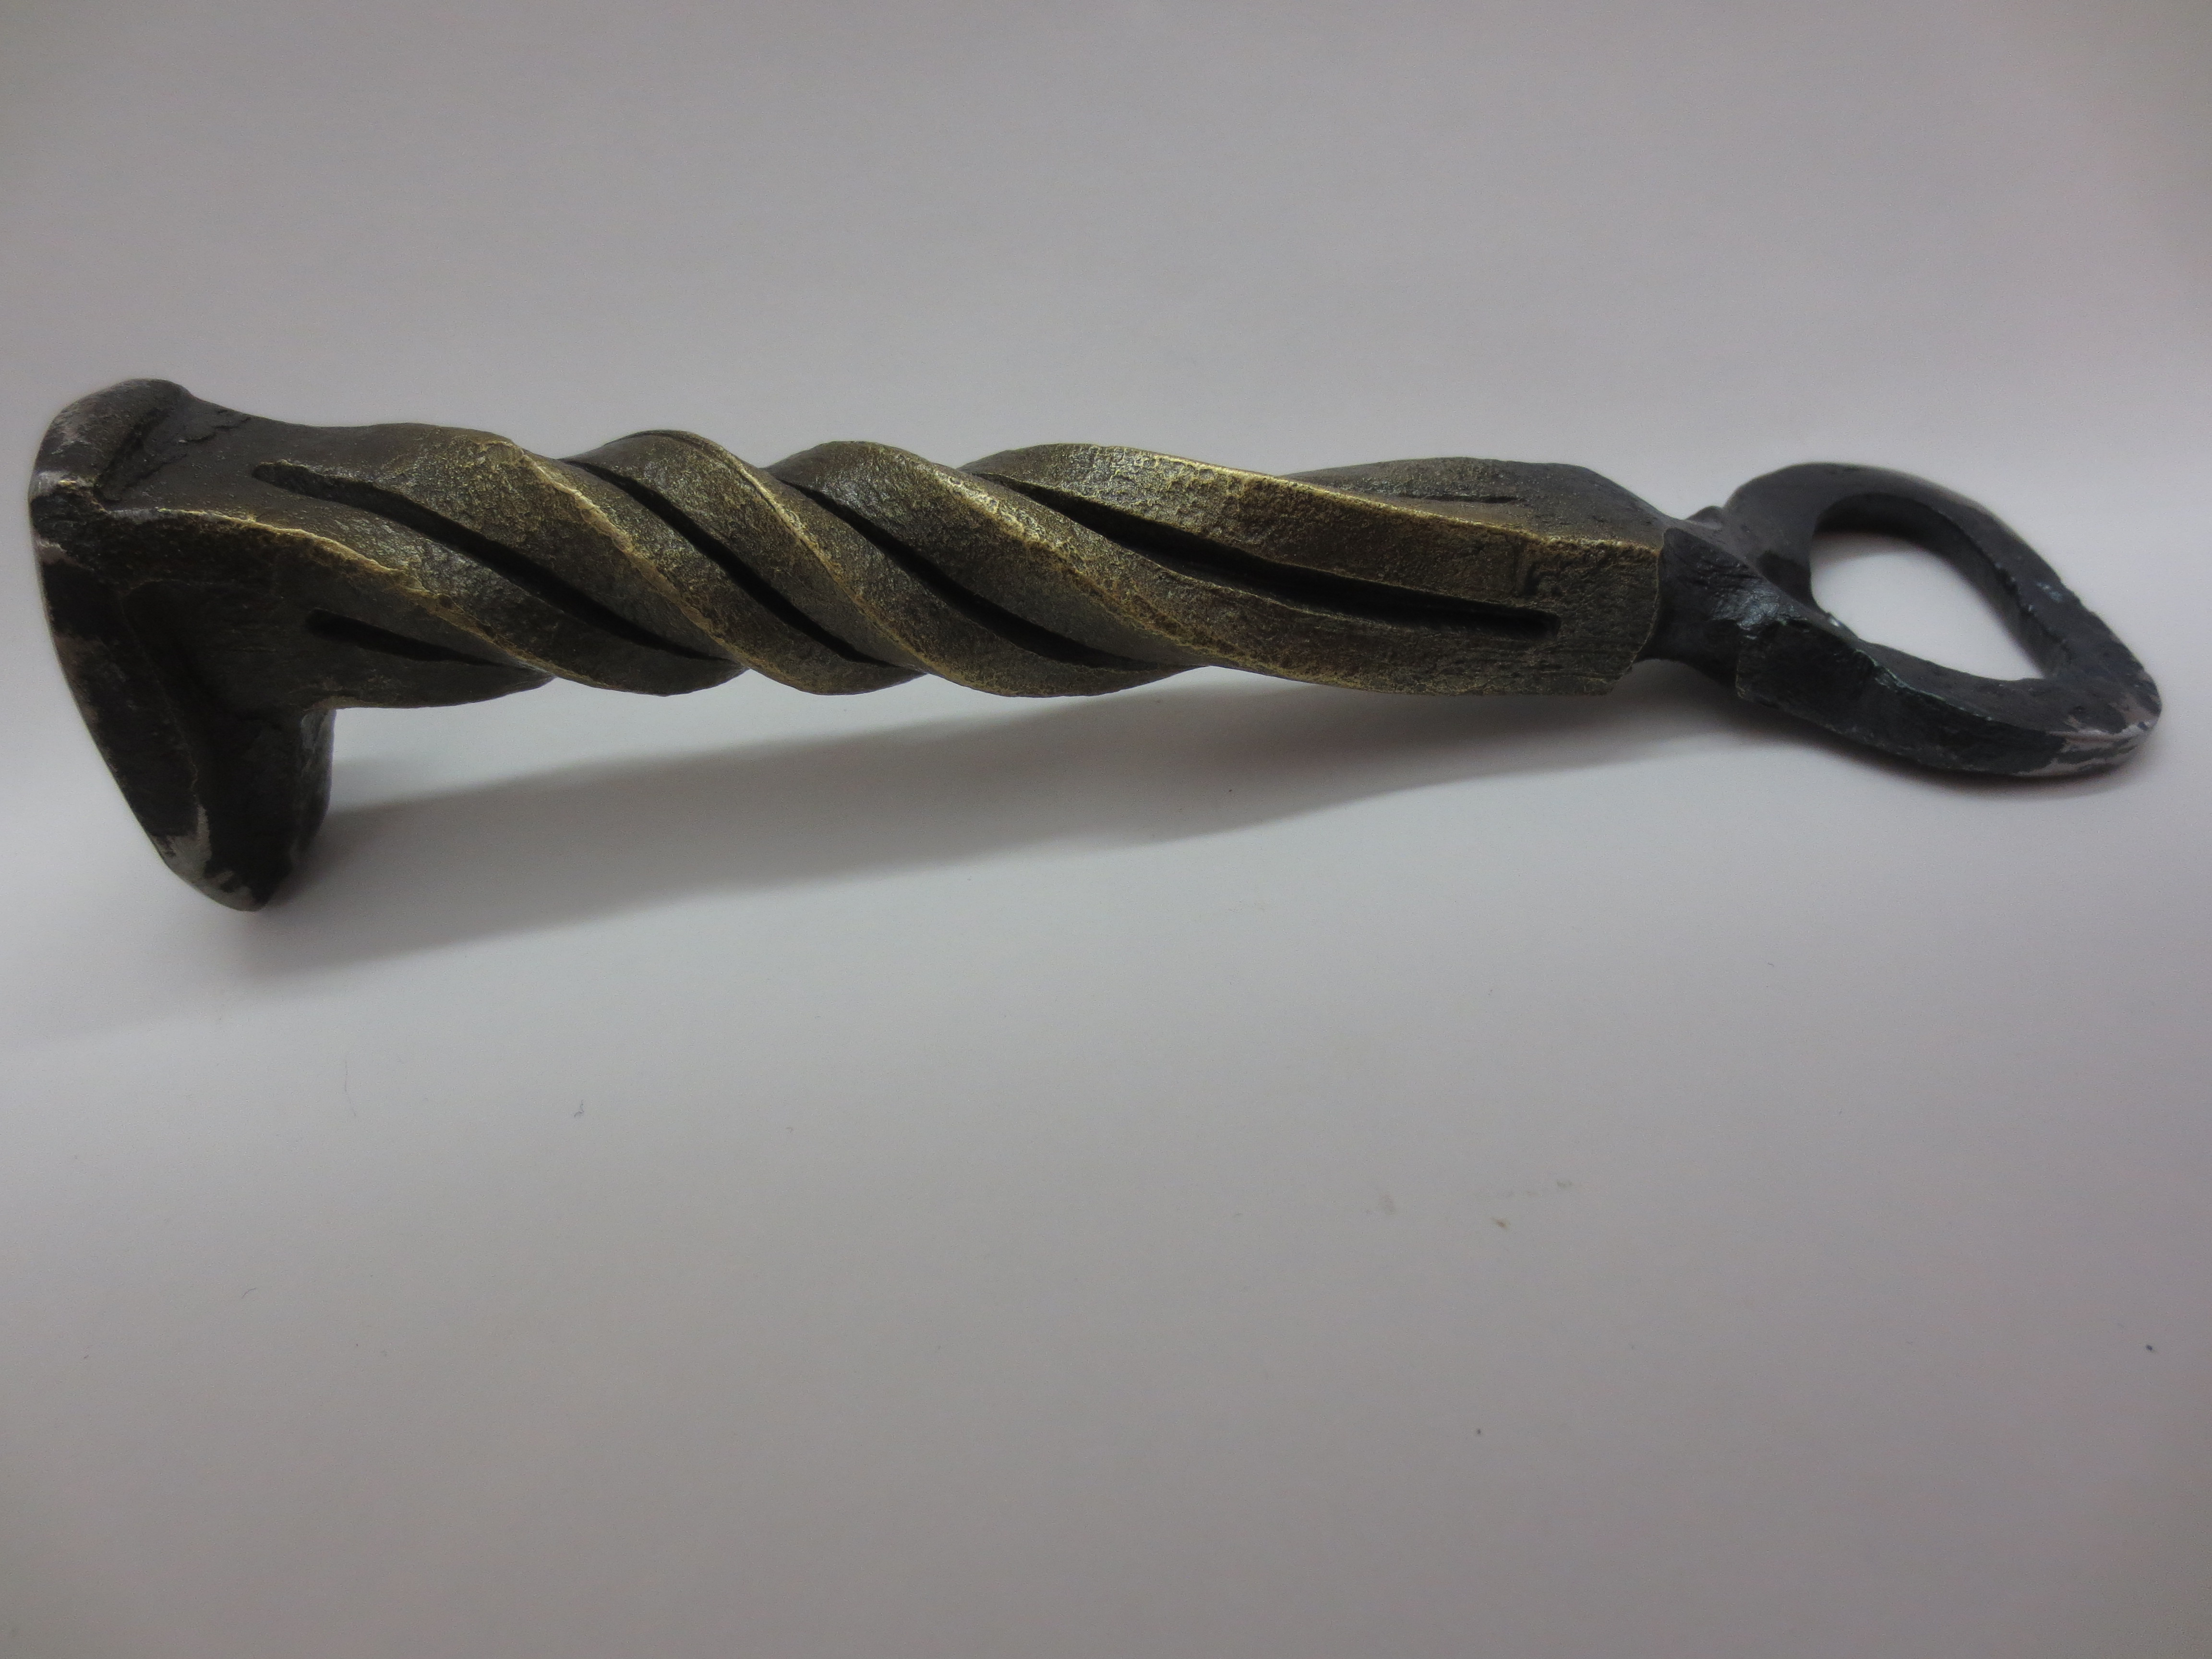
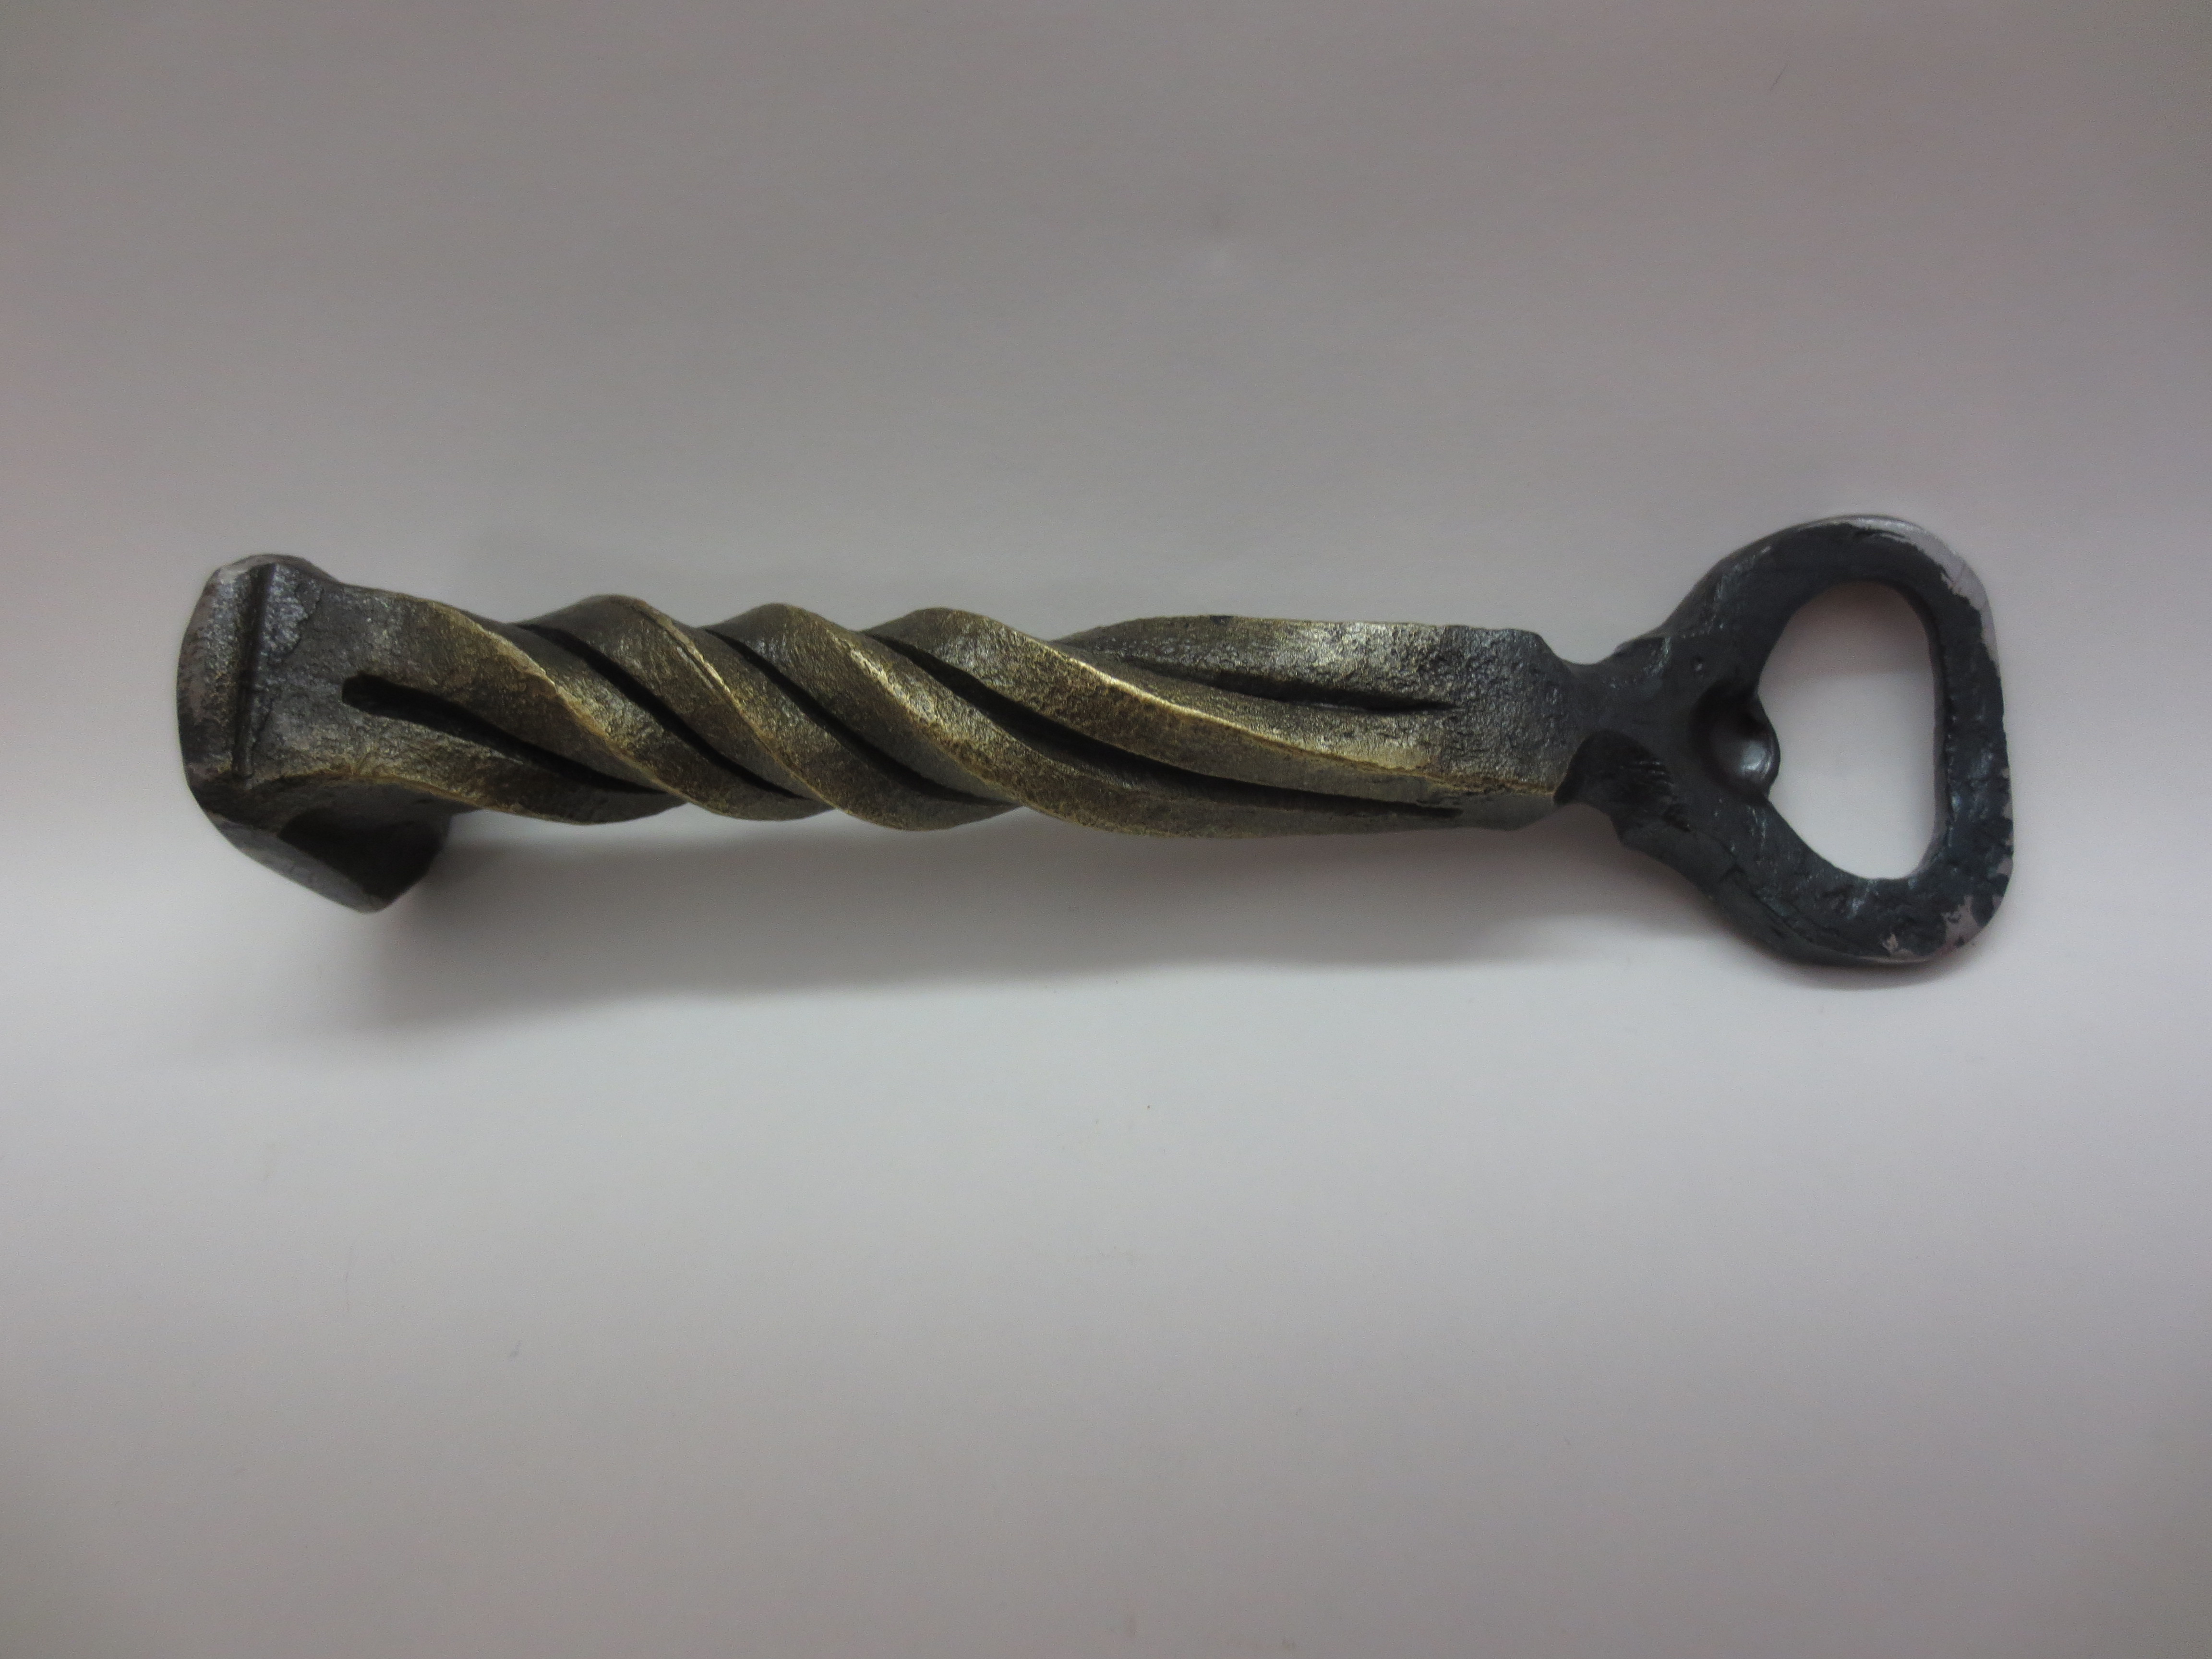
I always like working with Railroad Spikes; they are easily available and cheap and make great handles for just about anything. This project was a bottle opener and is good practice for several skills. I started with a typical size RR Spike and using a Smithin Magician with fuller dies I segmented off a piece on the spike end about one inch back from the point. I then used my handled hot cut to scribe lines from the fuller to the head of the spike on each side of the spike. A good deep line makes for an attractive twist. I then twisted the spike along the scribed lines before I started work on the bottle opener. That was started by tapering the point down to about 1/2 its normal thickness and used a slitting chisel to cut a slit through the spike. The slit was then drifted round and flatted on one side. The final forging was to use a ball punch to punch a hemispherical nub on the handle end of the drifted opening to give it something to lift the edge of a bottle cap. I did a good power wire brush of the entire piece and then heated the piece and brushed the handle with a brass brush to highlight the twist. I used a 4.5" angle grinder to grind the end of the handle and give it a polished surface. Finally, the entire piece was sprayed with a clear acrylic coat to prevent rust.

-
My wife got me a great set of books on Early American Ironwork; over 349 plates and thousands of pictures of every type of ironwork from the Colonial period. A first addition from 1928 in fine condition. The only better set I ever saw was at the St. Louis Art Museum Library in St. Louis. Now I have to be careful not to drool on the pages when looking for project ideas.


-
I operate at a community forge every Saturday morning, year round in Southeastern Missouri, so the temp. range goes from below freezing to over 100 degrees F. with lots of humidity most of the year. The shop is a wind break at best; a tin roofed board & batten without the battens. This is a hobby, not an occupation so comfort of the smith is preferred. We have more problems with heat and humidity than cold, because you can only take off so many layers before you are down to skin, and heat exhaustion is not uncommon and can be dangerous. When its bad we just quit forging early and b.s. until closing. In the winter I can heartily recommend two products: quilted Carhart coveralls and Toasty Toes chemical foot warmers. The foot warmers make forging at 35 to 50 degrees enjoyable again and allows you to stand some sub-freezing work if we have both coal forges going and the doors closed. We sometime wish for gas forges in the winter, but they would be even worse than coal in the heat of the summer around here, so coal is all we do. The slack tub freezes an inch or two deep most winters but seldom freezes solid. The way this winter is going, however, I think we may have to invest in a stock tank warmer.
-
I worked in the shop on Black Friday and decided to do do a version of my standard Leaf Letter Opener. I used an 18 inch long piece of 3/8 inch round stock, segemented a leaf and stem on one end and then used the horn to make a blade on the other. After bending and twisting to shape I power wire brushed the piece and brass brushed the leaf. The finished piece was sprayed with a clear acrylic coating to retard rust.


-
I made a matching deer antler barn door handle to create a pair.

-
A great look and functional to boot. Good job. By the way, how did you sink the ladel and put in the two pouring spouts? Do you have a special swedge?
-
The smaller antler does not come as far out from the door as the larger one and the tip of the smaller antler curves back towards the door instead of being straight up and down. I suppose someone who grabbed the larger antler handle and slipped could scrape their hand/arm on the smaller antler, but I doubt they could be impaled by the smaller antler. It's a good point to consider when designing the door handle. Thanks.
-
I decided to scale up an earlier deer antler forging to deer antler barn door handle. This was forged from one ¾ inch diameter round stock seventeen inches long which was drawn out on both ends, then hammer textured, bent back slightly off center and forge welded. The forge welded end was then shaped, rounded, upset and drilled for screw holes. The antlers angle out at the base to give decent clearance for a hand to grab and hold the larger horn.


-
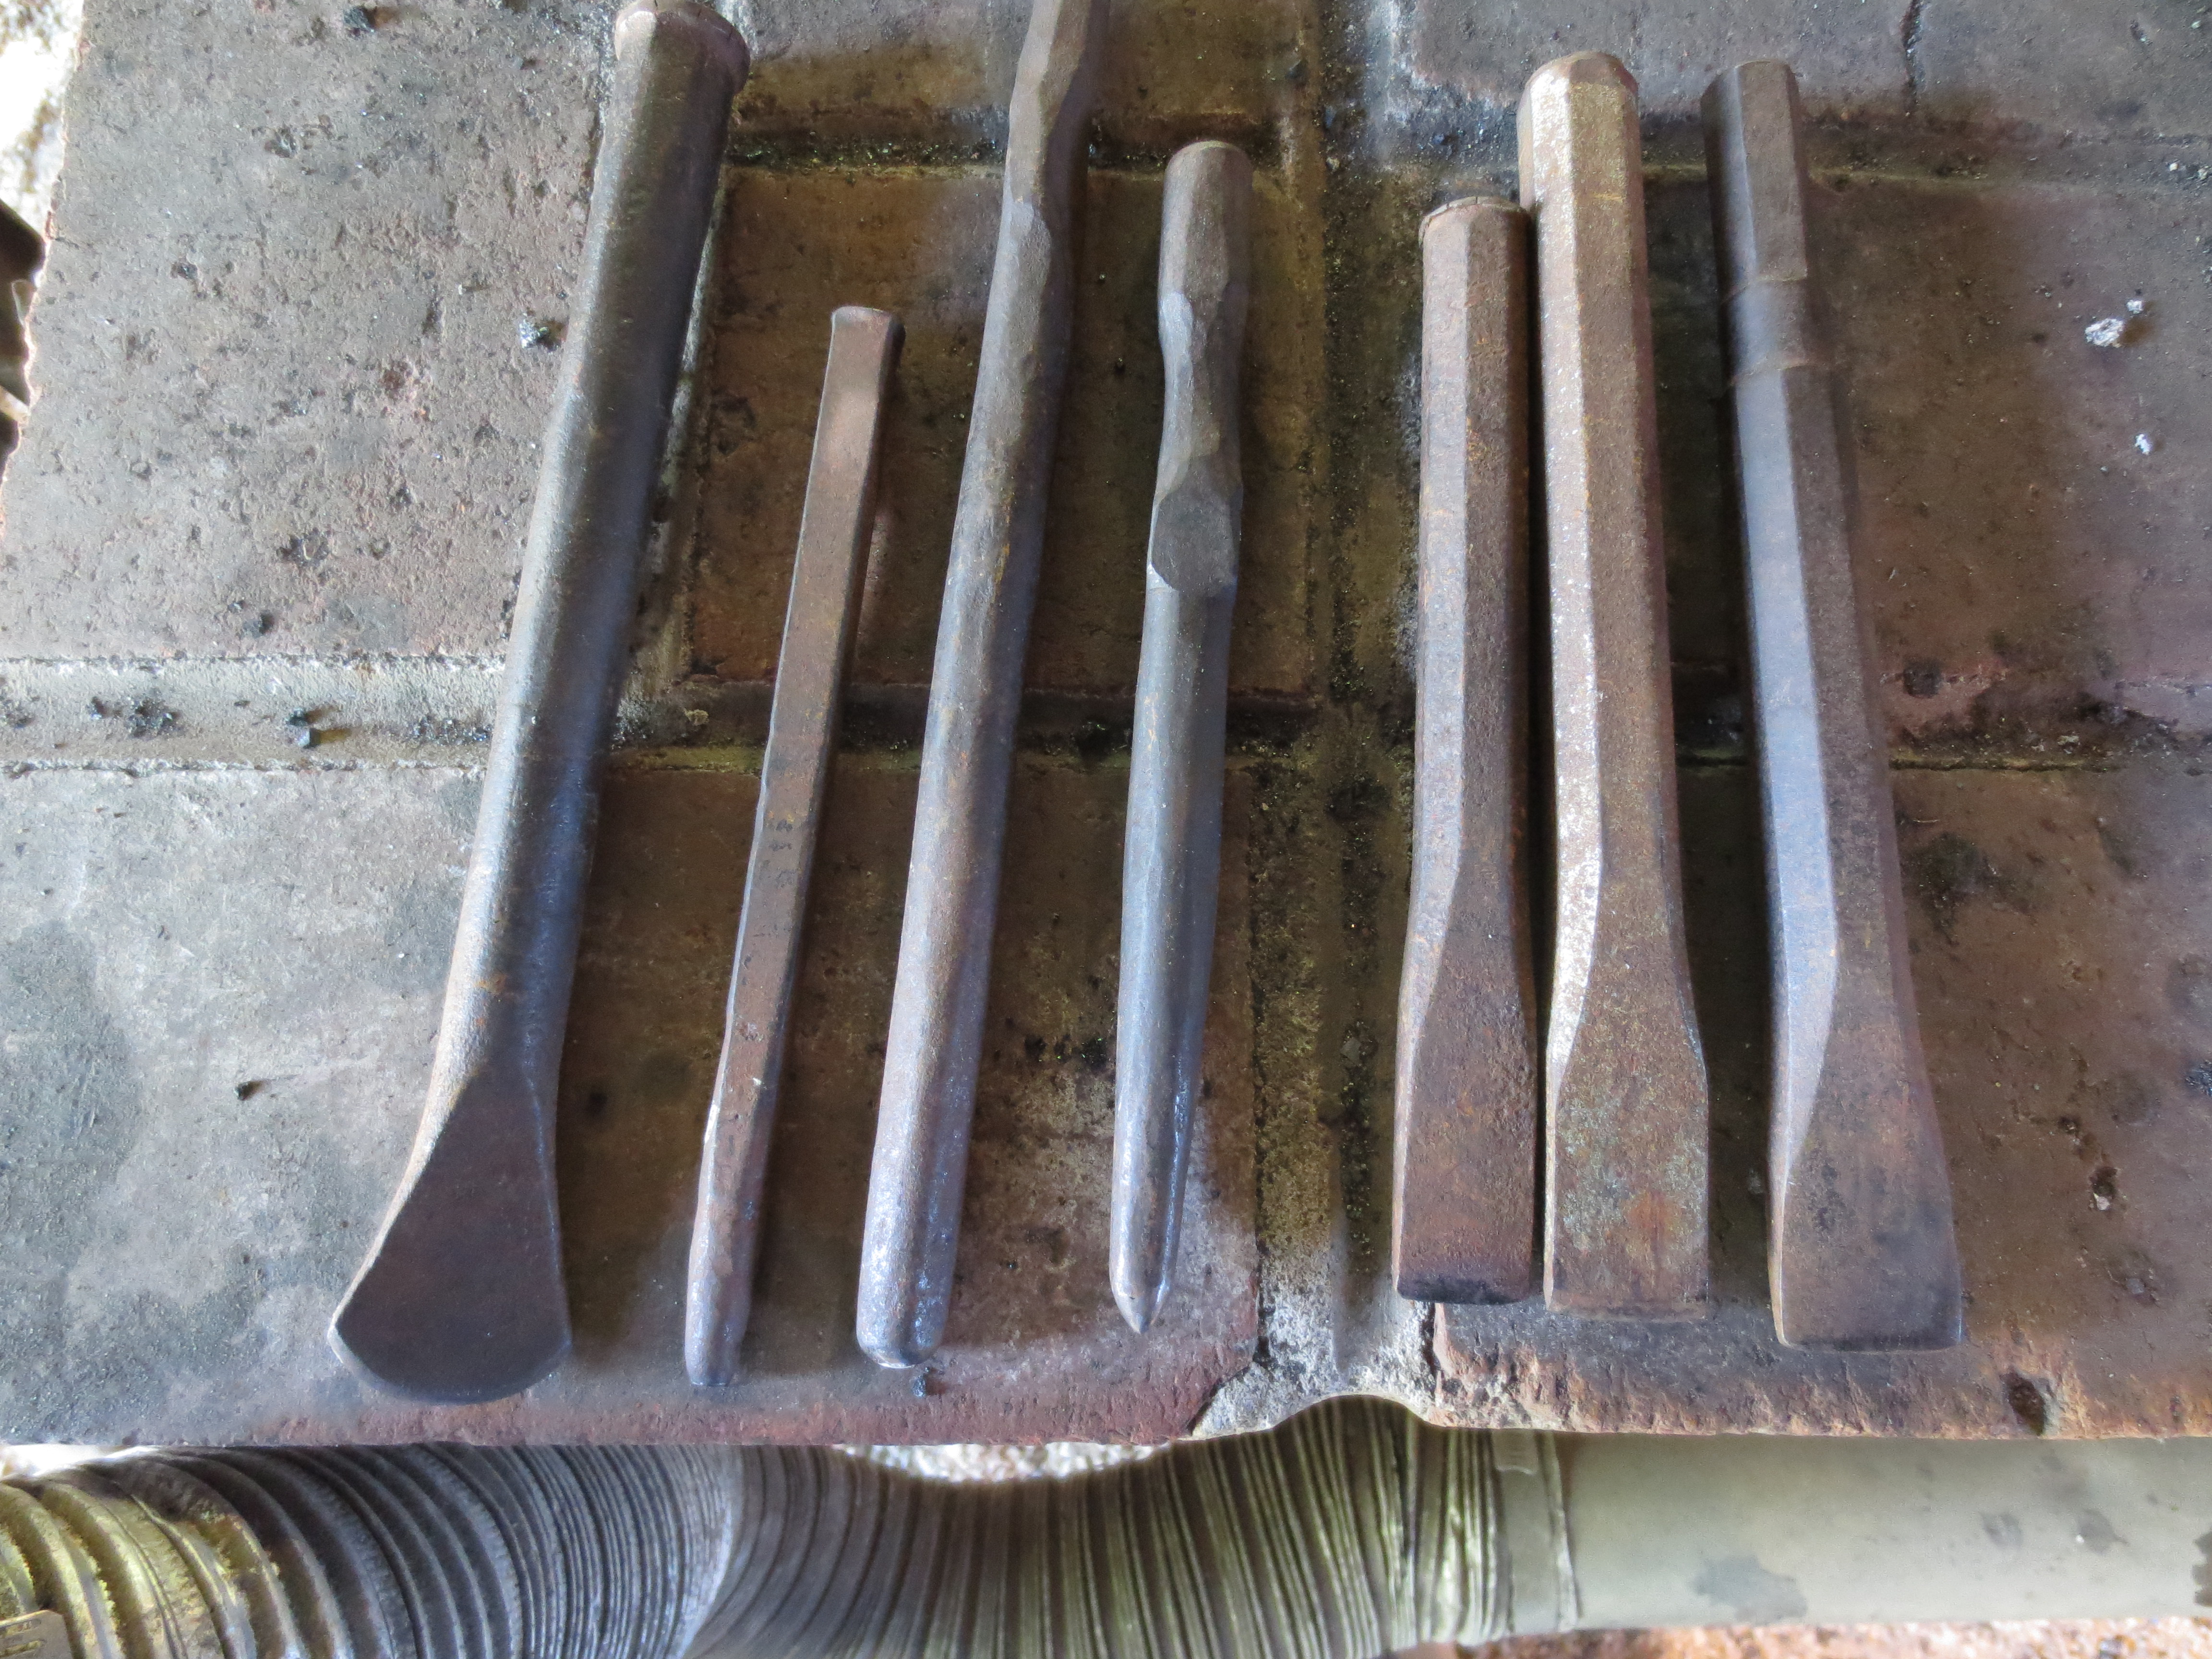
Nice Looking Tools. Did you harden and heat treat the working ends or just use them as forged?
-
Almost everyone else in the County disappeared into the woods on the first day of deer season (a National Holiday here locally) but I had the shop pretty much to myself and a few old timers who stopped by. I decided to do something to fit the season so I tried my hand at making a deer antler with the idea that I might be able to make one good enough to use as a door handle for the shop. I also tried my first spoon forge from a RR spike that might fit into the cook shack at deer camp.


-
I was on the Board of a local development group that owned a Blacksmith Shop Building with quite a few tools but no permanent masonry forge. The working shop had been closed for over thirty years and then donated to our group. The shop was taken down and moved to a park in town but the forge was not included in the move. For years the group just opened the shop on the Labor Day weekend and the rest of the year it just sat unused. I had no experience with the craft, no high school shop history and little manual dexterity. The Board agreed that we needed a working shop to be a tourist draw and I was assigned the task of finding blacksmiths to make it work. Long story short; no local blacksmiths materialized, so I went looking far afield and found out about the Blacksmith Association of Missouri (BAM). They were extemely helpful and suggested I take their Begining Blacksmithing Class which I did and thoroughly enjoyed. With the advice of BAM members and internet searches I found designs for a two workstation masonry forge at our shop and helped get it built. If you build it, they will come, and, come they did. With a working shop available, many locals interested in the art of blacksmithing came and agreed to form a group to operate the shop on a regular weekly basis as a community forge. We now have nine BAM members locally who volunteer to take turns keeping the shop open every Saturday morning for public and touist demonstrations. I found out that I enjoyed it and it became the hobby I never really had before. I have been doing it now for seven years, working with BAM and joining the Artist Blacksmith Association of North America (ABANA). When I retire as Prosecuting Attorney of my county in a few years I hope to be able to work more than one day a week honing my skills and teaching classes to young people to encourage their recruitment to the craft. You can check out our community forge, The Tom Kennon Blacksmith Shop" at our website: www.doniphanmissouri.org/tom_kennon_blacksmith_shop

-
Here are three pictures of a longer potrack I did several years ago. This was my standard design until I did the short one in this thread. Sometimes I do the end scrolls asymetrically (but with each end symetrical to the other). I always like to use pyramid head screws to affix the racks to the wall. Also, I now do much more texturing of the rack than is shown in these photos; usually by cold hammering the entire piece of stock with my rounding hammer overlapping blows until the entire front face has been textured. I also use the same rounding hammer to break the edges of the rack. It is a lot of work, but it really makes a difference in the finished project.


-
In response to Yves' questions: The flat stock I started with was a piece of 1.5" x 1/4" by 14 inches long. The length was not designed into the project, it was just a piece of leftover scrap I had from an earlier project. All of the forging, texturing and drilling were done with the bar flat. I then use the bending fork in the hardy and a bending wrench to bend out the center in a smooth radius leaving both ends and the screw holes flat. When screwed into the wall the screws pull the ends down flat against the wall and leave the radius in the middle about 3 inches from the wall. The hooks could have easily been fixed but since pots are often of different sizes, being able to slide the hooks along the rack a couple of inches in either direction might be useful. In bigger racks I often put a fixed hook in the center that has decorative scrolls running above the rack. In this case the rack was so short I did not think I had room for two movable hooks and a fixed center hook so I just did a decorative element in the center with the hooks on either side. The center disk was a 2.5 in disk of 18 ga. steel that I have a bucket full of from an Iron in the Hat Acquisition. The 1/4" hole was already predrilled. I just did a bit of countersinking on the back for the rivet. The disk itself was texured with my cross peen and power wire brushed with just enough brass hot brushing to give the texture some highlights. It was then riveted to the rack with a copper rivet.
-
I had a scrap piece of 1.5 by 1/4 inch stock that I thought might make a small pot rack so I split both ends and drew them out and curved them over the horn of the anvil. I hand hammered and broke the edges on the rack for texture. I then drilled each end and drilled screw holes on each end with another hole in the center for a decorative disk in the middle of the pot rack. The disk was riveted with a copper rivet and the entire rack bent with a bending fork. The whole thing was finished with a clear acrylic spray. The hooks were drawn out of 1/4 inch round stock and hung on the rack.

-
I decided to try a flower and leaf project by forge welding the leaves to the flower stem. The flower is a steel disc about 1/8 by 2.5 inch with a hole drilled in the center. I hot cut the disk into petals and used a ball punch on each petal end. The stem for the leaf assembly and the stem for the flower were 3/8" round stock about six inches long. I drew out one rod and put leaves on each end and then nicked the rod a bit off center folded it and faggot welded it to itself. I used a butcher die in my guillotine to draw out a tennon in the other rod and then peened the tennon to affix the flower to the stem. I then forge welded the flower stem between the stems of the leaves. Final finish was to heat and bend the petals with a long nosed plyers and bend the stems into a pleasing orientation. A hot wire brusing with a power wire brush and a brass brush on the leaves finished the piece. I applied a clear acrylic spray to complete the work.


-
It would rip open a box quite nicely! I haven't heard of what the BAM Conference forging contest will entail this year. Hope to learn more at the meeting on January 12th.
-
The next BAM meeting on January 12, 2013 in Higbee, Mo has specified that the trade item for the meeting is a cork screw. Here is my project forged from 1/2 inch diameter round stock. It works, if you don't mind tearing the cork a bit. It would be better to use with cask sized corks. I am looking forward to see what other members bring to the meeting.


-
I considered another rivet on the top but it would have required me to countersink the top rivet in order not to get it in the way of the shelf the brakets will support and I did not have a good countersink available at the shop while I was fabricating the brackets. In any event the scrolls rest against the bottom of the shelf supports and will carry a reasonable weight if the shelf support deflects downward due to any weight on the shelf even without a physical connection from a band or rivet; but you are right, a top rivet would be a better design.
-
This project developed out of playing with a new scrolling jig I picked up tailgaiting at a BAM meeting. After doing a number of scrolls I decided to do something useful with them and came up with this hanging basket wall bracket. The first one turned out so well everyone who saw it told me to make a matching one and use the pair as a shelf support. Since I have a brother who does cabinet making who can do a nice shelf, I completed the second bracket. A word of advice; when making pieces to match, forge and fabricate two of everything at the same time. It's a real pain to complete one and start from scratch to make an identical piece.


-
Dr. James E. Price of Naylor, Missouri, wrote and published a monograph on the history of braces and bits while a member of the Midwest Tool Collectors Association about ten to fifteen years back. He probably has one of every kind known to man and could tell you everything you would want to know. The Midwest Tool Collector's Association may also have lots of info in their achives and newsletters.
-
The masons who built our community dual forge also thought it would need a steel plate between the two firepots. They had never built a forge before but they knew fireplaces quite well and knew it needed a smoke ledge to draw properly. The attached pic is of the steel plate they installed.
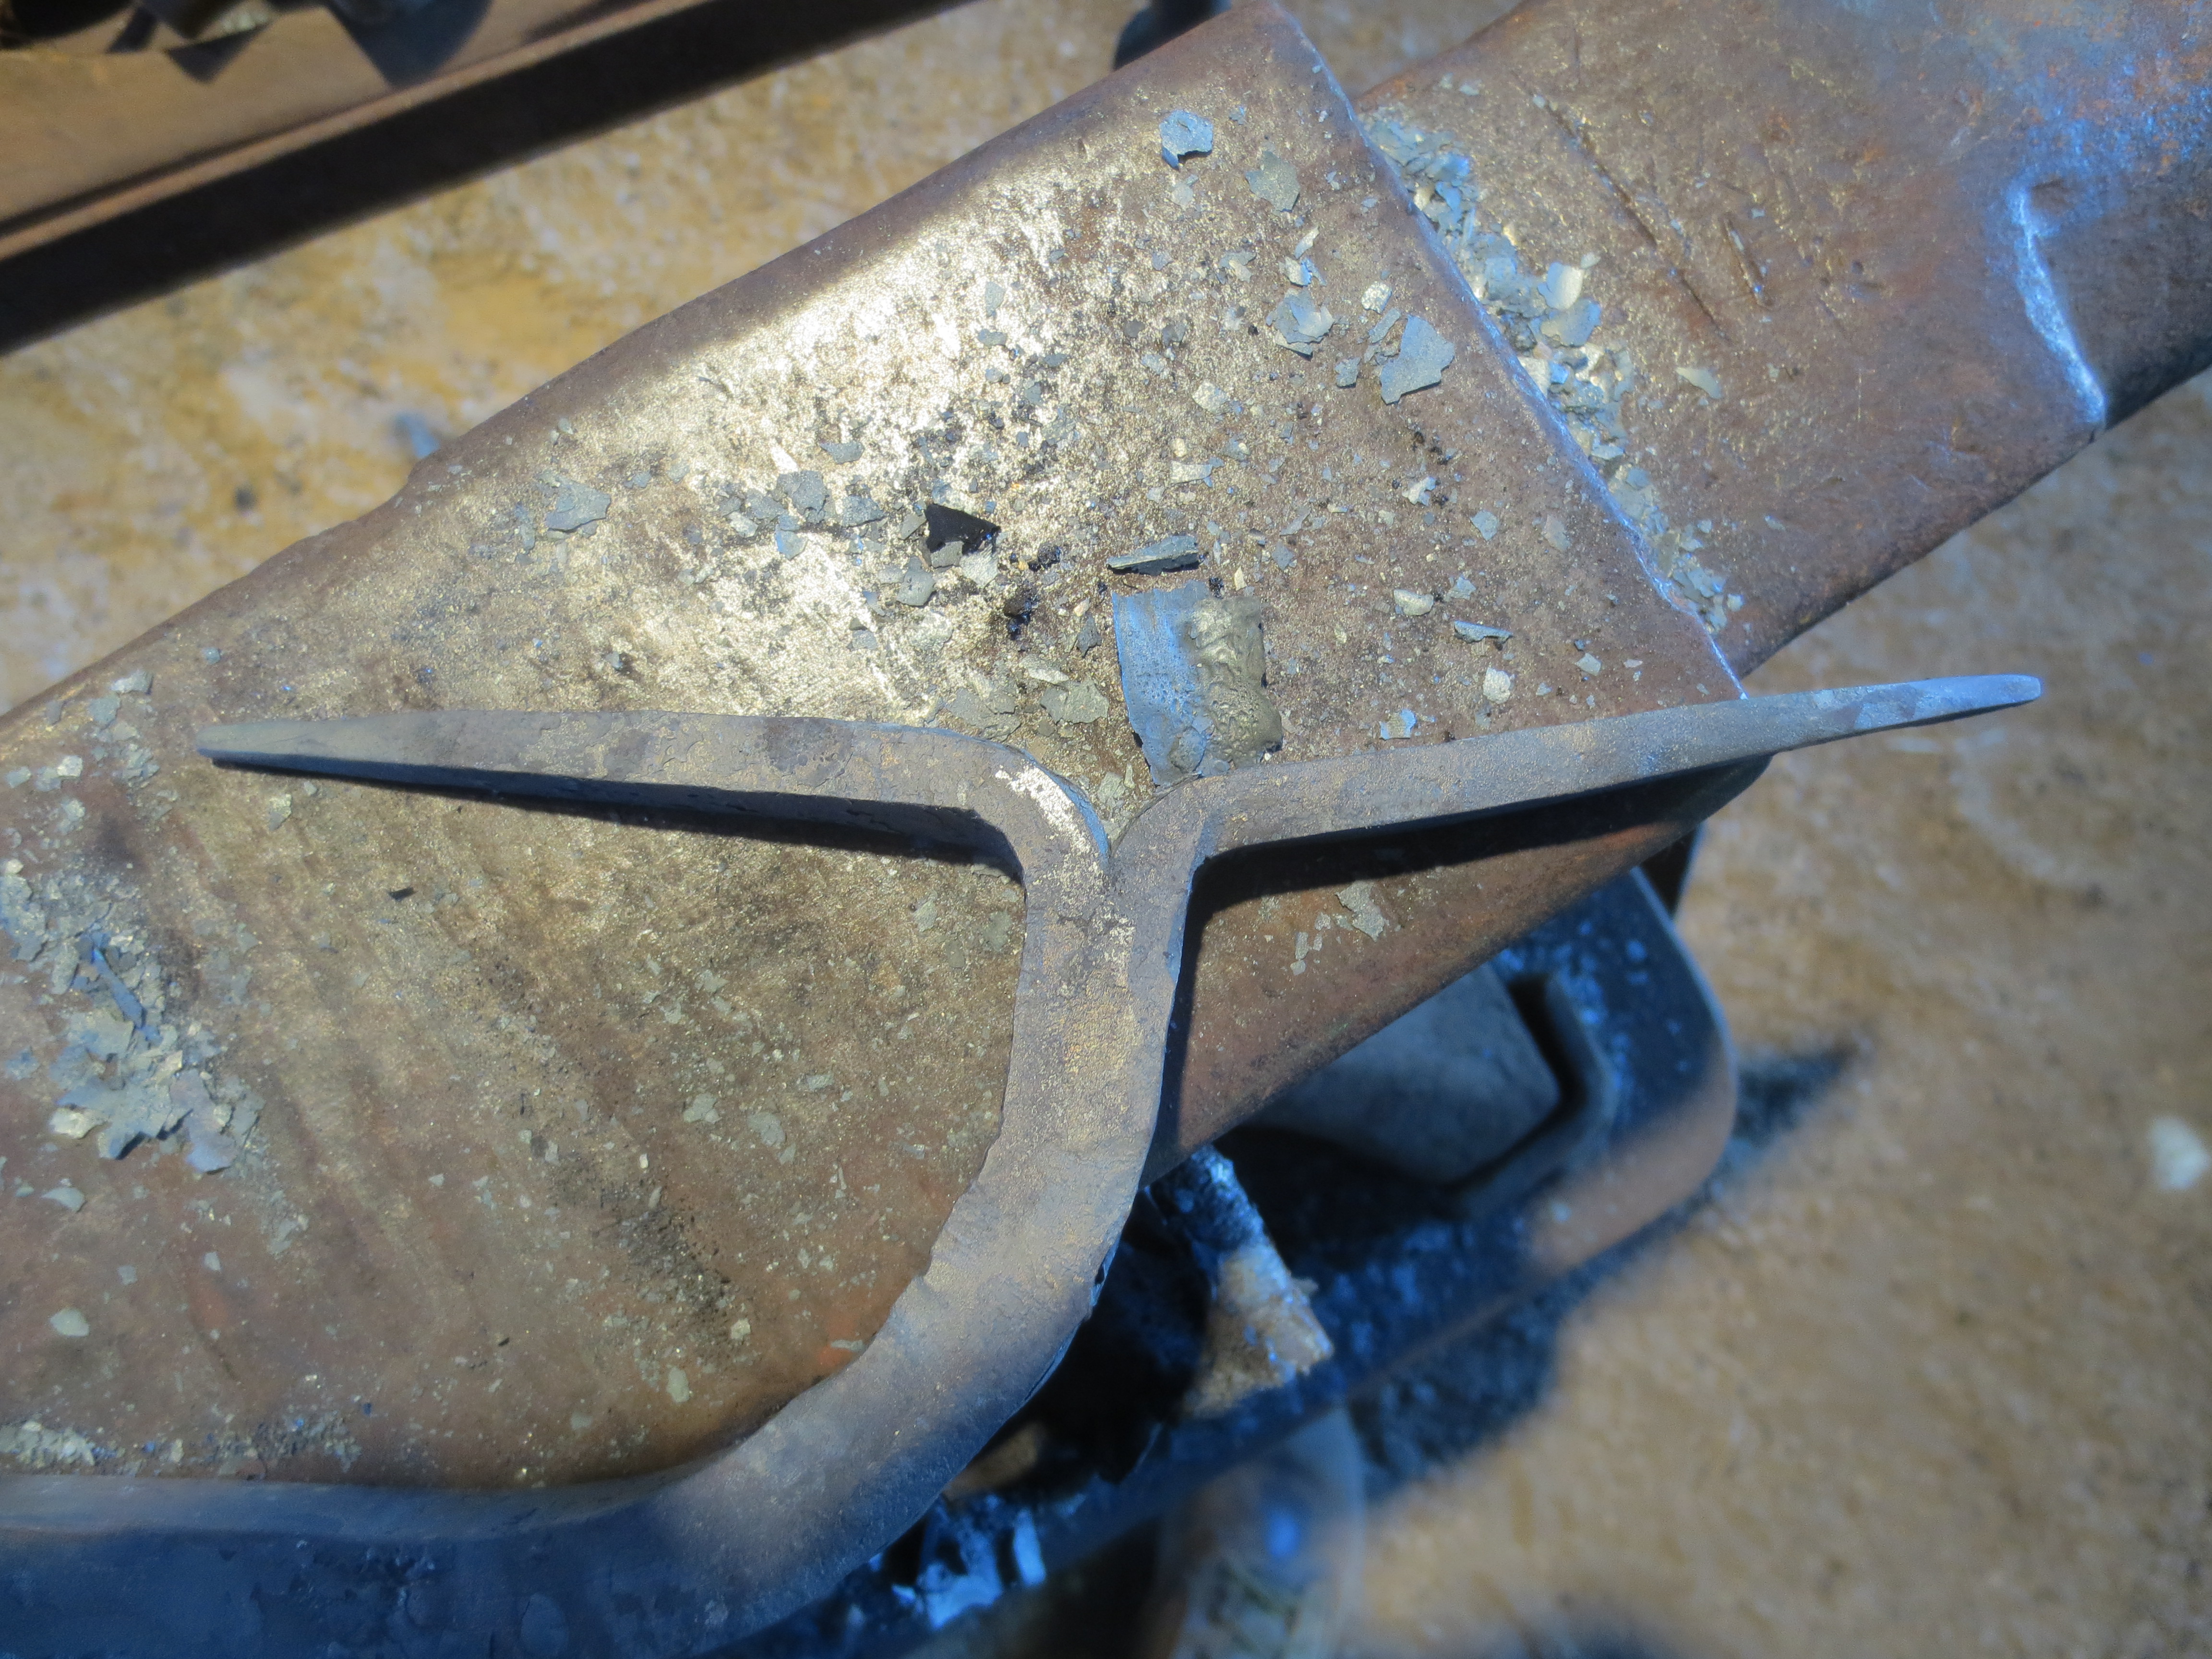

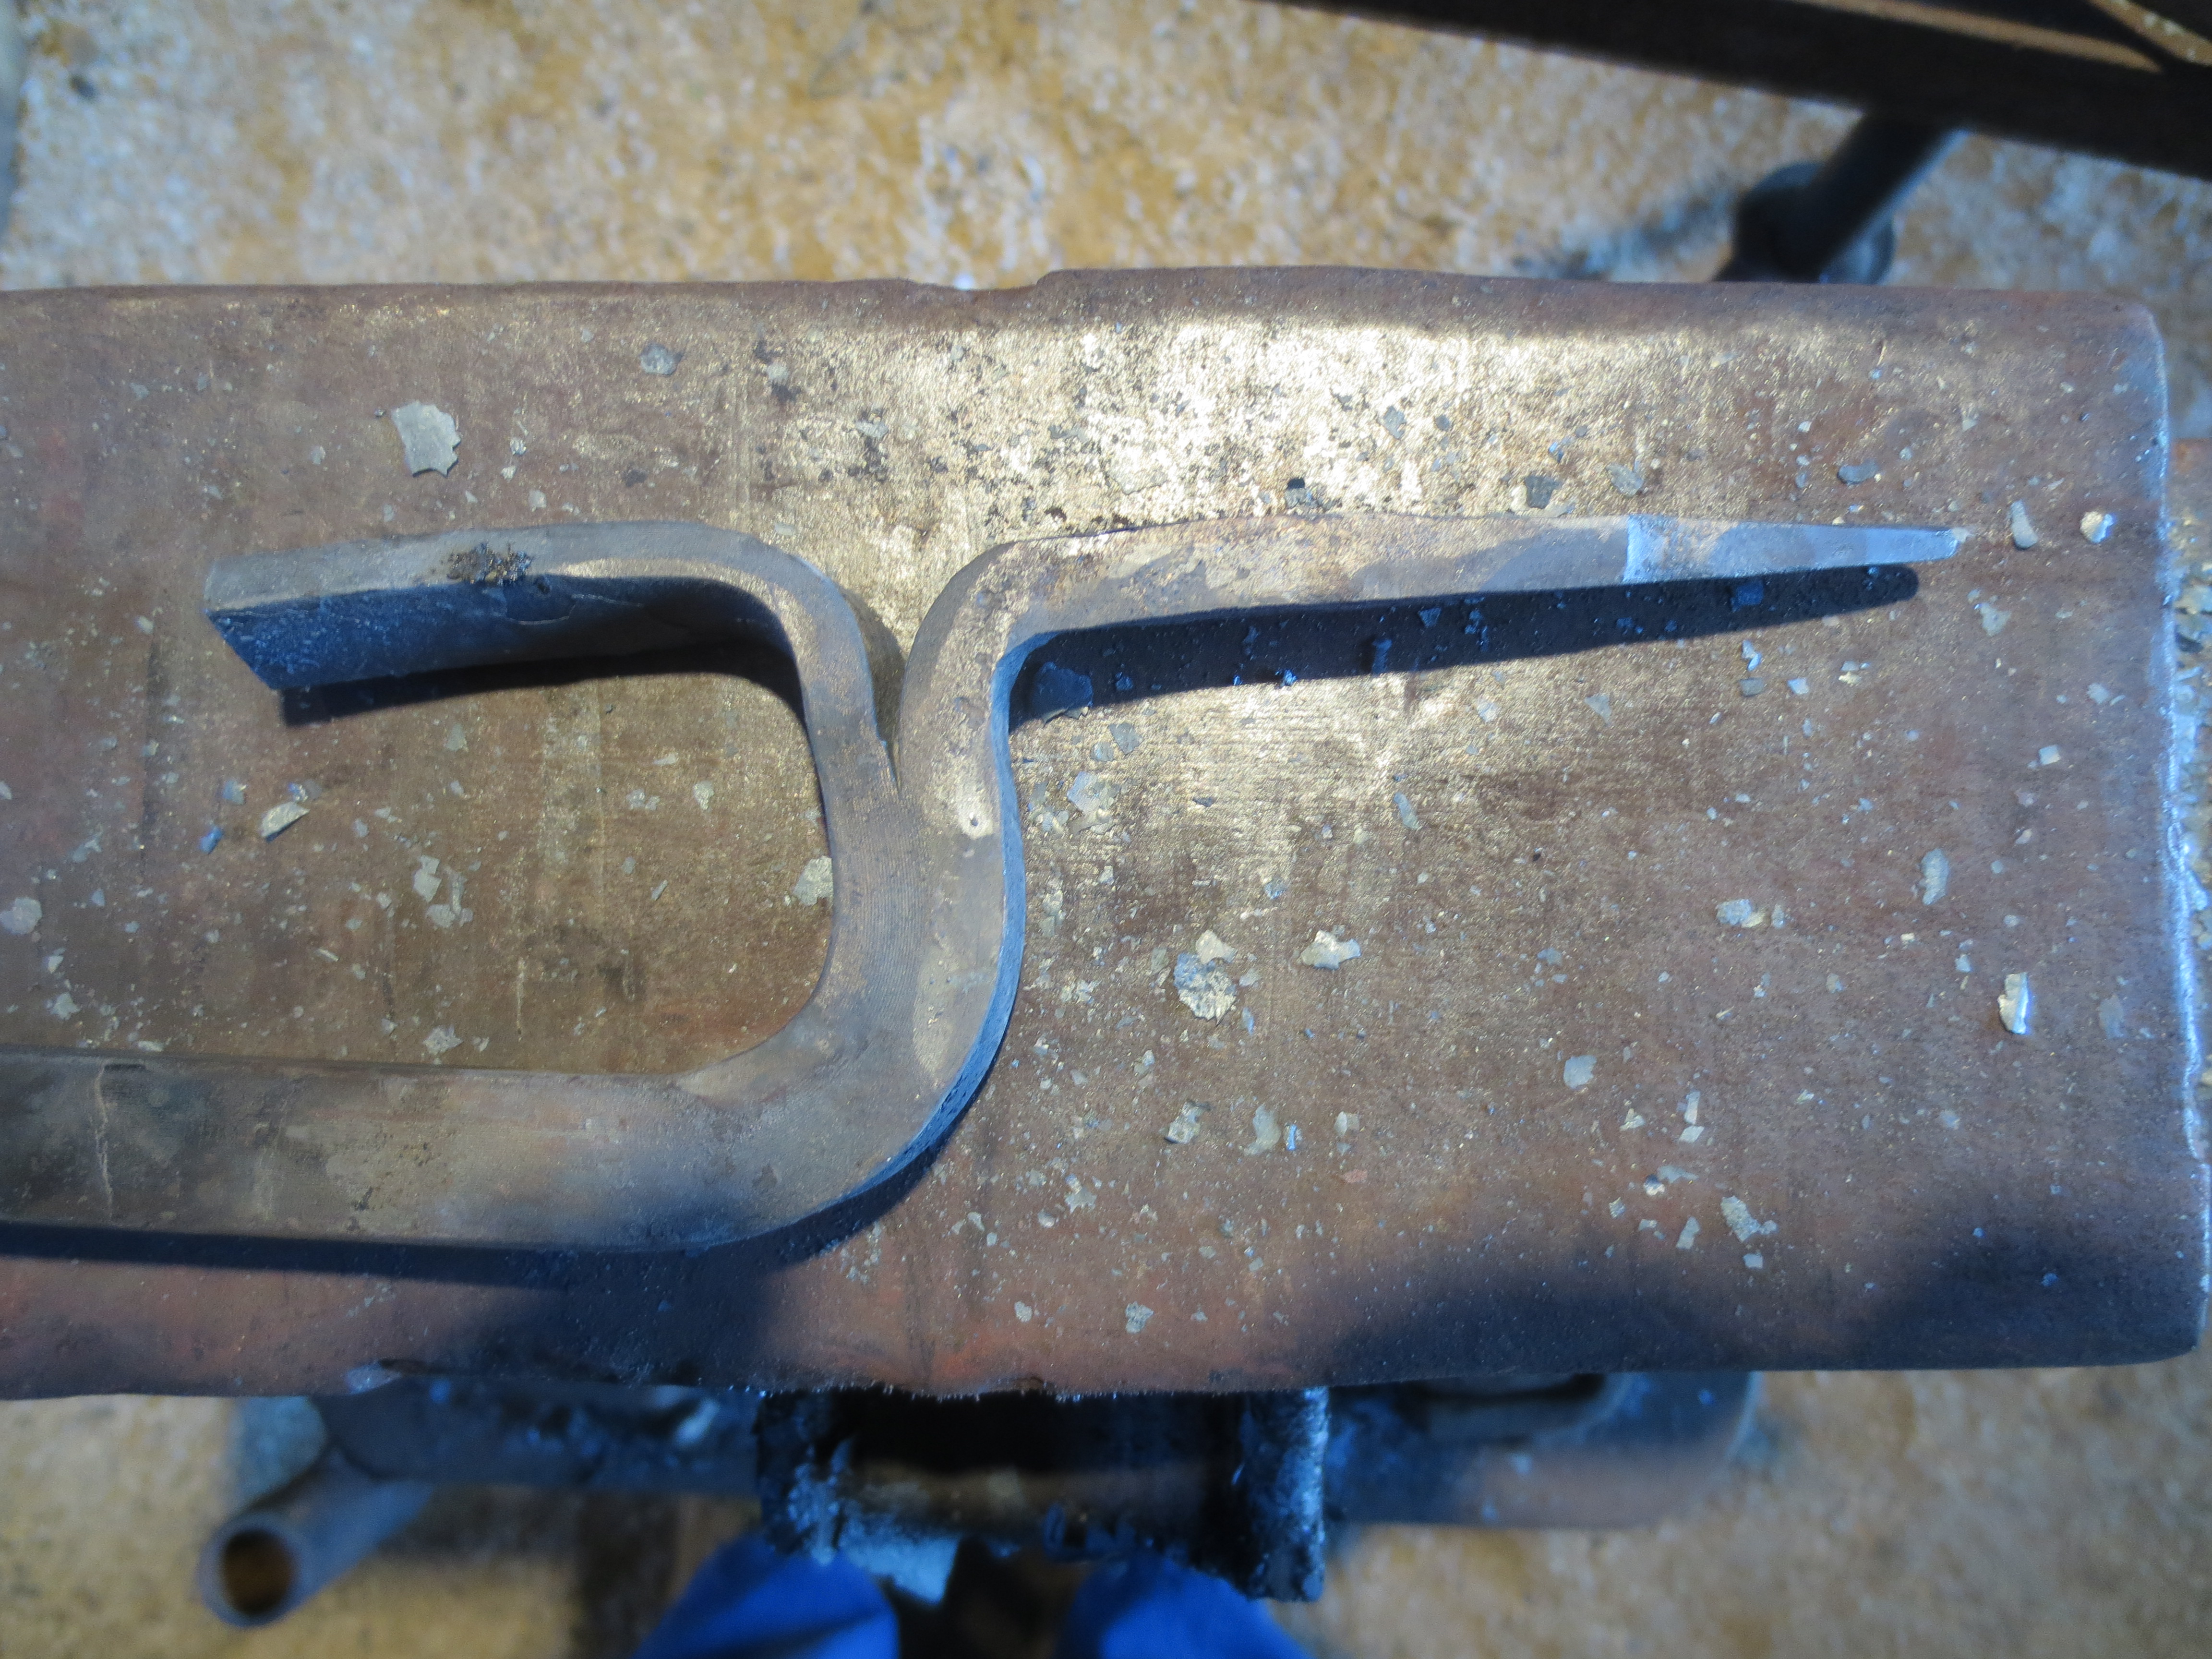


Midieval Door Pull/Door Knocker
in Member Projects
Posted
We obtained a new cone mandrel in the shop last year but had not put it to much use so I decided to practice a ring to use as a component for a door pull or door knocker. I used half inch round stock 12.5 inches long and scarfed both ends before bending in the bending fork. It was tough getting the scarfs to line up and that is where the cone was a big help. It took three welding heats to forge weld the ring. After that, the cone mandrel made short work of getting a near perfect circle. The base plate was 2 inch by 1/8 inch plate. I did not measure its length since I was not sure how long a piece would be needed until I finished the ring and the pointed leaf ends I intended to forge. After fullering off a 3 inch segment on one end of the plate I forged it to a spear point and then used a veining chisel and a curved chisel to inscribe the leaf veins. After one end was done I used the ring as my indicator on how long the plate would need to be to forge an identical leaf on the other end before affixing the ring. I cut the plate and then worked that end to fuller and forge the other leaf. When both leaf ends were complete I used a cutting chisel and a handled hot cut chisel to cut out slot anchored at one end of the slot. This was pulled out and then drawn out to a length that would wrap around the ring. Final assembly consisted of heating the slot tab, laying the ring on the plate and wrapping the slot tab around the ring, tight enough to hold it permanently in place, but loosely enough to allow the ring to be pulled out. A 1/4 inch screw hole was drilled at each end to anchor the plate to your favorite castle door. The entire assembly was soaked in vinegar for a day, rinsed, dried, and power wire brushed. I then heated each leaf end from the back with a torch and used a brass brush on the front to impart a brass patina. The entire piece was then given two coats of clear acrylic spray. Now, if I just had the castle.