

bengriswold
-
Posts
30 -
Joined
-
Last visited
Content Type
Profiles
Forums
Articles
Gallery
Downloads
Events
Posts posted by bengriswold
-
-
Kurokubi, good question as I have pondered a better way to do this for a while as I often have large lumps as thick as a forearm.
I take an old cardboard box that is wider than it is deep or at least roughly square (heavier cardboard is better) and cut a U shape in 1 of the 4 sides. The bottom of the U goes about about 2 to 3 inches from the bottom of the box. The purpose of the U is a slot for whatever striking tool you choose to use. Then I set it on a stump and just break it up with an axe or hammer and all the pieces are usually contained in the box.
It's so simple to make another I usually don't bother to reinforce it but I have used duct tape to make it more durable and reinforce the bottom.
-
9 hours ago, Frosty said:
If it's seasoned at all it will go rancid in time unless you use a mineral oil seasoning say motor oil.
Frosty, not that anyone comes to IFI to learn about the science of seasoning cast iron.. =) but with science stuff like this I think your statement sounds like a fact. While it may be your experience it is certainly not a fact. I have personal experience that contradicts this as do many others on nerdy cast iron forums and cooking science websites. http://www.castironcollector.com/forum/showthread.php?t=3234 http://ths.gardenweb.com/discussions/2337724/cooking-with-cast-iron user danab_z9_la is a chemist who gives the most complete accurate picture of how to care for/cook with a cast iron that i've ever read so just read what he says and apply it. A properly seasoned cast iron is a matrix of polymerized and carbonized oils when done properly forms a hard durable carbonized polymer matrix. If you have developed a proper seasoning layer, scraped your pan clean, cleaned with soap and heated to 450 for as many minutes as it takes to stop smoking and there is a dull black not shiny finish (which will be the case if the seasoning layer is a good one) you will not have a rancid smell even after years of storage.
9 hours ago, Frosty said:The ONLY way to keep cast iron from eventually going rancid is to completely wash the seasoning out of it. Of course rust is a LOT easier to clean out than a rancid season. Do you remember the screaming that went on when you discover someone did you a "favor" and WASHED your cast iron?
a properly seasoned pan cannot have the seasoning washed out of it. That would require heat around 550 to 600 to flake it off slowly and abrasives a lye bucket are the common methods. Your seasoning layer is not good if it can wash out.
By the way your one of my favorite people on here and I've got a lot of respect for you.
-
Frosty - the basic idea to prevent this is you want to polymerize or burn off all the oil on the surface and in the pores of the cast iron prior to storage. JHCC basically said the same thing
If you put a cast iron away with that has a visible layer of oil on it that's the reason for the rancidity. It's hard to describe w/o a picture but prior to putting it in storage you want to to have it a dull black color with just barely any shine or none at all is fine actually but usually there will be various bits of shine on different parts of the pan (rim, edges inside corners etc). On a evenly seasoned pan You can achieve this in the oven and hold it around 350 for 20 or 30 mins and then raise up the temp till your smoking slightly. Rub down with a dry paper towel if oil seeps out of pores as the heat builds and basically just look for that dull black but try not to overdo it. 375 to 400 seem to be about the right temp for most oils to smoke. This is basically burning off the unpolymerized oil that is sitting on the surface or in the cracks. This can be achieved on the stovetop as well and in less time but it doesn't heat the sides as well. so it really depends on how nicely machined the and smoothed the sides are and how much trouble you want to go to. Bacon grease is fine in cast iron but it will never polymerize and you will want to burn that out real good (or just cook something else that will soak it up) before longer term storage and then heat the pan in whichever method you choose to get a dull black surface. Use a good thin springy S.S.metal spatula (the dexter brand is great) to scrape as much as you can prior to any of this as this will reduce the smoking of unburnt food during the process. I find veg oil or shortening are great oils to use right before going through the "dry heating" process. Don't oil after this until you are ready to cook again.
-
On 7/17/2017 at 6:36 PM, VaughnT said:
even had to make a nice little organizer to keep them all together.
VaughT - I love that little punch holder. I use toilet paper cardboard tubes in an old nancy's yogurt containers for a similar storage effect- though obviously less durable. Also welded up one with a bunch of conduit cut-offs for my smaller punches. This is so much simpler.
-
On 3/26/2017 at 3:29 PM, iamjoe said:
My forge build. It has a lot of room for improvement but it's more than what I had.
That looks real nice and simple and real hot. I am curious what are the things you want to improve? Great Job.
-
On 3/2/2017 at 1:35 PM, JHCC said:
The "vegetable oil because upholsters carry nails in their mouths" story in that link reminded me of the time I visited an old-school upholstery factory and met the senior upholsterer who still would "spit tacks" when nailing up a seat suspension. He would literally fill his mouth full of nails, maneuver each one to the front with his tongue (nail head out), grab it with a magnetic tack hammer, and whack it into place. He worked really fast, but he was missing a few teeth.
Cool Story. Watching people who are masters in their craft is really a joy.
On 3/2/2017 at 11:34 PM, John B said:The difference between hand making and the production method show is the basic shape of the "spider"
For my cob fork, a similar shape being hot cut in from a piece of leaf spring material 1/2" thick and 3" wide was used,
Some 1/2" holes punched through at strategic points (5 in all, 3 for the four tines/prongs, and two to isolate the handle socket to be section) these were then split using a hot cut, leaving a blank (imagine a four fingered hand, no thumb, on a wrist (see around 2.50 -2.51) similar to the one you can see that has had already been manipulated ready for the drawing down of the tines (see around 1.46), the outer sections being slightly widerr than the inner sections as they are needed to be longer than the two central tines when finish drawn to length
More tines required, more "fingers" on the blank.
Then it was basic hammer work on anvil and stakes to draw out the tines, (We did have a striker involved here as no power hammers were available.)
From the 1.40 to 2.45 frame you will see the method for a hand forged fork,(but using rollers to draw the tines as opposed to on the anvil)
Not shown is that some work has already been done to allow access to the parts to be forged individually,
"Finger sections" are bent out of the way to allow the tines to be worked on first, 2.50 to 2.51 gives a good idea of pre and post blank profiles. Tines then positioned in place, and the socket section drawn/spread, trimmed to shape and formed into a socket ready for final setting of shape.required.
Sounds and is easy, but hard work getting there without the power hammer.
Hope this has helped,
If you have some spare forks, the tines can make good scrolling tongs, handle part is already drawn down, only need the top (thicker) end tapered for the jaw section, and a set hammer to indent the hinge area, slit and drift for rivet, and rivet together. Voila !
Sorry I did not see this earlier John but I wanted to be sure to thank you for taking the time to explain this. Very interesting. referring back to the video helped me to understand your explanations much better.
-
7 hours ago, Michael Cochran said:
I am collecting cardboard tubes from work for that very purpose. I need to see how many I actually have and start building a frame for them.
56 minutes ago, Glenn said:Start with a 5 gallon plastic bucket. Fill it with cardboard tubes cut about level or an inch below the top rim. The bucket can get heavy fast, but you can move it when needed. Think similar materials in the same bucket and several buckets as needed.
The cardboard tubes inside a roll of pallet wrap are particularly robust if you have access to a production facility cardboard bin. I have cut these different lengths and glued them together to make a freestanding "cubby" shelf, the difference being they are laid on their sides rather that the tube openings facing the ceiling. I also picked up a whole bunch of poster/ paper roll tubes once from a posting on craigslist intending to use them as setting forms for concrete posts but i had leftovers and ended up making a larger one of those freestanding shelves. really heavy stuff will squish it down a bit but with really thick walled tube mixed in I imagine you could create quite the sturdy free standing shelf with a frame on the outside to keep it all together while the glue dries. Maybe you wouldn't even need glue if you framed it. I have a bunch of short six to eighteen inch long round 3 to 6 inch diameter thin walled pipe I am saving up to make a similar shelf that is more heavy duty. I like to lay them on their sides just because of floor space being at a premium.
-
16 minutes ago, Daswulf said:
On a small scale you could check out fork forging videos. I agree it would be interesting to watch. I might have to try it some time because to me that would be even more interesting then watching it.
")
When you do try it tell us about it and better yet take a picture. Its interesting how they say in the video "the worker has to first shape a spider" This is obviously industry specific jargon I am pretty sure I remember reading a post on here where some was using these hay forks for to make actual forged arachnids... aka spiders =P
18 minutes ago, ThomasPowers said:When I was in Germany I visited a water powered smithy that was now a museum and had a video of forging a hoe---from heavy sq stock (2" ?) using a board drop hammer and then powerhammers to stretch the sides out. Well worth a visit if you are over there.
Der Historische Eisenhammer ECKERSMÜHLEN
We sort of stumbled over it as we were driving and there was a large air hammer by the side of the road marking the entrance to the Museum. All water powered! (including the air hammers...)
Very cool. There are a few places in Europe like this i want to visit and this sounds like it should be added to the list. I want to visit the Rivierre Nail factory in France.
Great article on them here: http://www.core77.com/posts/53466/Why-You-Should-Use-Nails-Not-Screws-Also-Why-is-This-Nail-Factory-Covered-in-Vegetable-Oil
-
Thanks Jhcc. That's a useful link. I tried searching quite a bit for a video of someone doing this by hand but found nothing. I think it would be an interesting process to watch.
-
I've got a bunch of rusty, handle-less pitchforks / hay forks lately as the tapered diameter of the tines seems about right for a couple projects I have in mind. I find these at used tool places, flea markets, etc.
My question is this: How are these forged by regular folk w/o all that expensive machinery?
I found one video on youtube that showed the process https://youtu.be/jY14Oi0i4gg?t=1m38s Clarington Forge ( I believe) uses to make them in a industrial production type setting. I found this fascinating as really am having a hard time imagining how the process would work by hand; especially with multi pronged forks of 5 or more.
I will just make clear that this is not something I intend to tackle but rather a question or curiosity and love for the craft.
Thanks,
-
On 1/19/2017 at 3:46 PM, Alwayslearning said:
Good ideas all!
And Frosty, where do you get waterglass these days? (Just wanted to hear other options other than feebay, or glamazon)
Water Glass - AKA Sodium Silicate. What I did was buy some kitty litter in a purple bag at fred meyer maybe "kroger" on the east coast. Doesn't matter the brand but it has to be 100% silica gel- mine was in a purple bag and said amazing something litter. I already have the Lye - Sodium Hydroxide and I did what this guy does but in a much bigger batch outside:
Got a big 2 gallon bottle of the stuff now and I use it mixed with perlite and fireclay for a cheap forge lining. I also rub it into my mechanics gloves so i can do metalworking and grinding with them and it doesn't burn holes in them as fast. Does take awhile to dry but i buy those multipacks of gloves at costco and usually rub some into the mesh parts of a few pairs. When you make it and let it get real thick to store you can pour out a small amount into a small plastic cup and thin it with water to the desired consistency to "paint on to fabric" that you want to fireproof or fire resist. Its not a perfect solution but its a relatively cheap one if you are resourceful and keep lye around already. Fabric cant be washed without washing away sodium silicate. I also rubbed some onto and old pair of jeans so I drape that over my chest when I am cutting with my metabo angle grinder. That thing catches me on fire very easily and it gets bothersome to keep checking.
Hope that helps
On 1/19/2017 at 3:46 PM, Alwayslearning said: -
Love it. Looks scrappy and brutish at the same time.
-
Makes sense to me too. Best we can do is share is our experience and Goro has gotten loads of help- now he just has to sort through it all do what's best for him (and hopefully let us know). Appreciate all the skilled people on this forum. Glen's oversight and the awesome wealth of knowledge here is the only reason I have a vise much less anything to contribute.

-Ben
-
If what the seller said was true originally, that the jaws close but to not open- then the screwbox *theoretically* should be fine - in other words working. If your pivot bolt/rivet area is froze up all that would happen when you backout the screw is that the screw and washer would... well backup leaving you with enough sludge rust whatever in the pivot point to counteract the pressure of the spring which normally would force it back. Daswulf and Jeremy K already alluded to this but I just wanted to reiterate if what the seller says is true then your screwbox is not the issue.
The vise looks pretty nice and not beat up for sure and the fact that you don't have to drive forever to get it is worth some extra money to me so I would buy it if i needed one. That's my 2 cents.
-
On 8/29/2016 at 4:48 PM, MarkDobson said:
the smaller square sections in the middle that are sticking out far enough so that if i need more leverage or need to be higher for whatever reason i can stand on those too
I was about to ask if you welded those on for that purpose but it sounds like they were there.
On 8/29/2016 at 4:51 PM, ThomasPowers said:Say what! I can tilt my 515# vise easily trying to bend some 1.25" stock in the hardy hole.
Ya I thought the same thing as Thomas. I am having to redesign my original stand idea since my original "ill just attach it to this 200 lb stump" idea was way to unstable for my Liking and simply laughed at me when trying to bend stuff. Those tabs should come in handy for putting some sideways and downwards pressure to keeps things from rocking around depending on what type of work your doing.
Looks great and thanks for sharing. Ill post mine up once I am finished.
-
It actually looks like a bark spud to me. Pointy end to roll or shift the log.
-
Nice is this you? EDIT* my mistake, I didn't realize i was on the 2nd page of this post. Great stuff Mac. I think a fire rake is actually the first thing i made funny enough.
-
Esseman,
My advice- try to inspect the clamp mechanism. the heavier duty the clamp and the table the steel sits on (really thin sheet metal here sucks) the happier you will be. Also does the angle adjustment have a quick knob or does it require a special tool? Are the angle numbers readable? Mine build up with gunk and i can barely turn the fence when i want to change angles nor read the angles. Those types of things are what irritate me about my abrasive chop saw.
Cold saw will dull faster cutting springs and if it were my blade i would use an portable bandsaw to cut springs or forklift forks. With an abrasive chopsaw The heat buildup towards the last 1/3 of the cut tends to be a bear and cutting always seems to slow down for me. You will be amazed by how much of a 14" blade you wear away cutting a forklift tine.. Make sure to buy the thinnest abrasive blades you can find. You likely won't find those anywhere but online. I bought some pferd ones and did a review of them on amazon. I don't wanna repeat myself so just look up pferd 14" cutoff discs with reviews and you'll find it.
-
Yuppie Jr - I also use the vise "vice" trick. One of my favorites. Got a 5 1/2" post "vice" this way. In portland for $100 that's a steal.
Also lookup EDGETA - Early Days Gas Engine and Tractor Association. They have all kinds of local branches that host swap meets. These are the types of things that antique shops and pickers are connected into so they can actually turn a profit in their shops.
-
Hello all,
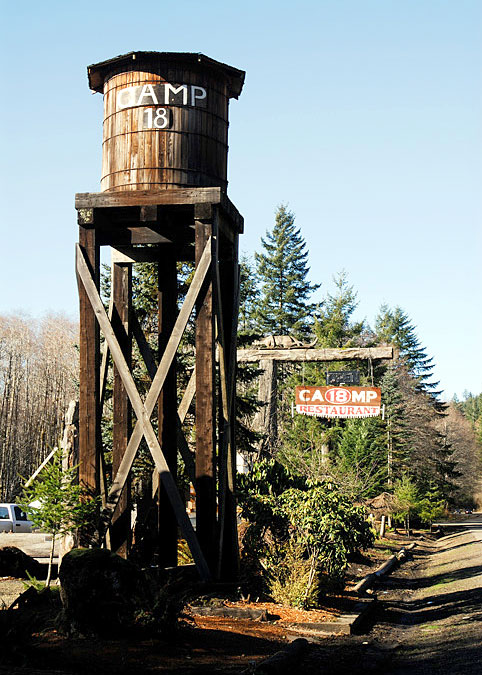
Still pretty new to this site and I wanted to let you know about a hammer in I found out about when this weekend by chance while visiting the beach this weekend with my wife. I met a blacksmith by the name of Herman Doty who has a shop/store in Rockaway Beach, Oregon called 'Washed Ashore Arts and Crafts'. I had no idea such places like this even existed- anyways I chatted with Herman and he encouraged me to come to this hammer in at Camp 18 off hwy 26 (on your way to/from the beach). I couldn't remember all the details but looked it up when I got home and their website is a bit lacking however the facebook page has lots of pics of the shop and details on the hammer in. https://www.facebook.com/washedashoreacm/home Here are the details in case you cant/wont/ use facebook:
You are invited and welcome to come to our 1st Annual
Blacksmith HAMMER IN and Antique Tool Swap/ShowBring your equipment, tools, and projects to work amongst fellow blacksmiths, or simply come and watch. We will be able to collaborate, visit, and learn from each other during this fun HAMMER IN event. Or, bring your antique tools to display or sell.
This event is FREE!
When: August 27th and August 28th
10:00 a.m. - 5:00 p.m.Where: Blacksmith Shop at Camp 18
(on Highway 26, Mile Post 18, between Seaside and Portland)If interested or you have questions, please contact Herman Doty,
503-990-4134, or Mark Standley, 503-434-0148, for more informationAlso here is a video I found online of this (as Herman tells it) new blacksmith shop that has been setup at Camp 18.
I don't know if I can make it yet but I wanted to make sure that people on here from the Oregon Washington areas got word of this as I don't see many references to it online.
Thanks for spreading the word
-
Martin,
If you thinking of making an anvil with it- it will best serve you stood on end (you likely know that if you've read enough on here) . When I got my chunk recently, First thing I did was stand it on end and do the ball bearing test. It bounced the ball bearing higher than anything else i had so I set it in concrete and used it. I just wrote a post about it. I can't really answer any of your other questions since I am still new. Good luck and be sure to show us what you come up with in the form of pictures.
-Ben
-
Thanks Brian. Not planning on messing with the anvil, it rebounds nicely, face is hard enough. Originally when I thought it was 4140 I was thinking of using the extra chunk I have for some random tooling. Just slice some pieces off with my bandsaw. What kind of things do you like to make? Any pics of your setup on here?
-Ben
-
On 5/31/2016 at 1:22 PM, Clayton Hewitt said:
Me posing with my leg vise, I think I'm done adding stuff to it.. I think..
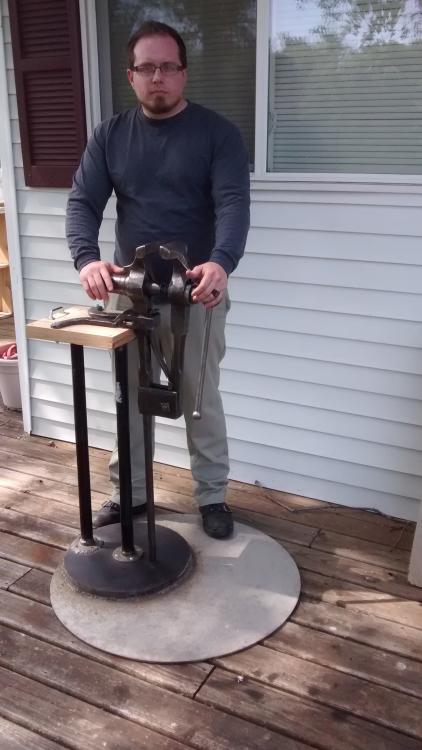
Clayton, that looks 10x more useful now. Similar type of setup I am planning. Hope its working out!
-
Perfect. I had it on its side in my mind. That makes a lot more sense.

Solar powered mig welder
in Welding Equipment
Posted
Trip- Thanks for sharing this. I've been doing research on this very topic and somehow I ended up here which is ironic because I did not expect to find a post like this on IFI. I know its an old thread but I am curious if anyone reading this has built a similar system. I can certainly relate to the author of the article and have a bunch of my stuff jammed into one of those Costco carport tents after buying some a house and some property with no outbuildings. Building some sort of small pole shed for a smithy is on my list but unfortunately much further down.