
jay_cat
-
Posts
99 -
Joined
-
Last visited
Content Type
Profiles
Forums
Articles
Gallery
Downloads
Events
Everything posted by jay_cat
-
I went to fire up the forge for the first time and decided to read the instructions before I started. Its a goog thing I followed the part about testing for leaks with soapy water before fireing the forge. One of the crimps on the hose connecting the regulator to the the burners was leaking. I don't blame Majestic, The hose is store bought or ordered. I can pick up a replacement at lowes. And yes the top is hinged.
-
After months of debating wether to build or buy a gas forge I decided to buy one. this is how it came. I will let you know how it works as soon as I fire it up.
-
Thanks for the tip Phil. I think I put the fire brick to close to the grate not enabling me to have a thick enough layer of clay. I'll try patching it. I can get as much natural clay as I can have. My friend works for a gravel company and they have hills of clay they don't use. If it doen't work I'll just bust out the current clay and bricks and just use natural clay for the whole thing which is what I should have done the first time. Live and learn.
-

Homebrew electrolytic etching
jay_cat replied to MikePierich's topic in Finish and Polish for Knives
do you print a reverse image so it appears normal once you wash off the paper? -
Homebrew electrolytic etching
jay_cat replied to MikePierich's topic in Finish and Polish for Knives
do you print a reverse image so it appears normal once you wash off the paper? -
I fired up my forge today and it seems my Idea of using fire brick under the clay back fired. The areas were the clay was thin bubbled up with the heat and diverted the air under the clay and ending my forgeing session. I was able to make my first bottle opener before I had to quit.
-
Thanks for the info Bigfootnampa. Rich, I was trying to avoid online shopping as much as possible. I hate waiting for shipping.
-
is there any reason stainless steel brake line can't be used for my lanyard hole tube? I'm try to find materials I can buy at local stores.
-
This is the stuff I used. It's really thick. The consistancy of potting clay.
-
I bought the cement from a place that sells wood and pellet stoves. It is a gallon size container pre-mixed. It has no asbestos. I can take a pic of the container if anyone wants to try it out. I used 3 1/2 bricks broken in half or thirds to give me my hight. I was able to surround the pan wuite well with them I had half bricks not the full size 1 inch I think. I'm glad I used the bricks because I used all of the furnace cement. I was planning on using just TW bricks but there were still a lot of gaps and I don't want to risk cracking my pan. My brake drum forge worked well but I don't want to go back to it. If anyone in the Leominster mass area wants to pound metal some time hit me up. I'm still a complete novice but it's still fun.
-
I found this link to a photo bucket page with hundreds of knife patterns. I suck at drawing so the use of a pattern is essential. I found a couple i liked, and printed them out. You can adjust the size of the image to print the size you want. I thought this might be helpful to other beginners like myself. I didn't want to ruin the new piece of steel I bought. http://media.photobucket.com/image/knife%20patterns/cantador4u/Knife%20Blade%20Patterns%20and%20Designs/BladesoutlinedsidekickbyBGoode.gif?o=35#!oZZ3QQcurrentZZhttp%3A%2F%2Fmedia.photobucket.com%2Fimage%2Fknife%20patterns%2Fcantador4u%2FKnife%20Blade%20Patterns%20and%20Designs%2FbladesoutlinedofAM.gif%3Fo%3D3
-
I picked up this champion forge last weekend. After reading several post on here about lining the forge pan, I gave it a try. I didn't find to many pics to use as examples so I winged it. I first lined the pan with some fire bricks to conserve on refractory cement. Its not cheap and I only had a small bucket. So is this ok or did I fail?
-
Another my first real anvil
jay_cat replied to jay_cat's topic in Anvils, Swage Blocks, and Mandrels
That great info. Thank you very much. I was curious why there where not any markings other than the eagle. I'm not doing anymore sanding. I wouldn't want to get carried away and mess it up. Only 2 issues with this anvil is someone pluged the pritchel hole and a leg is broken off. It almost seems not right to hammer on something a over a hundred years old. I will try to hear the stories of its past echo with my hammer blows. -
Another my first real anvil
jay_cat replied to jay_cat's topic in Anvils, Swage Blocks, and Mandrels
I took a belt sander to the rusted anvil and it came great. I used a wire wheel on the base then painted it black. The face is still very hard as it took over 2 hours with 34 grit to remove almost all of the pitting. here are the photos of my progression. Thought I would share. The anvil still has great rebound even though it is not mounted to anything yet. That is my next project. -
I thought I would share this for the rest of you. http://westernmass.craigslist.org/for/3078474631.html
-
Location?
-
Another my first real anvil
jay_cat replied to jay_cat's topic in Anvils, Swage Blocks, and Mandrels
I forgot to add someone welded the pritchel hole and one of the feet are broken off the anvil. -
Another my first real anvil
jay_cat replied to jay_cat's topic in Anvils, Swage Blocks, and Mandrels
I will just use it first to see what falls off. Thats more fun anyway. I'm assuming its a Fisher due to the eagle on the side. I am wondering if the steel face might have fallen off. I don't see a seperation line from where the steel face would be welded on. I get 40-50% rebound but no ring. It doesn't make a loud clank either like another fisher anvil I choose not to buy. I'm confused. -
I bought this for $60. I lightly tapped the top of the anvil with the pean side of my hammer to break the rust crust off. I then took a wire brush to it for a couple minutes looking for any markings. I could not find any. I feels about 60-70lbs. I'm excited either way. It will suite my needs right and my budget right now. What should I do to it next? sand blast it? belt sander? flap disk?
-
Using charcoal first then adding coal worked excellent for me and both are easily available for me here in Massachusetts. I need to add a metal skirt around my forge so I can pile on more fuel. The cabinet is narrow and the coal falls off easily. Thats my next modification.
-
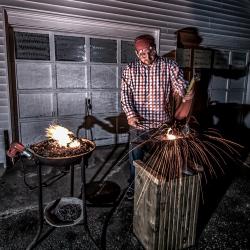
I finally got my feet wet today. I bought some lump charcoal and started off with that. It was easy to light. Then I added the antharcite coal. I do need to down size from a 4lb hammer to a 2lb. My forearms got fatigued real fast and I launched a red hot file through the air past my head. I learn the hard way. First thing I made was a coal hook (not sure what its called). I learned fast that it is a lot less work to hammer yellow glowing metal than dark red. Thanks again for all the help getting my fire burning. I already began my first file knife.
-
I already added a plate to the bottom with holes drilled. I noticed the problem upon my first lighting attempt. I also don't have any coke to burn yet since Its my first fire to be lit with green coal. I'm going to use charcoal to get the coal lit next time. I also just noticed my first burn on my arm from an amber landing on it. Pretty sweat.
-
Fortunately I can buy lump charcoal or natural charcoal briquettes at my local Lowes. As soon as I get a day withou rain I'm going to start off with the charcoal then add the coal. I've never failed lighting a fire before yesterday so I'll be xxxxxx if I let it happen again. Thanks again for the advice.
-
Its the rear rotor off a pickup truck. If I flipped it over you would see the shiny rim form the brake pad. The truck must have had a seized caliper because the back side is not shiny. Either way today was a big fail on my part. I will try again. Tomorrow or friday.
-
The heat gun has a cold air only setting. I'm sure the fire I built was no were near a boy scout fire. I got to anxious and didn't build a quality fire. I then used my shop Vac thinking I didn't have enough air and blew out my wood coals. I plan on using furnace cement to smooth out the bottom once I am happy with everything. Next time I plan on using brickets to light the charcoal. Is Nut size anthracite the correct coal to be using? I am using the bottom drawer to hold my coal at the moment.