Drunken Dwarf
-
Posts
45 -
Joined
-
Last visited
Content Type
Profiles
Forums
Articles
Gallery
Downloads
Events
Everything posted by Drunken Dwarf
-

New shop flue - Sanity check required
Drunken Dwarf replied to Drunken Dwarf's topic in Chimneys, Hoods, and Stacks
So, after various problems with suppliers, my sheet finally arrived. On with the work! 1mm sheet is surprisingly hard work to bend without a proper jig:p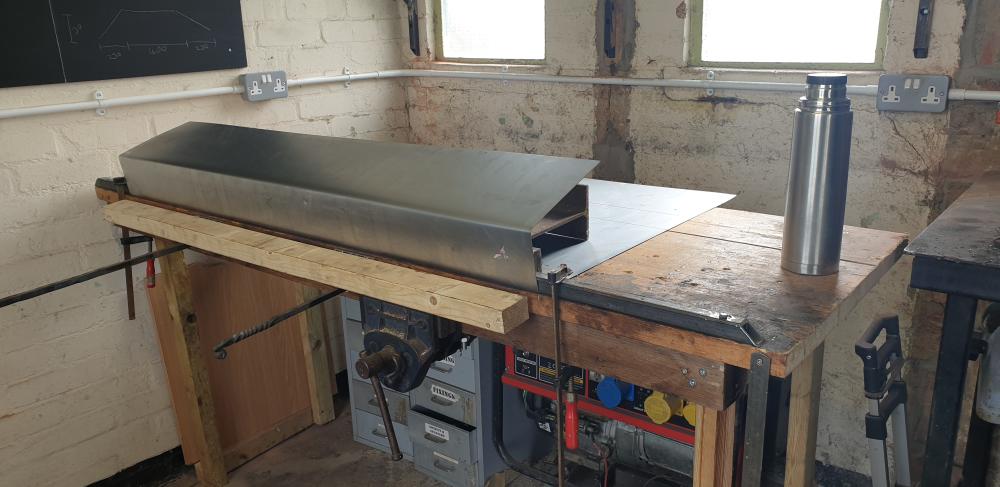
-
New shop flue - Sanity check required
Drunken Dwarf replied to Drunken Dwarf's topic in Chimneys, Hoods, and Stacks
Thanks for all the help, I'm ordering the steel tonight I think. Would 19 gauge (1mm) be thick enough? Assuming I can weld that with my little stick welder without blowing through (1.5mm it's the thinnest I've welded so far). -
New shop flue - Sanity check required
Drunken Dwarf replied to Drunken Dwarf's topic in Chimneys, Hoods, and Stacks
Lol, I meant CO, carbon dioxide I'm not overly fussed about , I'll just get a plant -
New shop flue - Sanity check required
Drunken Dwarf replied to Drunken Dwarf's topic in Chimneys, Hoods, and Stacks
Unfortunately, I can't go straight out. I've seen Hofi's setups, they look amazing but the forge is considerably lower than the sil of the window and only the top section of the window can be opened/removed. I'm definately going to be installing brand new CO2 detectors in the new workshop before any forging starts. That's not optional in my view ... I've been back to the shop today and taken measurements, so now for the first time, my pictures are TO SCALE! The opening part of the window is 10" tall but actually 17" wide, so I can go straight up with it rather than tapering in as in my last upload. Still fairly unsure about opening size though.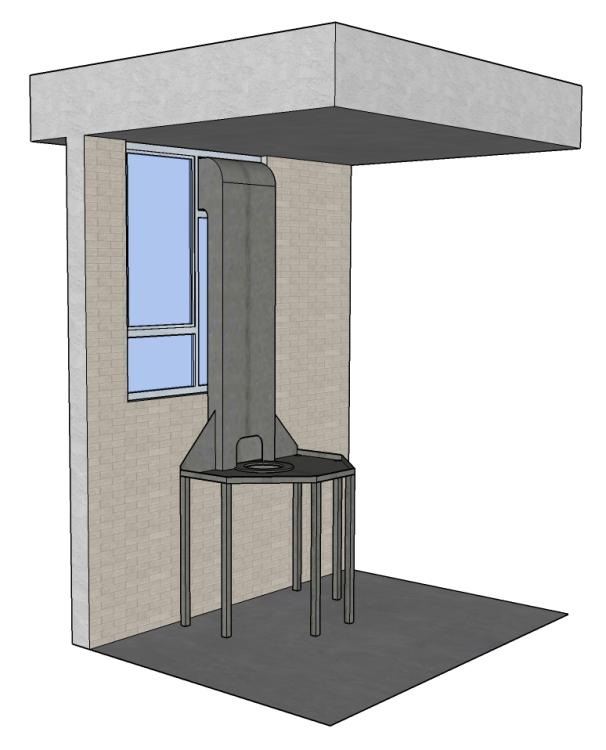
-
New shop flue - Sanity check required
Drunken Dwarf replied to Drunken Dwarf's topic in Chimneys, Hoods, and Stacks
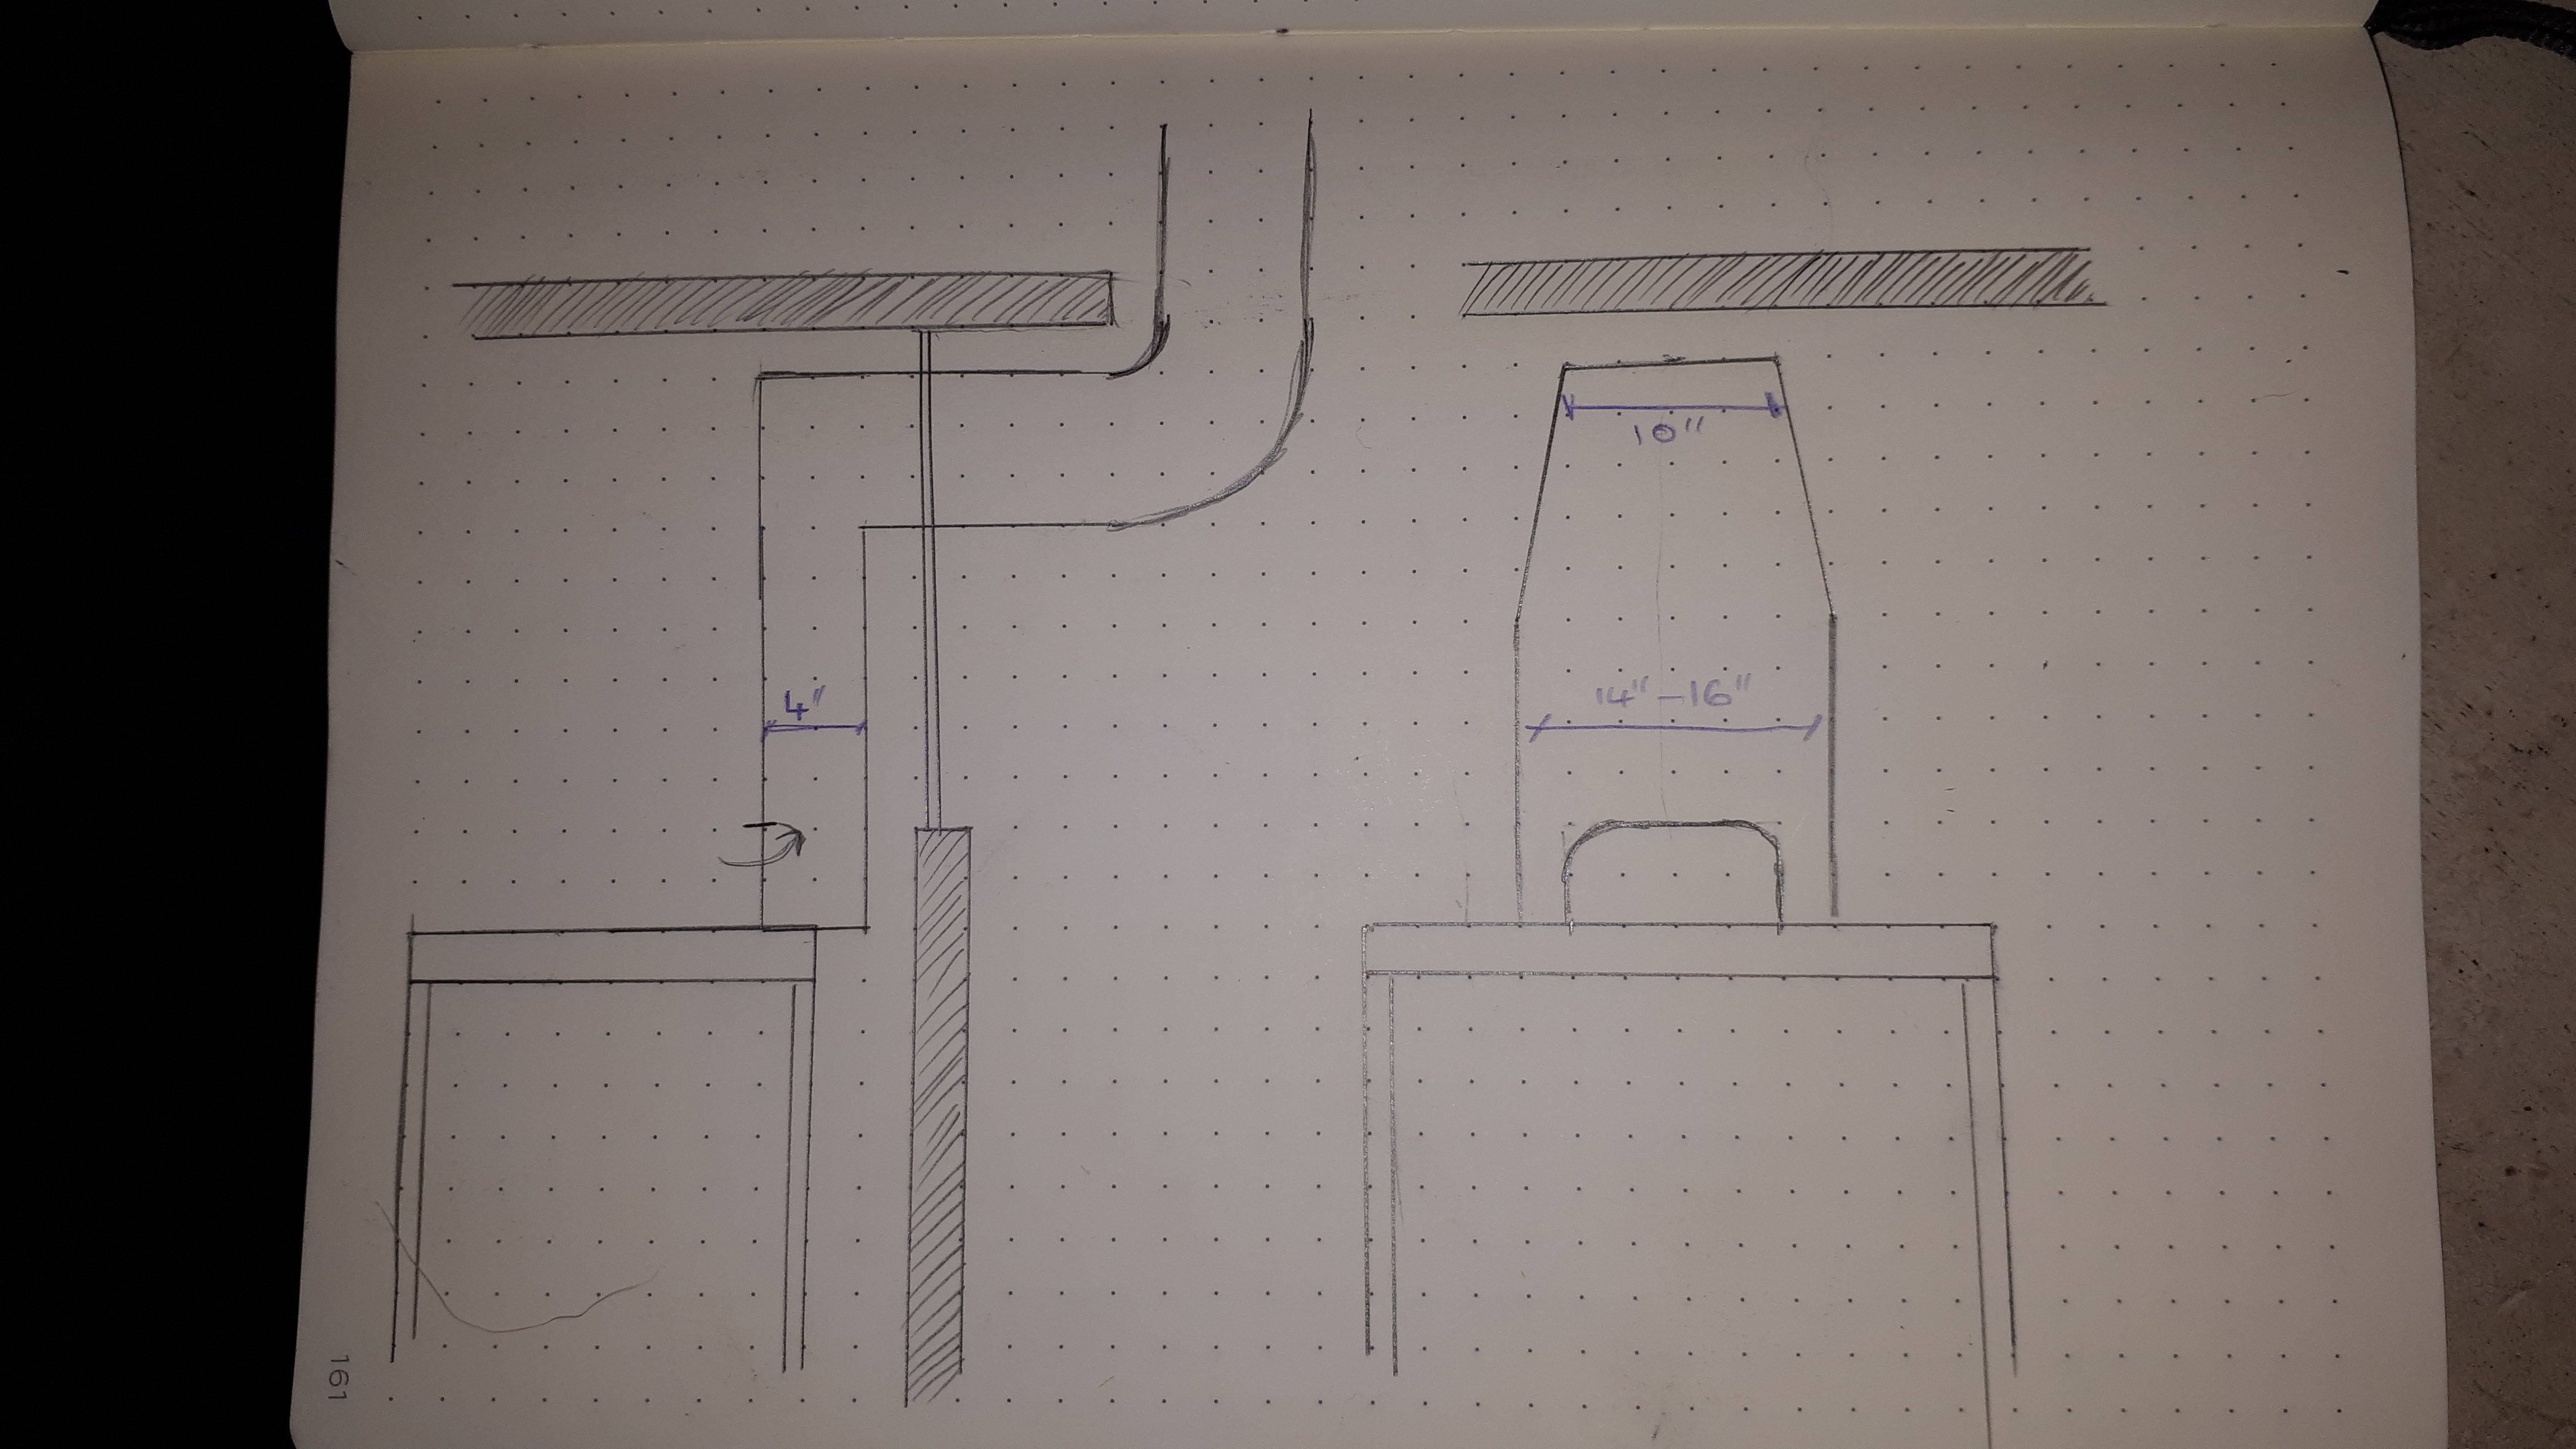
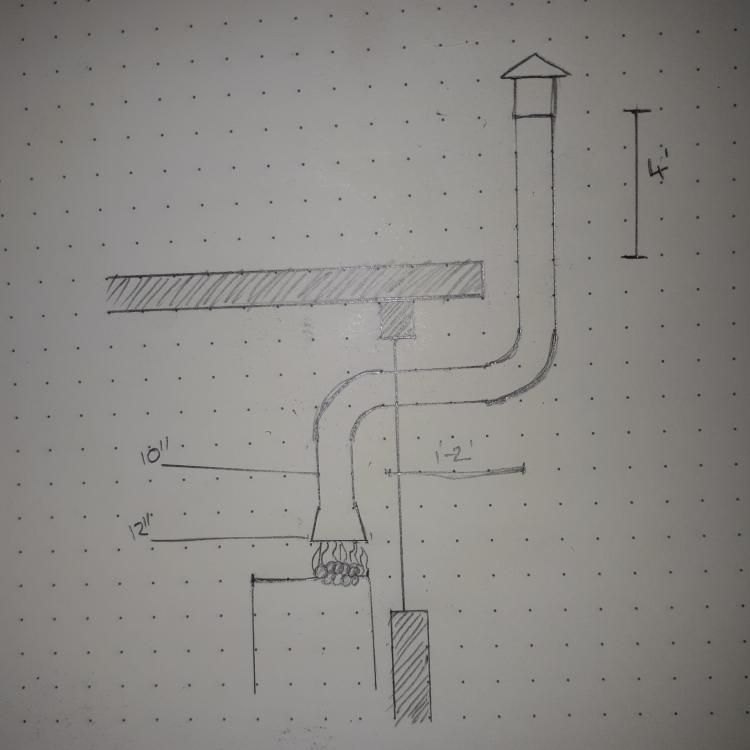
I was thinking more of a fabricated square curve for the transition, rather than a 12" elbow. As attached (you know it's getting serious when the CAD comes out). Any advice on an appropriate size of opening?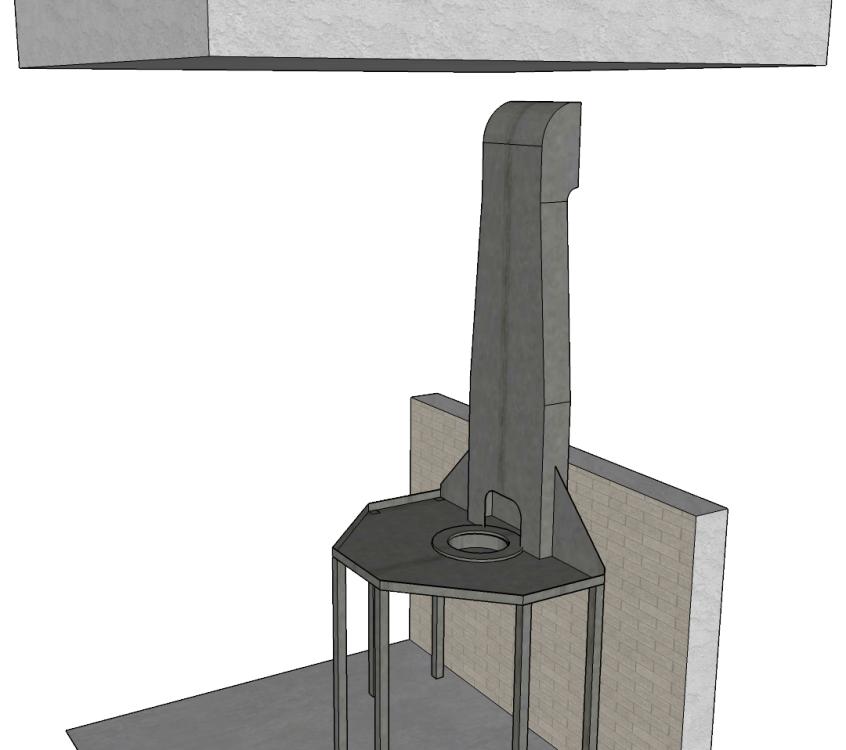
-
New shop flue - Sanity check required
Drunken Dwarf replied to Drunken Dwarf's topic in Chimneys, Hoods, and Stacks
Better late than never The top of the box where it comes off at 90 degrees to go through the window, I assume that would be better as a curved corner rather than the sharp right angle I drew? -
New shop flue - Sanity check required
Drunken Dwarf replied to Drunken Dwarf's topic in Chimneys, Hoods, and Stacks
Do you mean a 4" depth all the way up, then just out the window? (Sketched below if I understand right)... You guys are going to be the end of this sketchbook I'm thinking I might want to transition to round after it's come through the window, upping to 12" round for the external flue so I'm not reducing the cross-sectional area at all (actually increasing it). That way I can weld the internal stuff from mild as it's not open to the elements and use cheaper galv flue outside as I'm not worried about it getting hot and off-gassing zinc when it's outside the shop. My main reason to want to go round is that presumably it would suffer a lot less from wind forces. I don't reallt want to give the wind a flat surface to push against.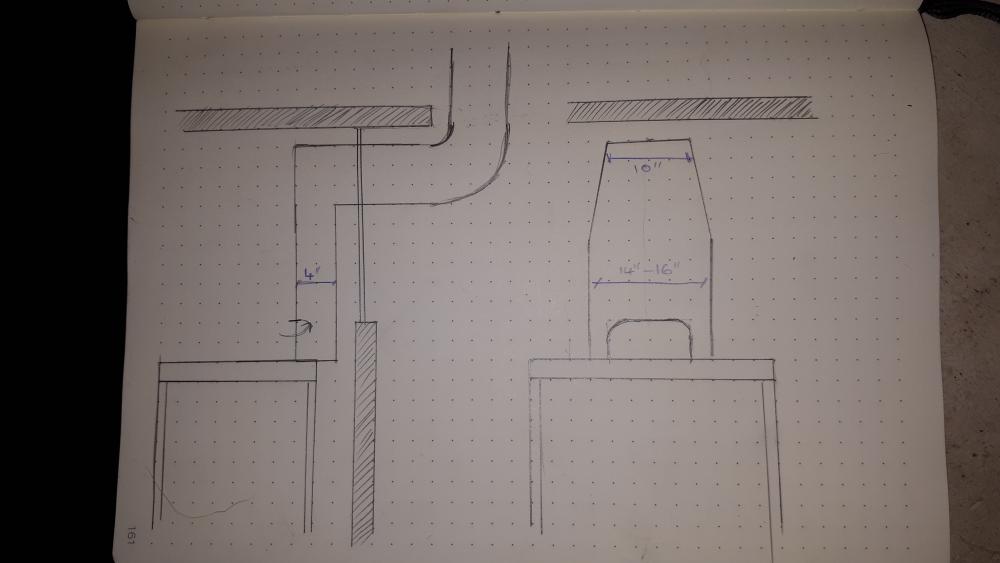
-
New shop flue - Sanity check required
Drunken Dwarf replied to Drunken Dwarf's topic in Chimneys, Hoods, and Stacks
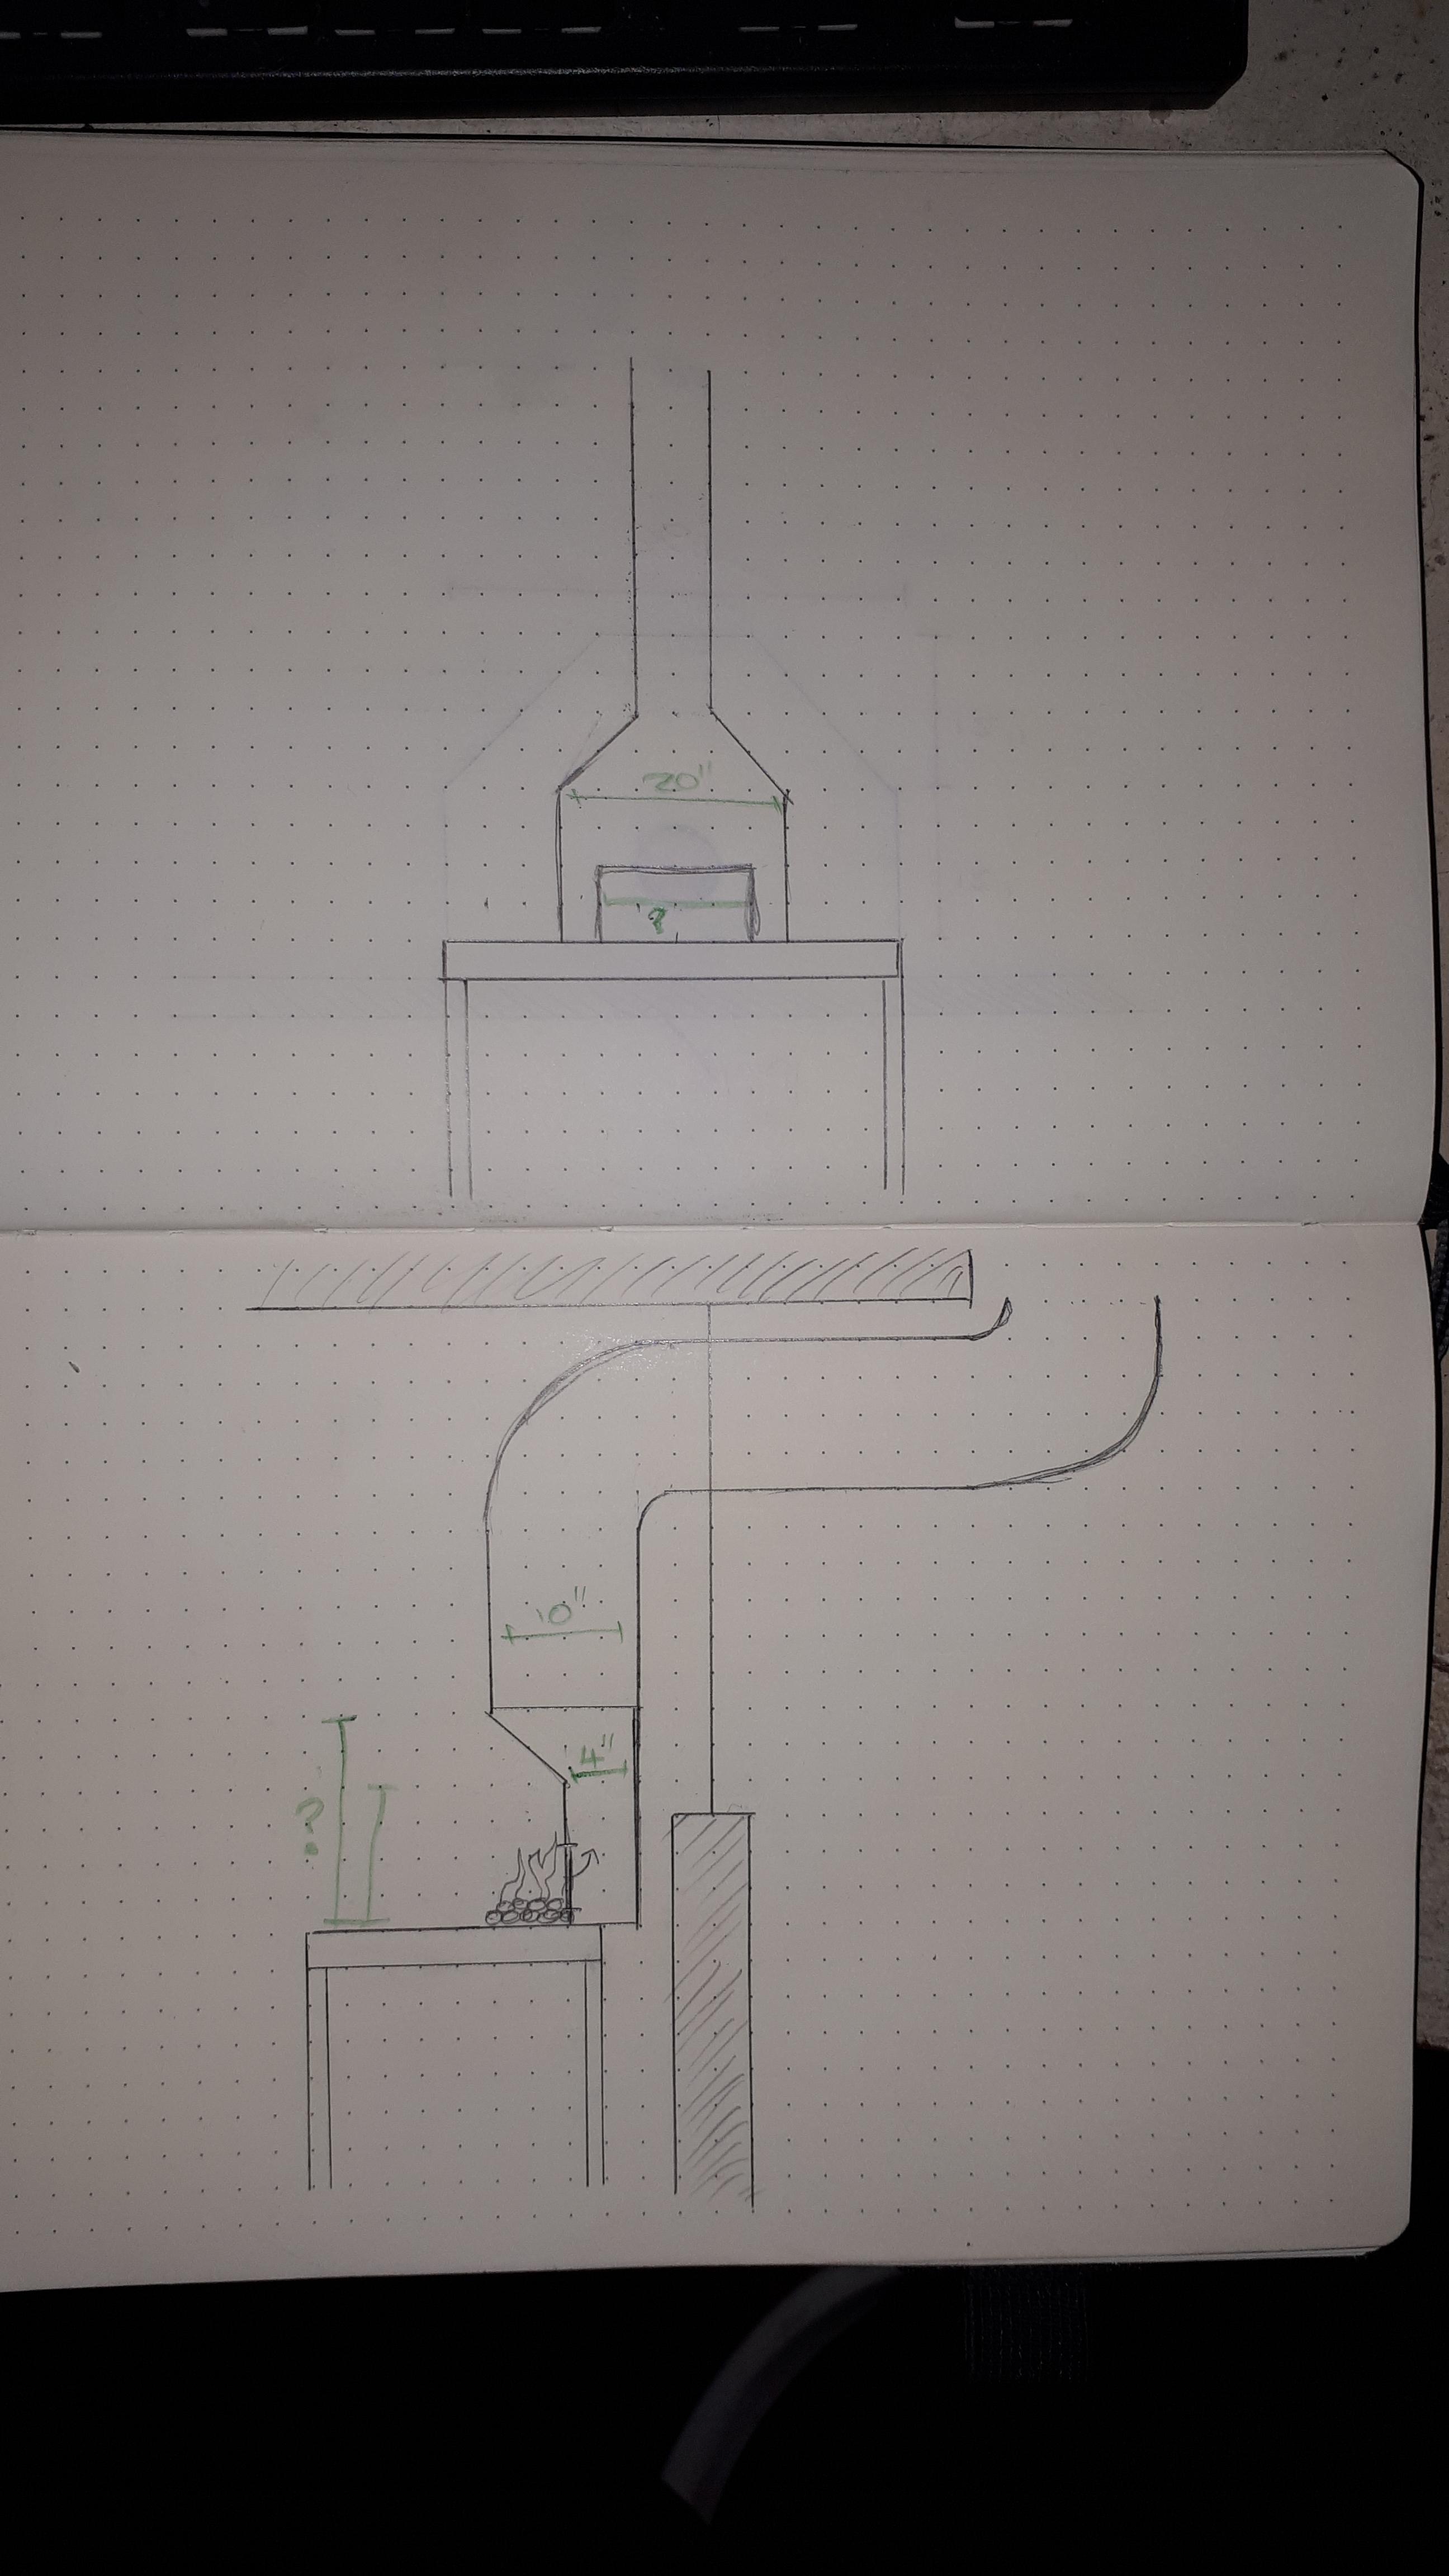
So, if I'm getting the idea right, a 4" deep, 20" wide box (Theres about 2" between the fire pot and edge of hearth, but I can probably live with loosing 2" of floorspace). Above the opening it's get deeper and thinner (increasing depth to 10" and reducing width to 10") to then transition into flue. How big would the opening be? I'm guessing pretty wide otherwise there's no reason for it to be 20" wide, although still less area than 100"sq. I get that the side draft actively sucks and is very effective at pulling in the smoke, I think whar I dont understand is why an overhead hood doesn't suck. I'd have thought with heat below heating the air and lots of vertical, the stack would've created a similar amount of suction. I think that's where my lack of understanding stems. Also, stupid question. feel free to call me a fool. There's an open door providing lots of new airflow. The window opening is above the fire and theres another similar one the other side of the room (10' away). Since smoke rises cause it's hot. Would a powered 10" extractor fan in both these windows not also keep my shop smoke and carbon monoxide free?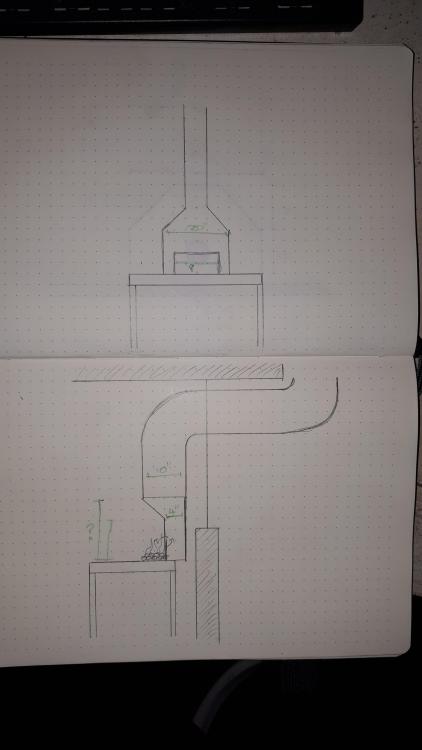
-
New shop flue - Sanity check required
Drunken Dwarf replied to Drunken Dwarf's topic in Chimneys, Hoods, and Stacks
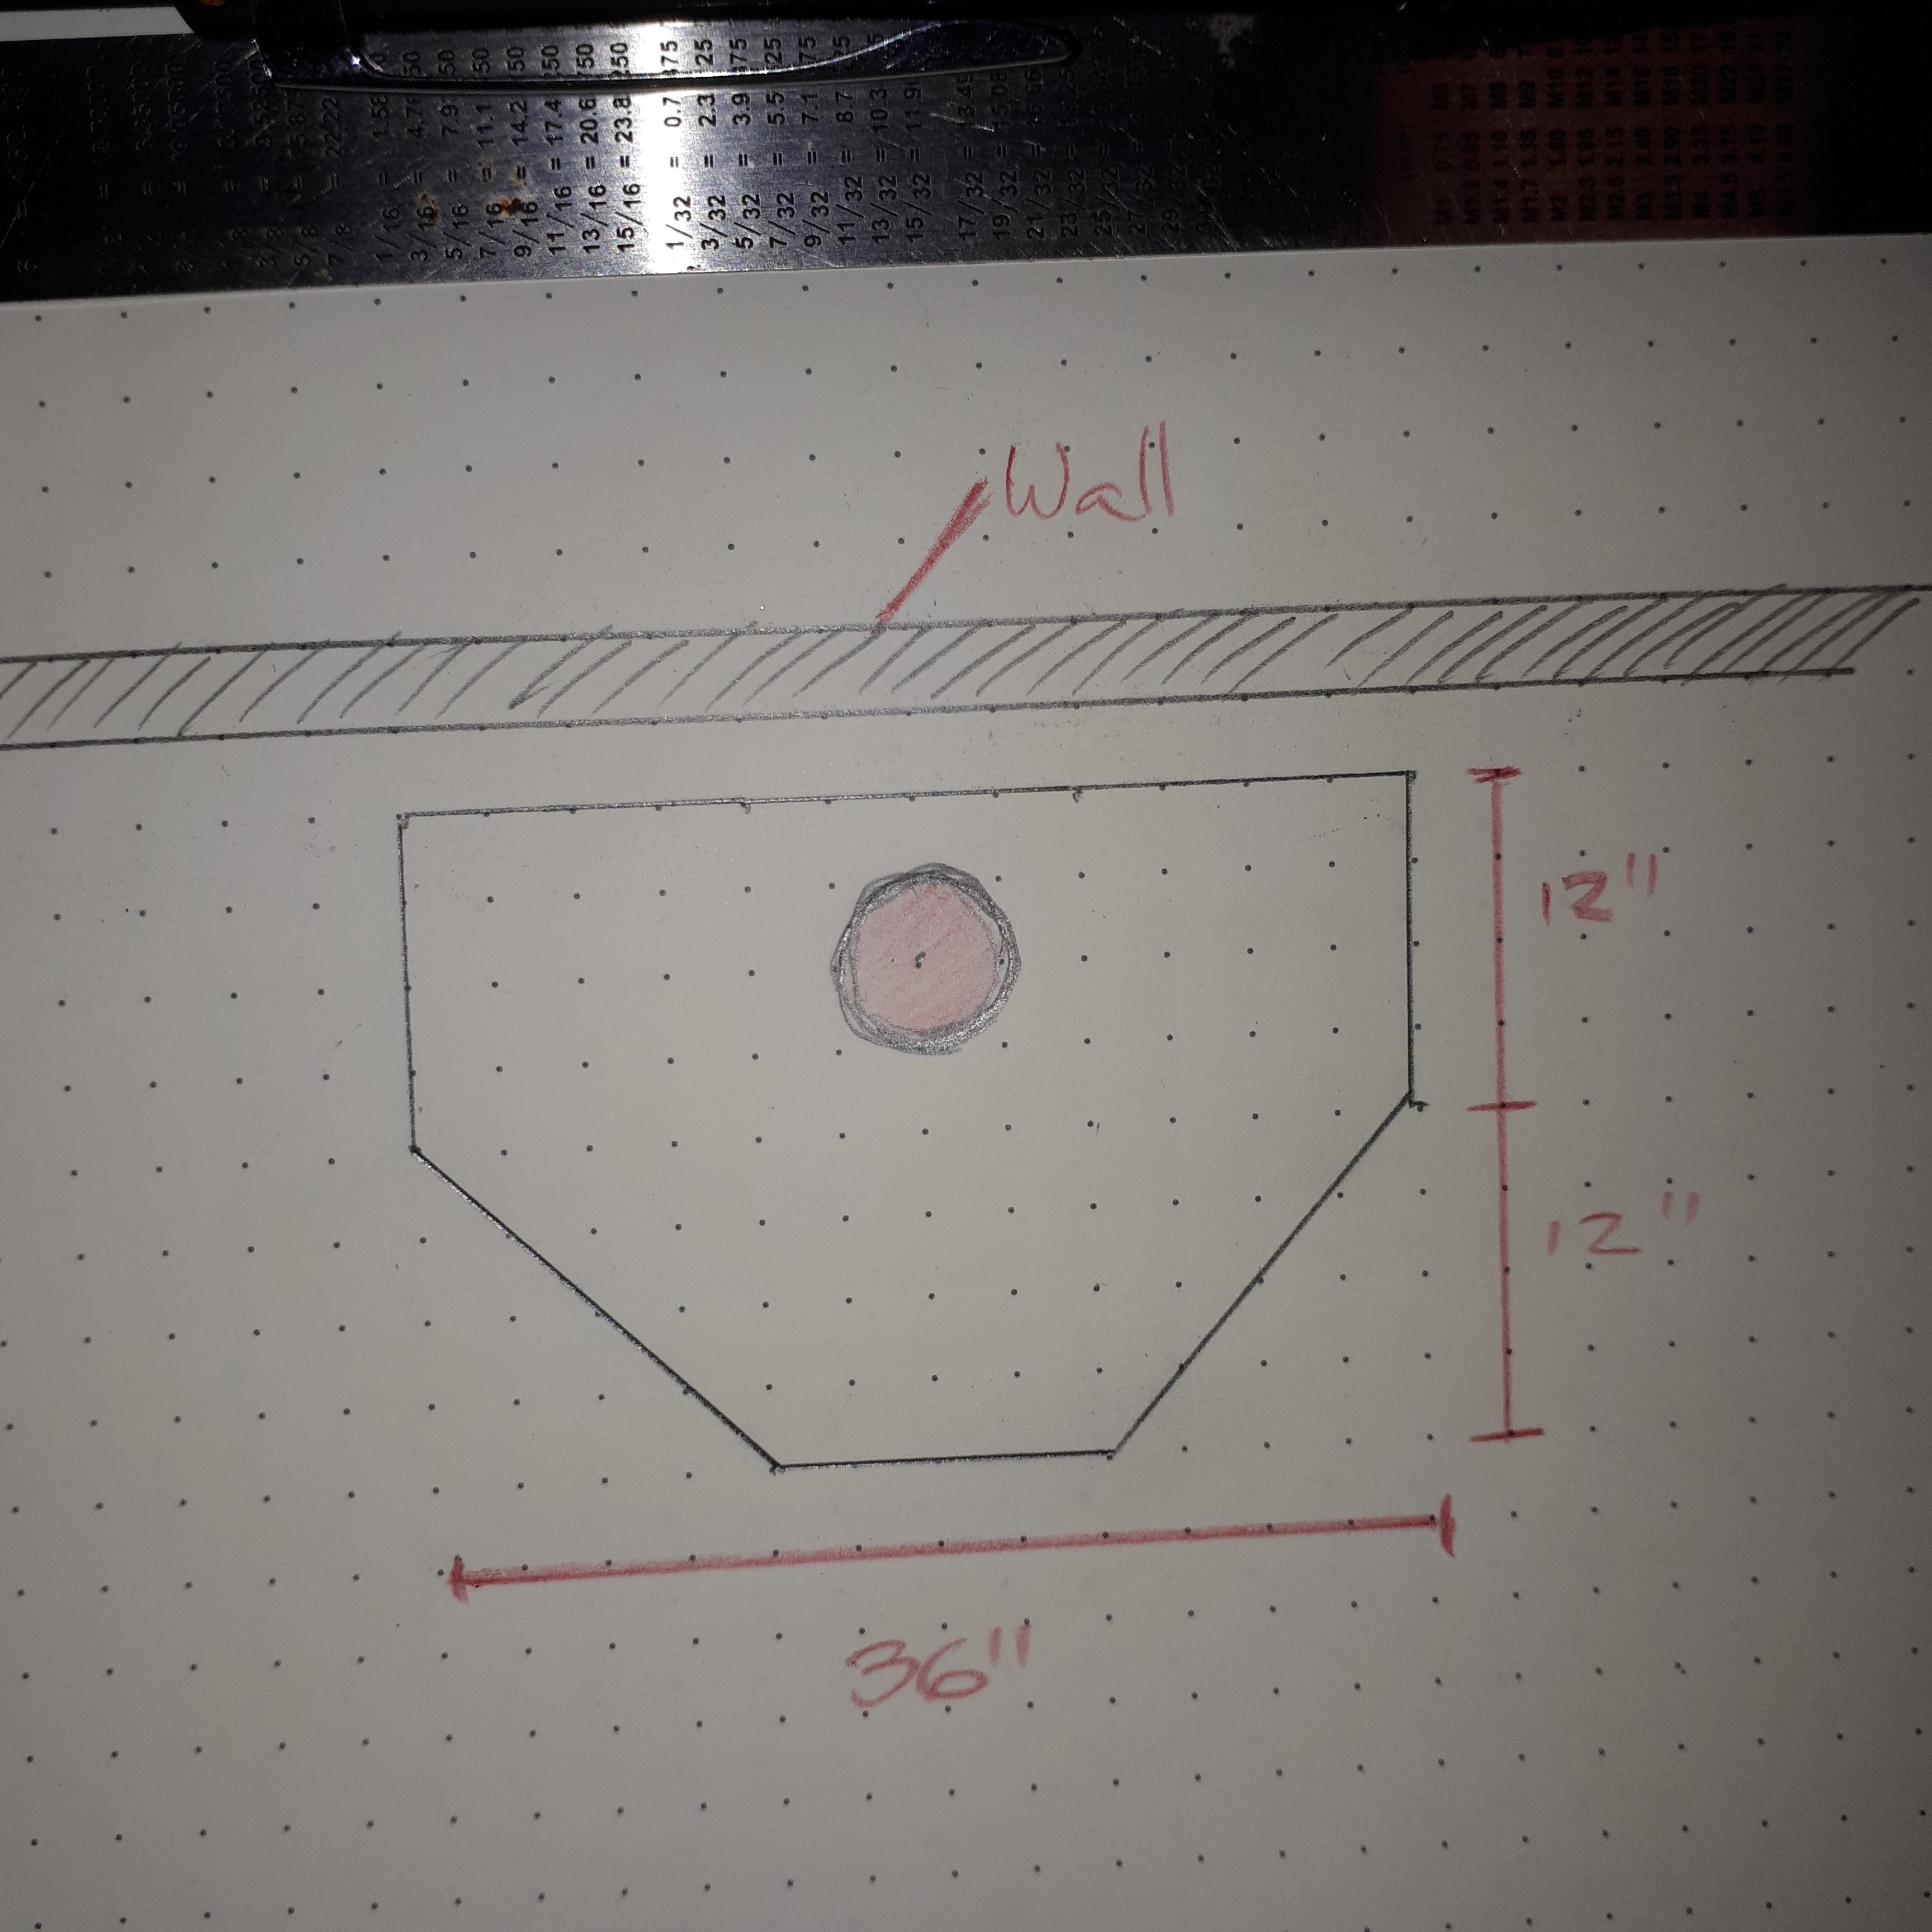
I've attached a drawing of my hearth, 36" x 24" with a 12"x12" corner cut off on each side. The fire pot is centered on the middle-rear 12"x12" section (about 8"-10" diameter). I don't think there's space behind it within the footprint of the hearth, couple of inches at most. And on either side the hood in combination with the wall would prevent me working on long bars as I cannot post through the fire. And still I can't see why a side draft hood is so preferable. The question was about design of an overhead hooded flue. After going back to the shop today, my original drawing may be slightly inacurate in that the forge is lower than the sill of the window. I could raise it, but removing the fixed pane would not be allowed in my tennancy, even if I kept it to reinstall.
-
New shop flue - Sanity check required
Drunken Dwarf replied to Drunken Dwarf's topic in Chimneys, Hoods, and Stacks
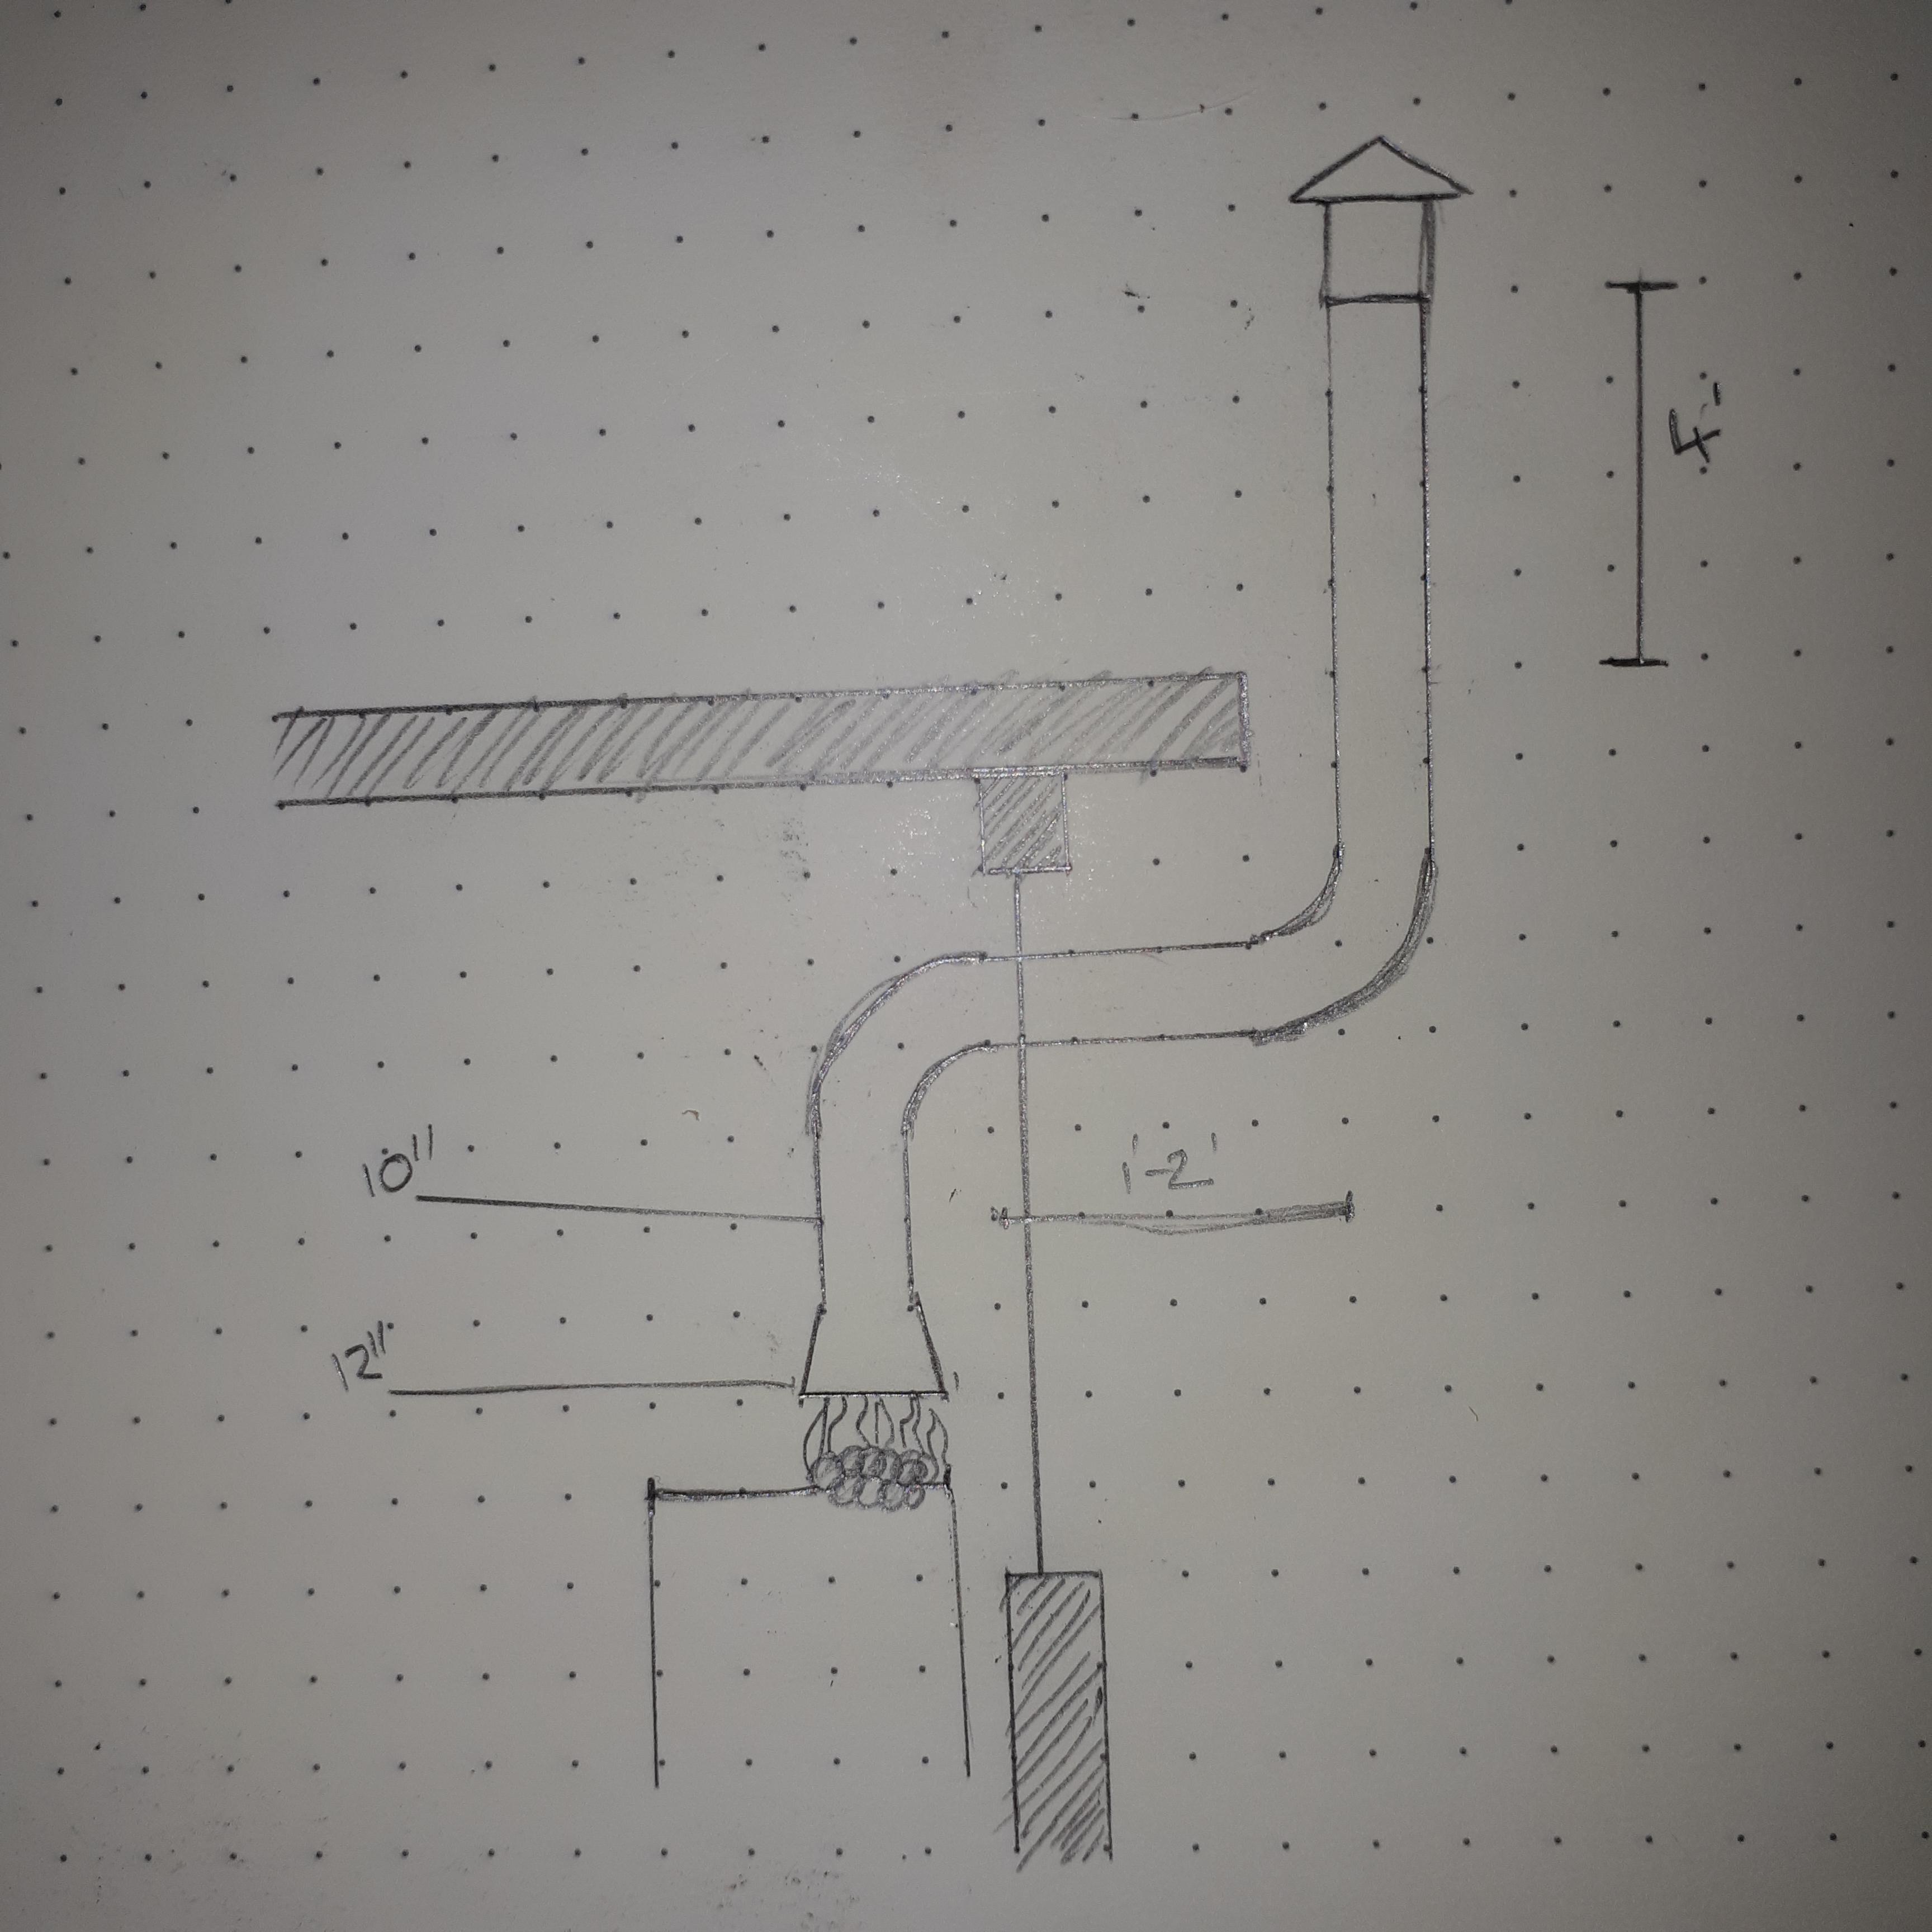
Thanks for all the replies. A lot of great information here. I was thinking perhaps a coupld of lengths of 1" pipe, one either side of the flue and concreted into the ground outside 1' - 2' deep. I can increase the hood if need be. A 12" hood is just what's currently on it. So, would this be 20" tall, or wide? I get how side drafts work, with the pressure and drawing through horizontally, I don't think I really understand why a side draft is beneficial over a top hood. Doesn't the side draft box thing also have to have the flue attached to the top, which would require it being 10" deep for a 10" flue to attach, or have I misunderstood entirely? Unfortunately not, the lower part of the window is a fixed pane, only the top 10" opens. Yes! I could absolutely use square ducting to increase the cross sectional area. It's only a couple of feet from an external door, which will be open at all times when forge is running. -
Hi all. Now moving into a new shop and unlike the old one, this one has an opening I can "in theory" run a passive flue through (In the past I had to work with a fabricobbled centrifugal extractor fan, which worked VERY poorly). For reference, this is for a small, bottom blast coal forge (forge pot about 10" diameter at top). Theres a window behind where the forge is going with an opening leaf with an apeture of about 10.5". Going through the roof is NOT an option (rented shop, strict requirements). I'd like to install an overtop hood (I cannot afford the extra 12" space behind the fire for a side draft flue) which will start as a 12" hood (8"-10" above fire pot), reduce to a 10" pipe and go up a small way. It will need a 90deg bend to go through the window and a horizontal run of 1'-2' to clear the eaves of the building. Then a 90deg elbow and up for another 4.5' - 5'. Clearing 4' above the flat roof with a cowl. Unfortunately the window openeing is too small to get through at a 45deg angle, and the eaves of the building extend enough to get in the way of that too. Should this work? Unfortunately I have neither the time nor money to get it wrong. If I can't be sure this will work, I'll need to resort to powered extraction, which im pretty certain will work but I'd like to avoid for it's own complications. Any help/advice would be amazing. Thanks a lot, Danny
-
Minimum size for wood framed dirt box forge.
Drunken Dwarf replied to Drunken Dwarf's topic in JABOD - Just A Box Of Dirt
Lol. Im lucky enough that a local smith buys coal direct by the several tonne and resells to everyone in the area for cheaper than we could buy it from the source in more manageable quantities. -
Minimum size for wood framed dirt box forge.
Drunken Dwarf replied to Drunken Dwarf's topic in JABOD - Just A Box Of Dirt
Recreating my own saga in wood carving? Since I live on a boat and have very little to do of an evening, that sounds quite appealing to be honest. The event sounds very cool! I'm aware that charcoal was the fuel of the time, but I am not a real viking, but a dwarf of proud mining heritage deep in the coal filled mountains ;). And from a practicality standpoint, while the general public cant often tell the difference between the fuels, the Welsh steam coal I use gives off a lot less smoke and far fewer 'fireflies' to reach the eye sockets of younglings being inducted into the craft -
Minimum size for wood framed dirt box forge.
Drunken Dwarf replied to Drunken Dwarf's topic in JABOD - Just A Box Of Dirt
That's really interesting Thomas. While probably not the typical 'travelling craftsman', the first carving showing the forge bellows behind Regin definitely shows the forge at at least knee height, not on the ground. Suggests to me at least that at the time some forges were raised. Makes sense, they would feel that bending down was hurting their backs. The alternative of course was the type Rune Bertrum-Neillson made a video of where he dug out a pit to sit in and work at ground level. I'm not sure tbh whether to go fully reenactment about it. Onviously if I got in with a reenactment group that'd be different, but I see no harm in adding a non historical twist to traditional techniques. I am 5'1", I can always add some "dwarven" style to traditional feeling setups. -
Minimum size for wood framed dirt box forge.
Drunken Dwarf replied to Drunken Dwarf's topic in JABOD - Just A Box Of Dirt
I had thought that it'd be the case that more people would buy what they've seen being made. That's one reason I'm going to focus the quick little stuff with the bigger bits pre-made. I make an axe head pendant that's quite popular. Luckily I should be able to count on the wife to run the stall and sales while I do demos, if we can keep the dogs quiet and calm that is. I'll keep my touch mark readily available too, although its a slightly annoying one as the punch is too short to hold comfortably. I'm thinking of welding a handle to it, but I don't want to mess with the heat treating. I'll definitely check out that thread, sounds interesting:) -
Minimum size for wood framed dirt box forge.
Drunken Dwarf replied to Drunken Dwarf's topic in JABOD - Just A Box Of Dirt
Thanks for the comments George. I'm aware that most smiths of the age would have made a dirt mound forge wherever they were working, however I've decided to build a standing forge for 2 reasons, although it is not historically accurate. 1, if I were to go to faires and do demonstrations, most hosting spaces don't take to kindly to you digging holes in their ground and charring it somewhat. 2, and the main reason to be honest, if I even try to picture a ground based forge in my head, the small of my back makes it very known that I would be punished harshly for such nonesense It's a very good idea to incorporate layers of vermiculite or something like that, to increase the insulation. Thanks for that :) And yeah, this little forge is for the small stuff at shows or whatnot. S-Hooks, brooches, little neck knives etc. I have a workshop where my 'proper' forge and beloved anvil live where I do the 'business' smithing. Very few people would hang around at a demo to watch a 3 hour axe build, but 10 minutes to whip up a nice S-Hook more people will stick with me for -
Hi all. Im looking at putting together a little dirtbox forge, just for some mobile stuff and maybe some demos. I'm building a Mastermyr style tool chest and my plan is to fit an entire smithy into it. Stake anvils, stands, forge, hammers the works. Whats the minimum thickness of lining between forge bowl and wooden frame people would consider safe? I'm not going to be doing massive projects in it, just the smaller stuff really. I probably don't need more than a 6inch firebowl. It'll be mainly for coal use, with a leather bellows as a manual air source. Would 2 inches of dirt or cast lining be enough? That would give me a 12x12 inch forge in total which would be pretty neat and easy to pack away. (6 inch firebowl, 2 inches of lining each side and inch thick wooden frame)
-
Possibly Pine Anvil Stand
Drunken Dwarf replied to Drunken Dwarf's topic in Stands for Anvils, Swage Blocks, etc
After going through and hunting Ebay, the British members are right, you can still get hold of it, not from your local supermarket anymore. I finished off the pine stand, looks lovely. Got it nice and flat with a quick router jig. Even welded up a couple of hammer racks for the side. Frosty, the only thing I will say is no, Brexit has not helped with anything. And I'll refrain from saying anything more on my views of that due to the forums rules on political content -
Possibly Pine Anvil Stand
Drunken Dwarf replied to Drunken Dwarf's topic in Stands for Anvils, Swage Blocks, etc
Many things are regulated and there are so many factors to regulation that you can't really use that as any basis for judgement. But I like to at least look up the stuff I don't know about before I use it, if you don't get into the habit of that then it's not a big stretch to start thinking "Well, galvanised steel is everywhere and cheap, why shouldn't I build my forge pipe out of it" if you've never actually come across the dangers of zinc. -
Possibly Pine Anvil Stand
Drunken Dwarf replied to Drunken Dwarf's topic in Stands for Anvils, Swage Blocks, etc
You definiately can't get it in supermarkets here, possibly chemists but that would be the only option. Looking at the classifications it's considered a risk to fertility and unborn children. The risk is obviously negligable, and yes, it does seem extreme. But on the other hand, just because people use it doesn't mean it's safe. -
Possibly Pine Anvil Stand
Drunken Dwarf replied to Drunken Dwarf's topic in Stands for Anvils, Swage Blocks, etc
I googled about getting Borax in the UK and came across some hippe girls blog saying that it's been reclassified in the EU as a hazardous material (which we knew already) but that reclassification means it can't be bought in the EU or UK, only borax substitute (dont know if it works the same way for smithing). Although the standard English method taught over here, and I know used by my local smiths, is not to use flux at all. Welding becomes more about maintaining a clean fire. -
Possibly Pine Anvil Stand
Drunken Dwarf replied to Drunken Dwarf's topic in Stands for Anvils, Swage Blocks, etc
Thank you for all of the awesome input. You guys never cease to be incredibly helpful. After this I will go ahead with what I have, I've got the day off on Wedensday to finish the stand ;) I've cut it 1cm too high on purpose and my plan is to use my router to route out a 1cm deep footprint of my anvil to keep it nice and secure horizontally. (Got a sheet of dense rubber to lay in the cutout too for deadening). And treat the stand with BLO probably. Anvil will be fastened down with chain and turn buckles, shouldn't take more than a day to get it all finished:) -
Possibly Pine Anvil Stand
Drunken Dwarf replied to Drunken Dwarf's topic in Stands for Anvils, Swage Blocks, etc
This is true. I didn't flesh out my original post enough I don't think. There are ways to fabricate an anvil stand without welding, that's true, my personal preference would be for a wooden stand but in reality, getting a forging surface going is more important to me than personal preference. However, if possible I would like to limit costs, my main interest is whether I can use the sleeper-made block I have as I already have it so there's no additional costs/time etc. -
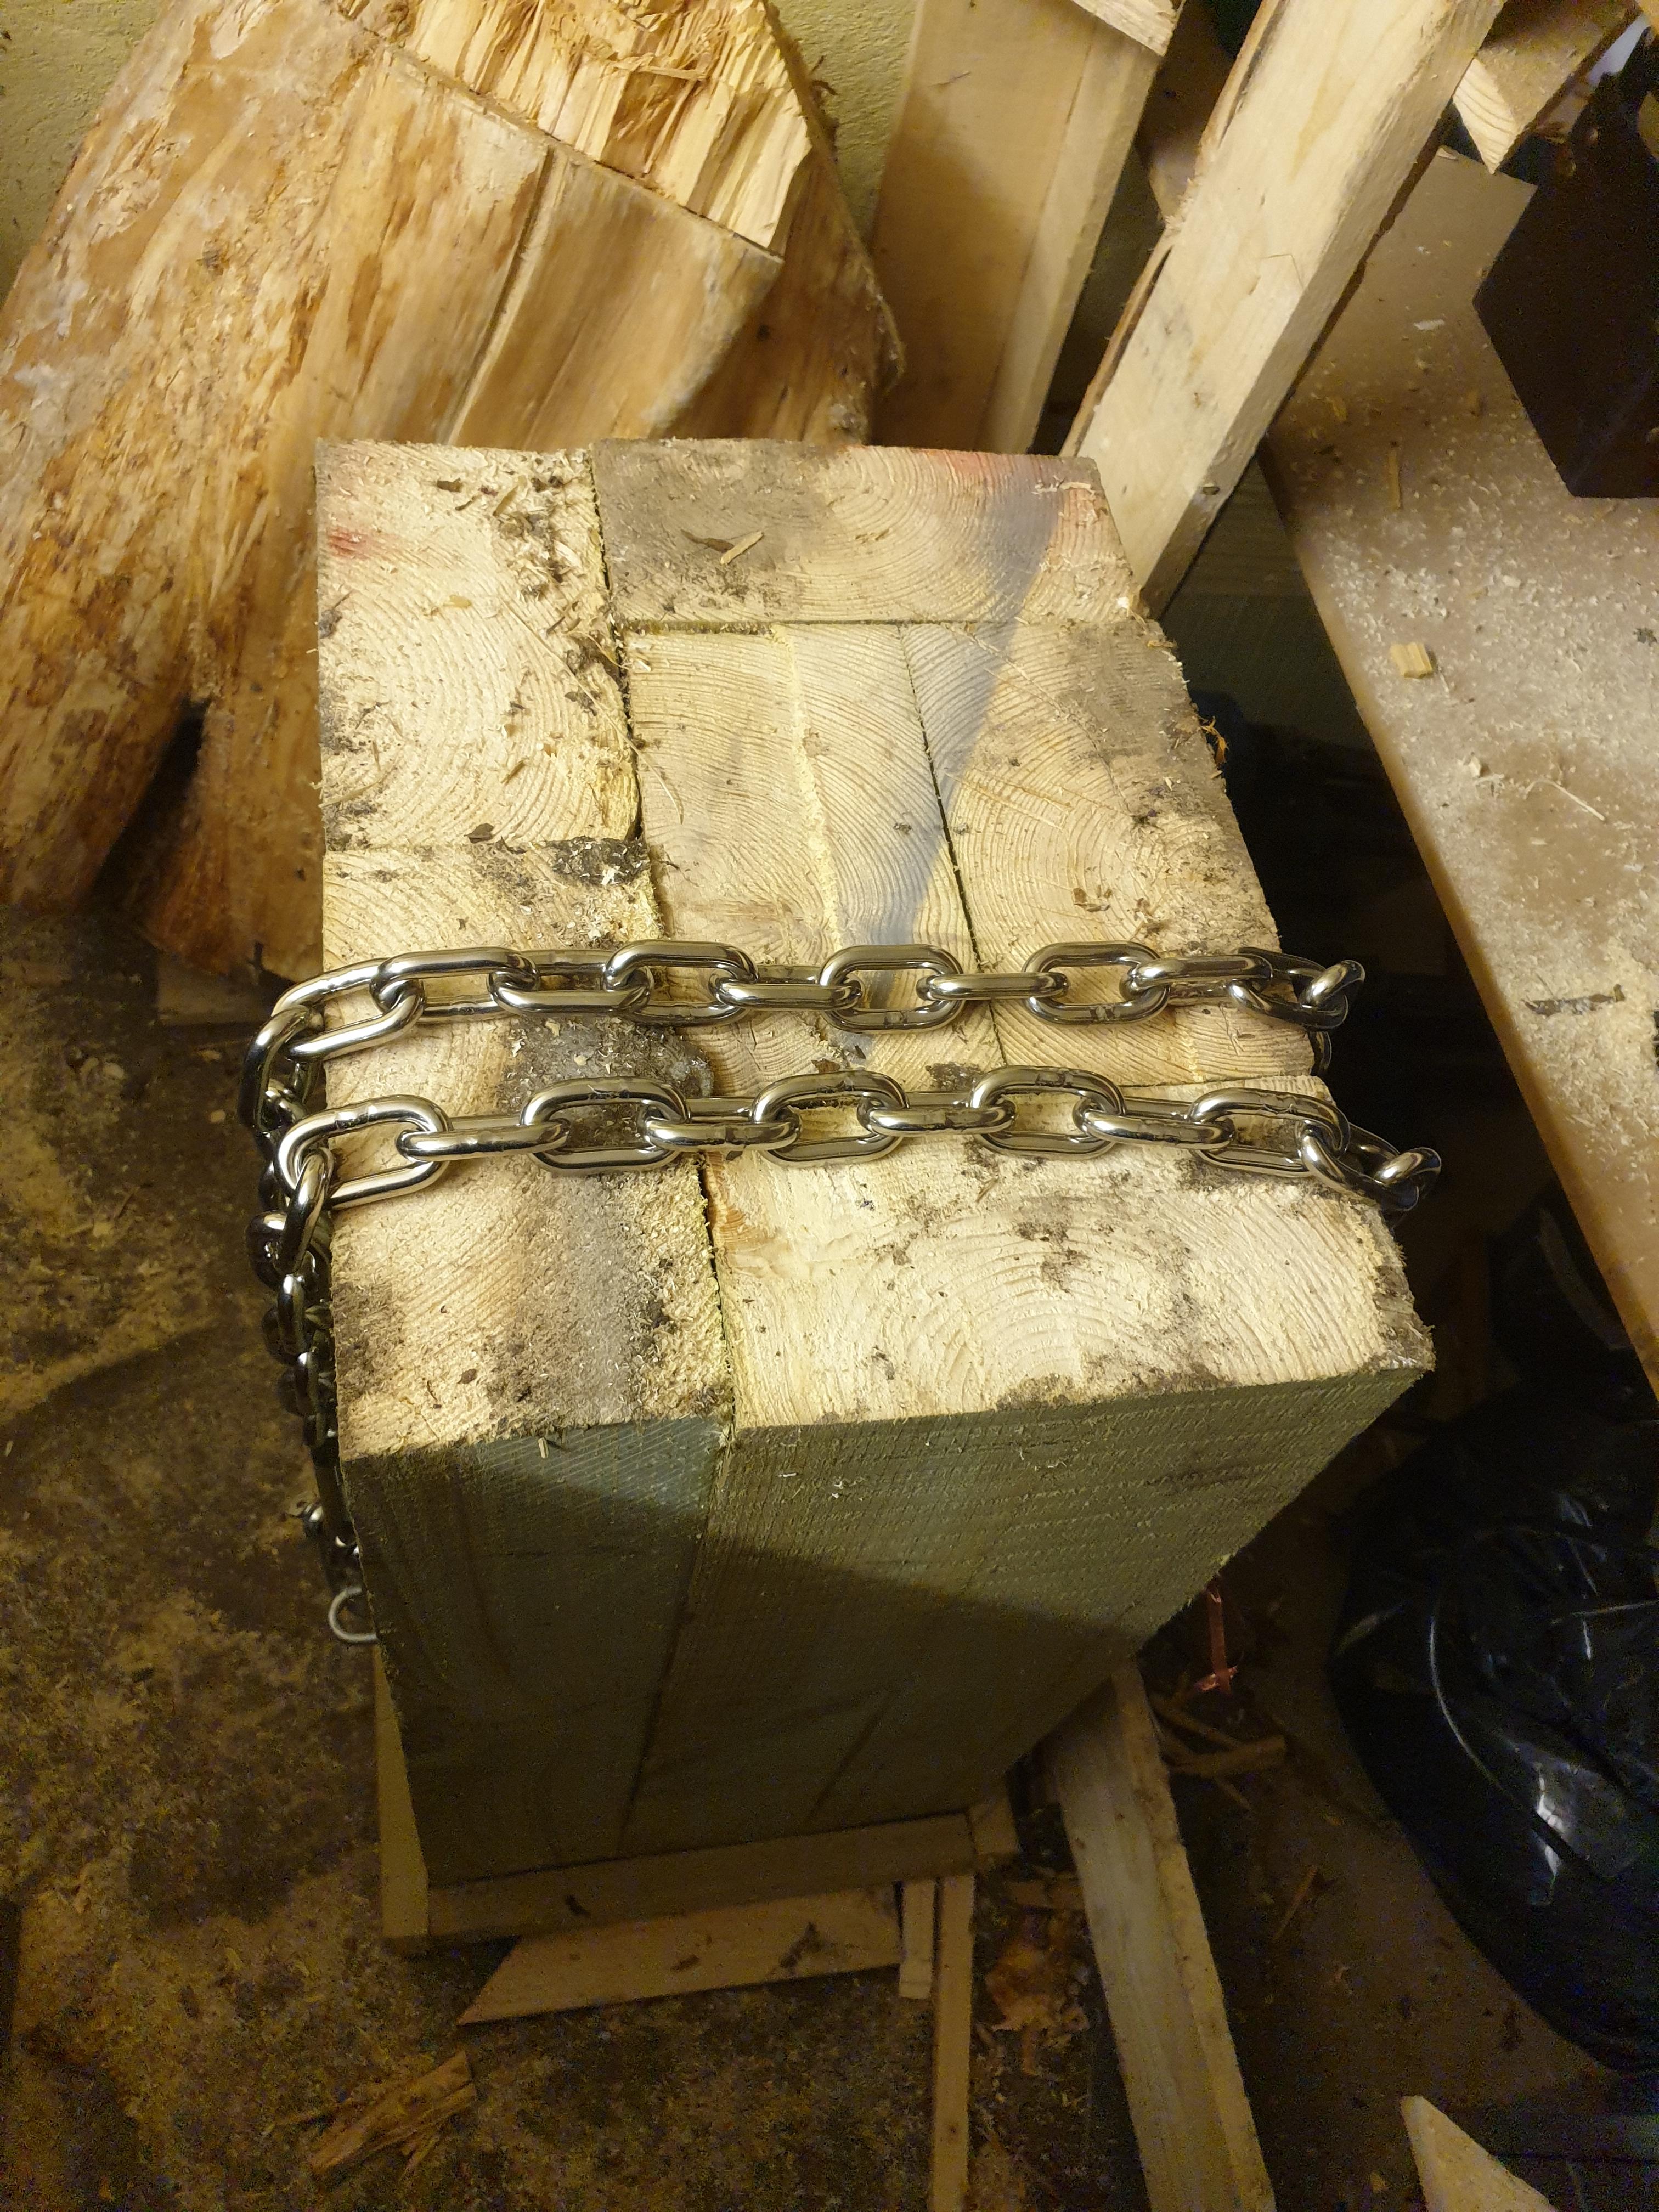
Hi all I have a question about the wood for my anvil stand. I made a stand (not quite finished yet) out of the largest peices of wood I could find locally (100mm x 200mm sleepers). They're kinda roughly glues together (sleepers weren't flat and I lack the proper tooling to make them flat, but it's pretty xxxx strong) I was listening to "The Forgecast" in the truck and they said that the one wood to not make your stand out of is pine, due to the fire hazard of the sap and oils. The sleepers I used commercial link removed were advertised as "Scandanavian Softwood", now just listed as softwood, so there's a good chance they are pine if not spruce. The wood itself seems pretty dry and it's pressure treated, (I didnt know if the podcast was talking about sawn, treated wood or fresh stumps), would the fire safety still be an issue with what I have or could I safely use it? Any advice would be great (except for replacing it with steel, I can't weld) Many thanks Drunken Dwarf

-
So the oven cleaner and hand wire brush did absolutely nothing The example on the previous post was lye based, but I don't think we can get that in our country, at least it's not readily available in supermarkets. There was hints of another colour coming through (more the brushing than the cleaner) so I think there's more than 1 coat of paint on it. I will move up to the wire wheel I think. While I'm taking it slow on what I do with the anvil, I'm also building the anvil stand which has been fun, a bit surprised by the height though. I've read a lot through the anvil height thread, I'd originally just thought about the knuckle height rule, however I did make a tall block of wood and strike it, adjusting the height until I got full round impressions, and was really surprised that it was at BELOW knuckle height, even though there was a lot of comments that wrist height is actually better as the old knuckle height is based off having strikers and top tools. I am wondering whether I was standing closer to the block than I could to an anvil or if there was something wrong with my posture, though I tried to keep the back straight.