Drunken Dwarf Iron
Members
-
Joined
-
Last visited
Everything posted by Drunken Dwarf Iron
-
The terrible alternative that popped into my 6am brain, is taking a length of 4" flexible aluminum hose and fixing it directly to the intake of my blower. Putting the blower outside and hoping that the hose is long enough so there's not enough heat left in the air to melt the plastic bits ...
-
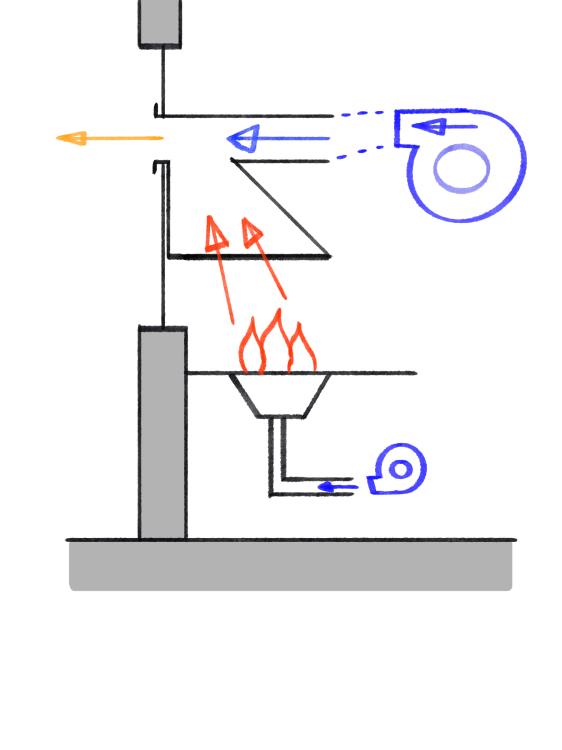
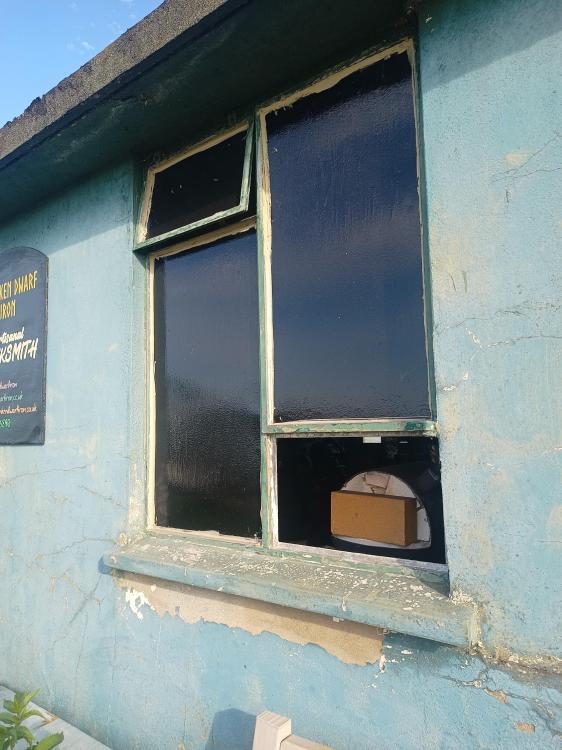
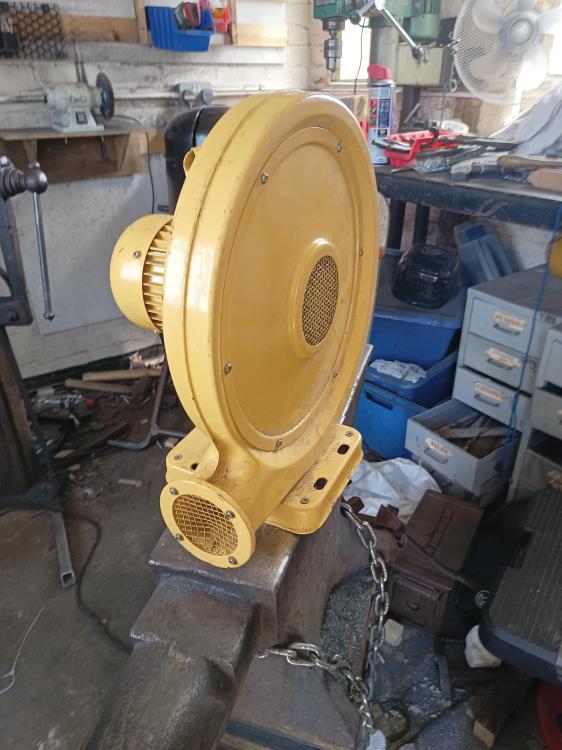
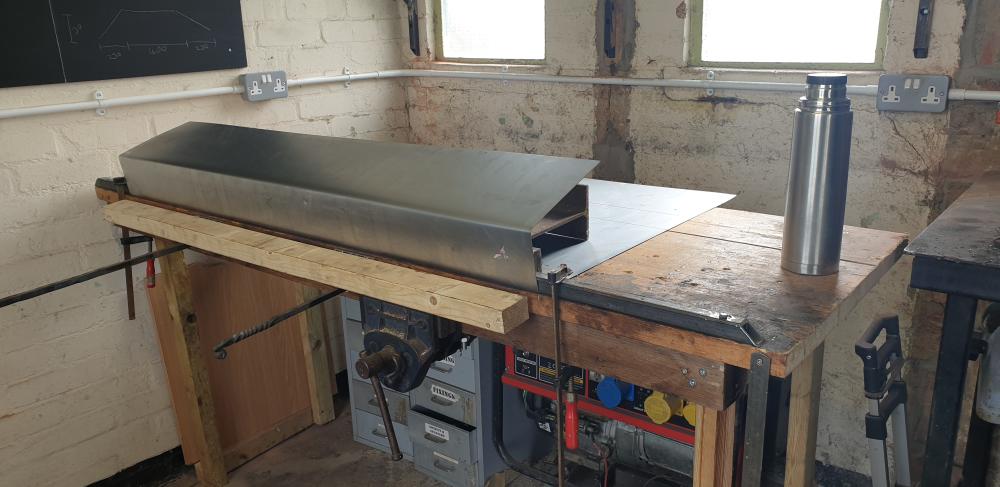
Hi all, I'd like some advice on doing something incorrect, but functional. So, I have a window in my shop about a foot higher than the level of my forge table. I used to have a flue coming out from it with a side draft and a chimney 1.5m above the roof and it worked really well. I have since moved away (so had to remove the chimney) and come back. My landlord is not allowing me to reinstall my chimney, or anything affixed to the building. I have kinda stopped caring that much about my workshop, I'm in the process of looking for alternative shop space. I need to reinstall my coal forge (Ive been using gas for the last 2 years) and just get things functional and the smoke out of the window. I cannot add anything to the outside of the building, but i need to extract smoke out of the shop. I have a bouncy castle (bounce house) blower which is pretty strong and some thin sheet steel. Because I am not staying for long, i need to do it as cheaply as possible, not really invest anything in it, but I need a coal forge this summer to work on my qualification pieces (WCB). My current idea is just a kinda hood, with forced air blowing across the top and, in theory, pulling the smoke via venturi. No idea whether that will work or not. Note: this doesn't have to last for years Any help would be awesome xxx
-
So, this ended up on the back burner (excuse the pun) as a little jiggery pokery got 1 of my burners usable again. It also took a while for recommenting a thread with Frosty to stop feeling weird (not entirely there yet). Well, it stopped being usable yesterday (no idea whats actually changed) so I've just ordered myself a 3/4" AMAL injector. Is 3/4" the size of the pipe nipple? cause that feels awfully skinny.
-
hah. Good to know. So direction against gravity is unimportant, what about additional bends in the path? like this?

-
I'm up to page 14 of the NARB thread, getting through it Looks like it's definately the way to go, with an AMAL injector. JHCC, did you find that mounting gas pipe pointing up rather than horizontal or down introduced any issues? I like the way my burners are currently directed (45degree angle from the top) but the way I would like to ideally lay that out would be an upwards facing pipe and an additional 45 degree elbow, and I dont know what that would do to air velocity
-
So, I've had a better look at the AMAL injectors and they look fabulous. Definitely better than something I could put together. Not as expensive as I expected either tbh. I've attached photos of my current terrible burners. I think my next job is going to be to load the forum on my tablet, get a large mug of tea and read through the whole NARB thread. I have questions about yours TinkerTim, I see you'd mounted the pipe onto the side of your burner and I have questions about orientation etc, but I'll read the thread first. Most questions I may have have probably already been answered. I like the idea of being able to use a soft firebrick as the ribbon insert as yeah, some of the common american refractories seem to be a nightmare to get hold of. I will be back in, however long it takes me to read a monster thread


-
sorry for going AWOL from the conversation, was driving across the country most of the day after spending the weekend with the in-laws. This is awesome advice and information, as usual. Thanks for chiming in Tinker Tim, it is really useful having the experience of someone who has access to the same stuff as I do. I'm going to dig into the NARB thread, and tomorrow when I get into the workshop I will take photos/video of my burners failing at their one job. My concern has been that if I'm going to rebuild, I want to build the best option I am able to, and if thats a NARB then that's that. Also, something that I know is not going to be as unreliable as my current burners. What may help with that is a more solid understanding of why they are failing, so taking some pics/video of them may help in that regard.
-
Hi Frosty, always a pleasure. And a REALLY helpful post. I was absolutely going to go through the gas forge 101 section with the actual building technique, but that was a really useful description to go through. Thanks. So my current forge I have my burners coming in at approximately a 45degree angle to create a bit of a flow round the forge volume rather than pointing straight down onto the piece, however it is still pointed at the middle of the forge floor. And I agree, there isn't place for fire bricks in the floor, I was aware I'd made a mistake there the moment I'd finished the build I've never actually heard them described as "Gun Burners", that's an interesting new bit of lingo. Yes, there is a difference between effective and efficient, I guess what I am looking for is a forge that allows me to do the amount of forging I do now without getting through any more gas. But most importantly without fuss. At the moment, my forge is out of action for a few days while I tinker with whatever is wrong with my burners. I think what I was expecting from forced air burners is less of a pain with tuning and getting it to run consistently as you're not relying on the exact pressure of propane drawing in the right amount of air, you're forcing it in. Also I was under the impression that the main efficiency gain with ribbon burners is that with many small flames rather than one big one, theyre providing a more spread and even heat, and more of the combustion is being completed before it leaves the forge. I just get really frustrated getting this stuff wrong, y'know. There's enough imposter syndrome trying to do this for a living as it is
-
actually, yeah. Now I think about it, would wire a NC valve into the on switch for the blower. So gas would only be allowed in when the blower is recieving power
-
thats a good shout tbh, but easily included
-
I'm not too bothered with the noise to be honest, ill be using the same blower as I hook up to my coal forge (bounce house blower). The gas forge I've got at the moment is loud as all hell. And I have very stable electricity. My main focus and concern is: gas efficiency as much as possible and a stable burner. The problem I have at the moment with my venturi burners lighting and burning for a while and then going out and spluttering. I'm wondering if a forced airflow would stop this happening?
-
Hi all. In addition to my other post about my new coal forge, I'm using the January slow period to rebuild my gas forge as well. I have a double burner (venturi) built from an old 13kg butane bottle and soft firebrick. The burners are from a cheap Vevor forge I bought a couple of years ago. I made a mistake in building the forge in putting hard brick in as a non-removable floor and it just sucked all the heat out of everything. Took an age to heat up. Since then I'm layering half cut soft bricks on top but they are disintegrating and take up half of my forge volume. The problem I'm having with my burners is that the flame keeps puttering out, which is usually a sign of running out of gas, but it's a new bottle. It will only stay lit for less than a minute some times, and im getting about 1 heat before having to relight it. So, I'm going to build a new forge. I'm doing another gas bottle design (it makes a great container). I want to make the best forge I can, so It will do me for several years. I have a good blower so I'm thinking that a forged air ribbon burner might be the best option, but I dont know anyone with a ribbon burner so I've never been able to compare. My main focus is on gas efficiency. My current forge runs on next to nothing (a 47kg propane bottle lasts me 3 months as a fulltime smith). So would a forced air ribbon be the most gas efficient way to go? (understanding that it takes a lot more effort to build) (I'm also not sure how a naturally aspirated ribbon works tbh). Also, would forcing the gas and air into the forge at a constant pressure rather than relying on air being drawn in by the gas flow also fix the issue of the forge going out and puttering? I think if I want to make the most effective forge I can, I probably also need to move away from soft firebrick and towards ceramic wool. oh dear. As always, love ya feedback. Thanks
-
That forge build looks amazing JHCC, I've been through the thread and it looks incredible. So, I probably could make a watercooled tuyere without welding, or get it welded by someone much more simply, but I'm not convinced that it's the right choice for my workshop. The 6" of space I have is from the back of the firepot to the wall, so that includes the water tank AND the nozzle. And with the only available space being below the forge table, it would need mechanical water pumping in order to circulate the water too. Although I don't think we should skip over Frosty's idea of a ceramic tuyere. Surely there must be a reason we don't see it more often though
-
I'm back on dry land now, so can focus on this a little more. I think I'm still getting confused on the sacrificial nozzle (thread protector). I get that the thread protector is the cheapest part to burn through, cheaper than a pipe nipple, but I thought that not burning up the tuyere was the whole point of watercooling it? Why not just have a thread protector being the final part of a normal pipe run? I promise I'm not trying to be argumentative You lot have years of experience I've always been helped by, I've just not had the "ahhh" moment so it;s not clicking with me.
-
I may have misunderstood, but isn't the point of water-cooling your tuyere that none of it burns up? Otherwise is it not just like having a pipe through the fire clay into the pot. The extruding bit will burn up and need replacing. Also, the 6" between the fire and the wall I only have below the table. Above the table, that's taken up by the side draft hood. The boat is possibly the most financially irresponsible decision my wife and I have made we used to live on a boat for years (inland waters) and we missed it so much. So we bought a little 23ft tugger,(not like we were ever affording a house anyway) it's a 2 day cruise from the coast (where we bought it) and the river we want to moor it, and no heating or insulation. It's a fun weekend
-
FROSTY! How are you? well I hope. That's a really interesting idea with the water jacket with plumbing fittings. If I understand you correctly, connecting to the inside of the bell reducer would be configures like my attached sketch? (excuse the low quality, im currently freezing my fingers off on a boat) My main concern is also that I dont think I have space for a water tank. So a couple of years ago I built a shallow but wide side draft flue with the help of you all here, and I'm back in the same workshop now so Ill be making something similar. But that takes up the space behind the fire. I only have about 6" between the firepot and the wall, and that space from the forge table and up is taken up by the draft hood.

-
Hello all, I've been back in my old workshop for just over a year now and have until now been subsiding on my gas forge, but I could really do with getting a good solid fuel forge established again. I've always used bottom blast forges in the past (either commercially available cast iron BECMA forges or homemade brake rotor ones. I want to upgrade this build to a side blast (I know there's a lot of debate about the merits of each, but it also seems to be cultural, as a brit, side blasts are the standard in the UK and considered far superior to bottom blasts, especially for welding) I have the table made, I'm designing the pot to go into it. I'm not able to weld myself, so I will be outsourcing the welding. I don't really have the facility to get or fabricate a hollow jacket cone tuyere for a water cooled pipe. I also don't really have space for the water tank. If it's not watercooled, should the tuyere (which will be black iron pipe) extrude into the firepot or stop at the back wall? I imagine if it's IN the firepot, it will just burn up immediately? Also, I'm not sure whether to get the firepot welded out of 10mm plate, and leave it like that. Or to weld a larger tray and build the firepot shape from fireclay within it? I'm trying to spend a little bit more time and research in making a GOOD firepot that is not going to limit my forging and I wont need to replace in a couple of years. And this is before I even start thinking of dimensions Any help or advice would be greatly appreciated. You lot have always put me on the right path before
-
Of course. Sorry. I am a member of ABANA, don't know why I'd assume an American smith wouldn't be aware of BABA Having thought about it, I do have a 1.5m length of 200mm stainles spiral ducting (it used to be my chimney). That might be more uniformly shaped than what I can cobble from plywood. And a LOT lighter and easier to manage and move. Depending on if I can work out how to get a non-return valve into 2" black iron pipe, I can use the maluable pipe work as the secondary chamber on it's way into the fire inlet. That a really interesting idea JHCC. I can definately see how that would work and be more controllable in terms of airflow. Would it be harder to maintain a good forging (welding) heat with a much longer wait between blasts?

-
The barrel of water bellows sounds ingenious. I orriginally started to think of the option as there was an article in Artist Blacksmith about a lady designing one out of a stainless duct pipe. (Artist Blacksmith is a magazine here in the UK, you get it as a member of British Artist Blacksmith Association or BABA). I was aware of the vertical setup of like, leather bellows, i wasnt sure if there was a reason I'd never seen anyone do the same with wooden box bellows. The only issues I could think of is perhaps having less controll of the airflow pressure when the piston is on it's downstroke, as with a horizontal one you dont have to worry about any sort of flow adjusting valve as you just dont push the rod as hard. I'm still looking into designs for optimum sizing, and in particular about the correct size of the air intake valves etc. But I'm having technical problems with the forum's search not working. I'm not sure I understand what you mean by having a smaller bellows to pump the main bellows though? Thanks for the feedback Danny
-
Hi all, Thinking of building a box bellows for some shows ive got coming up this summer. I'll be demonstrating and wont have any electricity hookup for my normal blower fan. I also do not have the budget to find an old hand crank bellows. I've been watching some videos and I get the gist of how they work (they look really quite cool). Is there any reason that they cannot be done vertically? I would prefer to run a bellows by pulling down on a handle rather than a hosizontal push/pull motion (just what I find comfortable). In theory I cant see why this wouldnt be effective allowing gravity to handle the downward stroke and just pulling it up. Also by transferring it to an up/down motion, I'm opening the option of controlling with a foot pedal. Am I missing some reason as to why it wouldnt work well? For context, my solid fuel forge is a bottom blast with about a 200mm round firepot (with a flat bottom). I use steam coal, but I'm not adverse to using charcoal if I can't get enough airflow for green coal. Also, I will be forging mainly small stock (6mm-12mm) with the occasional bit of 25*5 flat bar. Although I would like to be able to forge upto 25mm square with this forge and get a welding heat on the smaller stuff without issue. I've attached a sketch of what I'm thinking. I would appreciate the thoughts and opinions of you wonderful peeps.

-
Yeah, I did notice that the burner was higher up. The guys video showed him putting his in the bottom slightly angled up and that really didn't seem right to me. I was working out mine for the burner to go in maybe 2/3 the way up the wall? (as pictured). May have to work on brick layout though, I don't know if standard brick size in the US is different to here, but ours as standard are 9" x 4.5" x 3" which only gives me a 3"wide forge chamber. I may have to rething that, I want to keep it nice and small for fuel efficiency, but my candle holders are 4" once finished and I need to be able to at least fit one of them in

-
Hiya Frosty, always a wealth of information! That news is perfect, once I came across a sideways burner orientation I really hoped it would be viable, it's perfect for the way I want to build mine. To be fair, I wasn't really planning to follow the design of Essential Craftsmans, hes never really struck me as a blacksmithing authority I was just going to weld up an angle frame for the basic square brick pattern and had picked up on his use of the burner coming in the side of the forge. I had planned to use soft brick for the sides and top (https://shop.vitcas.com/products/fire-bricks/insulation-fire-bricks.html) and hard brick for the floor (https://shop.vitcas.com/products/fire-bricks/refractory-fire-bricks.html). I don't klow if Morgan are a brand we get much in the UK, but Vitcas seems to be our standard for thermal stuff. Interesting that you'd used grade 26 bricks. Do I not need to shell out for full grade 30 ones? (I do like saving a little money) Thanks so much Frosty
-
Hi all, I'm relatively inexperiences with gas forge design. I've forged for years with both coal and induction, but for various reasons I now use gas in my shop. I'm using a commercial forge right now but I don't like it so I'm planning to build a new quick little brick built forge. One of my main problems with my current forge is that with the burner coming directly vertical from the top, there's a lot of rising heat and the gas hose gets a lot more mot than I am comfortable with. So I want to change the burner angle. I was noodling around youtube and found "Essential Craftsman's" brick built forge where the burner comes in the side. (https://www.youtube.com/watch?v=TS7wumQt0s8) I've never seen this before, only ever seen burners pointing down, either vertically or at a slight 30-45 degree angle. Is the sideways burner effective? It's exactly what I would like in terms of layout if its viable as a production forge (for full time use, not hobbyist use) and reasonably fuel efficient. It's worth noting that I work pretty much entirely in mild steel, so dont really care about the whole "keeping out of direct burner path" and associated issues that happen when unevenly heating knife steel for example. Thanks for any guidance Danny
-
So, after various problems with suppliers, my sheet finally arrived. On with the work! 1mm sheet is surprisingly hard work to bend without a proper jig:p
-
Thanks for all the help, I'm ordering the steel tonight I think. Would 19 gauge (1mm) be thick enough? Assuming I can weld that with my little stick welder without blowing through (1.5mm it's the thinnest I've welded so far).