

Private Entrance
-
Posts
312 -
Joined
-
Last visited
Content Type
Profiles
Forums
Articles
Gallery
Downloads
Events
Posts posted by Private Entrance
-
-
I use a brake drum for my firepot. About 13" across and 3" deep, set into a forge table. Seems plenty deep to me - I can build a pretty good mound of coke over the top of firepot/table and get up to welding temps, assuming I've managed my fire well up to that point (mostly not let it burn hollow or let ash build up to much around the tuyere).
-
The 'LA Area' is pretty big - whereabouts are you at? I'm 70 miles from there, but tell most people that ain't from around here that I'm in the 'LA Area'.
Again, you might be pretty surprised how many folks live reasonably close to you.
-
Crikey, but those tongs are nice. MUCH better than my first pair, and better than pairs 2-4 as well.
And I like the bottle-tiki holder, too.
-
Metal99, I prefer powders as well, and I think the laser printer powder is a great idea.
I've tried using the suspended pigments (I think they are suspended in resin) and they work ok, but I think the powders give you more control in terms of depth of color and mixing.
And that does look like a $350 knife.
-
Welcome!
If smithing works on your PTSD like it does my depression, you'll turn out just fine. Banging the crap out of stuff with a hammer does wonders for my state of mind.
Nice batch of starter stuff you got yourself.
PE
PS - thanks for your service.
-
Nice stand, and I like the rough-and-ready ruler on the side. I now have a mini-project for tonight.
-
I have put a dab of black leather dye in my epoxy and it turns black. Just a drop will do it too. Not sure if it will harm the epoxy strength though???
I've done a LOT of epoxy pigmenting and have not noticed any significant decrease in strength as long as you don't put too much pigment into it. By too much, I'm talking ridiculous amounts, like more than 5-10% by weight. If you're just putting in enough pigment to color it well, you should be fine. For a 2-3 oz batch of epoxy, I'd put in enough to cover the end of a popsicle stick fairly thickly - a little dab will do you.
Granted, I was using pigment specifically made for epoxy - I don't know what effect leather dye would have, chemically, on the epoxy. The batches I made have held up to 7-8 years in extreme environments - exposure to changes in temperature, from 100*F in the summer, to sub freezing in the winter, and subjected to longitudinal flex and twisting.
And you can use it pigmented to glue the scales on, metal99, assuming the epoxy you are using is any good to start with. It'll hold fine and you don't have to worry about digging the 'clear' stuff out and then putting in more colored epoxy.
If I were going to get serious about doing epoxy work again, I'd track down Coltana 24 hr epoxy. It used to be distributed by Montana Ski Products and is best epoxy I personally have ever used. It's pricey, as I recall, but worth every penny. They used to sell it in kits of 2 quart cans. Exceptional stuff.
-
That is purty. Nicely done.
-
Oooohhh!!! :huh: I'll have to do some fiddling around with that. Thanks!
-
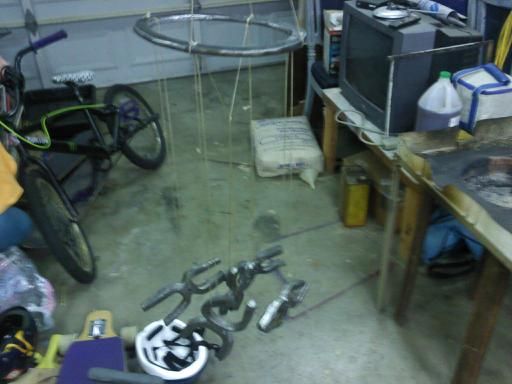
That set doesn't require much breeze to get them moving - the diameter on the set is only about 4-5", and once they get swinging/twisting, it takes awhile for them to settle down.
Frosty, I have a bucket of superquench but didn't use it on these. I will try it on the next set and see what kind of difference it makes. As to the hanging point, the best tones came from hanging them right in the middle, right betwixt the bases of the forks.
-
Cold rolled steel - thought I put that in there before. Doh!
I did heat the chimes to medium red and quenched them in water. I don't think it makes it that much harder, based on the little I know about cold rolled, but it does change the tone of the ring, at least to my ear. It sounds 'tighter' to me, if that makes any sense.
-
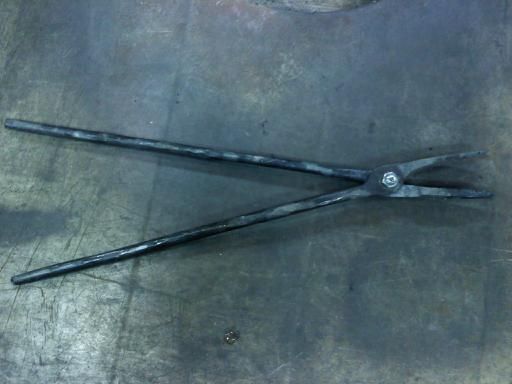
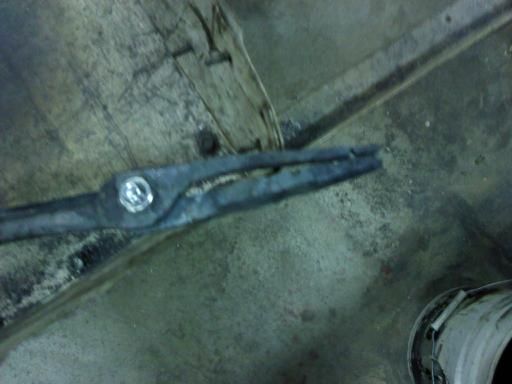
This is the fourth set of tongs I've made, and they are starting to look they were done by someone with a clue. :)
The one jaw with the deep chisel cut in it did eventually break at that point. I've since reshaped them and they match better and the fit is better, too. I did the finish work initially with both halves still on the bar, and it was hard making them match. Going forward, I'll finish the reins and rough shape the jaws, then finish the halves side-by-side. I expect it will be easier getting them to match that way. And the chiseling of the grooves in the jaws didn't go as well as it should've, either, for the same reason, with the same possible solution.
This was a good exercise in square -> octagon -> round -> square, etc. I've gotten much better at it than before. Still slow as heck, but stuff comes out cleaner and straighter now. I expect speed to come with experience.

-
This is another attempt at making a set of chimes. Turned out better than the last, I think, which is all I can ask for.
The top is a 5" ring split and shaped from a length of 3/4" x 3/8" then rounded over the horn.
The chimes are vary lengths cut from the same bar, with the ends split back most of the way towards the center and the ends on each side folded towards each other (more or less) so the form two 'U"s with the bases touching. They were then heated and quenched. I soaked them in vinegar overnight, then wire wheeled them. Finally they got a shot of clear coat.
The tone on them is nice, clearer than the last. They sound like tiny bells, which is good. I think. ;)
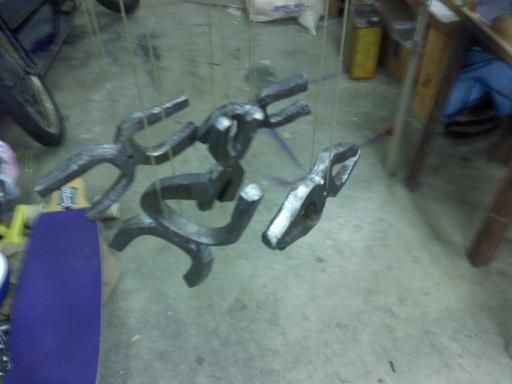
PS - Yes, my garage is a mess. It's what you get when you have a wife that doesn't throw much away and a twelve year old son. :)
-
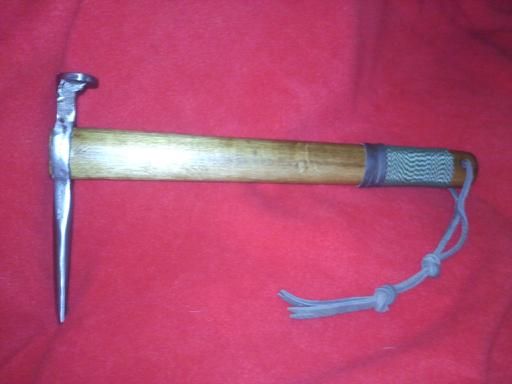
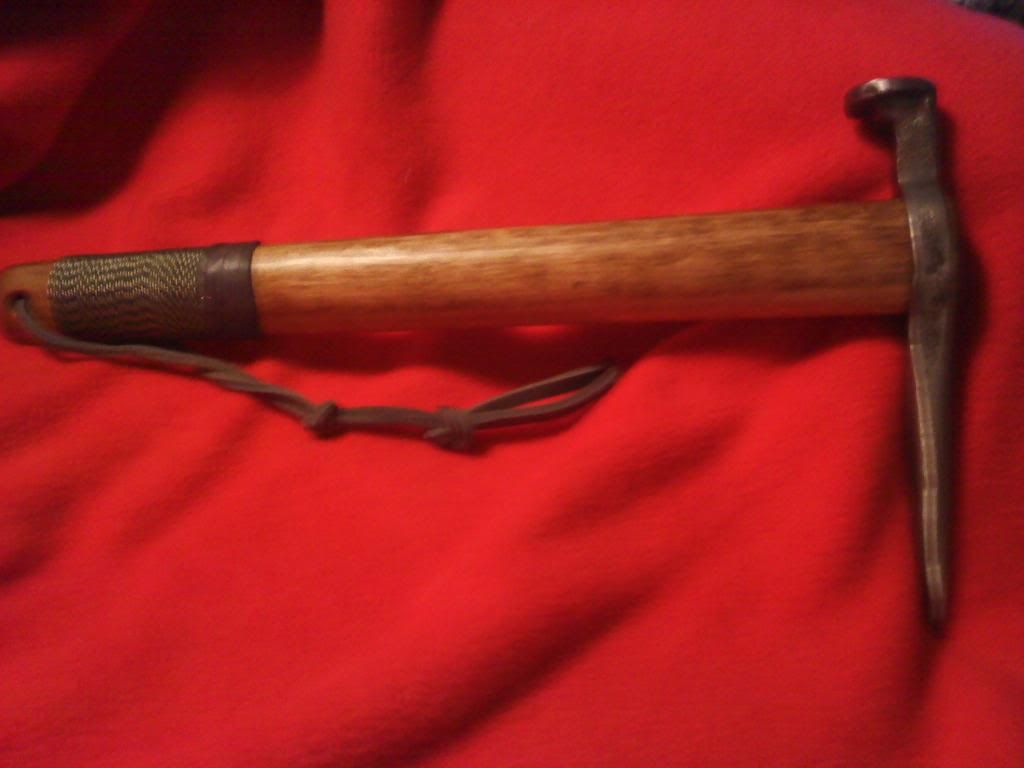
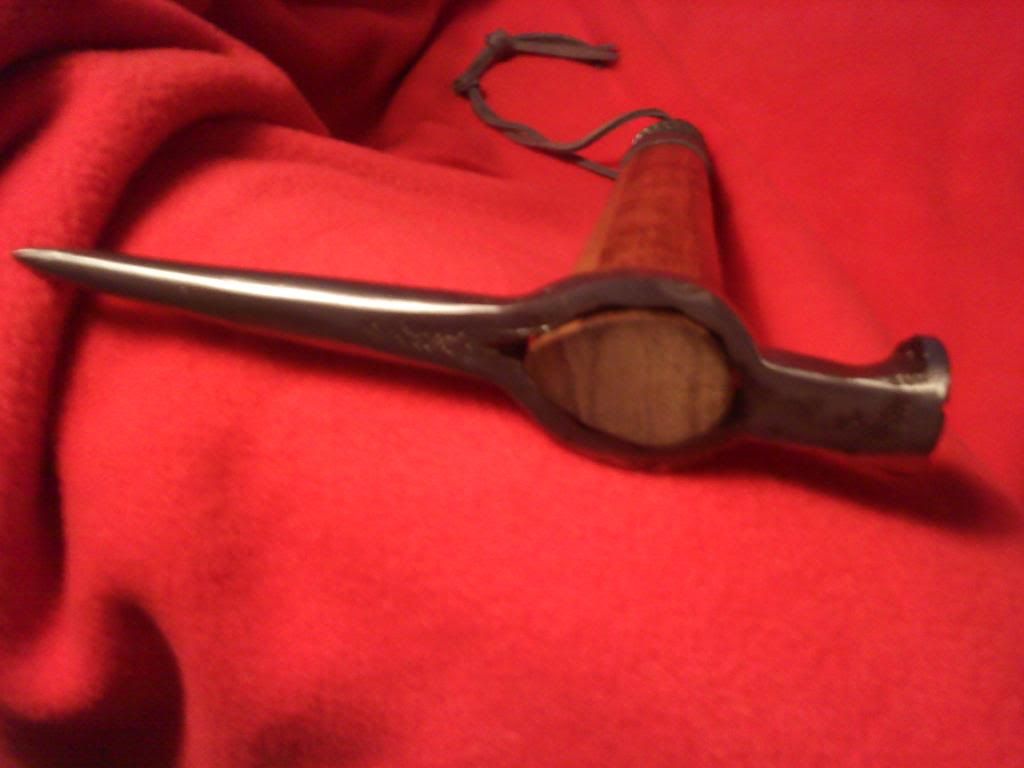
This is my 2nd effort at a warhammer from a RR spike. Turned out much better than the first, IMHO. Most of the problems I had previous were solved when I figured out I was making the slit for drifting the handle hole too small.
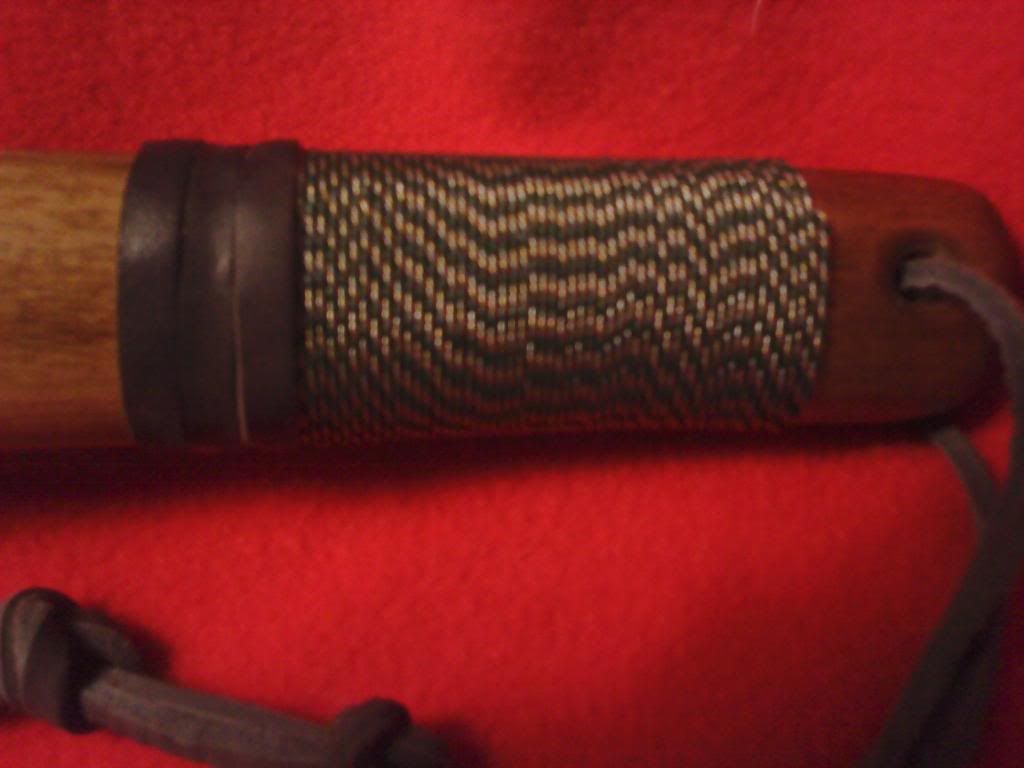
Handle is shaped from a piece I got from Home Depot that was marked 'hardwood.' I suspect it is poplar, but have no way to confirm. I stained it with a couple of coats of Golden Oak. The base of the handle is wrapped with 3 strands of wire - gold, silver, and green - that I twisted together with a drill into a sort of cable. Above that is a couple of wraps of leather that I split the top layer off with a razor blade. The leather's there only because I didn't make enough of the 3 strand wire. I'll need to make about 10-15' more than I did (about 25') to get enough of a wrap for a decent sized grip. The strap is a piece of unsplit leather from the same batch as the wrap.
The whole thing got a couple of coats of clear matte paint to seal it all up.
Generally, I am extremely pleased with it. It's the first real 'I want you to make one of these, here's a check' commissions I've gotten from a friend's wife for him for Christmas.
Other than some of things (I think) are obvious, like the issue with not enough wire for the grip, and, in my opinion, the handle is a bit too bulky for the head proportion-wise (though it fits in the hand fairly well), I'd love to hear any suggestions for improvement.
-
Ontario, CA, or Ontario, Canada? If you're in California, I'm not that far from you. My guess is Canada, based on the family history.
Either way, welcome. :)
(did I just sound like Thomas Powers there for a sec?) :huh:
-
I had planned on building one for years but bought one off Kijiji for $90. My drum is about 30" long and about 18" dia. The drum is an old water or air pressure tank. For media I am just using a bunch of offcuts that I hotcut off a repeat job that I do. I also threw in a handful of wood screws. I would like to get a bucketful of ironworker punchings to help clean concave areas. Most of the offcuts are too big and work well on convex surfaces but not so well on concave.
I feel the 2 most dangerous tools in my whole shop are the wire wheel and the buffing wheel.
Thanks. I've got about 10-15# of self-tapping sheetmetal screws that I can use for media. I was thinking I would need something more exotic, like ground walnut hulls, lobster carapaces, or elephant toenail clippings. And I'll keep an eye out for tumbler for sale. Based on the amount of free time I actually have (vs what I THINK I have) this might be the more tactically sound way to go.
-
Looks good - better than my first batch of stuff. And better than some of the stuff I still end up with. ;)
-
The danger of grabbing and flying wires is why I use a tumbler as much as possible for finishing rather than wire wheel. As well it works while I am doing something else.
I like this idea, and might have to rig one up. Wire wheeling is sketchy and a time-suck, for sure.
What do you use as a tumbling medium? And how big did you make the tub?
-
Looks very similar to my fire pot set up, down to the size of the angle iron. I bolted together a frame for it to sit in rather than welding something up. I think you are very much on the right track, and there ain't nothing to laugh about. My forge works great - gets up to welding heat (though I haven't successfully welded yet). Results are more important than how it looks.
You can check out the 'Ghetto Forge' thread if want to have a look at how I built my forge table. It's a separate piece from the firepot & stand, which makes it easier for me to move in and out of the garage.
-
there are countless stories of hogs shot in the head with a 22 that just walked off...
I had a .22 pistol with me for the coup-de-grace the one time I went pig hunting. Dropped a boar nicely with a rifle shot, but as he was still kicking, I thought a shot in the center of the skull would do nicely to quiet him down.
I ended up emptying the magazine (10 shots) into various points on his head before he finally settled down.
Very good eating, as I recall.
-
Build yourself a forge, and then use it to fabricate Mom a sweet firepit? I've seen few pics posted on here that are amazing.
-
I spread the contents of the firepot out on the forge table when I'm done, and let it sit and cool off for a few minutes while I'm putting everything else away. Once it's had a bit to cool, I dump the works in a bucket of water, and let that sit for about an hour or so while the forge cools down enough for me to carry it inside.
Once everything's moved inside, I pull the forge contents out of the water and put it into another dry bucket. While I'm doing that, I sift out the ash, clinkers, and other assorted junk that seems to collect during a session. Usually the coke is dried out enough that it's ready to use at the next session.
-
If you do some poking around on Ebay, you can find RR spikes for about $1 ea, or less. I bought a box of 25 of them for about that price, including shipping.
-
I used a piece of sheet metal from an old washing machine for mine. I don't expect it to hold up forever, but it works just fine for now.
Be creative - my vote is that you can come up with something that will work great.
Steel thickness for fire ring?
in Problem Solving
Posted
I'm a fan of the classic metal washing machine tub. Use bolts and/or fab a tripod stand and you are good to go.