

tomhw
-
Posts
160 -
Joined
-
Last visited
Content Type
Profiles
Forums
Articles
Gallery
Downloads
Events
Posts posted by tomhw
-
-
When I started smithing a lot I had lots of trouble and expense getting good coal. I finally locaded a pile of coal in the woods and traded a set of stainless steel spurs I made for all of it. It was nasty stuff- high sulfer, lots of shale, and lots of dirt. I had to clean giant clinkers out of the fire every few heats and I could not weld in it. But it did coke and it did get hot. I used it for common forging and saved the high grade stuff for welding and particular jobs.
The stuff was fuel for the logging tram engines for logging long leaf pine in the first decades of the last century. -
Willis "Hope the anvil pict loaded. Acquired this from a cousin, no charge. Great grandpa used it to make grapple anchors for his shrimp boats out of St Marks Florida. Apperance is dead ringer for Hay-Budden but can find no markings. A good friend-Jeff Mohr- says its probably 250-275lb, turn of the century cast base. Weld line noticable 1/2" from top of face
33 inches total length x 13 inches high.
Face is 5" wide, step is 2" wide horn is 10 1/2" face and heel make up the remaining length
Hardy hole is1 1/4" sq pritchel hole is 3/4"
Two apparent square tong holes are present in front and rear of base but are offset. Front hole is
1 1/4"x1"x1 1/2" deep. Bottom of base to top of hole is 5" Rear hole is 5/8"x5/8" sq x 1 1/2 " deep and top of hole is 2" from bottom of base.
My great grand pa died in 1970 at the age of 93.
Jeff says the anvil was well cared for and would make a good shop anvil as is.
It now resides in my shop and is my go-to anvil."
Wilis, I agree that it looks like an HB. My 25# has no Manufacturer's mark but does have the number on the front foot,starboard side. From your picture it looks to me like it is a later HB- tool steel top, welded at the waist to the wrought iron base. -
"What kind of rock carving? 40' cubes of granite or small alabaster or soapstone carvings, or small jade carvings?
Harde stones will profit more from high alloy chisels. Soft stones can use easier to find and work materials." ThomasPowers
Yes to that. Also, the driven end is different for steel driving hammers or wood. -
It is very important to have a uniform cross section even on tapered leaf springs. Thin places flex more than thick sections. After forging anneal or normalize and then file or grind the surface to remove hammer marks and insure uniformity.
-
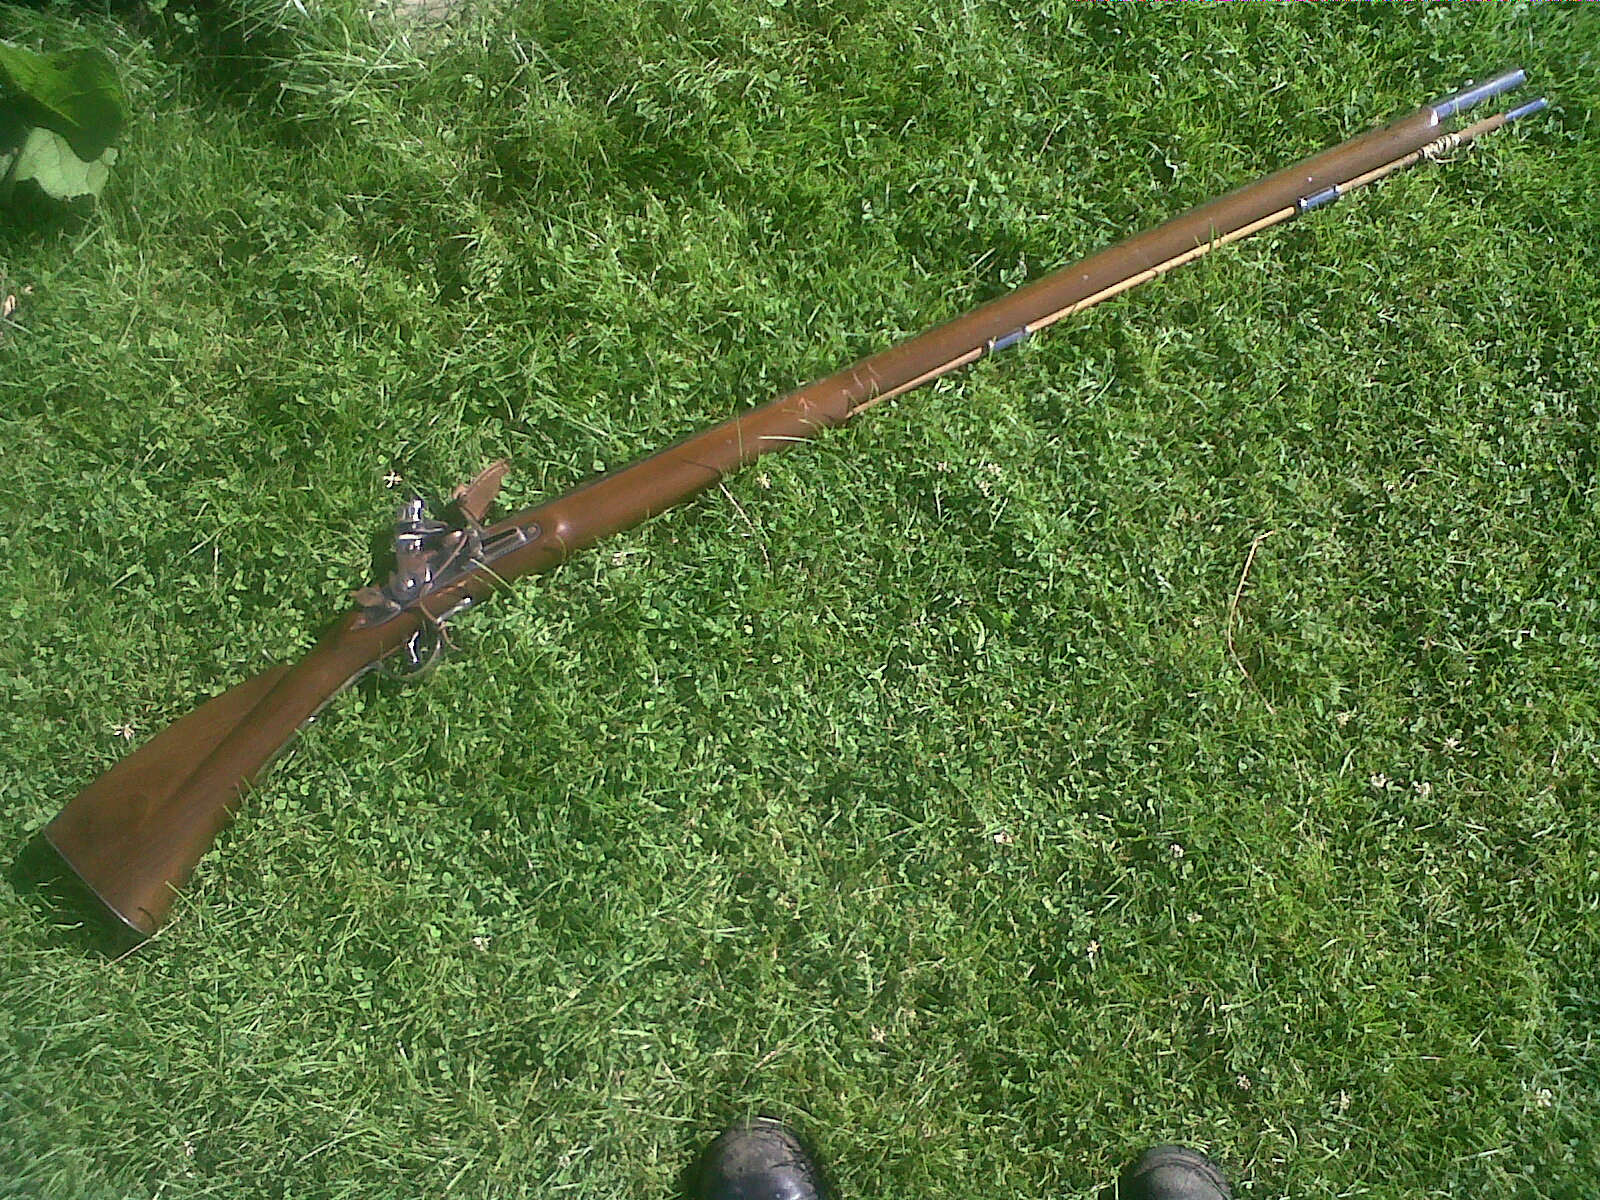
I am trying to figure out the easiest way to make a bayonet for my dog-lock trade musket. It can compensate a socket bayonet but was really made for a plug; which I don't want. I'd like to make my own socket bayonet and don't know how. I think I need a swedge.
I have an unmarked and unidentified socket bayonet. The triangular blade is about 14 inches long, and has a straight taper from about 11/4 at the widest to the point. The top of the blade is flat and the lower is deeply fullered to form the lower two sides, separated by a narrow spine. The tang is integral with the blade and is about 2.5 inches long and is bent 90 degrees to the socket.
The tang is forge welded to the socket. The socket looks like it was made from a sheet that had been rolled into a cylinder and welded. It was not reamed to make the interior perfectly round and smooth. The barrel attachment is a Z-shaped groove that extends from the rear of the socket, on the same plane as the blade. There is a punched 1/8 inch hole on top of the socket (bayonet on a flat surface, with the blade on the left side). It does not have a locking ring.
I bought the bayonet in a junk store long ago, thinking that it might be a Confederate piece. It is similar to18th century French bayonets. It is well made and appears to be a production product but, imperfectly, pre-industrial. -
I love the smell of high grade coal burning i the morning. Learning how to maintain a good fire is an essential skill. John Mcpherson is correct - carbon is our fuel. I live in a suberban place where "industrial" kinds of activities are proscribed so I generally use Walmart ROYAL OAK, charcoal. It is cleaner than coal or coke but has fewer BTU's than coke.
-
I'm with Frosty on plating or soldering. Another method would be color glazing. consult with your local art-glass specialist. He will most likely know more about this than most people.
-
Back in the 1970's I lived in Minneapolis. I rode my road bike everywhere. One week end I rode around in north Minneapolis in an old industrial area and wound up on a degenerating asphalt surface laid directly on a square, butt end, wood road. As I recall, the timbers were about 10 to 12 inches square butts (each member was the center of a log cut square) and were in better condition than the asphalt overlay. I memember seeing a stone curb or fence about 6- 8 inches wide and several feet long.
-
With notable exceptions the South was not, and is not, heavily industrialized. Blacksmiths were in general demand but industrialized areas were, and are, centered on trading centers and resource rich areas like Richmond, Montgomery, Savanna, Charleston, Memphis, New Orleans, Shreveport, Natchez, and Vicksburg.
I doubt stories of Yankees damaging anvils- the demonical carpet-bagging Yankees were much too busy with other, more remunerative and less physically challenging, nefarious pursuits.
Most of the South was rural and, analogous to welding shops today, were small scale in nearly every village and plantation, and large machine and forging shops were concentrated in and near industrialized cities. -
David,hi.I've used the skidding tongs extensively,and may even have to forge a set here in a while.
Much good info has passed above,let me quickly reiterate some of it.
The stock would be better round.One inch mentioned may be overkill,but it won't hurt nothing.
There's a link above that i didn't open(computer speed is dismal),but it's a right idea,look at a store-boughten pair.The photo above is,of course,not the skidding tongs,but a log-builder's hand-tong,for manipulating logs in const.,very useful tool indeed.
The kind that you need have a 2-stage compression joint,like a forging tong with 2 hinges.The outer-most is made of three rings,(mig or arc them well).
I wouldn't worry about the sort of steel,as the physics work to your advantage,mild'll be fine,the points that carry the load are proportionally very stout.
Size the tongs so that the points point in a bit(obviously ),but grabbing the little ends will serve you better,so no reason to build a giant set.
There's a number of log-builders that i know that use regular,store tongs(usually bought at Bailey's mailorder)for lifting,though they're not rated for it.But lifting is a different story.Dragging logs along the ground you're safe no matter what you do.Or,if you have a 3-point on the tractor,do lift it a bit,it's very helpful.
If you end up dragging with just a chain(chokers are nice,but are used in industry where often some lift is present,dragging by choker is fairly dismal,depends on terrain/hp of your rig),use a 8-10' or so log chain,with a hook on each end,5/16" be plenty.Choke one end around the log,and use the other end to bridle back to the opposite side of your loop.Making a loop that grabs the bottom 1/3 or so of the log dia.That will keep it from rolling and diggging in(for the most part ,it helps,anyway).
If you grab the skinny end of the log the physics will provide some lift.
Best of luck,Jake
I agree with this and add that tongs do not require that the log be lifted off the ground, as chokers do, to grab and drag the log to its destination. -
what I have use for conservation of iron artifacts is a strong solution of lye, a stainless steel anode, 12 volt charger, and amperage and elapsed time to suit the size and condition of the object.
-
Welllllll---"Sources for the History of the Science of Steel" has an entire chapter dedicated to renaissance quenchants that included such weird stuff as "worm water" and "radish juice" all claiming that they work *better* than plain water. My take on it is that at best they are going for a sort of brine quench---much like Theophilus wrote about in "Divers Arts" in 1120 C.E. when he suggested quenching in the "urine of a small red headed boy" or the "urine of a goat fed ferns for three days" either one is rather a smelly way of getting a weak brine quench. (It works BTW, but there is such an amusing smell when the hot steel hits the "quenchant"!)
We forget that the beginning of scientific metallurgy dates no earlier than the late 18th century. -
Hello all,
I am new to the forum and blacksmithing as well. I have been attempting a few projects but keep running into the same problem of when I punch a hole then expand it, it tends to go off to one side or the other.
does anyone have any tips or techniques I can read up on to keep the hole inline with the rest of the work, I know I have to try to punch the first hole as close to center as possible. here are some pictures to show the problem.
easier to see in dog picture then railroad spike
any help appreciated.
poundhound
In addition to all the above it is easier to keep a long tool perpendicular to the work than a short tool. If the tool is too long then you will tend to hit the driven end on the edge- don't do that. I wear a welder's gauntlet on my left hand to hold the tool when working larger stuff (hammers and such).
What you are doing now is teaching your body how to do the work- building "muscle memory". Eventually, you will think at the fire and act at the anvil. -
Hello,
I'm more of a collector than a blacksmith, and I was wondering if you guys can help me decide on the authenticity of this item as well as help answer a few other questions. It is stated as 19th century, but I want to be sure before I purchase it. One of the trim pieces does not seem to be original and is stated as such in the auction--would you guys have any idea when that piece could have been added based on the way it looks? How many man hours would this entire piece along with the skewers take? Any help is appreciated.
Here is the link to the auction: http://cgi.ebay.com/19th-C-Spanish-Ironwork-HandForged-Utensil-Rack-2-Forks-/200626986297
I agree with all the above responses. I bought Frank's book shortly after it first came out. It was a great help in analyzing and dating some iron artifacts from colonial Los Adais and Natchitoches, Louisiana.
As a collector you may find this book useful:
"Decorative Antique Ironwork" by Henry Rene' D'Allemagne, Dover Publications (1968).
It is mostly illustrations of French work but there are some Spanish too. Almost all objects featured were made for high end purchasers, rather than what might be called "folk art" such as the set you are interested in. See Nos. 288, 338, 339, and 389. -
so, the reason im asking this is because i have no coal (i will be going to get some soon) the question is, what do you do on down time when you cant be forging. i have considered making charcoal but because i am going to get coal soon i figured that i would wait. my shop is clean and organized (it is my only excuse out of house work LOL) so what would you do?
Josh
Get some copper sheet and tubing and silver braze a still. Then make whiskey!
Ahem...But only if it is legal where you are. {legal disclaimer} -
Thanks for all of your help. I looked it over and it is very dirty a little surface rust on the gears but it spins real easy. All the teeth are intact. We filled it up with atf and it flows not drips but flows from behind the fan and from the crank handle. 1/2 a quart in the yard in 5 mins.
Any ideas how to fix this?
thanks karl
My champion 400 leaks at the fan shaft. After a couple of hours the oil got blown up to the ash drop and smoked. One time the oil caught fire. I tried to figure out a way to seal off the fan shaft but failed to find an acceptabe solution. Finally, I drilled and taped a drain hole at the lowest point of the air pipe to let the oil drain out. The open hole let the oil out but reduced air pressure to the fire. Next, I attached a 3/4" hose to a threaded nipple at the air pipe and the other end of the hose is inserted into an old brake fluid can. This way there is no air pressure loss and the oil is removed from air pipe. -
I agree with that, Drewed: theory be xxxxxx! What works is true. I just wanted to see what the idea was. Fire management is an endless, practical, endevor.
-
I am glad that you learned to weld and to manage a fire. There is so much to be learned that the learning never ends.
I don't understand why you would want to reduce the fire pit volume for welding. The size of the fire and the intensity of the heat are controlled by the volume of air entering the fire, wetting around the fire, and moving fresh coke into the fire. It seems that you will have to be continually rebuilding your fire because reducing the size of the duck-nest reduces the amount of coke that can be made while heating your work. How am I wrong? -
ide take some 1/8 plate and make a plate on the inside that covers all three holes and overlaps the crack an inch or to on the sides drill and bolt thru should work fine ... if you deside to have it welded i would still put the plate in (ive welded cast iron before and it is not as strong after its been welded ) also remember that it broke there cause that is the stress point when running the blower .. so reinforceing it wont hurt... in fact if you want to do a traditional repair clean out the jb weld make the plate heat the whole thing and braze it plate cracks and all ...good luck!
I agree with you on this and add that the blower should be free standing so as avoid putting stress on this weak point or on any other part of the forge. -
I recently put in a clay lining into my rivet forge. It used clay right out of the ground. I burnished it smooth and I scored a few concentric circles into it. However, it still cracked badly. There has to be over 20 or 25 deep cracks in it that run around the firepot, as well as into the firepot.
What should I fill the cracks with? More clay? Or could I use sand or ash? What about lime putty?
Thanks!
Clay is cheap and readily available- use it. The problen with clay is that it cracks and that it readily joins with slag and will come out with the clinkers. I have no experience with refractory clays- you might try some of that. -
You are looking for a plating that is wear resistant. This calls for very high tinsel strength in the thin metal plating. Please correct me if I am wrong. As I understand it chrome does not stick to steel; chrome will stick to copper and its alloys, which will stick to steel, so the steel object to be chrome plated is first copper/alloy plated and then chrome plated.
After the complete chroming pricess there will be two thin layers of metal plated on a third metal, each having a different tinsel strength. Copper and chromium both work harden and will flake off. -
I agree with you on every point. For me people are often a bother and a nuisance. I have to work at forbearance. I spend most of my time as a smith- with a hammer in my hand. I pound steel into submission.
People deserve courtesy and I owe that to them- not the zingers with which I want to hit them. -
I have decided to tae my work from practice piece to public sales. In order to do this I have started taking a table at one of my local flea markets last week end. while I sold only about $10 so far, I have had several other customers show interest and most that did had no money on them(or atleast thas the story being given) I will be goig back over the next few weeks and see if i can sell anything.
on guy almost begged me to throw one of my wall hooks at him. he picked up a hook I made. just a simple nail flattened at the poin drilled with two mounting holes and the head end of the nail bent into a hook. he picked it up loked at it commented "hmph i can make these" dropped(dropped about 8 inches, not set down gently) the hook and walked away from my table. It was all I could do not to pick it up and throw it at him, yelling, get you own forge anvil and hammer and make them yourself then.
anyone else have similar things happen? yes I know people can be jerks but this guy just rubbed me the wrong way.
Years ago, before I considered participating in craft fairs and folk-life events, I spent a day watching a blacksmith performing in public. He was asked the same dozen questions and the same dozen comments, over and over, all day. In every case he listened politely, as though it was the first time he had been asked the question or heard the comment, and responded to all with friendly cheerfulness.
I realized that he knew that he was an actor performing a roll for the public's amusement and education. Ever since then I tried to remember to emulate his Christian kindness and forbearance when I performed in public. It gets easier with practice. -
The late Houston Fairchild was the local smith I always referred this work to. He used coal fire and a LG 100 like mine. I watched him once, and chickened out. He was holding the blade in tongs and used a top tool to bevel the blade. Like me had flat dies in his hammer. I really dont like trying top tool work in a Little Giant.Does anyone have a suggestion that would be simpler, safer,and easier?
Doh! Sorry about the silent reply, above.
Rusty, I always used a hand hammer- 6 pound for the heavy work and a 4 pounder for refining the bevel. Hold the blade on the far side of the anvil and pound away. Bush hog blades are usually a low to medium carbon steel and, though thick and heavy, work easily.
Side shelf, upsetting block orientation
in Anvils, Swage Blocks, and Mandrels
Posted
See Ecclesiasticus 44 - 1-15 "Let us now sing the praises of great men........."